

'70 Nova LY6/TH400 6.0VVT
 03-23-2018 | 11:19 AM
#1422
Thread Starter
TECH Addict
iTrader: (1)
Joined: Apr 2010
Posts: 2,816
Likes: 84
From: Instagram @chevyhotrodder
ryeguy2006a - Thank you for the kind words. Things change a lot between age 3-4. You might find your little one helping in the garage soon, if he isn't already. Regarding the LS1 brakes, keep in mind that I narrowed my rear 1" per side using Strange housing ends for Ford bearings. Also my shocks are relocated inboard, so I do not have stagger shocks that might interfere with the parking brake lever. I am using the LS1 brakes exactly as they came. They simply bolted and both are "front pull" from the factory.
Motown 454 - Thank you I'm just getting started!
Motown 454 - Thank you I'm just getting started!
03-23-2018 | 11:22 AM
#1423
Thread Starter
TECH Addict
iTrader: (1)
Joined: Apr 2010
Posts: 2,816
Likes: 84
From: Instagram @chevyhotrodder
Step 3: Compound ~ SKIP ~
On the advice of a professional detailer, I decided to skip compounding (for now) and start by seeing what I could accomplish with polish alone. Something I have heard from him and others over-and-over is to:
because I assumed the car would need to be repainted at some point anyway. But now that I've seen the diamond in the rough, I realize I had no idea what was under there. Now I am going to be more conservative with my approach. So let's skip to the next step...
Step 4: Polish
I decided to start on one of the worst areas on the car - the quarter panel. Rain gutters and trim direct runoff from rain or washing right over the middle of the quarter panel, so this area had a considerable amount of chalky oxidation and/or sediment buildup. Some of it came off during the clay bar and conditioning steps, but it was still pretty bad. I started by taping out a test area with blue painters tape to protect the trim.
Finally I could try out my new toy - the Harbor Freight 69924 6" dual action polisher. I have used electric angle grinders, die grinders, saws, and other motorized rotary equipment in the past. This unit is very similar in size, design, power, and noise to a typical 4" angle grinder - it just uses a different head and has speed control. The "dual action" of this unit refers to the combination of a rotating motion (simple spinning, i.e. the pad rotates around it's center) and an orbiting motion (the i.e. center of the pad is moving in an orbit). This combination is what makes DA polishers safer to use than rotary polishers and a good choice for a beginner like me.
I attached a Lake Country 5" backing plate and then a Lake Country 6" x 7/8" white foam polishing pad. The backing plate simply screws on. The pad attaches very securely with a hook & loop system. Next I shook up my bottle of Maguiars M205 polish and put 5 dime size dollops on the pad. Then, with the polisher OFF, I "patted out" the polish to distribute it around my test area. Next I turned the polisher on at a very slow speed to spread the polish across the whole test area. Finally I cranked up the speed and started polishing. I ran horizontal passes, overlapping by about 50%, then vertical passes again overlapping by 50%, and repeated until I had a total of 5 passes (3 horizontal, 2 vertical). I applied only a little pressure to the head of the polisher. Once done, I wiped the polish from the surface with a microfiber towel using linear movements. This worked very well on the non-oxidized areas of the paint, but still left some faint foggy trails from the water runoff. So I went back over it a second time using 6 more passes (3 horizontal, 3 vertical) and the same light pressure.
Here is a video showing the polishing process and the resulting before & after finish after a total of 11 passes with polish.
Here are some before and after "50/50" photos after just the first 5 passes. The right side was washed, clayed, and hand conditioned with Maguiars no 7. The left side was the same plus DA polished 5 light pressure passes with M205. You can see there are still some rain trails / oxidation here after 5 passes. The video above shows the before & after for 11 passes and it's a lot better than the photos below.


I extended the work area to the rest of the top quarter panel, working in roughly 1x3 ft sections, and here's what I ended up with. I haven't yet polished the top few inches of the quarter panel immediately under the vinyl top/trunk/windows. My plan is to use the smaller 3" Griots polisher to do those areas (it's still in transit).

Even after 11 passes, I could still detect some oxidation trails (although faint) near the bottom of this area that don't show so well in the photos or video. So I went back another 4 passes in the affected areas only and this seemed to do the trick - but it was dark and the lighting wasn't great, so I may have to revisit this area when I get back to work. All in all the non oxidized areas looked good after around 5 or 6 passes and the heaviest oxidation required at least 15 passes with light pressure and M205 to clean up. Would it have been better to compound those areas first? I imagine it would have at least been faster, but I don't mind taking more time. I think I will continue to just polish the car and skip the compound step altogether unless I find defect areas that the polish wont fix.
I am very happy with the results. My only misgiving is that the area immediately next to the side trim did not polish quite as well as the rest of the panel. If you have any tips on how best to run the polisher against edges, that would be much appreciated. I tried sneaking up lightly on the edge as well is pressing into the edge, but neither seemed to get the last 1/4" completely fog-free. If all else fails I may remove the side trim in the future and give these areas a thorough polishing.
Between each application of polish, I cleaned my pad "on the fly" by running the DA with the pad in a terry cloth. By gripping the pad within the terry cloth, I was able to transfer spent product and paint into the terry cloth, readying the pad for further polishing. This seemed to work well and allowed me to continue work without washing the pad - we'll see if it's adequate when I do more sections of the car. I learned this method watching the following video.
That's all I had time for last night, so I peeled the pad off my polisher and took it to the kitchen to wash. Look at all that heavily paint-tinted spent polish! I am really curious how much of that is removed paint vs. spent polish. My understanding is it's mostly spent polish, but the very small amount of removed paint gives it a strong tint.

Hot water, a little unscented dawn soap, and working the pad with my thumbs took care of that.


Once clean, I squeezed water out of the pad and left it out to finish drying. I only bought one of these pads, so I hope it lasts for the whole car.
On the advice of a professional detailer, I decided to skip compounding (for now) and start by seeing what I could accomplish with polish alone. Something I have heard from him and others over-and-over is to:
"Use the least aggressive method that gets the job done!"
Before I started this project, I felt like I had nothing to lose. I wasn't so concerned about being overly aggressive and possibly damaging some areas of the paint, because I assumed the car would need to be repainted at some point anyway. But now that I've seen the diamond in the rough, I realize I had no idea what was under there. Now I am going to be more conservative with my approach. So let's skip to the next step...
Step 4: Polish
I decided to start on one of the worst areas on the car - the quarter panel. Rain gutters and trim direct runoff from rain or washing right over the middle of the quarter panel, so this area had a considerable amount of chalky oxidation and/or sediment buildup. Some of it came off during the clay bar and conditioning steps, but it was still pretty bad. I started by taping out a test area with blue painters tape to protect the trim.
Finally I could try out my new toy - the Harbor Freight 69924 6" dual action polisher. I have used electric angle grinders, die grinders, saws, and other motorized rotary equipment in the past. This unit is very similar in size, design, power, and noise to a typical 4" angle grinder - it just uses a different head and has speed control. The "dual action" of this unit refers to the combination of a rotating motion (simple spinning, i.e. the pad rotates around it's center) and an orbiting motion (the i.e. center of the pad is moving in an orbit). This combination is what makes DA polishers safer to use than rotary polishers and a good choice for a beginner like me.
I attached a Lake Country 5" backing plate and then a Lake Country 6" x 7/8" white foam polishing pad. The backing plate simply screws on. The pad attaches very securely with a hook & loop system. Next I shook up my bottle of Maguiars M205 polish and put 5 dime size dollops on the pad. Then, with the polisher OFF, I "patted out" the polish to distribute it around my test area. Next I turned the polisher on at a very slow speed to spread the polish across the whole test area. Finally I cranked up the speed and started polishing. I ran horizontal passes, overlapping by about 50%, then vertical passes again overlapping by 50%, and repeated until I had a total of 5 passes (3 horizontal, 2 vertical). I applied only a little pressure to the head of the polisher. Once done, I wiped the polish from the surface with a microfiber towel using linear movements. This worked very well on the non-oxidized areas of the paint, but still left some faint foggy trails from the water runoff. So I went back over it a second time using 6 more passes (3 horizontal, 3 vertical) and the same light pressure.
Here is a video showing the polishing process and the resulting before & after finish after a total of 11 passes with polish.
Here are some before and after "50/50" photos after just the first 5 passes. The right side was washed, clayed, and hand conditioned with Maguiars no 7. The left side was the same plus DA polished 5 light pressure passes with M205. You can see there are still some rain trails / oxidation here after 5 passes. The video above shows the before & after for 11 passes and it's a lot better than the photos below.
I extended the work area to the rest of the top quarter panel, working in roughly 1x3 ft sections, and here's what I ended up with. I haven't yet polished the top few inches of the quarter panel immediately under the vinyl top/trunk/windows. My plan is to use the smaller 3" Griots polisher to do those areas (it's still in transit).
Even after 11 passes, I could still detect some oxidation trails (although faint) near the bottom of this area that don't show so well in the photos or video. So I went back another 4 passes in the affected areas only and this seemed to do the trick - but it was dark and the lighting wasn't great, so I may have to revisit this area when I get back to work. All in all the non oxidized areas looked good after around 5 or 6 passes and the heaviest oxidation required at least 15 passes with light pressure and M205 to clean up. Would it have been better to compound those areas first? I imagine it would have at least been faster, but I don't mind taking more time. I think I will continue to just polish the car and skip the compound step altogether unless I find defect areas that the polish wont fix.
I am very happy with the results. My only misgiving is that the area immediately next to the side trim did not polish quite as well as the rest of the panel. If you have any tips on how best to run the polisher against edges, that would be much appreciated. I tried sneaking up lightly on the edge as well is pressing into the edge, but neither seemed to get the last 1/4" completely fog-free. If all else fails I may remove the side trim in the future and give these areas a thorough polishing.
Between each application of polish, I cleaned my pad "on the fly" by running the DA with the pad in a terry cloth. By gripping the pad within the terry cloth, I was able to transfer spent product and paint into the terry cloth, readying the pad for further polishing. This seemed to work well and allowed me to continue work without washing the pad - we'll see if it's adequate when I do more sections of the car. I learned this method watching the following video.
That's all I had time for last night, so I peeled the pad off my polisher and took it to the kitchen to wash. Look at all that heavily paint-tinted spent polish! I am really curious how much of that is removed paint vs. spent polish. My understanding is it's mostly spent polish, but the very small amount of removed paint gives it a strong tint.
Hot water, a little unscented dawn soap, and working the pad with my thumbs took care of that.
Once clean, I squeezed water out of the pad and left it out to finish drying. I only bought one of these pads, so I hope it lasts for the whole car.
03-23-2018 | 01:37 PM
#1424

TECH Enthusiast

Joined: Dec 2007
Posts: 566
Likes: 1
I've polished a lot of cars and a lot of boats... that paint needs compound without a doubt.
Try the compound on the section next to it. Then follow up with the polish. You will cut your work in half and the results should be better.
Try the compound on the section next to it. Then follow up with the polish. You will cut your work in half and the results should be better.
03-23-2018 | 02:21 PM
#1425
Thread Starter
TECH Addict
iTrader: (1)
Joined: Apr 2010
Posts: 2,816
Likes: 84
From: Instagram @chevyhotrodder
Thanks for the advice doug. Someone suggested on another forum to just try out a more abrasive pad, but I may give the compound a try. The polish did nothing to knock down orange peel (not that the compound would do miracles there either - it probably needs wet sanding) and I still have a bit of haze. Maybe since I've already put quite a few passes on it with polish I will try only a couple passes of compound followed by polish and see how it looks after. I just don't want to get too aggressive and cause more harm than good. When you say you have polished a lot of cars and boats, are you including a lot that have old single stage paint?
03-25-2018 | 07:08 AM
#1426

TECH Fanatic
Joined: Jun 2014
Posts: 1,527
Likes: 11
What you want is 3M perfect it. It’s a mild 2step process. Compound and glaze. It will take off all the oxidation and will really shine. They also have trizac 5000 grit da sandpaper you can use first but I would give the compound a shot first. Look it up on u tube, should be some videos. This is what most body shops use.
03-25-2018 | 01:11 PM
#1427
TECH Enthusiast
Joined: Dec 2007
Posts: 566
Likes: 1
Thanks for the advice doug. Someone suggested on another forum to just try out a more abrasive pad, but I may give the compound a try. The polish did nothing to knock down orange peel (not that the compound would do miracles there either - it probably needs wet sanding) and I still have a bit of haze. Maybe since I've already put quite a few passes on it with polish I will try only a couple passes of compound followed by polish and see how it looks after. I just don't want to get too aggressive and cause more harm than good. When you say you have polished a lot of cars and boats, are you including a lot that have old single stage paint?
Normally I would have suggested wet sanding as a last resort, but because your paint is single stage, I opted not to even suggest it. You can burn through edges really quickly on single stage. Not that you couldn't figure it out, but it's definitely something I wouldn't recommend for the average person. I really think you'll get the results you're after with a compound/polish routine. Let us know how it goes.
03-26-2018 | 10:00 AM
#1428
Thread Starter
TECH Addict
iTrader: (1)
Joined: Apr 2010
Posts: 2,816
Likes: 84
From: Instagram @chevyhotrodder
Thanks for the continued input. Very much appreciate the advice! I think you are right that this needs to be gone over with something a little more aggressive. I can still see water trails on the quarter panel. I also found I just can't get up to the edge of the side molding with the DA, so I think I am going to take the time to remove it before going any further.
Friday after work I decided I needed a drive, so I hopped in the Nova and went for a cruise around town. I stopped outside a local restaurant bearing my (screen) name to snap a few photos, including a before & after.

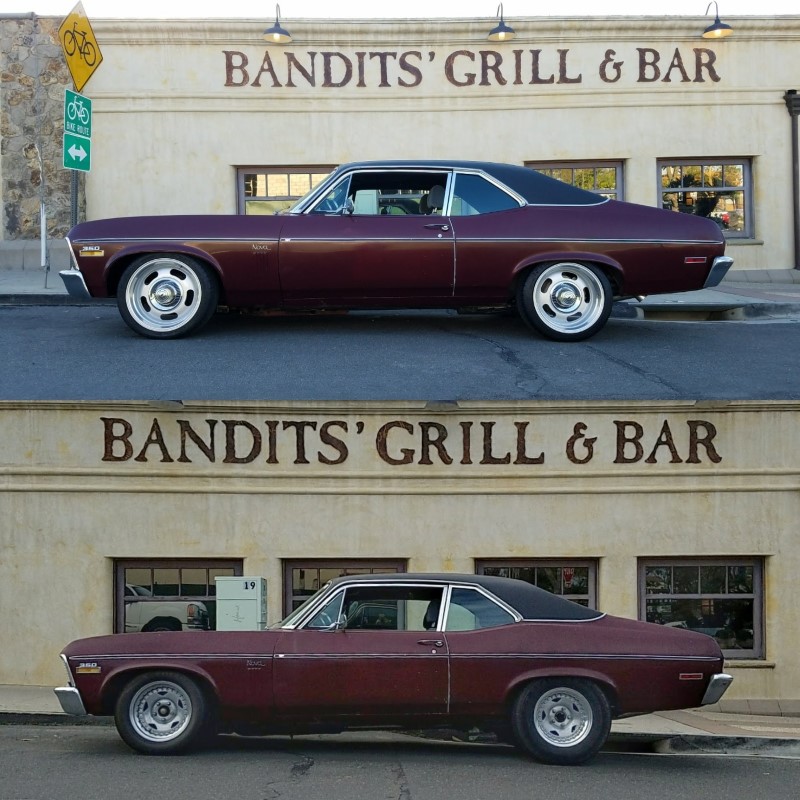
I also snapped photos a few other places - nowhere particular.

It is really a kick to drive the car now for a two main reasons. First, TRACTION. I have been driving on old hard rubber for a very long time. The new tires are narrower, but they stick a lot better. Now when I hit the throttle I'm forced well back into my seat the way it should be. Second, TIGHTNESS. Except for the steering box (which still has a dead spot and excess assist), the car feels like it's "on rails". It's hard to describe that sensation without using a cliche, but basically the car does not sway much as it turns so it really feels stuck to the ground. There are certainly other new things about how it drives. The brakes feel better, but not dramatically so. I still need to adjust the proportioning valve to maximize use of the rear. The car is lower in the back (around 3inches) and it looks a lot lower standing next to the car, but inside it doesn't feel much lower. It does not seem to ride noticeably more harsh, but it also isn't bouncing around like it used to going over dips in the road. I am pretty happy with it so far. It just feels more solid overall and I like it!

Friday after work I decided I needed a drive, so I hopped in the Nova and went for a cruise around town. I stopped outside a local restaurant bearing my (screen) name to snap a few photos, including a before & after.
I also snapped photos a few other places - nowhere particular.
It is really a kick to drive the car now for a two main reasons. First, TRACTION. I have been driving on old hard rubber for a very long time. The new tires are narrower, but they stick a lot better. Now when I hit the throttle I'm forced well back into my seat the way it should be. Second, TIGHTNESS. Except for the steering box (which still has a dead spot and excess assist), the car feels like it's "on rails". It's hard to describe that sensation without using a cliche, but basically the car does not sway much as it turns so it really feels stuck to the ground. There are certainly other new things about how it drives. The brakes feel better, but not dramatically so. I still need to adjust the proportioning valve to maximize use of the rear. The car is lower in the back (around 3inches) and it looks a lot lower standing next to the car, but inside it doesn't feel much lower. It does not seem to ride noticeably more harsh, but it also isn't bouncing around like it used to going over dips in the road. I am pretty happy with it so far. It just feels more solid overall and I like it!
Last edited by -TheBandit-; 03-26-2018 at 10:35 AM.
03-27-2018 | 10:54 AM
#1431
Thread Starter
TECH Addict
iTrader: (1)
Joined: Apr 2010
Posts: 2,816
Likes: 84
From: Instagram @chevyhotrodder
Thank you both! It's a good fifteen footer now!
My son outgrew the car seat I was using in the Nova last year. It was attached via the OE lap belts and put him in a 5 point harness, but now he's in a booster and has to use whatever belt is in the car. The safety of my kids is very important to me, so I ordered a set of 3 point retractable belts for the back of the car from Morris Classics. These are not cheap, but I thought having a ready-made solution would speed things along. My son's been begging for a drive and I can't wait to get out with him again.
The trick to this belt install is having a suitably reinforced mounting point for the retractor. There was a rarely-ordered 3 point belt option for the Nova that mounted to the package tray, but the area is probably 18 gauge or thinner sheet metal. Morris came up with a simple angle bracket that ties from the package tray down to the wheel tub and trunk support brackets. Installation requires drilling three holes in a very confined space. Here is the mounting bracket in position:

It's not a good sign when the supplied 5/16" fasteners do not fit through the holes in the supplied bracket. I called Morris and apparently I was the first to tell them the holes were undersized. They confirmed there was an error at the laser cutter. This is incoming inspection 101 - they should have identified this way before it got to me, but no matter I simply drilled the holes to the correct size.


The photos don't do it justice, but this bracket is located in a very tight space inside the trunk. I did a lot of cussing while tightening up the little 5/16" all-metal lock nuts (aka crimp nuts) because they were too close to the edge to get a socket on and I had to use an open ended wrench about 1/8 turn at a time to snug them down. This took quite a while, especially while contorted awkwardly in the trunk. Fortunately I didn't drop any hardware or tools down into the quarter panel.
In the next photo you can see the bracket shifted a little after attaching the lower bolts at the wheeltub. I ignored my original marking and used a spring-loaded center punch to locate the new center of the hole for drilling. A spring-loaded center punch is a tool everyone should have; it makes punching a locating dimple very easy even in confined spaces.

My next problem was drilling the 1/2" hole up through the package tray. From experience I know only a step bit aka unibit would make a satisfactory hole in this sheet metal. What I wasn't counting on was the lack of space between the package tray and the wheel tub. There is only about 5-1/2 inches to work with in there and it's not nearly enough space for a standard drill. Even a right angle drill would probably not fit due to the length of the chuck and drive system. The solution I came up with was to use a Milwaukee offset hex driver P/N 48-32-2100 and a Harbor Freight hex drive step bit. This offset driver is not exactly 90 degrees (although they do make that as well P/N 49-82-8510), but it was on the shelf at my local big box hardware store. Here's a comparison of my cordless drill and the offset driver with step bits.

That goofy setup did the trick. I was able to make the hole up through the package tray. It even carved through the tray itself without any drama.


Next I sat the retractors and pushed the 1/2" bolts down from the inside of the car. Below are both brackets installed with the retractor attachment nuts loosely attached - I didn't have a helper in the garage last night so I will need to go back in and put washers on before tightening these down.


The next photos show where the retractors sit in the car. They are tucked back very close to the sail panels. I am really happy with the location. They are about as out of the way as I could hope.


That was all I had time for last night. Today I plan to finish the install and put the back seat in, then I need to do some serious housekeeping inside the car. The interior is still covered in dust from before the LS swap! I want it looking good by Wednesday because the insurance company is coming to inspect the car. I am trying to setup an agreed value policy.
My son outgrew the car seat I was using in the Nova last year. It was attached via the OE lap belts and put him in a 5 point harness, but now he's in a booster and has to use whatever belt is in the car. The safety of my kids is very important to me, so I ordered a set of 3 point retractable belts for the back of the car from Morris Classics. These are not cheap, but I thought having a ready-made solution would speed things along. My son's been begging for a drive and I can't wait to get out with him again.
The trick to this belt install is having a suitably reinforced mounting point for the retractor. There was a rarely-ordered 3 point belt option for the Nova that mounted to the package tray, but the area is probably 18 gauge or thinner sheet metal. Morris came up with a simple angle bracket that ties from the package tray down to the wheel tub and trunk support brackets. Installation requires drilling three holes in a very confined space. Here is the mounting bracket in position:
It's not a good sign when the supplied 5/16" fasteners do not fit through the holes in the supplied bracket. I called Morris and apparently I was the first to tell them the holes were undersized. They confirmed there was an error at the laser cutter. This is incoming inspection 101 - they should have identified this way before it got to me, but no matter I simply drilled the holes to the correct size.
The photos don't do it justice, but this bracket is located in a very tight space inside the trunk. I did a lot of cussing while tightening up the little 5/16" all-metal lock nuts (aka crimp nuts) because they were too close to the edge to get a socket on and I had to use an open ended wrench about 1/8 turn at a time to snug them down. This took quite a while, especially while contorted awkwardly in the trunk. Fortunately I didn't drop any hardware or tools down into the quarter panel.
In the next photo you can see the bracket shifted a little after attaching the lower bolts at the wheeltub. I ignored my original marking and used a spring-loaded center punch to locate the new center of the hole for drilling. A spring-loaded center punch is a tool everyone should have; it makes punching a locating dimple very easy even in confined spaces.
My next problem was drilling the 1/2" hole up through the package tray. From experience I know only a step bit aka unibit would make a satisfactory hole in this sheet metal. What I wasn't counting on was the lack of space between the package tray and the wheel tub. There is only about 5-1/2 inches to work with in there and it's not nearly enough space for a standard drill. Even a right angle drill would probably not fit due to the length of the chuck and drive system. The solution I came up with was to use a Milwaukee offset hex driver P/N 48-32-2100 and a Harbor Freight hex drive step bit. This offset driver is not exactly 90 degrees (although they do make that as well P/N 49-82-8510), but it was on the shelf at my local big box hardware store. Here's a comparison of my cordless drill and the offset driver with step bits.
That goofy setup did the trick. I was able to make the hole up through the package tray. It even carved through the tray itself without any drama.
Next I sat the retractors and pushed the 1/2" bolts down from the inside of the car. Below are both brackets installed with the retractor attachment nuts loosely attached - I didn't have a helper in the garage last night so I will need to go back in and put washers on before tightening these down.
The next photos show where the retractors sit in the car. They are tucked back very close to the sail panels. I am really happy with the location. They are about as out of the way as I could hope.
That was all I had time for last night. Today I plan to finish the install and put the back seat in, then I need to do some serious housekeeping inside the car. The interior is still covered in dust from before the LS swap! I want it looking good by Wednesday because the insurance company is coming to inspect the car. I am trying to setup an agreed value policy.
03-28-2018 | 11:16 AM
#1433

That's exactly how I installed mine, albeit with an anchor plate for the middle belt that I don't really ever intend to use*. Though I was able to use my drill somehow. Did you already have Morris setup in the front?
I've never used a unibit, why exactly are they better for sheetmetal like this?
(*though now that I think about it, I have a third is on the way, so I will actually be using it)
I've never used a unibit, why exactly are they better for sheetmetal like this?
(*though now that I think about it, I have a third is on the way, so I will actually be using it)
03-28-2018 | 12:09 PM
#1434
Thread Starter
TECH Addict
iTrader: (1)
Joined: Apr 2010
Posts: 2,816
Likes: 84
From: Instagram @chevyhotrodder
Dude! CONGRATULATIONS! A third on the way? W00t w00t! I take it you put a 3 point in the center rear also? On mine I left an original lap belt in the center just in case, but I don't expect to use it.
I don't have Morris up front. I actually really like the nostalgia of the original fixed 3 points and I plan to keep them. It sucks when I need to reach over to the glove box or something but most of the time it doesn't bother me. I like explaining how to use them to new passengers. It's part of the experience of an old car. I might get new replacement belts since I'm sure they have lost their elasticity over the years.
The benefits of a unibit on sheet metal are two fold. First, the previous step is always piloting in the hole, so it stays very centered and does not wander. Second, there are no spiral/twist flutes that can grab and pull back the sheet metal. Sometimes with a standard twist bit the sheet will get caught up in the flute instead of cutting the hole and it can tweak and bend the sheetmetal. That doesn't happen with a unibit.
03-28-2018 | 12:49 PM
#1435
And can "thread" the thin metal up onto the flute and pull it up, usually spinning the material in the procss. I'm sure we all have scars from that.. you really only need to have that happen once or twice at the most to appreciate the benefits of a unibit, as well as how to hold and how not to hold something in the drillpress!
 03-28-2018 | 07:33 PM
#1437

TECH Senior Member
Joined: Jun 2016
Posts: 21,525
Likes: 3,284
From: Central Cal.
03-29-2018 | 10:18 AM
#1438
Thread Starter
TECH Addict
iTrader: (1)
Joined: Apr 2010
Posts: 2,816
Likes: 84
From: Instagram @chevyhotrodder
You've got it. They are Rev Classic 107 silver with diamond lip 18x8 and 18x9. To fit the rears, I narrowed my rear end 1in per side because they are only available in 0 offset (Novas need offset!). I added GM metal derby style caps (there are other styles available and plastic versions for less $$$). I bought them from Wheel Dealer in Spring TX. You can find them on ebay. They also make them in 15" and 17".
03-29-2018 | 10:48 AM
#1439
Thread Starter
TECH Addict
iTrader: (1)
Joined: Apr 2010
Posts: 2,816
Likes: 84
From: Instagram @chevyhotrodder
Tuesday night I hustled to finish the Morris Classic 3pt belt install in the back. I thought I'd be able to do it with just the bottom of the seat removed, but I had a hard time getting to the lower anchor bolts so I removed the back of the seat too. This had the added benefit of being able to reach through the rear panel to tighten the nut for the retractor while holding the bolt from the top - definitely better than having two people. The Morris instructions did not say which way to orient the belts, so I installed them the way the factory belts were routed (outside pointing up, inside pointing down). I kept the original center lap belt installed just in case.


Once that was back together, I spent some time cleaning out the inside of the car, vacuuming, and wiping everything down. I zip tied a few loose wires under the dash and made the interior presentable for the insurance inspector. Wednesday morning he showed up to take photos of the car and make sure it was in fact garage kept (a requirement for an agreed value policy).
When he arrived he wanted to just take photos of the car in the driveway. The lighting there was poor and the garage was casting shadows over the car, so I insisted we back the car into the street to get better photos. Considering these photos may some day establish a value for the car, I want it looking it's best. I positioned the car in the street with the wheels turned slightly over and got this 3/4 view shot.

Of course he had to get photos all around and inside the car, so when he asked me to pop the hood, I gladly showed off the LS.


Fresh off the victory of installing the rear belts, we decided to take the kids out for ice cream. They were both stoked to take a ride in the Nova! I put my 7yo son's booster seat in and installed my 4yo daughters car seat using a seat belt locking clip. Having the shoulder harness for my son (and eventually my daughter) is the reason I bought these belts.

They all had a great time and when we started to leave from the ice cream place, my daughter was so excited to get back in the Nova she started bouncing around yelling "Nova! Nova! Nova! We get to ride in the Nova!" A dad's heart can only swell so big before it explodes!
Once that was back together, I spent some time cleaning out the inside of the car, vacuuming, and wiping everything down. I zip tied a few loose wires under the dash and made the interior presentable for the insurance inspector. Wednesday morning he showed up to take photos of the car and make sure it was in fact garage kept (a requirement for an agreed value policy).
When he arrived he wanted to just take photos of the car in the driveway. The lighting there was poor and the garage was casting shadows over the car, so I insisted we back the car into the street to get better photos. Considering these photos may some day establish a value for the car, I want it looking it's best. I positioned the car in the street with the wheels turned slightly over and got this 3/4 view shot.
Of course he had to get photos all around and inside the car, so when he asked me to pop the hood, I gladly showed off the LS.
Fresh off the victory of installing the rear belts, we decided to take the kids out for ice cream. They were both stoked to take a ride in the Nova! I put my 7yo son's booster seat in and installed my 4yo daughters car seat using a seat belt locking clip. Having the shoulder harness for my son (and eventually my daughter) is the reason I bought these belts.
They all had a great time and when we started to leave from the ice cream place, my daughter was so excited to get back in the Nova she started bouncing around yelling "Nova! Nova! Nova! We get to ride in the Nova!" A dad's heart can only swell so big before it explodes!
Last edited by -TheBandit-; 03-29-2018 at 12:40 PM.