

'70 Nova LY6/TH400 6.0VVT
 03-15-2018, 05:59 PM
#1401

I think your car appears higher than mine even though the fender lips aren't all that much higher because my spindles are tucked up more due to the taller sidewalls, moving the rim hoop itself visually higher up into the fender opening. I'd be curious what your tire OD's are and your spindle-to-fender-lip measurements are.
Your Front" 275/40/18, 26.57" OD 4.28" sidewall (+0.6").
I'm surprised I have rear inner fender clearance issues when I have roughly 1" smaller diameter tire up front, but apparently the offset/scrub radius is really impacting my clearance (*EDIT* could also be because you don't have inner fenders!). That extra sidewall on yours really helps visually eliminate the rubber band look. I think my rears also look a little rubber bandy because the 255 doesn't pooch much on a 9" wheel and I think yours have a little more pooch (is that a technical term?)
My rear: 255/40R18, 26" OD, 4" widewall
Your Rear = 305/35/18, 26.42" OD 4.21" sidewall (+0.2")
We have similar sidewall height out back, but your rim is tucked inside the lip which makes a really big visual difference on height. It's also 1-3/4" shorter in the back overall so that definitely adds to the overall visual. I think the rim size is probably narrower compared to the section width on yours than mine, as mentioned above regarding "pooch".
My concern on up-travel is mostly in the front where I am not too far from the bumpstop and my tire is very close to the inner fender. I think if I had more (ANY) wheel offset and I was willing to shave my bumpstops or go to aftermarket lowers, I could probably get by at a lower ride height both front a rear. But remember I'm on leafs out back so I don't have nearly the control over movement that you do. I also don't have coil overs up front - I have AFCO spring adjusters - so front height adjustment is not easy. Doable, but not easy.


 03-15-2018, 09:31 PM
#1405
That's nice of you to offer but I don't want to take any time from your turbo progress. Plus there are so many differences between our suspension, steering, brakes, wheels and tires that it would be tough to see how everything translates
03-16-2018, 10:19 AM
#1406
I failed to mention I took that photo on the first real drive for the Nova since last June. Wow I can't believe how fast time flies with a family and young kids!
Here's a summary of what was and what is:
Front suspension (no changes)
600lb AFCO springs and adjusters set to the same length and Hotchkis 2" lowering springs. Hotchkis Bilstein shocks. Helwig hollow 1-1/8" sway bar. Guldstrand mod. Stock spindles and lowers. Global West uppers.
Rear suspension
WAS stock multi leaf springs and KYB shocks. NOW Hotchkis 1.5" drop springs, same KYB shocks (for now), and Helwig 3/4" tubular sway bar. Stock power steering box (boo)
Brakes
Front stock 11" discs (no change for now), Rear was stock drums now LS1 rear (~12" diameter rotors), master 1-1/16" stock with 11" single diaphragm booster. Removed stock fixed proportioning valve and front hold off valve and added Wilwood adjustable prop valve.
Wheels/Tires
WAS 205/60R15 front on 15x7 w/ 3-3/8" BS (neg 5/8" offset) and 275/60R15 rear on 15x8.5 w/ 5" BS (pos 1/4" offset). NOW 235/40R18 front on 18x8 w/ 4.5" BS (0 offset) and 255/40R18 rear on 18x9 w/ 5"BS (0 offset, note axle narrowing effectively adds 1" pos offset)
Rear End
12 bolt with 3.73 posi WAS stock c-clip axles 60-1/4" wms-to-wms NOW narrowed to 58-1/4" wms-to-wms, Strange axles, Strange Ford bearing ends and Strange axles with tapered bearings / no c-clips.
Future plans
- Rear needs more damping / better shocks
- Front brakes need to be upsized, probably going to Z51 'vette brakes
- Master and/or booster may need replacement to get desired pedal feel (we'll see)
- Steering box needs to be quicker and heavier (feel)
- Subframe needs connecting
For my first real drive, I took the car around the neighborhood hills and focused on bedding the brake pads and gaining confidence in the brakes. Shakedown runs are always nerve racking because so many things can go wrong. You start out focusing on a few things and can quickly be overcome by some unexpected issue. Fortunately this drive was drama-free.
Before driving, I set the proportioning valve to mid travel (count turns from full open to close, then back half way) and found that at least on a damp surface the fronts lock before the rear. Stopping distances felt a little long with this setting and I probably need to adjust the bias to get more out of the rear. I did a series of very slow speed stops followed by some faster intermittent stops to warm up the brakes a tad to help bed the pads. I kept speeds below 40mph and listened for any weird noises coming out of the rear (since I did adjust the backlash and change a bunch in the rearend) - it seems to run quiet so far. I kept steering below 1 steering wheel turn either direction so I wouldn't rub the rear inner wheeltub, which was fine until I needed to make a U-turn lol. The car is going to be tough to park until get the tire clearance worked out up front.
I think the biggest grin of the drive came when I did a NASCAR-style tire warm-up routine, darting left and right rapidly down the street as if I was going through a tight slalom. The usual body roll was gone and the tires stuck firm. I got a little sense of the lowness and go-kart feeling of having a more tightly sprung car on (finally) decent tires. I can not wait to get this thing out on a course and see what it can do!

There are quite a number of things that need buttoning up, but I'm going to try making my first cruise of the season this weekend (weather permitting).
Here's a summary of what was and what is:
Front suspension (no changes)
600lb AFCO springs and adjusters set to the same length and Hotchkis 2" lowering springs. Hotchkis Bilstein shocks. Helwig hollow 1-1/8" sway bar. Guldstrand mod. Stock spindles and lowers. Global West uppers.
Rear suspension
WAS stock multi leaf springs and KYB shocks. NOW Hotchkis 1.5" drop springs, same KYB shocks (for now), and Helwig 3/4" tubular sway bar. Stock power steering box (boo)
Brakes
Front stock 11" discs (no change for now), Rear was stock drums now LS1 rear (~12" diameter rotors), master 1-1/16" stock with 11" single diaphragm booster. Removed stock fixed proportioning valve and front hold off valve and added Wilwood adjustable prop valve.
Wheels/Tires
WAS 205/60R15 front on 15x7 w/ 3-3/8" BS (neg 5/8" offset) and 275/60R15 rear on 15x8.5 w/ 5" BS (pos 1/4" offset). NOW 235/40R18 front on 18x8 w/ 4.5" BS (0 offset) and 255/40R18 rear on 18x9 w/ 5"BS (0 offset, note axle narrowing effectively adds 1" pos offset)
Rear End
12 bolt with 3.73 posi WAS stock c-clip axles 60-1/4" wms-to-wms NOW narrowed to 58-1/4" wms-to-wms, Strange axles, Strange Ford bearing ends and Strange axles with tapered bearings / no c-clips.
Future plans
- Rear needs more damping / better shocks
- Front brakes need to be upsized, probably going to Z51 'vette brakes
- Master and/or booster may need replacement to get desired pedal feel (we'll see)
- Steering box needs to be quicker and heavier (feel)
- Subframe needs connecting
For my first real drive, I took the car around the neighborhood hills and focused on bedding the brake pads and gaining confidence in the brakes. Shakedown runs are always nerve racking because so many things can go wrong. You start out focusing on a few things and can quickly be overcome by some unexpected issue. Fortunately this drive was drama-free.
Before driving, I set the proportioning valve to mid travel (count turns from full open to close, then back half way) and found that at least on a damp surface the fronts lock before the rear. Stopping distances felt a little long with this setting and I probably need to adjust the bias to get more out of the rear. I did a series of very slow speed stops followed by some faster intermittent stops to warm up the brakes a tad to help bed the pads. I kept speeds below 40mph and listened for any weird noises coming out of the rear (since I did adjust the backlash and change a bunch in the rearend) - it seems to run quiet so far. I kept steering below 1 steering wheel turn either direction so I wouldn't rub the rear inner wheeltub, which was fine until I needed to make a U-turn lol. The car is going to be tough to park until get the tire clearance worked out up front.
I think the biggest grin of the drive came when I did a NASCAR-style tire warm-up routine, darting left and right rapidly down the street as if I was going through a tight slalom. The usual body roll was gone and the tires stuck firm. I got a little sense of the lowness and go-kart feeling of having a more tightly sprung car on (finally) decent tires. I can not wait to get this thing out on a course and see what it can do!
There are quite a number of things that need buttoning up, but I'm going to try making my first cruise of the season this weekend (weather permitting).
03-16-2018, 11:18 AM
#1407

Clint,
While I love GM ralleys, I never really liked them on your gen Nova's before. The modern sizing changed my mind. Very, very sharp.
What are the next projects planned for the Nova?
While I love GM ralleys, I never really liked them on your gen Nova's before. The modern sizing changed my mind. Very, very sharp.
What are the next projects planned for the Nova?
03-16-2018, 11:22 AM
#1408
Seeing as we have hard numbers comparing our measured wheel front spacing from the WMS, I would be curious to see what kind of clearance my outer sidewall has to the bottom corner of the fender opening vs yours, for the same steering angle and point of travel.
03-16-2018, 11:39 AM
#1409
Thank you Jimbo. I appreciate the kind feedback. I came across a few 1st gen Camaros with these wheels and it really changed my mind about big wheels. It's too bad no one is making them with good offsets for Novas, unless of course you want to shell out big money for 2 or 3 pc wheels. I could really use some offset up front and it's a little insane that I ended up narrowing my rearend to fit wheels. Maybe these photos will convince the manufacturer they need to come up with some high offset variants.
I have a list of small unfinished items I need to address on the car and of course I want to fix the tire clearance issue up front. After that the next mini project is attempting to restore the exterior paint. My plan is to strip wash the car, clay it, slather it in Maguiars no 7 to restore oils to the paint, DA polish it, and wax. I have never done that kind of detailing on a car, so I have been reading a bunch on the subject, especially what it takes to bring back single stage paint. I don't expect a show quality finish since my paint has a lot of chips and some dents, but if I can get a lot of the oxidation off and restore some shine it should get me by another year or two before I do all the rust repair and full paintjob the car really needs. In addition to detailing, I want to paint the grill black like an SS grill and paint the filler panel silver. I painted that filler panel body color around 2000 but most of the paint has since chipped off and I just hate seeing it that way in all my photos.
Summer is coming and I'm also thinking about what it will take to get the AC functional.
03-16-2018, 12:19 PM
#1410
It would honestly be no big deal, the driver side spring is out, and car is up in the air.. so very easy for me to turn the steering and move the wheel up/down.
Seeing as we have hard numbers comparing our measured wheel front spacing from the WMS, I would be curious to see what kind of clearance my outer sidewall has to the bottom corner of the fender opening vs yours, for the same steering angle and point of travel.
Seeing as we have hard numbers comparing our measured wheel front spacing from the WMS, I would be curious to see what kind of clearance my outer sidewall has to the bottom corner of the fender opening vs yours, for the same steering angle and point of travel.
03-16-2018, 12:30 PM
#1411
I think I mentioned it above but I am currently at -1.0* camber and +5.0* caster.. so very similar to you. We both have the Gulstrand mod (mine was re-drilling, yours was cut/welding) however there could be differences in our control arms that might be placing our spindles more forward/rearward compared to each other, for the same caster numbers.
I was running -2.5" camber before, then got tired of the street manners and how silly it looked, dialed it back to -2.0*. Then I tried -1.5* but I was getting serious fender inner lip rubbing, so I finally trimmed the inner lip from 10 o'clock to 2 o'clock (like shown in pics/vids on my thread) and was finally able to run a more street-friendly camber with no rubbing. I eventually settled on -1.0* and am now happy with how it performs on rutted roads, onramps, and the general looks of just slight tire tip-in. Very scientific reasoning, I know haha.
I was running -2.5" camber before, then got tired of the street manners and how silly it looked, dialed it back to -2.0*. Then I tried -1.5* but I was getting serious fender inner lip rubbing, so I finally trimmed the inner lip from 10 o'clock to 2 o'clock (like shown in pics/vids on my thread) and was finally able to run a more street-friendly camber with no rubbing. I eventually settled on -1.0* and am now happy with how it performs on rutted roads, onramps, and the general looks of just slight tire tip-in. Very scientific reasoning, I know haha.
03-16-2018, 12:47 PM
#1412
Thanks for all the info Joe. I think keeping the camber around -1deg or less is best for street driving, especially tread wear. I have been thinking about getting or making some shims that I can swap in to quickly increase camber for autocross, but the potential gains from another degree or two of camber are not worth the time for me when at this point I really should focus on learning to drive the car. I'm only out there to race myself. I choose to compromise to keep mine comfortable on the street, so I will never be as fast as the fastest guys.
I hope some time you get yours to an autocross or track day. If you haven't been, you can't imagine how much fun it is.
I hope some time you get yours to an autocross or track day. If you haven't been, you can't imagine how much fun it is.
03-19-2018, 12:16 PM
#1413
I was thinking about taking my car to a show this weekend and naturally that snowballed into starting a full detail / paint restoration. Why drive the car when I can continue to work on it?
I have been researching this topic for a while. For anyone interested in bringing life back to old single stage paint, I suggest checking out this article on autogeek.
The steps I plan to follow are as follows:
(1) Strip wash the car to remove any residual wax/polish from previous work
(2) Clay bar to remove surface bonded contaminants / industrial fallout
(3) Condition the paint with Maguiars no 7 to restore oils
(4) Compound to remove oxidation
(5) Polish to remove swirls and scratches
(6) Wax to protect the finish
Paint Restoration: Before photos
Here is what I'm starting with. I don't know if this paint is original, but I certainly haven't painted it since I bought the car twenty years ago. It's a single stage "black cherry" factory color with lots of chips and a few dents. In this photo there is a layer of dust over the car from being stored for a while, but it also has significant oxidation and water deposits.
03-19-2018, 12:26 PM
#1414
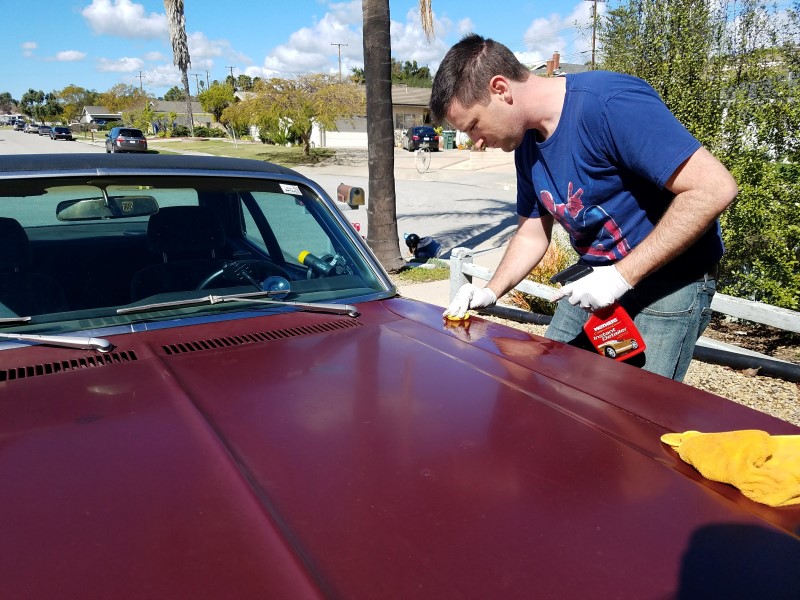
Step 1: Strip Wash
To get the car back to a "clean" slate, the first step was a "strip wash". Most maintenance car wash soaps are neutral, meaning they are designed NOT to remove waxes. If you want to polish your paint, you first need to remove any residual waxes from the car. There are a number of ways to do this. Dawn concentrated cleaner is a low buck approach. I decided to use Maguiars Wash Plus buckless soap. I applied it directly to a microfiber wash mitt and worked over the car one panel at a time. Between panels, I rinsed off the wash mitt and reapplied the soap so any dirt/debri removed from the car wouldn't get dragged all over it. This soap contains a finish polish which doesn't do a lot for paint in this condition, but it can't hurt. Usually when you wash a car you should be using a linear/back-and-forth motion to avoid making intersecting circular scratches, but since this has a polish in it I used circular motions for most of the wash. Once washed, I dried the car with microfiber towels.Then I went under the hood and rinsed down the inner fenders, suspension, and engine, followed by drying the body around it again and then drying under the hood.
Here is a hyperlapse of washing the car
Here is what the paint looked like immediately after washing.
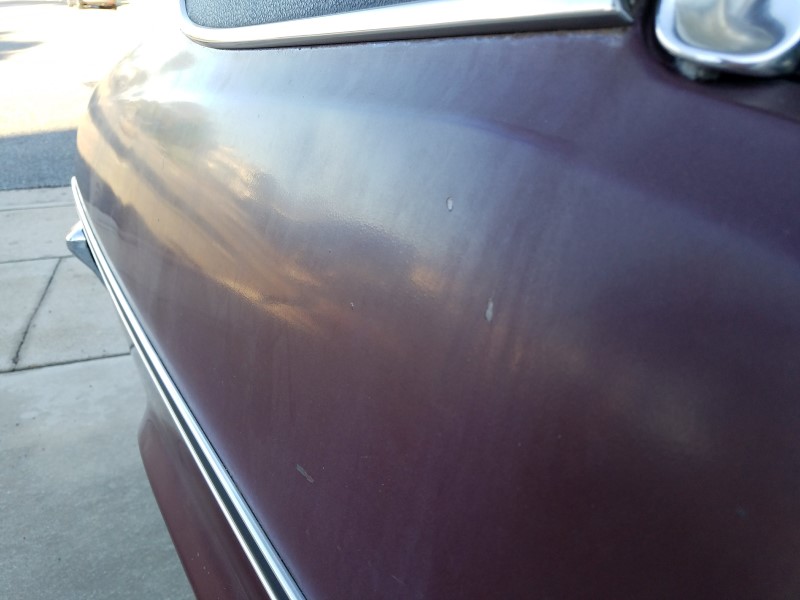
Here are some closer shots of the passenger quarter panel. This area has a lot of water deposits from vinyl top / gutter runoff so I will use it as a bell weather for progress.


Products used:
- Maguiars Wash Plus bucketless soap
- Amazon Basics microfiber wash mitt
- Generic microfiber towels (drying)
Time: Approx 1.5hr
To get the car back to a "clean" slate, the first step was a "strip wash". Most maintenance car wash soaps are neutral, meaning they are designed NOT to remove waxes. If you want to polish your paint, you first need to remove any residual waxes from the car. There are a number of ways to do this. Dawn concentrated cleaner is a low buck approach. I decided to use Maguiars Wash Plus buckless soap. I applied it directly to a microfiber wash mitt and worked over the car one panel at a time. Between panels, I rinsed off the wash mitt and reapplied the soap so any dirt/debri removed from the car wouldn't get dragged all over it. This soap contains a finish polish which doesn't do a lot for paint in this condition, but it can't hurt. Usually when you wash a car you should be using a linear/back-and-forth motion to avoid making intersecting circular scratches, but since this has a polish in it I used circular motions for most of the wash. Once washed, I dried the car with microfiber towels.Then I went under the hood and rinsed down the inner fenders, suspension, and engine, followed by drying the body around it again and then drying under the hood.
Here is a hyperlapse of washing the car
Here is what the paint looked like immediately after washing.
Here are some closer shots of the passenger quarter panel. This area has a lot of water deposits from vinyl top / gutter runoff so I will use it as a bell weather for progress.
Products used:
- Maguiars Wash Plus bucketless soap
- Amazon Basics microfiber wash mitt
- Generic microfiber towels (drying)
Time: Approx 1.5hr
Last edited by -TheBandit-; 03-20-2018 at 10:47 AM.
03-19-2018, 03:22 PM
#1415
Step 2: Clay Bar
The next step is to clay the surface. The purpose of clay is to remove "surface bonded contaminants" aka "industrial fallout". These are harder to see contaminants on the surface of the paint, but they are easy to feel and typically wont come off with just a wash. If you run your fingers across the surface of the paint you will feel these contaminants as a sort of an inconsistent, rough texture. It's easier to feel if you put your hands in a plastic bag or wear rubber/nitrile/latex gloves. The clay acts as an abrasive that picks up these contaminants. It is similar in texture to play dough. To use the clay, you spray a lubricant on the surface and simply rub it back and forth. Working in a small area (roughly 2ft x 2ft), you spray the lube, work the clay, then follow with a microfiber towel. Kneed the contaminants back into the clay and continue to the next section. You can easily feel the smooth clean paint surface left after the clay.
The top surfaces of the car will have the most surface contaminants, especially the hood and trunk. I also had a particularly nasty section behind the tire on the quarter panel. This is probably some bits of embedded rubber and asphalt left on the paint from making clouds.

Here are some closeups of various areas after clay bar. You can see it didn't remove a lot of visually-obvious contaminants, but the car FELT a lot cleaner when I was done.


I also took the clay bar to the windows. It made a big difference there too. Here is what the car looked like after the strip wash and clay. The paint still looks weathered but it's CLEAN.

Products used:
- Mothers clay kit (2x100g clay and instant detailer spray lube)
Time: Approx 2 hours
The next step is to clay the surface. The purpose of clay is to remove "surface bonded contaminants" aka "industrial fallout". These are harder to see contaminants on the surface of the paint, but they are easy to feel and typically wont come off with just a wash. If you run your fingers across the surface of the paint you will feel these contaminants as a sort of an inconsistent, rough texture. It's easier to feel if you put your hands in a plastic bag or wear rubber/nitrile/latex gloves. The clay acts as an abrasive that picks up these contaminants. It is similar in texture to play dough. To use the clay, you spray a lubricant on the surface and simply rub it back and forth. Working in a small area (roughly 2ft x 2ft), you spray the lube, work the clay, then follow with a microfiber towel. Kneed the contaminants back into the clay and continue to the next section. You can easily feel the smooth clean paint surface left after the clay.
The top surfaces of the car will have the most surface contaminants, especially the hood and trunk. I also had a particularly nasty section behind the tire on the quarter panel. This is probably some bits of embedded rubber and asphalt left on the paint from making clouds.
Here are some closeups of various areas after clay bar. You can see it didn't remove a lot of visually-obvious contaminants, but the car FELT a lot cleaner when I was done.
I also took the clay bar to the windows. It made a big difference there too. Here is what the car looked like after the strip wash and clay. The paint still looks weathered but it's CLEAN.
Products used:
- Mothers clay kit (2x100g clay and instant detailer spray lube)
Time: Approx 2 hours
Last edited by -TheBandit-; 03-20-2018 at 10:30 AM.
03-19-2018, 03:50 PM
#1416
Step 3: Condition
This is where the paint "restoration" part comes in. Single stage paints aren't sealed up by clear coat, so over time they lose their composition as base oils are degraded and washed off over decades. At least that's my understanding of the theory I'll happily regurgitate from this great in-depth article. To restore those important oils to the paint, I slathered the entire car in a very wet coat of Maguiars number 7 show car glaze.


I was really tired after all the hard work washing, claying, and applying no 7 to the car, so the next step was welcome: I LEFT THE CAR OVERNIGHT. That's right. I just left that stuff on my car for a period of 24+ hours so it could impregnate the paint with all the juicy oils to make paint happy. Then, after 24 hours, I started to take it off. I used a number of microfiber towels (about 1 per panel) and rubbed vigorously in circular motions.
Rubbing off the no 7 was like discovering a new car. Here are a couple videos looking over the surface afterwards. You can see the no 7 restored depth, richness, and gloss back to the paint. There are still a lot of defects in the paint, but the the car has a reflection now. I'd say it's analogous to a fogged up or dirty mirror now - it still needs compounding and polishing, but this turned the clock back a few decades.
Here are a few close photos to show what it looks like after conditioning:

The trunk panel has serious left-to-right scratches all over it. I am not sure why.

I'm starting to see myself in the quarter panel


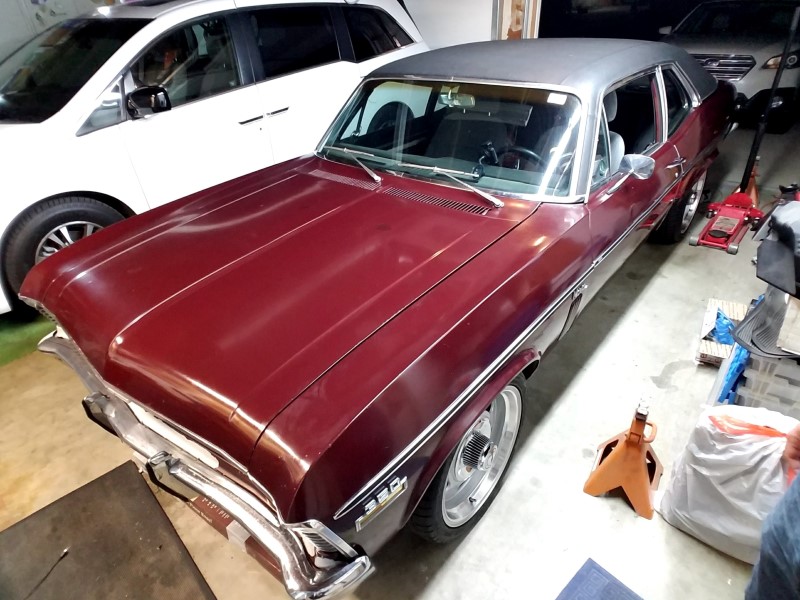
Stepping back, the car is looking fresh. Note: driver's side hasn't been rubbed out yet in this photo.

Due to family needs, I had to leave the car an extra night before rubbing off the driver's side. This made the glaze harder to remove and I noticed swirl left on the paint afterwards in a few places, so I would definitely suggest if you follow this process to try to get all the glaze off in one go.


Suffice to say I'm pretty stoked on seeing a reflection in this old paint!

Here are all the microfiber towels I went through removing the glaze. I folded the towels into sixths and flipped or refolded after I felt the towel gumming up.

That's where I'm at for now. So far I have only been working by hand, but for the next step (compound cutting) I will be using a dual action (DA) polisher. Stay tuned.
Products Used
- Maguiars No 7 Show Car Glaze
- Generic microfiber towels (application and removal)'
Time: approx 5 hours
This is where the paint "restoration" part comes in. Single stage paints aren't sealed up by clear coat, so over time they lose their composition as base oils are degraded and washed off over decades. At least that's my understanding of the theory I'll happily regurgitate from this great in-depth article. To restore those important oils to the paint, I slathered the entire car in a very wet coat of Maguiars number 7 show car glaze.
I was really tired after all the hard work washing, claying, and applying no 7 to the car, so the next step was welcome: I LEFT THE CAR OVERNIGHT. That's right. I just left that stuff on my car for a period of 24+ hours so it could impregnate the paint with all the juicy oils to make paint happy. Then, after 24 hours, I started to take it off. I used a number of microfiber towels (about 1 per panel) and rubbed vigorously in circular motions.
Rubbing off the no 7 was like discovering a new car. Here are a couple videos looking over the surface afterwards. You can see the no 7 restored depth, richness, and gloss back to the paint. There are still a lot of defects in the paint, but the the car has a reflection now. I'd say it's analogous to a fogged up or dirty mirror now - it still needs compounding and polishing, but this turned the clock back a few decades.
Here are a few close photos to show what it looks like after conditioning:
The trunk panel has serious left-to-right scratches all over it. I am not sure why.
I'm starting to see myself in the quarter panel
Stepping back, the car is looking fresh. Note: driver's side hasn't been rubbed out yet in this photo.
Due to family needs, I had to leave the car an extra night before rubbing off the driver's side. This made the glaze harder to remove and I noticed swirl left on the paint afterwards in a few places, so I would definitely suggest if you follow this process to try to get all the glaze off in one go.
Suffice to say I'm pretty stoked on seeing a reflection in this old paint!
Here are all the microfiber towels I went through removing the glaze. I folded the towels into sixths and flipped or refolded after I felt the towel gumming up.
That's where I'm at for now. So far I have only been working by hand, but for the next step (compound cutting) I will be using a dual action (DA) polisher. Stay tuned.
Products Used
- Maguiars No 7 Show Car Glaze
- Generic microfiber towels (application and removal)'
Time: approx 5 hours
Last edited by -TheBandit-; 03-20-2018 at 10:29 AM.
 03-20-2018, 11:27 AM
#1418
I like the vinyl top look of the 3rd gen Nova much better. Only car that looks good this way IMO
03-20-2018, 12:32 PM
#1419
Thanks guys. Jimbo it certainly is model and color dependent. Some cars have weird cutoff lines or the top looks "poofy" but I think the way GM trimmed out the top on this car is quite good. It's not for everyone but I love it on my car.
03-22-2018, 02:57 PM
#1420
TECH Addict
iTrader: (27)

I have to say I love this build! I started the build on my Camaro at the same time that my wife was several months pregnant, so I can totally understand working on the car having a little one. Now my little guy is turning 3 in June. It's amazing how fast time flies.
There are several idea's that I am going to borrow from your build. The documentation is invaluable.
One question I have is specific to your LS1 rear brakes. I have the exact same kit as yours but I cannot tell if you swapped the left and right sides so that the brakes pull from the front, or if you switched the lever inside? I am totally going to use the stock ebrake idea that you used with the clevis. Brilliant.