

'70 Nova LY6/TH400 6.0VVT
 06-07-2018, 11:31 AM
#1521

The seats were fantastic! So much more support than what I had before and it's surprising how much feedback you get from your body when you are better connected to the car. I did ride-alongs in other cars with "race" seats and the seats themselves weren't any more supportive, but they did offer harness accommodations. 5 point harnesses help a lot. My brother's buggy and a few other cars I rode in had them. Being tightened into the seat helps. I had a little back pain the next day that probably wouldn't be so bad if I was strapped in tigther.
I will say the Procar Rally seats are generally small. The top of the seat back (without headrest) is a few inches below my shoulders. I think they were designed after the original buckets of the 60s so their dimensions are made for smaller people.They fit me well width-wise though and I think they are a good compromise between comfort on the street and security for performance driving. I put the headrests up so they will still keep my head secure in a collision. I think I might want the seats to be a tad lower, so I may modify the brackets to get them there down the road. I can probably drop them another inch by modifying the seat brackets.
Other "cons" of these seats - there is not a single lever for tilt/slide rear seat access (sucks when you have kids like me!). The recline lever is really far behind you when you're driving so it's hard to find. Also the lever for the seat slider has a plastic "****" on it that comes right off if you're not careful with how you pull on it. I expected better quality mechanical design for the money. But the upholstery is well done and they look dynamite. I also really like the pouch behind the seat for stowing stuff.
I will never take my car to one of those big show events like Good guys. Super tight courses, minimal seat time, and crash barricades all around? No thanks! I have been watching videos and following a few autocrossers online to get a feel for where I want to go next. I really want to do NMCA West in Fontana, but I have a hard conflict with their next event in September. V8builds is doing one in Irwindale June 28 and that looks pretty good. If you don't already, check out autoxandtrack.com and follow Chad Ryker (@autoxandtrack) on Instagram. He has a list of autocross events around Southern California on his site but more importantly you can go find trip reports and get a great feel for the kinds of events that you might be interested in. Chad is an autocross junky - I don't know how he gets away from his family enough to drive as often as he does, but I am jealous. He has some great lap timer videos on his Instagram feed doing triple digit speeds on road course. He helped me figure out the HLT setup.
It would be awesome to meet up with you for one of these events. Next summer will be here before you know it - please come out! I think NMCA west is the one to do or if you want we could try Streets of WIllow (road course). I want to get to LS Fest but I either need a 6 speed or I need to see if my brother will help trailer it out (omg did I really just suggest trailer queen things?). Highway driving is miserable with the TH400, 3.73s and 25" tall tires.
I will say the Procar Rally seats are generally small. The top of the seat back (without headrest) is a few inches below my shoulders. I think they were designed after the original buckets of the 60s so their dimensions are made for smaller people.They fit me well width-wise though and I think they are a good compromise between comfort on the street and security for performance driving. I put the headrests up so they will still keep my head secure in a collision. I think I might want the seats to be a tad lower, so I may modify the brackets to get them there down the road. I can probably drop them another inch by modifying the seat brackets.
Other "cons" of these seats - there is not a single lever for tilt/slide rear seat access (sucks when you have kids like me!). The recline lever is really far behind you when you're driving so it's hard to find. Also the lever for the seat slider has a plastic "****" on it that comes right off if you're not careful with how you pull on it. I expected better quality mechanical design for the money. But the upholstery is well done and they look dynamite. I also really like the pouch behind the seat for stowing stuff.
It would be awesome to meet up with you for one of these events. Next summer will be here before you know it - please come out! I think NMCA west is the one to do or if you want we could try Streets of WIllow (road course). I want to get to LS Fest but I either need a 6 speed or I need to see if my brother will help trailer it out (omg did I really just suggest trailer queen things?). Highway driving is miserable with the TH400, 3.73s and 25" tall tires.
 06-07-2018, 09:12 PM
#1522
I damn near fell over when I saw your brother's buggy . It looks like a giant toy car. Must be a blast to drive on the course.
I'm also jealous of how little you have to turn your steering wheel. I still have the manual box in my Nova. It's like driving a freakin' bus LOL.
I really appreciate your in depth posts. I've learned a lot, have found some great ideas, but most importantly I have found inspiration.
Keep it up.
Ken
. It looks like a giant toy car. Must be a blast to drive on the course.I'm also jealous of how little you have to turn your steering wheel. I still have the manual box in my Nova. It's like driving a freakin' bus LOL.
I really appreciate your in depth posts. I've learned a lot, have found some great ideas, but most importantly I have found inspiration.
Keep it up.
Ken
06-08-2018, 11:56 AM
#1523
Ken you've got that right about my brother's buggy! It looks like something from Hotwheels or a Cars movie with those enormous Hoosiers on it. It gets a lot of attention and it was fun to drive!
The ratio on my box is OK. Steering wheel size helps too. My issue is the car provides almost no steering feedback with the stock powersteering setup. I want to get a faster ratio box with a heavier t-bar. Right now you can turn it with your pinky which means you feel nothing coming back from the tires. The front brakes and steering box are my highest priority go fast upgrades for next time.
Glad you enjoy the thread. It has gotten pretty far from just an LS conversion thread, but I like sharing everything here. You guys give me motivation!
06-08-2018, 02:24 PM
#1524
TECH Senior Member

Well, Bandit, I have a feeling reading about your stuff has inspired others, in turn! Good work!!
06-19-2018, 05:15 PM
#1525
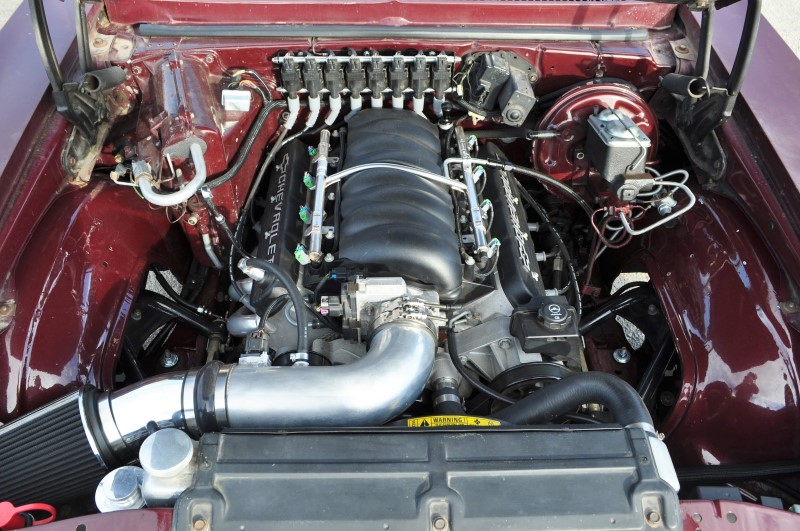
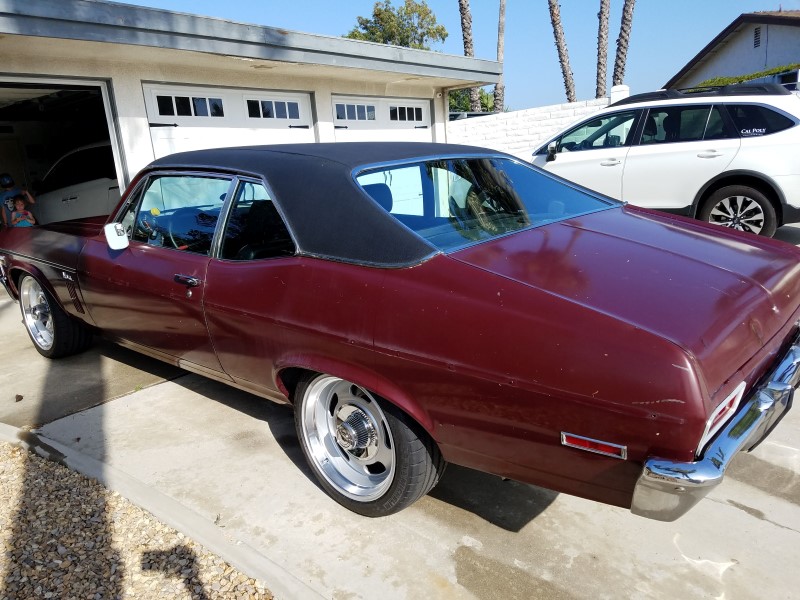
Hopped in the car the other day and just drove around town and on some backroads for over an hour. I just love driving this thing now! Snapped a few photos because sometimes I forget what's under the hood


I need to get back to my paint restoration project. I never got around to compound, polish or wax, so the initial shine wore off quickly. Problem is I want to take the side trim off beforehand and I just can't bring myself to do anything but drive and enjoy the car as it is!
I need to get back to my paint restoration project. I never got around to compound, polish or wax, so the initial shine wore off quickly. Problem is I want to take the side trim off beforehand and I just can't bring myself to do anything but drive and enjoy the car as it is!
06-19-2018, 05:37 PM
#1527
TECH Senior Member
Gotta say it AGAIN. Those wheels look so clean! Your car is what a Nova SS should have been back in the day!
06-20-2018, 11:51 AM
#1529
TECH Addict
iTrader: (27)

I have taken many ideas from your car and will be using them on mine. Ebrake cables and frame notch to name a few. Pictures are beautiful by the way. I can't wait to get mine back on the road.
06-20-2018, 11:59 AM
#1530
Here is a quick walk around video I took after a cruise a few days ago. The fuel pump has been getting noisier and noisier over time. It's especially bad when the fuel level is low like in this video. I'm wondering if the pump is smashed too tightly against the bottom of the tray or if something else is wrong in there. I may have to drop the tank soon to check things out. Other than the pump noise, you can see in the video how much patina the car actually has. It needs body work and paint but it's just not a priority.
[
06-20-2018, 01:57 PM
#1532
TECH Senior Member
Clint, this is such a long thread, I would not know where to look for your cam specs. Would you mind putting them up here again? It DOES sound so bitchin'!
06-20-2018, 02:29 PM
#1533
You mean you didn't read post #462 out of like 1500 posts spanning a decade? LOL. The cam is the old/original TSP VVT-2 manufactured by Comp Cams. The grind uses LSL lobes and the specs are 227/235 .614/.621 113LSA+6 (107ICL). The tuner adjusted the cam tables. I think TSP has updated all their grinds and started making cams in house, so what they currently refer to as a VVT-2 may not be the same as what I have.
The sound is affected by the exhaust system too and that's Doug's headers, 3" pipe, 2.5" H pipe, large case Super Turbo mufflers and over-axle tailpipes. The mufflers were really quiet when I first put them on but they've gotten louder over time.
06-20-2018, 02:40 PM
#1534
TECH Senior Member
Well, since you put the post# I guess I COULD have looked, but thanks for just putting it all here! It has a nice smooth lope, as in not a ratty-sounding one. Thanks for taking ALL of us on a ride thru the cones!
06-21-2018, 11:19 AM
#1536

Clint,
All the engine bay needs now is a VA. a/c system. GM made the A/C suitcases so damn big and fugly. Do you recall what brand of muffles you installed? Sounds great.
All the engine bay needs now is a VA. a/c system. GM made the A/C suitcases so damn big and fugly. Do you recall what brand of muffles you installed? Sounds great.
06-21-2018, 12:54 PM
#1537
This document explains how the factory system works: http://thefirstgensite.com/library/6...ce/FI67S1B.pdf
07-09-2018, 11:41 AM
#1538
A few months ago I started a quest to restore my paint. I managed to wash, clay, and glaze the car, which made the paint look a whole lot better. I stopped working on it because I didn't have time to do it the way I wanted. Last week I finally had some free time off so I decided to get back into it. I really wanted to pull off the side body moldings so I could do a better job cutting the paint so off they came!

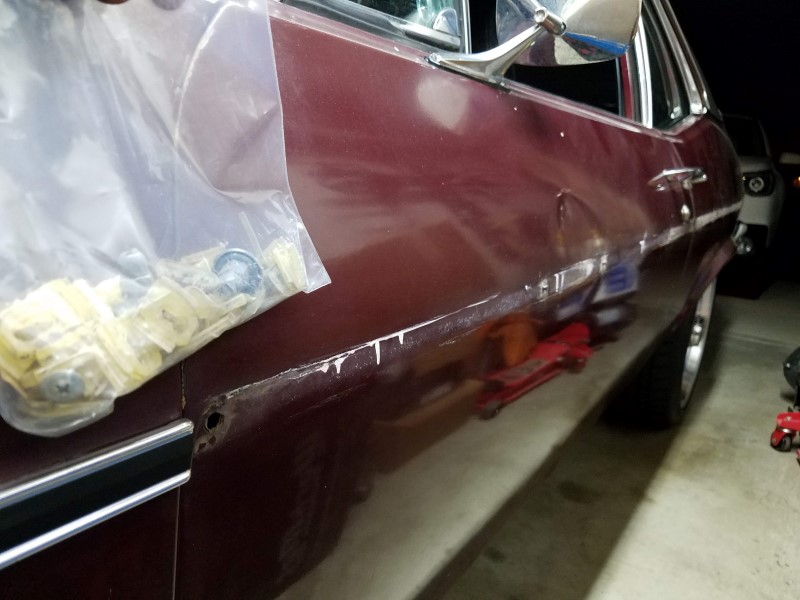

For the most part, the moldings attach to clips like the one pictured above, but before you can get the trim off the clips you have to take off a few fasteners. The quarter molding has one stud at the very back whose nut needs to be removed from inside of the trunk. The doors have screws at the front and rear (total 2 per door) which you can access just by opening the door (no need to remove the door panel. The fenders are a different story; they have studs the entire length that can only be removed from inside of the fender. To get the trim off the plastic clips, I gripped the trim carefully with my fingers and while pulling upward, I pulled/tilted the top away from the car. They sort of unsnapped.
As I mentioned, the fender trim is attached from the inside, so I dropped the inner fender and attempted to take them off.

As it turns out I could get to all the nuts except a couple which were blocked by the cowl. I tried snaking my fingers in from the door hinge area, but there was no way I could get them off without removing the fender from the car. The same held for the "Nova" emblem and decorative "gills" - no way to get them off without taking off the fender. I decided I had gone far enough and I would just have to work around these things. Out the car came for a fresh strip wash.

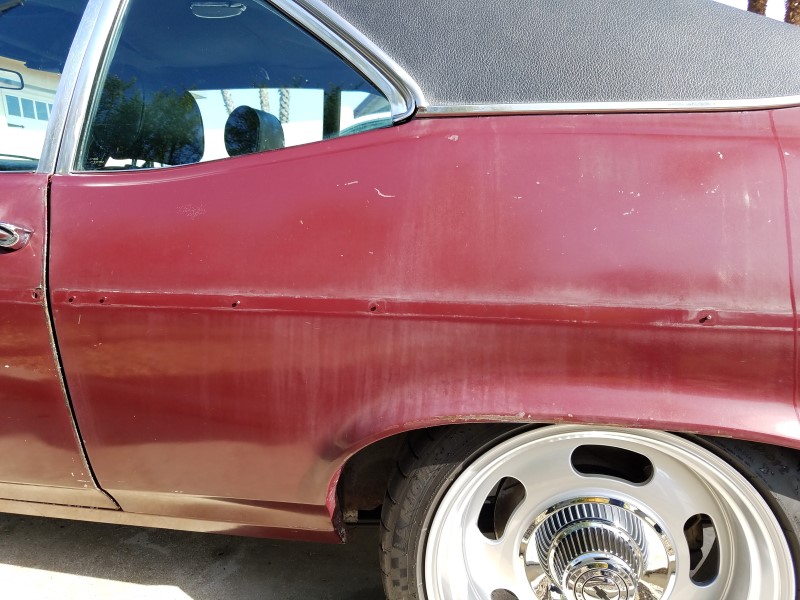
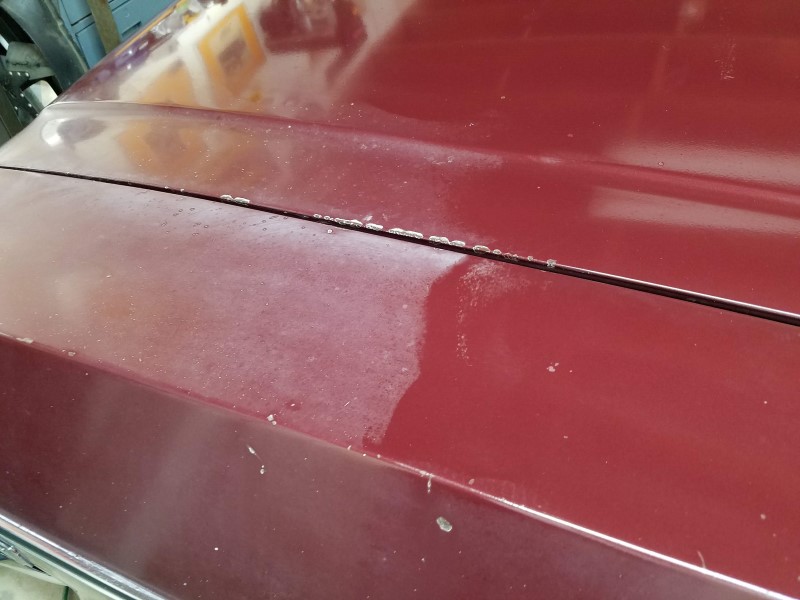
I think of my car as a "fifteen footer" because it looks and photographs well from about 15 ft, but anything closer and you start to see why I need to work on this paint. Case in point: take a look at the oxidation and/or deposits on the driver's side quarter panel.
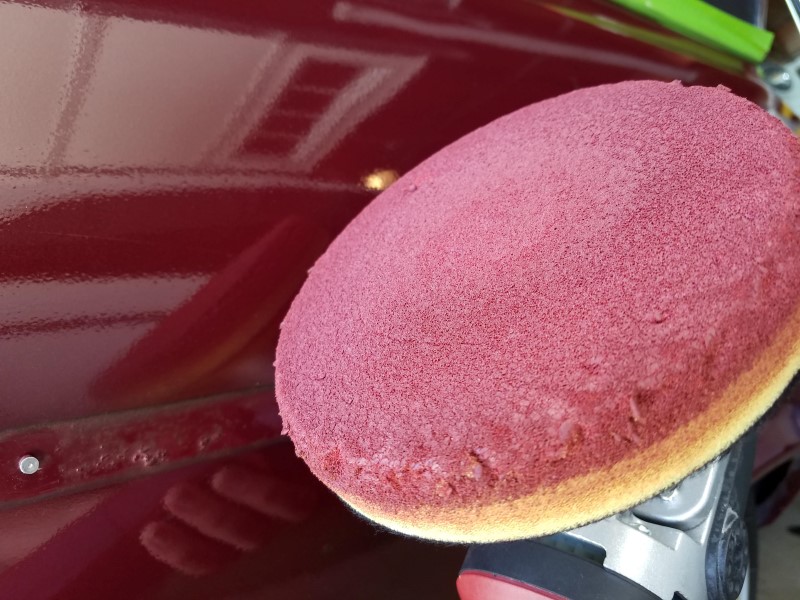
With the car clean, it was time to break out the detailing tools again. My goal was to "cut" the paint, which basically means using compound and aggressive pads to cut through oxidation and deep defects. I am using a Harbor Freight DA polisher, but I've added a Lake Country 5" backing plate because the one that comes with the polisher is junk.

Shown below are some of my Lake Country foam pads, 6" dia x 0.875in thick. The white one is a polishing pad and the orange is a medium cutting pad. After some experimentation, I decided to go with a more aggressive yellow cutting pad.

For product, I decided to try Meguiars Ultimate Compound

And with that, off to cutting!
Working with the DA polisher is a somewhat new thing for me so bear with me. First I drizzled some compound onto the pad; roughly 4 or 5 dime size drops. Then with the DA off, I pressed the pad against a few places on the car to dab the compound onto the panel, working in roughly a 2ft x 2ft area. Then I put the DA on a very low speed setting (just over "1") to do a quick spread of the compound over the area I'll be working on. Finally, with the pad still against the car, I dial up the speed to setting "3" and move slowly (as shown in the video) in overlapping passes, first going horizontal, then vertical, and repeating. I found about 6 passes (3 hor, 3 ver) with moderate pressure worked in most areas. I came back over some where there was stubborn oxidation. One thing that helped was to mark a black Sharpie line onto my backing plate so I could monitor rotation of the pad. Sometimes if you tilt the pad or don't apply enough pressure, the pad will stop rotating and only orbit (the "dual action" is to both rotate and orbit and you want both!) so this line helped me keep an eye on things. Once finished with my 2x2ish area, I turn off the polisher while it's still held against the body (so it doesn't spin freely and splatter compound everywhere), then I go over the panel with a microfiber to remove remaining compound residue. Occasionally I ended up with some stubborn compound residue that was very hard to remove by hand. I found a sprits of distilled water took it right off. Repeat, repeat, repeat all over the car!
For the most part, the moldings attach to clips like the one pictured above, but before you can get the trim off the clips you have to take off a few fasteners. The quarter molding has one stud at the very back whose nut needs to be removed from inside of the trunk. The doors have screws at the front and rear (total 2 per door) which you can access just by opening the door (no need to remove the door panel. The fenders are a different story; they have studs the entire length that can only be removed from inside of the fender. To get the trim off the plastic clips, I gripped the trim carefully with my fingers and while pulling upward, I pulled/tilted the top away from the car. They sort of unsnapped.
As I mentioned, the fender trim is attached from the inside, so I dropped the inner fender and attempted to take them off.
As it turns out I could get to all the nuts except a couple which were blocked by the cowl. I tried snaking my fingers in from the door hinge area, but there was no way I could get them off without removing the fender from the car. The same held for the "Nova" emblem and decorative "gills" - no way to get them off without taking off the fender. I decided I had gone far enough and I would just have to work around these things. Out the car came for a fresh strip wash.
I think of my car as a "fifteen footer" because it looks and photographs well from about 15 ft, but anything closer and you start to see why I need to work on this paint. Case in point: take a look at the oxidation and/or deposits on the driver's side quarter panel.
With the car clean, it was time to break out the detailing tools again. My goal was to "cut" the paint, which basically means using compound and aggressive pads to cut through oxidation and deep defects. I am using a Harbor Freight DA polisher, but I've added a Lake Country 5" backing plate because the one that comes with the polisher is junk.
Shown below are some of my Lake Country foam pads, 6" dia x 0.875in thick. The white one is a polishing pad and the orange is a medium cutting pad. After some experimentation, I decided to go with a more aggressive yellow cutting pad.
For product, I decided to try Meguiars Ultimate Compound
And with that, off to cutting!
Working with the DA polisher is a somewhat new thing for me so bear with me. First I drizzled some compound onto the pad; roughly 4 or 5 dime size drops. Then with the DA off, I pressed the pad against a few places on the car to dab the compound onto the panel, working in roughly a 2ft x 2ft area. Then I put the DA on a very low speed setting (just over "1") to do a quick spread of the compound over the area I'll be working on. Finally, with the pad still against the car, I dial up the speed to setting "3" and move slowly (as shown in the video) in overlapping passes, first going horizontal, then vertical, and repeating. I found about 6 passes (3 hor, 3 ver) with moderate pressure worked in most areas. I came back over some where there was stubborn oxidation. One thing that helped was to mark a black Sharpie line onto my backing plate so I could monitor rotation of the pad. Sometimes if you tilt the pad or don't apply enough pressure, the pad will stop rotating and only orbit (the "dual action" is to both rotate and orbit and you want both!) so this line helped me keep an eye on things. Once finished with my 2x2ish area, I turn off the polisher while it's still held against the body (so it doesn't spin freely and splatter compound everywhere), then I go over the panel with a microfiber to remove remaining compound residue. Occasionally I ended up with some stubborn compound residue that was very hard to remove by hand. I found a sprits of distilled water took it right off. Repeat, repeat, repeat all over the car!
07-09-2018, 12:02 PM
#1539
I was blown away at the results of cutting the oxidation off this old paint. It's hard to explain the magnitude of the change, so here are some videos that really show the difference.
Hood 50/50
Door 50/50
Trunk 50/50
In addition to the videos, here are some photos. The tops of the fenders were pretty bad - no more!
Trunk chalk be gone!

Quarter panel vs. door.

The edges of my pad got a little chewed up as I occasionally hit the nubs/studs that retain the side molding clips. I occasionally cleaned off the pad to remove spent compound.
Hood 50/50
Door 50/50
Trunk 50/50
In addition to the videos, here are some photos. The tops of the fenders were pretty bad - no more!
Trunk chalk be gone!
Quarter panel vs. door.
The edges of my pad got a little chewed up as I occasionally hit the nubs/studs that retain the side molding clips. I occasionally cleaned off the pad to remove spent compound.
07-09-2018, 12:10 PM
#1540
TECH Senior Member
Well, crap Clint! You're gonna get that thing looking SO cherry you won't wanna race it, or nothin'! Might get rubber dust stuck to the paint, and MAYBE a bug or two's gonna hit it in the meantime! Yep, that's it, trailer queen status... LOL Couldn't resist.... That thing's gonna look GOOD while smokin' the troops thru the cones!