
'70 Nova LY6/TH400 6.0VVT
 08-12-2019, 11:19 AM
#1721

Next up I needed to address brake lines. The process started with straitening out some 3/16" brake line tubing using my time-tested, vise-based door roller straightener.

I probably could have cut and reflared the lines going to the front wheels to mate up with the new location of the master/distribution block, but the flare nut out by the wheel was rounded off badly. I decided to fished out the lines and replace them completely. I laid the old line out on the concrete and transferred bend locations one at a time to replicate the original path.

While they are not absolutely required, I like the original spaghetti look and installation flexibility provided by spiral loops in the line.

Based on my measurements of the old and new setups, the lines needed to shift down about 2in and forward about 2".


Here is the completed line for crossing under the engine to the passenger side.

For flaring, I am using an Eastwood brake flaring tool. These use 45deg inverted flares which take two steps to form. Step 1 makes a sort of bubble flare.

Step 2 inverts that flare into a 45deg contact angle.

This is what it looks like when completed. This tool has always produced a really nice, concentric flare for me without the tube slipping. I highly recommend!

Here is the start of the driver's side line which is much shorter. I snapped this picture to show the hand bending pliers I got from Eastwood that I used for most of the bending on these lines. They allow you to place a bend very close to a completed end, which was needed in several locations and makes for tighter fitting lines.

I also made new lines to connect the new master to the distribution block and from the distribution block to the rear proportioning valve. They aren't perfect and it came out looking a bit jumbled, but that's partly a consequence of using the original distribution block. If you just use a basic tee for the front lines or a combination valve, you can reduce the number of connections and lines for a cleaner look.


It's probably worth noting that the rear port on his master feeds the front brakes. This required some cross-over on the lines.


I'm happy with the completed lines. The brake swap is just about done. I hope to wrap up and bleed the brakes in the next few days. Let's hope there aren't any unexpected snags!
I probably could have cut and reflared the lines going to the front wheels to mate up with the new location of the master/distribution block, but the flare nut out by the wheel was rounded off badly. I decided to fished out the lines and replace them completely. I laid the old line out on the concrete and transferred bend locations one at a time to replicate the original path.
While they are not absolutely required, I like the original spaghetti look and installation flexibility provided by spiral loops in the line.
Based on my measurements of the old and new setups, the lines needed to shift down about 2in and forward about 2".
Here is the completed line for crossing under the engine to the passenger side.
For flaring, I am using an Eastwood brake flaring tool. These use 45deg inverted flares which take two steps to form. Step 1 makes a sort of bubble flare.
Step 2 inverts that flare into a 45deg contact angle.
This is what it looks like when completed. This tool has always produced a really nice, concentric flare for me without the tube slipping. I highly recommend!
Here is the start of the driver's side line which is much shorter. I snapped this picture to show the hand bending pliers I got from Eastwood that I used for most of the bending on these lines. They allow you to place a bend very close to a completed end, which was needed in several locations and makes for tighter fitting lines.
I also made new lines to connect the new master to the distribution block and from the distribution block to the rear proportioning valve. They aren't perfect and it came out looking a bit jumbled, but that's partly a consequence of using the original distribution block. If you just use a basic tee for the front lines or a combination valve, you can reduce the number of connections and lines for a cleaner look.
It's probably worth noting that the rear port on his master feeds the front brakes. This required some cross-over on the lines.
I'm happy with the completed lines. The brake swap is just about done. I hope to wrap up and bleed the brakes in the next few days. Let's hope there aren't any unexpected snags!


The following users liked this post:
-TheBandit- (08-13-2019)
08-16-2019, 04:10 PM
#1723
Installed the passenger side brake pads and stainless hose. Confirmed the hose is okay at full lock.


I also very quickly assembled the driver's side hub and caliper bracket. I though it would be a good idea to snap a photo of the brake pad install. With these calipers, you can remove the top bolt going into the slider pin and tilt the caliper down to install the pads into the abutments. This is WAY easier than the original 1970 setup where you have to load the pads into the calipers and handle all 3 at once as you put them on. I put high temp brake grease on all the sliding surfaces and where the pistons and caliper make contact with the pads. I also put the wear indicator on the inside pad at the bottom so I can easily check for wear without pulling off the wheel/tire. These are Hawk HPS pads which is the compound I ran on the old front brakes and the current rear.


I also think it's worth mentioning I use torque wrenches for all critical fastners (of which I feel steering and brakes are included!). I have a 3/8" drive in-lb torque wrench that I use for stuff under around 25ft-lb like the banjo bolts on the caliper hose and a larger 1/2" drive I use for all the big stuff. I like the clicker type wrenches. I also own a digital torque wrench but feel like it's a lot easier to overtorque with those even though they beep like crazy. For really light stuff like checking bearing preloads I use a tiny 1/4" beam type wrench, but I didn't need that for anything here.

Finally I was ready to bleed the brakes. My system used to have DOT5 silicon brake fluid in it and I decided to switch to DOT3 glycol based fluid. This was a good time to do it since I have new front calipers, lines and master and there will be less cross contamination. Before I pulled the old master off, I bled the old system with some DOT3 then I blew out the lines with compressed air. There is probably some trace DOT5 silicon left in the old rear lines and calipers, but I have done a lot of research and I think the concerns over switching back from DOT5 to DOT3 are overblown. Silicon fluid and glycol do not mix (they are immiscible just like water and oil), but I have not seen objective evidence that the two will cause problems when mixed. I have, however, seen very clear evidence that petroleum distillates (like brake cleaner or mineral spirits) will interact with rubbers and seals, so I avoided using anything like that to flush the lines. I figure blowing out the lines with compressed air and then flushing the lines with DOT3 is the safest way to clear old DOT5 out of the system. I plan to flush them again after some driving to clear out any residual moisture or DOT5 that's become entrapped in the new fluid.
With that explanation out of the way, let me introduce you to my new favorite method of brake bleeding:

I finally got to use my new Motive pressure-based brake bleeder and I am completely sold. The short process is as follows: top the master with fluid, screw on the cap, pump up (I used 10psi but you can supposedly go up to 15psi on this master), and then go to the wheel to open the bleeder. Keep an eye on fluid in the master and when it gets low, you can loosen the Motive gap/pump to bleed off pressure, refill the master and repeat. I found this thing worked great and saved me a ton of time. The only issue I had was the metal cap adapter I'm using, which is specified for late model GM masters, doesn't fit the "threads" (3 slots/tabs) in the reservoir very well. It still worked just not a great fit.
Here's a video
It's kinda cool to see fluid through the side of this master, unlike my old cast master where I had to pull off the cap to see what's going on. Here you can see how the master is divided for front and rear. In this case the rear part of the reservoir, which feeds the front brakes, is low on fluid due to where I was at in the bleeding process.

With the brakes bled, I had my 8yo help me torque on the wheels and went for a little test drive. It felt so good to be back in the car!


I managed to take the car out for two drives now: a quick putt around the block and then a few mile stint to bed the pads. Late in the second drive, I found a parking lot with good pavement and managed to get the proportioning valve adjusted so the fronts just lock before the rears - that took a little help from slow motion video on my phone which I'll upload when I have time.
On the first drive, I was really unhappy with how sensitive the brakes felt at initial pedal travel. It felt like the booster was taking the pedal from my foot and doing all the braking (not literally, but just a feeling like very little pedal input resulted in a lot of initial braking). This got better with bedding the pads and adjusting the prop valve to add more rear braking. It got better, but I'm not sure I like it yet. It feels like it just has a lot of boost and less modulation on initial pedal application, although I feel like it modulates okay after that. I also feel like the pedal is very slightly slow (milliseconds) to return when releasing, so I will double check that the compensating port is clear open and nothing is getting hung up. It may just be a feeling of having more booster than I had before. I will investigate.
I also very quickly assembled the driver's side hub and caliper bracket. I though it would be a good idea to snap a photo of the brake pad install. With these calipers, you can remove the top bolt going into the slider pin and tilt the caliper down to install the pads into the abutments. This is WAY easier than the original 1970 setup where you have to load the pads into the calipers and handle all 3 at once as you put them on. I put high temp brake grease on all the sliding surfaces and where the pistons and caliper make contact with the pads. I also put the wear indicator on the inside pad at the bottom so I can easily check for wear without pulling off the wheel/tire. These are Hawk HPS pads which is the compound I ran on the old front brakes and the current rear.
I also think it's worth mentioning I use torque wrenches for all critical fastners (of which I feel steering and brakes are included!). I have a 3/8" drive in-lb torque wrench that I use for stuff under around 25ft-lb like the banjo bolts on the caliper hose and a larger 1/2" drive I use for all the big stuff. I like the clicker type wrenches. I also own a digital torque wrench but feel like it's a lot easier to overtorque with those even though they beep like crazy. For really light stuff like checking bearing preloads I use a tiny 1/4" beam type wrench, but I didn't need that for anything here.
Finally I was ready to bleed the brakes. My system used to have DOT5 silicon brake fluid in it and I decided to switch to DOT3 glycol based fluid. This was a good time to do it since I have new front calipers, lines and master and there will be less cross contamination. Before I pulled the old master off, I bled the old system with some DOT3 then I blew out the lines with compressed air. There is probably some trace DOT5 silicon left in the old rear lines and calipers, but I have done a lot of research and I think the concerns over switching back from DOT5 to DOT3 are overblown. Silicon fluid and glycol do not mix (they are immiscible just like water and oil), but I have not seen objective evidence that the two will cause problems when mixed. I have, however, seen very clear evidence that petroleum distillates (like brake cleaner or mineral spirits) will interact with rubbers and seals, so I avoided using anything like that to flush the lines. I figure blowing out the lines with compressed air and then flushing the lines with DOT3 is the safest way to clear old DOT5 out of the system. I plan to flush them again after some driving to clear out any residual moisture or DOT5 that's become entrapped in the new fluid.
With that explanation out of the way, let me introduce you to my new favorite method of brake bleeding:
I finally got to use my new Motive pressure-based brake bleeder and I am completely sold. The short process is as follows: top the master with fluid, screw on the cap, pump up (I used 10psi but you can supposedly go up to 15psi on this master), and then go to the wheel to open the bleeder. Keep an eye on fluid in the master and when it gets low, you can loosen the Motive gap/pump to bleed off pressure, refill the master and repeat. I found this thing worked great and saved me a ton of time. The only issue I had was the metal cap adapter I'm using, which is specified for late model GM masters, doesn't fit the "threads" (3 slots/tabs) in the reservoir very well. It still worked just not a great fit.
Here's a video
It's kinda cool to see fluid through the side of this master, unlike my old cast master where I had to pull off the cap to see what's going on. Here you can see how the master is divided for front and rear. In this case the rear part of the reservoir, which feeds the front brakes, is low on fluid due to where I was at in the bleeding process.
With the brakes bled, I had my 8yo help me torque on the wheels and went for a little test drive. It felt so good to be back in the car!
I managed to take the car out for two drives now: a quick putt around the block and then a few mile stint to bed the pads. Late in the second drive, I found a parking lot with good pavement and managed to get the proportioning valve adjusted so the fronts just lock before the rears - that took a little help from slow motion video on my phone which I'll upload when I have time.
On the first drive, I was really unhappy with how sensitive the brakes felt at initial pedal travel. It felt like the booster was taking the pedal from my foot and doing all the braking (not literally, but just a feeling like very little pedal input resulted in a lot of initial braking). This got better with bedding the pads and adjusting the prop valve to add more rear braking. It got better, but I'm not sure I like it yet. It feels like it just has a lot of boost and less modulation on initial pedal application, although I feel like it modulates okay after that. I also feel like the pedal is very slightly slow (milliseconds) to return when releasing, so I will double check that the compensating port is clear open and nothing is getting hung up. It may just be a feeling of having more booster than I had before. I will investigate.
09-09-2019, 11:42 AM
#1724
As promised, here is one of dozens of slow motion videos I took while adjusting the brake bias (w/ proportioning valve). I adjusted in 1 turn increments until the rear locked before the front, then I adjusted back in 1/2 turn increments until I found the sweet spot where the front would just lock before the rear. Definitely feels wild when the rear locks first - the rear wants to swing around so the car starts feeling very sketchy. When the fronts lock first, the car is stable and stops in a nice straight line as shown in the video.
I continue to drive the car. here are some photos I've snapped over the last month or so.

Small compared to modern cars...


Finally got a photo of me with the car at one of my favorite spots.


Also had a local artist Darren Hitchens (@hitchensartwork on Instagram) do a really cool sketch of my car aka the "Cone Killer"

The night I was out adjusting brake bias, I came home to find one of my center caps missing.

I remembered hearing a "clink" while I was driving, so I drove back to the spot and...
I was so happy I found it relatively unscathed.

After that I went around and added Loctite to all the center cap screws.
I continue to drive the car. here are some photos I've snapped over the last month or so.
Small compared to modern cars...
Finally got a photo of me with the car at one of my favorite spots.
Also had a local artist Darren Hitchens (@hitchensartwork on Instagram) do a really cool sketch of my car aka the "Cone Killer"
The night I was out adjusting brake bias, I came home to find one of my center caps missing.
I remembered hearing a "clink" while I was driving, so I drove back to the spot and...
I was so happy I found it relatively unscathed.
After that I went around and added Loctite to all the center cap screws.
09-09-2019, 12:00 PM
#1725
As I mentioned earlier, I noticed a few times while driving that the brakes felt just a tad slow to release. One thing I decided to recheck was the clearance with the firewall hole and the brake booster bellows/boot. As it turns out the boot was catching on the firewall hole. Sometimes I found it on one side of the hole or the other after a drive, so it was definitely getting hung up.
I decided to stop rolling the dice and take my booster out to resolve the issue. Thankfully with all the brake line service loops I put in, the brake lines were flexible enough to move the master forward and get the booster out without opening up the lines. No need to rebleed the brakes!


While I was in there, I decided to get the proper tool for checking master/booster pushrod clearance. A long while back when I put this master and booster together for the first time, I noticed through the compensating port that the piston was moving as I tightened the master to the booster. To identify how much interference there was, I added shims between the the master and booster until I no longer observed movement when tightening them together. Then I took the shim thickness and ground off approximately that thickness from the pushrod. It was a considerable amount of interference - I want to say around .100in - and I wanted to make sure I had at least 0.020in clearance, so I had to take quite a bit off the pushrod. I was really curious to see if I'd taken off too little or too much. So I got the tool on Amazon (search "Power Brake Booster Pin Adjustment Tool").


Using feeler gauges I found I have about 0.040in clearance, which should be good. I've read anywhere from 0.20min to around 1/16th (0.063in) is ideal.
Next, I had to decide how to fix the clearance issue with the firewall hole. Doing a little research, I found Detroid Speed Engineering sells a booster/master combination that uses a custom boot and seal plate. I called them up and asked if I could buy just the boot and seal plate, since I already have their booster brackets. They sent me part numbers 99050028 and 99050030. Perfect! This boot just takes up the space between the booster and firewall while providing a watertight seal at both ends. It allows the booster pushrod to move freely inside.

Here is the "old" bellows that protruded through the firewall and moved with the pushrod

Here is the "new" DSE seal and seal plate that allow the pushrod to move freely inside.

When bolted up to the firewall, everything is watertight.

I just got that together last night so I haven't had a chance to drive it yet, but I'm hopeful this resolves some of my brake feel and slow return issues.
I decided to stop rolling the dice and take my booster out to resolve the issue. Thankfully with all the brake line service loops I put in, the brake lines were flexible enough to move the master forward and get the booster out without opening up the lines. No need to rebleed the brakes!
While I was in there, I decided to get the proper tool for checking master/booster pushrod clearance. A long while back when I put this master and booster together for the first time, I noticed through the compensating port that the piston was moving as I tightened the master to the booster. To identify how much interference there was, I added shims between the the master and booster until I no longer observed movement when tightening them together. Then I took the shim thickness and ground off approximately that thickness from the pushrod. It was a considerable amount of interference - I want to say around .100in - and I wanted to make sure I had at least 0.020in clearance, so I had to take quite a bit off the pushrod. I was really curious to see if I'd taken off too little or too much. So I got the tool on Amazon (search "Power Brake Booster Pin Adjustment Tool").
Using feeler gauges I found I have about 0.040in clearance, which should be good. I've read anywhere from 0.20min to around 1/16th (0.063in) is ideal.
Next, I had to decide how to fix the clearance issue with the firewall hole. Doing a little research, I found Detroid Speed Engineering sells a booster/master combination that uses a custom boot and seal plate. I called them up and asked if I could buy just the boot and seal plate, since I already have their booster brackets. They sent me part numbers 99050028 and 99050030. Perfect! This boot just takes up the space between the booster and firewall while providing a watertight seal at both ends. It allows the booster pushrod to move freely inside.
Here is the "old" bellows that protruded through the firewall and moved with the pushrod
Here is the "new" DSE seal and seal plate that allow the pushrod to move freely inside.
When bolted up to the firewall, everything is watertight.
I just got that together last night so I haven't had a chance to drive it yet, but I'm hopeful this resolves some of my brake feel and slow return issues.
09-10-2019, 04:57 AM
#1726

Don�t you like it when fixes have all ready been designed and brought to the market? Turned out to be a easy fix. How�s the price from DSE?
09-11-2019, 11:00 AM
#1727
The price was more than reasonable for what looks to be a custom molded DSE part (has their part number molded in). It's not directly on their website so you'd have to call for info and pricing.
I took the car out last night and hallelujah, this resolved my braking woes! The pedal releases immediately now and no longer feels touchy/sensitive on initial application. I suspect the bellows interference must have been putting a strange input force on the booster, causing weird stuff to happen. Now it acts like it should and I can modulate the brakes properly. I do have some pull to the right under hard braking, so I will need to investigate. Perhaps the left caliper is bound up a bit. These were used calipers after. More to look into.
I took the car out last night and hallelujah, this resolved my braking woes! The pedal releases immediately now and no longer feels touchy/sensitive on initial application. I suspect the bellows interference must have been putting a strange input force on the booster, causing weird stuff to happen. Now it acts like it should and I can modulate the brakes properly. I do have some pull to the right under hard braking, so I will need to investigate. Perhaps the left caliper is bound up a bit. These were used calipers after. More to look into.
09-11-2019, 05:08 PM
#1728
Glad it worked out for you Clint. hopefully the careful documentation you provided will help someone else.
01-23-2020, 01:57 PM
#1729
After over 2 years with the Procar seats, I finally came to the realization that they just plain sat too high for my liking. It wasn't so much an issue of headroom (although it was tight with a helmet on), but rather I just felt like I rode too high in the car, looking out of the top of the windshield. I still really like the seats, so I decided to do something about it.,
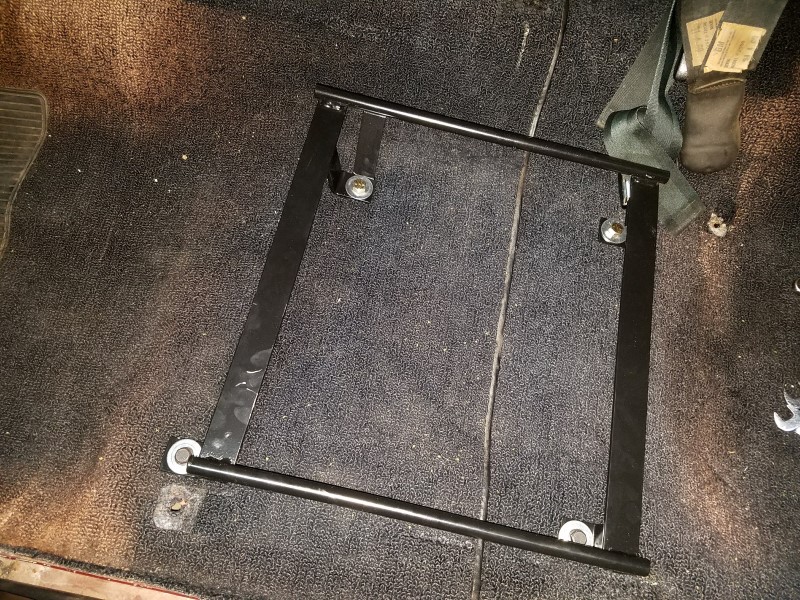
The Procar seats mount on a pair of sliders which in turn mount to a vehicle-specific mounting frame. The frame is made from 1-1/4" wide, 3/16" flat bar and a pair of 9/16" rods. The flat bar is used for crossbracing and four mounting tabs, which attach to the floor and ensure the seat is positioned and leveled appropriately. The seat sliders bolt into the neds of the 9/16" rod. Here's what the frame looks like in the car:
I decided the easiest approach to lowering the seats would be to modify the four mounting tabs on the frame. I found the most I could lower the seat would be 7/8"in, because it would put the shortest mounting tab completely against the floor. So I picked up 7/8" thick stack of washers and began making my own mounting tabs one by one to replace the old ones. My method was to bolt a new tab on with spacer washers, weld the new tab on, then cut off the old one. I made the new tabs from 3/16 flat bar with my portaband and drill press. The bolt located the hole for the new tab and the spacer washers ensured an even drop at all four mounting points. After I welded the accessible side of each new tab, I cut off the old tab, then welded the backside and ground it flat. I'll let the photos do the talking...


Here is the modified frame back in the car.

In order to take advantage of the newly-lowered mounting frame, I also had to remove the lower mounting tab positions on the seat sliders (which would have brought the seat back up)


Here is the "before" headroom for the unmodified passenger side

Here is the "after" headroom for the modified driver's side.

I'll be damn if that wasn't one of the best mods I've done in the last 2 years. It was like letting my belt out after a Thanksgiving meal - the car just fits me comfortably. I didn't fully appreciate just how uncomfortable I was. The weirdest realization was when I stopped at a traffic light and I could actually see it above me without tilting my head slightly forward to peer up. It's even easier to get into the car due to the added head space at the top of the door opening. Just goes to show the little things really count.


The Procar seats mount on a pair of sliders which in turn mount to a vehicle-specific mounting frame. The frame is made from 1-1/4" wide, 3/16" flat bar and a pair of 9/16" rods. The flat bar is used for crossbracing and four mounting tabs, which attach to the floor and ensure the seat is positioned and leveled appropriately. The seat sliders bolt into the neds of the 9/16" rod. Here's what the frame looks like in the car:
I decided the easiest approach to lowering the seats would be to modify the four mounting tabs on the frame. I found the most I could lower the seat would be 7/8"in, because it would put the shortest mounting tab completely against the floor. So I picked up 7/8" thick stack of washers and began making my own mounting tabs one by one to replace the old ones. My method was to bolt a new tab on with spacer washers, weld the new tab on, then cut off the old one. I made the new tabs from 3/16 flat bar with my portaband and drill press. The bolt located the hole for the new tab and the spacer washers ensured an even drop at all four mounting points. After I welded the accessible side of each new tab, I cut off the old tab, then welded the backside and ground it flat. I'll let the photos do the talking...
Here is the modified frame back in the car.
In order to take advantage of the newly-lowered mounting frame, I also had to remove the lower mounting tab positions on the seat sliders (which would have brought the seat back up)
Here is the "before" headroom for the unmodified passenger side
Here is the "after" headroom for the modified driver's side.
I'll be damn if that wasn't one of the best mods I've done in the last 2 years. It was like letting my belt out after a Thanksgiving meal - the car just fits me comfortably. I didn't fully appreciate just how uncomfortable I was. The weirdest realization was when I stopped at a traffic light and I could actually see it above me without tilting my head slightly forward to peer up. It's even easier to get into the car due to the added head space at the top of the door opening. Just goes to show the little things really count.
Last edited by -TheBandit-; 01-27-2020 at 02:03 PM.
01-23-2020, 02:32 PM
#1730
TECH Senior Member

Amazing how much 7/8" is, huh? YUUUUGE!! LOL
The following users liked this post:
G Atsma (01-23-2020)
01-29-2020, 02:56 PM
#1732
Clint, how tall are you?
I replaced my bench seat in my Nova with a pair of Pro Car Elite seats. The huge difference in seat height was the first thing I noticed. Mind you, the bench seat was over 40 years old so I'm sure it had some sag in it.
As noticeable as the change is I haven't found it objectionable, although I am used to driving my pickup.
Ken
01-30-2020, 09:59 AM
#1734
Clint, how tall are you?
I replaced my bench seat in my Nova with a pair of Pro Car Elite seats. The huge difference in seat height was the first thing I noticed. Mind you, the bench seat was over 40 years old so I'm sure it had some sag in it.
As noticeable as the change is I haven't found it objectionable, although I am used to driving my pickup.
01-30-2020, 08:39 PM
#1735
I'm 6'0" tall and I wear pants with a 32" inseam. This is definitely a matter of preference and individual body dimensions. Other factors like slider position and recline can contribute to the overall fitment too. For me it just felt uncomfortably tall and I became more and more aware of it as time passed, until I finally did something about it.
Ken
06-24-2020, 10:07 AM
#1736
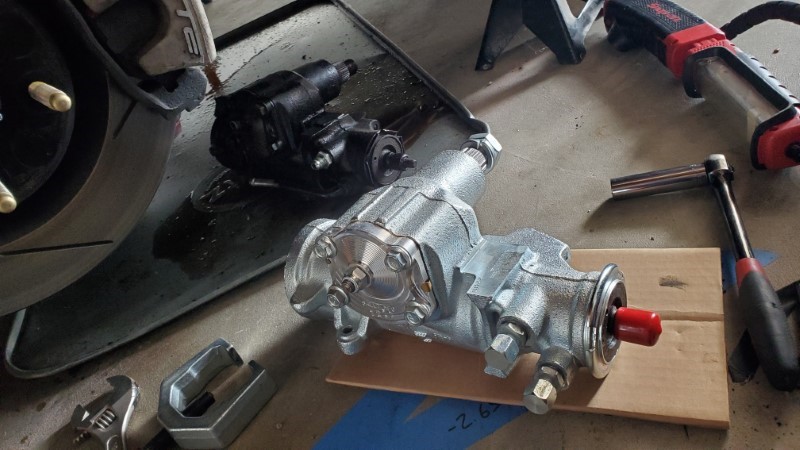
In April I finally got serious about swapping the steering box. I found a great deal on a new-in-box Sweet Manufacturing "Sportsman" 700 series 12.7:1 box with a 0.235in t-bar. For reference, many of the major "pro touring" aftermarket companies offer 12.7:1 boxes with 0.210in t-bars for this application, so a 0.235 is considered "heavy". I decided to give it a try anyway.

The first step for getting the old box out was to pull the hoses and disconnect the rag joint from the column. I used a large syringe to pull as much powersteering fluid out from the reservoir as I could before pulling the hoses, which helped minimize fluid mess.

Next off with the pitman arm using a puller. Then the 3 bolts holding the box to the frame were removed and the whole box dropped down & out.

I found the rag joint was torn in a couple places and definitely ready to go in the trash.

After putting a new rag joint onto the new box, it was lifted into place and bolted to the frame.

An important step at this point was to loosen the steering column at the firewall and under the dash so the steering column could be aligned to the steering box. Then the rag joint was attached to the steering column and finally the steering column was tightened back down.
After that the lines were reconnected, fluid added, and the system was "burped".

Finally... driving!

Wow what a difference! This completely transformed the driving experience. The feel of the heavy t-bar is just incredible - I feel so much more connected to the car. Every corners feels like a fun corner now, even just tooling around town. This "heavy" 235 tbar steering box has been one of my favorite ever upgrades to the Nova. My first impressions were filled with anxiety thinking this might be too heavy for street driving (parking, driveways etc), but now that I'm used to it I am in love with the go kart feeling. I love having a sense of what the tires are doing and I can't wait to get to a track or autocross.
Since I am trying the quick vlog thing, here are some videos I made related to the swap and driving impressions:
Pt 1: Pre-Upgrade Driving Impressions
Pt 2: Removing the Old Stereing Box
Pt 3: Post-Upgrade First Driving Impressions
The first step for getting the old box out was to pull the hoses and disconnect the rag joint from the column. I used a large syringe to pull as much powersteering fluid out from the reservoir as I could before pulling the hoses, which helped minimize fluid mess.
Next off with the pitman arm using a puller. Then the 3 bolts holding the box to the frame were removed and the whole box dropped down & out.
I found the rag joint was torn in a couple places and definitely ready to go in the trash.
After putting a new rag joint onto the new box, it was lifted into place and bolted to the frame.
An important step at this point was to loosen the steering column at the firewall and under the dash so the steering column could be aligned to the steering box. Then the rag joint was attached to the steering column and finally the steering column was tightened back down.
After that the lines were reconnected, fluid added, and the system was "burped".
Finally... driving!
Wow what a difference! This completely transformed the driving experience. The feel of the heavy t-bar is just incredible - I feel so much more connected to the car. Every corners feels like a fun corner now, even just tooling around town. This "heavy" 235 tbar steering box has been one of my favorite ever upgrades to the Nova. My first impressions were filled with anxiety thinking this might be too heavy for street driving (parking, driveways etc), but now that I'm used to it I am in love with the go kart feeling. I love having a sense of what the tires are doing and I can't wait to get to a track or autocross.
Since I am trying the quick vlog thing, here are some videos I made related to the swap and driving impressions:
Pt 1: Pre-Upgrade Driving Impressions
Pt 2: Removing the Old Stereing Box
Pt 3: Post-Upgrade First Driving Impressions
06-24-2020, 12:09 PM
#1737
TECH Senior Member
Just shows that while nice, a R & P isn't totally needed for good steering feel. Glad to see you get some improvement!
Want a windey road? Take the goat path to Ojai....
Want a windey road? Take the goat path to Ojai....
Last edited by G Atsma; 06-24-2020 at 12:30 PM.
06-24-2020, 02:03 PM
#1738
The problem with rack and pinion is that it doesn't retrofit well into this rear-steer frame. Most of the R&P conversion kits make unacceptable compromises to the steering geometry.
The following users liked this post:
G Atsma (06-24-2020)
06-24-2020, 03:01 PM
#1739
TECH Senior Member
Oh yeah for sure there are much more exciting roads to drive around here! And ever since I swapped this box I just LOVE driving them.
The problem with rack and pinion is that it doesn't retrofit well into this rear-steer frame. Most of the R&P conversion kits make unacceptable compromises to the steering geometry.
The problem with rack and pinion is that it doesn't retrofit well into this rear-steer frame. Most of the R&P conversion kits make unacceptable compromises to the steering geometry.
Hey as long as you can get good hardware like the box you got, R & P won't be missed nearly as much.