
1965 Skylark LQ9 Retrofit / Swap - Build Thread


 12-03-2010, 12:06 AM
#23
12-03-2010, 07:38 AM
#24
As for the pushrods, I was quite surprised to see factory preload on this engine at .130". After installing the new camshaft, I used the comp cams pushrod checker to determine the appropriate length to obtain .080" - .100" preload. Here is a thread that I started on my findings and choosing the correct pushrods:
https://ls1tech.com/forums/generatio...r-preload.html
In searching for tidy solution to the air bleed line configuration, I found this nice little set up in another build thread. It is already made and at a great price ($38):
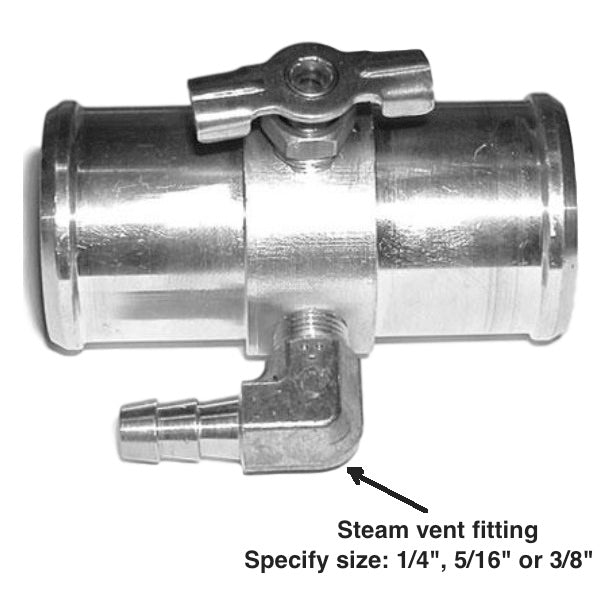
This company also solved another problem for me. The LQ9 coolant outlet pipe is 1 5/16" and my radiator is 1 9/16". Jags that Run also makes transitional cooling system tee/bleeder assemblies. So, I just ordered a 1 5/16" x 1 9/16" x 1/4" bleeder and viola! Problems solved.
Here is where to get it:
http://www.jagsthatrun.com/Pages/Par...g_LSI-tee.html
Now, if the local auto parts store will just let me dig through their hoses til' I find just the right ones.
 12-04-2010, 07:35 PM
#26
All we are waiting on at this point is the Mast oil pan. The latest promise date is the week of Christmas. I have been trying to be as thorough as possible and I think I have everything except for hoses. I am anxious to experience what all the LSX hubub is about.
I picked up the LS6 valley cover today. Many threads I have read say these do a much better job of controlling oil in the PCV system and reduce oil consumption. I am all for that.
A note for LQ4/LQ9 guys contemplating the LS6 valley cover: My iron block did not require the cutting that has been noted by some of the LS1 guys who have done the conversion. The valley cover was a drop-in replacement.
I will tell you that these valley covers are damn heavy. It weighs over 3 pounds.
Mast posted on their Facebook page that 15 oil pans will be ready for shipping the end of next week! So, I called and put down my money. Chris at Mast said the pan utilized the LS3 dipstick as used in the 2010 and up Camaros. So, I will need to order that assembly tomorrow.
That is the last piece of the puzzle for me. Once that pan arrives, I can start the swap anytime.
Now, I just have to decide if I am going to buy the BRP mid-length headers. I looked over the factory manifolds and they are actually pretty impressive for a factory piece. And, both of them together only weigh 27 lbs. I just don't know that there is that much to be gained for $500.
12-07-2010, 04:34 PM
#27
Mast posted on their Facebook page that 15 oil pans will be ready for shipping the end of next week! So, I called and put down my money. Chris at Mast said the pan utilized the LS3 dipstick as used in the 2010 and up Camaros. So, I will need to order that assembly tomorrow.
That is the last piece of the puzzle for me. Once that pan arrives, I can start the swap anytime.
Now, I just have to decide if I am going to buy the BRP mid-length headers. I looked over the factory manifolds and they are actually pretty impressive for a factory piece. And, both of them together only weigh 27 lbs. I just don't know that there is that much to be gained for $500.
12-07-2010, 04:59 PM
#28
http://www.carcraft.com/techarticles...o_numbers.html
For the record, I don't want to get into a long tube vs mid-tube vs short tube header discussion on this build thread. There are plenty of those epic threads already.
I have chosen not to go with long tubes for this build because the best long tubes I have seen for 64/65 A-bodies are the Edelbrocks and from what I have seen in person, I do not care for the ground clearance or the inability to service the starter without removing the right header. That is the reason I am considering the mid-length design. And, BRP seems to be the only player for mid-length 64/65 A-body headers.
Last edited by speedtigger; 01-10-2011 at 10:38 AM.
12-07-2010, 05:57 PM
#30
I am using the Corporate 10 bolt 8.5" out of a 71 Skylark. You can see my entire build parts list in this post:
https://ls1tech.com/forums/14092457-post13.html
A little bump in the parts progress today. I was waiting for my Derale 16789 fan controller to be shipped from the manufacturer this week. However, I found out today, that the product is "still in development". Say what?
Summit sold me a part that did not even exist yet! They told me they are expecting it to be done around the end of January.
So, I cancelled that order and I am back on the business of selecting a new fan control system for my Taurus fan. I need a set up that can handle the amperage draw of the Taurus fan, can control both fan speeds and have an override for the air conditioning once it is added.
I could probably build one out of regular auto parts stores relays if I had a good diagram/design to work from.
Painless wiring has a solution, but it is $250 bux.
Decisions decisions.
I am thinking about just building a fan control system out of off the shelf relays. Texas Industrial Electric offered this design diagram as a solution:
Well, I guess old school guys can have a cold air kit too. I don't know if I will run this all the time, maybe just track days. But, I bought this Spectre ram air kit so damn cheap on ebay, I could not pass it up!
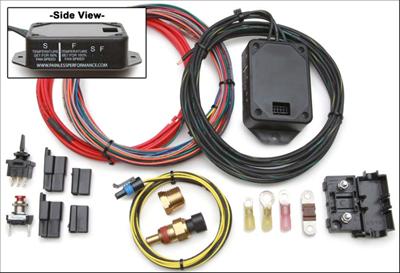
After a lot of deliberation, I have chosen to go with the Painless Wiring fan controller system #PRF-30141. While I would have preferred to use a relay set up made from off the shelf parts, but the simplicity of this system won me over.
The feature that sunk the deal for me was the fact that it utilizes the factory temperature sensor. Other features include: soft on, variable speed and built in provisions for a/c and a manual overide. Now I don't have to drill the heads or the water pump for switches. It is expensive, but it is just too clean and easy.
Yesterday, I plumbed the on-engine portion of the fuel system. As you will notice, there are no high dollar fittings anywhere. I like my fuel systems the old school OEM way.
https://ls1tech.com/forums/14092457-post13.html
A little bump in the parts progress today. I was waiting for my Derale 16789 fan controller to be shipped from the manufacturer this week. However, I found out today, that the product is "still in development".
Say what?Summit sold me a part that did not even exist yet! They told me they are expecting it to be done around the end of January.
So, I cancelled that order and I am back on the business of selecting a new fan control system for my Taurus fan. I need a set up that can handle the amperage draw of the Taurus fan, can control both fan speeds and have an override for the air conditioning once it is added.
I could probably build one out of regular auto parts stores relays if I had a good diagram/design to work from.
Painless wiring has a solution, but it is $250 bux.
Decisions decisions.
I am thinking about just building a fan control system out of off the shelf relays. Texas Industrial Electric offered this design diagram as a solution:
Well, I guess old school guys can have a cold air kit too.
I don't know if I will run this all the time, maybe just track days. But, I bought this Spectre ram air kit so damn cheap on ebay, I could not pass it up!After a lot of deliberation, I have chosen to go with the Painless Wiring fan controller system #PRF-30141. While I would have preferred to use a relay set up made from off the shelf parts, but the simplicity of this system won me over.
The feature that sunk the deal for me was the fact that it utilizes the factory temperature sensor. Other features include: soft on, variable speed and built in provisions for a/c and a manual overide. Now I don't have to drill the heads or the water pump for switches. It is expensive, but it is just too clean and easy.
Yesterday, I plumbed the on-engine portion of the fuel system. As you will notice, there are no high dollar fittings anywhere. I like my fuel systems the old school OEM way.
12-16-2010, 07:13 PM
#31
TECH Fanatic
iTrader: (14)
Join Date: Mar 2007
Location: Phoenix/Tempe, AZ
Posts: 1,969
Likes: 0
Received 0 Likes
on
0 Posts

Enjoying the progress. I just spent like 400 on -an fititngs for all of my stuff, and you really have something with the less is more theme..
ill be going brass next time
ill be going brass next time
12-16-2010, 08:38 PM
#32
TECH Resident
iTrader: (24)
Join Date: Jun 2005
Location: Houston, TX
Posts: 860
Likes: 0
Received 0 Likes
on
0 Posts
Mast posted on their Facebook page that 15 oil pans will be ready for shipping the end of next week! So, I called and put down my money. Chris at Mast said the pan utilized the LS3 dipstick as used in the 2010 and up Camaros. So, I will need to order that assembly tomorrow.
12-17-2010, 08:17 AM
#33
Today I plumbed hard lines for the LS6 PCV system and brake booster vacuum line on the engine. I had a request for some detailed pictures of the PCV set up, so here they are.
A nice little problem solving part that I found was the elbow that connects the PCV valve to the LS6 valley cover vent outlet. It is a Help product from Advanced Autoparts #46017. The package says that it is a replacement part for Ford part #F85Z-6C324-AA. The PCV valve itself is a common part similar to (if not the same as) the PCV that came factory on my 65. This particular part was bought from Auto Zone under the brand Luber Finer # PCV1134. But, I am pretty certain it is the same PCV valve GM used on most cars in the 60s and 70s.
12-18-2010, 10:13 PM
#35
Degreed the cam today. It was pretty close to dead on out of the box. The cam card says the ICL should be 110 degrees. My results said 110.5 degrees. The 1/2 of a degree could easily be margin of error. I decided to throw in 1 additional degree of advance for a final measured ICL of 109.5 degrees.
We are so close now. I just need that oil pan from Mast. Here is a picture with all the accessories installed except for the Power steering pump. The P/S pulley is there just for mock up purposes.
We are so close now. I just need that oil pan from Mast. Here is a picture with all the accessories installed except for the Power steering pump. The P/S pulley is there just for mock up purposes.
12-19-2010, 06:08 AM
#36
Staging Lane

Join Date: May 2005
Location: Benton Harbor, Mi
Posts: 70
Likes: 0
Received 0 Likes
on
0 Posts
Curious to see how this runs and how you like it. I am on the V8Buick site too. 455's are nice and they can run, but they are a weakly designed engine as far as serious high performance goes. I have thought if my 455 ever goes, a LS series or BBC motor may be in its future. They will hang me if I post that over there though! Good Luck! Post some video if you can when you get her running.
Good Luck! Post some video if you can when you get her running.
12-19-2010, 06:42 AM
#37
Curious to see how this runs and how you like it. I am on the V8Buick site too. 455's are nice and they can run, but they are a weakly designed engine as far as serious high performance goes. I have thought if my 455 ever goes, a LS series or BBC motor may be in its future. They will hang me if I post that over there though! Good Luck! Post some video if you can when you get her running.
Good Luck! Post some video if you can when you get her running.My problem with the BBB is how much I know about them. Once you start considering a 455 build, you start remembering: core shift, valley webbing weakness, oiling revisions, deck height, block girdles and the crazy crazy parts costs.
Knowing all that and then hearing stories about guys buying junk yard LQs and LYs with just minor performance upgrades making 450 - 500hp makes it hard to justify dropping 10 grand on the BBB.
12-19-2010, 07:15 AM
#38
Staging Lane
Join Date: May 2005
Location: Benton Harbor, Mi
Posts: 70
Likes: 0
Received 0 Likes
on
0 Posts
I read your thread over there and knew you were fighting a losing battle LOL!
I had a 99 Z28 and it was an awesome car. Would run mid 12's and get 25 MPG. It was very difficult for me to work on though and I do have a taste for the classic iron so I sold it. Can't deny the LS series is the best bang for the buck there is.
I had a 99 Z28 and it was an awesome car. Would run mid 12's and get 25 MPG. It was very difficult for me to work on though and I do have a taste for the classic iron so I sold it. Can't deny the LS series is the best bang for the buck there is.
12-19-2010, 08:56 PM
#39
One of the fun things I have learned about LS motors is the oil and temp sender ports have a new fangled metric thread system that is not compatible with most after-market gauge systems. So, today I went about the business of solving these problems.
First up was the oil sender. The solution that I came up with was to remove the factory sender and remove the guts so the that it could be drilled and tapped to 1/8" pipe thread. Now the old sender serves the roll as an adapter.
This partially solved the problem. My electrical sending unit is pretty large, so I needed to space it up a little. This was solved with 1 male to male 1/8" pipe union and 1 female to female 1/8" pipe union.
Here are a few pics of the new set up.
Next up was the water pump. The fun part about drilling and tapping the water pump is getting all of the aluminum shavings and chips out of the housing.
I pulled it from the motor of course, removed the pump cover and then drilled and tapped the housing on the bench. After the threads were done, I washed and blew out the housing through all of the ports repeatedly until I could detect no aluminum chips and/or shavings remaining.
12-21-2010, 08:21 AM
#40
Staging Lane
iTrader: (5)
Join Date: Dec 2006
Location: dyer indiana
Posts: 59
Likes: 0
Received 0 Likes
on
0 Posts
Have a question about your brake set up. Im converting my 64 special to disc fronts also and was considering purchasing the kit from summit for $700. I do have a junk yard set up from a chevelle with spindles... Did you find it cheaper converting it yourself or should i go the summit route?