

1971 Nova Swap - 02 LS1/A4
 03-08-2011, 01:03 PM
#41

Yeah. just working on my back under the Shade Tree, on the wet and cold ground ! LOL...
I've had a few of each of the X's, A's and F's.. they each have there following, pro/con.. but I got one of each right now..
Currently on the grounds right now. (can't say garage, its on a 2 car LOL)...:
71 Chevelle
71 Nova (project)
84 Camaro
88 Vette
79 4x4 VAN
99 Tahoe
48 Ford F-1 (semi running)
I've had a few of each of the X's, A's and F's.. they each have there following, pro/con.. but I got one of each right now..
Currently on the grounds right now. (can't say garage, its on a 2 car LOL)...:
71 Chevelle
71 Nova (project)
84 Camaro
88 Vette
79 4x4 VAN
99 Tahoe
48 Ford F-1 (semi running)
 03-08-2011, 03:27 PM
#43
On The Tree
iTrader: (5)

Join Date: Mar 2010
Location: Maine
Posts: 126
Likes: 0
Received 0 Likes
on
0 Posts
do u have any pix of how the pan looks on the frame? im trying to figure out what pan i want for my swap, u said thats the RetroLSX from holley right?
sweet build though man
sweet build though man
03-08-2011, 05:54 PM
#44
You can see the pan in the earlier post as it sits on the engine stand.
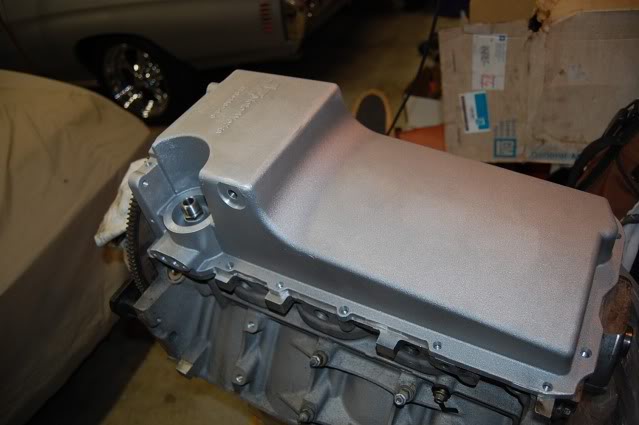
As it sits in the Subframe mounted.
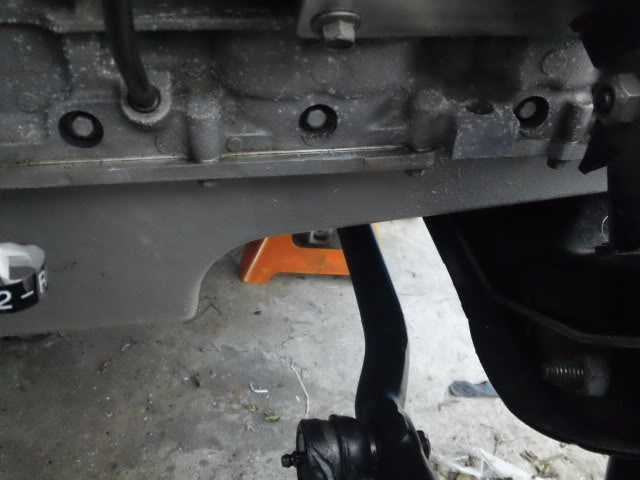
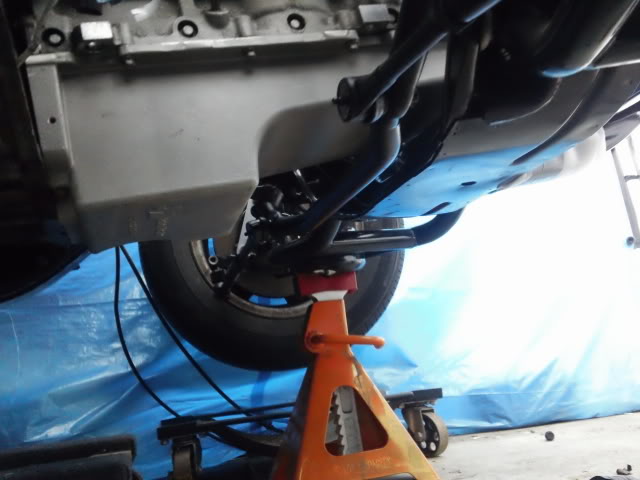
Brian.H...: I am not sure, as I have not read any office posting on the Retrolsx pan. But it is the same as the one Holley is marketing, or a damn good copy of it. Don't quote me.. but I suspect that Retrolsx and JTZmotor might have sold rights to Holley .. ??.. as Retrolsx is not responding to any new request or order on the web/forum. Shawn has taken a normal 9-5 job somewhere from what I was told.!?!?
As it sits in the Subframe mounted.
Brian.H...: I am not sure, as I have not read any office posting on the Retrolsx pan. But it is the same as the one Holley is marketing, or a damn good copy of it. Don't quote me.. but I suspect that Retrolsx and JTZmotor might have sold rights to Holley .. ??.. as Retrolsx is not responding to any new request or order on the web/forum. Shawn has taken a normal 9-5 job somewhere from what I was told.!?!?
Last edited by bczee; 03-08-2011 at 09:41 PM.
03-08-2011, 09:37 PM
#45
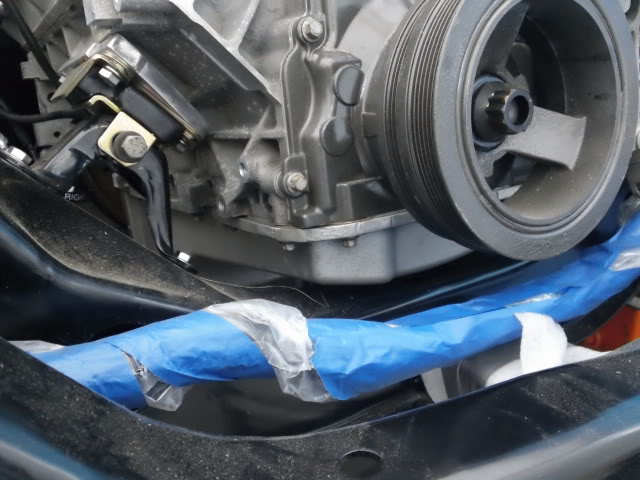
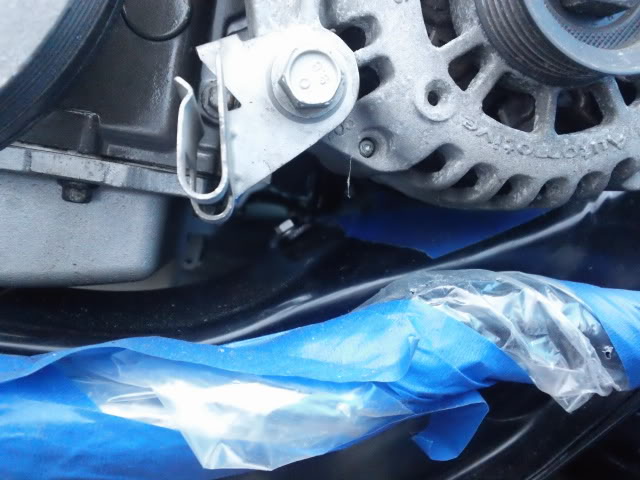
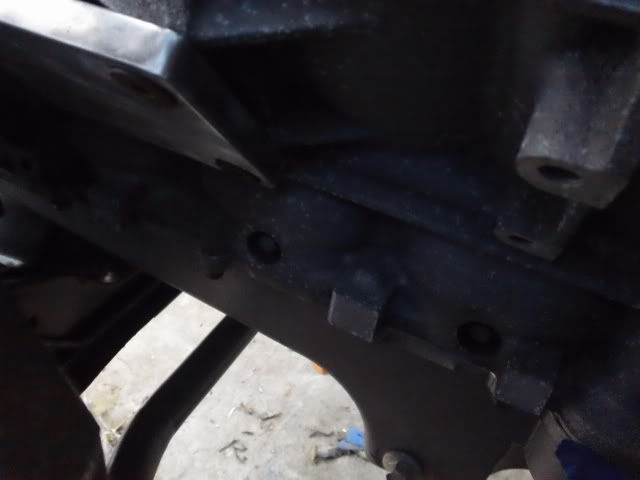
Some pictures of the Frame stands redrilled 1/2" to move the engine forward.
Driver side:
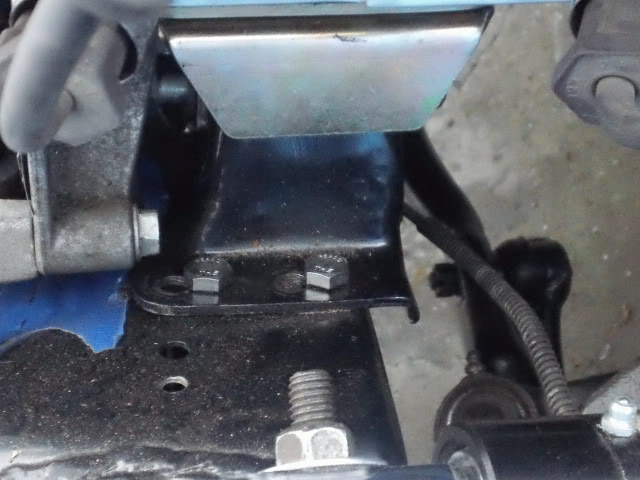
Passenger side:
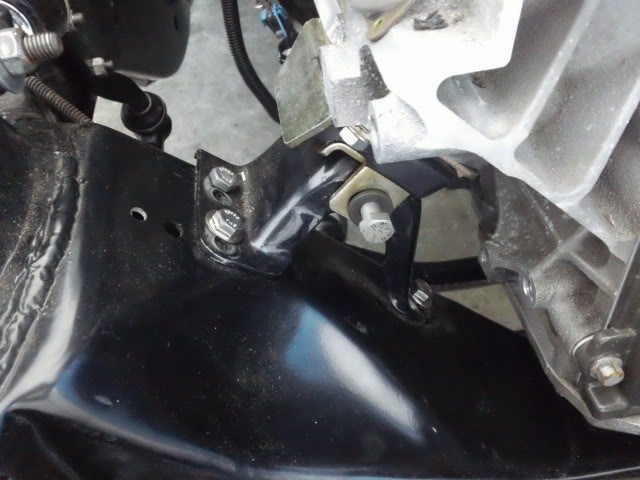
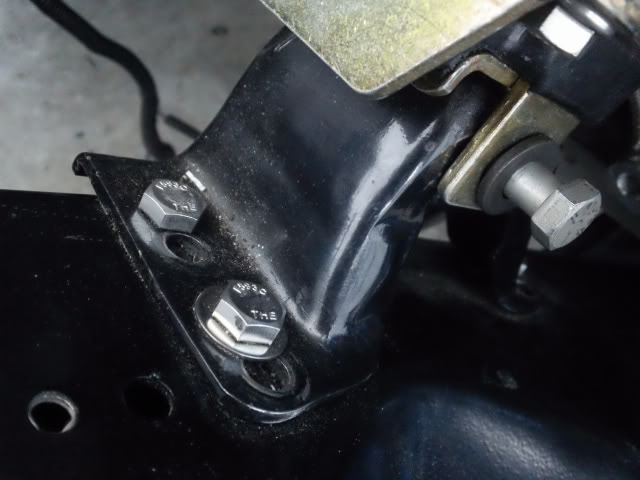
Note.. if you noticed, the dust/dirt and that most of the bolts and nuts are still loose. I usually finish mod'ing everything up and pull it appart and then do a final cleaning and touch up and then do the final assembly.
Driver side:
Passenger side:
Note.. if you noticed, the dust/dirt and that most of the bolts and nuts are still loose. I usually finish mod'ing everything up and pull it appart and then do a final cleaning and touch up and then do the final assembly.
03-15-2011, 07:10 PM
#46
Got most of the Wiring harness done.. and started to work on convering one of the Camaro's Fuse/Relay box. I re-wired one of them to handle the following and utilized the OEM Relays and fuses.
I used the three OEM relay for the Fans. The two smaller relays for Fuel Pump and one to activate IGN fuses and relay off of direct Battery power within the box and not throught the old key circuit.
What I utilized and rewired from the old boxes:
Relays:
Fan Relays (2)
Fuel Pump Relay (smaller Relay)
Ign Relay (to feed off of 12+ Battery to feed the IGN/Pink related fuses and wires)
Fuses:
1) PCM Battery 12+
2) PCM Ign 12+
3) Fuel Pump Relay
4) Fan Relay
5) Ign Bank #1 (optional)
6) Ign Bank #2 (optional)
7) Injectors (optional)
8) ODBII Connector
Large 40A/50A fuse:
1) Fans Relay Fuse
2) Battery 12+ Fuses
3) IGN Relay/Fuses
Now I just have to wait until I figure out where I will mount the PCM and the Box.
The three optional fuse are if I decied to use them, it will seperate out the Ign coil and Injector IGN Power (pink wires) to be fused from the rest of the IGN Pink circuits. I would have to do more work on the harness to utilize this.
I figured by using the Relay to be activated by the Key/IGN wire... it will keep the load off of the the cirucits that would normal go through the Key switch (this way, it no new load to the old circuit)

Well, its still raining. so once the weather get drier, work will continue.
I used the three OEM relay for the Fans. The two smaller relays for Fuel Pump and one to activate IGN fuses and relay off of direct Battery power within the box and not throught the old key circuit.
What I utilized and rewired from the old boxes:
Relays:
Fan Relays (2)
Fuel Pump Relay (smaller Relay)
Ign Relay (to feed off of 12+ Battery to feed the IGN/Pink related fuses and wires)
Fuses:
1) PCM Battery 12+
2) PCM Ign 12+
3) Fuel Pump Relay
4) Fan Relay
5) Ign Bank #1 (optional)
6) Ign Bank #2 (optional)
7) Injectors (optional)
8) ODBII Connector
Large 40A/50A fuse:
1) Fans Relay Fuse
2) Battery 12+ Fuses
3) IGN Relay/Fuses
Now I just have to wait until I figure out where I will mount the PCM and the Box.
The three optional fuse are if I decied to use them, it will seperate out the Ign coil and Injector IGN Power (pink wires) to be fused from the rest of the IGN Pink circuits. I would have to do more work on the harness to utilize this.
I figured by using the Relay to be activated by the Key/IGN wire... it will keep the load off of the the cirucits that would normal go through the Key switch (this way, it no new load to the old circuit)
Well, its still raining. so once the weather get drier, work will continue.
03-15-2011, 07:44 PM
#47
Just bench tested the Box and relays.. both fans came on and the IGN Relay and fuel pump relay distributed power as expected when activated (+12 or ground). Got both low and high speed fan activated ok. The Ign relay feed power to the fuses. So all is good.
The only think I don't like is the size. It is a bit larger that I would like, But I will work with it to see what it ends up being.
The only think I don't like is the size. It is a bit larger that I would like, But I will work with it to see what it ends up being.
05-27-2011, 09:53 AM
#48
Just bench tested the Box and relays.. both fans came on and the IGN Relay and fuel pump relay distributed power as expected when activated (+12 or ground). Got both low and high speed fan activated ok. The Ign relay feed power to the fuses. So all is good.
The only think I don't like is the size. It is a bit larger that I would like, But I will work with it to see what it ends up being.
The only think I don't like is the size. It is a bit larger that I would like, But I will work with it to see what it ends up being.
Glad to hear you're making progress.
05-27-2011, 04:02 PM
#49
Not really, been a bit busy with other things and just driving the Chevelle.. 
I have orders new Flex plate, new converter, bolts and other stuff. hoping to start working on it again after the holiday. Need to redo the Trans X-Member. don't like the way it is going.
Well need to finish up the Wiring now that I have order some wire and metric connectors to complete my harness.
well post updates and pictures then..
BC
06-23-2011, 10:47 AM
#51
that's actually a great question... those a-arms lower the vehicle at least an inch by themselves... the Hotchkis TVS system lowers the car 2" in the front. Make sure you check your ride height before bolting everything together.
Last edited by hookemdevils22; 06-23-2011 at 11:01 AM.
06-23-2011, 01:11 PM
#52
Using the Hotchkis 80013 kit for a SBC Nova. This kit is suppose to lowers the vehicle an avg of 2" (F) and 1.5" (R) from orig factory ride height, so they state. I am using POL Tube A-Arms..
Knowing that i used Hotchkis on my Chevelle, B-Body spindel, it should have dropped my Chevelle 3" or more..but after the swap, the ride heigth up front was at best.. stock height .. and had to cut 1/2 coil off to get it down,.
I am expecting to do the same on the Nova. but well have to see once I get it back down and completed. That 100+ lbs less does make a diff over a SBC setup.. !
I has been laying off the build some, its summer time and the Chevelle is running great. Just had Mark Romans dyno tune it. My engine is stock with only header, LS6 intake and a PnP TB.. he found about 30+ rwhp. It was running Lean.
It put down 330 RWHP and 338 RWTQ.. not bad for a stocker. Torque was like Flat from 2600 to 550 at 300+...
Back on the build next month after the parts come in. stand by !
Waiting for parts to come in.. then back at it.. ! more to come next month...
06-23-2011, 08:42 PM
#53
TECH Enthusiast
iTrader: (2)
Join Date: Jul 2010
Location: missouri
Posts: 508
Likes: 0
Received 0 Likes
on
0 Posts
Using the Hotchkis 80013 kit for a SBC Nova. This kit is suppose to lowers the vehicle an avg of 2" (F) and 1.5" (R) from orig factory ride height, so they state. I am using POL Tube A-Arms..
Knowing that i used Hotchkis on my Chevelle, B-Body spindel, it should have dropped my Chevelle 3" or more..but after the swap, the ride heigth up front was at best.. stock height .. and had to cut 1/2 coil off to get it down,.
I am expecting to do the same on the Nova. but well have to see once I get it back down and completed. That 100+ lbs less does make a diff over a SBC setup.. !
I has been laying off the build some, its summer time and the Chevelle is running great. Just had Mark Romans dyno tune it. My engine is stock with only header, LS6 intake and a PnP TB.. he found about 30+ rwhp. It was running Lean.
It put down 330 RWHP and 338 RWTQ.. not bad for a stocker. Torque was like Flat from 2600 to 550 at 300+...
Back on the build next month after the parts come in. stand by !
Waiting for parts to come in.. then back at it.. ! more to come next month...
Knowing that i used Hotchkis on my Chevelle, B-Body spindel, it should have dropped my Chevelle 3" or more..but after the swap, the ride heigth up front was at best.. stock height .. and had to cut 1/2 coil off to get it down,.
I am expecting to do the same on the Nova. but well have to see once I get it back down and completed. That 100+ lbs less does make a diff over a SBC setup.. !
I has been laying off the build some, its summer time and the Chevelle is running great. Just had Mark Romans dyno tune it. My engine is stock with only header, LS6 intake and a PnP TB.. he found about 30+ rwhp. It was running Lean.
It put down 330 RWHP and 338 RWTQ.. not bad for a stocker. Torque was like Flat from 2600 to 550 at 300+...
Back on the build next month after the parts come in. stand by !
Waiting for parts to come in.. then back at it.. ! more to come next month...
I heard they make a 3 inch drop spring from hotchkis. i thought about running those.. do you think those would be a harsh ride? Im running a ls2 with a super vic intake and edelbrock elbow and gto procharger and bracket in my 68 camaro. i wonder if that additional weight might put it closer to a sb. so maybe i should run the 2 inch drop and let the springs settle.. idk im lost in what to do, i dont wanna watse money lol
06-26-2011, 09:34 PM
#54
TECH Enthusiast
iTrader: (2)
Join Date: Jul 2010
Location: missouri
Posts: 508
Likes: 0
Received 0 Likes
on
0 Posts
Hey, im running those control arms top and bottoms. do you know for a fact they lower the car an inch. I'm building a ls2 procharged with the ebay control arms and i'm trying to decide on running the hotchkis 2" drop or 3" drop, i hear both springs will sit higher since the ls1 platform weighs 100 lbs less than the small block chevy... i wish i could find more pics of first gens with ls engine and different ride heights .. let me know what you think thanks
06-27-2011, 02:15 PM
#55
I can't really give you an answer, as it always seems it turns out different for everyone using the same parts..! Other than what you might expect due to the weight differences..
The 2" to 3" lower spring/kits are designed and built with a fairly stock car and weight with it intended engine. With Weight being the key factor on how much you can expect to lower a car. Springs are design with weight in mind for compressed height. So you can have two spring that are the same unloaded height but have two different ride heights !
So util they start marking kit with a Gen III / IV engine for both Iron and Alum blocks, it is a guessing game. The iron block being about 80lbs more than a alum Block. Which would bring it closer to a SBC. Been stated that a full dressed LS1 engine (RPO Code) is about 440 lbs shipping weight as about 575 lbs for the SBC(iron/iron). (you can add another 100 for the BBC)
I don't have my Nova on the ground with full fender/hood and all. So, I can not even take a guess at this point on what I have found.
06-27-2011, 02:52 PM
#56
A buddy put the KMJ arms on his 68 Camaro, and it dropped it about an inch - this is with a 350 and Muncie 4-speed before and after, as well as newer stock springs.
I had to ratchet up my QA1 coil-overs at least as high (if not higher) when I switched from custom tubular arms and drop spindles to the KMJ's and stock spindles (car had LQ4/4L80e before and after).
Keep in mind that I had custom tubulars on before, so my experience will be different than a drop spring setup. And neither setup went from small-block to LSx, so I can't comment on ride height changes from that, either.
EDIT: Clint's post (below) reminded me that my buddy went with AFCO 1/2" (IIRC) spacers on the front of the 'camaro to bring his nose up slightly.
Last edited by hookemdevils22; 06-28-2011 at 03:49 PM.
06-28-2011, 09:36 AM
#57
I don't mean to distract from your thread too much, but since you're on the topic of spring selection and ride height I thought I'd mention an option here that I'm pursuing on my Nova. Because of the many variables involved with vehicle weight, differences in OEM springs (both rate & free length), uncertainty over sagging older springs, etc, it can be difficult to predict exactly how much a given spring will drop a car from the current height. You can make an educated calculation but when you consider that a 1/4" difference in spring compressed height will translate to about 1/2" difference in ride height, I wouldn't rely entirely on calculation. I've decided to use spring adjusters made by AFCO (also formerly also made by Landrum and potentially still made by ATS). Here is what they look like:

You can read more about those here if you scroll down a bit. Understand they are not completely drop in - you do have to cut a helix into the spacer so they seat properly in the Nova/Camaro frame.
http://www.geocities.com/casanoc/
I bought the AFCO 20191 spacer with an AFCO 20600 5x9.5 600lb/in spring, which mimics the Hotchkis 1907F spring rate but gives me adjustability. I am going to trim my AFCO adjusters a little to match the Hotchkis 1907F free length of 12.5" while putting me in the center of the adjustment range. That will get me in the ballpark of a 2" drop and from there I can adjust as needed to fine tune. Two springs and two spacers cost about $180 - virtually the same cost as a pair of Hotchkis springs. In addition to ride height adjustment, another advantage to this setup is you can get a wide range of spring rates if you want a firmer or softer ride and associated handling.
Last edited by -TheBandit-; 06-28-2011 at 03:42 PM.
06-28-2011, 03:40 PM
#59
From what I've read, you are still pretty much stuck with pulling the spring in and out, so no different really from a normal coil spring swap (support the car, pop the balljoint, lower the arm, pull out the spring, etc). Due to the arc of the lower control arm, you have to install this on the frame side, so there realy isn't access to adjust it in the car. Even if access were there it would tough to move under the weight of the car / preload of the springs. One tip is to weld a small stud to the top of the adjuster (near the highest point on the helix) to pass through the frame so you can "attach" the spacer to the frame temporarily. This keeps it in place so you're not handling multiple pieces at once as you R&R it. The only thing I haven't seen addressed is how to keep the adjustment from changing after it's installed. I haven't found anyone complaining about it either though. When I get to that step in my build I'll be sure to document it heavily, but until then if you have questions about the parts, I have them sitting in my garage waiting to be installed.
06-29-2011, 11:33 AM
#60
This may be a dumb question, but given that the upper a-arms have nothing to do with ride height, couldn't you install the springs and torque down just the lower ball joint, leaving the upper loose (obvi still attached to the spindle though)? This way you could check the ride height w/o having to fight (and potentially damage) the upper ball joint.