

Another ls1 Fox
 12-21-2010, 10:20 AM
#21
Launching!
Thread Starter
iTrader: (5)

Join Date: Sep 2010
Location: Austin, TX
Posts: 264
Likes: 0
Received 0 Likes
on
0 Posts

Its a Lokar shifter specific for a 4l60e. It has a connection for a neutral safety switch so you cant start the car in drive or reverse. Once I get the trans mounted up ill post more pics and if I really like it. Since its marketed as "adjustable" im hoping it will adjust to the stock shifter hole and ill be able to use the factory shifter boot and everything.

 12-21-2010, 10:46 AM
#23
Launching!
Thread Starter
iTrader: (5)
Join Date: Sep 2010
Location: Austin, TX
Posts: 264
Likes: 0
Received 0 Likes
on
0 Posts
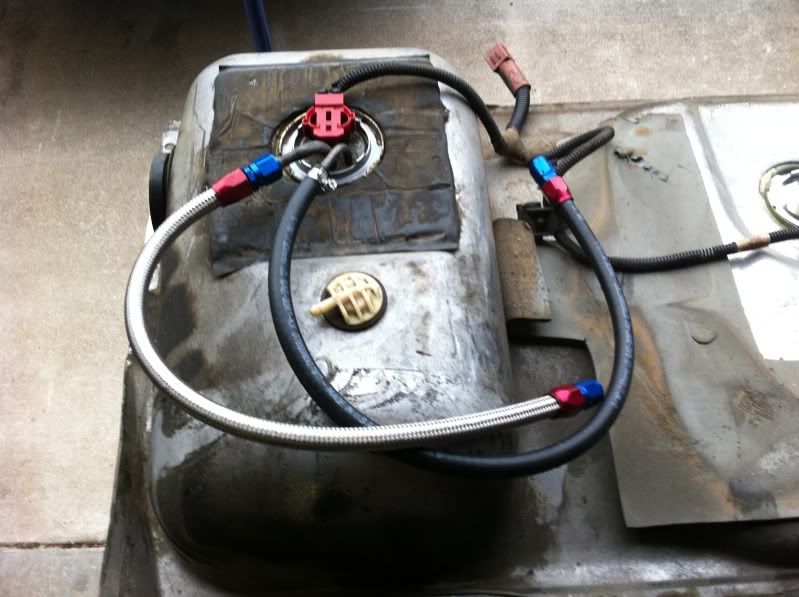
I bought an aftermarket cover from glennsperformance.com Im having trouble pulling up the site right now though. I also bought the chrome gas tank straps. You may be able to paint the stock cover but it wont be as smooth or look as good.


 01-02-2011, 11:15 PM
#31
Launching!
Thread Starter
iTrader: (5)
Join Date: Sep 2010
Location: Austin, TX
Posts: 264
Likes: 0
Received 0 Likes
on
0 Posts
Well today was the only day Ive worked on car in a couple weeks. I changed out the heater core. Which as always turned out to be a good idea. The existing one poured out all kinds of brown water when I emptied it.
I got the wires for the speedo, tach, fuel pump, and power ran across the dash and protected with loom. I also retaped and shrink wrapped a lot of wires where the factory cloth tape deteriorated. I got the dash back in place also, hopefully i wont need to pull it out again. Also found the perfect place to mount the OBDII port. I felt like I discovered the wheel when I found the spot to mount it lol.
I got a hell of a deal on a Clarion radio on crutchfield. Nothing fancy but i needed a radio in the car. Ive never ordered from crutchfield either since they are aways high priced but I esentially got an $80 radio for $20. I was lucky to have a set of pioneer speakers sitting in my closet that were supposed to go in my other mustang. They never made there way into it so they are now installed in this one. Also I got a new set of speakers for the dash and have a set of rear speakers that ill put in also.
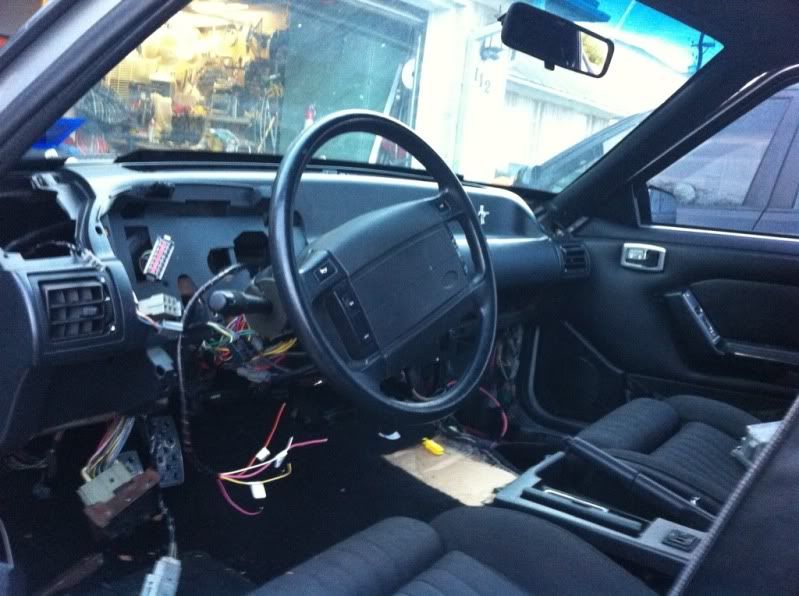
Almost forgot I swapped out steering column and steering wheels. The previous owner had a nice Grant wheel in place with a quick release hub but it wouldnt pass inspection. Also installed a weld-in adapter so I couldnt simply mount a factory wheel back on. After swapping out a different column I got the "new" wheel mounted. No the airbag wont work but unless the inspector crashes my car he'll never know lol. If anyone is interested in an aftermarket steering wheel with column ready to mount up I'll be posting it in the f/s section for half the price everything costs new......and everything it essentially still new.
Still looking for an oil pan. I was supposed to have met someone on thursday to pick one up but I seem to have terrible luck trying to buy things face to face. I guess people don't really want to sell stuff they have for sale, lol. The group buy finally went through so my torque converted is finally on its way to me as well.
Im hopeful that the wiring will be finished next weekend. Then all Ill have left is to mount the motor and trans add fluids and start her up.
I also found a modified ford racing driveshaft made for my exact setup I have. The guy that used it had the same trans, k member, crossmember, motor, and of course car. It should be here next week so Ill see if it matches up once its here. By dumbluck I came across a guy that does metal fabrication and is starting up his own shop. After talking to him and asking if he did exhaust work I found out he did. Then i told him what I needed and it turns out he was doing a ls1/fox conversion so knew exactly what he would be dealing with. He gave me a great price quote so once Im ready ill be going to him.
Not many new pics today.
New steering
OBD II port
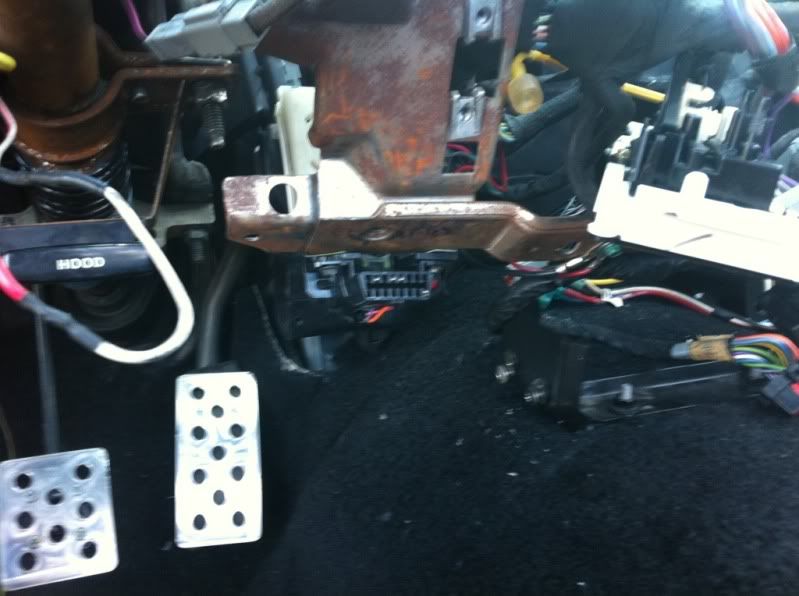
I got the wires for the speedo, tach, fuel pump, and power ran across the dash and protected with loom. I also retaped and shrink wrapped a lot of wires where the factory cloth tape deteriorated. I got the dash back in place also, hopefully i wont need to pull it out again. Also found the perfect place to mount the OBDII port. I felt like I discovered the wheel when I found the spot to mount it lol.
I got a hell of a deal on a Clarion radio on crutchfield. Nothing fancy but i needed a radio in the car. Ive never ordered from crutchfield either since they are aways high priced but I esentially got an $80 radio for $20. I was lucky to have a set of pioneer speakers sitting in my closet that were supposed to go in my other mustang. They never made there way into it so they are now installed in this one. Also I got a new set of speakers for the dash and have a set of rear speakers that ill put in also.
Almost forgot I swapped out steering column and steering wheels. The previous owner had a nice Grant wheel in place with a quick release hub but it wouldnt pass inspection. Also installed a weld-in adapter so I couldnt simply mount a factory wheel back on. After swapping out a different column I got the "new" wheel mounted. No the airbag wont work but unless the inspector crashes my car he'll never know lol. If anyone is interested in an aftermarket steering wheel with column ready to mount up I'll be posting it in the f/s section for half the price everything costs new......and everything it essentially still new.
Still looking for an oil pan. I was supposed to have met someone on thursday to pick one up but I seem to have terrible luck trying to buy things face to face. I guess people don't really want to sell stuff they have for sale, lol. The group buy finally went through so my torque converted is finally on its way to me as well.
Im hopeful that the wiring will be finished next weekend. Then all Ill have left is to mount the motor and trans add fluids and start her up.
I also found a modified ford racing driveshaft made for my exact setup I have. The guy that used it had the same trans, k member, crossmember, motor, and of course car. It should be here next week so Ill see if it matches up once its here. By dumbluck I came across a guy that does metal fabrication and is starting up his own shop. After talking to him and asking if he did exhaust work I found out he did. Then i told him what I needed and it turns out he was doing a ls1/fox conversion so knew exactly what he would be dealing with. He gave me a great price quote so once Im ready ill be going to him.
Not many new pics today.
New steering
OBD II port
 01-07-2011, 03:08 PM
#33
Launching!
Thread Starter
iTrader: (5)
Join Date: Sep 2010
Location: Austin, TX
Posts: 264
Likes: 0
Received 0 Likes
on
0 Posts
Finally someone searched!!! Let me know if you have any questions. I got most the info off this site and google by just typing in ls1 mustang swap. Im trying to keep as much info about the swap on here as possible. A few things ill be including that wasnt in any swap article I found. Mainly Im coping and pasting info here from the mustang website Im actually keep my write up on.
01-09-2011, 12:11 AM
#34
Launching!
Thread Starter
iTrader: (5)
Join Date: Sep 2010
Location: Austin, TX
Posts: 264
Likes: 0
Received 0 Likes
on
0 Posts
Well after almost sneezing to death due to the cedar in the air I toughed it out and worked on the car most of the day. The gauges are wired up along with the engine harness, minus the wire that needs to be sliced into the brake switch. This is used for the torqure converter clutch engagement/disengagment. I still need to wire up the turn signal lights, brake light, oil light, high beam indicator, and check engine light. Sounds like a lot but its not. If it doesnt rain tomorrow ill have it finished up. Also got the radio harness connected and ready to install.
I noticed the center brake line was leaking and i think i got it fixed.
Crossing my fingers ill have the new oil pan next weekend and ill be able to install the motor.
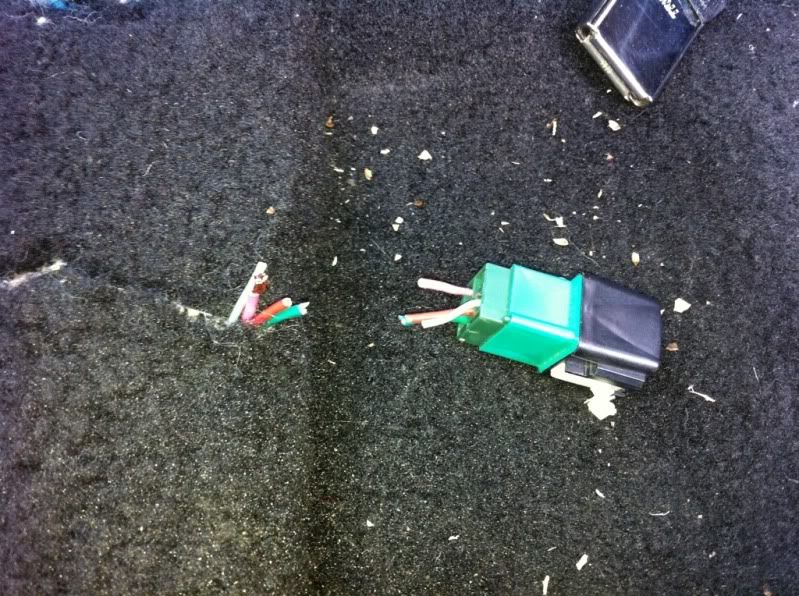
Heres a pic of the old fuel pump relay. According to the ford wiring book i have the pink and black wire shold be going to the fuel pump. Thats where I wired the fuel pump wire on the engine harness to. Can anyone confirm this?
I got this print out from MC Machine to help with the wiring of the autometer gauges. It was a life saver and saved me a lot of time. I hope it can help out others.
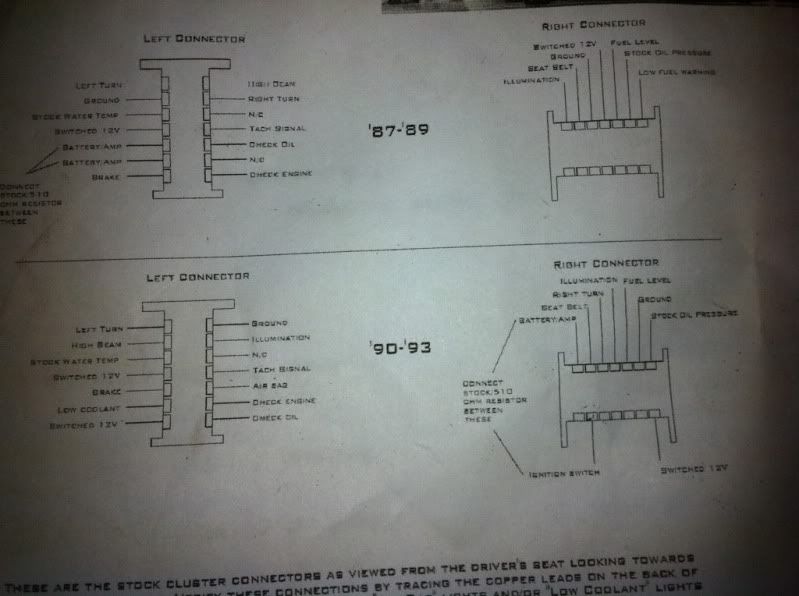
Heres the gauges wired up. I thought I got a picture of the back of the cluster so everyone could get and idea of how to wire it up but i guess I didnt. All I did was jumper all the 12+v connection, lamp connections, and grounds together so I would only have three wires to connect to the interior harness.

I noticed the center brake line was leaking and i think i got it fixed.
Crossing my fingers ill have the new oil pan next weekend and ill be able to install the motor.
Heres a pic of the old fuel pump relay. According to the ford wiring book i have the pink and black wire shold be going to the fuel pump. Thats where I wired the fuel pump wire on the engine harness to. Can anyone confirm this?
I got this print out from MC Machine to help with the wiring of the autometer gauges. It was a life saver and saved me a lot of time. I hope it can help out others.
Heres the gauges wired up. I thought I got a picture of the back of the cluster so everyone could get and idea of how to wire it up but i guess I didnt. All I did was jumper all the 12+v connection, lamp connections, and grounds together so I would only have three wires to connect to the interior harness.
 01-23-2011, 11:16 PM
#36
Launching!
Thread Starter
iTrader: (5)
Join Date: Sep 2010
Location: Austin, TX
Posts: 264
Likes: 0
Received 0 Likes
on
0 Posts
Been a couple weeks since I update here so........
Well the rain ruined any chance to do much work on the actual car. But I did get the windage tray, oil pan, pick up tube, and dip stick swapped out. I tapped the block off plate for the oil pressure gauge. Also got bored and removed the valve covers and cleaned them up and painted them black.
I got a late start today cause it was still raining. I changed the oil in my dads truck (in the rain lol). Then it ended up stopping so I decided to do some stuff on the car. I decided to go with a full sweep electric temperature gauge so I removed the other gauge and installed the new one. Also got the turn signals, high beam indicator, and brake light indicator wired up. For some reason the brake light isnt working though and the oil pressure light quit working........ill have to look into that more next weekend.
Heres the oil pans. The front sump GTO pan is on top. This pan wont work on this swap or any other swaps I have seen.
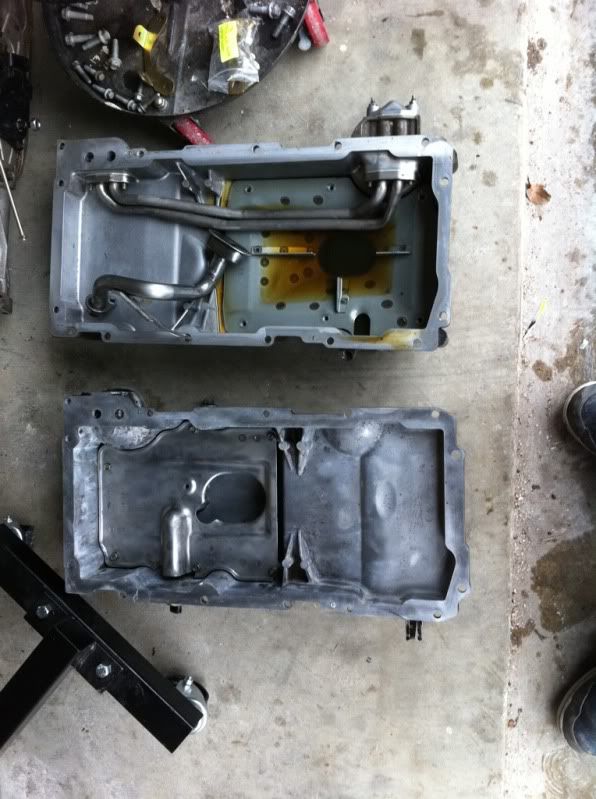
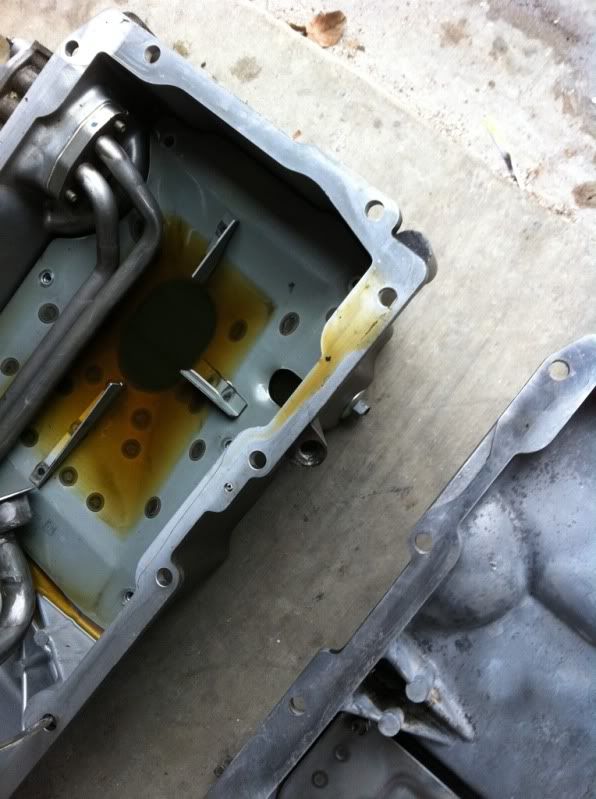
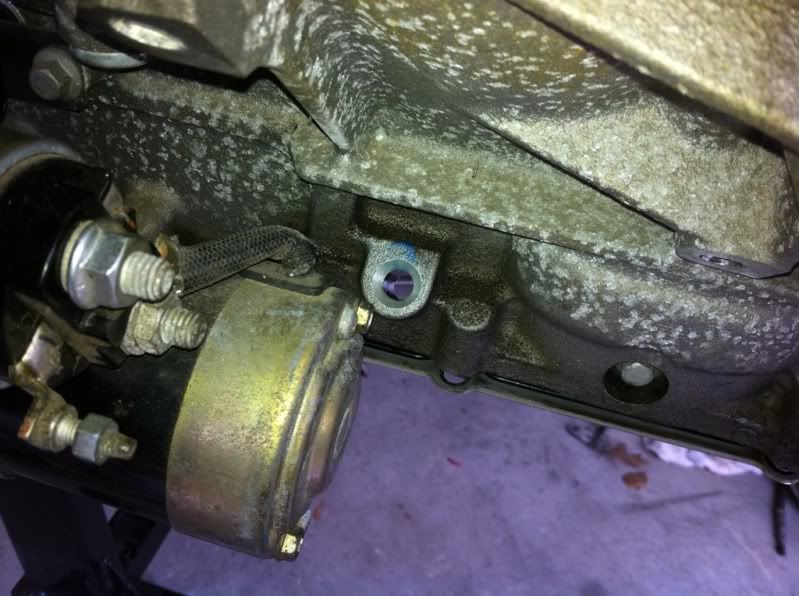
The GTO has the dip stick inserted in the pan. F body pans go through the block. In the first pic below you can see the hole for the dip stick tube right above the drain plug on the pan. On the second picture you can kind of see the existing hole where the f body dip stick goes (the hole is right behind the starter with a little blue mark on it).
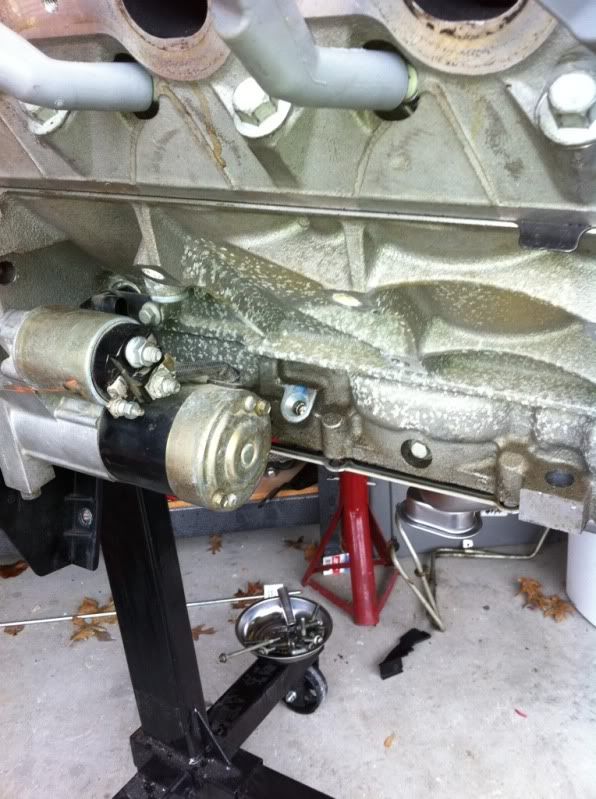
I was a bit leary about messing up drilling the hole on the block so did some research to make sure i didnt screw it up. Low and behold I found out you dont need to drill the block at all. Its only a freeze plug type thing sealing it. Keep in mind if you ever go to a racing oil pan that uses a pan dip stick you will want to fill the plug again or else.....
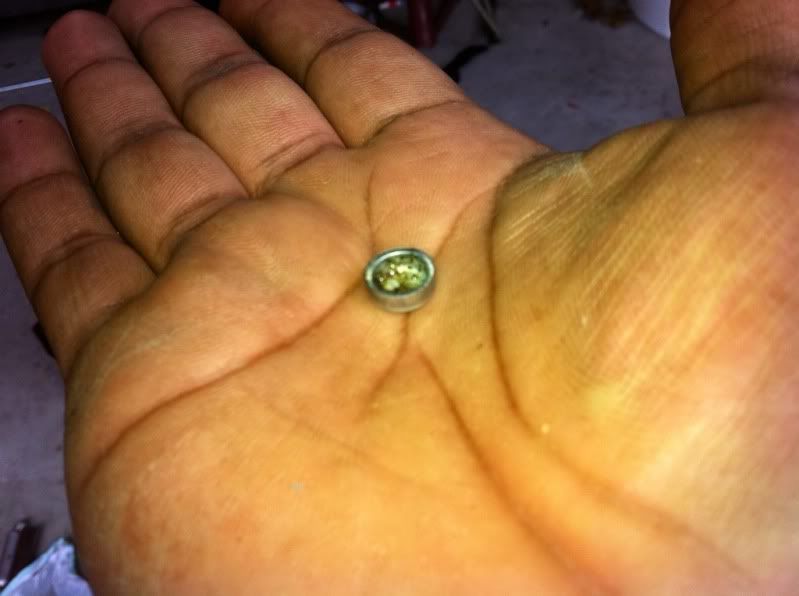
Just get a punch and hammer and ightly tap it out from the underside of the block outward.
After I mounted the pan I tapped the block off plate for the oil pressure. I think Corvettes use this plate for their oil pressure senders so its the perfect spot to do the install. You will need to carefully drill out the plate with a 5/16" drill bit then tap it with a 1/8" npt bit.
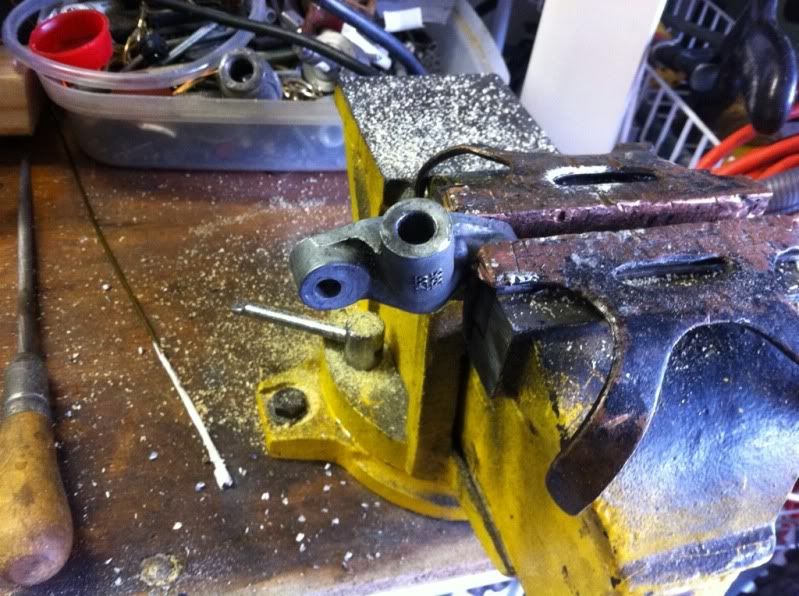
Tapped and ready for action.
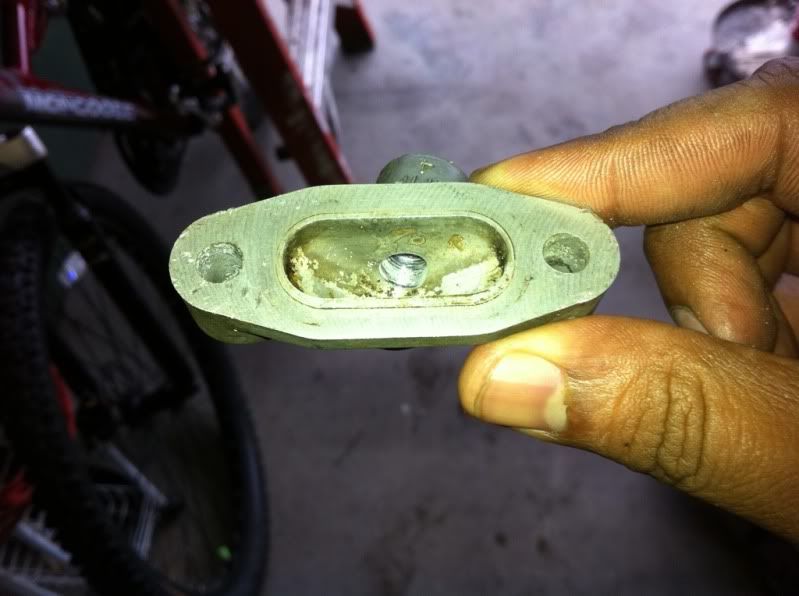

If you notice in the pics of the GTO oil pan the block off plate looks different. If you have this type of plate you will need to get the one like I tapped. Or you can buy one off ebay that is machined and pretapped. I actually bought one off ebay for $15 but ended up liking the factory plate better.
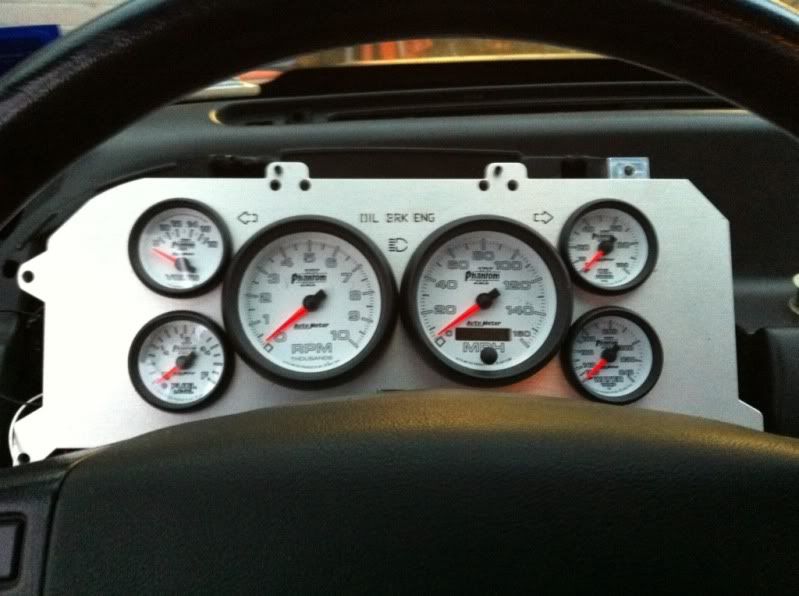
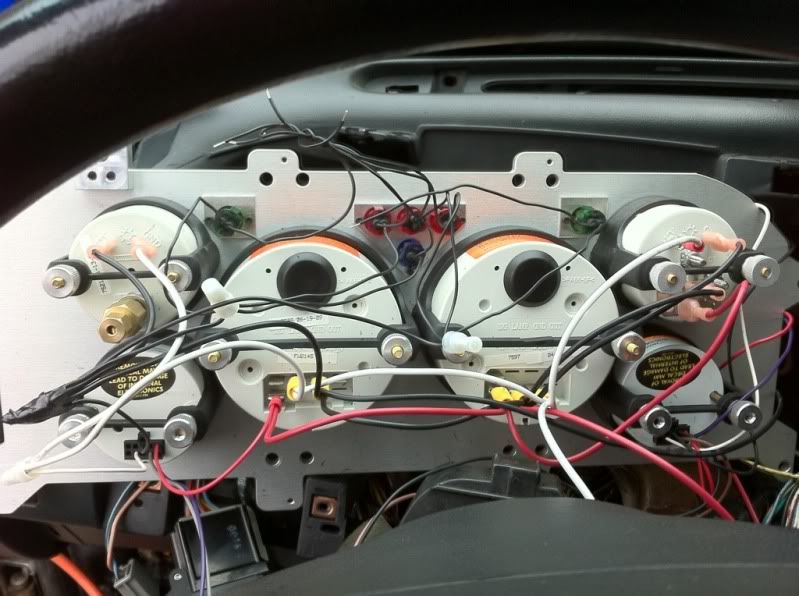
Heres a quick picture of the back of the gauge plate. I tried keeping the wires correctly colored. Black is grounds (except the signals, indicator lights, those are all black), red is to a switched power source, white is all to a dash lamp source.
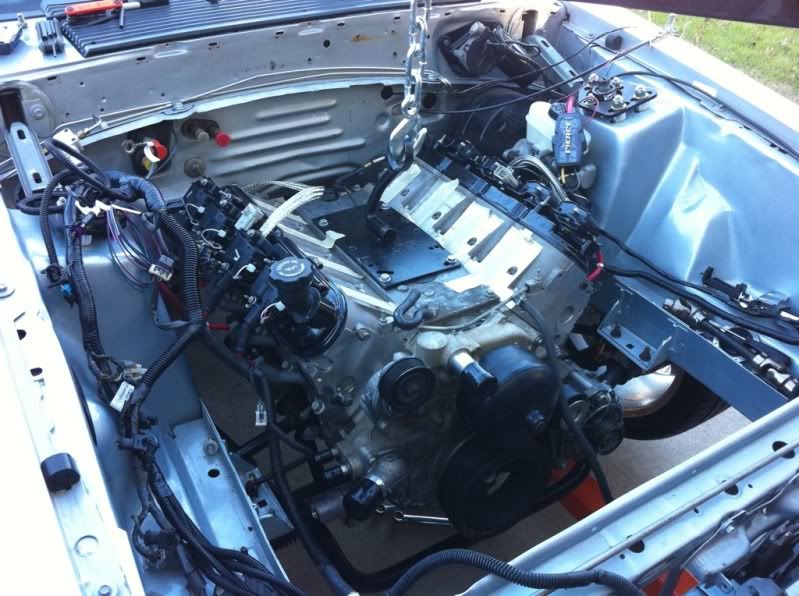
Well I had to replace the flywheel due to it being damaged by me. *sigh* Luckily I found a used one for dirt cheap and it arrived on thursday. Once I got it replaced I decided to attempt mounting the motor again. Only this time after a little but of playing with the motor mounts everything fell right into place. After getting the motor set in place I called it a day for saturday.
Today I worked on getting the intake mounted back on and making the throttle cable work. Once I got that done I routed the wiring harness around the engine bay, ran the temperature gauge sensor, and oil pressure line. Oh course as soon as that was done it began to rain. So I used that time to run to the parts store and grab some heater hose, radiator hoses, and a belt. Unfortunately no one carries the camaro radiator hose in stock and those are what a re needed......at least the upper. I opted to just hold off on the hoses for now.
About the time I got back home the rain quit and back to work it was. I installed the heater hoses to the engine and heater core. Mounted the fuse holder for the alternator on the shock tower.....and forgot to buy more wire to actually wire it to the alternator :facepalm: After that I decided to check the wiring to make sure the ecu was getting power. Everything looked good but I still cant figure out why two gauges are acting funny. Also for some reason the red/blue wire for the starter isnt getting voltage......so i have some bugs to fix yet. After looking over wiring diagrams for an hour I decided to quit before i got really frustrated and started wiring the dual fans. The modified harness pretty much has everything prewired except for the actual wiring to the fans. Of course I sorted, taped, wire loomed, and cleaned up the existing wires.
Im really hoping to have the torque converter in this week so I can finally mount the trans and hopefully get the car fired up. If not i still have plenty of work to do still. Still need to wire the back up lights, torque converter, starter and alternator. Not to mention I need to finish putting the interior back together and installing the radio. Tomorrow my magnaflow catback should be here though. Im thinking Im about 3 weeks away from being completely finished up.....unless I take some time off work to work on the car. Which is a very real possibility lol
Now for some pics.
First heres the diagram to wire up the camaro dual fans. This diagram is for the fans to be dual speed.

My harness was reworked for the fans to only be single speed thus using only 2 relays. As far as I know you can wire them either way but double check for your application.
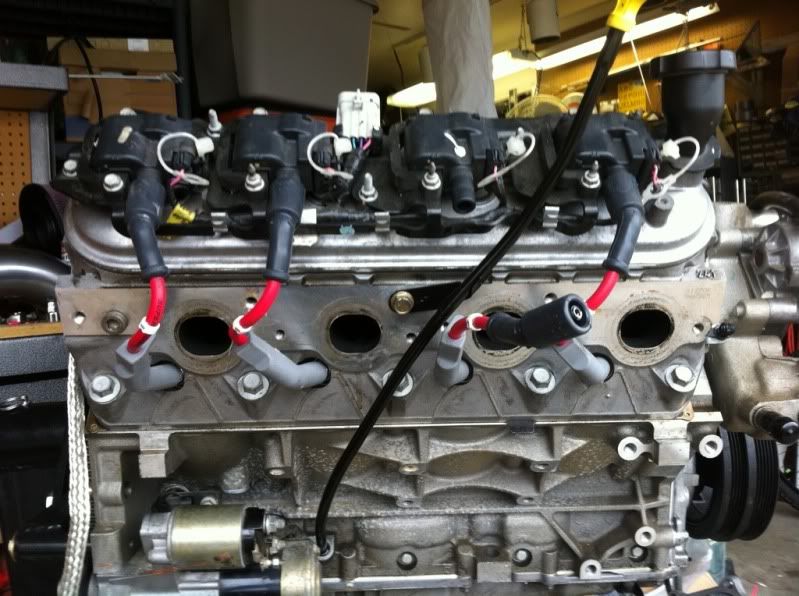
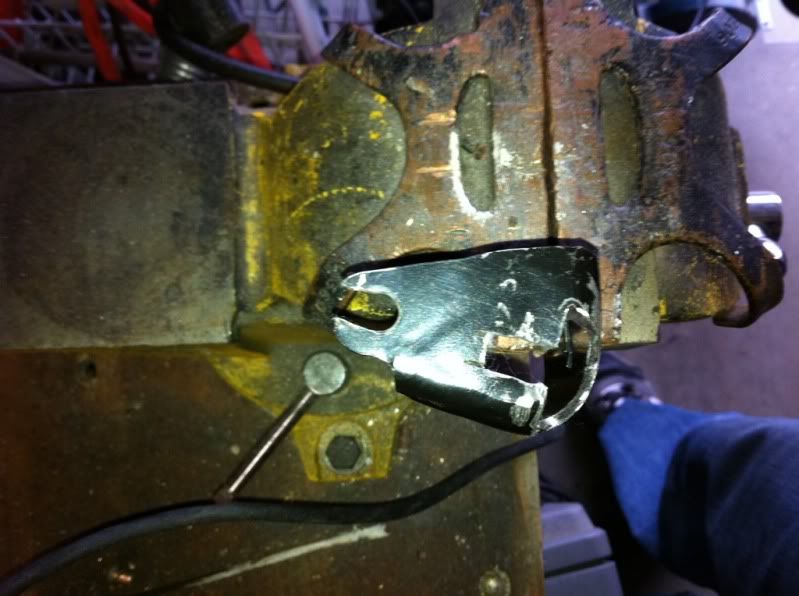
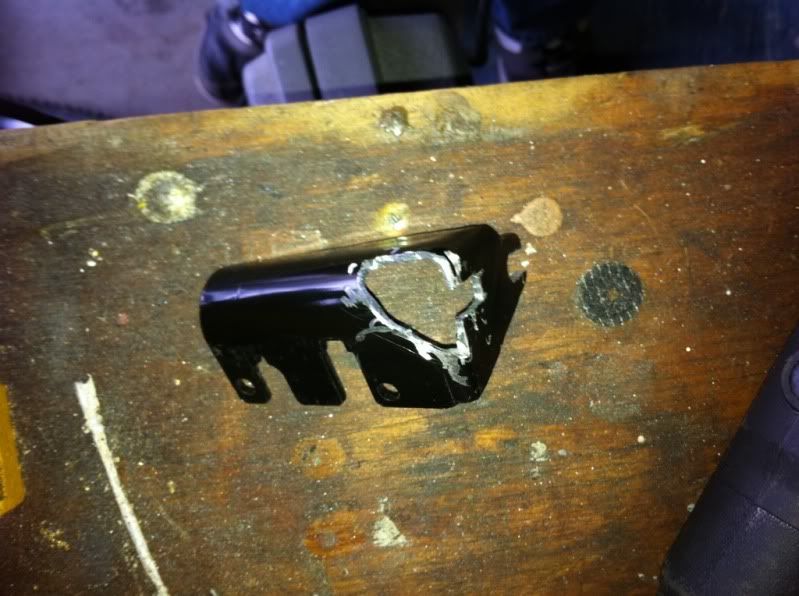
The stock throttle cable from the fox worked fine. I had to file down the nipple on the throttle body for it to snap in place. When you do this DONT use a dremel. That will grind away too much too fast then you'll be screwed. It didnt take a lot of filing but I was constantly stopping and checking to see when I had it just right. Once the cable would snap on I installed it on the bracket. Only to find out when the pedal is on the floor I still had a 1/8" let to go until the throttle body was wide open. I started out by enlongating the mounting hole on the bracket. That got it very close but not quite enough. I ended up having to shave off some of the back of the bracket to allow me more room to adjust the bracket further back (the bracket was hitting the intake manifold). Once I finally got it adjusted enough to be WOT with the pedal on the floor I noticed the thottle stays open about a millimeter. Not sure if thats going to be an issue but I would think not or at most it may bump the idle by 50-100 rpms max. If need be Ill be an aftermarket cable but I havent heard of anyone having issues with the stock cable.
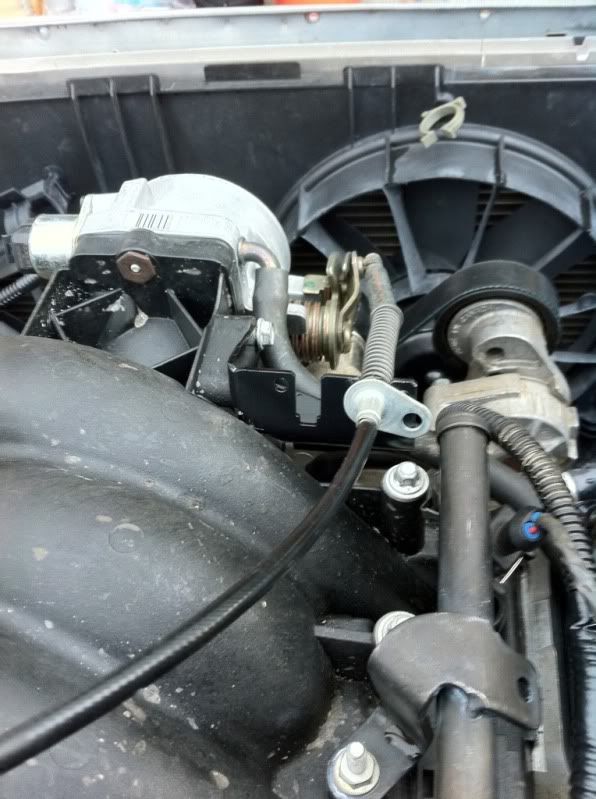
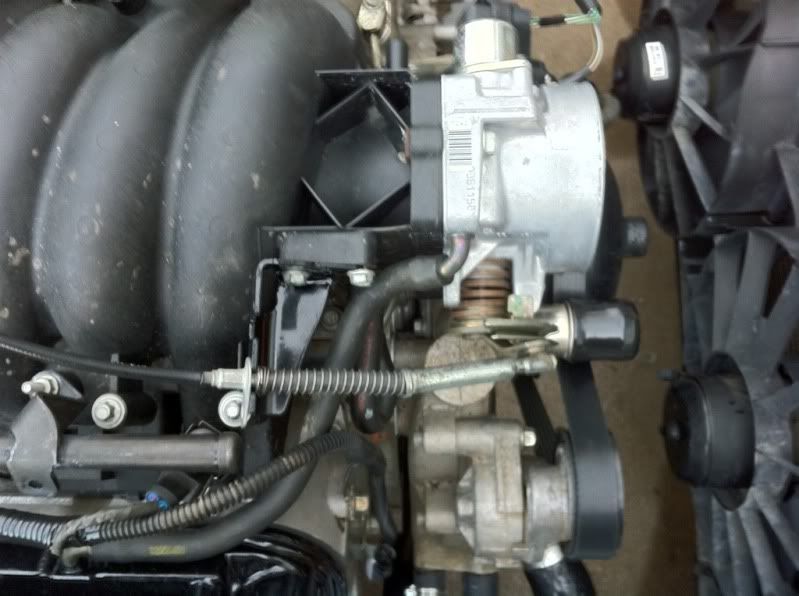
What she looked like after today was done.

Well the rain ruined any chance to do much work on the actual car. But I did get the windage tray, oil pan, pick up tube, and dip stick swapped out. I tapped the block off plate for the oil pressure gauge. Also got bored and removed the valve covers and cleaned them up and painted them black.
I got a late start today cause it was still raining. I changed the oil in my dads truck (in the rain lol). Then it ended up stopping so I decided to do some stuff on the car. I decided to go with a full sweep electric temperature gauge so I removed the other gauge and installed the new one. Also got the turn signals, high beam indicator, and brake light indicator wired up. For some reason the brake light isnt working though and the oil pressure light quit working........ill have to look into that more next weekend.
Heres the oil pans. The front sump GTO pan is on top. This pan wont work on this swap or any other swaps I have seen.
The GTO has the dip stick inserted in the pan. F body pans go through the block. In the first pic below you can see the hole for the dip stick tube right above the drain plug on the pan. On the second picture you can kind of see the existing hole where the f body dip stick goes (the hole is right behind the starter with a little blue mark on it).
I was a bit leary about messing up drilling the hole on the block so did some research to make sure i didnt screw it up. Low and behold I found out you dont need to drill the block at all. Its only a freeze plug type thing sealing it. Keep in mind if you ever go to a racing oil pan that uses a pan dip stick you will want to fill the plug again or else.....
Just get a punch and hammer and ightly tap it out from the underside of the block outward.
After I mounted the pan I tapped the block off plate for the oil pressure. I think Corvettes use this plate for their oil pressure senders so its the perfect spot to do the install. You will need to carefully drill out the plate with a 5/16" drill bit then tap it with a 1/8" npt bit.
Tapped and ready for action.
If you notice in the pics of the GTO oil pan the block off plate looks different. If you have this type of plate you will need to get the one like I tapped. Or you can buy one off ebay that is machined and pretapped. I actually bought one off ebay for $15 but ended up liking the factory plate better.
Heres a quick picture of the back of the gauge plate. I tried keeping the wires correctly colored. Black is grounds (except the signals, indicator lights, those are all black), red is to a switched power source, white is all to a dash lamp source.
Well I had to replace the flywheel due to it being damaged by me. *sigh* Luckily I found a used one for dirt cheap and it arrived on thursday. Once I got it replaced I decided to attempt mounting the motor again. Only this time after a little but of playing with the motor mounts everything fell right into place. After getting the motor set in place I called it a day for saturday.
Today I worked on getting the intake mounted back on and making the throttle cable work. Once I got that done I routed the wiring harness around the engine bay, ran the temperature gauge sensor, and oil pressure line. Oh course as soon as that was done it began to rain. So I used that time to run to the parts store and grab some heater hose, radiator hoses, and a belt. Unfortunately no one carries the camaro radiator hose in stock and those are what a re needed......at least the upper. I opted to just hold off on the hoses for now.
About the time I got back home the rain quit and back to work it was. I installed the heater hoses to the engine and heater core. Mounted the fuse holder for the alternator on the shock tower.....and forgot to buy more wire to actually wire it to the alternator :facepalm: After that I decided to check the wiring to make sure the ecu was getting power. Everything looked good but I still cant figure out why two gauges are acting funny. Also for some reason the red/blue wire for the starter isnt getting voltage......so i have some bugs to fix yet. After looking over wiring diagrams for an hour I decided to quit before i got really frustrated and started wiring the dual fans. The modified harness pretty much has everything prewired except for the actual wiring to the fans. Of course I sorted, taped, wire loomed, and cleaned up the existing wires.
Im really hoping to have the torque converter in this week so I can finally mount the trans and hopefully get the car fired up. If not i still have plenty of work to do still. Still need to wire the back up lights, torque converter, starter and alternator. Not to mention I need to finish putting the interior back together and installing the radio. Tomorrow my magnaflow catback should be here though. Im thinking Im about 3 weeks away from being completely finished up.....unless I take some time off work to work on the car. Which is a very real possibility lol
Now for some pics.
First heres the diagram to wire up the camaro dual fans. This diagram is for the fans to be dual speed.
My harness was reworked for the fans to only be single speed thus using only 2 relays. As far as I know you can wire them either way but double check for your application.
Relay # 1 Low speed relay
terminal
86 to C100 pin J
85 to + IGN source (old HEI power wire)
30 to cooling fan fuse (size depends on amperage of fans) then directly to constant battery power
87 to + low speed wire on fan
Relay # 2 High speed relay
86 to C100 pin H
85 to + IGN source (old HEI power wire)
30 to cooling fan fuse (size depends on amperage of fans) then directly to constant battery power
87 to + high speed wire on fan
Then ground the ground wire on the fan and your done.
The stock throttle cable from the fox worked fine. I had to file down the nipple on the throttle body for it to snap in place. When you do this DONT use a dremel. That will grind away too much too fast then you'll be screwed. It didnt take a lot of filing but I was constantly stopping and checking to see when I had it just right. Once the cable would snap on I installed it on the bracket. Only to find out when the pedal is on the floor I still had a 1/8" let to go until the throttle body was wide open. I started out by enlongating the mounting hole on the bracket. That got it very close but not quite enough. I ended up having to shave off some of the back of the bracket to allow me more room to adjust the bracket further back (the bracket was hitting the intake manifold). Once I finally got it adjusted enough to be WOT with the pedal on the floor I noticed the thottle stays open about a millimeter. Not sure if thats going to be an issue but I would think not or at most it may bump the idle by 50-100 rpms max. If need be Ill be an aftermarket cable but I havent heard of anyone having issues with the stock cable.
What she looked like after today was done.
01-24-2011, 08:00 AM
#38
Launching!
Thread Starter
iTrader: (5)
Join Date: Sep 2010
Location: Austin, TX
Posts: 264
Likes: 0
Received 0 Likes
on
0 Posts
The panel alone is $150. It fits perfect and comes with some nice instructions on how to hook everything up.
http://mc-machine.com/mcm_joom/content/view/13/27/
http://mc-machine.com/mcm_joom/content/view/13/27/
01-28-2011, 08:45 PM
#40
Launching!
Thread Starter
iTrader: (5)
Join Date: Sep 2010
Location: Austin, TX
Posts: 264
Likes: 0
Received 0 Likes
on
0 Posts
I have a new era intake for the 04 gto. I mocked it up and think the only way it will work is to mount it towards the driver side. If i try to mount it towards the passenger side like factory the radiator hoses and overflow tank will be in the way.