
1970 El Camino 5.3 build
 12-26-2010, 08:30 PM
#1
Staging Lane
Thread Starter
iTrader: (4)

Join Date: Feb 2010
Location: Sask, Canada
Posts: 95
Likes: 0
Received 0 Likes
on
0 Posts

a little bit of backstory:
I got the car in the spring of 2009, it was from near Rapid City, South Dakota, then it was hauled north into Canada
Here is how it looked when i got it
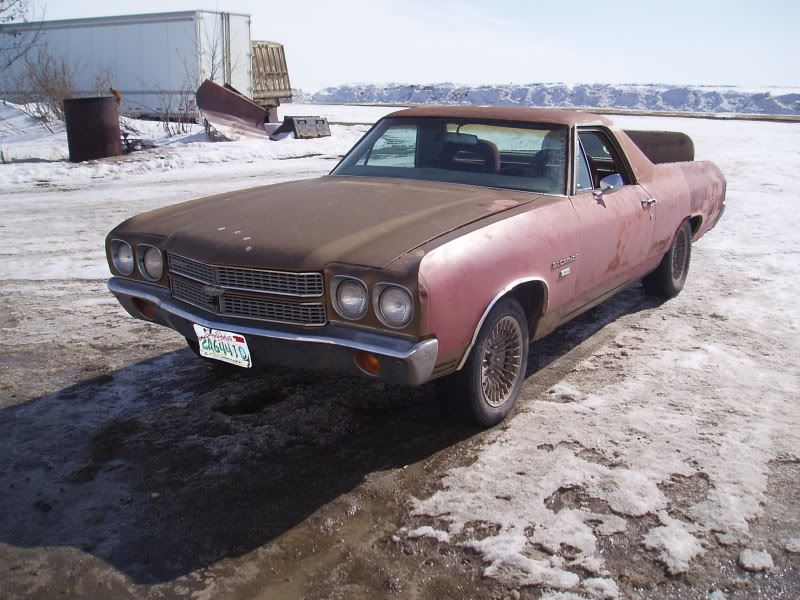
The options then were to either park it until i had the time and money to do the body work that was needed or either do a quick paint job on it and drive it around until painting it was in the budget
Option number 2 was chosen.
The car had a pretty much stock 350 except for an edelbrock intake. and a TH350 transmission.
This is how it has looked since then

In the spring of 2010, I bought a 1999 Silverado 1500 with a 5.3 and a 4l60e that was rolled in 2005 with 75,000 miles.

In September, I had time to pull the motor, trans, and wiring harness out of the truck.


The original plan when i bought the truck was to do a weekend swap and during the summer get the motor and transmission into the car and drive it around. I then got a killer deal on some lightly used trick flow heads and plans changed.
In early December i finally had the time to start actually working on this.


I got the car in the spring of 2009, it was from near Rapid City, South Dakota, then it was hauled north into Canada
Here is how it looked when i got it
The options then were to either park it until i had the time and money to do the body work that was needed or either do a quick paint job on it and drive it around until painting it was in the budget
Option number 2 was chosen.
The car had a pretty much stock 350 except for an edelbrock intake. and a TH350 transmission.
This is how it has looked since then
In the spring of 2010, I bought a 1999 Silverado 1500 with a 5.3 and a 4l60e that was rolled in 2005 with 75,000 miles.
In September, I had time to pull the motor, trans, and wiring harness out of the truck.
The original plan when i bought the truck was to do a weekend swap and during the summer get the motor and transmission into the car and drive it around. I then got a killer deal on some lightly used trick flow heads and plans changed.
In early December i finally had the time to start actually working on this.
 12-26-2010, 08:38 PM
#2
Staging Lane
Thread Starter
iTrader: (4)
Join Date: Feb 2010
Location: Sask, Canada
Posts: 95
Likes: 0
Received 0 Likes
on
0 Posts
I installed a comp cam that is 228/230, then cleaned up the decks and the heads, and installed them.


At this point I ran out of parts to work on the motor so i spent some time getting the unneeded wires out and clean it up a little bit.

This is what i was starting with and after a few hours i got it down to this

From here it was a lot of sitting on the floor looking at pin outs and pulling out what i don't need.
After doing that until my fingers hurt, i decided to get the old motor and trans out of the car.


From here i was busy writing finals for a couple of weeks and during this time most of the parts that i needed arrived.
At this point I ran out of parts to work on the motor so i spent some time getting the unneeded wires out and clean it up a little bit.
This is what i was starting with and after a few hours i got it down to this
From here it was a lot of sitting on the floor looking at pin outs and pulling out what i don't need.
After doing that until my fingers hurt, i decided to get the old motor and trans out of the car.
From here i was busy writing finals for a couple of weeks and during this time most of the parts that i needed arrived.
12-26-2010, 08:44 PM
#3
Staging Lane
Thread Starter
iTrader: (4)
Join Date: Feb 2010
Location: Sask, Canada
Posts: 95
Likes: 0
Received 0 Likes
on
0 Posts
When i got time to get back on this project, this is what was there when i walked in the shop


One of those boxes was containing my new transmission, a TKO 500

installed my new timing chain and oil pump

put the front cover and balancer on and moved to the rod bolts

From here i cleaned up the valve covers and then have been busy with other things
One of those boxes was containing my new transmission, a TKO 500
installed my new timing chain and oil pump
put the front cover and balancer on and moved to the rod bolts
From here i cleaned up the valve covers and then have been busy with other things
12-28-2010, 05:18 PM
#6
Staging Lane
Thread Starter
iTrader: (4)
Join Date: Feb 2010
Location: Sask, Canada
Posts: 95
Likes: 0
Received 0 Likes
on
0 Posts
new rockers installed

set the engine back in for one of what will probably be many test fits

Lets say that ground clearance may be an issue

Fortunately it was an issue that i was expecting so the oil pan got marked and the motor got taken back out.
my brother got tasked the job of making it shorter


about an inch and a half was removed

The bottom was set back on and everything was pretty close except for a gap at the back that needed a corner ground down to close it up


He welded the outside, then it was filled with solvent to check for leaks, there was one one the side of the pan, so the whole inside of the pan get welded too
and the final product

set the engine back in for one of what will probably be many test fits
Lets say that ground clearance may be an issue
Fortunately it was an issue that i was expecting so the oil pan got marked and the motor got taken back out.
my brother got tasked the job of making it shorter
about an inch and a half was removed
The bottom was set back on and everything was pretty close except for a gap at the back that needed a corner ground down to close it up
He welded the outside, then it was filled with solvent to check for leaks, there was one one the side of the pan, so the whole inside of the pan get welded too
and the final product
Trending Topics
01-05-2011, 01:51 PM
#11
Staging Lane
Thread Starter
iTrader: (4)
Join Date: Feb 2010
Location: Sask, Canada
Posts: 95
Likes: 0
Received 0 Likes
on
0 Posts

The oil pick up tube also got shortened

While my brother was doing all that, I was finishing up pulling wires from the harness. Every connector was labeled as to where it goes and every pin was labeled for its location on the PCM

Here is the box of wires that got removed

Put the LS1 intake on.

New Bosch 30 lb injectors got put into my Aeromotive fuel rails


__________________
01-05-2011, 01:57 PM
#12
Staging Lane
Thread Starter
iTrader: (4)
Join Date: Feb 2010
Location: Sask, Canada
Posts: 95
Likes: 0
Received 0 Likes
on
0 Posts
Since the truck injectors take a different connector than the LS1 injectors i had to solder the old wires to the injector plug pigtails that i got.

Also ran the wires to the throttle body to start remaking my harness

I was happy with how that was looking, so i put the coil packs in place

I didnt really like how that looked, and after a lot of staring at them, so i just cut the plugs off and hard wired them on.


The plugs will get soldered on under the dash, just in case i ever want to add a two step.
I intend to have all the wires come to the back of the intake, to which they will go through the firewall to the PCM which will be mounted inside.

This is only about half of them and they are already starting to add up.
Also ran the wires to the throttle body to start remaking my harness
I was happy with how that was looking, so i put the coil packs in place
I didnt really like how that looked, and after a lot of staring at them, so i just cut the plugs off and hard wired them on.
The plugs will get soldered on under the dash, just in case i ever want to add a two step.
I intend to have all the wires come to the back of the intake, to which they will go through the firewall to the PCM which will be mounted inside.
This is only about half of them and they are already starting to add up.
 01-05-2011, 02:15 PM
#14
Staging Lane
Thread Starter
iTrader: (4)
Join Date: Feb 2010
Location: Sask, Canada
Posts: 95
Likes: 0
Received 0 Likes
on
0 Posts
I'm going to leave them where they are. I think they will look not half bad once i clean the coils and brackets up and run the wires in some loom
01-18-2011, 03:03 PM
#15
Staging Lane
Thread Starter
iTrader: (4)
Join Date: Feb 2010
Location: Sask, Canada
Posts: 95
Likes: 0
Received 0 Likes
on
0 Posts
As you can see in this picture there was some interference between the throttle body and the water pump outlet
the solution for this was to pull the outlet out, put a frost plug in and then drill the front so it is the same as an f body water pump.

I installed the flywheel and the bellhousing to check the runout, is was not within the spec of the transmission so offset dowels will be needed

Then i removed the seat and the interior

He was slowing me down a bit
The location of the transmission hump was marked

Then the hole was cut in the floor


Put the paper template on the floor to mark where to cut

And cut along the line

I also have done the relocation of my front accessories but forgot my camera at home so i will add the pictures in my next update
the solution for this was to pull the outlet out, put a frost plug in and then drill the front so it is the same as an f body water pump.
I installed the flywheel and the bellhousing to check the runout, is was not within the spec of the transmission so offset dowels will be needed
Then i removed the seat and the interior
He was slowing me down a bit
The location of the transmission hump was marked
Then the hole was cut in the floor
Put the paper template on the floor to mark where to cut
And cut along the line
I also have done the relocation of my front accessories but forgot my camera at home so i will add the pictures in my next update
 01-18-2011, 03:53 PM
#18
hmmmm....i see...yea im factory bench seat too and like it.....
who is gonna do the tune on it...and what motor mounts did you end up using...just curious...i used brp's..they worked great..?
who is gonna do the tune on it...and what motor mounts did you end up using...just curious...i used brp's..they worked great..?
01-18-2011, 06:47 PM
#20
TECH Fanatic
iTrader: (3)

Join Date: Jan 2008
Location: Corpus Christi Texas
Posts: 1,519
Likes: 0
Received 0 Likes
on
0 Posts
Very nice.
Im building a cruiser 350 but with a nice interior/dash/paint then slowly building the suspension and chassis.
I want a BBC tho. Big cubes seemed the way to go
Im building a cruiser 350 but with a nice interior/dash/paint then slowly building the suspension and chassis.
I want a BBC tho. Big cubes seemed the way to go