
66 Chevelle LQ4 4l80 swap
 08-25-2011, 12:41 PM
#21
TECH Enthusiast


NICE!!! where did you end up mounting the computer ? If I had to do it again I would have mounted it in the glove box area , I did mount mine on top of the trans tunnel by the firewall - a real pain to get to it now if I need to .the dash gets real tight when all the ac hoses are ran , on my car I bought the reducers for the air hose and ended up using the smaller hose for all the ducting JOHN
 08-25-2011, 01:22 PM
#22

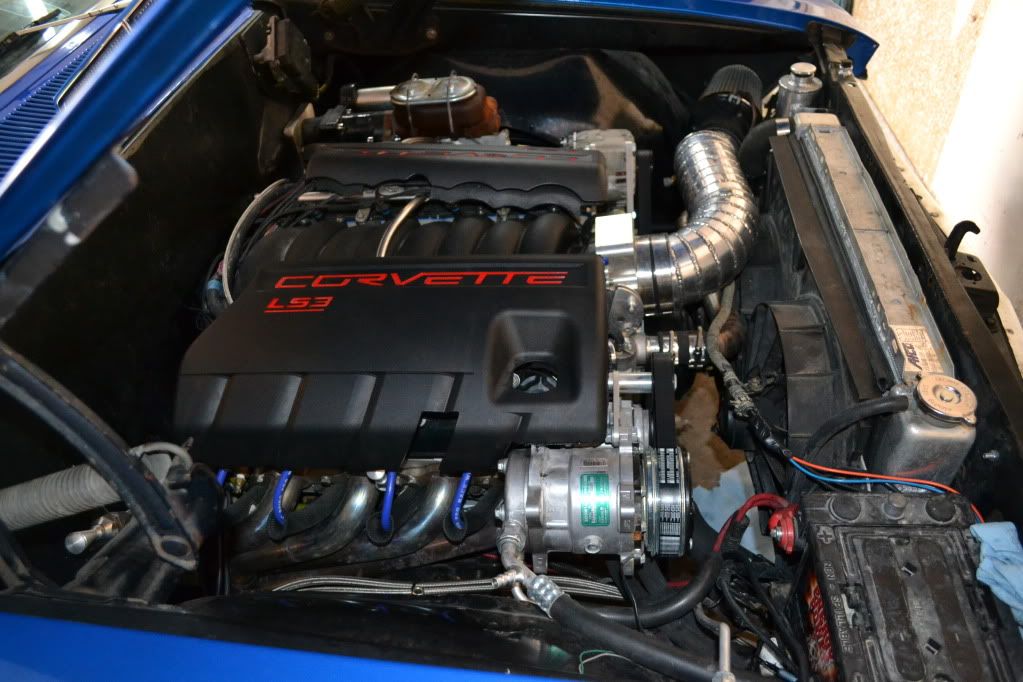
Very nice work on the headers and great progress.
Regarding the intake tube, just like the headers, you can buy pre-bent aluminum tube and cut the angles you need. I can't believe how many cuts you used to make that part. It must have taken a long time. I don't mean to criticize, but I think you could have gotten that done a lot faster and cleaner. I'd still consider getting some prebent tube because cleaning up all those welds (assuming you plan to smooth it out) will likely take about as much time as starting over.
Regarding the intake tube, just like the headers, you can buy pre-bent aluminum tube and cut the angles you need. I can't believe how many cuts you used to make that part. It must have taken a long time. I don't mean to criticize, but I think you could have gotten that done a lot faster and cleaner. I'd still consider getting some prebent tube because cleaning up all those welds (assuming you plan to smooth it out) will likely take about as much time as starting over.
 08-25-2011, 05:49 PM
#23
On The Tree
Thread Starter

Join Date: Apr 2011
Location: Mobile Alabama
Posts: 108
Likes: 0
Received 0 Likes
on
0 Posts
Very nice work on the headers and great progress.
Regarding the intake tube, just like the headers, you can buy pre-bent aluminum tube and cut the angles you need. I can't believe how many cuts you used to make that part. It must have taken a long time. I don't mean to criticize, but I think you could have gotten that done a lot faster and cleaner. I'd still consider getting some prebent tube because cleaning up all those welds (assuming you plan to smooth it out) will likely take about as much time as starting over.
Regarding the intake tube, just like the headers, you can buy pre-bent aluminum tube and cut the angles you need. I can't believe how many cuts you used to make that part. It must have taken a long time. I don't mean to criticize, but I think you could have gotten that done a lot faster and cleaner. I'd still consider getting some prebent tube because cleaning up all those welds (assuming you plan to smooth it out) will likely take about as much time as starting over.
The welds are staying and after polishing it should have a good unique look.
There is no doubt he got carried away a little though. It started with proving a concept with the intention of piecutting the 4" radius bend but the result will look good.
08-25-2011, 05:54 PM
#24
On The Tree
Thread Starter
Join Date: Apr 2011
Location: Mobile Alabama
Posts: 108
Likes: 0
Received 0 Likes
on
0 Posts
NICE!!! where did you end up mounting the computer ? If I had to do it again I would have mounted it in the glove box area , I did mount mine on top of the trans tunnel by the firewall - a real pain to get to it now if I need to .the dash gets real tight when all the ac hoses are ran , on my car I bought the reducers for the air hose and ended up using the smaller hose for all the ducting JOHN
I have a Vintage Air unit so there is no room in the glovebox and do not want it in the engine compartment or the huge bundle of wires running all the way to the trunk so that seemed like the best option.
I made a console (first iteration of one anyhow) that will hide the computer and wires and allow for me to put in some cup holders and an AFR gauge.
08-15-2012, 11:06 PM
#25
On The Tree
Thread Starter
Join Date: Apr 2011
Location: Mobile Alabama
Posts: 108
Likes: 0
Received 0 Likes
on
0 Posts
Well I let this thread die after getting discouraged fixing all of the hack job screw ups by the guy I trusted to do the hard parts of this swap (and a few of my own screwups) However, I did get it finished around January. Here are a few pics of the end result.
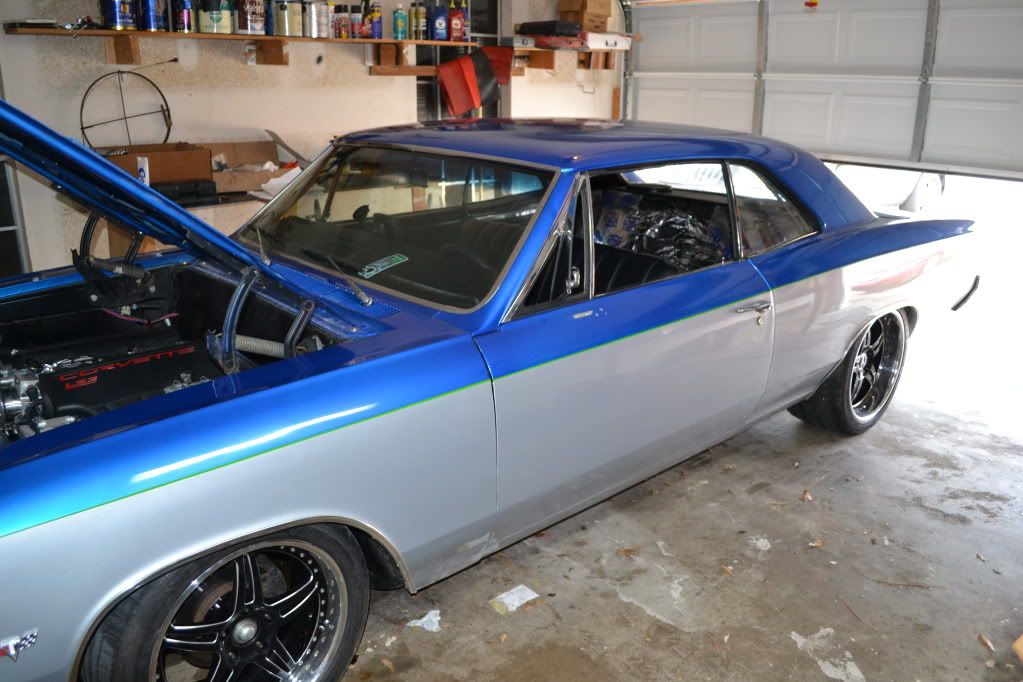
Car is currently torn down for paint and I hope to put it back together in two more weeks. Going with a color very close to the viper steel grey and getting all of the chrome powder coated black. While I am a hair nervous about the trim thing I think it is going to look good.
After that I just have to redo the sloppy *** rear suspension the fab guy made and get back to daily driving so that I can enjoy all this work.

 09-06-2012, 10:41 AM
#30
On The Tree
Thread Starter
Join Date: Apr 2011
Location: Mobile Alabama
Posts: 108
Likes: 0
Received 0 Likes
on
0 Posts
Car is coming along nicely. I spent the past weekend getting everything back together I could with the trim that I had back from the powder coater and without the hood/trunk.
Here is the rear smoked glass with Black Powder coated trim. I was nervous about trying this but it is turning out perfectly so far:

This pic of the vent windows being put back together shows the glass more clearly. I am pleased with the way the smoked glass kit looks even if I am upset with the vendor for his failure to return any of my calls to get another issue addressed.:

Front Glass I had flush mounted and it turned out fairly well. I still need to do a little work on the upper corners to fill that gap but I think it is going to look sharp. The cowl area was just brushed black to keep the old color overspray from showing.


The door handles were also coated. Please ignore all the other junk and dirty carpet in this picture I was way to tired to clean up the area better at this point after a few consecutive days with 3 hours of sleep trying to get this back together.


Here is the rear smoked glass with Black Powder coated trim. I was nervous about trying this but it is turning out perfectly so far:
This pic of the vent windows being put back together shows the glass more clearly. I am pleased with the way the smoked glass kit looks even if I am upset with the vendor for his failure to return any of my calls to get another issue addressed.:
Front Glass I had flush mounted and it turned out fairly well. I still need to do a little work on the upper corners to fill that gap but I think it is going to look sharp. The cowl area was just brushed black to keep the old color overspray from showing.
The door handles were also coated. Please ignore all the other junk and dirty carpet in this picture
I was way to tired to clean up the area better at this point after a few consecutive days with 3 hours of sleep trying to get this back together.
09-06-2012, 10:46 AM
#31
On The Tree
Thread Starter
Join Date: Apr 2011
Location: Mobile Alabama
Posts: 108
Likes: 0
Received 0 Likes
on
0 Posts
I am still struggling with finding a clean, convenient, secure, and accessible mounting location for my ECU. I will have to play with that in a few weeks after I get finished with this Test Block and can afford to take another weekend off.
I am also searching for a good way to make some smooth, air ducting for the vintage air kit to increase air flow and get rid of the condensation that randomly drips from the convoluted tubing. If anyone has good ideas on this please let me know.
I am also searching for a good way to make some smooth, air ducting for the vintage air kit to increase air flow and get rid of the condensation that randomly drips from the convoluted tubing. If anyone has good ideas on this please let me know.
09-06-2012, 12:03 PM
#32
Launching!
iTrader: (1)

Join Date: Apr 2012
Location: NC
Posts: 222
Likes: 0
Received 0 Likes
on
0 Posts
Great swap!!! I am building a LQ4/L92 as well and am actually researching to see how much I can mill the L92's. My cam is a little milder at 220/224 .530/.534 112LSA so I am thinking I should be able to replicate your 0.025 without PtoV issues
Where does your ECU naturally end up without the wires being too tight? It might be good to find a mounting location nearby
Where does your ECU naturally end up without the wires being too tight? It might be good to find a mounting location nearby
09-06-2012, 12:27 PM
#33
On The Tree
Thread Starter
Join Date: Apr 2011
Location: Mobile Alabama
Posts: 108
Likes: 0
Received 0 Likes
on
0 Posts
Great swap!!! I am building a LQ4/L92 as well and am actually researching to see how much I can mill the L92's. My cam is a little milder at 220/224 .530/.534 112LSA so I am thinking I should be able to replicate your 0.025 without PtoV issues
Where does your ECU naturally end up without the wires being too tight? It might be good to find a mounting location nearby
Where does your ECU naturally end up without the wires being too tight? It might be good to find a mounting location nearby
For an easy option just mounting the computer to the inner fender works well but I did not like that look. Without the vintage air unit there would be plenty of room on the firewall.
1966, 4l80, 66, brackets, chevelle, conversion, conversions, drive, installation, lq4, ls, ls1, motor, rx7, serpentine, swap