
5.3/T56 swap into a First Gen RX7 GS **Update 3-25-12**
 10-19-2012, 11:07 AM
#41
Teching In
Thread Starter
iTrader: (4)

Join Date: May 2011
Location: Moorhead, MN
Posts: 49
Likes: 0
Received 0 Likes
on
0 Posts
I tried to figure that out when you posted this... I am somewhere around 5K with only a low 13 slip for it so far. Ha
I hear that Holley LS Swap pan fits nicely.
 10-19-2012, 08:42 PM
#43
Teching In
Thread Starter
iTrader: (4)
Join Date: May 2011
Location: Moorhead, MN
Posts: 49
Likes: 0
Received 0 Likes
on
0 Posts
Ok to cover what I missed, here is a list of things that have been done.
Installed Ford solid 8.8 using stock 4 links, bought a universal Watts link from Speedway and installed on the rear side of the diff. The driveshaft I got with the 8.8 that the guy was using in his ford T5 was the perfect length (34") after swapping on a chevy yoke for the T56. I still have lots of real suspension work to do....


I finished up the Engine crossmember and mounts, it now sits perfectly in the middle of the engine bay with good clearance all the way around.


I picked up a throttle cable, found some awesome fitting radiator hoses, and a belt with my custom idler pulley setup.


I started putting coolant in it and I had a bad leak! Stupid used water pump!

I picked up a new one at O'Reilly's, man I love working there!


I started it up for the first time! Let it warm up for a few minutes to bleed cooling system, checked fluids, and hopped in. I took it for the first drive and it was amazing! It just plain goes! only drawback right now is no exhaust at all lol
Sweet burnout vid!
http://www.youtube.com/watch?feature...&v=L5rUDlKg7g0
I did some exhaust work, 2.5" stainless to the Magnaflow muffs and turn-downs in front of the rear axle for now.


All of this driving around after years of sitting had a few bad parts show them selves. My Idler arm was first to go, replaced with a sweet new Moog unit.

I made it to the track and ended up with a messed up rod bearing journal, best time when she blew was a 13.7 with also broken upper link bars on the diff with bad wheel hop... not my best day at the track
So then I found this miniature beast


Add some of this

Clean up


Chevy Orange


Re-assembly

Install


Installed Ford solid 8.8 using stock 4 links, bought a universal Watts link from Speedway and installed on the rear side of the diff. The driveshaft I got with the 8.8 that the guy was using in his ford T5 was the perfect length (34") after swapping on a chevy yoke for the T56. I still have lots of real suspension work to do....
I finished up the Engine crossmember and mounts, it now sits perfectly in the middle of the engine bay with good clearance all the way around.
I picked up a throttle cable, found some awesome fitting radiator hoses, and a belt with my custom idler pulley setup.
I started putting coolant in it and I had a bad leak! Stupid used water pump!
I picked up a new one at O'Reilly's, man I love working there!
I started it up for the first time! Let it warm up for a few minutes to bleed cooling system, checked fluids, and hopped in. I took it for the first drive and it was amazing! It just plain goes! only drawback right now is no exhaust at all lol
Sweet burnout vid!
http://www.youtube.com/watch?feature...&v=L5rUDlKg7g0
I did some exhaust work, 2.5" stainless to the Magnaflow muffs and turn-downs in front of the rear axle for now.
All of this driving around after years of sitting had a few bad parts show them selves. My Idler arm was first to go, replaced with a sweet new Moog unit.
I made it to the track and ended up with a messed up rod bearing journal, best time when she blew was a 13.7 with also broken upper link bars on the diff with bad wheel hop... not my best day at the track
So then I found this miniature beast
Add some of this
Clean up
Chevy Orange
Re-assembly
Install
10-19-2012, 08:54 PM
#44
Teching In
Thread Starter
iTrader: (4)
Join Date: May 2011
Location: Moorhead, MN
Posts: 49
Likes: 0
Received 0 Likes
on
0 Posts
Ready for the track again!

In the staging lanes


Best run of the day against a Z06.... he was not on his game and I ran a low 13 second pass and there is more to go with some better tunning now that I have a wide band.
http://www.youtube.com/watch?feature...&v=DMZ7pb_wOhk
Some more pics of how it is sitting in the engine bay.


Right now I am working on the suspension. The whole front end is getting swapped out with parts from newer RX7's. Strut assemblies from FB 1984-85 GSL-SE, 5 lug hubs from a Turbo II or Convertable FC, 4 piston calipers from a 93 FD, new bearings and adapter plates for the larger brakes from Re-speed. I am gonna try to get some 5 way adjustable front strut cartridges as well!
The rear end will be next, the 8.8 will get a major overhaul. Gonna cut and grind off all of the brackets crappily welded onto it. Shorten the longer drivers side to match the passenger side. Weld on all new brackets with proper suspension geometry in mind. Beefy lower links with rod ends, upper links with better bushings or rod ends. I want this thing to launch like it should!
(Oh and incase anyone notices, I do have real tires and rims for the front! Pics of that next time)
In the staging lanes
Best run of the day against a Z06.... he was not on his game and I ran a low 13 second pass and there is more to go with some better tunning now that I have a wide band.
http://www.youtube.com/watch?feature...&v=DMZ7pb_wOhk
Some more pics of how it is sitting in the engine bay.
Right now I am working on the suspension. The whole front end is getting swapped out with parts from newer RX7's. Strut assemblies from FB 1984-85 GSL-SE, 5 lug hubs from a Turbo II or Convertable FC, 4 piston calipers from a 93 FD, new bearings and adapter plates for the larger brakes from Re-speed. I am gonna try to get some 5 way adjustable front strut cartridges as well!
The rear end will be next, the 8.8 will get a major overhaul. Gonna cut and grind off all of the brackets crappily welded onto it. Shorten the longer drivers side to match the passenger side. Weld on all new brackets with proper suspension geometry in mind. Beefy lower links with rod ends, upper links with better bushings or rod ends. I want this thing to launch like it should!
(Oh and incase anyone notices, I do have real tires and rims for the front! Pics of that next time)

 12-07-2012, 11:17 AM
#46
Teching In

Join Date: May 2009
Posts: 12
Likes: 0
Received 0 Likes
on
0 Posts
got my oil pan figured out. i just chopped up a truck pan. made it alot like yours except i took about an inch out of the front of the sump to clear the drag link. you have any pics of how that radiator fits in there?
04-26-2013, 11:49 PM
#47
Teching In
Thread Starter
iTrader: (4)
Join Date: May 2011
Location: Moorhead, MN
Posts: 49
Likes: 0
Received 0 Likes
on
0 Posts
This thread right here, http://www.norotors.com/index.php?topic=2877.120 page 9 has the radiator setup.

 05-14-2013, 10:08 PM
#50
Teching In
Thread Starter
iTrader: (4)
Join Date: May 2011
Location: Moorhead, MN
Posts: 49
Likes: 0
Received 0 Likes
on
0 Posts
Haha yup, some nice looking cars when done right, fun too
I took a grinder to it just to take off 1/8 inch. The truck pan clears just fine with the engine slammed agaist the firewall. Granny's has a write up to a more extensive mod.
http://www.grannysspeedshop.com
manuals tab at the top, then all the way to the bottom of the list.
I have much to update soon.
05-20-2013, 09:55 PM
#51
Teching In
Thread Starter
iTrader: (4)
Join Date: May 2011
Location: Moorhead, MN
Posts: 49
Likes: 0
Received 0 Likes
on
0 Posts
I got the old SA22C hauled up from my parents place before the last snow storm actually, been sitting in the garage for the last 3 weeks draining the old Red top stone dead. I had the battery unhooked all winter and she cranked over and fired up awesome this winter/spring. So idk when this drain started. I was gonna try to investigate today but could not find my Multi-meter anywhere. So I decided to put my mess of tools away first. I am pretty sure the Red top is not gonna come back from the dead, add that to the list for this year...
Ah yes the list to do:
Install my almost new Grannies Stage 5 8.8 rear end.
Remove rust filled old gas tank
Install Fuel cell
Re-plum fuel lines
Enjoy some smoky burnouts
Repostion/re-mount radiator with ducting
Re-do/modify exhaust to fit it up into the tunnel better, run it all the way out the back end
Install GSL-SE front spindles with TurboII front brakes
Install a GSL-SE brake master cylinder
New front struts/springs
Get a better shifter
prep for paint
New parts


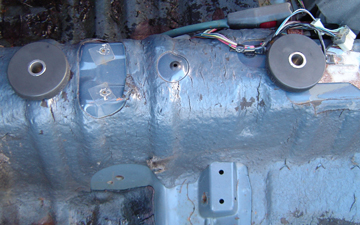
I got the rear end all tore apart, dropped the junk 8.8 and fuel tank. I used a 4.5" grinder and cut off wheels to remove the spare tire well. This ended up being pretty easy going except for a few extra brackets that needed to be cut from the bottom.


After that was all done I found the last place in town that sells all kinds of steel and aluminum. Picked up a plate of 16 gauge steel 31"x30" for a bit over $12. Trimmed it down to a nice round 27" diameter with my killer skills.
Plan A: Cut with my sweet little air saw. FAIL air compressor can't keep up and cheap blades failed.

Plan B: 4.5" grinder with cut off wheels again!

Holding it up into place

The notch is key for proper fitment


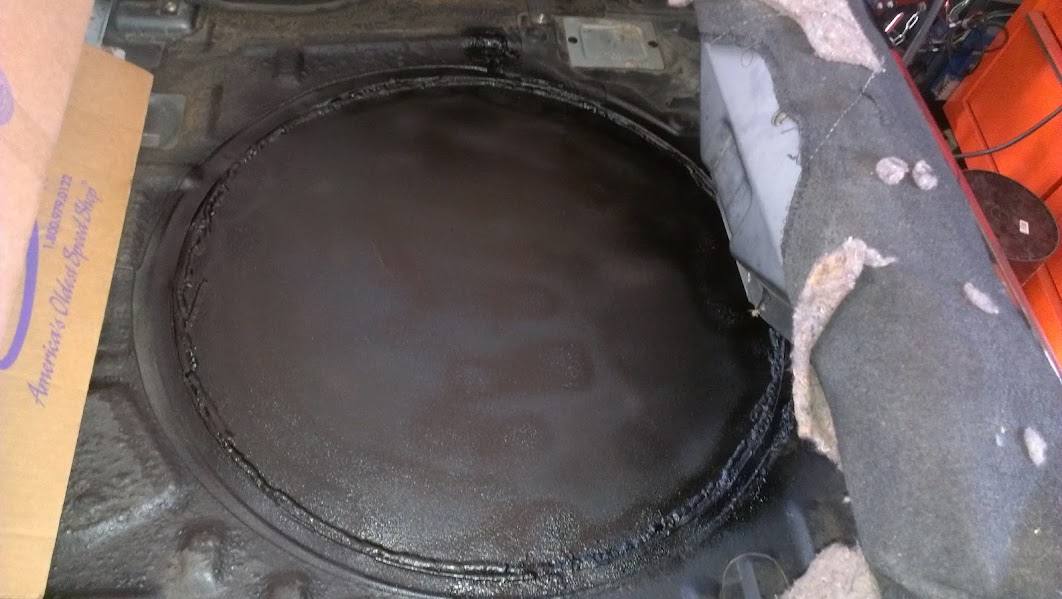
Welded it in... This took a long time and proved difficult. If I would do it again I would cut back the this remains of the spare tire well further the a double lip of metal that would not have burned through so bad over and over again. My welding skills are rusty but they held well enough when I stood on the plate after it was all done. I then got a little to trigger happy with underbody coating, still had some holes to make


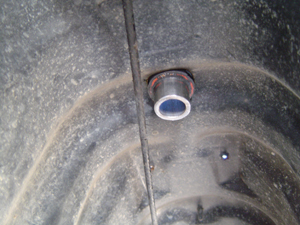
Holes for the fill and sending unit. I was able to borrow a nice 3.25" inch hole saw and a cheap 5" one

I ended up have to cut the hole though with my little cut-off wheel then cut around with my air saw and some new dewalt blades, I left the compressor run till full then I made it 3/4 of the way around. Took a break then finished it off. I guess my measuring skills didn't take into account that summit don't center the sending unit in the tank :o

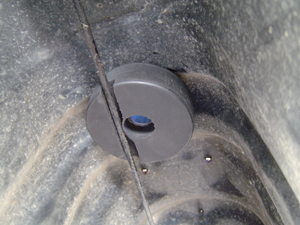
Tank all mounted in with some weather stripping between tank and bottom of car.


Ok switching to the rear axle I picked up, here is a great example of how not to install rear brake pads in a system with integrated parking brakes.
Bent pin


Broken pin


Looks like the pins on the rear of the pads were not lined up with the slots in the piston. The inside pins looked the be ground or sheared off.
Front Brake calipers are almost ready to go

Ah yes the list to do:
Install my almost new Grannies Stage 5 8.8 rear end.
Remove rust filled old gas tank
Install Fuel cell
Re-plum fuel lines
Enjoy some smoky burnouts
Repostion/re-mount radiator with ducting
Re-do/modify exhaust to fit it up into the tunnel better, run it all the way out the back end
Install GSL-SE front spindles with TurboII front brakes
Install a GSL-SE brake master cylinder
New front struts/springs
Get a better shifter
prep for paint
New parts
I got the rear end all tore apart, dropped the junk 8.8 and fuel tank. I used a 4.5" grinder and cut off wheels to remove the spare tire well. This ended up being pretty easy going except for a few extra brackets that needed to be cut from the bottom.
After that was all done I found the last place in town that sells all kinds of steel and aluminum. Picked up a plate of 16 gauge steel 31"x30" for a bit over $12. Trimmed it down to a nice round 27" diameter with my killer skills.
Plan A: Cut with my sweet little air saw. FAIL air compressor can't keep up and cheap blades failed.
Plan B: 4.5" grinder with cut off wheels again!
Holding it up into place
The notch is key for proper fitment
Welded it in... This took a long time and proved difficult. If I would do it again I would cut back the this remains of the spare tire well further the a double lip of metal that would not have burned through so bad over and over again. My welding skills are rusty but they held well enough when I stood on the plate after it was all done. I then got a little to trigger happy with underbody coating, still had some holes to make
Holes for the fill and sending unit. I was able to borrow a nice 3.25" inch hole saw and a cheap 5" one
I ended up have to cut the hole though with my little cut-off wheel then cut around with my air saw and some new dewalt blades, I left the compressor run till full then I made it 3/4 of the way around. Took a break then finished it off. I guess my measuring skills didn't take into account that summit don't center the sending unit in the tank :o
Tank all mounted in with some weather stripping between tank and bottom of car.
Ok switching to the rear axle I picked up, here is a great example of how not to install rear brake pads in a system with integrated parking brakes.
Bent pin
Broken pin
Looks like the pins on the rear of the pads were not lined up with the slots in the piston. The inside pins looked the be ground or sheared off.
Front Brake calipers are almost ready to go
05-20-2013, 10:01 PM
#52
Teching In
Thread Starter
iTrader: (4)
Join Date: May 2011
Location: Moorhead, MN
Posts: 49
Likes: 0
Received 0 Likes
on
0 Posts
Between work, my gf, and this car I am busy busy!
I have been doing a few things with the new 8.8 setup. easiest thing to do so far was bolt up the shocks lol. The holes for the new beefy lower links needed to be enlarged for the much bigger 3/4" grade 8 bolts. While enlarging them with my 90* air die grinder and carbide bits I went down with the hole to move it closer to that 10mm lower like the FB has. Mazda did this to help improve rear handling as I hear it. Next up is I still have to drill the holes for the torque arm mounts. This has a few problems with it. My SA is not specing out like an FB as the instructions were wrote for on Granny's website. Also the mounts this diff came with are not the ones it should have, these look like ****. :o
http://grannys.tripod.com/1TASAinstallguide.html


What they are supposed to be

I guess I will have to make some new ones and find new steel bushings, anyone know the specs on the bushings they come with?
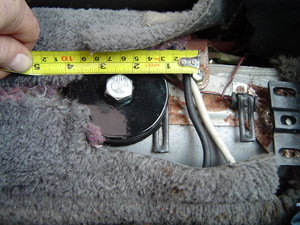
Then there is the hole locations, my SA center tunnel looks a bit different than the one they have pictured in the directions and don't seem to measure out the same. Supposed to start the first hole "about 2-3/8" to the rear of the e-brake handle's mounting bolt. The rear hole is located in the center of the tunnel at a point about 12-3/4" to the rear of the front hole. The center-to-center distance between the holes should be 12-3/4"
Pointing at the bolt

Can anyone confirm that this would be the same location on an SA22C? I have tried calling grannies a bunch of times, never any answer and no replies to my messages.
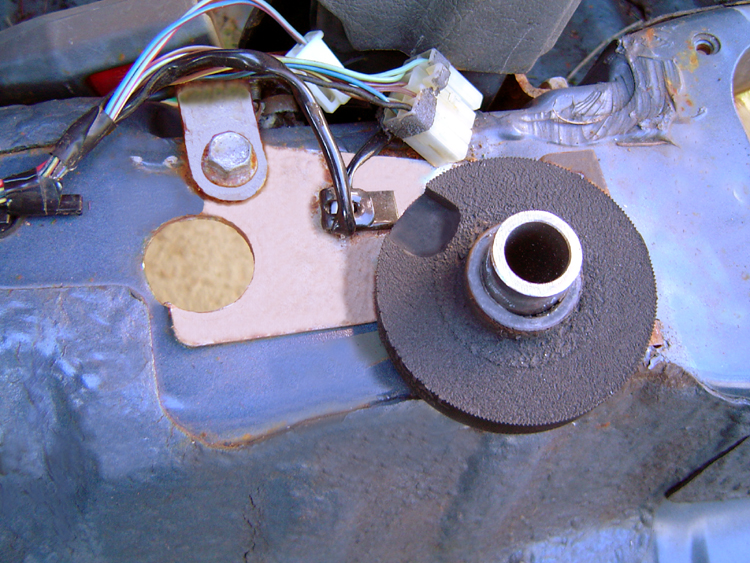
The mounting holes I enlarged and lowered.


Sitting on the old stock springs because this diff has the stock style tappered seats for some reason... Now I have to buy new springs. What do you guys suggest for a good spring rate? 200? 225? or just buy a whole kit for a First Gen
One other little thing is I bought a new LS1 dipstick and tube, bent is slightly to clear the hood and the LS3 manifolds, also with the truck pan. Fits pretty nice. Hell of a lot better than the super long Truck dipstick and tube.

Well wtf I just noticed this on their install guide.
These are not even the same car.
I see a huge difference in hole mounting location!
I need some insight as to where is the best location to mount my torque arm.
I just went ahead with stalling the mounts the best I could, used the 2 3/8" back from e-brake bolt location. I didn't have the fancy looking bushings that come with Granny's kit so I just made my own.


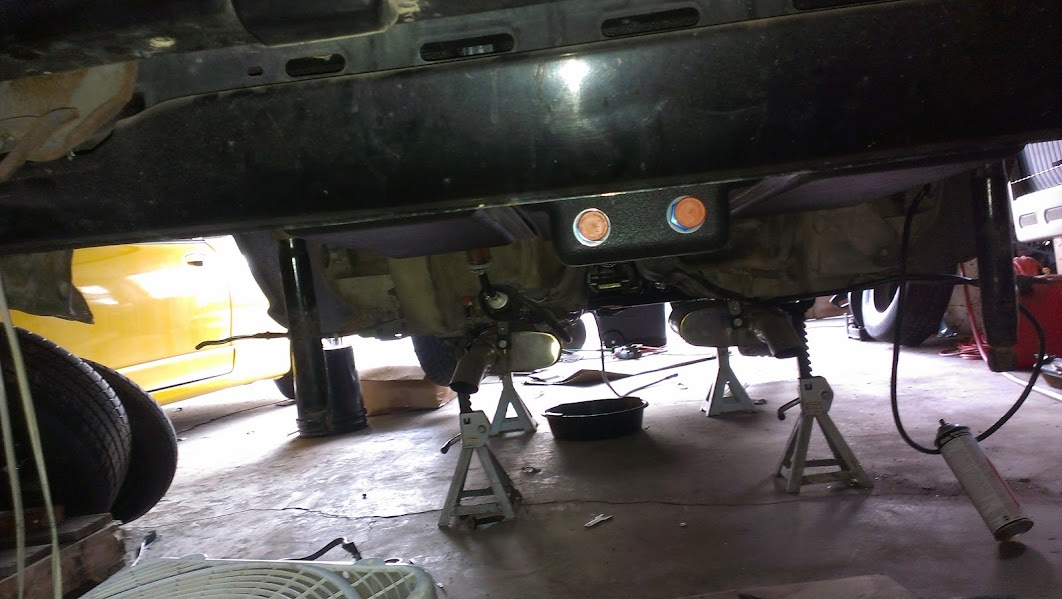
The diff is now installed fully and sitting on the jack stands.


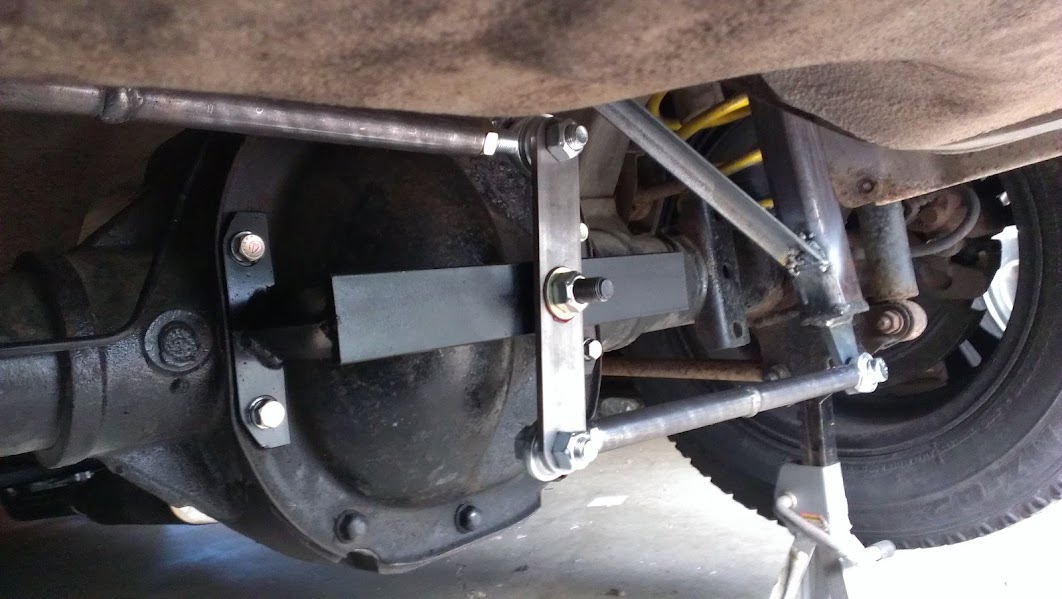
After that I got the Watts links all sorted out, seems the watts link center piece was on the diff up side down. Only ended up using 2 of the 4 supplied bushing between the rod ends of the links and the body of the car. Still need to plum in the rear brakes, hard to do without the calipers mounted up, so that will wait till I get the broken pins in the brackets sorted out.
Then I turned my attention forward to the transmission. Pulled the drain plug and only 1 qt of ATF came out :o ****! I guess the rear seal was leaking worse than I thought, sad thing is I put a new one in when I got the trans. I flushed it with a little new ATF then I filled it with Royal Purple Syncromax fluid, it was either that of Penzoil Syncromesh stuff... Installed my new/used Pro 5.0 Shifter with TriAxe lever arm. The old boots cover it not to bad, still need a cover for in front of the shifter.


Now I need to do up my fuel lines and hook up a battery, then its time for a drive!
I have been doing a few things with the new 8.8 setup. easiest thing to do so far was bolt up the shocks lol. The holes for the new beefy lower links needed to be enlarged for the much bigger 3/4" grade 8 bolts. While enlarging them with my 90* air die grinder and carbide bits I went down with the hole to move it closer to that 10mm lower like the FB has. Mazda did this to help improve rear handling as I hear it. Next up is I still have to drill the holes for the torque arm mounts. This has a few problems with it. My SA is not specing out like an FB as the instructions were wrote for on Granny's website. Also the mounts this diff came with are not the ones it should have, these look like ****. :o
http://grannys.tripod.com/1TASAinstallguide.html
What they are supposed to be
I guess I will have to make some new ones and find new steel bushings, anyone know the specs on the bushings they come with?
Then there is the hole locations, my SA center tunnel looks a bit different than the one they have pictured in the directions and don't seem to measure out the same. Supposed to start the first hole "about 2-3/8" to the rear of the e-brake handle's mounting bolt. The rear hole is located in the center of the tunnel at a point about 12-3/4" to the rear of the front hole. The center-to-center distance between the holes should be 12-3/4"
Pointing at the bolt
Can anyone confirm that this would be the same location on an SA22C? I have tried calling grannies a bunch of times, never any answer and no replies to my messages.
The mounting holes I enlarged and lowered.
Sitting on the old stock springs because this diff has the stock style tappered seats for some reason... Now I have to buy new springs. What do you guys suggest for a good spring rate? 200? 225? or just buy a whole kit for a First Gen
One other little thing is I bought a new LS1 dipstick and tube, bent is slightly to clear the hood and the LS3 manifolds, also with the truck pan. Fits pretty nice. Hell of a lot better than the super long Truck dipstick and tube.
Well wtf I just noticed this on their install guide.
These are not even the same car.
I see a huge difference in hole mounting location!
I need some insight as to where is the best location to mount my torque arm.
I just went ahead with stalling the mounts the best I could, used the 2 3/8" back from e-brake bolt location. I didn't have the fancy looking bushings that come with Granny's kit so I just made my own.
The diff is now installed fully and sitting on the jack stands.
After that I got the Watts links all sorted out, seems the watts link center piece was on the diff up side down. Only ended up using 2 of the 4 supplied bushing between the rod ends of the links and the body of the car. Still need to plum in the rear brakes, hard to do without the calipers mounted up, so that will wait till I get the broken pins in the brackets sorted out.
Then I turned my attention forward to the transmission. Pulled the drain plug and only 1 qt of ATF came out :o ****! I guess the rear seal was leaking worse than I thought, sad thing is I put a new one in when I got the trans. I flushed it with a little new ATF then I filled it with Royal Purple Syncromax fluid, it was either that of Penzoil Syncromesh stuff... Installed my new/used Pro 5.0 Shifter with TriAxe lever arm. The old boots cover it not to bad, still need a cover for in front of the shifter.
Now I need to do up my fuel lines and hook up a battery, then its time for a drive!
 10-30-2020, 10:49 AM
#54
TECH Senior Member

SSjon hasn't been here for over 6 years. You might want to check post dates.