
project high school: 5.3 in 72 nova
 06-21-2011, 08:05 PM
#21
Launching!
Thread Starter

Join Date: Jan 2011
Location: Arizona
Posts: 200
Likes: 0
Received 0 Likes
on
0 Posts

thenova70ss-Hey if you need any pic of the PSI harness on a 1972 nova let me know i used the PSI harness and ECM on my LS1 Nova Build and it worked out GREAT the harness is just the right fit for the nova these guys know how to build a harness thats for sure.
thenova70ss-And if you need any help at al just let me know i just got finished with my Nova build so i can help some if you have a question.
 06-22-2011, 11:23 PM
#22
Launching!
Thread Starter
Join Date: Jan 2011
Location: Arizona
Posts: 200
Likes: 0
Received 0 Likes
on
0 Posts
salemetro-
I hope that she's right there with ya, learning how to build a KILLER first car
I hope that she's right there with ya, learning how to build a KILLER first car
so for proof.
 06-26-2011, 05:23 PM
#23
Launching!
Thread Starter
Join Date: Jan 2011
Location: Arizona
Posts: 200
Likes: 0
Received 0 Likes
on
0 Posts
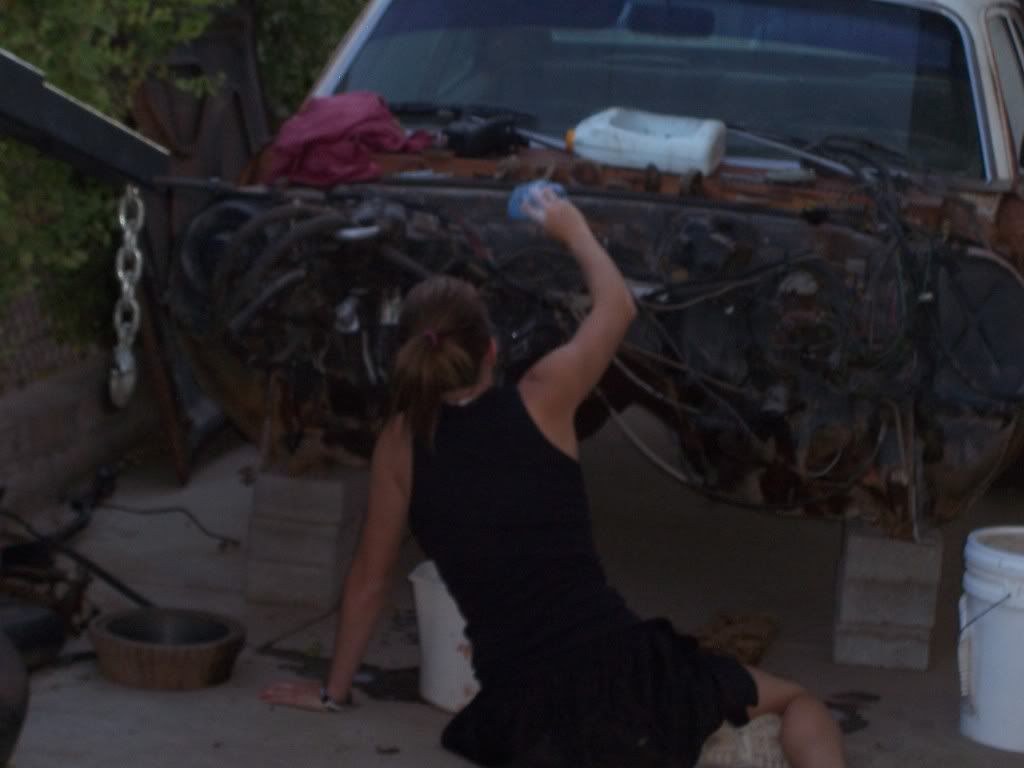
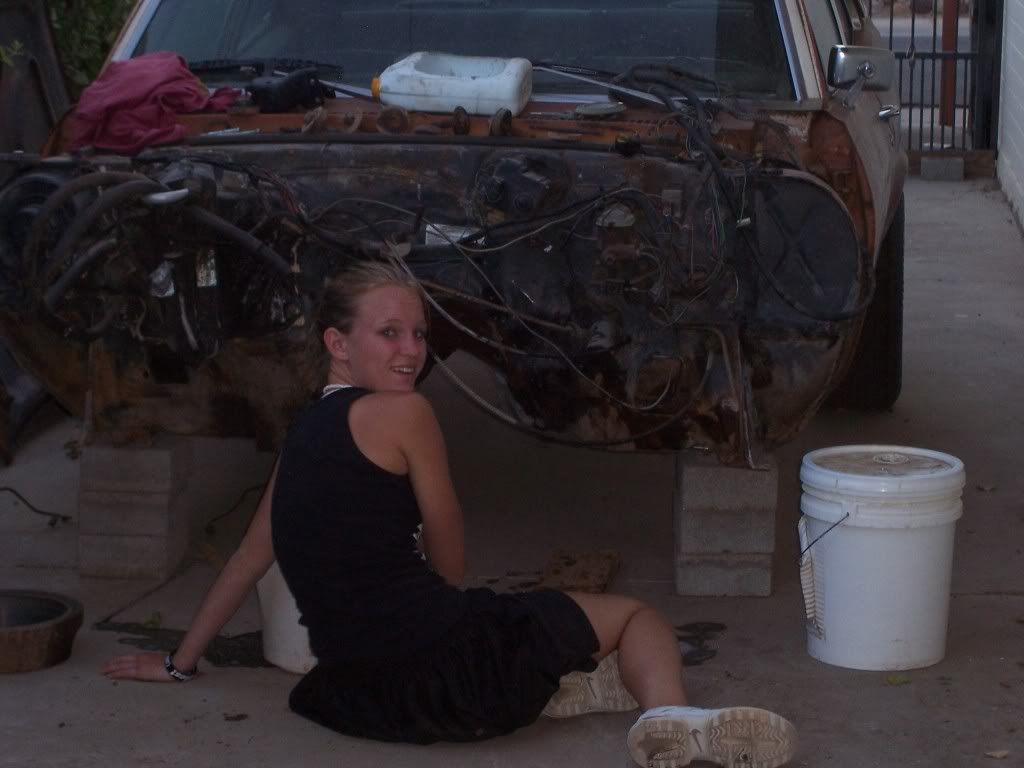
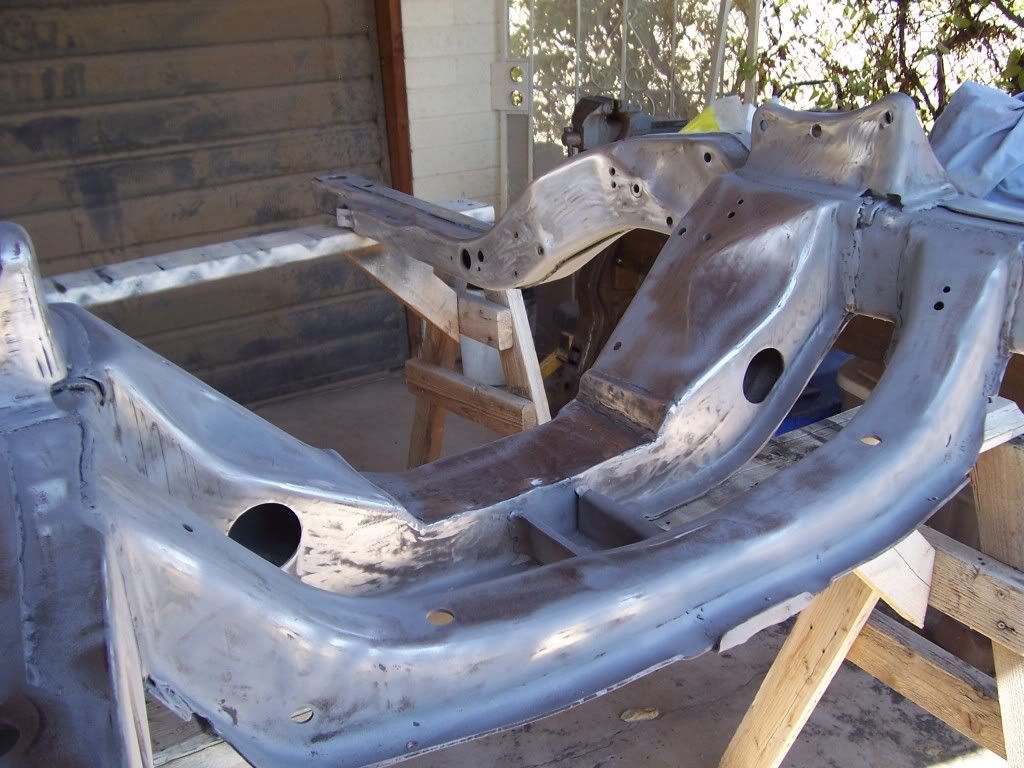
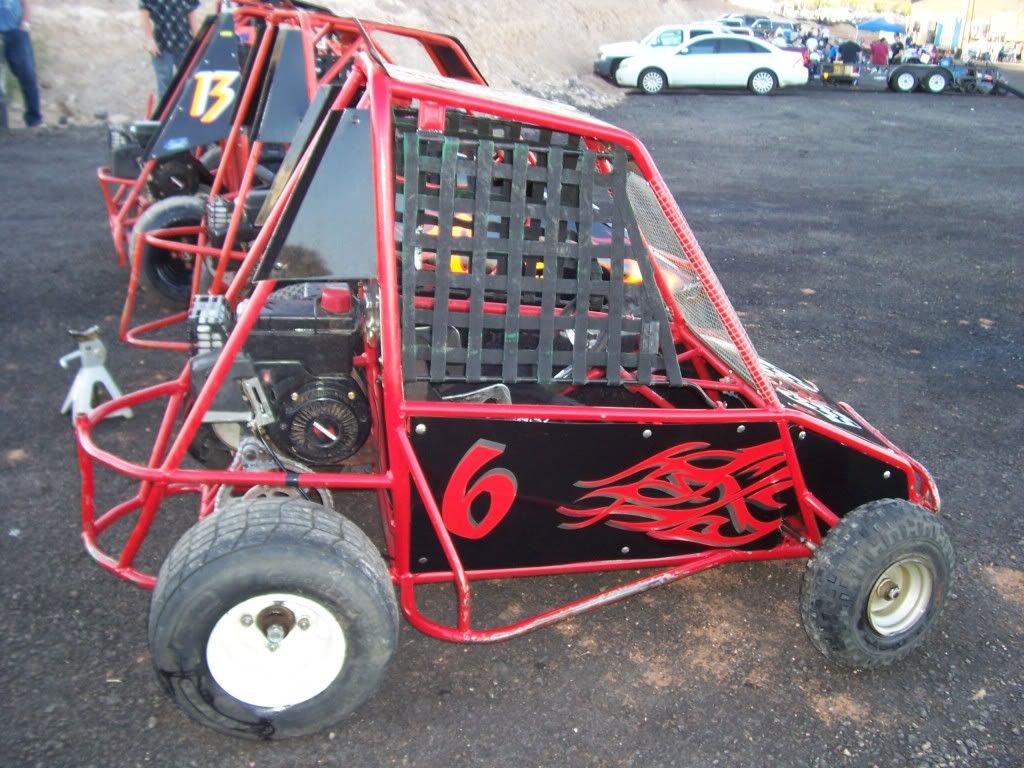
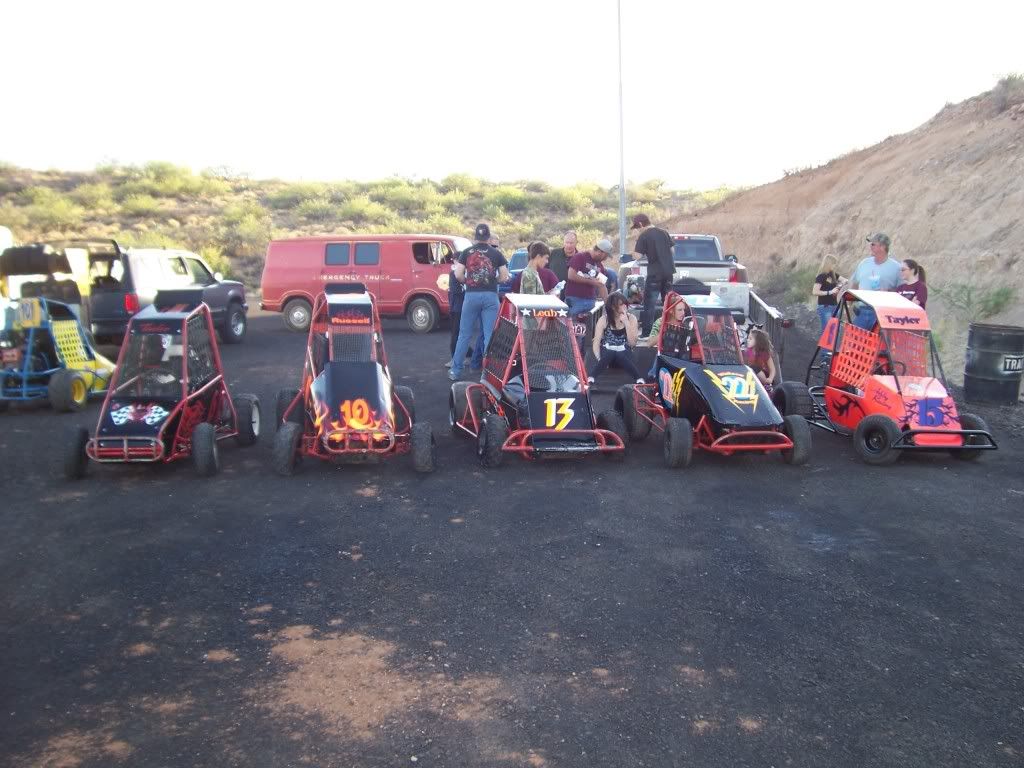
just a small update. I have been real busy at work, and due to it being 114 + degrees here, my daughter has been real busy at the pool. I got the subframe as clean as i could then went to my father in law's and fired up the big sand blaster. The pics show different textures but in person it looks great. Now the dilema is powder coat or paint. I have to take it 60 miles for powdercoat but it is the same price as por 15 or a good quality paint. And oh yeah, went racing friday night. I know it's not imca ar a late model but it's a blast and my daughter loves to race, and it's cheap. Hard to believe that a girl 5'8" fits in there, but she does. Kinda like a monkey on a football. Hope to get the subframe done this week.
the rough part of the weekend.
and the fun part of the weekend.
couple of vids of the races from last year.
http://www.youtube.com/watch?v=UlZryJFTVzQ
http://www.youtube.com/watch?v=c-7PghpDBdQ
the rough part of the weekend.
and the fun part of the weekend.
couple of vids of the races from last year.
http://www.youtube.com/watch?v=UlZryJFTVzQ
http://www.youtube.com/watch?v=c-7PghpDBdQ
07-19-2011, 09:10 PM
#24
Launching!
Thread Starter
Join Date: Jan 2011
Location: Arizona
Posts: 200
Likes: 0
Received 0 Likes
on
0 Posts
this project hasn't died - i promise. been a lot going on lately and it seems that the nova goes to the back burner. I do have the subframe sandblasted and painted but i'm waiting for the upper and lower a-arm bushings and ball joints. i got the a-arms blasted but the monsoon season put a bit of rust on them before i could get them painted. i plan on taking them to work tomorrow to reblast them and then paint them right away. somewhere on this sight i saw a neon console in a nova or camaro, but i couldn't find it again. anybody??? Planning on spending a lot more time this coming week and hopefully have the subframe back in next weekend. Thanks to hookemdevils22 for the p.m.'s to get my *** back in gear. pics will follow soon i promise.
09-11-2011, 07:31 PM
#25
Launching!
Thread Starter
Join Date: Jan 2011
Location: Arizona
Posts: 200
Likes: 0
Received 0 Likes
on
0 Posts
so almost two months go by without an update. my camera broke and i can't download the pics so i will do a little written update. got the subframe painted and installed new upper and lower a-arm bushings. new upper and lower ball joints. set the motor and trans in place (still need to get a 2,500 stall converter for the 4l60- anybody got one?) did the ford f350 fuel pump mod to the tank (thanks firstgenguy and tsnow) and need to get it painted. i didn't want to work with a fuel sending unit that wasn't right, so i cut the old one off of the pickup and made a bracket and welded it to the other side of the plate and made the wires ( had to solder a wire to the housing for a solid ground) plug into the fuel pump harness. now i all i have to do is unplug it when and if i ever have to remove the fuel pump and my guage will still right in the nova. if i get a new camera before i install the pump for good i will take a pic or two. didn't like the oil pan i had, so i decided to mod my own truck pan. should've left well enough alone. The breaker i had the tig wired to decided to burn one contact and didn't trip so the tig welder overloaded the other leg of the 220 and burned up the transformer. BUMMER!!!! now i have it off to be fixed and can finish the pan when i'm done. would've used the other one, except i gave it away two days before. We have a local car show here for Octoberfest and my daughter wants to put it in there in the "in construction" class, but my heart tells me she just wants to rod it around. don't blame her though. thanks to all the guys that post regurlarly on their builds, it keeps me going when i want to just throw the towel in.
-wade-
-wade-
09-12-2011, 09:35 AM
#26

so almost two months go by without an update. my camera broke and i can't download the pics so i will do a little written update. got the subframe painted and installed new upper and lower a-arm bushings. new upper and lower ball joints. set the motor and trans in place (still need to get a 2,500 stall converter for the 4l60- anybody got one?) did the ford f350 fuel pump mod to the tank (thanks firstgenguy and tsnow) and need to get it painted. i didn't want to work with a fuel sending unit that wasn't right, so i cut the old one off of the pickup and made a bracket and welded it to the other side of the plate and made the wires ( had to solder a wire to the housing for a solid ground) plug into the fuel pump harness. now i all i have to do is unplug it when and if i ever have to remove the fuel pump and my guage will still right in the nova. if i get a new camera before i install the pump for good i will take a pic or two. didn't like the oil pan i had, so i decided to mod my own truck pan. should've left well enough alone. The breaker i had the tig wired to decided to burn one contact and didn't trip so the tig welder overloaded the other leg of the 220 and burned up the transformer. BUMMER!!!! now i have it off to be fixed and can finish the pan when i'm done. would've used the other one, except i gave it away two days before. We have a local car show here for Octoberfest and my daughter wants to put it in there in the "in construction" class, but my heart tells me she just wants to rod it around. don't blame her though. thanks to all the guys that post regurlarly on their builds, it keeps me going when i want to just throw the towel in.
-wade-
-wade-
09-12-2011, 02:20 PM
#27
Launching!
Thread Starter
Join Date: Jan 2011
Location: Arizona
Posts: 200
Likes: 0
Received 0 Likes
on
0 Posts
it's just a little podunk local show that pulls in from this area and globe. once in a while we will get cars from tucson or showlow maybe even apache juct. but not often. just kind of a reason for the locals to let their hair down so to speak. but we would love to have you show up. i will get more info on the dates and let you know. i will p.m. you.
-wade-
-wade-
09-12-2011, 03:12 PM
#28
it's just a little podunk local show that pulls in from this area and globe. once in a while we will get cars from tucson or showlow maybe even apache juct. but not often. just kind of a reason for the locals to let their hair down so to speak. but we would love to have you show up. i will get more info on the dates and let you know. i will p.m. you.
-wade-
-wade-
09-14-2011, 04:10 PM
#29
I just stumbled upon this thread while debating whether to build a BBC or LS to put into a 1971 Chevelle. So glad there are more young people out there that like the old cars, and even more so don't mind doing the hard work that makes them so rewarding.
02-26-2012, 11:39 AM
#30
Launching!
Thread Starter
Join Date: Jan 2011
Location: Arizona
Posts: 200
Likes: 0
Received 0 Likes
on
0 Posts
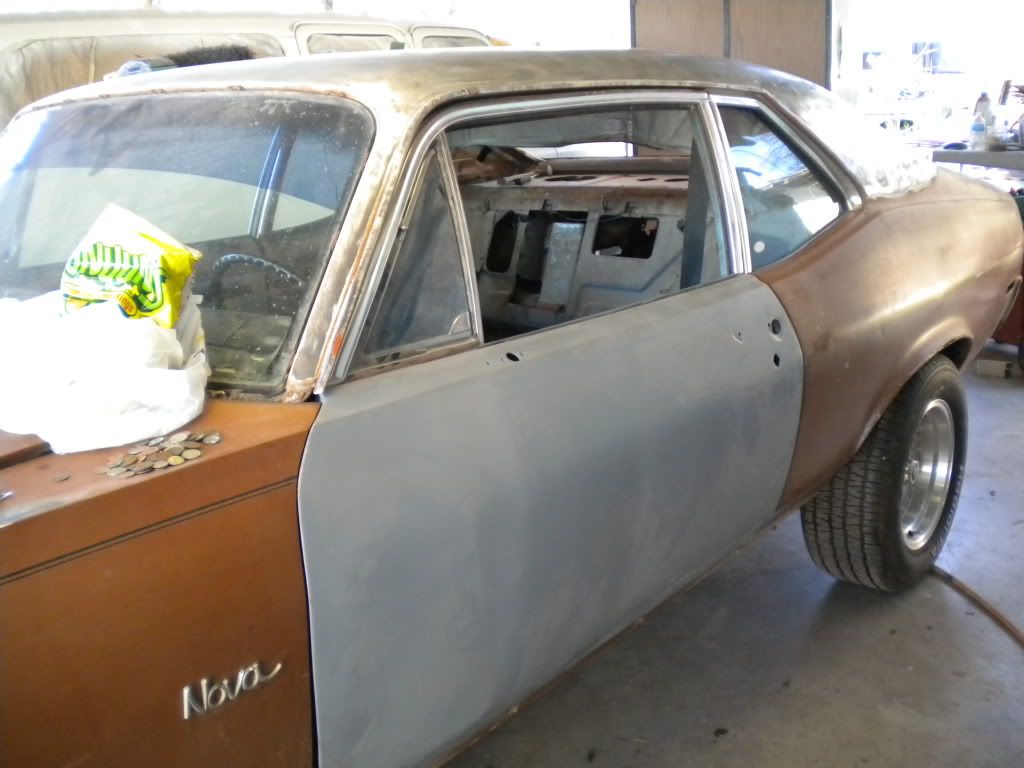
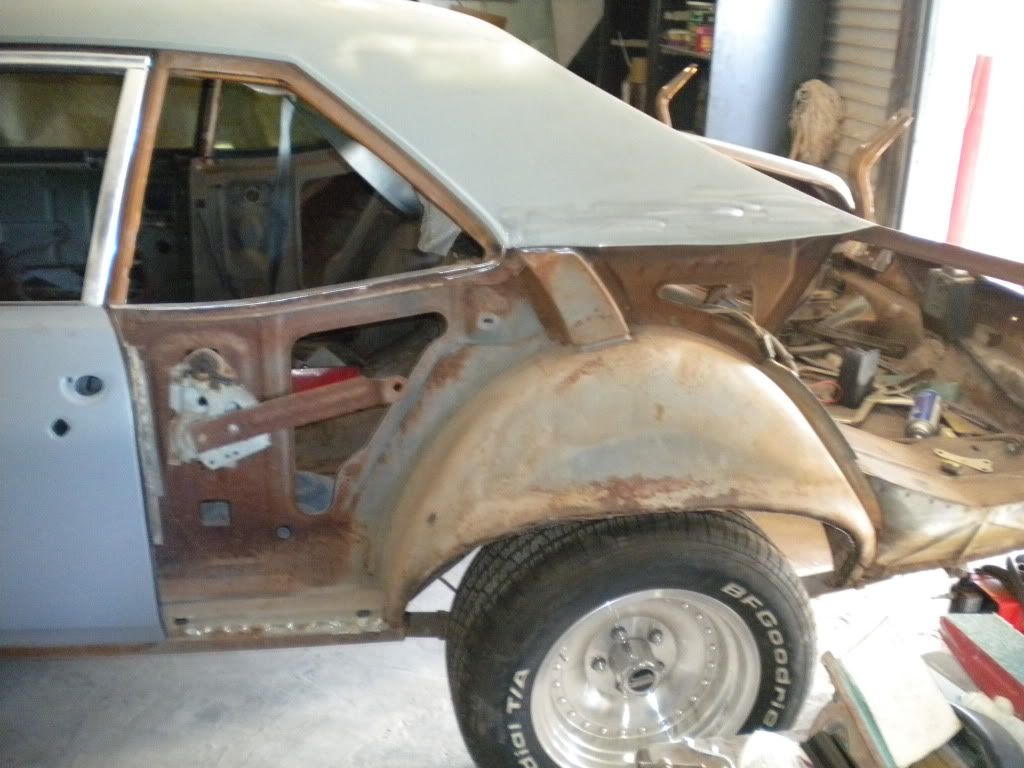
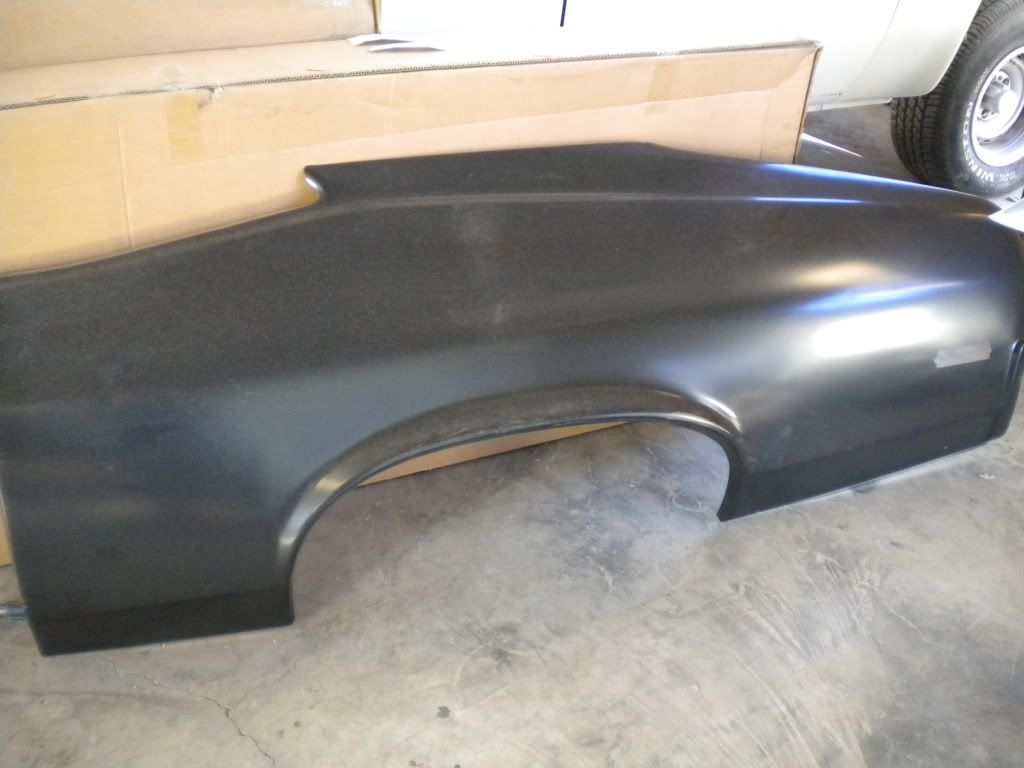
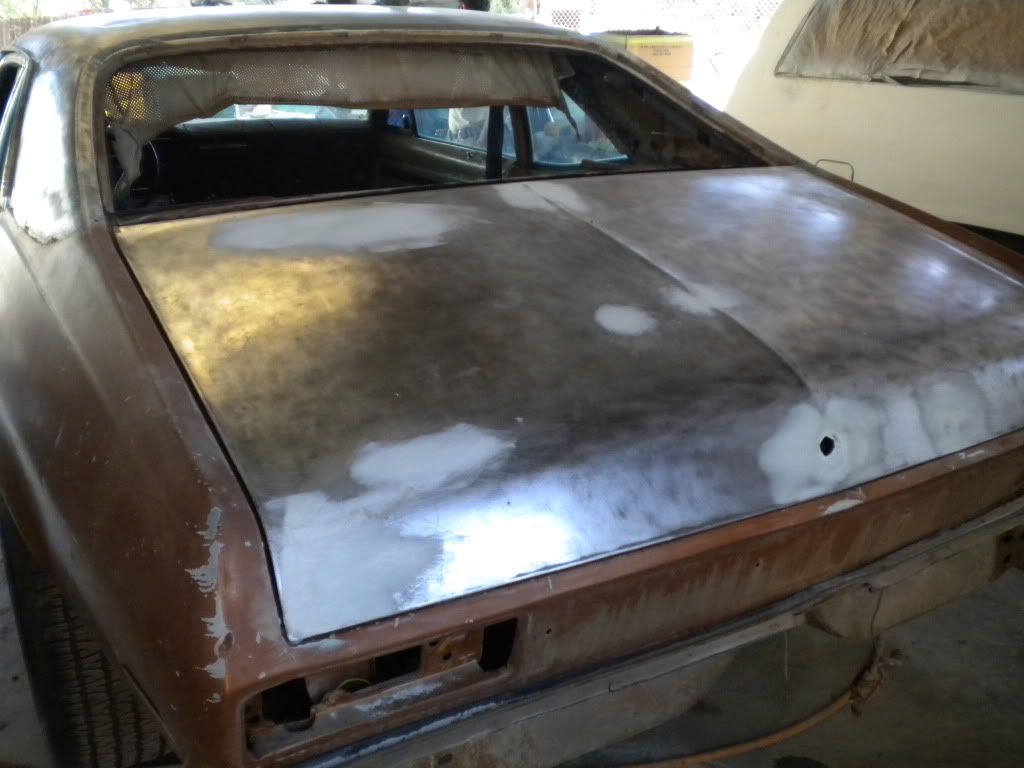
So it's been a bit since i've posted on the nova. i get a chance every now and then to pop in and look around on here and then have to go. We have been spending a lot of time (damn near every evening after work) at the body shop getting the rust bucket back into shape. The tally so far has been two rear quarters, different trunk, different doors, new hood, patched front fenders (would've bought new ones but the credit card was about melted in two) and a lot of work. only getting to work on the car for a few hours at a time is frustrating but it's coming along great. before anyone bitches about the quality of the photos, i had to use my phone as i STILL have not replaced my camera.
in primer
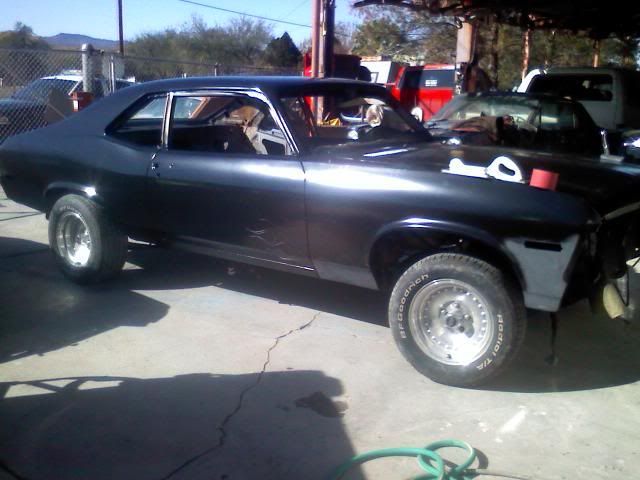
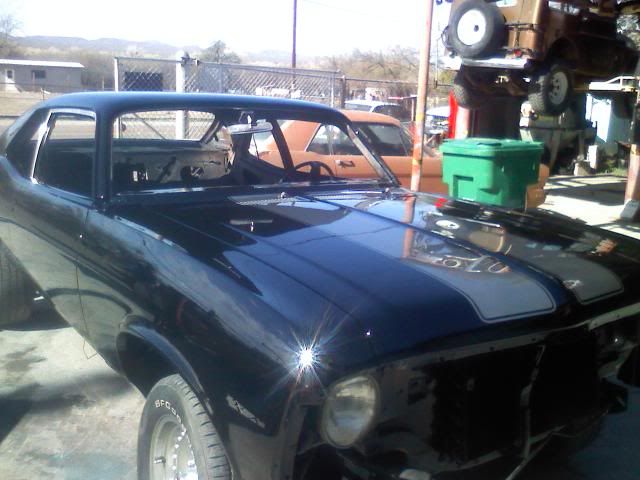
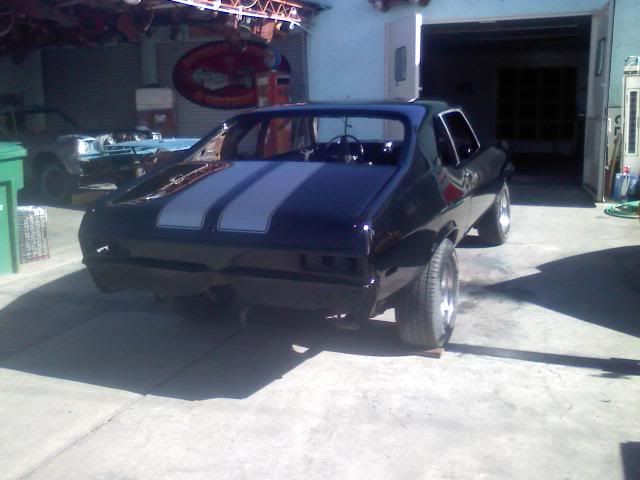
finally paint and stripes. stripes look more grey in pic but are a few shades darker than pure silver.
in primer
finally paint and stripes. stripes look more grey in pic but are a few shades darker than pure silver.
Last edited by ls68firebird; 02-26-2012 at 11:50 AM. Reason: fixed the photo links
02-26-2012, 11:47 AM
#31
Launching!
Thread Starter
Join Date: Jan 2011
Location: Arizona
Posts: 200
Likes: 0
Received 0 Likes
on
0 Posts
got the door window weatherstripping and side windows in. gonna do the quarter glass weatherstripping and windows today (hopefully) the "cherry" bumper i bought turns out to be junk and bent (man i hate people sometimes).
to anyone that has had their car painted. remember when you were taking it all apart and all the chrome looked good and you thought "man i'm lucky i can re-use that" cause it looked so good against the aging paint and rock chips? then you pull it out of your careful packaging and storage cause it was "so good" and put it against the new paint- it looks like GARBAGE. yep happened here. now i am looking for a good plating shop close and waiting for the credit card to cool down and get new trim. my daughter is definitely spoiled. the door panels and the carpet kit are on the way, and the headliner and windows will be put in this week. hooray!
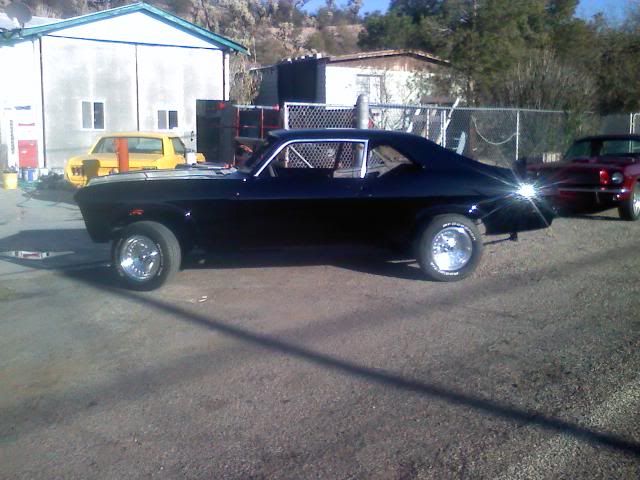
letting the paint cure. turned a lot of heads. looks old school and i love it.
to anyone that has had their car painted. remember when you were taking it all apart and all the chrome looked good and you thought "man i'm lucky i can re-use that" cause it looked so good against the aging paint and rock chips? then you pull it out of your careful packaging and storage cause it was "so good" and put it against the new paint- it looks like GARBAGE. yep happened here. now i am looking for a good plating shop close and waiting for the credit card to cool down and get new trim. my daughter is definitely spoiled. the door panels and the carpet kit are on the way, and the headliner and windows will be put in this week. hooray!
letting the paint cure. turned a lot of heads. looks old school and i love it.
02-26-2012, 08:46 PM
#33
Launching!
Thread Starter
Join Date: Jan 2011
Location: Arizona
Posts: 200
Likes: 0
Received 0 Likes
on
0 Posts
i need some help. i bought the weatherstripping for the door window and quarter windows from classic ind. That may have been a mistake. the forward quarter window weatherstrip does not have the correct channell for the plastic guide on the window to run in. Does anyone know who makes this piece correctly. it was really pissing me off tonight and i finally threw in the towel and came home. any suggestions would be greatly appreciated.
-wade-
-wade-
03-03-2012, 06:42 PM
#34
Launching!
Thread Starter
Join Date: Jan 2011
Location: Arizona
Posts: 200
Likes: 0
Received 0 Likes
on
0 Posts
update time. got the motor setting in and the headers in place. still a ton of things to do. headers only hang down about an inch below the subframe, but i kinda like the old school "header look".
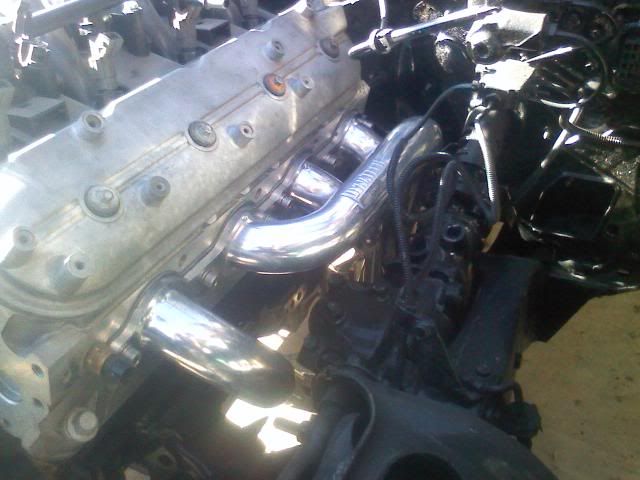
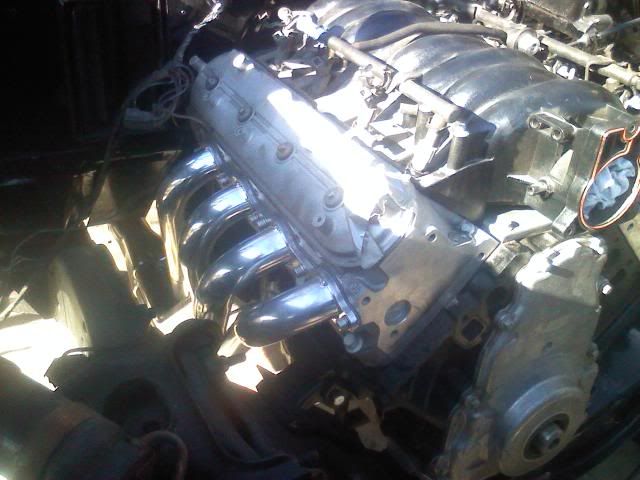
Yes the motor needs cleaned up, been sitting in the garage for far too long.
still having trouble with the vertical post weatherstripping for the quarter window. had to put in the old ones and will try to find another set to have rebuilt for 80.00. warm days are beautiful!!!!!
Yes the motor needs cleaned up, been sitting in the garage for far too long.
still having trouble with the vertical post weatherstripping for the quarter window. had to put in the old ones and will try to find another set to have rebuilt for 80.00. warm days are beautiful!!!!!

 .
03-04-2012, 03:26 PM
.
03-04-2012, 03:26 PM
#37
Launching!
Thread Starter
Join Date: Jan 2011
Location: Arizona
Posts: 200
Likes: 0
Received 0 Likes
on
0 Posts
the headers fit really good. i built my own mounts (1/2" under the stock perches and napa mounts on the engine.) i built my adapter plate so that both mounts share one hole. they cleared the steering box great and don't hang too low. maybe the engine sits a little higher due to the mounts but i like it.
yeah surprised the hell out of me when she started picking all the muscle cars over the fartrockets all her friends at school drive. she's really been on my *** to get it done before graduation on may 25th. she busts her hump on it too and it turned out to be a lot more work than we thought. It was supposed to be a 1 week scratch and shoot. Blew that idea all to hell.
thanks for the support.
-wade-
03-05-2012, 11:17 AM
#38
the headers fit really good. i built my own mounts (1/2" under the stock perches and napa mounts on the engine.) i built my adapter plate so that both mounts share one hole. they cleared the steering box great and don't hang too low. maybe the engine sits a little higher due to the mounts but i like it.
yeah surprised the hell out of me when she started picking all the muscle cars over the fartrockets all her friends at school drive. she's really been on my *** to get it done before graduation on may 25th. she busts her hump on it too and it turned out to be a lot more work than we thought. It was supposed to be a 1 week scratch and shoot. Blew that idea all to hell.
thanks for the support.
-wade-
yeah surprised the hell out of me when she started picking all the muscle cars over the fartrockets all her friends at school drive. she's really been on my *** to get it done before graduation on may 25th. she busts her hump on it too and it turned out to be a lot more work than we thought. It was supposed to be a 1 week scratch and shoot. Blew that idea all to hell.
thanks for the support.
-wade-
 03-05-2012, 11:56 AM
#39
Nice work. Cool to see another Nova with factory AC and an LSx going in. Have you checked to see if it still fits with those Dynatech headers?
The hole you put into the AC suitcase can be fiberglassed in easily. You can buy a fiberglass patch kit from a local hardware store that will include plenty of material.
The hole you put into the AC suitcase can be fiberglassed in easily. You can buy a fiberglass patch kit from a local hardware store that will include plenty of material.
03-05-2012, 08:58 PM
#40
Launching!
Thread Starter
Join Date: Jan 2011
Location: Arizona
Posts: 200
Likes: 0
Received 0 Likes
on
0 Posts
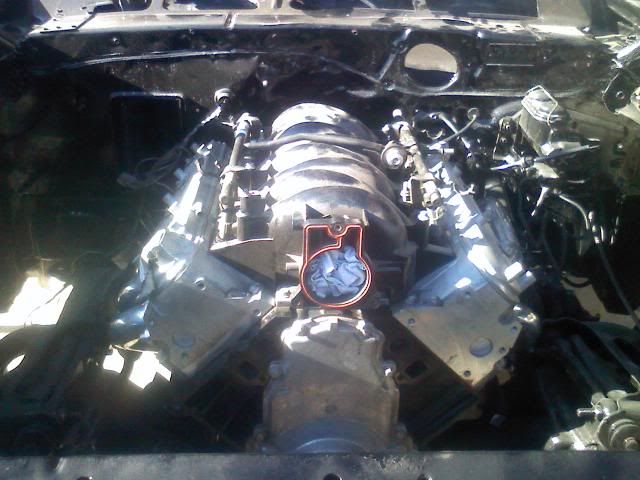
i will be checking the clearance tomorrow and "adjusting" as needed. When i first made the mounts and mocked up the engine the suitcase was in there. i put the header in and held it in place by hand, it lacked about 1/4" being high enough to line up the bolts. With the mounts i made, i will need to notch the suitcase a little. I want to make that fit now while i have the inner fenders out, but the compressor will have to go on later - $$$$  I am using the truck accessories and water pump. i will have to turn the outlet and possibly dent it a little to clear the throttle body. i should have the room to mount it and have already notched the compressor mount to clear the brackets. I just hope it clears the crossmember, if not i will have to mount it higher- compromises.
By a week scratch n shoot- i meant we didn't know (always the case) how bad it was under the old paint. The more we fixed the more we found. I am lucky that i have an awesome body and paint guy that pretty much let me live there after work and do what i could to save some money and learn. We were just gonna go the easy basecoat & satin clear for the flat look and be done, i blame the "painter guy" for not letting me off easy and making me do it right ha ha ha.
This sight is a blessing to guys like me that love to get their hands dirty and do it themselves.
thanks guys
-wade-
I am using the truck accessories and water pump. i will have to turn the outlet and possibly dent it a little to clear the throttle body. i should have the room to mount it and have already notched the compressor mount to clear the brackets. I just hope it clears the crossmember, if not i will have to mount it higher- compromises. By a week scratch n shoot- i meant we didn't know (always the case) how bad it was under the old paint. The more we fixed the more we found. I am lucky that i have an awesome body and paint guy that pretty much let me live there after work and do what i could to save some money and learn. We were just gonna go the easy basecoat & satin clear for the flat look and be done, i blame the "painter guy" for not letting me off easy and making me do it right ha ha ha.
This sight is a blessing to guys like me that love to get their hands dirty and do it themselves.
thanks guys
-wade-