
79 Cutlass Wagon, 5.3 G machine


 09-14-2012, 11:13 AM
#185
On The Tree
Thread Starter
Join Date: Aug 2010
Location: Eagle Mountain, Utah
Posts: 143
Likes: 0
Received 0 Likes
on
0 Posts
Unfortunately the race Nova is in storage in Utah with most of our furniture. I'm hoping to beat the heavy snow and go back to get it soon...
Ok everyone, I finally found the box that had my camera in it so I'll be posting more of the build items real soon. BTW since I had to sell my 5.3 to help fund the final items to get the wagon ready for the trip I'm looking into bigger inches options for the swap. There was a guy with a euro style Monte at LS fest that I heard has a basically stock LS1 with a truck intake that was running high 11s. Is he on this forum?
For now, here's a teaser of where it's at right now...
I was playing around with a can of orange spray paint for some stripes on my temporary rattle can semi gloss black paint scheme a couple days ago. The driveway at my new home made the perfect photo opportunity...
09-14-2012, 11:27 AM
#186
On The Tree
Thread Starter
Join Date: Aug 2010
Location: Eagle Mountain, Utah
Posts: 143
Likes: 0
Received 0 Likes
on
0 Posts
Couple photos from the road trip from Utah to Georgia. First photo was in Colorado, second was in Kentucky I think. Notice on the roof of my Daewoo is the new sub frame for the Nova, lol...


 09-14-2012, 10:41 PM
#188
TECH Enthusiast
iTrader: (9)
Join Date: Mar 2008
Location: IL
Posts: 698
Likes: 0
Received 0 Likes
on
0 Posts

That looks awesome lol. I don't think a stock LS1 with a truck intake will get you 11's, but if the Monte was gutted and was weighing under 3k lbs I could maybe see it happening.
Have you thought about a turbo setup? I think with your fab skills it wouldn't be to hard to weld up your own setup
Have you thought about a turbo setup? I think with your fab skills it wouldn't be to hard to weld up your own setup
 01-16-2013, 10:08 AM
#190
On The Tree
Thread Starter
Join Date: Aug 2010
Location: Eagle Mountain, Utah
Posts: 143
Likes: 0
Received 0 Likes
on
0 Posts
Thanks everyone!
OK, finally I have some spare time for updating, going back in time to Utah and the front suspension assembly...
This shot shows the Speedway Motors circle track "spindle savers" installed. Not sure they're necessary but they're a little extra inexpensive insurance and should eliminate any potential flex in this area.
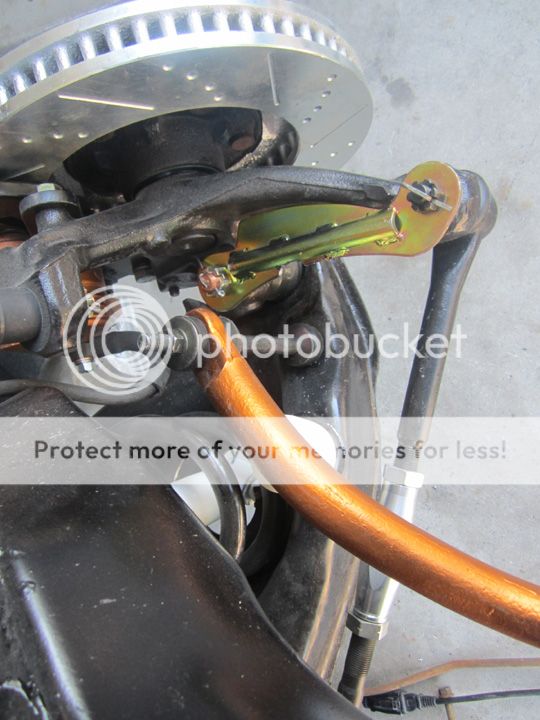
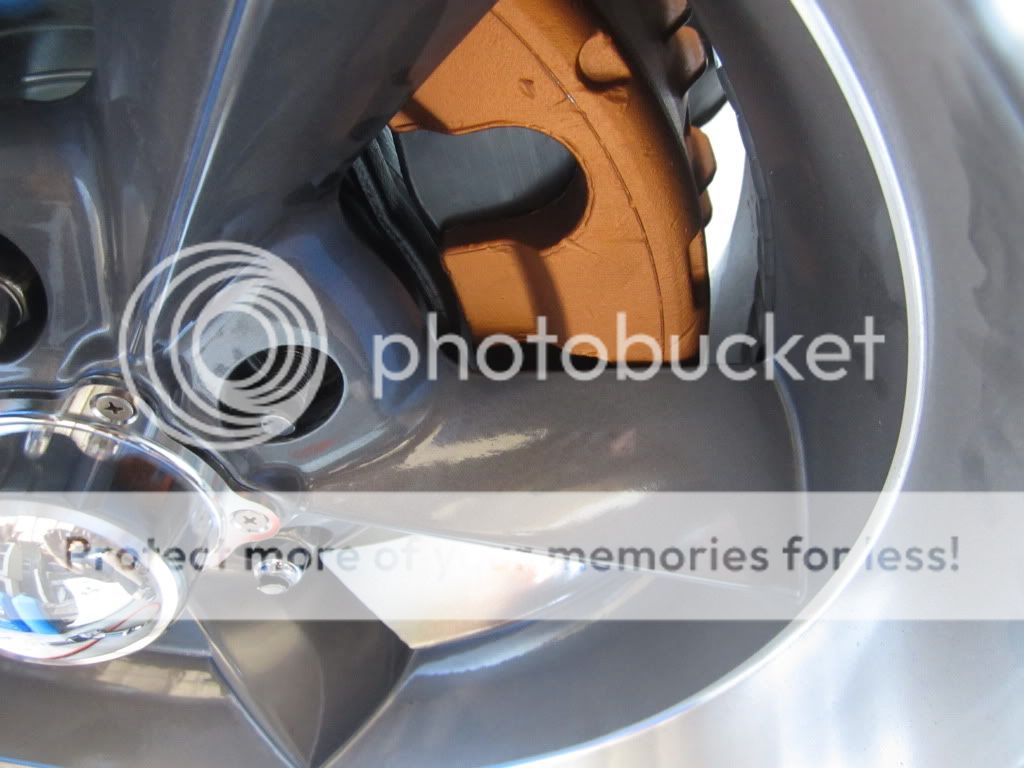
...and my custom front 10mm thick, hub and wheel centric spacers for the front wheels. Next to them is the universal 3/4" spacer I used with the GTA wheels. With the custom ones there's no slop in mounting, so there's no driving vibration caused by the spacers getting offset when mounting the tires.
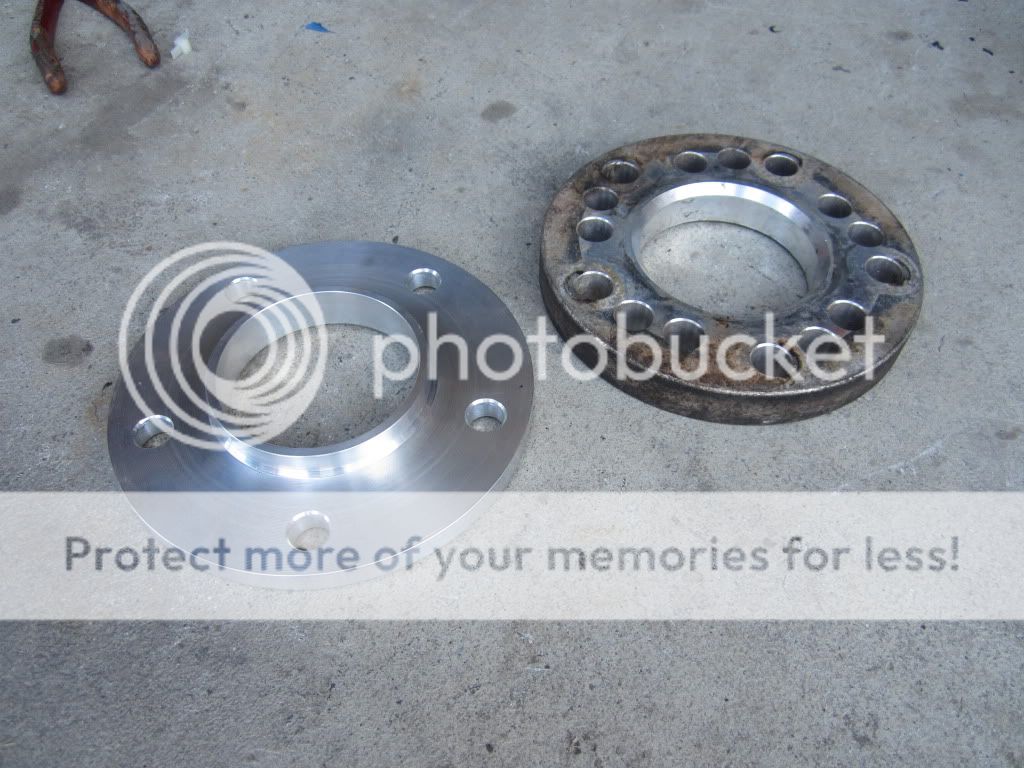
I measured, re-measured, and repeated the process several times to be sure I had something that would fit without issues. It paid off, there's barely room between the caliper and the wheel but it keeps the wheel/ tire assembly neatly tucked under the fenders and now there's no rubbing while turning.
OK, finally I have some spare time for updating, going back in time to Utah and the front suspension assembly...
This shot shows the Speedway Motors circle track "spindle savers" installed. Not sure they're necessary but they're a little extra inexpensive insurance and should eliminate any potential flex in this area.
...and my custom front 10mm thick, hub and wheel centric spacers for the front wheels. Next to them is the universal 3/4" spacer I used with the GTA wheels. With the custom ones there's no slop in mounting, so there's no driving vibration caused by the spacers getting offset when mounting the tires.
I measured, re-measured, and repeated the process several times to be sure I had something that would fit without issues. It paid off, there's barely room between the caliper and the wheel but it keeps the wheel/ tire assembly neatly tucked under the fenders and now there's no rubbing while turning.
01-16-2013, 10:10 AM
#191
On The Tree
Thread Starter
Join Date: Aug 2010
Location: Eagle Mountain, Utah
Posts: 143
Likes: 0
Received 0 Likes
on
0 Posts
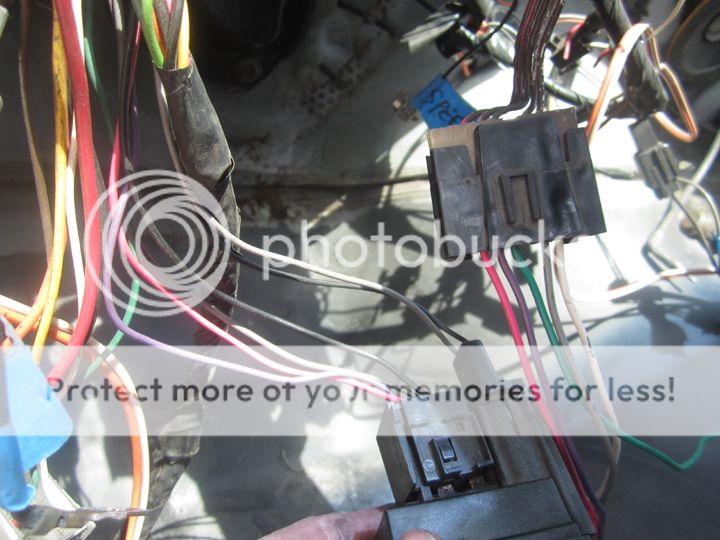
After I got the front suspension done I moved to the dash wiring to get the later model steering column and switches installed. The main reason for swapping these was because my 79 column was damaged pretty heavily when the car had been stolen and I really couldn't stand not having wiper delay.
I did a lot of research on this and read that it was kind of a pain to swap these over. I was a bit nervous about the whole process but once I got in there what I found was that it was a relatively very simple swap. Anybody with an early g-body could do this...
First off, the steering column wiring is almost exactly alike between my 79 and the 85 Cutlass columns. The 85 column had some sort of additional plug near the bottom that took a little research to figure out. It went into the engine computer and after a little debate on the g-body forum and a bunch of research with different wiring diagrams I finally found it safe to assume it was a simple gear indicator switch and I could leave it unplugged in my car. My guess was correct, it didn't affect function at all.
Next on the list was to swap the headlight switch wiring. The 79 dash had the typical push/ pull headlight switch with the dash light dimmer activated by turning the ****. The junkyard 85 Cutlass switch is a push button with a separate wheel that adjusts the dimmer. I think just this alone will give the interior a cleaner more modern look.
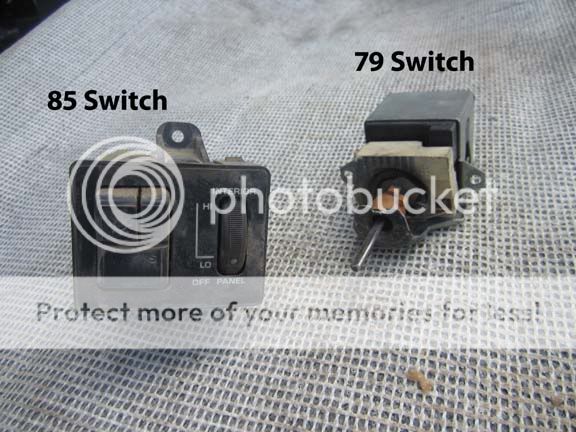
Here's a photo comparing the wiring for the newer switch and the 79 wiring. Notice they're the same.
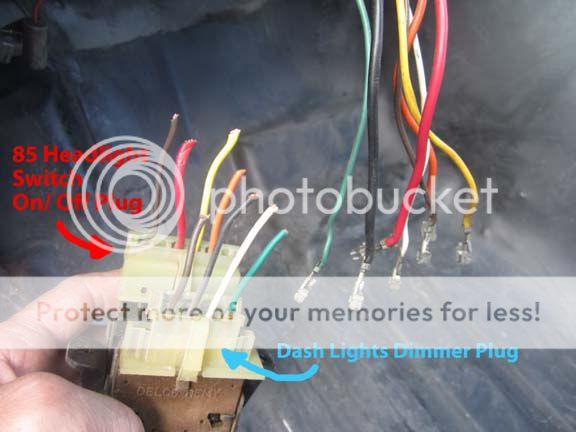
I pulled the pins from the 79 switch and trimmed and spliced them into the wires for the 85 switch. Pretty basic wiring here.
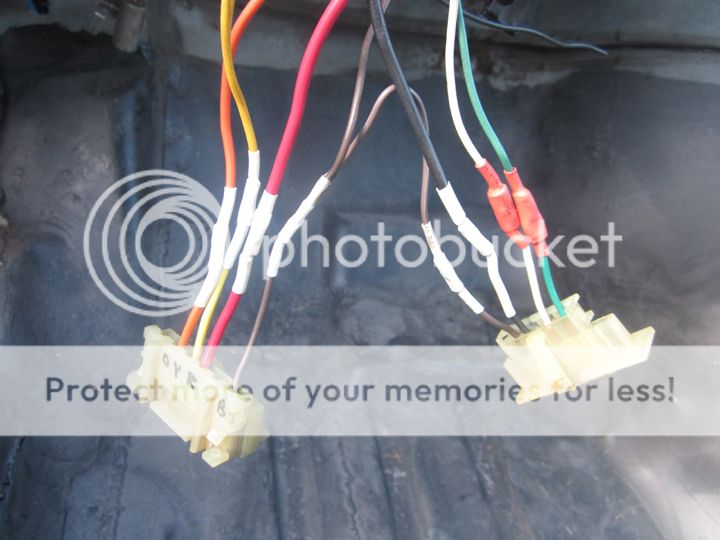
The process was basically the same for the wiper wiring, wherein the wiper switch is now on the column rather than on the dash. I did this back in August, so if memory serves me right, the 82+ g-bodies got a re-designed wiper motor that has reversed polarity. To do this steering column swap YOU ABSOLUTELY MUST SWAP TO THE NEWER WIPER MOTOR TOO. On the right is the wiring from the column, the left is the 79 wiper switch. The main difference is the green delay wire, which needs to be wired directly to the green wire coming out of the newer wiper motor rather than spliced into any dash wiring. On the switch in the photo you also see a black and white wire that is the light for the 79 switch. I left this unplugged and eventually conveniently spliced into it as the power and ground for my aftermarket gauge lights.
I did a lot of research on this and read that it was kind of a pain to swap these over. I was a bit nervous about the whole process but once I got in there what I found was that it was a relatively very simple swap. Anybody with an early g-body could do this...
First off, the steering column wiring is almost exactly alike between my 79 and the 85 Cutlass columns. The 85 column had some sort of additional plug near the bottom that took a little research to figure out. It went into the engine computer and after a little debate on the g-body forum and a bunch of research with different wiring diagrams I finally found it safe to assume it was a simple gear indicator switch and I could leave it unplugged in my car. My guess was correct, it didn't affect function at all.
Next on the list was to swap the headlight switch wiring. The 79 dash had the typical push/ pull headlight switch with the dash light dimmer activated by turning the ****. The junkyard 85 Cutlass switch is a push button with a separate wheel that adjusts the dimmer. I think just this alone will give the interior a cleaner more modern look.
Here's a photo comparing the wiring for the newer switch and the 79 wiring. Notice they're the same.
I pulled the pins from the 79 switch and trimmed and spliced them into the wires for the 85 switch. Pretty basic wiring here.
The process was basically the same for the wiper wiring, wherein the wiper switch is now on the column rather than on the dash. I did this back in August, so if memory serves me right, the 82+ g-bodies got a re-designed wiper motor that has reversed polarity. To do this steering column swap YOU ABSOLUTELY MUST SWAP TO THE NEWER WIPER MOTOR TOO. On the right is the wiring from the column, the left is the 79 wiper switch. The main difference is the green delay wire, which needs to be wired directly to the green wire coming out of the newer wiper motor rather than spliced into any dash wiring. On the switch in the photo you also see a black and white wire that is the light for the 79 switch. I left this unplugged and eventually conveniently spliced into it as the power and ground for my aftermarket gauge lights.
01-16-2013, 10:12 AM
#192
On The Tree
Thread Starter
Join Date: Aug 2010
Location: Eagle Mountain, Utah
Posts: 143
Likes: 0
Received 0 Likes
on
0 Posts
Pictured here is the 85 Wiper motor mocked up. One of the motor's mounting tabs, upper left as pictured, did not line up with the 79's mounting holes, see how it is offset about 3/4". Simply drilling a new hole and using a nut and bolt solved that issue. Everything works great, and having the switch on the column and using the delay system has been really nice.
Also pictured here is the later model master cylinder. The 79 came with a small bore iron unit. While at the junkyard I picked up a booster that accepts the later 1 1/8" aluminum master. I ordered the new master from Oreily's, punching an 85 Monte Carlo SS into Oreily's online website search for the part number. Unfortunately the factory g-body brake proportioning valve is mounted down on the frame right next to the header, kind of a dumb place to put it. When I install the disc brake rear axle I'll update all the lines, eliminate the factory valve, and use an aftermarket valve located away from the heat.
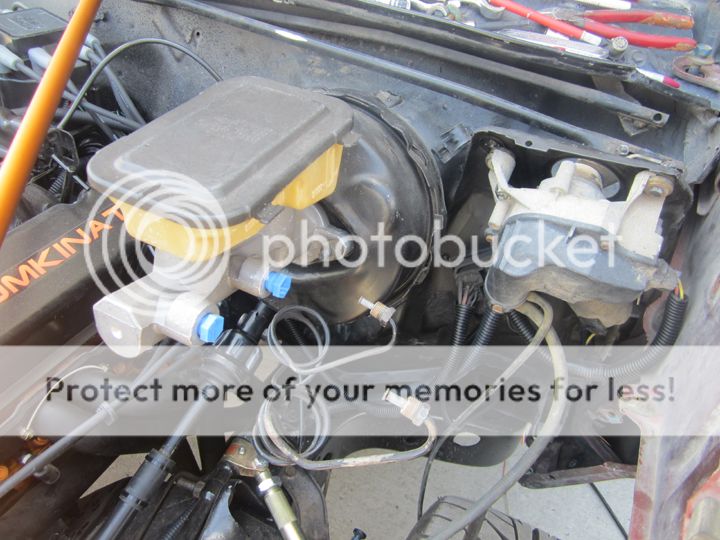
Also pictured here is the later model master cylinder. The 79 came with a small bore iron unit. While at the junkyard I picked up a booster that accepts the later 1 1/8" aluminum master. I ordered the new master from Oreily's, punching an 85 Monte Carlo SS into Oreily's online website search for the part number. Unfortunately the factory g-body brake proportioning valve is mounted down on the frame right next to the header, kind of a dumb place to put it. When I install the disc brake rear axle I'll update all the lines, eliminate the factory valve, and use an aftermarket valve located away from the heat.
01-16-2013, 10:14 AM
#193
On The Tree
Thread Starter
Join Date: Aug 2010
Location: Eagle Mountain, Utah
Posts: 143
Likes: 0
Received 0 Likes
on
0 Posts
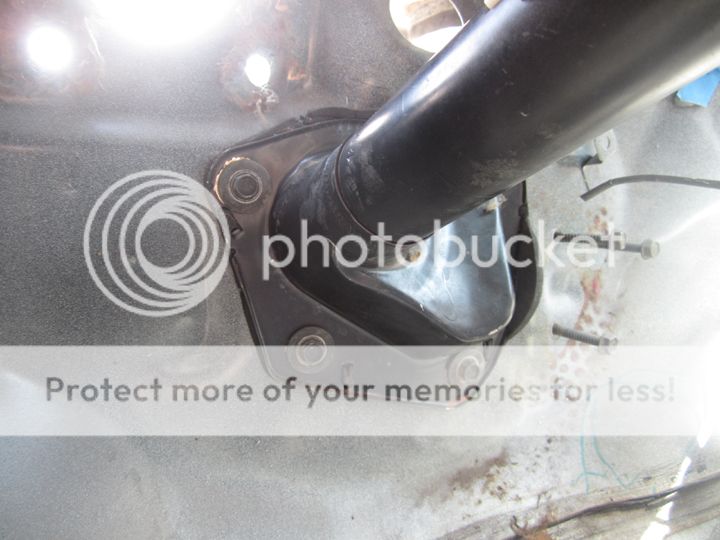
Installation of the newer column did require one slight mod- the mounting plate was mostly flat and the 79 firewall curves back on the lower right as pictured. A few light taps with a hammer curved the plate to match the firewall contour and all the bolts then lined up fine. As I said before, overall this was an easy install.
Once all the wiring and fitting it in place was done, I prepped the ugly brown 85 steering column by hitting it with 320 grit paper, then a quick once over with wax and grease remover and I rattle canned it with semi gloss black. My Grant steering wheel replaced the goofy factory unit.
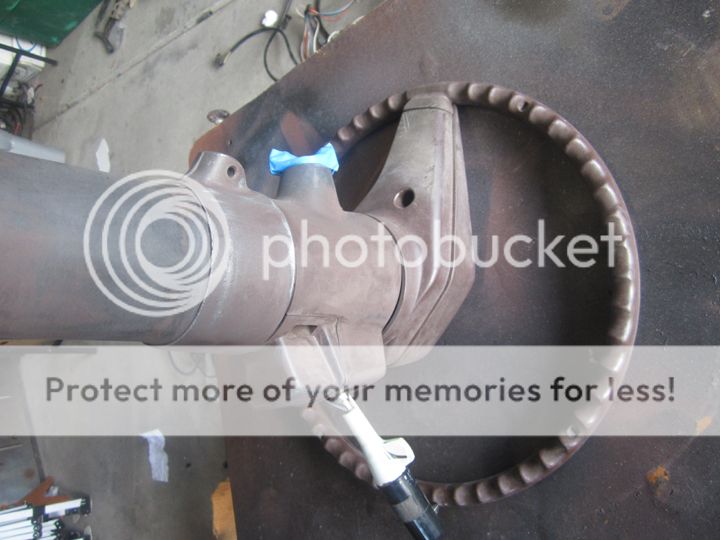
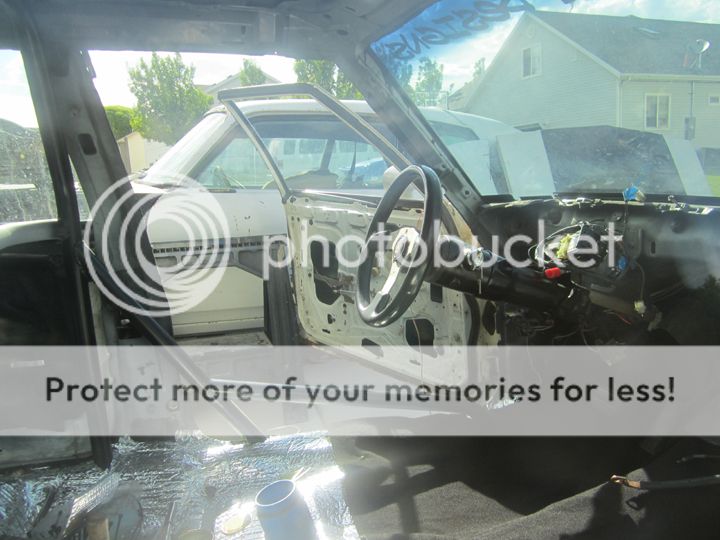
Here's the final install. I'll be keeping my eye out for a column from a floor shift car here in GA, as I never saw one in the junkyards in Utah...
Once all the wiring and fitting it in place was done, I prepped the ugly brown 85 steering column by hitting it with 320 grit paper, then a quick once over with wax and grease remover and I rattle canned it with semi gloss black. My Grant steering wheel replaced the goofy factory unit.
Here's the final install. I'll be keeping my eye out for a column from a floor shift car here in GA, as I never saw one in the junkyards in Utah...
01-16-2013, 10:18 AM
#194
On The Tree
Thread Starter
Join Date: Aug 2010
Location: Eagle Mountain, Utah
Posts: 143
Likes: 0
Received 0 Likes
on
0 Posts
Unfortunately I had to sell the 5.3 LS engine to help finance all the small stuff you don't think about when putting a car together. I kept the headers though, and will most likely be doing a 6.0 instead. Got a few other things the car needs before I can take on that again. In the mean time...
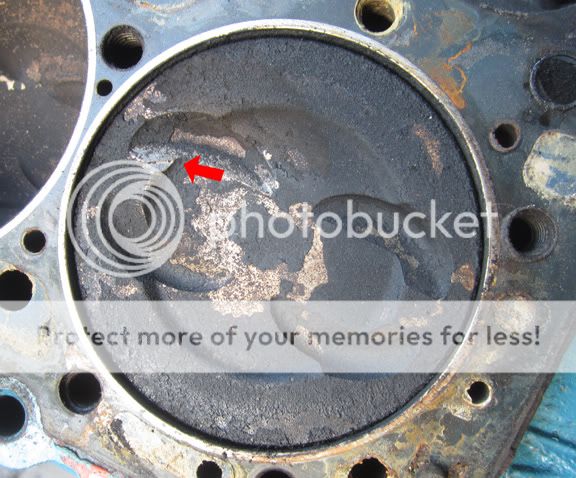
With the column done I turned my attention back to the engine bay. Remember the broken 406 from page two? I finally got around to seeing what I was up against after the valve spring broke.
Really there was no major damage. The valve licked the piston putting just a tiny dent in it, but nothing more.
Another problem I found was that the factory harmonic balancer started to have issues, a good portion of the rubber ring was missing.
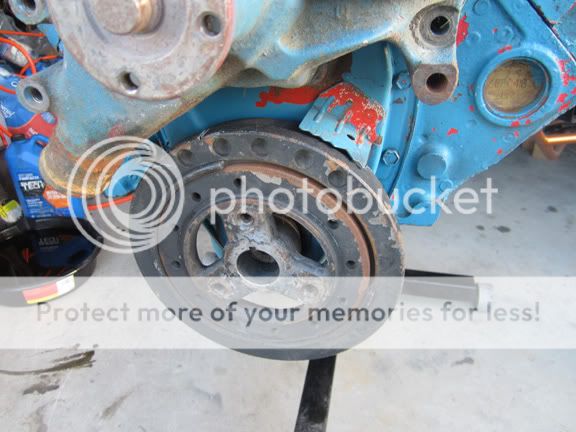
This motor had about 70K + miles on it but the cylinders all looked good, it doesn't burn oil and holds between 50 and 60 lbs of oil pressure so I decided to just clean it up go over the top end.

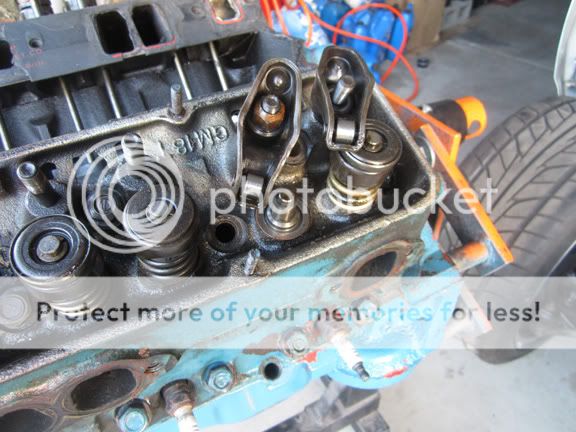
To make sure there wasn't any damage to the cam I pulled it out and inspected it. No damage found so I reinstalled it with a new double roller chain. Then the cover went back on and I added a new balancer. Sitting in a dark corner I've had some heads I experimented on about 15 years ago when I was learning how to port heads. They're just generic GM 400 heads but with the gasket match, improved port flow, blended bowls, new guides and a fresh valve job, this motor was a perfect reason to dust them off and pull 'em off the shelf. I threw those on with the Proform airgap dual plane intake and the new 600 Summit carb. I painted the top end of the engine semigloss black while the bottom end was VHT "Metallic Copper" engine paint. I designed and had printed some stickers and applied a couple to the valve covers. As of 5 months later the stickers haven't been affected by engine heat and still look new.


The cap is not one of those correct-a-caps, I simply bought a universal set of MSD wires where you make them to your own desired length and carefully set them up in a clean way. Here's the specs on the motor...
.030 400 small block Chevy, stock crank and rods with ARP bolts
high pressure oil pump and aftermarket pump drive
8.7:1 Eutectic pistons and plasma moly rings
Comp XE268 cam with true roller timing chain
ported factory heads with 1.5 /1.6 roller tip rockers, Comp's cam matched springs
air gap dual plane intake with Summit 600 Vac secs carb
factory HEI with Pertronix "Flame Thrower" upgrade kit and MSD wires
Hooker full length headers
Moroso alternator overdrive pulley, factory crank and water pump pullies
It's a pretty mild and basic budget build, though I'm guessing it makes about 300-325hp and 400-425 ft lbs at the flywheel. According to Comp Cam's online dyno speculation, it's torque peak should be right around 2200 rpms. Out driving it sure pulls hard from 2200 on up to about 4500, which is perfect for autocross. It'll do for now while I hunt down a decent 6.0 LS donor...
With the column done I turned my attention back to the engine bay. Remember the broken 406 from page two? I finally got around to seeing what I was up against after the valve spring broke.
Really there was no major damage. The valve licked the piston putting just a tiny dent in it, but nothing more.
Another problem I found was that the factory harmonic balancer started to have issues, a good portion of the rubber ring was missing.
This motor had about 70K + miles on it but the cylinders all looked good, it doesn't burn oil and holds between 50 and 60 lbs of oil pressure so I decided to just clean it up go over the top end.
To make sure there wasn't any damage to the cam I pulled it out and inspected it. No damage found so I reinstalled it with a new double roller chain. Then the cover went back on and I added a new balancer. Sitting in a dark corner I've had some heads I experimented on about 15 years ago when I was learning how to port heads. They're just generic GM 400 heads but with the gasket match, improved port flow, blended bowls, new guides and a fresh valve job, this motor was a perfect reason to dust them off and pull 'em off the shelf. I threw those on with the Proform airgap dual plane intake and the new 600 Summit carb. I painted the top end of the engine semigloss black while the bottom end was VHT "Metallic Copper" engine paint. I designed and had printed some stickers and applied a couple to the valve covers. As of 5 months later the stickers haven't been affected by engine heat and still look new.
The cap is not one of those correct-a-caps, I simply bought a universal set of MSD wires where you make them to your own desired length and carefully set them up in a clean way. Here's the specs on the motor...
.030 400 small block Chevy, stock crank and rods with ARP bolts
high pressure oil pump and aftermarket pump drive
8.7:1 Eutectic pistons and plasma moly rings
Comp XE268 cam with true roller timing chain
ported factory heads with 1.5 /1.6 roller tip rockers, Comp's cam matched springs
air gap dual plane intake with Summit 600 Vac secs carb
factory HEI with Pertronix "Flame Thrower" upgrade kit and MSD wires
Hooker full length headers
Moroso alternator overdrive pulley, factory crank and water pump pullies
It's a pretty mild and basic budget build, though I'm guessing it makes about 300-325hp and 400-425 ft lbs at the flywheel. According to Comp Cam's online dyno speculation, it's torque peak should be right around 2200 rpms. Out driving it sure pulls hard from 2200 on up to about 4500, which is perfect for autocross. It'll do for now while I hunt down a decent 6.0 LS donor...
01-16-2013, 10:19 AM
#195
On The Tree
Thread Starter
Join Date: Aug 2010
Location: Eagle Mountain, Utah
Posts: 143
Likes: 0
Received 0 Likes
on
0 Posts
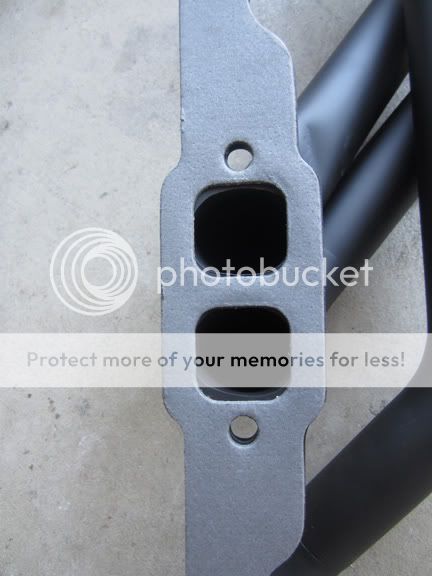
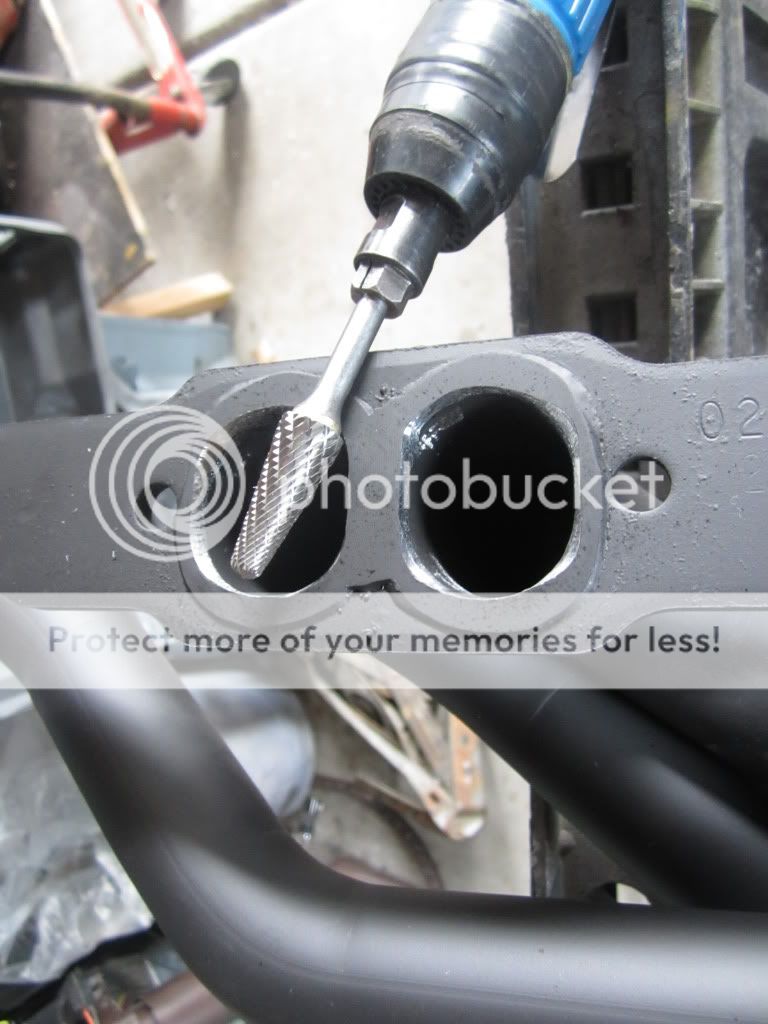
Here's one issue I had with the engine, the Hooker headers. I had a well fitting set of Hedman mid length headers on the car before but wanted the slight advantage of a basic long tube so I went with the Hooker name. Hooker doesn't have a specific G body part number, but rather the catalog lists this generic part number as one that "will fit" pretty much any GM chassis, including the listied g-body. I should've been skeptical at that, these headers are total crap. The tube alignment at the flange is off, the oval rather than round holes at the flange don't line up with the gasket at all and look like they would be a flow restriction, and worst of all they don't fit a g-body chassis without modification. In hindsight I should've sent them back, but instead I messed with them to make them work. What a pain it turned out to be.
First off I gasket matched them a bit, radiusing the ends as much as I could without taking too much out of the weld.
Then I had to bang on the driver's side lower outer tube to clear the lower control arm. I didn't want to affect flow too much so I only dented it in about 1/4", but it wasn't enough...
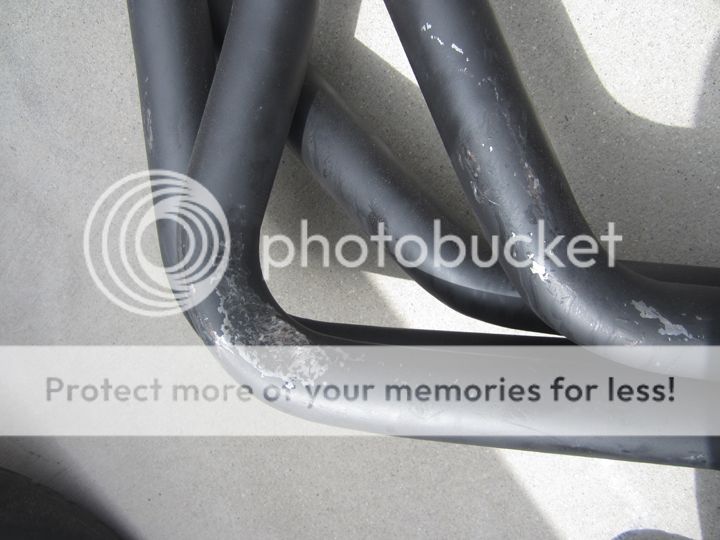
I then got up underneath and trimmed the control arm mount several times until the header would finally fit without touching the frame. I had to whack off a pretty good chunk. Remember the braces I made for this area? Yeah there was no way they'd fit with these headers either. I didn't want to remove the bolts to get them out because I was under a time constraint and removing the bolts meant that the control arm, spring, and shock would have to come out and be re-installed, so I simply cut them out. I was pretty disappointed to have to do this.
All in all I was very disappointed with them. I guess you have to buy Super Comps instead of their street header to get any sort of quality and decent fit. Boo on Hooker for being a big enough company to produce a decent product but rather to cut costs puts out garbage. I certainly wouldn't recommend them for anyone with a g-body.
First off I gasket matched them a bit, radiusing the ends as much as I could without taking too much out of the weld.
Then I had to bang on the driver's side lower outer tube to clear the lower control arm. I didn't want to affect flow too much so I only dented it in about 1/4", but it wasn't enough...
I then got up underneath and trimmed the control arm mount several times until the header would finally fit without touching the frame. I had to whack off a pretty good chunk. Remember the braces I made for this area? Yeah there was no way they'd fit with these headers either. I didn't want to remove the bolts to get them out because I was under a time constraint and removing the bolts meant that the control arm, spring, and shock would have to come out and be re-installed, so I simply cut them out. I was pretty disappointed to have to do this.
All in all I was very disappointed with them. I guess you have to buy Super Comps instead of their street header to get any sort of quality and decent fit. Boo on Hooker for being a big enough company to produce a decent product but rather to cut costs puts out garbage. I certainly wouldn't recommend them for anyone with a g-body.
01-16-2013, 10:23 AM
#196
On The Tree
Thread Starter
Join Date: Aug 2010
Location: Eagle Mountain, Utah
Posts: 143
Likes: 0
Received 0 Likes
on
0 Posts
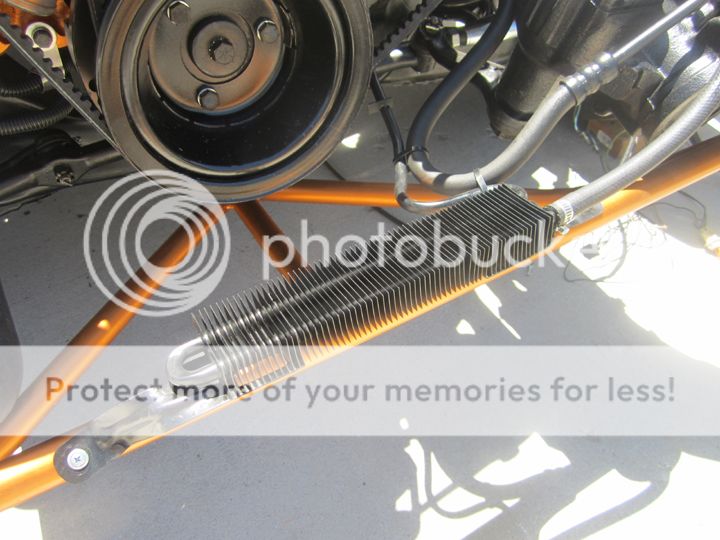
Here are my trans and power steering coolers. The trans cooler came off a parts truck I bought for some parts for my Suburban, and the ps cooler of a 90's Caddy in the junkyard.
The factory tranny lines had been worked and re-worked, so I decided to start over and bought some straight tube and some fittings and bent some new ones. These tuck up close to the block, cross over to the frame near the fuel pump, then follow the contour of the frame towards the radiator support, passing under it near the mount bushing. From there they curve back up and over to the cooler, which is mounted to the Buick Regal radiator support X bracing. Ideally the electric trans temp sensor should be mounted in the pan, but since I didn't have a welder for a bung at home I improvised a little with some old fittings I had on hand. It does the job for now, and I just assume the trans is a few degrees hotter than the gauge reads.
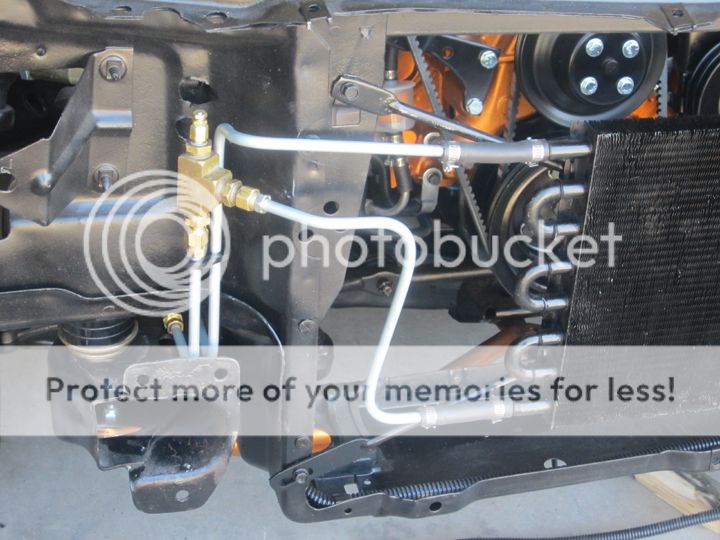
After cleaning thoroughly and repainting it black, the ps cooler was fairly easy to make work. I had to re-bend the factory metal tube to go the direction I needed, but mounting worked out perfect by using the front triangulated brace I made. I trimmed a hole to match the cooler in the bottom of the plastic factory fan shroud so the fan actually sucks air through it. It worked out great for just a few bucks from the junkyard.
The factory tranny lines had been worked and re-worked, so I decided to start over and bought some straight tube and some fittings and bent some new ones. These tuck up close to the block, cross over to the frame near the fuel pump, then follow the contour of the frame towards the radiator support, passing under it near the mount bushing. From there they curve back up and over to the cooler, which is mounted to the Buick Regal radiator support X bracing. Ideally the electric trans temp sensor should be mounted in the pan, but since I didn't have a welder for a bung at home I improvised a little with some old fittings I had on hand. It does the job for now, and I just assume the trans is a few degrees hotter than the gauge reads.
After cleaning thoroughly and repainting it black, the ps cooler was fairly easy to make work. I had to re-bend the factory metal tube to go the direction I needed, but mounting worked out perfect by using the front triangulated brace I made. I trimmed a hole to match the cooler in the bottom of the plastic factory fan shroud so the fan actually sucks air through it. It worked out great for just a few bucks from the junkyard.
01-16-2013, 10:24 AM
#197
On The Tree
Thread Starter
Join Date: Aug 2010
Location: Eagle Mountain, Utah
Posts: 143
Likes: 0
Received 0 Likes
on
0 Posts
My 14 year old son started to take a bit of interest here, so I had him clean and prep the engine compartment braces I pulled from a junkyard 75 El Camino. He did a great job with them, and went on to help me with some other things for the rest of the build. This did something to him, as we arrived here in GA he's really gotten into cars and we've started working on one of my Novas I decided to give to him. We should make a lot of progress on it this summer. http://www.pro-touring.com/showthrea...ght=tangermean
These braces fit great, they already had nuts welded on one end, so all I had to do was drill two holes in the cowl panel to make them work. Here's a few fitment pics... Again, a very cheap alternative to aftermarket.
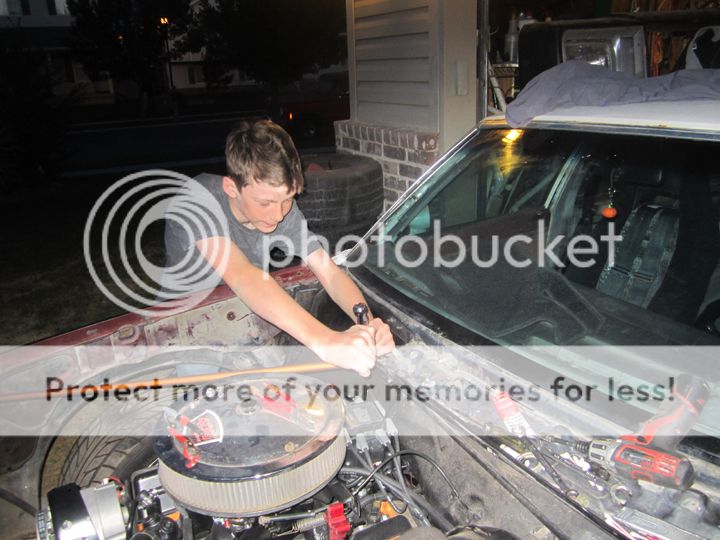
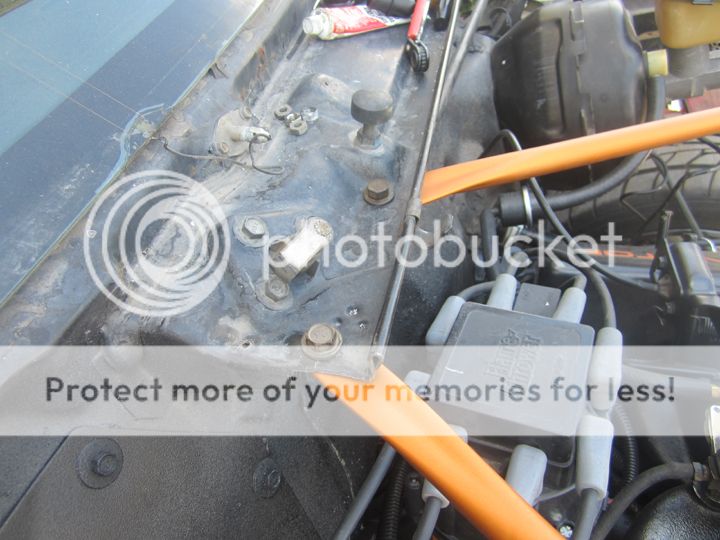
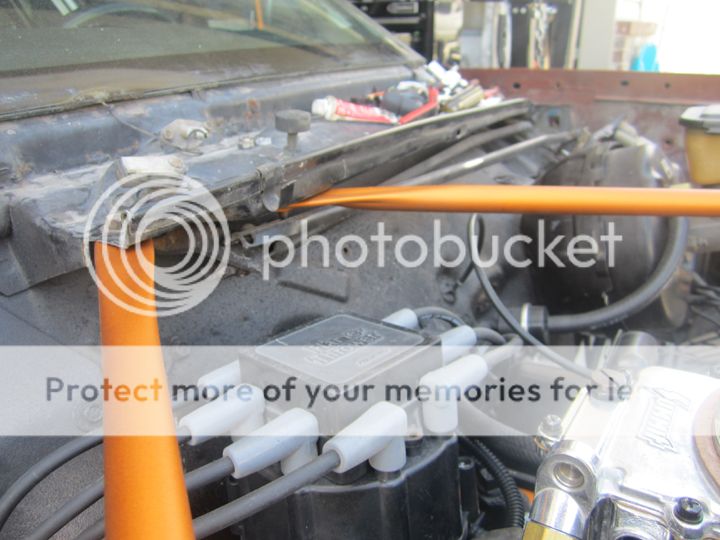
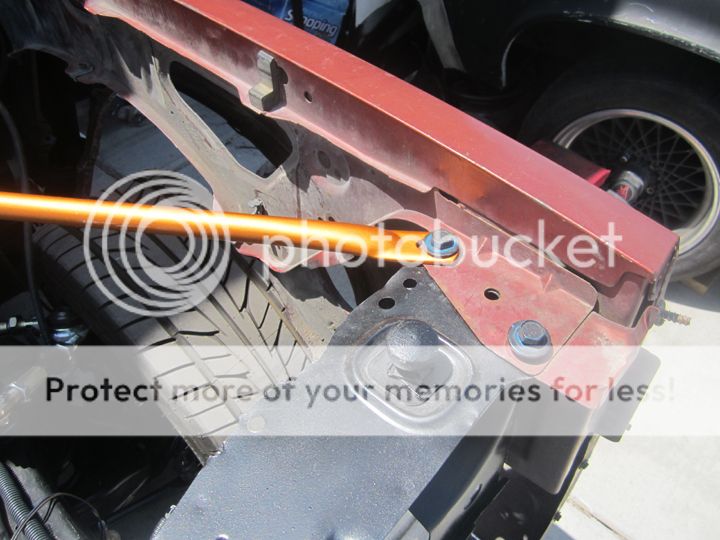
These braces fit great, they already had nuts welded on one end, so all I had to do was drill two holes in the cowl panel to make them work. Here's a few fitment pics... Again, a very cheap alternative to aftermarket.
01-16-2013, 10:26 AM
#198
On The Tree
Thread Starter
Join Date: Aug 2010
Location: Eagle Mountain, Utah
Posts: 143
Likes: 0
Received 0 Likes
on
0 Posts
In this post I wanted to share how I fabricated a way to effectively seal the carb to the hood on a really tight budget using some really basic materials.
First off, I had this bucket laying around. You can buy it from WalMart for about $6.00. Mine was well used and had a crack near the top so instead of trashing it I went green and recycled it. There are several designs of these buckets, so make sure to get one that is fairly rigid and has a large enough base to allow the air cleaner to breathe well.
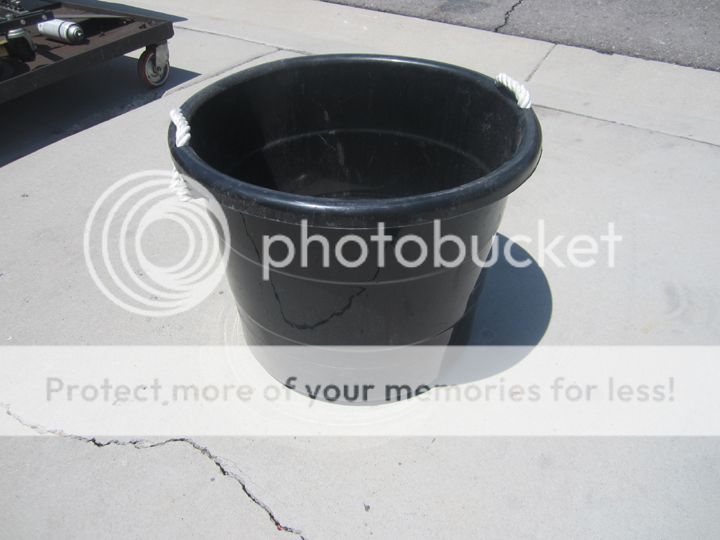
Step one is to cut a large hole in the bottom, about 12" in dia. Then cut the bottom away from the top, in my case it was about 5" tall from the bottom.
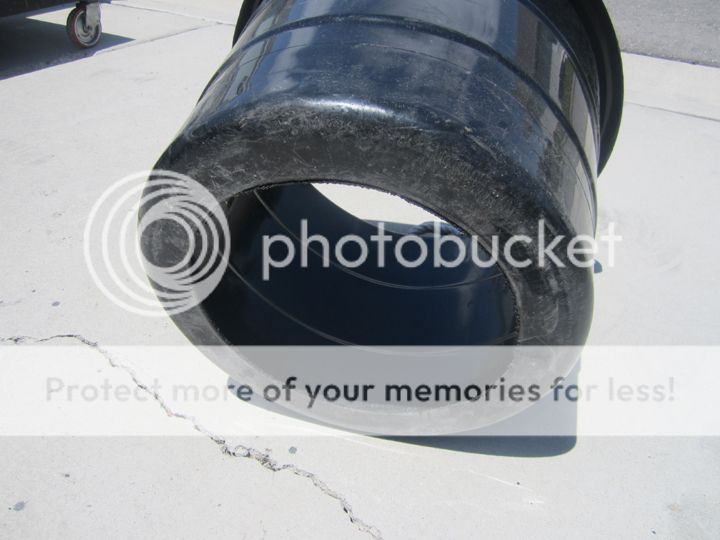
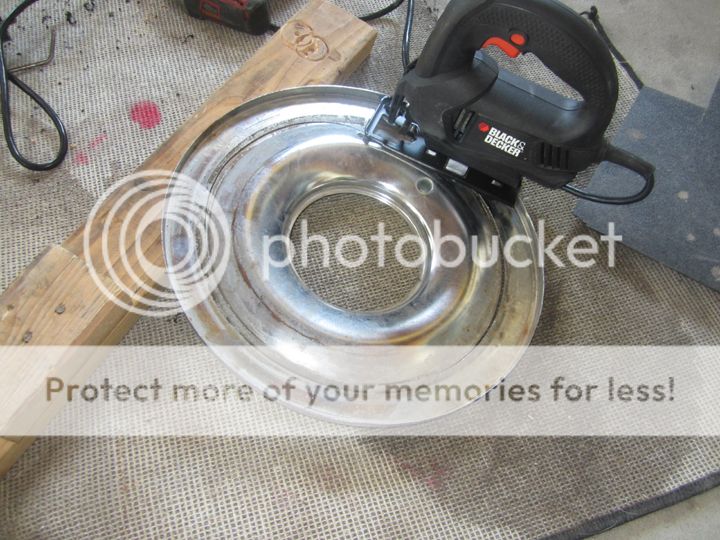
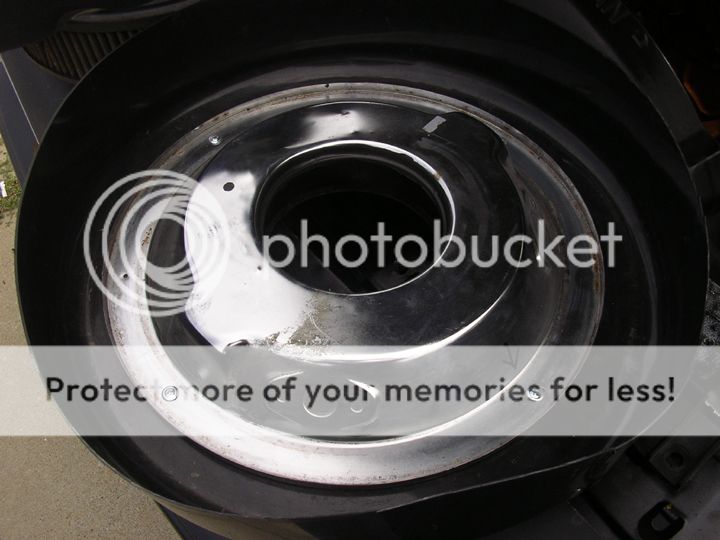
I then grabbed an old "flat" base 14" air cleaner bottom I had laying around which came on an old parts car. I've seen several of these in junkyards over the years. I used a metal blade on my jig saw and trimmed the center out, creating a large flat washer that had a 1/4" turned up lip on it making it plenty rigid.
I then placed the ring upside down under the plastic tub bottom, then placed the base for my Summit 14" dropped base air cleaner on top of the tub and used 4 fairly flat self tapping trim screws to hold the sandwich together. Rivets can be used too, but I like to keep things easy to change later on if need be.

Here it is at this point mounted on the carb....
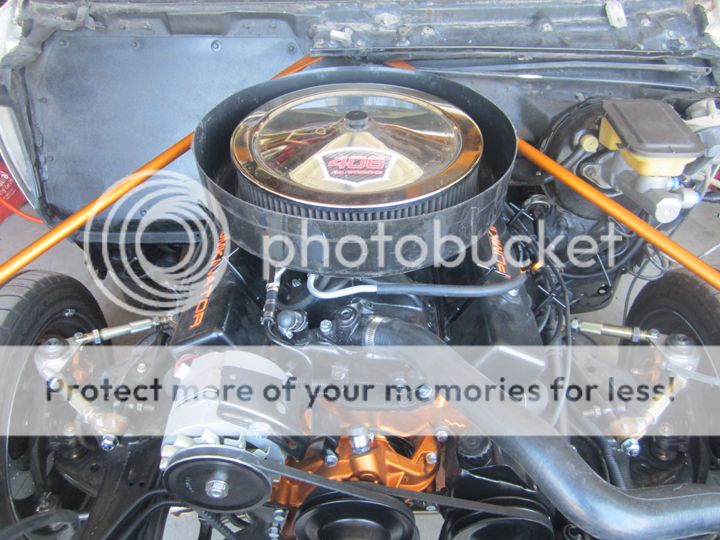
For the seal I got some 1/2" thick foam with scrim backing to the length of the dia of the tub from the local upholstery shop. The ends were sewn together to make a round doughnut of foam. I then carefully cut the foam in half length wise so I could fold it in half. You have to be careful to not cut the scrim backing as this keeps it as one unit rather than two foam rings stuck together.
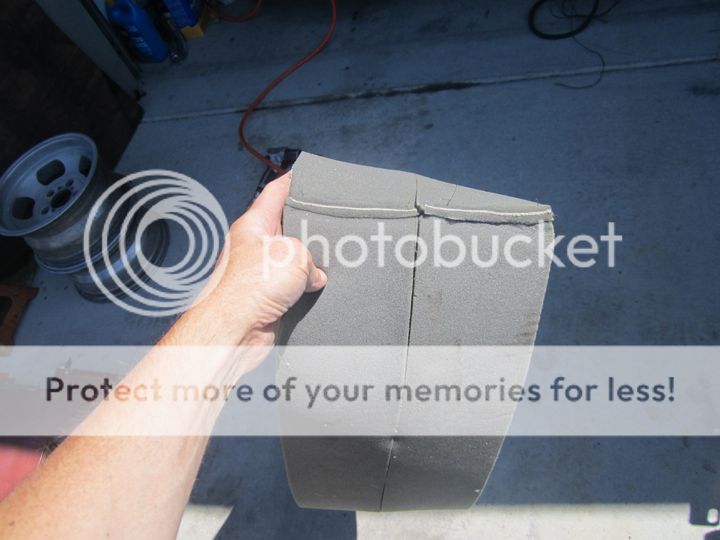
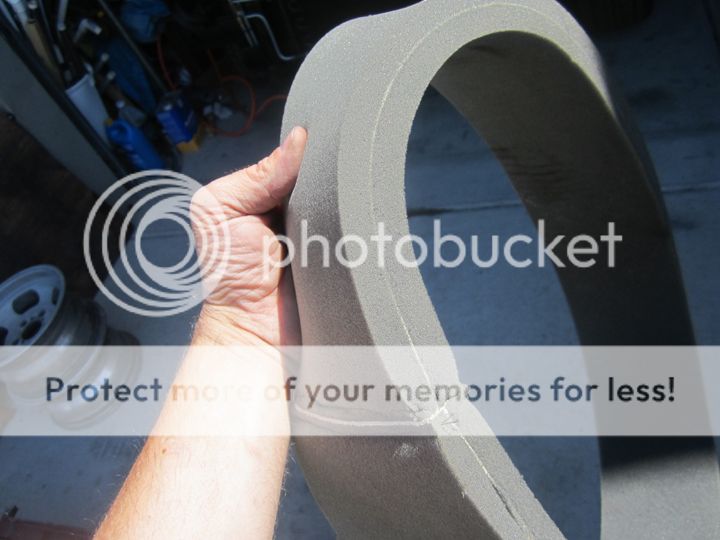
Here it is slipped over the base. The second photo shows it after some black interior paint. The hood holds it in place and it works great. Yeah, it's sort of rednecky, but for the most part the foam covers the ugly base and gives it a nice clean professional look for cheap cheap.


First off, I had this bucket laying around. You can buy it from WalMart for about $6.00. Mine was well used and had a crack near the top so instead of trashing it I went green and recycled it.
There are several designs of these buckets, so make sure to get one that is fairly rigid and has a large enough base to allow the air cleaner to breathe well. Step one is to cut a large hole in the bottom, about 12" in dia. Then cut the bottom away from the top, in my case it was about 5" tall from the bottom.
I then grabbed an old "flat" base 14" air cleaner bottom I had laying around which came on an old parts car. I've seen several of these in junkyards over the years. I used a metal blade on my jig saw and trimmed the center out, creating a large flat washer that had a 1/4" turned up lip on it making it plenty rigid.
I then placed the ring upside down under the plastic tub bottom, then placed the base for my Summit 14" dropped base air cleaner on top of the tub and used 4 fairly flat self tapping trim screws to hold the sandwich together. Rivets can be used too, but I like to keep things easy to change later on if need be.
Here it is at this point mounted on the carb....
For the seal I got some 1/2" thick foam with scrim backing to the length of the dia of the tub from the local upholstery shop. The ends were sewn together to make a round doughnut of foam. I then carefully cut the foam in half length wise so I could fold it in half. You have to be careful to not cut the scrim backing as this keeps it as one unit rather than two foam rings stuck together.
Here it is slipped over the base. The second photo shows it after some black interior paint. The hood holds it in place and it works great. Yeah, it's sort of rednecky, but for the most part the foam covers the ugly base and gives it a nice clean professional look for cheap cheap.
01-16-2013, 10:34 AM
#199
On The Tree
Thread Starter
Join Date: Aug 2010
Location: Eagle Mountain, Utah
Posts: 143
Likes: 0
Received 0 Likes
on
0 Posts
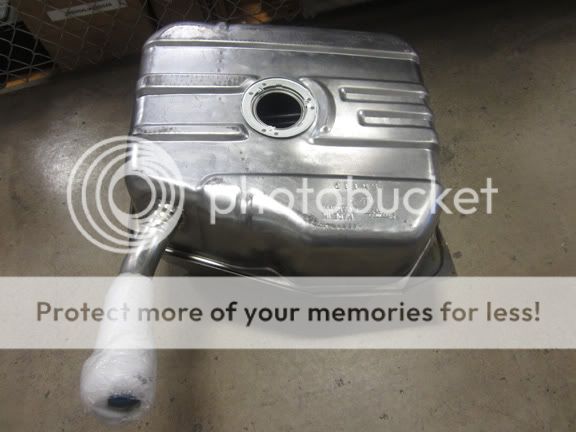
My factory tank had a lot of rust in it, and over the course of driving it a couple years before tearing the car down it had sprung several small pin hole leaks that I patched with gas tank patch kits from auto parts stores. This was only a temp band-aid so I got this new gas tank from Rock Auto for the rebuild. Their price spanked everyone else. A g-body forum member warned me after he saw that's where I bought it from that he had bought two of these wagon tanks from them and neither fit. I found this was the case with mine too, the filler tube wasn't even close. Luckily sheet metal flexes easily, and a few careful tugs and test fits on it, it lined up fine. I then pulled it back out, installed my sending unit and it was good to go back in. The factory fuel line was pretty rusty, so I custom fabricated the fuel line using a roll of 3/8" aluminum tubing from Summit and mounted it with some insulated clamps. The line was carefully routed away from exhaust in the front and rear, something of a problem with the factory line and a lowered car with headers.
Finally the car was ready to fire up for the first time. I didn't let it run long as there was plenty more to do, but it was pretty exciting to hear it run after 8 months and a complete disassembly.
Not long later I had all fluids filled, the carb adjusted, and the car running great. At this point I was running out of time to get ready to move across the country very quickly. The car was crazy loud inside and I wanted at least some degree of creature comfort for the drive so I addressed the interior, sort of.
01-16-2013, 10:36 AM
#200
On The Tree
Thread Starter
Join Date: Aug 2010
Location: Eagle Mountain, Utah
Posts: 143
Likes: 0
Received 0 Likes
on
0 Posts
Original plans were to get a new complete dash cover, new carpet kit, have the seats reupholstered, do some custom work on the nice factory door panels I found in the junkyard, and replace the headliner. However most of my remaining budget had been spent getting the car to this point so I had to temporarily improvise. I couldn't afford dynamat so I found some foil lined mat at Lowe's. Cost me about $40 for enough to do the whole floor. All in all, I'm not sure it really helped much. Really I just need a different muffler to begin with, lol!
I didn't want the interior to look stupid or have the sun reflect off it while driving, so I broke down and decided to spend the $9.00 at Walmart to buy one 3x5' roll of that ultra cheap crap automotive carpet. Of course it wouldn't contour to the floor very well so I put to work the training I got during my internship at Kirkham's Upholstery in American Fork, UT. BTW Utah folks, they do great custom automotive work http://www.kirkhamupholstery.com/.
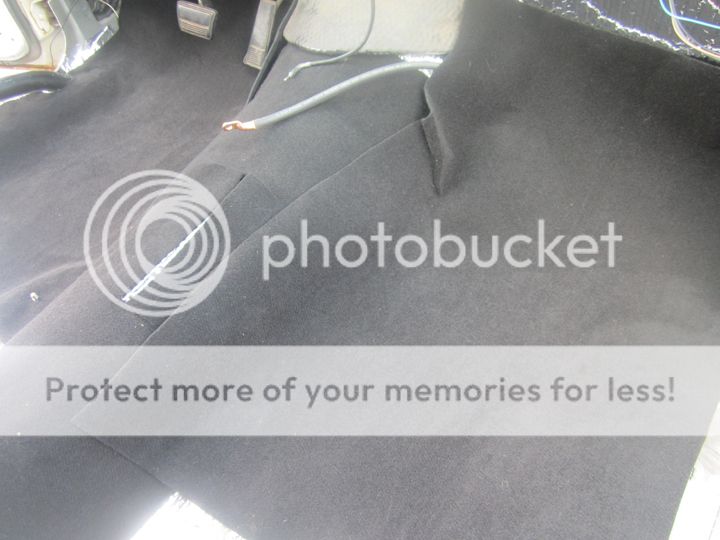
First step was covering the trans tunnel. Where the shape and contour changed I made a few cuts to help it lay flat...

Now onto taking what was left over from the roll and fitting the floor areas...
I used my kids' sidewalk chalk (lol) and calculated where to make pie cuts and sew together...
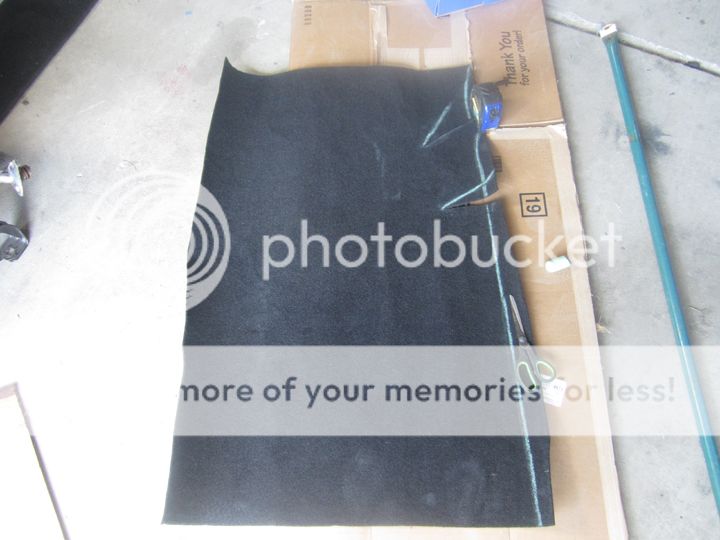
This is what the bottom looks like after sewing. I used my wife's Kenmore home machine with a wide stitch and a denim needle...

To make everything look nice and finished I used some material I had left over from another project. I decided to trim it with a hidden stitch. This is a relatively easy process. First I cut a length of material roughly 2" wide. You line this up on the edge of the TOP of the carpet and sew the length about 3/8" inward.

Then you simply fold that trim material over itself and snug under the carpet. Very carefully sew the length right in front of the trim. The stitch gets tucked down against the edge of the trim and the pile of the carpet hides the stitch. It's virtually invisible and looks very clean...
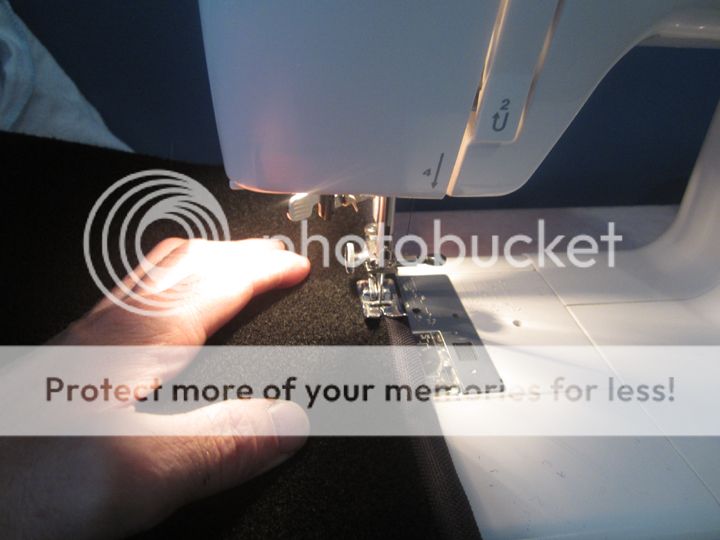
This is what it looks like on the back side...

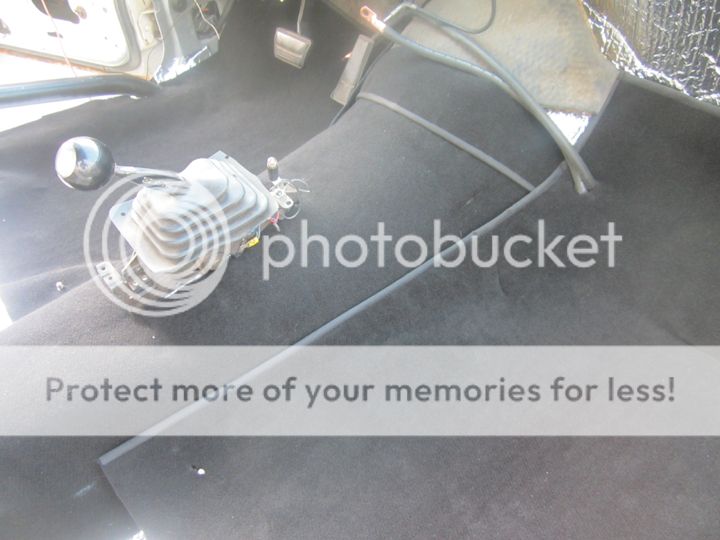
Here's the final product. One 3x5' roll barely covered the front floor area. On the outer edges the sill plates covered the rough areas. I used pro-grade interior glue brushed on to hold it all in place. For a little over $9 plus a little time, it looks a bazillion times better then the thrashed factory carpet which has long since gone to the land fill. Some cheap $15 black rubber backed protective floor mats topped it all off. Eventually it will be replaced by an aftermarket carpet kit, but it was good enough for the road trip and has held up great so far....
I didn't want the interior to look stupid or have the sun reflect off it while driving, so I broke down and decided to spend the $9.00 at Walmart to buy one 3x5' roll of that ultra cheap crap automotive carpet. Of course it wouldn't contour to the floor very well so I put to work the training I got during my internship at Kirkham's Upholstery in American Fork, UT. BTW Utah folks, they do great custom automotive work http://www.kirkhamupholstery.com/.
First step was covering the trans tunnel. Where the shape and contour changed I made a few cuts to help it lay flat...
Now onto taking what was left over from the roll and fitting the floor areas...
I used my kids' sidewalk chalk (lol) and calculated where to make pie cuts and sew together...
This is what the bottom looks like after sewing. I used my wife's Kenmore home machine with a wide stitch and a denim needle...
To make everything look nice and finished I used some material I had left over from another project. I decided to trim it with a hidden stitch. This is a relatively easy process. First I cut a length of material roughly 2" wide. You line this up on the edge of the TOP of the carpet and sew the length about 3/8" inward.
Then you simply fold that trim material over itself and snug under the carpet. Very carefully sew the length right in front of the trim. The stitch gets tucked down against the edge of the trim and the pile of the carpet hides the stitch. It's virtually invisible and looks very clean...
This is what it looks like on the back side...
Here's the final product. One 3x5' roll barely covered the front floor area. On the outer edges the sill plates covered the rough areas. I used pro-grade interior glue brushed on to hold it all in place. For a little over $9 plus a little time, it looks a bazillion times better then the thrashed factory carpet which has long since gone to the land fill. Some cheap $15 black rubber backed protective floor mats topped it all off. Eventually it will be replaced by an aftermarket carpet kit, but it was good enough for the road trip and has held up great so far....