
79 Cutlass Wagon, 5.3 G machine
 04-11-2012, 10:29 AM
#161
On The Tree
Thread Starter
Join Date: Aug 2010
Location: Eagle Mountain, Utah
Posts: 143
Likes: 0
Received 0 Likes
on
0 Posts
Thanks guys!
A little more progress-
The rear suspension is mostly in, still waiting on shocks and springs. I did a quick clean and spray on the rear axle. Up close it doesn't look as nice as the frame, but when I swap the 9" in there I'll take a little more time to make it look nice. To save time I also left the Spohn control arms red for now. I'm a bit worried about the VHT orange paint not being very durable. I noticed that Eastwood has a burnt orange powder coat paint, so I figure if they have it, it should be available commercially as well. Once I get to GA I plan on looking into having all the orange parts powder coated, including the Spohn arms. Still havta fabricate a way to attach the rear Camaro sway bar...


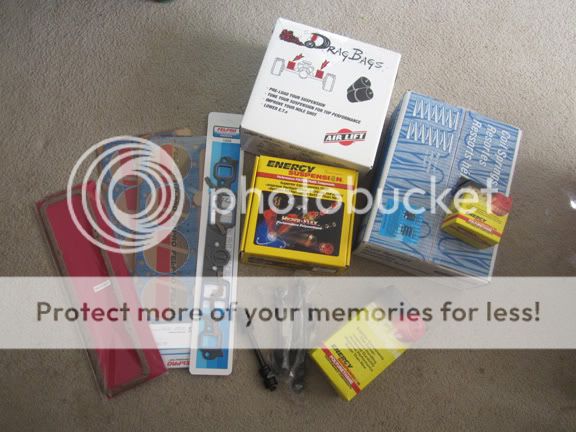
I also got a shipment from Summit. Drag Bags for easy spring rate adjustments at the track and to help with keeping things level after packing my car for my move, Energy Suspension Body mount, front lower control arm, and 36mm sway bar mount bushings, some all black sway bar end links, and gaskets to put my 406 back together. To get the car together on the cheap I bought Moog springs for now. I've heard both positive and negative about these, but Summit sells them for $54 for the pair and I needed something cheap for now. They're #5660, rated at 598 lbs. A lot of guys run the 5662 which are 748 lbs, but that sounds a bit stiff and Marc from SC&C suggested something around 550 lbs is a decent rate for what I'm after. Once I get the fiberglass hood and swap in the lighter LS based motor they should be just about right.
A little more progress-
The rear suspension is mostly in, still waiting on shocks and springs. I did a quick clean and spray on the rear axle. Up close it doesn't look as nice as the frame, but when I swap the 9" in there I'll take a little more time to make it look nice. To save time I also left the Spohn control arms red for now. I'm a bit worried about the VHT orange paint not being very durable. I noticed that Eastwood has a burnt orange powder coat paint, so I figure if they have it, it should be available commercially as well. Once I get to GA I plan on looking into having all the orange parts powder coated, including the Spohn arms. Still havta fabricate a way to attach the rear Camaro sway bar...
I also got a shipment from Summit. Drag Bags for easy spring rate adjustments at the track and to help with keeping things level after packing my car for my move, Energy Suspension Body mount, front lower control arm, and 36mm sway bar mount bushings, some all black sway bar end links, and gaskets to put my 406 back together. To get the car together on the cheap I bought Moog springs for now. I've heard both positive and negative about these, but Summit sells them for $54 for the pair and I needed something cheap for now. They're #5660, rated at 598 lbs. A lot of guys run the 5662 which are 748 lbs, but that sounds a bit stiff and Marc from SC&C suggested something around 550 lbs is a decent rate for what I'm after. Once I get the fiberglass hood and swap in the lighter LS based motor they should be just about right.
 04-11-2012, 09:18 PM
#162
On The Tree
Thread Starter
Join Date: Aug 2010
Location: Eagle Mountain, Utah
Posts: 143
Likes: 0
Received 0 Likes
on
0 Posts
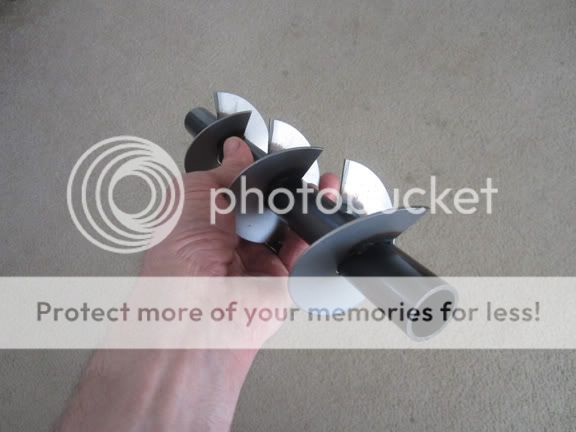
My last part from Summit showed up today, from of all places their Atlanta, GA warehouse. It's an auger style "muffler". Apparently they're used a lot in circle track racing and I've read on on several forums when placed upstream of the muffler they help quiet down the interior drone of some performance mufflers. I have a single 3" exhaust with a 40 series Flowmaster. There's a ton of drone at certain speeds, so I'm hoping this will help a bit. I don't want to drive 2500 miles and be deaf at the end, lol! For $15 even if it didn't work I figured I wasn't out much.
04-27-2012, 09:41 AM
#163
On The Tree
Thread Starter
Join Date: Aug 2010
Location: Eagle Mountain, Utah
Posts: 143
Likes: 0
Received 0 Likes
on
0 Posts
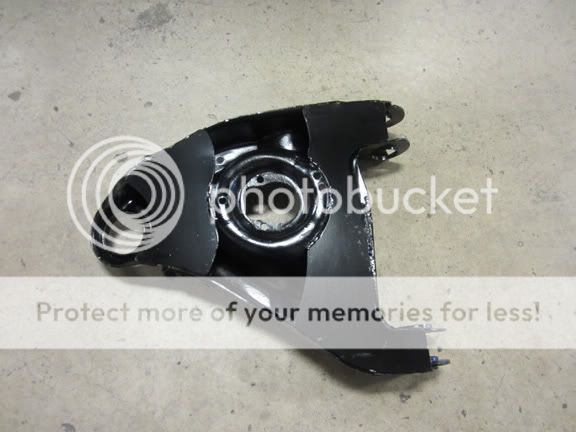
Some updates- Camaro rear sway bar...
Once the rear suspension was all together I tackled the rear sway bar using the junkyard 82-92 F-body 7/8" bar. From what I can tell this is the same size dia. as the largest factory stock G-body rear bar, the advantage being it will be attached to the frame rather than to the lower control arms.
I thought for sure this was going to be a pain and require a bunch of fab work but I found just the opposite. I ordered an extra set of FRONT g-body sway bar links, guessing they'd be just about the right length. At my car's actual lowered ride height they are the perfect length.
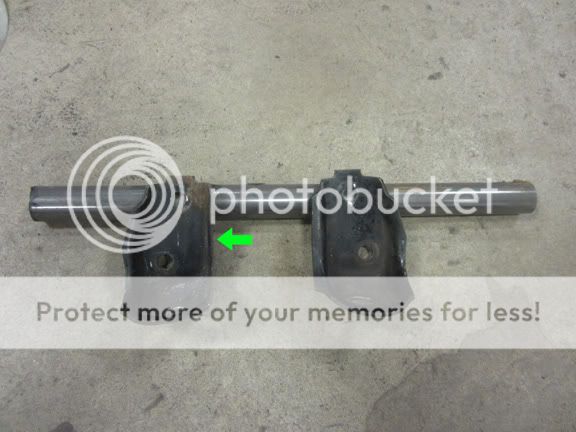
With a mock up of everything bolted together I found it fit right up into the frame. Only mod needed was shaving down the side of the brackets for shock clearance (green arrow). Notice how they are positioned here, they need to go into the car like this, right and left accordingly.
With everything mocked in place I marked the spot to drill the holes using the existing holes in the brackets. Then I drilled a pilot hole through both sides of the frame rail with a 3/16ths bit. On the outer side I drilled a 7/8" hole with a hole saw to allow access to the bolt. I then drilled the inner hole using a 3/8" bit. A 3/8" x 1" bolt and nylon lock nut finished the bracket bolt in. The outer holes are plugged off using plastic hole caps from Home Depot. Pretty simple actually, the hardest part was lining up the bracket at the right angle.
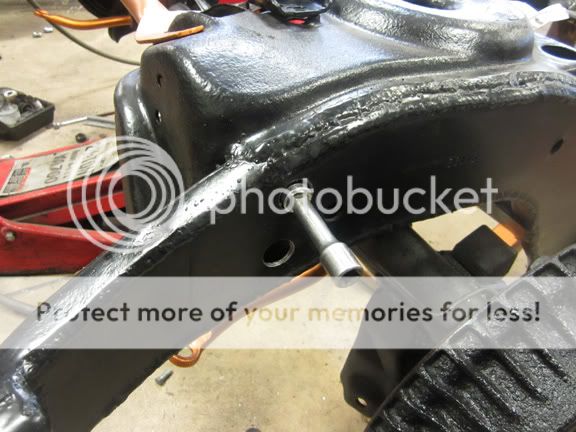
In this final photo, (sorry it's a little dark) you can see where the bracket bolts are (green arrow) and overall fitment. Notice the angle of the bar to the link is off (red arrow). This is the only disadvantage to using the upside-down F-body bar, the angle on the ends is off. With the suspension dropped about another 1.5" or so, which is estimated ride height for my car, it's a lot closer to the right angle. This might be way off with a car at close to stock ride height though, you might be able to fix that with longer end links but I'm not sure how that may affect stability of the bar.

The Camaro poly bushings and brackets that mount to the rear were in good shape so I just re-used them. The Camaro axle housing is the same or close to the g-body so it was a direct fit. With the 9" the axle housing is a lot larger, so when I get to installing it I'll use some 3" muffler clamps and fab up mounting brackets.
So here's the end result- sway bar and brackets from the wrecking yard- $15, end links with poly bushings from Summit- $4.99 ea., and bolts, nuts, and washers about $3, so for less than $30 I got it all set up. With the bar flipped I don't know how that may affect handling or functionality of the bar, however as I mentioned previously having it backwards like this is common on trucks so the assumption is it must work fine. Track time will be the ultimate test to see if it will be just as good as an aftermarket set-up that runs 4X as much $. At the very least it will be better than the factory bar that bolts to the control arms and it's keeping me in line with building on a budget. More coming...
Once the rear suspension was all together I tackled the rear sway bar using the junkyard 82-92 F-body 7/8" bar. From what I can tell this is the same size dia. as the largest factory stock G-body rear bar, the advantage being it will be attached to the frame rather than to the lower control arms.
I thought for sure this was going to be a pain and require a bunch of fab work but I found just the opposite. I ordered an extra set of FRONT g-body sway bar links, guessing they'd be just about the right length. At my car's actual lowered ride height they are the perfect length.
With a mock up of everything bolted together I found it fit right up into the frame. Only mod needed was shaving down the side of the brackets for shock clearance (green arrow). Notice how they are positioned here, they need to go into the car like this, right and left accordingly.
With everything mocked in place I marked the spot to drill the holes using the existing holes in the brackets. Then I drilled a pilot hole through both sides of the frame rail with a 3/16ths bit. On the outer side I drilled a 7/8" hole with a hole saw to allow access to the bolt. I then drilled the inner hole using a 3/8" bit. A 3/8" x 1" bolt and nylon lock nut finished the bracket bolt in. The outer holes are plugged off using plastic hole caps from Home Depot. Pretty simple actually, the hardest part was lining up the bracket at the right angle.
In this final photo, (sorry it's a little dark) you can see where the bracket bolts are (green arrow) and overall fitment. Notice the angle of the bar to the link is off (red arrow). This is the only disadvantage to using the upside-down F-body bar, the angle on the ends is off. With the suspension dropped about another 1.5" or so, which is estimated ride height for my car, it's a lot closer to the right angle. This might be way off with a car at close to stock ride height though, you might be able to fix that with longer end links but I'm not sure how that may affect stability of the bar.
The Camaro poly bushings and brackets that mount to the rear were in good shape so I just re-used them. The Camaro axle housing is the same or close to the g-body so it was a direct fit. With the 9" the axle housing is a lot larger, so when I get to installing it I'll use some 3" muffler clamps and fab up mounting brackets.
So here's the end result- sway bar and brackets from the wrecking yard- $15, end links with poly bushings from Summit- $4.99 ea., and bolts, nuts, and washers about $3, so for less than $30 I got it all set up. With the bar flipped I don't know how that may affect handling or functionality of the bar, however as I mentioned previously having it backwards like this is common on trucks so the assumption is it must work fine. Track time will be the ultimate test to see if it will be just as good as an aftermarket set-up that runs 4X as much $. At the very least it will be better than the factory bar that bolts to the control arms and it's keeping me in line with building on a budget. More coming...
04-27-2012, 09:41 AM
#164
On The Tree
Thread Starter
Join Date: Aug 2010
Location: Eagle Mountain, Utah
Posts: 143
Likes: 0
Received 0 Likes
on
0 Posts
Here's some more fab work. I saw some examples of boxed lower arms on a couple cars on the forum so I did mine as well. The way I cut out the plate allows space for installing the sway bar links and frame bumpers.
Finally! After getting the front suspension together on goes the body with the energy suspension frame bushings. Been looking forward to getting this done...
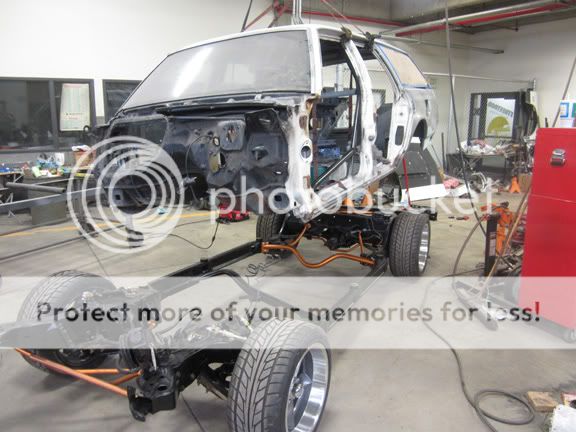
Finally! After getting the front suspension together on goes the body with the energy suspension frame bushings. Been looking forward to getting this done...
 05-07-2012, 08:11 PM
#167

are you keeping the rear drum brakes,you really should do the upgrade to F body rear disks....,its been awhile since i visitid this thread,i was hoping to see it completed--cant wait...i need a wagon for the old lady and kids....
some eye candy since you like orange..........................
http://cgi.ebay.com/ebaymotors/1972-...item4d00a83293
some eye candy since you like orange..........................
http://cgi.ebay.com/ebaymotors/1972-...item4d00a83293
Last edited by tta656; 05-07-2012 at 08:31 PM.
05-07-2012, 09:29 PM
#168
TECH Apprentice
Join Date: Jul 2006
Location: Kansas City
Posts: 301
Likes: 0
Received 0 Likes
on
0 Posts

By the way, love all your metal fab work and how you boxed in the control arms and such. I bet it improves ride/handling a lot huh?
05-07-2012, 09:52 PM
#169
On The Tree
Thread Starter
Join Date: Aug 2010
Location: Eagle Mountain, Utah
Posts: 143
Likes: 0
Received 0 Likes
on
0 Posts
Yeah, that wagon is definitely eye candy!
When I make the move to Georgia here real soon I will start on narrowing and welding the brackets onto my 9". I already have the F-body rear rotors, just need to get the calipers. I left the 7.5" factory rear alone (with drum brakes) because it's not worth sinking money into and with 2.41 gears should help with gas mileage for my 2500 mile trip.
It should handle great, unfortunately it's still apart, but coming together slow but sure.
I have a '74 Nova street strip car that has a bunch of fiberglass body parts, lexan windows, a well built n/a 406 gen 1 small block and 4.56 gears and it's in the mid 11's. 11's in a boat with just a cam and tune is way impressive.
05-16-2012, 07:53 AM
#170
On The Tree
Thread Starter
Join Date: Aug 2010
Location: Eagle Mountain, Utah
Posts: 143
Likes: 0
Received 0 Likes
on
0 Posts
Updates- It's been a coupla weeks since I brought the car home from school using my trusty '77 454 powered 2500 Suby. This is my first big block vehicle, we picked it up for a great price about 2 years ago, and it tows fantastically! The wagon spent the first 4 days on the trailer while I excavated all the crap I've accumulated out of the garage. Since the Race Nova has some naked body panels and the doors are off, I unburied my son's future 73 Nova and moved it out to the driveway for now, leaving a space to work on the wagon in our two car garage.
I am humbled with having to go from a huge shop with all the tools and machines I needed, back to essentially a one car garage to work in, limited to the tools I own or can rent from Oreily's. I salute all you that are doing this everyday.
I am humbled with having to go from a huge shop with all the tools and machines I needed, back to essentially a one car garage to work in, limited to the tools I own or can rent from Oreily's. I salute all you that are doing this everyday.
05-16-2012, 07:55 AM
#171
On The Tree
Thread Starter
Join Date: Aug 2010
Location: Eagle Mountain, Utah
Posts: 143
Likes: 0
Received 0 Likes
on
0 Posts
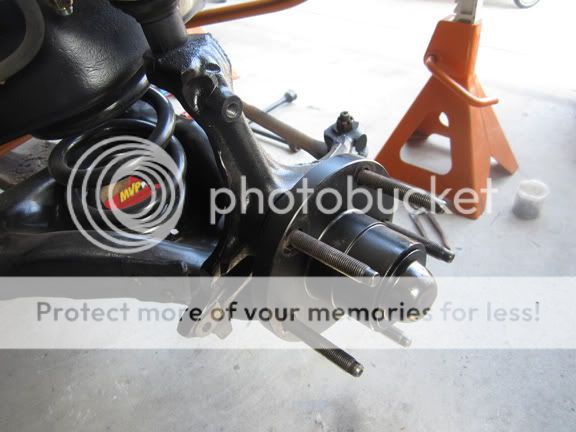
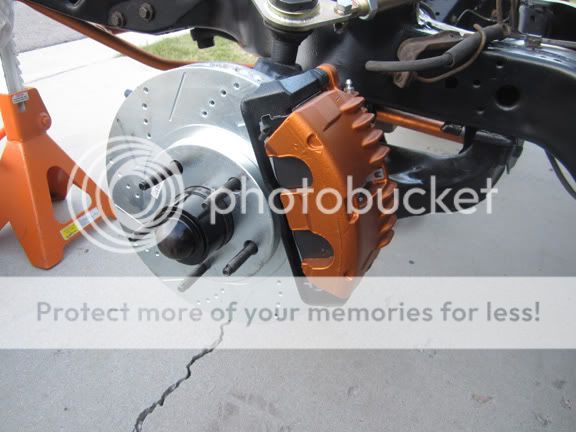
Swapping on the LS1 f-body front brakes turned out to be a bit of a pain, the biggest problem here is owning a "step bast@rd child" 79 G-body...
My on-line g-body research told me we share the same front suspension from the control arms out (except spring rate) as an S-10 truck. Knowing this I ordered a set of S-10 hubs made from cut down rotors from a guy on an S10 forum. They came with new seals and new extended studs, $110 shipped. Being under time constraints this was quicker and less stressful than trying to find a machine shop that could cut down mine. After hacking up my 79 spindles to fit the LS1 caliper adapter bracket and painting them and the S10 hubs, I found out I just flushed $110 down the toilet when I tried to assemble everything. My 79 g-body outer bearings were too big for the S10 hubs. A trip to the auto parts store later revealed the S10 outer bearings were too small for my spindle. At this point I was getting a bit frustrated.
After a big fail with the hubs I did a little more digging. All listings for interchangeable parts, a drop spindle for example, list S10 and 1982+ g-body as the same part numbers, but no one could explain to me why that didn't include the 78-81 cars. Further digging revealed the deal-
All 1973-1988 A/G body cars and non-sealed hub S10s have the same inner front bearing and seal, part # 6 for the bearing.
All 1973-1978 A/G body cars have the same outer bearing and spindle pin measurements, making the 1978 g-bodies, which are actually still called A bodies, the original bast@rd child. This bearing has a smaller inner dia than the 79-81 cars, bearing part #2.
All 1979-81 g-body cars have the same outer bearings, larger outer and inner diameters than the 1978 g-body and S10s, i.e. a larger spindle pin. The rotors for these cars also have larger hub diameters. This makes these cars the step bast@rd child. Outer bearing part #3. A 1978 or an 82+ rotor will not fit a 79-81 spindle. How dumb is that?!
All 1982 and up g-bodies and S10s have the same outer bearings, using a smaller outer and inner bearing diameter, i.e. a smaller pin. Outer bearing part # 34. Everything seems to swap between these two vehicles.
On another note there were also wiring and a few other changes between 81 and 82 g-bodies. :hand:
At this point I had to still track down a machine shop to mill down my original rotors. Ended up costing me $133, not including new seals and extended studs (which I had previously already installed). Oh well, I guess I'm your g-body owner's friendly neighborhood guinea pig, lol! Once I got the new hubs made, everything went together easily with new bearings, races, and seals.
Here's a photo that illustrates to you g-body guys the changes to the factory spindle and the cut down rotor hub...
And with all assembled...
With the wheels on...
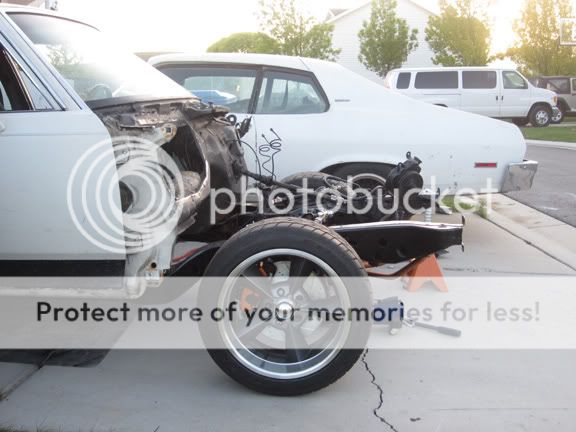
and what folks will see as I drive down the road, lol! ...
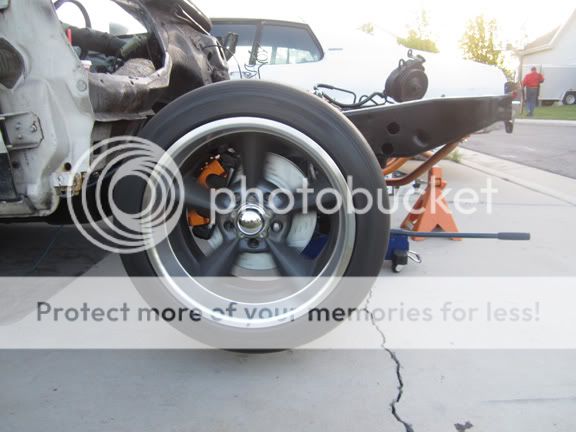
Funny how even though the 12" LS1 rotors look gynormous compared to the 10.25" g-body rotors, they still look too small in the 17" wheel. Dang it, now I gotta switch to Vette brakes with 13" rotors when I get to Georgia, lol!
My on-line g-body research told me we share the same front suspension from the control arms out (except spring rate) as an S-10 truck. Knowing this I ordered a set of S-10 hubs made from cut down rotors from a guy on an S10 forum. They came with new seals and new extended studs, $110 shipped. Being under time constraints this was quicker and less stressful than trying to find a machine shop that could cut down mine. After hacking up my 79 spindles to fit the LS1 caliper adapter bracket and painting them and the S10 hubs, I found out I just flushed $110 down the toilet when I tried to assemble everything. My 79 g-body outer bearings were too big for the S10 hubs. A trip to the auto parts store later revealed the S10 outer bearings were too small for my spindle. At this point I was getting a bit frustrated.
After a big fail with the hubs I did a little more digging. All listings for interchangeable parts, a drop spindle for example, list S10 and 1982+ g-body as the same part numbers, but no one could explain to me why that didn't include the 78-81 cars. Further digging revealed the deal-
All 1973-1988 A/G body cars and non-sealed hub S10s have the same inner front bearing and seal, part # 6 for the bearing.
All 1973-1978 A/G body cars have the same outer bearing and spindle pin measurements, making the 1978 g-bodies, which are actually still called A bodies, the original bast@rd child. This bearing has a smaller inner dia than the 79-81 cars, bearing part #2.
All 1979-81 g-body cars have the same outer bearings, larger outer and inner diameters than the 1978 g-body and S10s, i.e. a larger spindle pin. The rotors for these cars also have larger hub diameters. This makes these cars the step bast@rd child. Outer bearing part #3. A 1978 or an 82+ rotor will not fit a 79-81 spindle. How dumb is that?!
All 1982 and up g-bodies and S10s have the same outer bearings, using a smaller outer and inner bearing diameter, i.e. a smaller pin. Outer bearing part # 34. Everything seems to swap between these two vehicles.
On another note there were also wiring and a few other changes between 81 and 82 g-bodies. :hand:
At this point I had to still track down a machine shop to mill down my original rotors. Ended up costing me $133, not including new seals and extended studs (which I had previously already installed). Oh well, I guess I'm your g-body owner's friendly neighborhood guinea pig, lol! Once I got the new hubs made, everything went together easily with new bearings, races, and seals.
Here's a photo that illustrates to you g-body guys the changes to the factory spindle and the cut down rotor hub...
And with all assembled...
With the wheels on...
and what folks will see as I drive down the road, lol! ...
Funny how even though the 12" LS1 rotors look gynormous compared to the 10.25" g-body rotors, they still look too small in the 17" wheel. Dang it, now I gotta switch to Vette brakes with 13" rotors when I get to Georgia, lol!
05-16-2012, 08:08 AM
#172
On The Tree
Thread Starter
Join Date: Aug 2010
Location: Eagle Mountain, Utah
Posts: 143
Likes: 0
Received 0 Likes
on
0 Posts
Got my 1" bolt on spacers from TonySS. He used to have them on a Malibu g-body wagon that had the same wheels I have. He made me an awesome deal, Thanks again Tony! These spacers were built by Fred at http://www.wheeladapter.com/

Before the rear spacers my 5.5" backspacing wheels looked a little too tucked in and the front track width was a little wider than the rear. The photos don't illustrate really well just how goofy it looked but here's an idea...
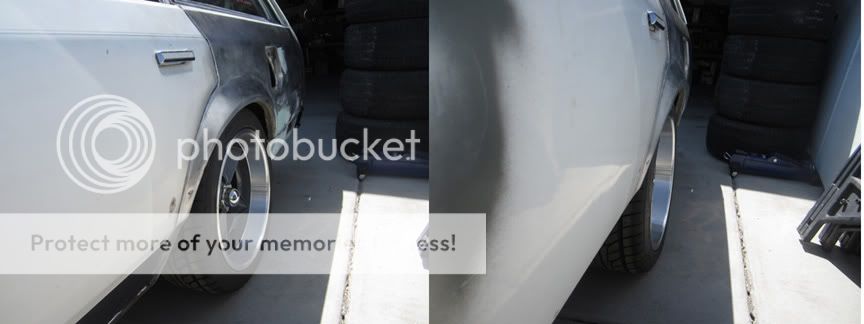
After installing the spacers- My car will be fairly low so I rolled the fender lips. I had my wife jump on the bumper and it has to compress about 3" before any contact up inside the fender well. I think they'll work out great.
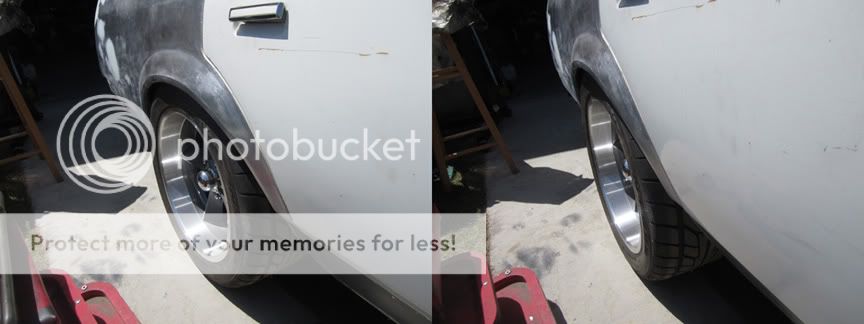
Before the rear spacers my 5.5" backspacing wheels looked a little too tucked in and the front track width was a little wider than the rear. The photos don't illustrate really well just how goofy it looked but here's an idea...
After installing the spacers- My car will be fairly low so I rolled the fender lips. I had my wife jump on the bumper and it has to compress about 3" before any contact up inside the fender well. I think they'll work out great.
 05-17-2012, 03:14 AM
#174
Staging Lane
iTrader: (4)
Join Date: Jul 2009
Location: Killeen, Texas
Posts: 99
Likes: 0
Received 0 Likes
on
0 Posts
SrDart, this is quite a build. I'm learning a lot from your post. I have a couple of questions... What are the type of tools you have in your shop? I've already identified; a welder, a bead roller, and a metal stretcher. I would also like to know what software your using to design your car. If you can't discuss it PM me. Thanks in advance.
05-19-2012, 09:02 AM
#175
I've been following this build and I really like what you have done. Didn't know about the spindle differences on the G-Body.
If those S10 hubs have a ABS reluctor ring on the back side, and you want to let em go cheap I might be interested.. Looking for a pair for my 99 S10 to do the C5 brake swap. Still slowly gathering parts..
Steve
If those S10 hubs have a ABS reluctor ring on the back side, and you want to let em go cheap I might be interested.. Looking for a pair for my 99 S10 to do the C5 brake swap. Still slowly gathering parts..
Steve
05-19-2012, 11:33 AM
#176
On The Tree
Thread Starter
Join Date: Aug 2010
Location: Eagle Mountain, Utah
Posts: 143
Likes: 0
Received 0 Likes
on
0 Posts
Killer- Unfortunately the shop wasn't mine.  It was at school. We had a planishing hammer, an Eckold shrinker/ stretcher, a hand shrinker/ stretcher, another foot powered shrinker/ stretcher, a slip roller, an english wheel, a hand powered bead roller and a power bead roller, 3 different size sheet metal brakes, 2 sheet metal cutters- one power and one you stand on, a Beverly sheer, several mig and tig welders, 2 gas welders/ torches, drill press, a louver press, band saw, a bench top disc/ belt sander, a large bench grinder, a chop saw, a tubing bender, and exhaust pipe bender, and pretty much any hand tool you could need. I use Adobe Illustrator for all my artwork, here's a link to more... http://www.pro-touring.com/showthrea...rk!&highlight=
Steve- sorry, they're for first gen S10s and the guy that makes 'em refunded my $. I wonder if GM cars even had ABS back around the early-mid '80s? lol! We've come a long way in technology in a relatively short time, eh?
It was at school. We had a planishing hammer, an Eckold shrinker/ stretcher, a hand shrinker/ stretcher, another foot powered shrinker/ stretcher, a slip roller, an english wheel, a hand powered bead roller and a power bead roller, 3 different size sheet metal brakes, 2 sheet metal cutters- one power and one you stand on, a Beverly sheer, several mig and tig welders, 2 gas welders/ torches, drill press, a louver press, band saw, a bench top disc/ belt sander, a large bench grinder, a chop saw, a tubing bender, and exhaust pipe bender, and pretty much any hand tool you could need. I use Adobe Illustrator for all my artwork, here's a link to more... http://www.pro-touring.com/showthrea...rk!&highlight=Steve- sorry, they're for first gen S10s and the guy that makes 'em refunded my $. I wonder if GM cars even had ABS back around the early-mid '80s? lol! We've come a long way in technology in a relatively short time, eh?
05-19-2012, 01:38 PM
#177
It's cool. I just pick up stuff here and there that I'll need eventually when I stumble upon it. I'm actually not sure when GM started ABS. I think mid-late 80's in the corvette, but not sure about trucks or sedans...lol
Looking forward to seeing the completed project when it's all done. Good luck and keep us updated on the build.
Looking forward to seeing the completed project when it's all done. Good luck and keep us updated on the build.
 08-22-2012, 08:45 AM
#179
On The Tree
Thread Starter
Join Date: Aug 2010
Location: Eagle Mountain, Utah
Posts: 143
Likes: 0
Received 0 Likes
on
0 Posts
Yep, I'm still around, thanks for asking. Life got really busy preparing to move. I wouldn't wish that on anyone!
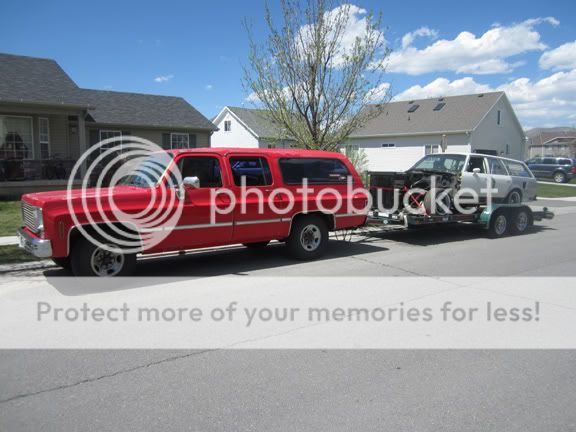
I got the wagon together and packed it full and packed my father/son project 73 Nova full and loaded it on a car dolly for me to tow with the wagon. We also packed my 77 Suburban full, and my little import commuter car which we loaded on a tow dolly for my wife to tow, and headed for Georgia. The trip went relatively easy. It was very long and somewhat boring. My car only averaged about 11 mpg and the Burby averaged about 8 mpg so we burned through a lot of gas and a lot of cash. Overall the trip was right about 2,000 miles.
The wagon ran great, only problem I had was one of my Lakewood Drag Bags blew out before we even got out of Utah. The fender lip gouged the right rear tire a little, but a quick roadside fender lip mod took care of that. Unfortunately the Burby's 454 started burning a little oil along the way, but it got us here and still runs fine. I've been wanting to go through that motor and slip it into my 74 street/ strip Nova anyway so now I have a good excuse. I'm thinking the Burby will get an LS swap now before my wagon does. We'll have to see how things pan out over the next 6 months to a year as we get settled in here in our new life.
Working at Bulldawg Muscle Cars is great. I've been here about a week and a half now and have been working on a 69 Pro-Touring Camaro and a 70 Cuda that's getting a late model Hemi swap. I think there's a bright future ahead...
I have a bunch of final wagon assembly photos I need to post up but I haven't found the box with my camera in it yet. As soon as I do I'll get this thread updated. There's still a long way to go on the car, so there will be plenty more...
