

79 Cutlass Wagon, 5.3 G machine

 01-24-2012, 10:13 AM
#122
TECH Fanatic
iTrader: (5)
Join Date: Jul 2006
Location: Jacksonville FL
Posts: 1,317
Likes: 0
Received 0 Likes
on
0 Posts
You are building a extreme project budget wise I can respect that you should tally up what all you have spent total so far and keep track that way when its done see what it cost you start to finish
01-24-2012, 06:32 PM
#123
On The Tree
Thread Starter
Join Date: Aug 2010
Location: Eagle Mountain, Utah
Posts: 143
Likes: 0
Received 0 Likes
on
0 Posts
I am keeping track, this semester I decided to put it in the computer. I have to put all last 3 semesters in the computer still, I'm guessing I'll be between $8-10K, I really don't think I'll be over that.
 01-27-2012, 12:29 AM
#125
On The Tree
Thread Starter
Join Date: Aug 2010
Location: Eagle Mountain, Utah
Posts: 143
Likes: 0
Received 0 Likes
on
0 Posts
A few more photos...
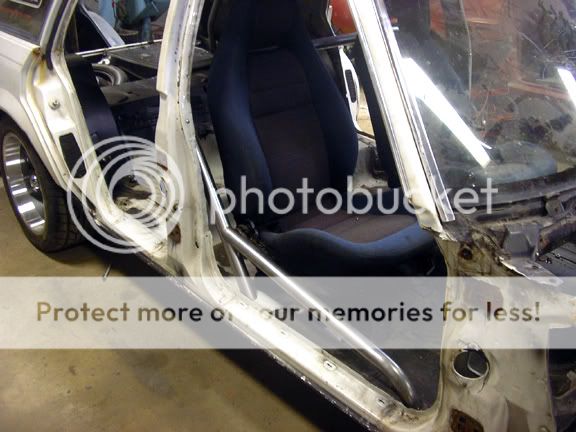
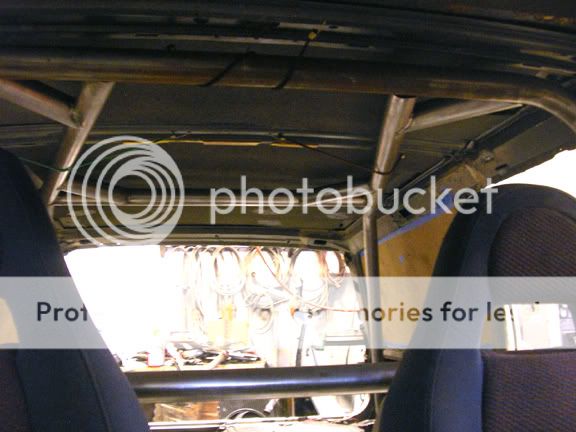
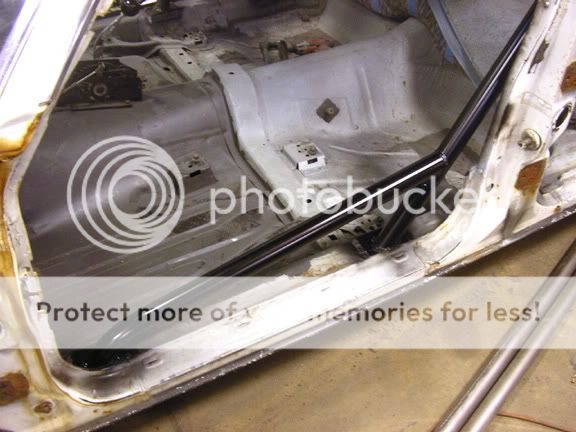
Here's the complete roll bar mocked up in the car. Again I wasn't necessarily after conforming to any particular type/ class of racing, although I think if I did the correct door bars it would be legal for under 11.90s at the strip. The biggest reasons for building it were 1. To learn how to build one from scratch, 2. To stiffen up the car, and 3. To create something that didn't look like a mass produced unit yet still have the strength of one, and 4. add a cool element of design.
I didn't want to weld the bar to the frame, mostly because I wanted the bars in the car for strength when I put the body on the rotisserie so I can start strengthening the chassis and building the rear suspension. While I'm in there welding up the bars I will weld them to 1/8" thick plates which will be welded to the floor. When it's all back together bolts will go through the floor and down through the frame to tie it all together.
Without the seats in...
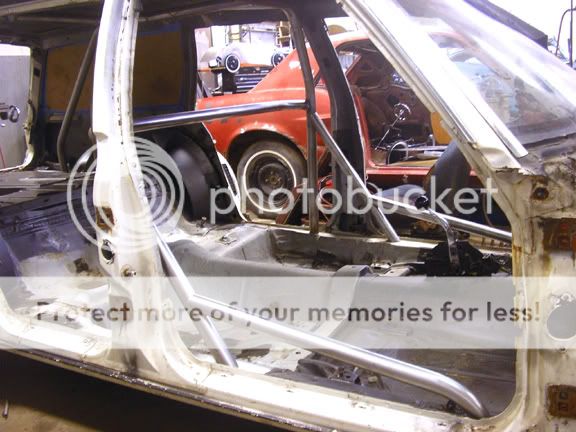
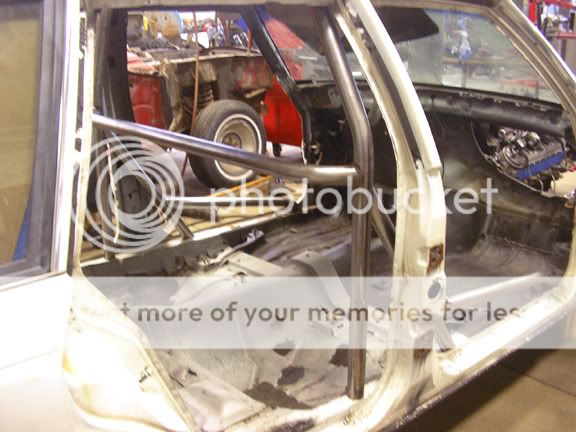
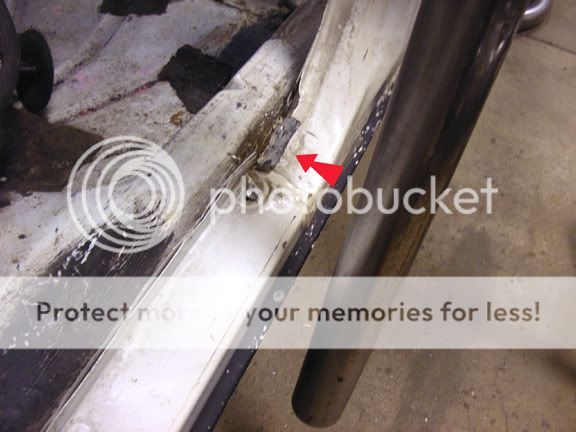
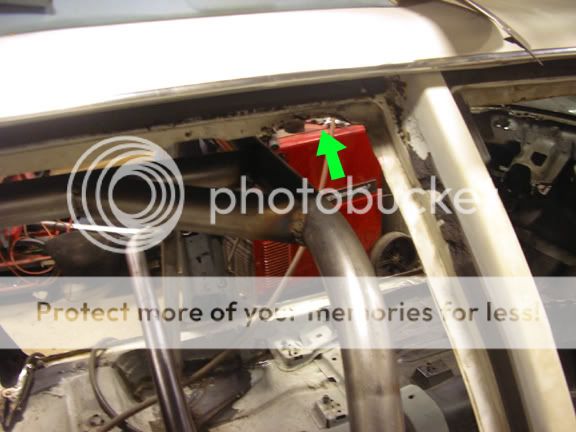
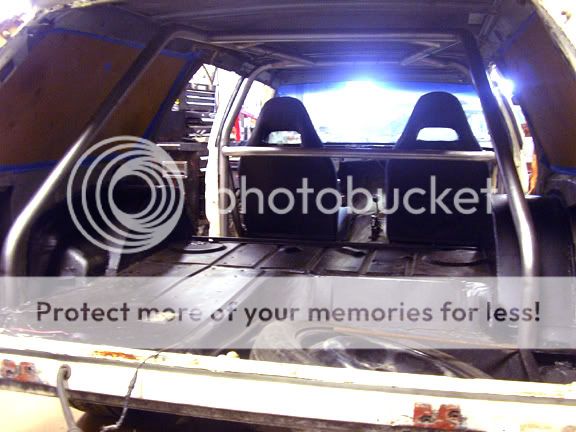
Notice in the photos above that the cage sits on a ledge from the main hoop forward. I knew once I got the rear section welded to the hoop welding the last little bit on the top was going to be difficult, especially since I've never done anything like this before. I know its typical to cut the floor out and drop the cage down but it's so tight to the roof I didn't think there'd be enough room since the frame is not far from the floor here. Several of the older guys in the program suggested cutting a couple holes in the roof, weld up the bars and then welding roof patches in. I didn't want to do that so a hunch said cut the body seam on the floor and bend it down (red arrow), bang the top seam out of the way (green arrow) then tugging on the partially welded cage would allow access to the top as it dropped out of the car on one side and down into the feet well on the other side. I got it within 1/8" of dropping down and it was pretty much stuck. Not willing to give up I gave the side that would drop into the feet well a little kick and the bar had enough flex to drop down and it fell right out of the car on the other side. This allowed plenty of welding access and it didn't take that much effort to get it back into place. I did the same on the opposite side, a little kick and it popped right out.
Here's the complete roll bar mocked up in the car. Again I wasn't necessarily after conforming to any particular type/ class of racing, although I think if I did the correct door bars it would be legal for under 11.90s at the strip. The biggest reasons for building it were 1. To learn how to build one from scratch, 2. To stiffen up the car, and 3. To create something that didn't look like a mass produced unit yet still have the strength of one, and 4. add a cool element of design.
I didn't want to weld the bar to the frame, mostly because I wanted the bars in the car for strength when I put the body on the rotisserie so I can start strengthening the chassis and building the rear suspension. While I'm in there welding up the bars I will weld them to 1/8" thick plates which will be welded to the floor. When it's all back together bolts will go through the floor and down through the frame to tie it all together.
Without the seats in...
Notice in the photos above that the cage sits on a ledge from the main hoop forward. I knew once I got the rear section welded to the hoop welding the last little bit on the top was going to be difficult, especially since I've never done anything like this before. I know its typical to cut the floor out and drop the cage down but it's so tight to the roof I didn't think there'd be enough room since the frame is not far from the floor here. Several of the older guys in the program suggested cutting a couple holes in the roof, weld up the bars and then welding roof patches in. I didn't want to do that so a hunch said cut the body seam on the floor and bend it down (red arrow), bang the top seam out of the way (green arrow) then tugging on the partially welded cage would allow access to the top as it dropped out of the car on one side and down into the feet well on the other side. I got it within 1/8" of dropping down and it was pretty much stuck. Not willing to give up I gave the side that would drop into the feet well a little kick and the bar had enough flex to drop down and it fell right out of the car on the other side. This allowed plenty of welding access and it didn't take that much effort to get it back into place. I did the same on the opposite side, a little kick and it popped right out.
01-27-2012, 01:32 AM
#126
On The Tree
Thread Starter
Join Date: Aug 2010
Location: Eagle Mountain, Utah
Posts: 143
Likes: 0
Received 0 Likes
on
0 Posts
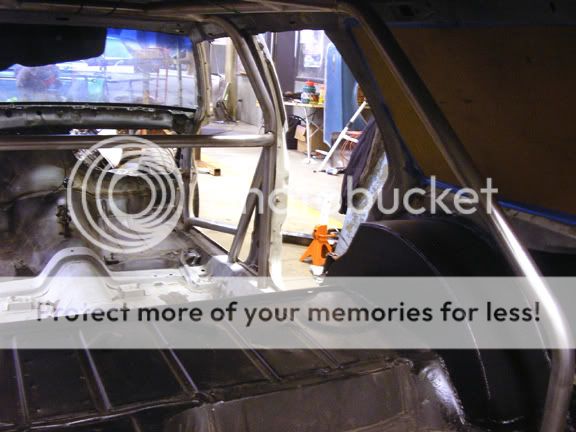
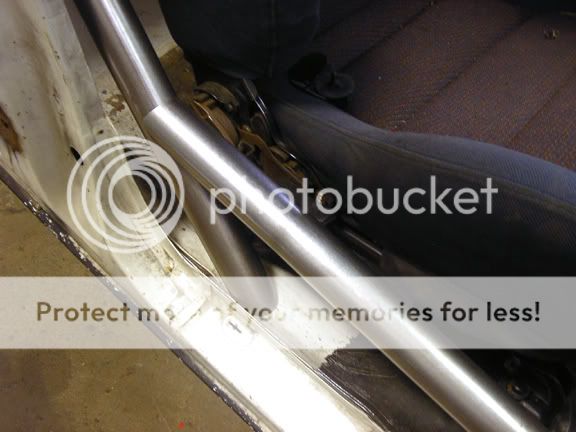
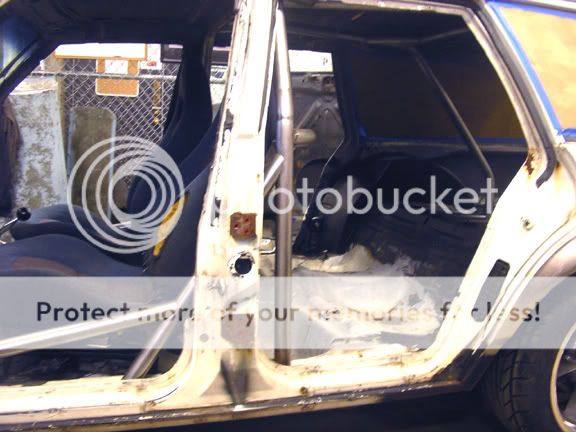
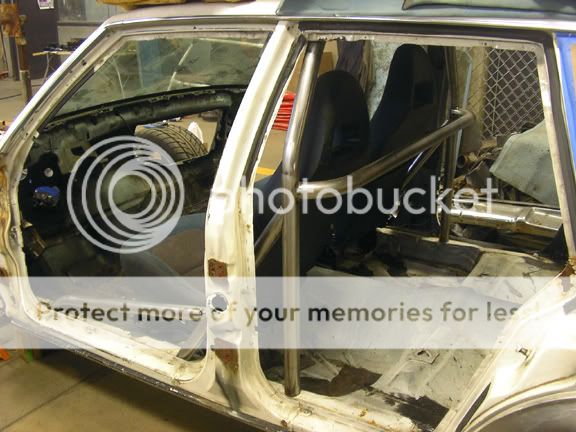
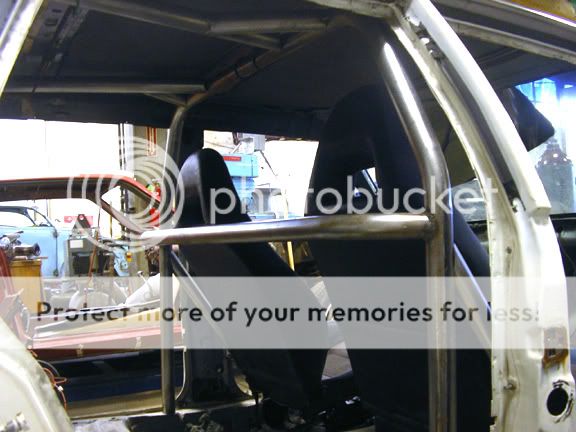
One problem I ran into while making the front bars was I ran out of bar. The last bar to bend was the floor bar for the passenger side and it was about 6 or 7" too short. So I grabbed piece of scrap practice tubing and carefully stitch welded them together. In the second photo you can see the end result, it came out pretty nice. There was some mild warpage and you can still feel where the weld was but I think it's good enough that if I didn't say anything it won't be noticed. Although I originally was going to have plain painted bars I may cover these floor bars with some vinyl that matches the seats. The rest of these photos are pre-welding, testing fit with the seats in. I need to oblong the driver's seat bolt holes a little to move the seat inward about 1/4" for door bar clearance, but other than that everything fits great.

02-03-2012, 02:11 AM
#127
On The Tree
Thread Starter
Join Date: Aug 2010
Location: Eagle Mountain, Utah
Posts: 143
Likes: 0
Received 0 Likes
on
0 Posts
A few more pics-
To weld the cage into the car I used our platform mounted plasma cutter on manual mode to cut out some 1/8" thick 4x4" plates and bent them with the metal brake to contour the floor pan.

For the back two bars I had to make custom plates that contoured around the body bushing bumps in the sheet metal. To do this I first cut out the shape I needed from white poster board. The light beam follows the lines of the cutout...
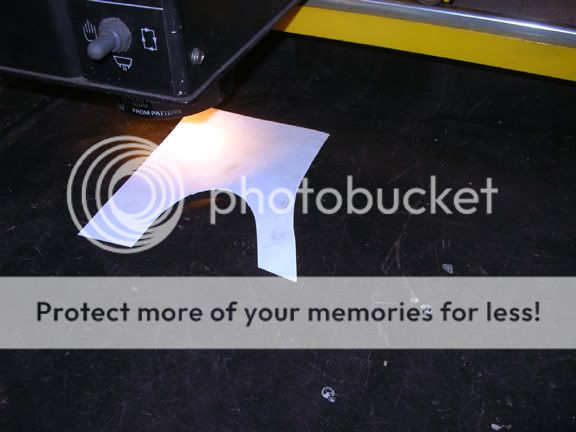
...and transfers that to the cutter.
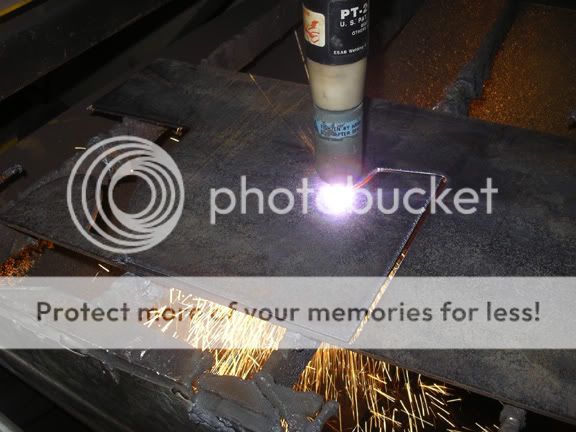
Maybe not as precise as processes like cnc water jetting but it did a great job. I used the machine again to fabricate some brackets for the trailer hitch, more coming on that soon.
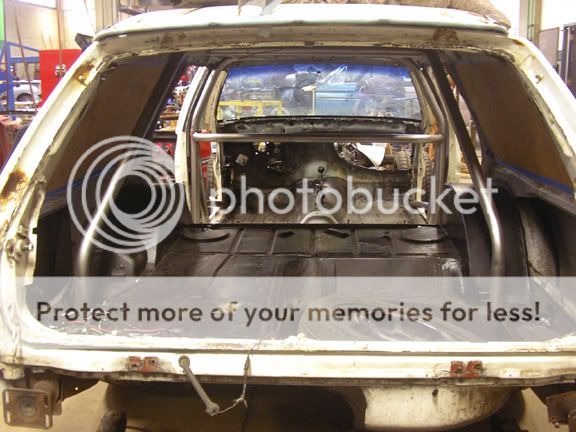
Originally I started to rattle can the roll cage satin aluminum but it was too bright and shiny and showed all the nicks and imperfections in the tubing. I decided to go with a more traditional satin black instead. The paint in this photo is fresh so it still looks fairly shiny, but it dulls down a bit as it dries. It should be just about the same sheen as the dash, console, and door panels when dry.
To weld the cage into the car I used our platform mounted plasma cutter on manual mode to cut out some 1/8" thick 4x4" plates and bent them with the metal brake to contour the floor pan.
For the back two bars I had to make custom plates that contoured around the body bushing bumps in the sheet metal. To do this I first cut out the shape I needed from white poster board. The light beam follows the lines of the cutout...
...and transfers that to the cutter.
Maybe not as precise as processes like cnc water jetting but it did a great job. I used the machine again to fabricate some brackets for the trailer hitch, more coming on that soon.
Originally I started to rattle can the roll cage satin aluminum but it was too bright and shiny and showed all the nicks and imperfections in the tubing. I decided to go with a more traditional satin black instead. The paint in this photo is fresh so it still looks fairly shiny, but it dulls down a bit as it dries. It should be just about the same sheen as the dash, console, and door panels when dry.


 02-08-2012, 09:54 PM
#131
On The Tree
Thread Starter
Join Date: Aug 2010
Location: Eagle Mountain, Utah
Posts: 143
Likes: 0
Received 0 Likes
on
0 Posts
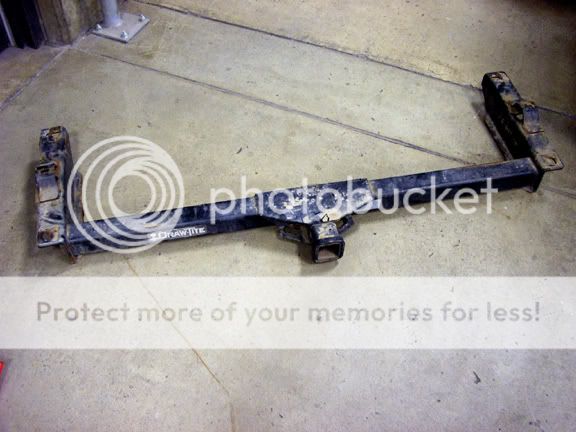
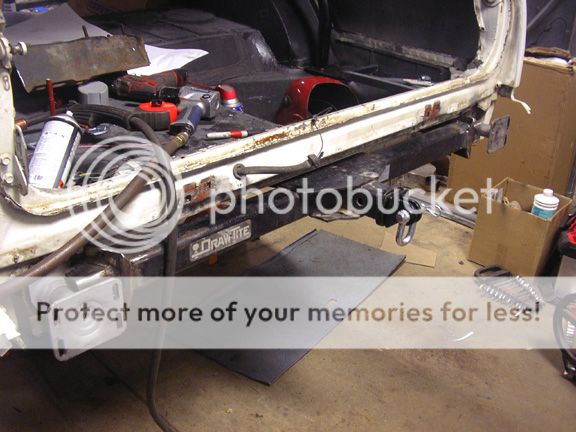
Updates- Trailer hitch is in!
A couple pages ago I mentioned that I scored a $25 g-body El Camino trailer hitch from the junkyard. I'll be using it to tow my street/strip Nova to Georgia when I relocate in a few months and to the track when I get the itch to go drag racing again. Two problems with a hitch is there's no room because I will be running the exhaust tips right under the center of the rear bumper and I also don't want an ugly trailer receiver visible from behind. So I decided to figure out how to hide it behind the bumper....
The hitch...
Here's the original bumper shock/ mount. I used a die grinder to cut a small slit in the body (not visible, it extends about 8" into the frame) to drain the oil. I did this pointed away from me inside the trash can because the oil is a bit under pressure and sprays out. (I learned this by accident practicing on one of the front bumper mounts. Lol, it sprayed about 10 feet in the air and got oil everywhere in about a 4 foot radius!) After the oil was drained I welded up the slit and sand blasted them.
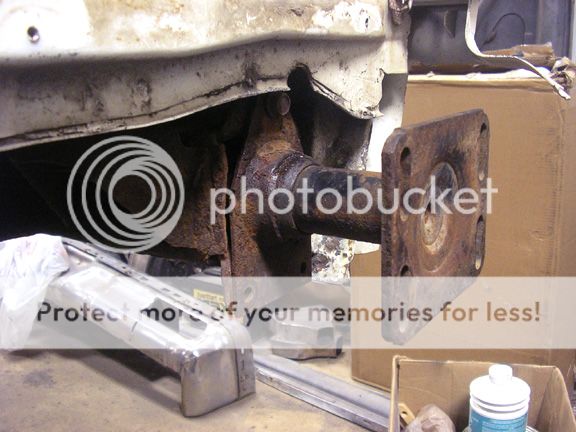
I then cut off the factory Draw-tite brackets. Using the bumper shocks to help make a poster board template I plasma cut out some C shape brackets from the 1/8" steel sheet and some C shape brackets from the left over hitch brackets. For strength I drilled out all the holes from the smaller metric to 3/8" and used grade 8 bolts. Here it is all welded and in place.

For clearance I had to persuade the spare tire well a little with a small sledge.
I then cut off the ends of the bumper support bracket and bolted them on.
Here is the first test fit with the bumper. It looks like a large gap but once the tailgate and the plastic piece that fills the rest of the gap is installed it looks better. Once all back together I will actually tuck the bumper closer to the body, another reason for draining the oil.

Measuring out a rectangle in the center of the bumper I cut it out with a die grinder. The cut out piece will be welded to some square tubing that will insert into the receiver when the race tow hook or the trailer ball is not being used. The panel will hide everything except the small gap outline around the rectangle. The bumper will be black so it shouldn't be very noticeable. I got the tow hook from Harbor Freight on sale for $10. Not sure yet if it's SCCA legal but for the price I figured I'd grab it.
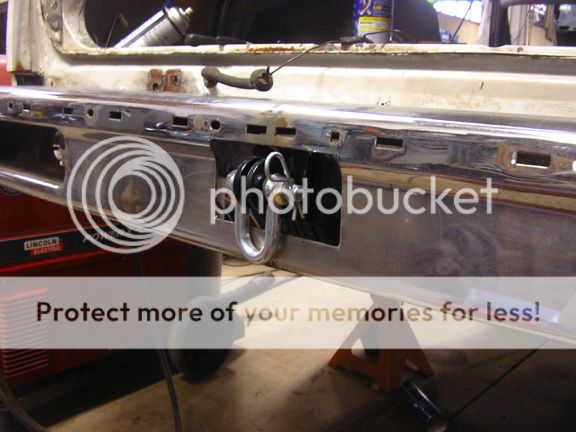
Next I need to build support brackets that will be welded to the hitch and bolted to the frame about 10" inward. More on that soon. Overall I think it turned out great and really ads to the car's versatility without sacrificing a clean look out back.
A couple pages ago I mentioned that I scored a $25 g-body El Camino trailer hitch from the junkyard. I'll be using it to tow my street/strip Nova to Georgia when I relocate in a few months and to the track when I get the itch to go drag racing again. Two problems with a hitch is there's no room because I will be running the exhaust tips right under the center of the rear bumper and I also don't want an ugly trailer receiver visible from behind. So I decided to figure out how to hide it behind the bumper....
The hitch...
Here's the original bumper shock/ mount. I used a die grinder to cut a small slit in the body (not visible, it extends about 8" into the frame) to drain the oil. I did this pointed away from me inside the trash can because the oil is a bit under pressure and sprays out. (I learned this by accident practicing on one of the front bumper mounts. Lol, it sprayed about 10 feet in the air and got oil everywhere in about a 4 foot radius!) After the oil was drained I welded up the slit and sand blasted them.
I then cut off the factory Draw-tite brackets. Using the bumper shocks to help make a poster board template I plasma cut out some C shape brackets from the 1/8" steel sheet and some C shape brackets from the left over hitch brackets. For strength I drilled out all the holes from the smaller metric to 3/8" and used grade 8 bolts. Here it is all welded and in place.
For clearance I had to persuade the spare tire well a little with a small sledge.
I then cut off the ends of the bumper support bracket and bolted them on.
Here is the first test fit with the bumper. It looks like a large gap but once the tailgate and the plastic piece that fills the rest of the gap is installed it looks better. Once all back together I will actually tuck the bumper closer to the body, another reason for draining the oil.
Measuring out a rectangle in the center of the bumper I cut it out with a die grinder. The cut out piece will be welded to some square tubing that will insert into the receiver when the race tow hook or the trailer ball is not being used. The panel will hide everything except the small gap outline around the rectangle. The bumper will be black so it shouldn't be very noticeable. I got the tow hook from Harbor Freight on sale for $10. Not sure yet if it's SCCA legal but for the price I figured I'd grab it.
Next I need to build support brackets that will be welded to the hitch and bolted to the frame about 10" inward. More on that soon. Overall I think it turned out great and really ads to the car's versatility without sacrificing a clean look out back.
02-08-2012, 09:55 PM
#132
On The Tree
Thread Starter
Join Date: Aug 2010
Location: Eagle Mountain, Utah
Posts: 143
Likes: 0
Received 0 Likes
on
0 Posts
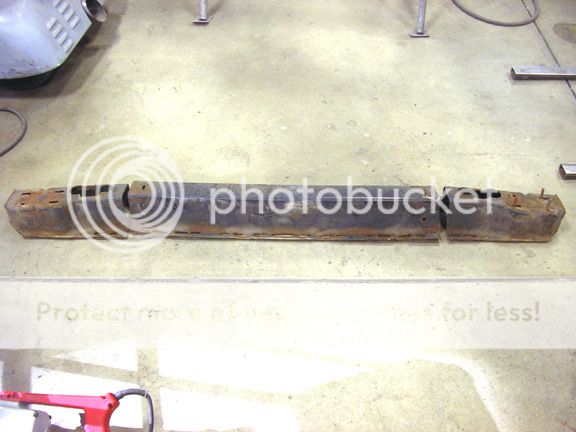
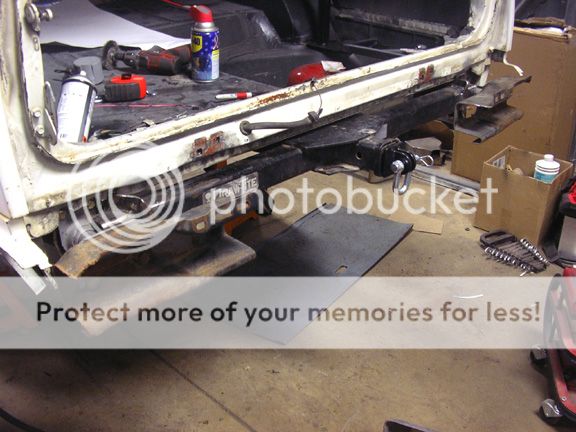
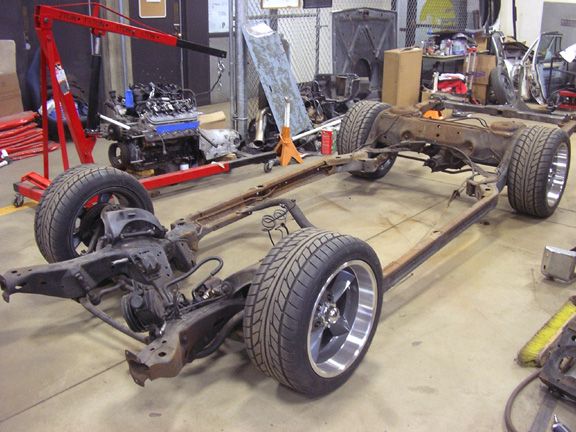
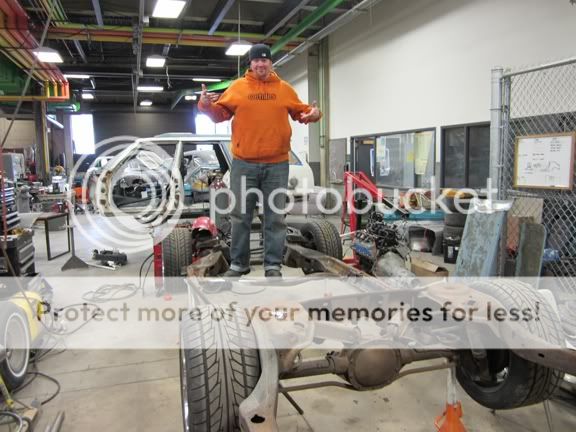
Now that the hitch was in and tied the rear frame rails together, the big highlight of today was pulling the body. Woohoo!
There are 12 body mounts on the wagon, 10 of them are bolted in, 2 are pushed in. 7 of the 10 bolts came out easily. 2 of them, both 4th back from the front, were so rusted that there was pretty much nothing left of them. I'm surprised they didn't just fall out of the car. number 3 bolt on the driver's side froze up after a few turns. Then it started spinning freely. I thought the bolt broke but actually the tapped plate started spinning inside the body and karate chopped through the floor sheet metal. I cut around it to peel up the sheet metal and spot welded the plate back down. After that and a bigger impact gun it came right out. Notice the torn sheet metal at the top of the photo, wow.
We have a rolling electric winch on beam track that spans the shop. Using a heavy tow strap I found the balance point in the rear door openings and pulled it up. I wish I could tell you guys how exciting today was. After fixing a couple things and some fabrication to beef up the frame it will head to the sandblaster. Once it's back and painted it's all bolting on parts from here on out. This was a huge milestone and I'm totally stoked. And yes, I know the front tires are on backwards.
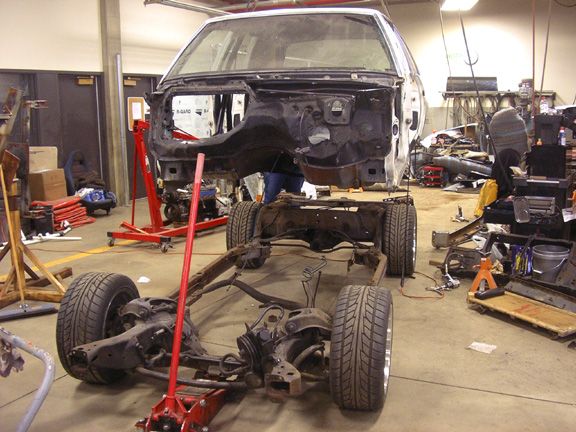
02-09-2012, 09:00 PM
#133
On The Tree
Thread Starter
Join Date: Aug 2010
Location: Eagle Mountain, Utah
Posts: 143
Likes: 0
Received 0 Likes
on
0 Posts
Progress for today...
I always stay as late as I can to work in the shop so most everyone was gone when I pulled the body off yesterday. I feel like I spent half of shop time today explaining over and over what I plan to do with the frame.
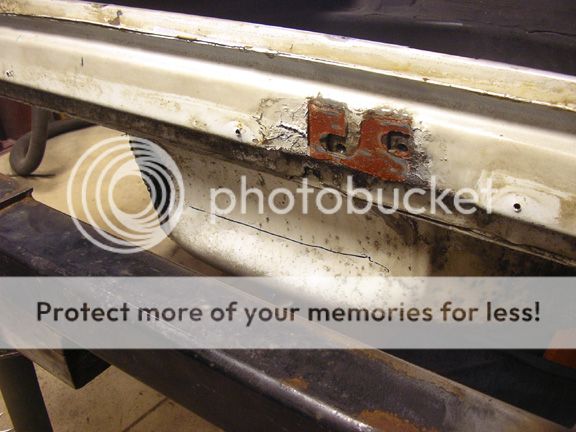
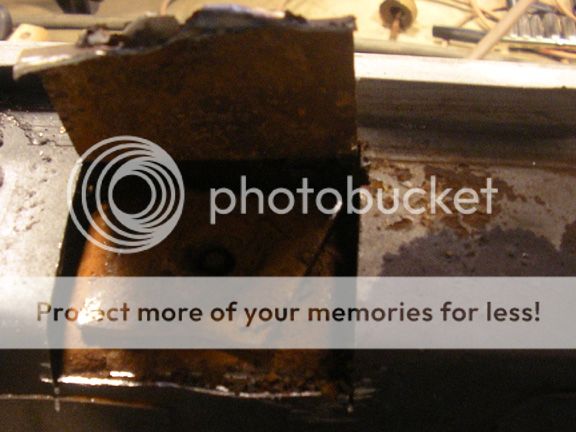
I did get to strip off all the brake and fuel lines and unbolted the rear shocks. The driver's side rear spring cup was torn, so I got this welded up too.
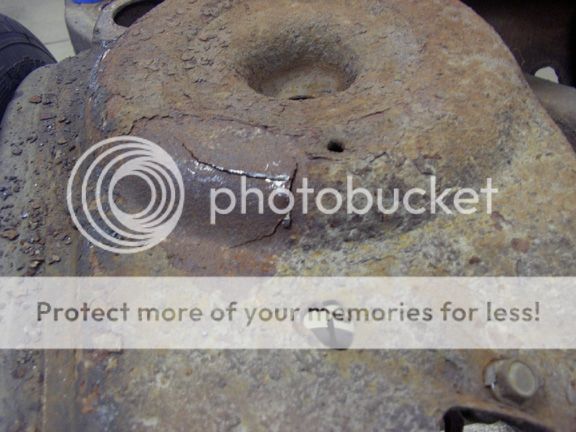
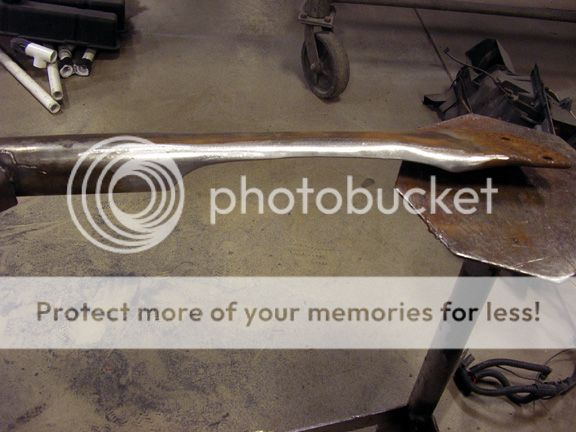
Then I addressed the retarded G-body trans cross member. For those that own these cars understand my pain because the g-bodies are set up for only single exhaust. Unless you can fab up something you're going to be out about $150+ for a cross member with a driver's side exhaust tube clearance. I looked at a couple aftermarket and a few custom dealios on the net and decided that the easiest and cheapest thing to do was modify mine.
Quick and dirty, the hand held plasma cutter hacked the thick tube easily. Unless you have a surgeon's steady hands, which I clearly don't , you end up with something like this.
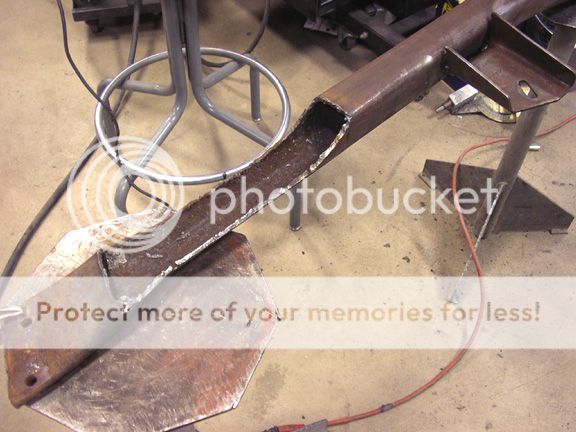
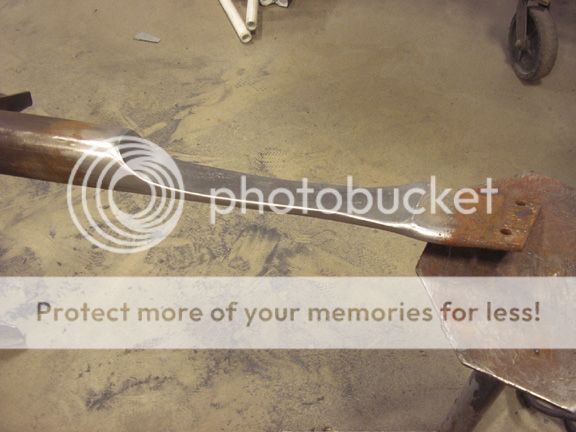
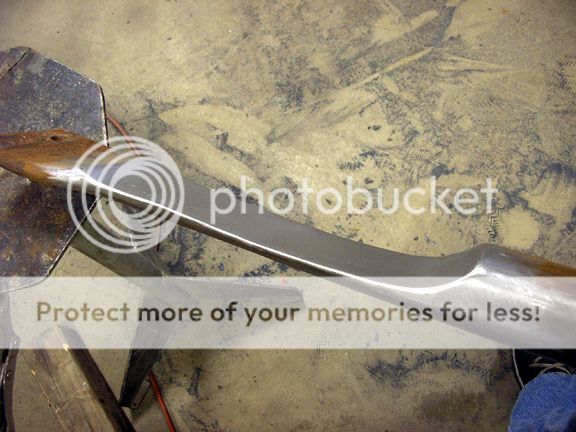
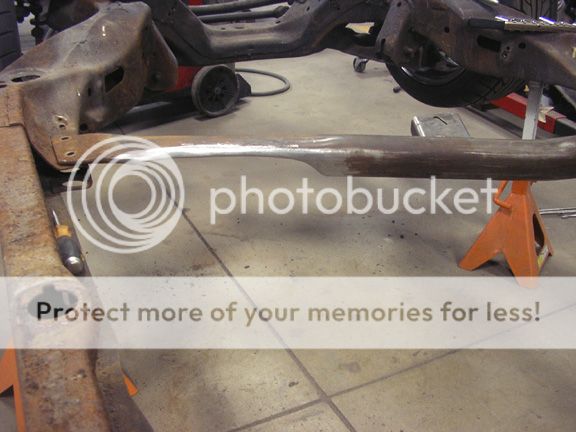
A couple minutes with the grinder smoothed it enough to weld. I think with keeping about 1/2" of the vertical sides it should be structurally strong enough to hold the tail of the tranny. To box and finish it I grabbed a scrap of 18 ga sheet, bent it to the shape of the void and welded it on. I could've stopped there but I wanted it to look like it was supposed to be like this from the factory so I took some time and metal finished it instead. Once it's painted it should look like it was formed that way. Here are a few shots from different views. I'm pretty happy with the end result.
Tomorrow I start boxing the frame!
I always stay as late as I can to work in the shop so most everyone was gone when I pulled the body off yesterday. I feel like I spent half of shop time today explaining over and over what I plan to do with the frame.
I did get to strip off all the brake and fuel lines and unbolted the rear shocks. The driver's side rear spring cup was torn, so I got this welded up too.
Then I addressed the retarded G-body trans cross member. For those that own these cars understand my pain because the g-bodies are set up for only single exhaust. Unless you can fab up something you're going to be out about $150+ for a cross member with a driver's side exhaust tube clearance. I looked at a couple aftermarket and a few custom dealios on the net and decided that the easiest and cheapest thing to do was modify mine.
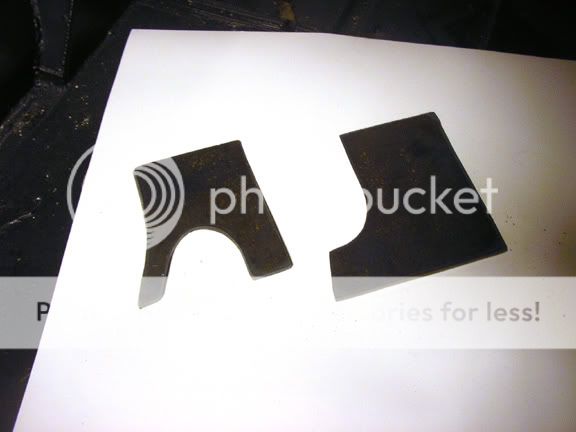
Quick and dirty, the hand held plasma cutter hacked the thick tube easily. Unless you have a surgeon's steady hands, which I clearly don't
, you end up with something like this. A couple minutes with the grinder smoothed it enough to weld. I think with keeping about 1/2" of the vertical sides it should be structurally strong enough to hold the tail of the tranny. To box and finish it I grabbed a scrap of 18 ga sheet, bent it to the shape of the void and welded it on. I could've stopped there but I wanted it to look like it was supposed to be like this from the factory so I took some time and metal finished it instead. Once it's painted it should look like it was formed that way. Here are a few shots from different views. I'm pretty happy with the end result.
Tomorrow I start boxing the frame!

 02-10-2012, 02:42 AM
#137
02-10-2012, 08:08 AM
#138
I used to have a Monte Carlo and I hated the trans crossmember. I notched it for duals and ran it a while but when I took the car off the frame I should have made a new one that was straight across instead of leaving it curved. Just another idea. Yours looks excellent and I understand for your budget / time may be your only option.
I'm always amazed how flimsy these C-channel frames are! You'll love the end result.
I'm always amazed how flimsy these C-channel frames are! You'll love the end result.
02-13-2012, 04:04 PM
#139
On The Tree
Thread Starter
Join Date: Aug 2010
Location: Eagle Mountain, Utah
Posts: 143
Likes: 0
Received 0 Likes
on
0 Posts
Someone on another forum asked if I thought the trans cross member was strong enough the way I modified it. Really, with the front motor mounts holding up the bulk of the weight, there isn't much weight on the trans cross member. It's almost more like a resting spot to bolt down the trans. Just to be safe I had my good friend Jay stand on it for me. It flexed about 1/8" but at 260 lbs. Jay probably weighs twice what a TH350 does.
02-13-2012, 07:52 PM
#140
On The Tree
iTrader: (28)
Join Date: Jun 2010
Location: New Phila, OH
Posts: 129
Likes: 0
Received 0 Likes
on
0 Posts

Great looking swap. I just read all 7 pages and have one question. Maybe I missed it what are you planning to do once you are finished with school? Are you doing all this to open your own shop?