

1970 GTO LS1/4L60e Swap Check List - Do I Have Everything Covered??
 03-12-2013, 10:30 AM
#81
TECH Apprentice
Thread Starter
iTrader: (10)
Join Date: Dec 2005
Location: Peoria IL
Posts: 340
Likes: 0
Received 0 Likes
on
0 Posts

Sorry, I guess I should be more clear. The picture that shows your intended location is pretty much right on where the truck compressor mount is. Not so sure if a Sanden will fit the same bracket.
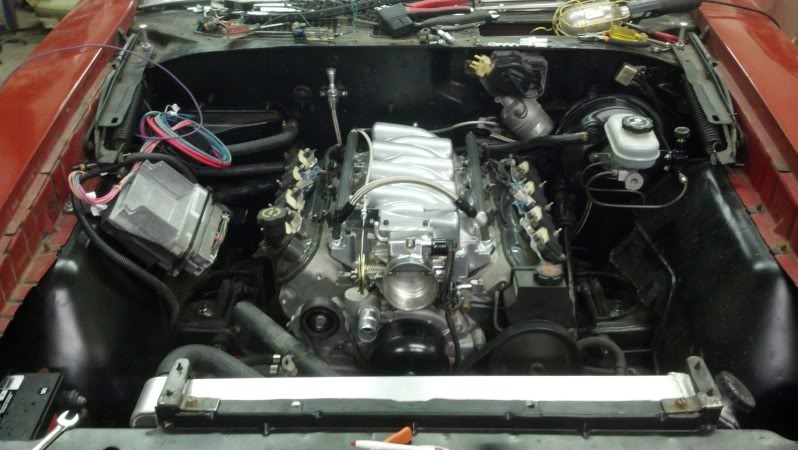
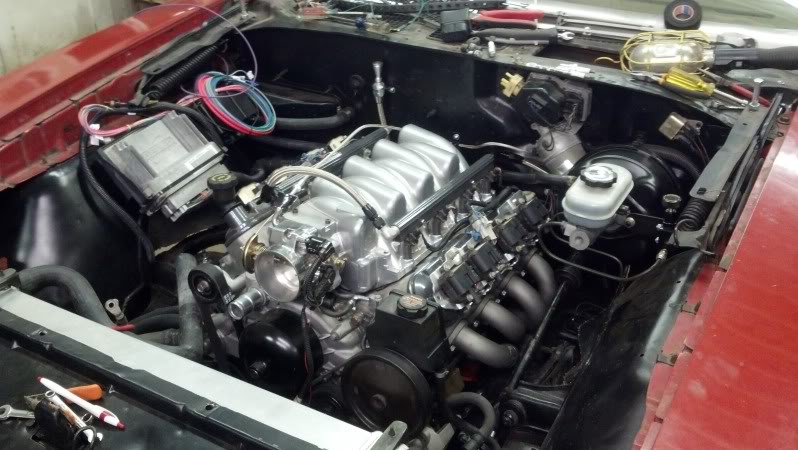
Here is the engine as I received it with the AC bracket in place. You can see the tensioner mounted forward and inboard.
Here is the engine as I received it with the AC bracket in place. You can see the tensioner mounted forward and inboard.
 04-02-2013, 09:03 AM
#82
TECH Apprentice
Thread Starter
iTrader: (10)
Join Date: Dec 2005
Location: Peoria IL
Posts: 340
Likes: 0
Received 0 Likes
on
0 Posts
I'm still working on the Judge, but I'm getting down to the smaller details that don't make for good picture opportunities. However, I have made some decent progress.
Brakes
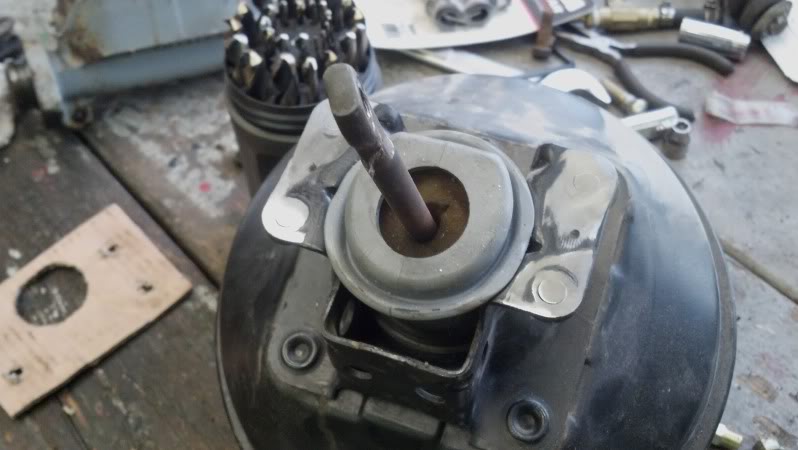
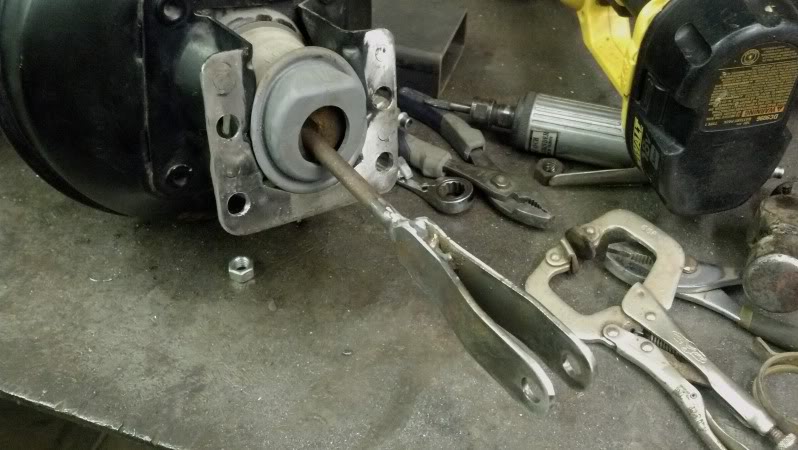
I shaved the studs off the LS1 brake booster, added some material to extend the braket down, drilled holes to match the studs in the GTO firewall, slightly enlarged the hole in the firewall, and fabbed up a clevis to work with the stock pedal:
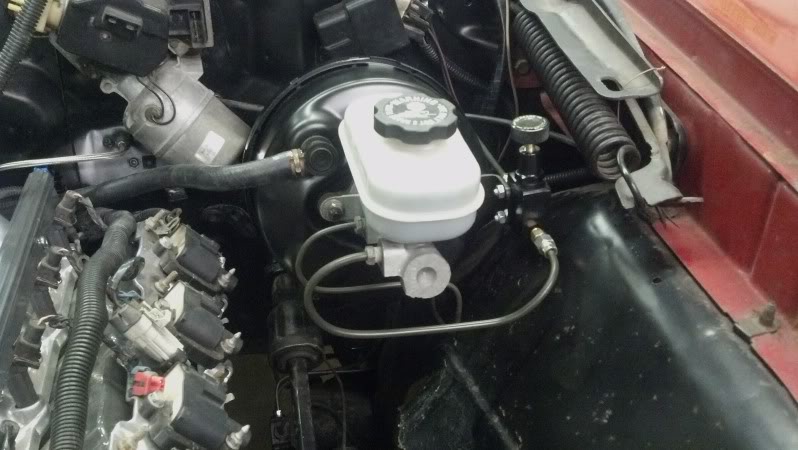
I made a lot of my own lines and plumbed up an in-line proportioning valve mounted to a bracket I made:
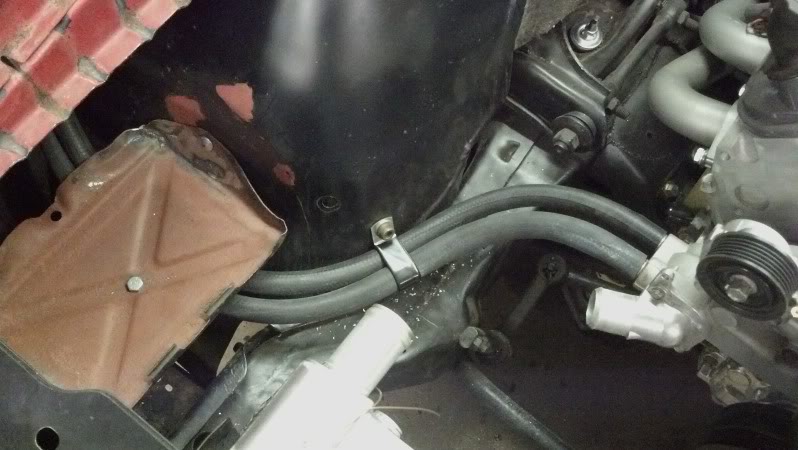
I routed the heater lines under the battery tray and inside the fender well for a cleaner look, and used formed 90* hoses on the heater core at the firewall:
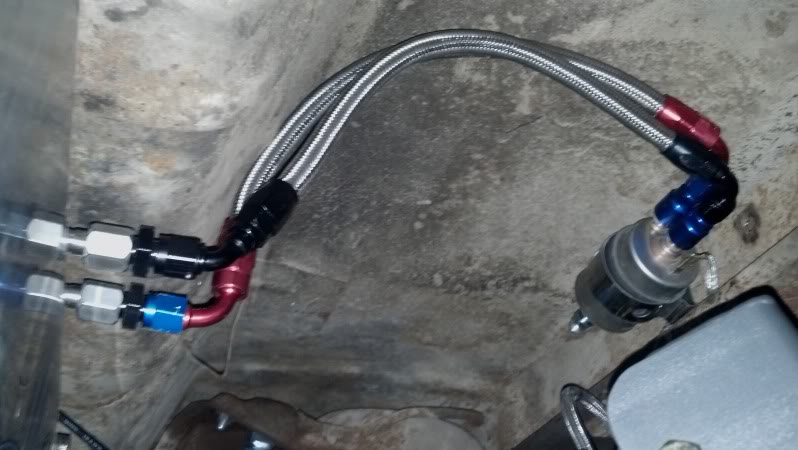
The fuel system is almost knocked out. The C5 FPR is mounted above the differential with the Rick's Stainless tank.
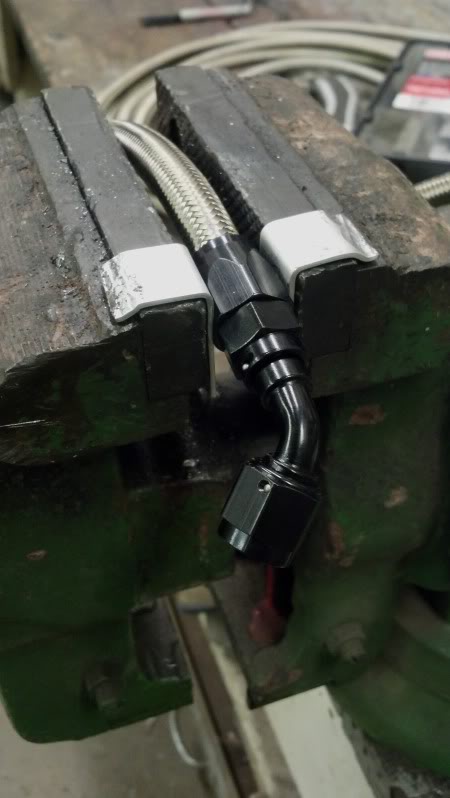
I made my own "soft jaws" out of some strap aluminum I had laying around... it actually works great:
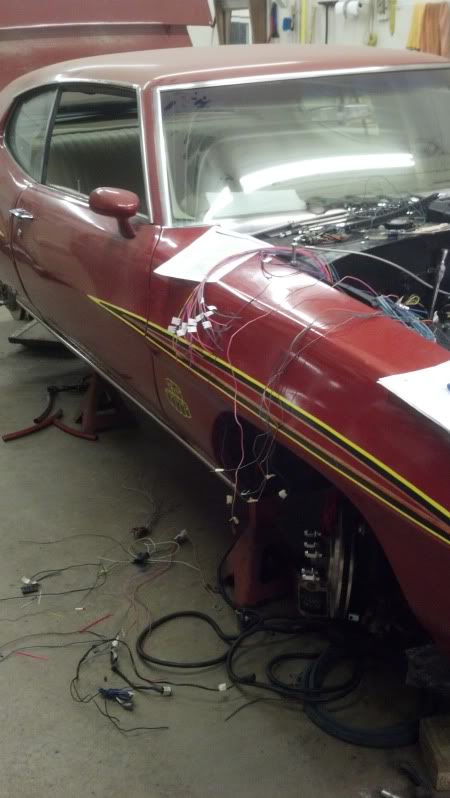
Now I'm trying to get the wiring sorted out... that's been a learning experience so far.
Brakes
I shaved the studs off the LS1 brake booster, added some material to extend the braket down, drilled holes to match the studs in the GTO firewall, slightly enlarged the hole in the firewall, and fabbed up a clevis to work with the stock pedal:
I made a lot of my own lines and plumbed up an in-line proportioning valve mounted to a bracket I made:
I routed the heater lines under the battery tray and inside the fender well for a cleaner look, and used formed 90* hoses on the heater core at the firewall:
The fuel system is almost knocked out. The C5 FPR is mounted above the differential with the Rick's Stainless tank.
I made my own "soft jaws" out of some strap aluminum I had laying around... it actually works great:
Now I'm trying to get the wiring sorted out... that's been a learning experience so far.
04-16-2013, 03:47 PM
#83
TECH Apprentice
Thread Starter
iTrader: (10)
Join Date: Dec 2005
Location: Peoria IL
Posts: 340
Likes: 0
Received 0 Likes
on
0 Posts
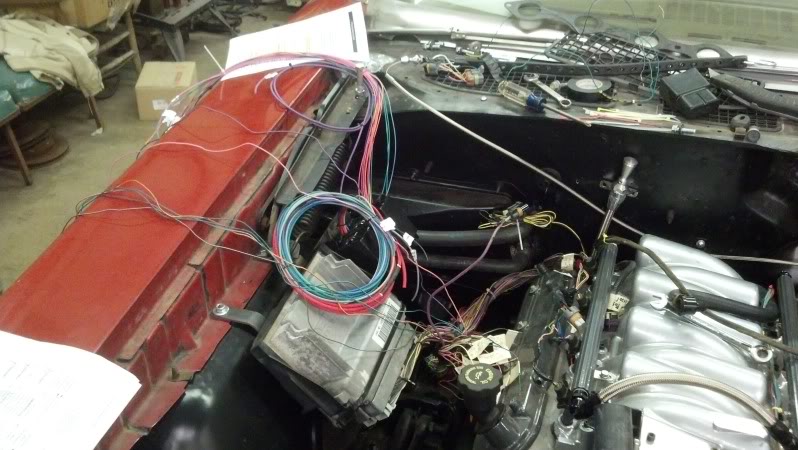
Well, I'm STILL working on the wiring on this thing! I'm leaving a little more functionality than most (AC request wire to tie into the Vintage AC system, cruise, and adding the performance shift #1 and #2 options), as well as integrating it with the original GTO wire harness.
I had to get creative to make all the soldered connections... notice the spring clamps at the edge of the table:
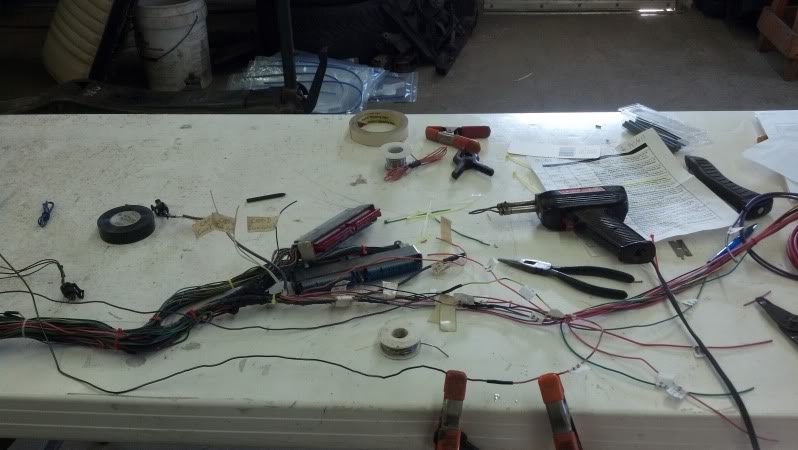
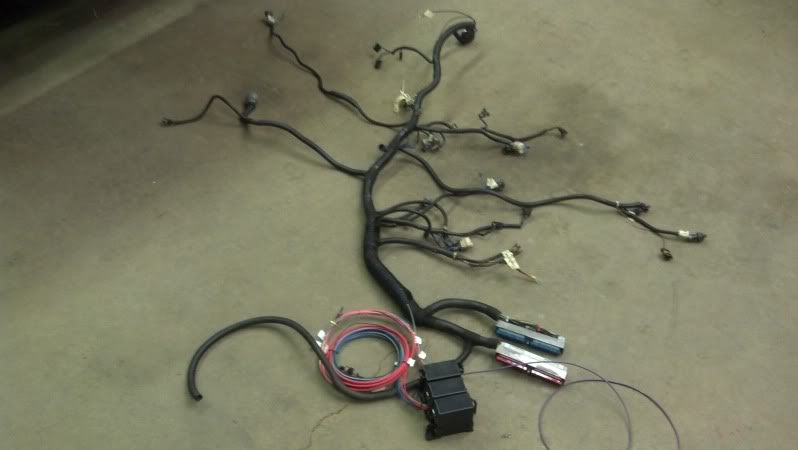
Harness mostly finished:
Its obviously not finished yet, but I feel more accomplished if I can see my progress. The wires at the top left are HOT's for stuff like fans 1&2, fuel pump, fuse panel power, etc.
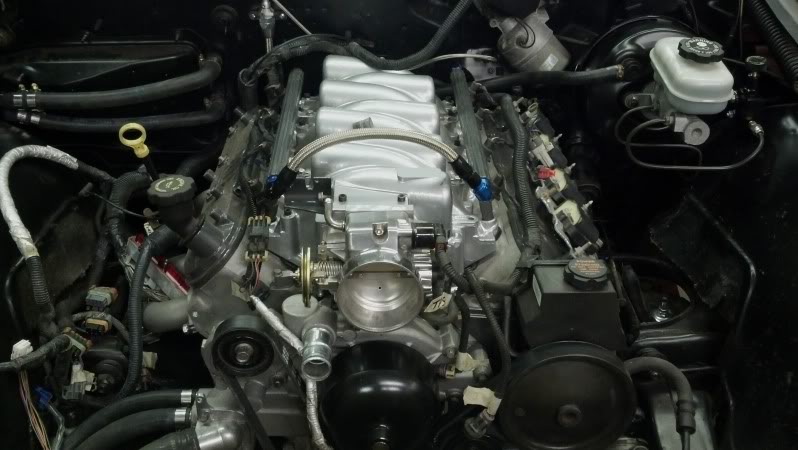
The wires for the TB sensors, alt, and IAT are all routed under the intake. I also moved the temp sensor from the front of the driver side head, to the back of the passenger head to clean up the front of the engine a little. I use a 1998 Trans Am temp sending unit so I can retain my factory Temp gage.


I had to get creative to make all the soldered connections... notice the spring clamps at the edge of the table:

Harness mostly finished:

Its obviously not finished yet, but I feel more accomplished if I can see my progress. The wires at the top left are HOT's for stuff like fans 1&2, fuel pump, fuse panel power, etc.

The wires for the TB sensors, alt, and IAT are all routed under the intake. I also moved the temp sensor from the front of the driver side head, to the back of the passenger head to clean up the front of the engine a little. I use a 1998 Trans Am temp sending unit so I can retain my factory Temp gage.
 04-23-2013, 03:48 PM
#84
TECH Apprentice
Thread Starter
iTrader: (10)
Join Date: Dec 2005
Location: Peoria IL
Posts: 340
Likes: 0
Received 0 Likes
on
0 Posts
It runs! Compressor Surge took time away from his turbo'd K5 Blazer project to help me with the initial PCM flash and tie up a few loose ends yesterday and after sorting out the fuel line plumbing (dumb mistake on my part) it fired right up! It definitely needs some tuning work before any major driving, but it settled to a decent idle after fiddling with the idle screw and plugging the IAT in (another oversight on my part).
05-06-2013, 10:50 AM
#85
TECH Apprentice
Thread Starter
iTrader: (10)
Join Date: Dec 2005
Location: Peoria IL
Posts: 340
Likes: 0
Received 0 Likes
on
0 Posts
Its alive and on the road!
I was fighting a bad C5 FPR unknowingly for about 1.5 weeks right after we fired it up for the first time. The car would barely hold an idle, and would fall on its face as soon as the throttle blade was opened. I got that fixed and then found a couple fuel leaks at the rails. I got those fixed and temporarily wired the MAF back in line just so it would run. The tune is still a LONG way from ideal, but I made some very generic changes that a heads/cam LS1 likes to see and it at least got me in the ballpark to drive the car safely.
Changed the fuel rail plumbing for better form and function, and added MSD wires to avoid the headers:

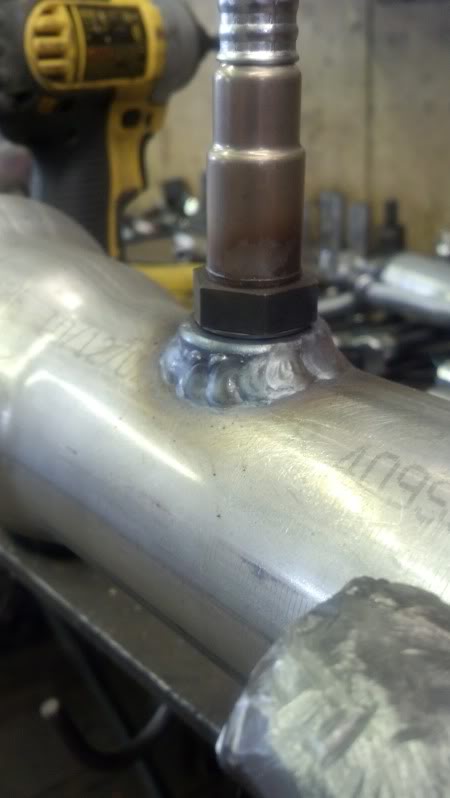
WBO2 bung welded in the exhaust... not too bad for a MIG:
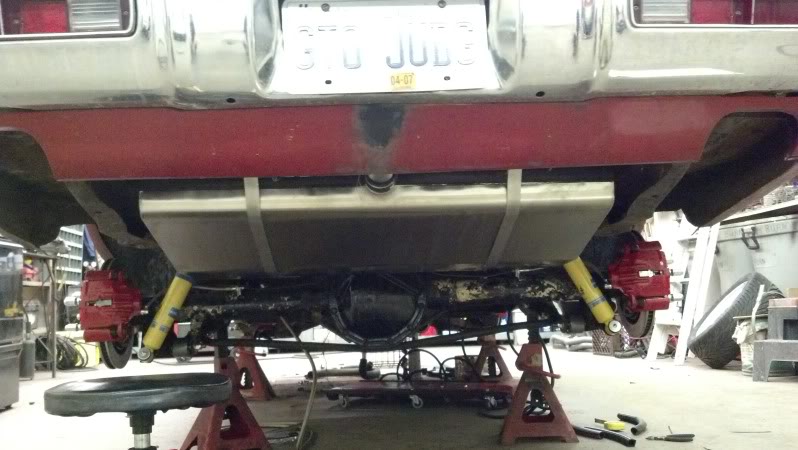
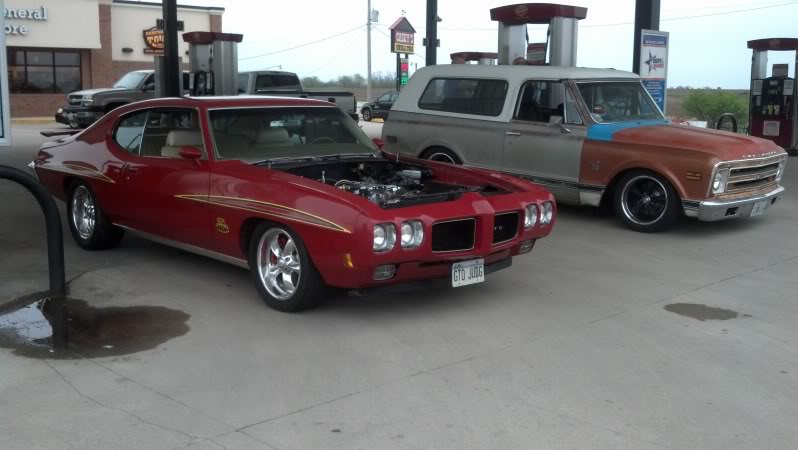
This is how it sat when I set it on the ground for the first time. The QA1's are cranked to their lowest setting and I only had about 2" of ground clearance with the headers, and that's being optimistic:

I drove out to Mackinaw to see how Compressor Surge was doing with the Blazer, and I ended up going with him on the maiden voyage to the gas station. I also cranked up the QA1's about 1/2" from the first pic.
The car is running pretty well for having a shot-in-the-dark tune. The Yank SS3600 stall is a blast, and the 2.5" SS Edelbrock exhaust sounds pretty damn healthy. I don't think the rear tires are going to be able to handle it.
I was fighting a bad C5 FPR unknowingly for about 1.5 weeks right after we fired it up for the first time. The car would barely hold an idle, and would fall on its face as soon as the throttle blade was opened. I got that fixed and then found a couple fuel leaks at the rails. I got those fixed and temporarily wired the MAF back in line just so it would run. The tune is still a LONG way from ideal, but I made some very generic changes that a heads/cam LS1 likes to see and it at least got me in the ballpark to drive the car safely.
Changed the fuel rail plumbing for better form and function, and added MSD wires to avoid the headers:

WBO2 bung welded in the exhaust... not too bad for a MIG:

This is how it sat when I set it on the ground for the first time. The QA1's are cranked to their lowest setting and I only had about 2" of ground clearance with the headers, and that's being optimistic:

I drove out to Mackinaw to see how Compressor Surge was doing with the Blazer, and I ended up going with him on the maiden voyage to the gas station. I also cranked up the QA1's about 1/2" from the first pic.

The car is running pretty well for having a shot-in-the-dark tune. The Yank SS3600 stall is a blast, and the 2.5" SS Edelbrock exhaust sounds pretty damn healthy. I don't think the rear tires are going to be able to handle it.
05-21-2013, 12:49 PM
#86
TECH Apprentice
Thread Starter
iTrader: (10)
Join Date: Dec 2005
Location: Peoria IL
Posts: 340
Likes: 0
Received 0 Likes
on
0 Posts
Welp, I'm going to chalk the GTO build up as a success to date. I still have a lot of details to address and finish, but it made the Automotion weekend 650 mile road trip pretty drama free with less than 200 miles of shake down time. The car got thumbs up and comments pretty much everywhere we went, and overall I got positive responses on the LS swap. I'm pretty sure one guy at the hotel still didn't believe that it was a legit Judge, but I'm ok with that.
The to-do short list as of now is:
- Contact Afco about their jank-*** brand new radiator that is seeping coolant that ends up blown all over my engine bay.
- Cut a hole in the core support and build a cold air box for the air filter to keep the intake air temps down
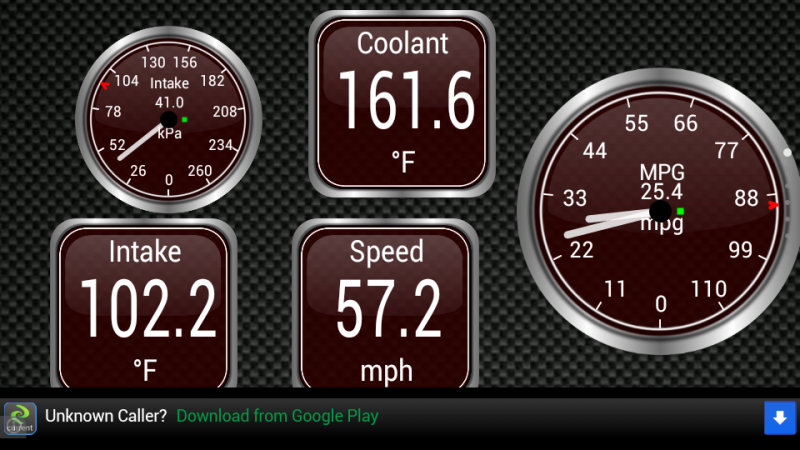
- Fab up a radiator fan shroud to help with stop-and-go traffic situations. I was seeing coolant temps as high as 230* when sitting in traffic for about 30 minutes. I was also seeing IAT's around 200* at that point.
- Figure out the 2-3 WOT shift... right now it just bumps the rev limiter.
- Buy and install new rear coil springs... the headers scraped a little (acutally a LOT) with 4 guys in the car.
The to-do short list as of now is:
- Contact Afco about their jank-*** brand new radiator that is seeping coolant that ends up blown all over my engine bay.
- Cut a hole in the core support and build a cold air box for the air filter to keep the intake air temps down
- Fab up a radiator fan shroud to help with stop-and-go traffic situations. I was seeing coolant temps as high as 230* when sitting in traffic for about 30 minutes. I was also seeing IAT's around 200* at that point.
- Figure out the 2-3 WOT shift... right now it just bumps the rev limiter.
- Buy and install new rear coil springs... the headers scraped a little (acutally a LOT) with 4 guys in the car.
 05-22-2013, 08:10 AM
#87
On The Tree
Join Date: Nov 2011
Location: South east Wisconsin
Posts: 159
Likes: 0
Received 0 Likes
on
0 Posts
Nice work! You were in the dells this past weekend? Would have been nice to have met up. Congrats on the success and I would assume you will get grief from people about the "Real Judge", I already got some heat from plenty of buick guys!
 07-06-2013, 06:05 AM
#89
TECH Fanatic
Great to see you on the road! I built upper and lower mounts for QA1 coilovers in the rear. The coilovers are the best improvement I have made outside the engine to date. I would be happy to share my design if you are interested.
 11-15-2013, 02:09 PM
#92
TECH Apprentice
Thread Starter
iTrader: (10)
Join Date: Dec 2005
Location: Peoria IL
Posts: 340
Likes: 0
Received 0 Likes
on
0 Posts

Thanks!
Which mount do you mean? This winter I'm planning to make my own mounts that locate the compressor where the stock unit was.
11-15-2013, 02:17 PM
#93
TECH Apprentice
Thread Starter
iTrader: (10)
Join Date: Dec 2005
Location: Peoria IL
Posts: 340
Likes: 0
Received 0 Likes
on
0 Posts
Apparently its winter now, so its time to shift gears from driving to wrenching on the GTO. I've got a laundry list of small (compared to last year) projects to complete on the car and improvements that I couldn't get to during the swap.
One of the big items that I regretted all summer was going with such a small cam. The current cam is a Comp XR275 which is a 222/224 .566/.568 on 112 and was perfect for the original plan of a cam only LS1. But, since the LS1 ended up with an 85mm intake/TB, port/polished/decked/3-angle valve job 799's, bumped compression, and a yank SS3600, it is wayyy undercammed. This afternoon I ordered a Comp XE-R281 232/234 .595/598 on 112 (carbon copy of the TSP Torquer V2) to be a better match to the rest of the mods, but still be mild enough to tune decent driveability and not require me to swap out the Comp 918 springs.
Once the roads are perfectly clear again I'll move the GTO back to the farm and tear into it.
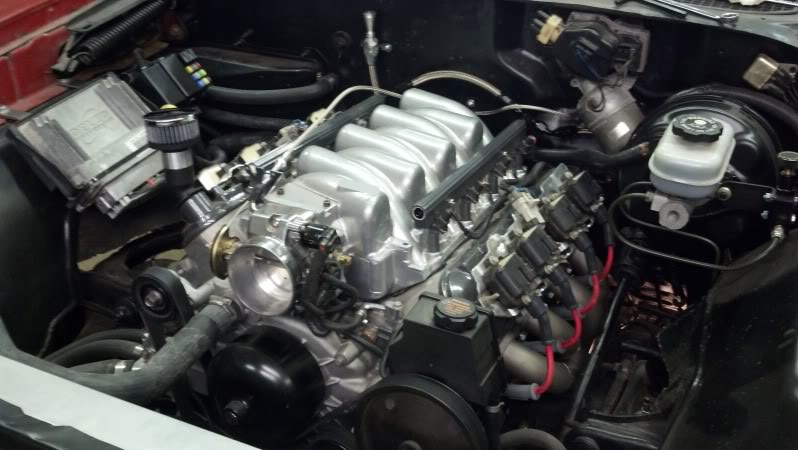
And just becuase posts are always better with a picture. . .

One of the big items that I regretted all summer was going with such a small cam. The current cam is a Comp XR275 which is a 222/224 .566/.568 on 112 and was perfect for the original plan of a cam only LS1. But, since the LS1 ended up with an 85mm intake/TB, port/polished/decked/3-angle valve job 799's, bumped compression, and a yank SS3600, it is wayyy undercammed. This afternoon I ordered a Comp XE-R281 232/234 .595/598 on 112 (carbon copy of the TSP Torquer V2) to be a better match to the rest of the mods, but still be mild enough to tune decent driveability and not require me to swap out the Comp 918 springs.
Once the roads are perfectly clear again I'll move the GTO back to the farm and tear into it.
And just becuase posts are always better with a picture. . .
11-15-2013, 06:26 PM
#94
On The Tree

Join Date: Oct 2010
Location: Kansas City
Posts: 179
Likes: 0
Received 0 Likes
on
0 Posts
"This winter I'm planning to make my own mounts that locate the compressor where the stock unit was."
Or... you could check out alan groove website for a low passenger mount sanden bracket to match you LS1 f-body accessories. I'm also using f-body accessories and and LS1 oil pan but using speedway weld-in motor mounts. I ended up having to notch my x-member slightly for the compressor, but that is because I moved the motor back far enough to fit the ls1 oil pan. With yours sitting farther forward due to the notch you did for the oil pan, you may not have any trouble with the alan groove bracket. Good luck.
Wish mine was moving as fast as yours but things have just spun out of control haha! It doesn't help that I only get a long weekend to work every 6 weeks or so when I take leave from work and travel to my father-in law's shop.
Thanks for some more motivation!
__________________
11-16-2013, 11:45 AM
#95
TECH Apprentice
Thread Starter
iTrader: (10)
Join Date: Dec 2005
Location: Peoria IL
Posts: 340
Likes: 0
Received 0 Likes
on
0 Posts
I've seen the AG mounts and like the style, but I need to run the compressor off the main 6 rip serpentine belt. With the exception of a couple minor design improvements, I plan do use the same method as this guy:
https://ls1tech.com/forums/conversio...dy-ls-2-a.html
https://ls1tech.com/forums/conversio...dy-ls-2-a.html
11-18-2013, 03:33 PM
#96
Staging Lane
iTrader: (2)
Join Date: May 2010
Location: mass
Posts: 57
Likes: 0
Received 0 Likes
on
0 Posts
I just bought an original 70 orbit orange judge a month ago and would love to do a build like you did i cant think of any reason to keep the non matching 400 thats in mine. it barely makes it up the driveway!, nice job!
08-19-2014, 11:44 AM
#97
TECH Apprentice
Thread Starter
iTrader: (10)
Join Date: Dec 2005
Location: Peoria IL
Posts: 340
Likes: 0
Received 0 Likes
on
0 Posts
I don't have much of an update on my GTO other than I got the V2 cam in along with some SVO "green top" 42# injectors. The tune is back to being pretty rough, but hopefully I can get that sorted out before its time to put the car into winter hibernation again.
I've made it to a couple cruise-ins and a local Cars 'n Coffee, but its surprising how little spare time there is for lately. :/

I've made it to a couple cruise-ins and a local Cars 'n Coffee, but its surprising how little spare time there is for lately. :/
Last edited by krwyellowZ28; 08-19-2014 at 11:50 AM.
08-20-2014, 08:57 AM
#98
11 Second Club
iTrader: (8)
Join Date: Jan 2010
Location: Southern Idaho
Posts: 502
Likes: 0
Received 0 Likes
on
0 Posts
What do you think about the V2 cam vs the Comp XR275?
08-20-2014, 01:53 PM
#99
TECH Apprentice
Thread Starter
iTrader: (10)
Join Date: Dec 2005
Location: Peoria IL
Posts: 340
Likes: 0
Received 0 Likes
on
0 Posts
You are spot on... at least now I have the ability to go for a quick spin if I want to, which is better than having the time but not a driveable car... maybe? lol
So far I can't give a good comparisson of the two cams. All I've done for the tune is adjust for the bigger injectors, so its far from max potential. I will say the lope and idle is notably choppier, which I really like, and it does seem to breather a little better in the higher RPM range.
So far I can't give a good comparisson of the two cams. All I've done for the tune is adjust for the bigger injectors, so its far from max potential. I will say the lope and idle is notably choppier, which I really like, and it does seem to breather a little better in the higher RPM range.