

67 Chevelle LS1 T56 Build
 07-08-2012, 10:42 PM
#61
Staging Lane
Thread Starter

Join Date: Dec 2007
Posts: 85
Likes: 0
Received 0 Likes
on
0 Posts

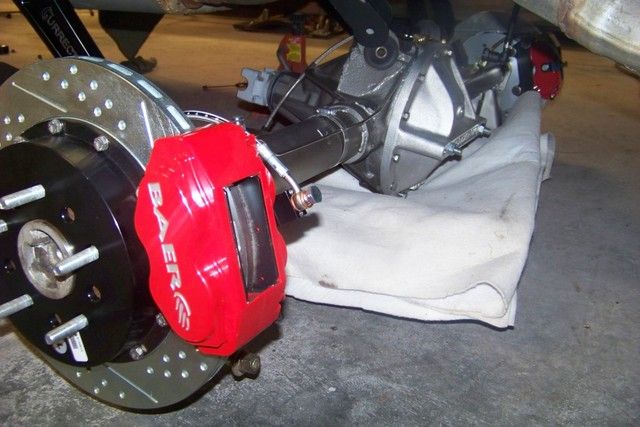
I also got my brake parts in. I went with the Baer 6P front brakes with 2 piece 14" rotors - -Massive!!! And the SS4+ rear with 13" 2 piece rotors. Baer sends everything to get these things going, including bolts, washers, brake lines, ebrake cables and brackets, etc....
I do have one problem though... mounting the 6P caliper to my ATS spindle, I don't seem to have enough clearance to the rotor. I might have the caliper brackets for a stock spindle or something, so I will have to call Baer tomorrow.
Front Stuff
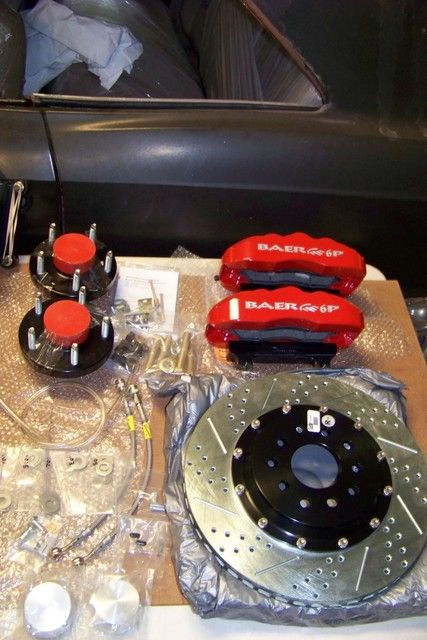
Rear Stuff

Clearance Problem
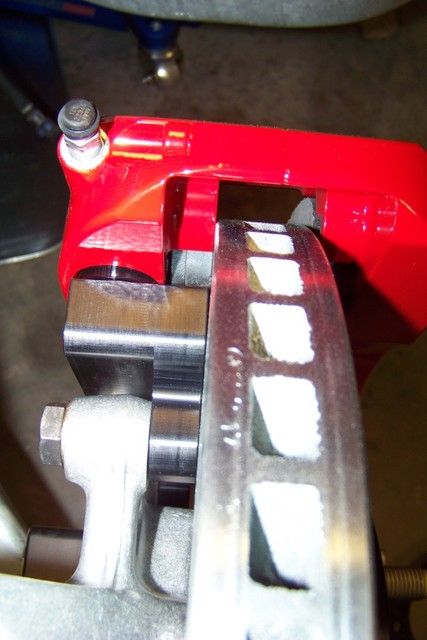
I do have one problem though... mounting the 6P caliper to my ATS spindle, I don't seem to have enough clearance to the rotor. I might have the caliper brackets for a stock spindle or something, so I will have to call Baer tomorrow.
Front Stuff
Rear Stuff
Clearance Problem
 08-01-2012, 05:57 AM
#62
Staging Lane
Thread Starter
Join Date: Dec 2007
Posts: 85
Likes: 0
Received 0 Likes
on
0 Posts
Resolved the Brake fit issue above. I received the kit for the stock spindle instead of for the ATS AFX spindle. When ordering brakes, make sure you don't just use the term AFX spindle because this can be confused as a stock spindle.... Anyway, the correct front rotors and caliper brackets are here now and time to install.
Also, this weekend, I dropped the rear end and degreased, sandblasted, epoxy, and painted. Waiting on the new bushings and new pinion and axle seals. I did make the mistake of pulling the yoke off and I did not mark the nut location, so now I am concerned about reinstalling to the proper preload. Any tips? I think I will set it at 150-175 ft lbs and use locktight.
Its out...
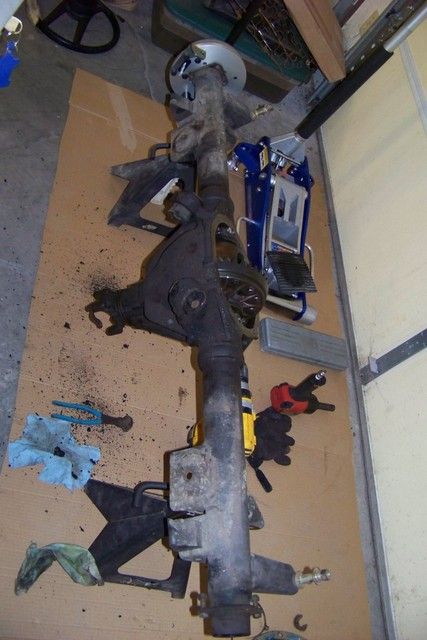
Its degreased....
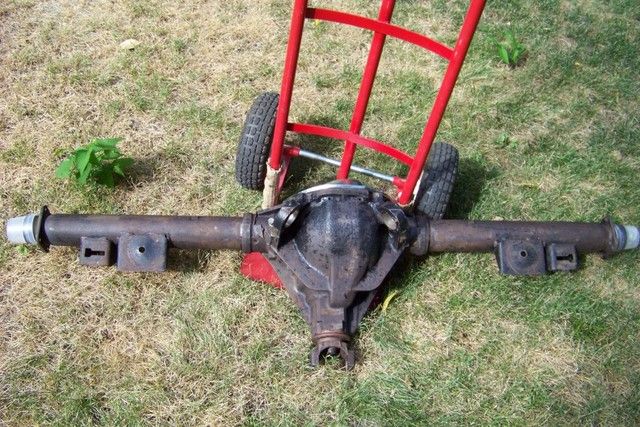
Sandblasted....
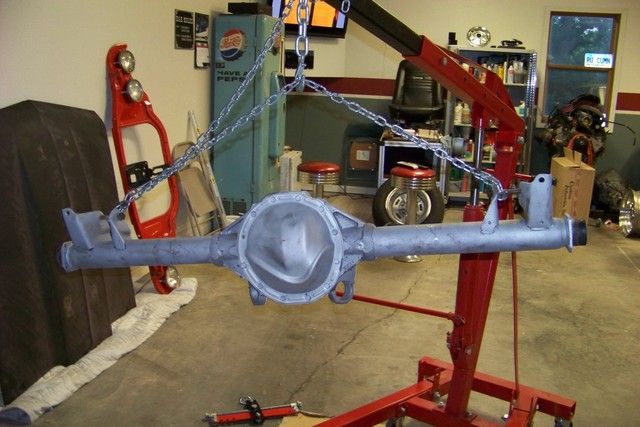
Epoxy....axle tubes painted
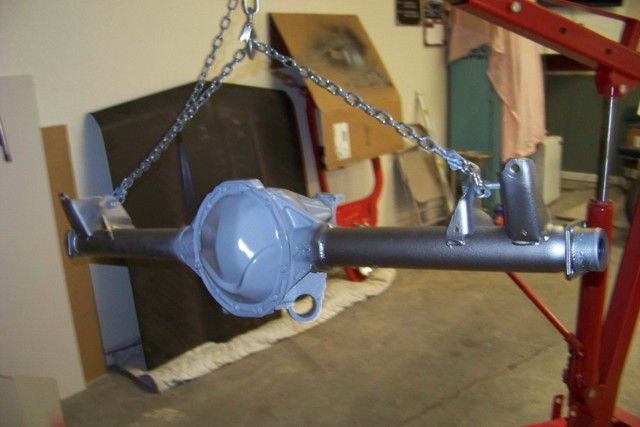
Painted....
Also, this weekend, I dropped the rear end and degreased, sandblasted, epoxy, and painted. Waiting on the new bushings and new pinion and axle seals. I did make the mistake of pulling the yoke off and I did not mark the nut location, so now I am concerned about reinstalling to the proper preload. Any tips? I think I will set it at 150-175 ft lbs and use locktight.
Its out...
Its degreased....
Sandblasted....
Epoxy....axle tubes painted
Painted....
08-06-2012, 05:35 AM
#63
Staging Lane
Thread Starter
Join Date: Dec 2007
Posts: 85
Likes: 0
Received 0 Likes
on
0 Posts
Didn't get a lot done this weekend....
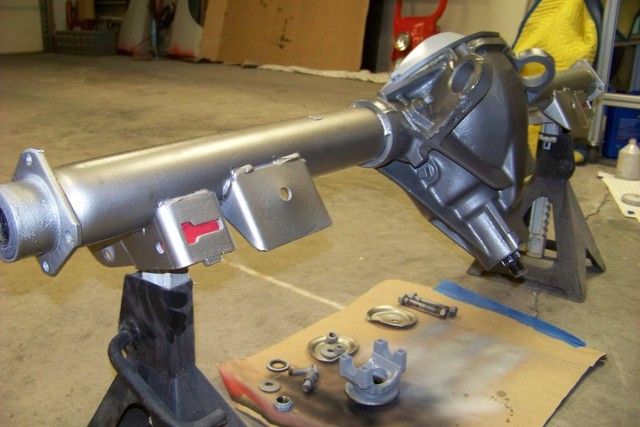
When I sandblasted the rear end, sand ended up blowing by the cover (no seal) and into the housing. Also had some sand get into the axle bearings - CRAP!!!
I decided the best way to clean everything out was to pop off all the seals and then use a pressure washer to thoroughly flush out every inch of the rear. As I pressure washed, I had a friend help rotate the gears and bearings. It worked really well and I don't think there is a spec of sand left in there.
We then used compressed air to thoroughly dry out the rear and the bearings and gears. We then replaced the seals and filled it with 80-90 to get the bearings and gears covered with oil. I lifted up each axle also to force oil out to the axle bearings.
I will change the oil after a couple of miles once the car is on the road or maybe even before so that I can inspect everything to ensure no rust is forming.
08-06-2012, 05:37 AM
#64
Staging Lane
Thread Starter
Join Date: Dec 2007
Posts: 85
Likes: 0
Received 0 Likes
on
0 Posts
Oh, I did get the stock tranny crossmember cut down and welded up to the new length and I started welding the metal into the tranny tunnel as well. I will try to post some pictures in the next couple days.
 08-08-2012, 09:31 PM
#66
Staging Lane
Thread Starter
Join Date: Dec 2007
Posts: 85
Likes: 0
Received 0 Likes
on
0 Posts
08-08-2012, 09:39 PM
#67
Staging Lane
Thread Starter
Join Date: Dec 2007
Posts: 85
Likes: 0
Received 0 Likes
on
0 Posts
Here are a couple of pictures of last weekends progress. Not the best pictures, but you get the idea.
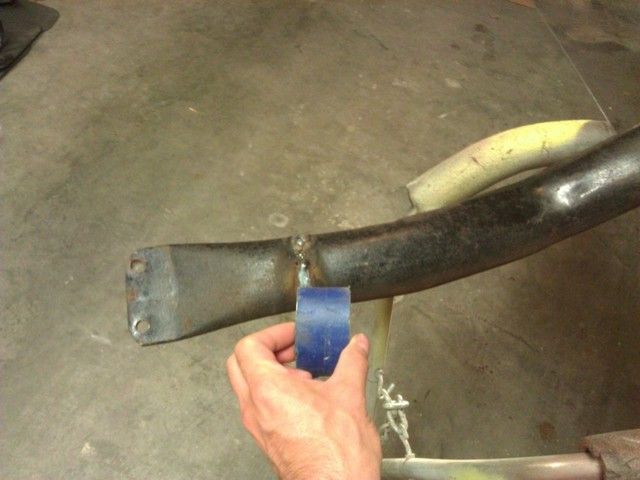
Here I cut 1-3/4" out of each side of the stock crossmember, so it will fit between the boxed frame rails. I plan to weld small pieces of angle iron to the frame rails for this to bolt to.
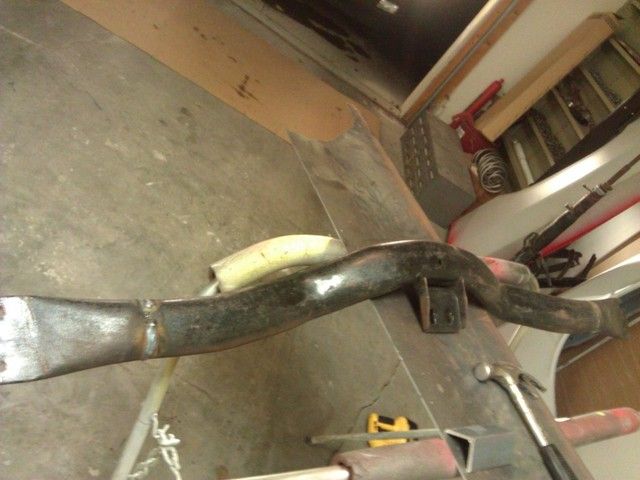
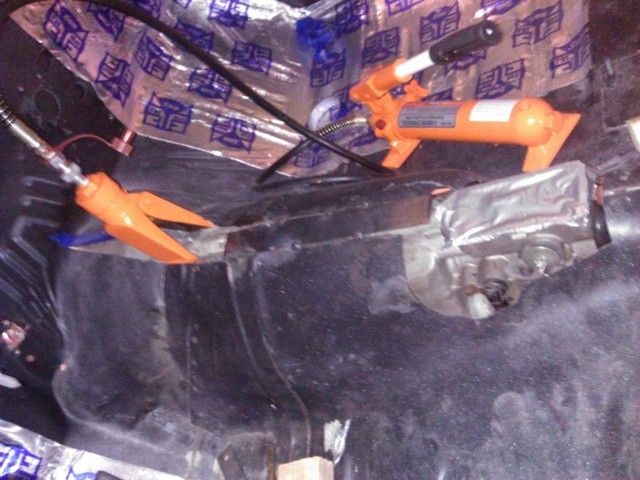
Here is the floor starting to be patched in and welded. Need to work the upper part of the tunnel a little more.
Here I cut 1-3/4" out of each side of the stock crossmember, so it will fit between the boxed frame rails. I plan to weld small pieces of angle iron to the frame rails for this to bolt to.
Here is the floor starting to be patched in and welded. Need to work the upper part of the tunnel a little more.
 08-13-2012, 07:03 AM
#69
On The Tree
iTrader: (2)

Join Date: Jun 2011
Location: Nashville, TN
Posts: 170
Likes: 0
Received 0 Likes
on
0 Posts
Looks like good progress!
I like that spreader tool. I wish I had had one of those when I did my floor. I took the redneck approach and jacked the transmission up to spread the floor...
Make sure to take some pictures as you patch the rest of the floor. My project has been on hiatus for awhile, and I haven't gotten there yet.
08-16-2012, 06:57 PM
#70
Staging Lane
Thread Starter
Join Date: Dec 2007
Posts: 85
Likes: 0
Received 0 Likes
on
0 Posts
Looks like good progress!
I like that spreader tool. I wish I had had one of those when I did my floor. I took the redneck approach and jacked the transmission up to spread the floor...
Make sure to take some pictures as you patch the rest of the floor. My project has been on hiatus for awhile, and I haven't gotten there yet.
I like that spreader tool. I wish I had had one of those when I did my floor. I took the redneck approach and jacked the transmission up to spread the floor...
Make sure to take some pictures as you patch the rest of the floor. My project has been on hiatus for awhile, and I haven't gotten there yet.
I will be sure to take as many pictures as I can to document what I ran into and how I remedied.
08-16-2012, 07:01 PM
#71
Staging Lane
Thread Starter
Join Date: Dec 2007
Posts: 85
Likes: 0
Received 0 Likes
on
0 Posts
Not much work lately out of Mutt, he is busy with all that advanced degree homework that he is going after. I did rib him some about stressing over a Marketing class.... an engineer should be able to fly through that class with his eyes shut and his lips attached to a keg.
Hopefully he will lay low on the online crash courses and attend the U which should help learn the material easier. Been 8 or 9 years out of homework practice.
Hopefully he will lay low on the online crash courses and attend the U which should help learn the material easier. Been 8 or 9 years out of homework practice.
 10-08-2012, 12:05 PM
#74
Staging Lane
Thread Starter
Join Date: Dec 2007
Posts: 85
Likes: 0
Received 0 Likes
on
0 Posts
It has been awhile since I last posted. Not a lot of progress, but here are some updates I will share.
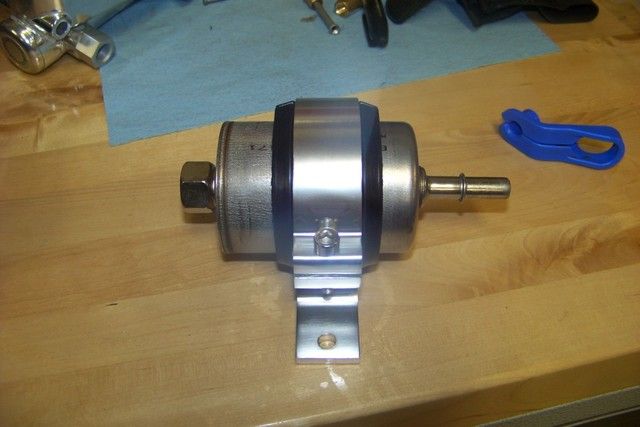
First, I bought an aluminum bracket to mount my fuel filter on the underside of the trunk shelf behind the rear end.
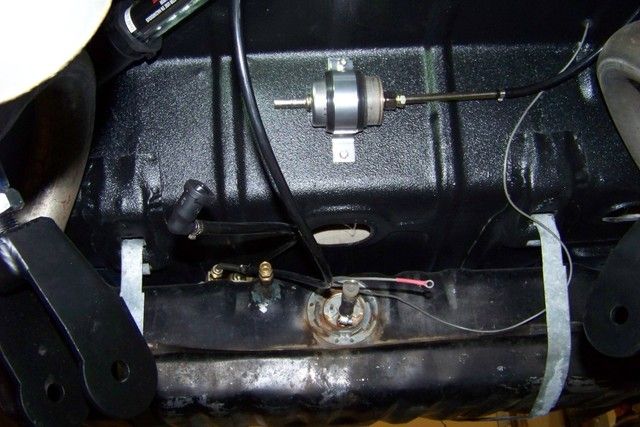
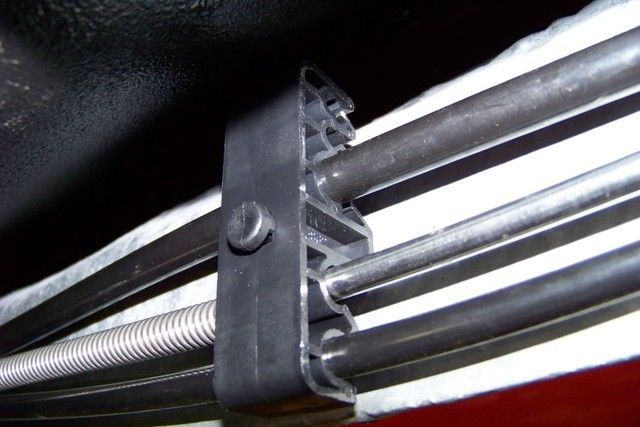
I also bought some Dorman clips to help mount my fuel lines and brake lines on the inside of the "boxed" frame rail. Still have some final adjustments and mounting to complete, but it is roughed in.

First, I bought an aluminum bracket to mount my fuel filter on the underside of the trunk shelf behind the rear end.
I also bought some Dorman clips to help mount my fuel lines and brake lines on the inside of the "boxed" frame rail. Still have some final adjustments and mounting to complete, but it is roughed in.
10-08-2012, 12:16 PM
#75
Staging Lane
Thread Starter
Join Date: Dec 2007
Posts: 85
Likes: 0
Received 0 Likes
on
0 Posts
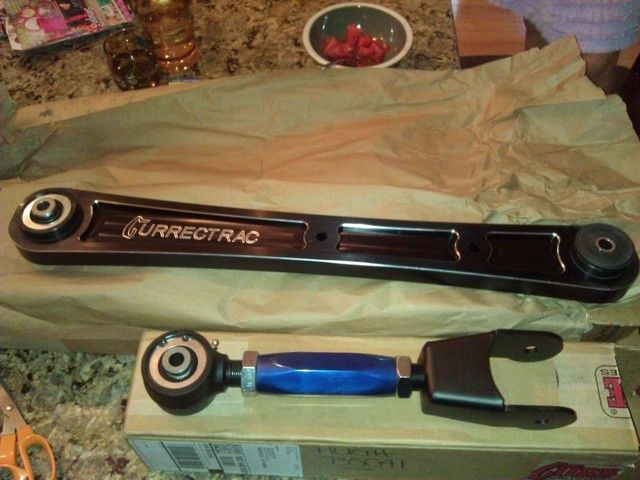
The rear is now ready to bolt up to the new control arms and secure all the brake line fittings. I plan on attacking this on Thursday when I get an extra set of hands over here.
Plan on using the DOT V synthetic fluid due to its non-corrosive properties.
Plan on using the DOT V synthetic fluid due to its non-corrosive properties.
10-08-2012, 12:22 PM
#76
Staging Lane
Thread Starter
Join Date: Dec 2007
Posts: 85
Likes: 0
Received 0 Likes
on
0 Posts
Oh, one last item, I have been laying out the wiring for the car. I have a universal 20 circuit harness from "It's a Snap". I think I paid around $125 for the harness.
I got the wild idea of building a '63 style corvette dash for the car, so I found a set of original dash pads and I am going to custom fabricate the rest of the dash. I will be posting pictures on this undertaking...no small chore. I got the idea from the Prodigy Camaro and I have always been partial to that style of dash.
So scope of project has changed once again, but thats why it is a custom!
Oh, Forgeline GA3 wheels on the way and power windows. Next shopping list has Digi Tails front and rear LED lights and some sort of HALO HID lamps for the front.
12-03-2012, 12:30 PM
#77
Staging Lane
Thread Starter
Join Date: Dec 2007
Posts: 85
Likes: 0
Received 0 Likes
on
0 Posts
I have a bunch of updates since the last post.
First, with some help of the father in law, got the brakes bled out. Started with bleeding the master... Used the DOT 5 fluid which is non-corrosive to paint and it doesn't burn the hands like regular brake fluid. It is a cool purple color... I have never worked with the stuff before. It is bit higher priced, so I was careful with each drop.
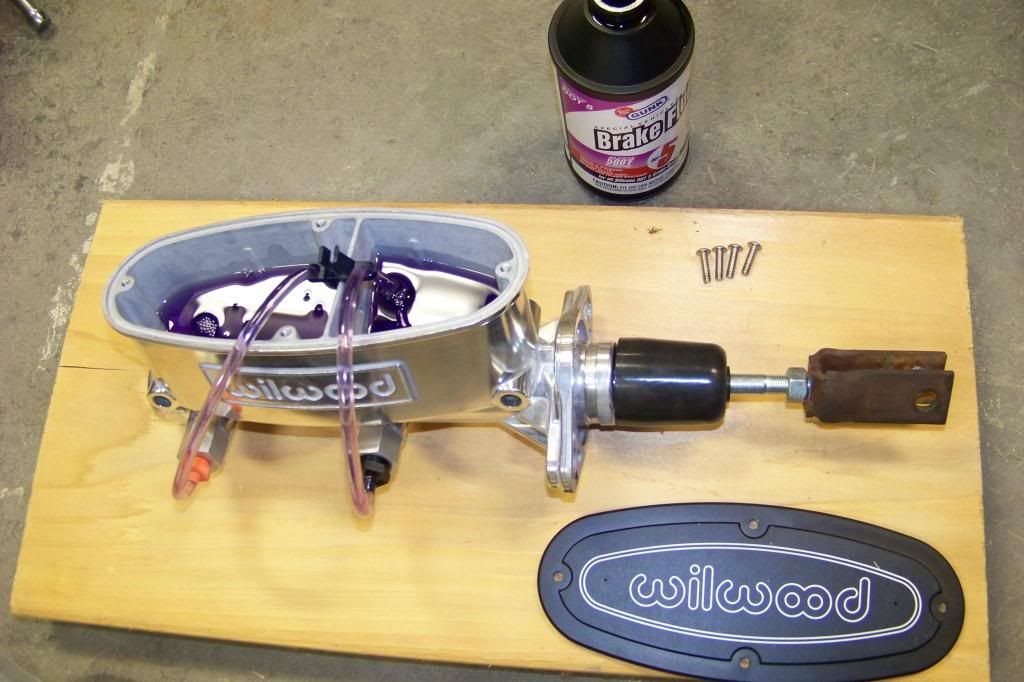
I did have a few connections that were leaking. Kept finding more as I tightened others. I will say that it took a long time to fill up and bleed this empty system. I kind of expected gravity to help, but it wasn't until I started pumping the pedal and opening the bleeders many times that fluid finally started to reach the back calipers in any amount of volume.
First, with some help of the father in law, got the brakes bled out. Started with bleeding the master... Used the DOT 5 fluid which is non-corrosive to paint and it doesn't burn the hands like regular brake fluid. It is a cool purple color... I have never worked with the stuff before. It is bit higher priced, so I was careful with each drop.
I did have a few connections that were leaking. Kept finding more as I tightened others. I will say that it took a long time to fill up and bleed this empty system. I kind of expected gravity to help, but it wasn't until I started pumping the pedal and opening the bleeders many times that fluid finally started to reach the back calipers in any amount of volume.
 12-03-2012, 04:45 PM
#79
Staging Lane
Thread Starter
Join Date: Dec 2007
Posts: 85
Likes: 0
Received 0 Likes
on
0 Posts
I still have your templates for the AC compressor mounting! Let me know if you would like some copies sent back to you?
What I was trying to figure out earlier was what Sanden compressor you were running, but I was able to get a pretty good look at the compressor from your build pictures. My compressor has fittings that exit out the back and they interfere, so I wanted to buy your same model compressor. I think I have it figured out now.