When you click on links to various merchants on this site and make a purchase, this can result in this site earning a commission. Affiliate programs and affiliations include, but are not limited to, the eBay Partner Network.
Haven't been doing much over the winter, although I have been driving it. I am in the middle of making some custom fiberglass inner fenders while the weather permits. I will post some pics in the next few days....assuming I can actually build the things!
Dude,
Considering the other cool stuff you've built for your car, I'm sure you will bang these out in no time. LOL Looking forward to seeing them.!!!!!!!
Ok, here's what I got done over the last couple of days:
Started by creating a "skeleton" of foamboard and those handy concrete tubes you get from Home Depot. A lot of planning in this stage because you don't want parts interfering with what you are trying to build
Here you can see the underside, which is reinforced just to make the structure a little tougher. It's ugly but it's temporary
You also need to plan ahead so that you can actually mount the thing. Here I have some bolts welded to a piece of steel. I drilled holes in the fender to match these, and then taped this part in place. Later, it will be completely encased in fiberglass. I will also be adding more mounting locations, but that will come later once it's in the car.
Next step is to cover the whole top side in foil. Fiberglass resin won't stick to foil, and since I need to get this foamboard skeleton back out, this step is crucial.
Instead of laying a top layer of fiberglass, I chose to do fleece. You could certainly lay fiberglass directly on top, but I am so messy and unskilled with fiberglass that I stuck to the method I am comfortable with (this is how I made my dash if you guys remember)
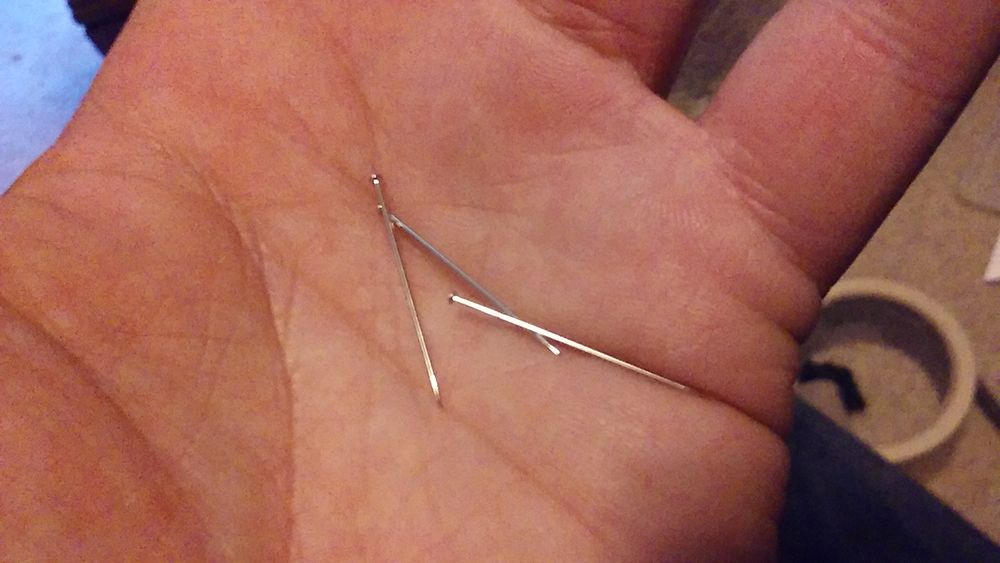
Since there's foil on top of the skeleton, I can't glue the fleece down. It would just pull the foil away from the skeleton. so I am using these little "headless" pins (I think they care called dress pins?). I just stick them wherever necessary directly into the foamoard. It takes a lot of them, and they hurt, so use a thimble or something.
Parts fit into the car a final time before committing to fiberglass resin.
And here it is after slathering on the resin. There's also fiberglass cloth reinforcing all the areas where the fleece had to be cut.
There will be corresponding underhood parts that cover up the radiator area and connect to the inner fenders I made. There's still a long way to go but you get the idea. I will let this sit until tomorrow, and then take the front tires off so I can pull the foamboard out from the underside. Then I will reinforce with fiberglass mat from underneath. I will also add some kind of additional material embedded in the mat for additional strength (especially in the larger flat areas). Long way to go still!
Last edited by superdave84; 03-24-2016 at 09:07 PM.
I missed it why did you go with these mirrors? I thought you made functional cameras?
I did. But it was terrifying to drive because it was impossible to see anything. I hate the idea of ANY mirror on the side of the car, but since I have to see what's happening behind me, this is the best solution I could come up with.
Hey. so i've been keeping up with this thread and i haven't seen how you mounted your seats yet. just curious on how you did it i have similar seats i'm putting in my 70 impala and they have those hooks on the front. any help would be appreciated. thanks
Hey. so i've been keeping up with this thread and i haven't seen how you mounted your seats yet. just curious on how you did it i have similar seats i'm putting in my 70 impala and they have those hooks on the front. any help would be appreciated. thanks
I chopped the hooks off. I thought it would be best to kind of imitate the stock way of fastening the seat but it just wasn't possible. It made the seat way too high in the front so I had to mount it in a more traditional method.
After cutting off the hooks, I measured the distance between the holes in the rails (there were still holes in my rails even though I don't think they were used for mounting....at least not the front ones). I made a little drawing on a piece of paper to keep track of each measurement because the holes on both sides of my seat rails were a different distance apart.
Next I had to map out the bolt pattern on the floor. This was easy enough to do. I used one of the original seat mounting locations for my starting point. Not sure about your floor, but on mine there is one threaded spot on each side of the car for a bolt to thread into the floor. I used that as my starting point, and then measured back to the next bolt location and drilled a new hole. I did the same thing for the other 2 holes, being careful to stay within the measurements on my paper.
Now of course, the seat rails are flat on the bottom, and the floor is crazy-shaped. Totally won't bolt right to the floor. So I got out a short level, and once again starting with the original bolt location, I carefully used the level to see how much space there was between the level and the floor of the car at each bolt hole I had drilled. I wrote all these numbers down on my paper for each hole, for both seats.
Then I got some thick-walled round stock at the Home Depot (can't remember the exact size diameter or thickness...you just want something close to your bolt size as the inner diameter, and as thick of a wall as you can find.....maybe like 1/8", but I think mine was a little less.)
Next I used the round stock to cut out spacers that corresponded to the necessary bolt holes. Mark them so you remember which goes where.
Now it's just a matter of bolting the seats into the car, making sure that your spacers are in the proper locations.
I did this without carpet in the car. I imagine if you have carpet installed it's going to complicate things some...but the basic idea still applies.
Ok that sounds simple enough. i was thinking of making a little box with slots in it or something and then a box for the back mounts with captive nuts welded into them. and there's no carpet in the car i had to take all that nasty blue **** crap out along with all the mouse crap. but thanks for answering so quickly! and also you have some mad skills with that car you're building i've never seen anyone do an interior quite that crazy and great idea with those coil covers they really set the engine bay off! thanks again
A small update on my wheel well project. If anyone needs any help, or some pointers on bodywork be sure ***NOT*** to ask me....I have no clue what I am doing. But here's my slow, meager attempt.
Some bodywork on one of the wheel wells
Roughing in the front panel design with the foamboard
Tried skipping the fleece and going directly to laying fiberglass. What a disaster.
After endless hours of bodywork and some major changes so that the hood actually closed (kind of important)
Getting the gaps to look decent between each panel
I used John Deere Blitz Black to paint the panels. Stupid paint nozzle dripped in a few places and I will need to try to repair (can't see the flaws in the pic though)
And finally, all of the panels painted and in the car. I still need to make two brackets to better support the front of both inner fenders. Also need to repaint the front panel...and I also have a cool addition to put in there once that's all done. Stay tuned!
Awesome job! How much do they weigh? Are they hard to lift out and / or position?
They're not super light but they are lighter than the steel ones. They are very easy to get in and out. As you can see the front panel isn't bolted in at all....I am using those plastic rivets you see on the more modern cars. I can remove/install all the pieces in about 5 minutes, although when I get the front brackets put in, there will be two more bolts to remove, so that'll bump up the time to maybe 7ish minutes.
As far as positioning, I elongated the holes I am using in the fenders so that they can slide front to back, and there's no reason to slide them side to side as they simply hug the fenders. The panel for the air cleaner surround is connected only to the driver side inner fender, but it also rests on the fender edge for support. The front panel has no adjustments. It rivets directly to the core support underneath.
The back of both of the inner fenders have rods embedded into them, and those rods go into holes I drilled in the firewall (with a rubber grommet). There are two bolts embedded on each side that go into the fenders. And like I said, there's another bracket to be make on each side to support the front


 03-23-2016, 11:54 PM