

LQ4/T56 into 2001 BMW 540i


 02-05-2013, 08:13 PM
#102

oil pan disassembled, had a coworker weld it up and leak test it. i also cut the required portion of the baffles

all assembled.

extent of the notch.

clusterfuck, i removed almost all the circuits that aren't necessary.

auto trans plug and the 2nd O2 sensor plug ditched.

all assembled.
extent of the notch.
clusterfuck, i removed almost all the circuits that aren't necessary.
auto trans plug and the 2nd O2 sensor plug ditched.
02-05-2013, 08:34 PM
#103
Listing of circuits that I removed. Some were not in the PCM connectors (since the van was not 4WD among other options), so those are labeled "NOT PRESENT".
BLUE
17 DK BLU 1225 Transmission Fluid Pressure Switch Signal B (A/T)
18 RED 1226 Transmission Fluid Pressure Switch Signal C (A/T)
25 TAN 1671 HO2S Low Signal - Bank 2 Sensor 2
28 TAN/WHT 1669 HO2S Low Signal - Bank 1 Sensor 2
30 LT GRN 1478 Coolant Level Switch Signal (empty 2006+) (NOT PRESENT)
32 BLK/WHT 771 Transmission Range Switch Signal A (A/T)
34 WHT 776 Transmission Range Switch Signal P (A/T) PCM can be programmed to accept a SINGLE WIRE park/neutral signal on this PIN, if no trans mounted range sensor is present
53 GRY 720 Low Reference (TRANS)
56 WHT 1579 Fuel Temperature/Composition Signal (L59) Flex Fuel Sensor (PCM SHOULD BE PROGRAMMED TO REMOVE FLEX FUEL FUNCTION)
65 PPL 1670 HO2S High Signal - Bank 2 Sensor 2
68 PPL/WHT 1668 HO2S High Signal - Bank 1 Sensor 2
72 YEL 772 Transmission Range Switch Signal B (A/T)
79 WHT 687 3-2 Shift Solenoid Valve Control (M30/M32) NOT PRESENT
GREEN
2 BRN 418 TCC PWM Solenoid Valve Control (A/T)
3 TAN 1465 Fuel Pump Relay Control – Secondary NOT PRESENT
6 RED/BLK 1228 PC Solenoid Valve High Control (A/T)
8 LT BLU/WHT 1229 PC Solenoid Valve Low Control (A/T)
16 GRY/BLK 1694 4WD Low Signal (KEEP IF USING STOCK TRANSFER CASE IN A 4WD APPLACTION, WITH VSS ON OUTPUT OF TRANSFER CASE. NOT PRESENT
22 RED/BLK 1230 AT ISS High Signal (4WD w/MT1)
23 DK BLU/WHT 1231 AT ISS Low Signal (4WD w/MT1)
42 TAN/BLK 422 TCC Solenoid Valve Control (M30/M32) NOT PRESENT
47 YEL/BLK 1223 2-3 Shift Solenoid Valve Control (A/T)
48 LT GRN 1222 1-2 Shift Solenoid Valve Control (A/T)
51 YEL/BLK 1227 TFT Sensor Signal (A/T)
52 BRN 2391 HO2S Heater Low Control Bank 1 Sensor 2
53 RED/WHT 3223 HO2S Heater Low Control Bank 2 Sensor 2
54 PPL 1589 Fuel Level Sensor Signal - Primary
62 GRY 773 Transmission Range Switch Signal C (A/T)
63 PNK 1224 Transmission Fluid Pressure Switch Signal A (A/T)
73 DK BLU 1936 Fuel Level Sensor Signal – Secondary NOT PRESENT
 02-06-2013, 11:30 AM
#105
LOL, wishful thinking...
i actually am engaged, my fiancee and i have been together since high school (over 7 years), engaged for 6 months of that. she puts up with all the crap in the living room only because i clean it up every night. we have been living together in this apartment for about 6 months or so.
other than that i just like beer...
02-07-2013, 02:50 PM
#106
LS6 CTS-V manifolds get here Monday, I’m really anxious to see if they fit. If not, I am falling back on the tubular steel Camaro manifolds and will get to work on those.
Didn’t feel like wasting hours and gallons of gas running around finding M16x2.0 stock for a pulley installer tool, so I bought a “kit” on LS1Tech for $20 shipped, that showed up yesterday.
Placed an order this morning with Rockauto.
Plugs (Bosch Platinums at a whopping 74 cents each, gotta love closeout)
a new wire set (the originals were probably fine, but the engine only came with 7, and they looked like dog ****)
2 oil filters (the bottom end was never apart and doesn’t need to be broken in, but I plan on still doing an oil change after a few miles to wash out the beer can tabs and condoms that probably fell in during the 5 months the motor was apart)
LS1 main belt tensioner (I should have bought a belt too, but forgot). For now I’ll be running without AC until I can figure out the wiring. It isn’t imperative to the car doing heaters so I’m not too worried about it.
Also ordered with Summit:
ARP Crank Balancer Bolt
ARP Pressure Plate Bolt Kit
ARP Flywheel Bolt Kit
I have a ton of bolts left over from when I disassembled the motor, so I’m reusing the valley cover bolts as exhaust manifold bolts.
Also snagged a new titanium 11/32” bit so that I can drill and tap the boss on the block for the F-Body alternator bracket.
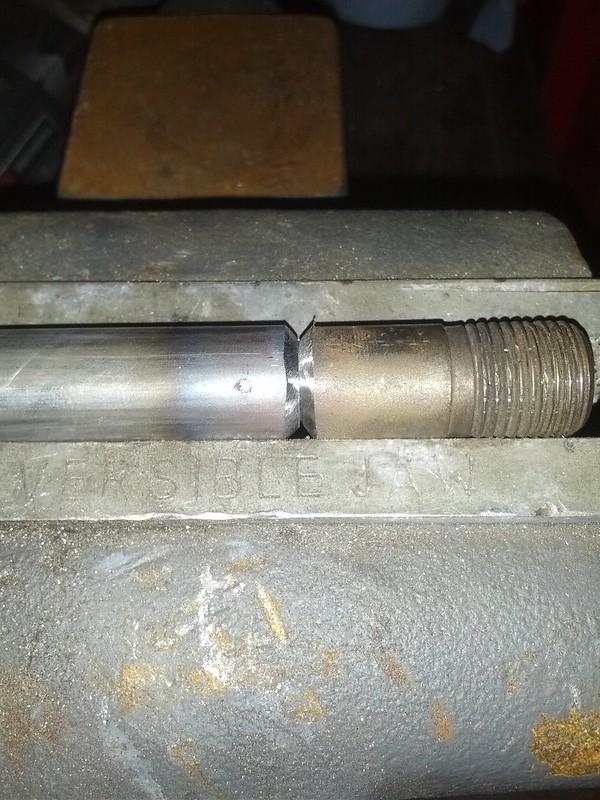
I didn’t like the look of the square shifter rod so I grabbed some �” round stock on lunch and will re-make it tonight. The square **** was only about �” thick and just looked so ghetto. I still want a tall shifter, just with better quality/finish. If I had access to a lathe I’d chuck it up and clean it/polish it but a wire wheel will have to do.
Didn’t feel like wasting hours and gallons of gas running around finding M16x2.0 stock for a pulley installer tool, so I bought a “kit” on LS1Tech for $20 shipped, that showed up yesterday.
Placed an order this morning with Rockauto.
Plugs (Bosch Platinums at a whopping 74 cents each, gotta love closeout)
a new wire set (the originals were probably fine, but the engine only came with 7, and they looked like dog ****)
2 oil filters (the bottom end was never apart and doesn’t need to be broken in, but I plan on still doing an oil change after a few miles to wash out the beer can tabs and condoms that probably fell in during the 5 months the motor was apart)
LS1 main belt tensioner (I should have bought a belt too, but forgot). For now I’ll be running without AC until I can figure out the wiring. It isn’t imperative to the car doing heaters so I’m not too worried about it.
Also ordered with Summit:
ARP Crank Balancer Bolt
ARP Pressure Plate Bolt Kit
ARP Flywheel Bolt Kit
I have a ton of bolts left over from when I disassembled the motor, so I’m reusing the valley cover bolts as exhaust manifold bolts.
Also snagged a new titanium 11/32” bit so that I can drill and tap the boss on the block for the F-Body alternator bracket.
I didn’t like the look of the square shifter rod so I grabbed some �” round stock on lunch and will re-make it tonight. The square **** was only about �” thick and just looked so ghetto. I still want a tall shifter, just with better quality/finish. If I had access to a lathe I’d chuck it up and clean it/polish it but a wire wheel will have to do.
02-08-2013, 11:17 AM
#107
Nice. Once I get further along I will start a build thread on my E34 Touring. Currently I am labeling wires in the harness. One thing I notices last night was that I don't seem to have a 3 wire coolant sensor to run a gauge. How are you setting up you coolant gauge. I want to run my stock BMW gauge.
Thanks
Vaz
Thanks
Vaz
02-08-2013, 11:57 AM
#108
Nice. Once I get further along I will start a build thread on my E34 Touring. Currently I am labeling wires in the harness. One thing I notices last night was that I don't seem to have a 3 wire coolant sensor to run a gauge. How are you setting up you coolant gauge. I want to run my stock BMW gauge.
Thanks
Vaz
Thanks
Vaz
A few pics I forgot to add.
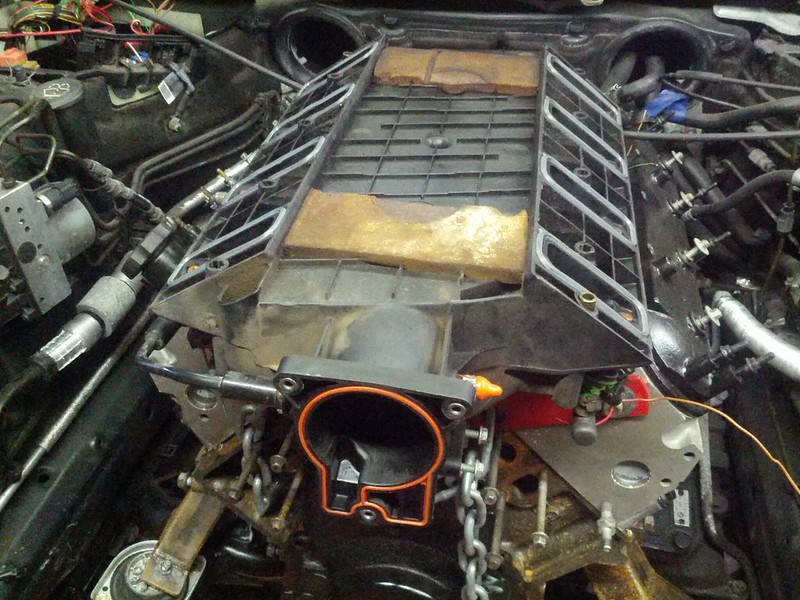
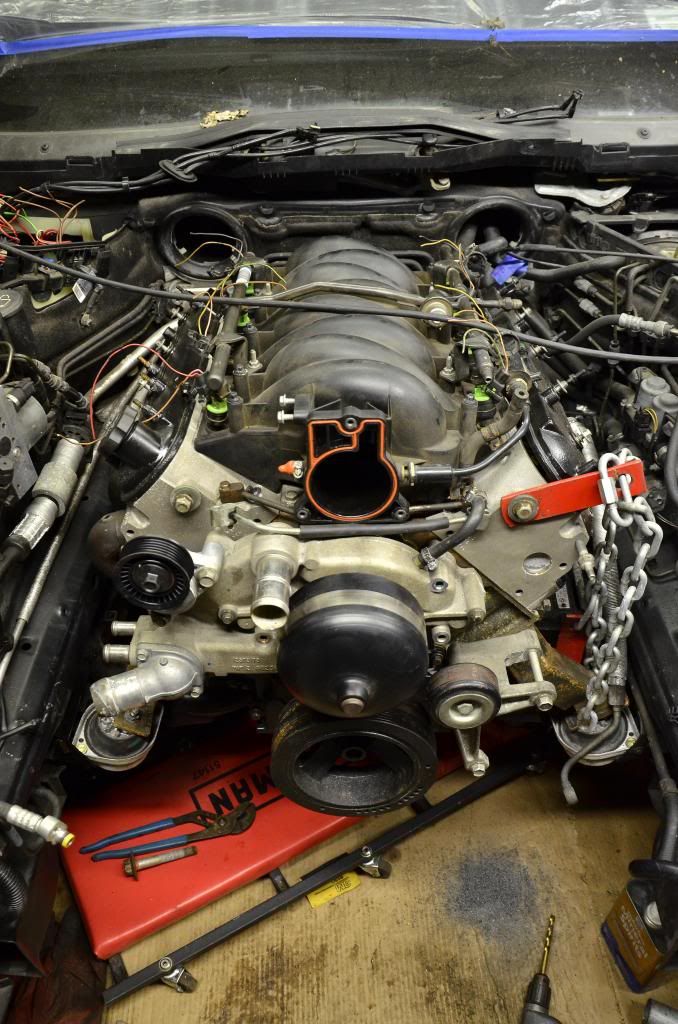
LS6 intake went in last week, all torqued down. I should have cleaned it up a bit before installing it but it�s not a big deal.
Bent up a new shifter rod. No pictures of the finished product as I still need to clean it up with a wirewheel, but it already looks a lot better than that square rod I initially made.

Getting better with prep for welding
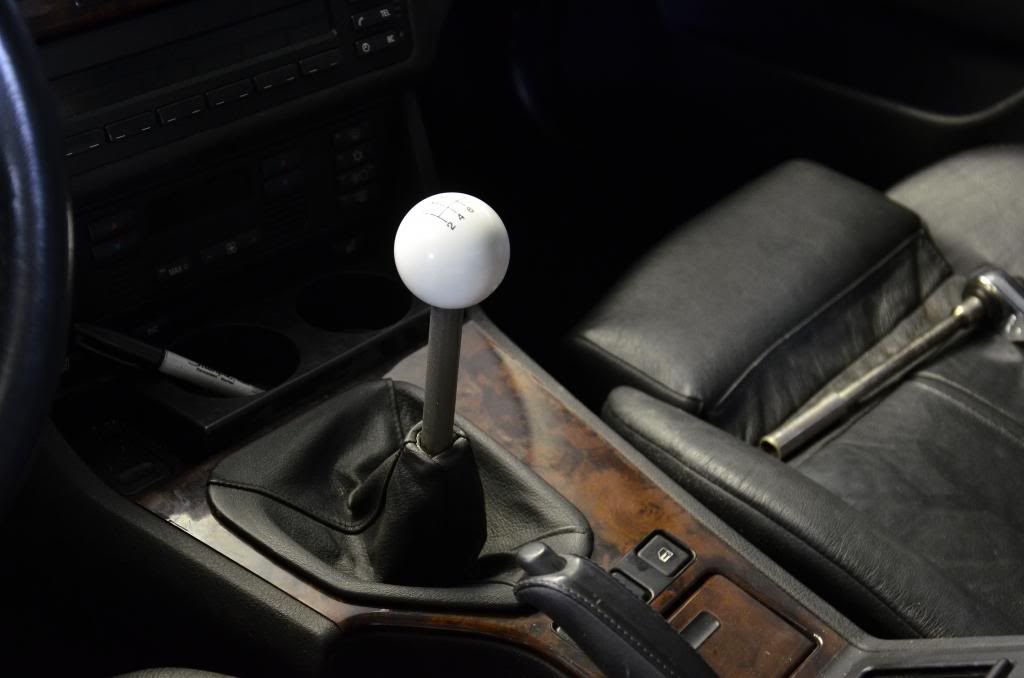
The shifter looks similar to this Viper setup, a thick rod with the ball right on top. Beefy.
 02-08-2013, 12:27 PM
#109
Thanks for the reply on the sensor. One last coolant sensor question. Does the BMW sensor work with the GM PCM? Based on the diagrams the GM sensor goes to the PCM for a reading. I may need do more harness tracing because the pinout for the sensor goes to an orange wire, but the sensor's wiress are black and white. I will have to trace off what is going on.
Thanks again, and you project is looking good. I hope I can follow suit
Thanks again, and you project is looking good. I hope I can follow suit
02-09-2013, 07:31 PM
#110
spent a few hours today, some progress and some setbacks.
started off with remaking the shifter stick. the only square rod was ugly as dick. It has a brushed finish and looks a ton better. I laid a bead about halfway up the stick, to act as a retaining ring that'll stop the leather boot from sliding down.
installed a new front main seal in the front cover, new front cover gasket, and installed it all finger tight onto the motor
threaded the M16x2.0 stud into the crank to get ready to pull in the F-Body Balancer
my torque wrench only read to 150 ft-lbs and i needed at least 230-240, so i rented one from Autozone. also grabbed another M16x2.0 nut to double nut the stud to be able to pull it out later.
threw in the ARP crank bolt (which is reusable, unlike the OEM TTY bolt), but it requires an oddball 12pt 27mm socket, so i'll pick one of those up tomorrow afternoon.
i also installed the F-Body water pump, belt tensioner, and alternator bracket (which required drilling and tapping the blank boss cast in on the truck style blocks for one of the bolts). once i tighten down the crank pulley for the final time it'll be nice because i can finally install all the front accessories and finish assembling the valvetrain (rockers, pushrods, and finally install the valve covers). once those are on, i'll wirewheel the coil packs because the steel brackets are rusty, and those can go on too.
that all fit fine and dandy, but unfornately i had a massive brain fart when i went to install the alternator and realized that the rear of the alternator interferes with the driver's side engine mount. it's nothing earth shattering but it means i will have to trim that mount and reweld a plate in place. **** happens.
02-10-2013, 06:47 AM
#111

Norb,
I went back over your thread and found something that you should address now so you do not have an issue when you drive it and shift hard to second/fourth/sixth - you should weld a stop on your shifter shaft in the location that I highlighted to prevent the stick from loosening up during a hard shift - just a piece of .250 x .250 x 1.00 mild steel welded to the stick to provide a good mechanical stop. I personally like short shifters that are out of the way - high speed hard corners (ie turn 12 Road Atlanta) will make you want your new armrest moved out of the way ;-)
Jerry
02-10-2013, 04:09 PM
#112
...that all fit fine and dandy, but unfornately i had a massive brain fart when i went to install the alternator and realized that the rear of the alternator interferes with the driver's side engine mount. it's nothing earth shattering but it means i will have to trim that mount and reweld a plate in place. **** happens.
Yup.
With these types of projects you are right.
The best laid plans...
Keep going it is looking good.
I like the side mount idea. I will probably dto something like that, but do a bit more reinforcing on it. Probably will cut thick plate to sandwich the mount between; building in more rigidity. I fear that the mount will become work hardened and brittle over time if not.
Last edited by vazfx16; 02-10-2013 at 04:11 PM. Reason: misspelling
02-12-2013, 07:51 AM
#113
Rented the PS pump pulley puller (what a clusterfuck of a name). Used the impact gun and it made very quick work of the truck pulley. It was rusty and nasty so I scrubbed it, wirewheeled it, put a coat of wrinkle black on it, and let it dry overnight. The main garage door in our apartment is being replaced over the next few days, so I rolled the car outside, progress will be slowed. In the meantime I'll try out the installer portion of the tool and see how it works pulling it onto the F-Body pump. At that point there�s no reason I can�t button up the accessories for the final time and order a belt.
A generous Bimmerforums member sent me a few extra freeze plugs for the dipstick hole on the block.
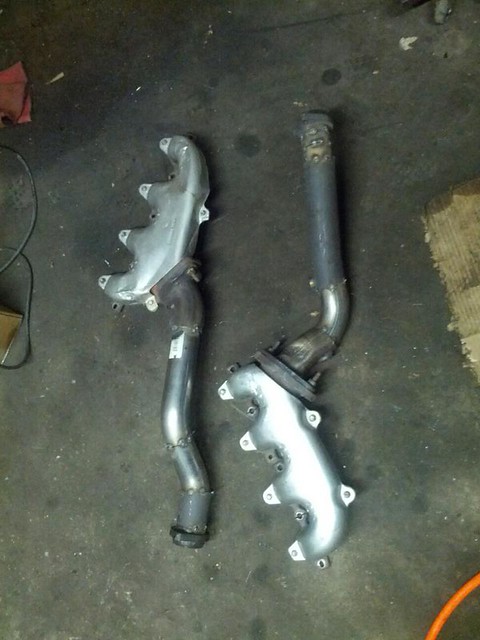
CTS-V manifolds fit very well. The passenger side drops right in. The driver's side rubbed on the steering shaft. The previous owner was nice enough to cut the cats off after the post header flange, like this, which makes fab easier:

Jacked up the front of the car so the wheels were off the ground and had Melissa turn the wheel lock to lock a few times. The steering shaft is square where it hits, so it only rubs at each corner of the square. I removed and flipped the post manifold pipe stub 180*, and it's VERY close to the steering shaft, but some convincing with a large diameter pipe and BFH will clearance it. Another big plus was that the OEM heat shields don't interfere with anything. The PS line that runs along the driver's side frame rail is very close to the manifold, but I think a few minutes with the torch should bend it right out of the way. It is covered with heat-shielding from the factory, but I don't want to risk cooking the PS fluid.
The plan for the next few weeks:
-Finish fabbing manifold pipes that connect to OEM ball flange. I�m only going to tack this up as fully welding it is above my skill set.
-Remove engine/tranny, send T56 off to TDP to be looked at. Order Diamond light flywheel while Jason has it.
-While trans is gone, assemble pushrods, rockers, install valve covers
-install oil pan, pickup, and deflection tray
-change rear cover gasket and rear main seal
-Install DBC pedal from 528i in car
-work up some sort of throttle cable
-clean up and paint the engine/trans mounts
-disassemble and rebuild the M5 Diff
-buy a yoke for the end of the trans
Once the trans comes back in I can install the flywheel, PP and clutch, and mate the engine/trans for the final time.
A generous Bimmerforums member sent me a few extra freeze plugs for the dipstick hole on the block.
CTS-V manifolds fit very well. The passenger side drops right in. The driver's side rubbed on the steering shaft. The previous owner was nice enough to cut the cats off after the post header flange, like this, which makes fab easier:
Jacked up the front of the car so the wheels were off the ground and had Melissa turn the wheel lock to lock a few times. The steering shaft is square where it hits, so it only rubs at each corner of the square. I removed and flipped the post manifold pipe stub 180*, and it's VERY close to the steering shaft, but some convincing with a large diameter pipe and BFH will clearance it. Another big plus was that the OEM heat shields don't interfere with anything. The PS line that runs along the driver's side frame rail is very close to the manifold, but I think a few minutes with the torch should bend it right out of the way. It is covered with heat-shielding from the factory, but I don't want to risk cooking the PS fluid.
The plan for the next few weeks:
-Finish fabbing manifold pipes that connect to OEM ball flange. I�m only going to tack this up as fully welding it is above my skill set.
-Remove engine/tranny, send T56 off to TDP to be looked at. Order Diamond light flywheel while Jason has it.
-While trans is gone, assemble pushrods, rockers, install valve covers
-install oil pan, pickup, and deflection tray
-change rear cover gasket and rear main seal
-Install DBC pedal from 528i in car
-work up some sort of throttle cable
-clean up and paint the engine/trans mounts
-disassemble and rebuild the M5 Diff
-buy a yoke for the end of the trans
Once the trans comes back in I can install the flywheel, PP and clutch, and mate the engine/trans for the final time.
 02-13-2013, 07:22 PM
#115
On The Tree

Join Date: Jan 2010
Location: granville ma
Posts: 171
Likes: 0
Received 0 Likes
on
0 Posts
I think I remember reading you shaved your heads.
You need to check push rod length if you've changed any of that geometry.
Not sure how much you can have the hyd lifters make up.
Better to be sure now then wait until you're firing it up and find out you PRs are too long.
Plenty of info on PR length and how to check elsewhere here.
You need to check push rod length if you've changed any of that geometry.
Not sure how much you can have the hyd lifters make up.
Better to be sure now then wait until you're firing it up and find out you PRs are too long.
Plenty of info on PR length and how to check elsewhere here.

 02-14-2013, 10:28 AM
#118
I love, love, love the CTSV solution.
I don't think I have read, but what's your driveshaft solution? I am thinking of using a one-piece Firebird shaft, but I don't know length needed yet -- until I get my engine installed and mounted.
I don't think I have read, but what's your driveshaft solution? I am thinking of using a one-piece Firebird shaft, but I don't know length needed yet -- until I get my engine installed and mounted.
02-14-2013, 10:30 AM
#119
I’m reusing the stock 540i driveshaft. The rear bolts up to the M5 diff, the CSB will be replaced with new one waiting in my toolbox, and I’m having a 1310 yoke welded on the front (during the shortening process) to accept the T56 output.
02-14-2013, 10:39 AM
#120
Great solution. I have not considered that solution. Sorry for the dumb questions, driveshafts are my least knowledgable area. What are the benefits of that solution? Can the CSB take the fact that the shaft will slip fore and aft (I am assuming that is what happens when the engine moves around a bit on the mounts. That's what the slip yoke accounts for?)