
How to make an accessory drive
 09-01-2012, 05:57 PM
#41
On The Tree

Join Date: Jul 2005
Posts: 180
Likes: 0
Received 0 Likes
on
0 Posts

I think it looks good without the extra idler. You could cut that neck off and weld an extension to it. I've built two custom serpentine systems and in my experience they are pretty forgiving. As long as the various pulleys are all aligned pretty closely I think your system will work fine.
 09-03-2012, 01:06 AM
#42
First, I'd like to thank everyone for their feedback and ideas. After reading through all the links and looking at what you guys have mentioned it seems that the following picture would sold my problems.
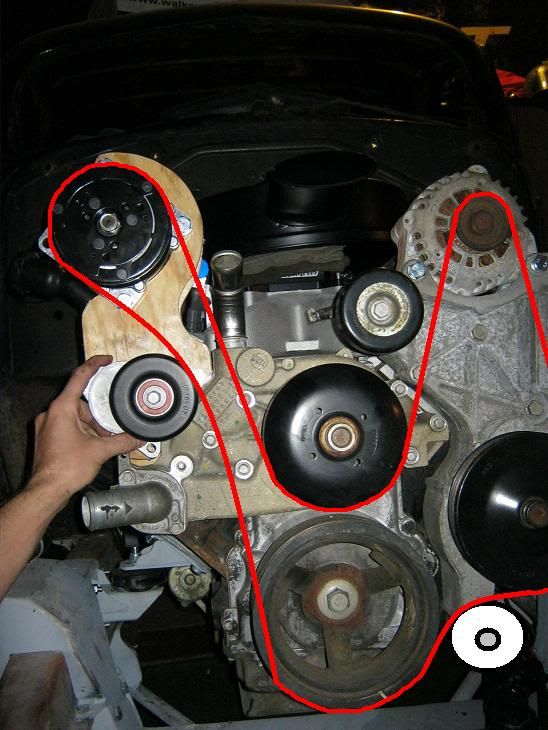
If I did this, to maintain appropriate belt wrap around the power steering pump it looks like I would have to add an idler pulley down on the bottom. Fortunately it looks like there is already a mounting bolt there so it's possible all I would have to do is get a longer bolt and it might just bolt right up. Would this idler be necessary? I saw the other setup didn't have one, but the alternator in that setup was also further down and to the passenger side which gave the power steering pump more belt wrap around the pulley.
If this setup would work it would mean I wouldn't need to modify anything about the pump outlet neck and could just attach it as it's intended, except for rotating it around about 15 degrees to face forward. The upper idler would no longer need to be used and could be removed. All that would be left to do is to find an appropriate location to mount the tensioner.
I'm also curious how the other compressors are able to be mounted so much lower than mine. I'm assuming they are a shorter compressor and so they don't have the interference problems with the valve covers and oil fill tube like I do.
Ideas and opinions?
Thanks,
Brandon
09-03-2012, 07:39 AM
#44
Launching!
Join Date: May 2012
Location: Mobile, Alabama
Posts: 205
Likes: 0
Received 0 Likes
on
0 Posts
I'm also curious how the other compressors are able to be mounted so much lower than mine. I'm assuming they are a shorter compressor and so they don't have the interference problems with the valve covers and oil fill tube like I do.
Ideas and opinions?
Thanks,
Brandon
Ideas and opinions?
Thanks,
Brandon
09-03-2012, 09:28 AM
#45
In response to an earlier post and diagram, I was confused and thought the upper hose was going through the belt. I did that once and it was a PITA. Even though you don't have to change belts often, it's unnecessary work when you do - especially for something you could have resolved during the design phase (I didn't catch it until the engine was in the car and I was installing said belt).
The setups you are talking about may have been "lower" in the sense that they are rotated closer to the fender, not the valve cover. I had the same problem on my Thunderbird. Couldn't go high because the hood is in the way, couldn't go GM style low mount using the Ford compressor due to other clearance issues so I went to the side. My alternator wound up where the AC was for the same reasons.
You may not have that option due to fender / hood clearance on your 37. I would mock up a fender and hood to see what happens.
I'm also curious how the other compressors are able to be mounted so much lower than mine. I'm assuming they are a shorter compressor and so they don't have the interference problems with the valve covers and oil fill tube like I do.
Ideas and opinions?
Thanks,
Brandon
Ideas and opinions?
Thanks,
Brandon
You may not have that option due to fender / hood clearance on your 37. I would mock up a fender and hood to see what happens.

 09-04-2012, 05:00 PM
#47
On The Tree
iTrader: (1)
Join Date: Apr 2007
Location: Huntsville, TX
Posts: 136
Likes: 0
Received 0 Likes
on
0 Posts
http://www.pro-touring.com/showthrea...nge-quot/page3
Look at the brackets these guys made


Sometimes there is more than one way to skin a cat. Maybe this will get the thinking juices flowing.
Sam
Look at the brackets these guys made
Sometimes there is more than one way to skin a cat. Maybe this will get the thinking juices flowing.
Sam

 09-04-2012, 05:59 PM
#50

I like the brackets like posted above, but the ones that move the compressor forward a little more so everything is off one belt like the high mount kwik bracket does, except you get to keep it down low. Not to mention with it coming forward a little more that's less metal you need to notch for, or even need to notch at all for some people.
09-04-2012, 09:26 PM
#51
74modified, you know, it never even crossed my mind to swap the valve covers. Haha. Thanks for the idea.
Thanks for the pictures, but it's not so much that I don't have any ideas about making the compressor fit low, it's that it physically won't fit in the space provided. I'm using a Chassis Engineering kit which has relatively enormous spring caps compared to other kits. It's all bolt together and it takes up a lot of room inside of the frame rail. I can't even get the compressor worked into that spot. I sure wish it would fit though because it would have made everything a lot cleaner looking.
Brandon
09-05-2012, 07:31 AM
#52
TECH Enthusiast

I know you said you said that low was not an option but it seems you have about the same amount of room as I did ( but a milimeter can through that off ) but if you look through page 5 & 6 of my thread link thet may be an option ?I can send you the templates if you want . John
09-05-2012, 07:35 AM
#53
TECH Enthusiast
74modified, you know, it never even crossed my mind to swap the valve covers. Haha. Thanks for the idea.
Thanks for the pictures, but it's not so much that I don't have any ideas about making the compressor fit low, it's that it physically won't fit in the space provided. I'm using a Chassis Engineering kit which has relatively enormous spring caps compared to other kits. It's all bolt together and it takes up a lot of room inside of the frame rail. I can't even get the compressor worked into that spot. I sure wish it would fit though because it would have made everything a lot cleaner looking.
Brandon
Thanks for the pictures, but it's not so much that I don't have any ideas about making the compressor fit low, it's that it physically won't fit in the space provided. I'm using a Chassis Engineering kit which has relatively enormous spring caps compared to other kits. It's all bolt together and it takes up a lot of room inside of the frame rail. I can't even get the compressor worked into that spot. I sure wish it would fit though because it would have made everything a lot cleaner looking.
Brandon
09-06-2012, 01:24 PM
#54
I think I have one last question on this topic (we'll see if that's true or not).
When measuring for belt length I suppose I'll be using a string or something that won't stretch. Do I measure the entire length using the outside of all the pulleys, getting it just long enough to slide on? My plan is to get a belt that fits and then that will help show me where to locate my tensioner.
Thanks,
Brandon
09-06-2012, 02:00 PM
#55
Use an old serpentine that you cut. Mark the belt overlap and tape measure it laying on the floor. You may need help from someone to rotate the tensioner to the stop. Doing this usually gives you the proper length once the tensioner is released. Get a used belt from a truck in the junk yard or find the longest cheapest one from the parts store to use.
09-07-2012, 10:07 AM
#56
TECH Resident
Join Date: Nov 2007
Location: Texas
Posts: 816
Likes: 0
Received 0 Likes
on
0 Posts
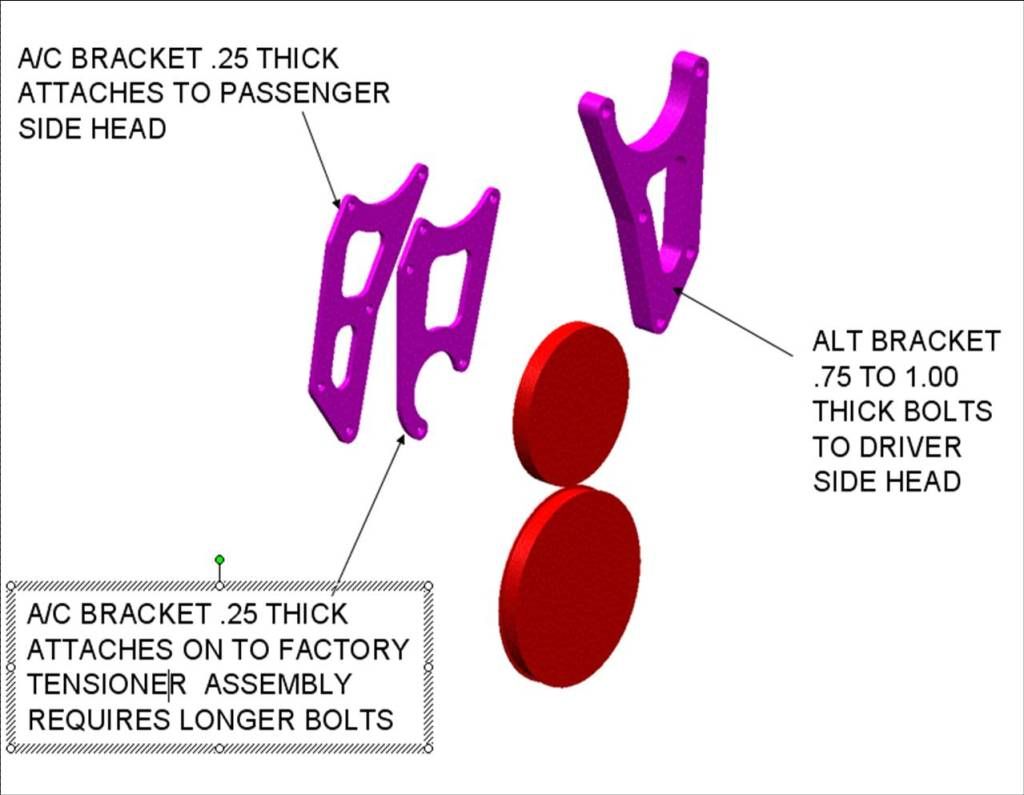
I'm a little late to the game but I thought this might help someone. I laid out this concept for another forum member who was doing a swap on a early model 30's truck which had a very narrow hood line. Needless to say it looks like you are doing a similar design. Good luck with it.
Rocky

Rocky