

Re-work my harness


I have yet to fully complete my harness but I'm getting close. I've never worked on a harness before, let alone this amount of wires at once.
What I did was familiarize my self with lt1swap. com. Read everything on there that had to do with my specific harness.
Figured out what I was keeping and what I was deleting. All emissions was being tossed so that was simple enough. Just go down the list of pin out #'s that are highlighted in yellow and just remove the wires. Here is a good video on doing just that.
But before any of that I laid out the complete harness on the floor. I used just plain ol 1in masking tape and a fine tip sharpie and labeled each connector so I know what they are and where they go.
Next was to remove all the old wire loom and electrical tape wrapped around everything, took a few hours alone for this.
After all the covering was removed the "OH ****!, WTF Have I gotten my self into" look was in full effect. Don't worry take your time it's not so bad.
I decided to switch over to a LS6 intake and injector for my truck motor. So I had to purchase a ls6 intake, ls1/ls6 fuel injectors, EV1 Injector connectors to wire in.
With the motor on the stand I temporary mocked everything up. From a truck intake to car intake there is a bit of work needed since both harness are routed completely different. So to route everything how I wanted it was going to take some cutting of the harness and extending wires.
Went back over the the exposed engine harness and found every connector I was keeping.
Throttle position
Idle control
MAF sensor
Coolant temp
All eight injector connectors
Map sensor
Cam sensor
Oil pressure sensor
Crank sensor
Knock sensors
Etc. Probably missing a few from the list. I cut all of these from the harness, leave 12in or so of wire on the connectors. With everything on the motor temporary mocked up I connected everything where they needed to be.
After that I went to the junk yard, with me I took a list of every connector I needed to extend with the color wires needed. Example I needed Light grey, Light green, Orange with black stripe wire to extend my Map sensor connector. Goal was to try and extend each connector by 3-5ft++ if I could find good lengths of wire from any GM donor car.
Now to splice these lengths of wire into connectors I cut from the harness
At first I thought soldering all the way!!! I've done a little of it, but that was for inside the car for use on non important things like my stereo, speakers etc. Who cares if a bad solder joint on these things break while I'm driving. But a bad solder joint on my fuel injectors while driving could leave me stranded somewhere.
Soldering is still good in my opinion if properly done, but not everyone is a professional at this. Or even know the proper procedures. I did a little of both solder and crimped.
I always kinda hated crimping myself but that was because I was using the wrong tools. Sometimes its not the user, it really is the tool. If crimping is good enough on air craft electrical systems its good enough for my car.
These are junk style crimper, stay away.

Get some like these. Klein 1005 look on amazon and ebay for best price.

Or Ratchet Crimping tool like this

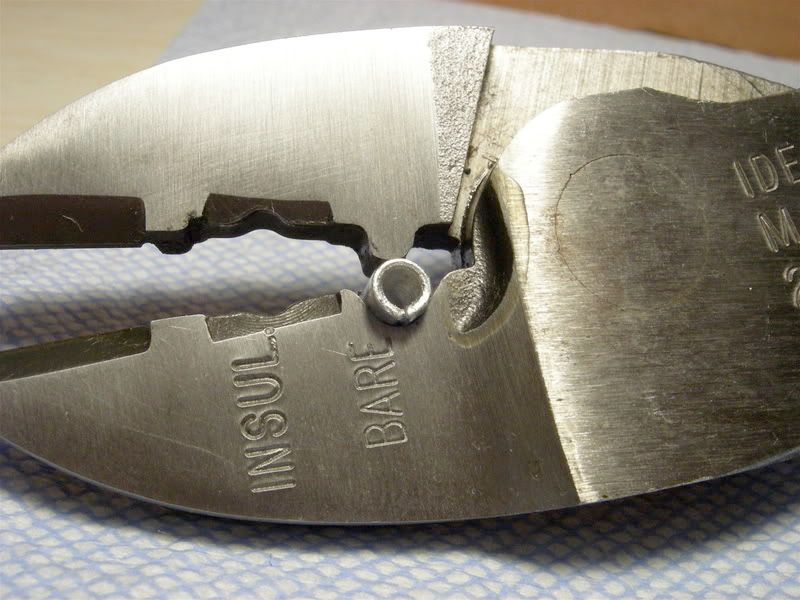
Onto the types of butt connectors you have a few choices. Uninsulated connectors, insulated connectors, butt connectors with heat shrink on them, solder butt connectors.
I like the uninsulated butt connectors, and ones with heat shrink over them. Have yet to use the ones with the solder in them but I've read good things.
Butt connectors with a seam down the length of the connector make sure you crimp them correctly.
NOT MY PIC*
Note the seam is in the dished part of the crimping tool.
Properly finished crimp. After this use some Adhesive lined heat shrink over the connector for a water tight seal.

Heat shrink connectors, just crimp then heat and done. Water tight connection.

Solder butt connectors. Just slide onto one side of a wire. Twist the two wires together then slide the solder connector over the twisted wire. Heat up the connector and it shrinks and seals both wires. Solder will melt from the heat gun used and join the two wires together..

Once I got all my wires either soldered or crimped I started routing everything where I wanted it to go and tape everything up. I taped and labeled the end of each wire. Then bundled it all together at the back of the motor a couple feet out.
After that Solder and crimp these wires back into the rest of the wires from the harness.
When you anything or remove pins from the PCM connector make sure you label everything.
If you remove PIN# 30 from the blue connector then tape and label it "PIN#30 BLUE C1" If you forget what the wires does or goes to look up the pin# on lt1swap. com or for whatever reason you need to put the pin back into the connector you know where it goes.
When you go to cut the wires from the original fuse box connector label each wire before you cut it. That way when you are almost done with your harness you don't have left over wires hanging around and you have no idea where it goes to. It will all be labeled.
What I did was familiarize my self with lt1swap. com. Read everything on there that had to do with my specific harness.
Figured out what I was keeping and what I was deleting. All emissions was being tossed so that was simple enough. Just go down the list of pin out #'s that are highlighted in yellow and just remove the wires. Here is a good video on doing just that.
But before any of that I laid out the complete harness on the floor. I used just plain ol 1in masking tape and a fine tip sharpie and labeled each connector so I know what they are and where they go.
Next was to remove all the old wire loom and electrical tape wrapped around everything, took a few hours alone for this.
After all the covering was removed the "OH ****!, WTF Have I gotten my self into" look was in full effect. Don't worry take your time it's not so bad.
I decided to switch over to a LS6 intake and injector for my truck motor. So I had to purchase a ls6 intake, ls1/ls6 fuel injectors, EV1 Injector connectors to wire in.
With the motor on the stand I temporary mocked everything up. From a truck intake to car intake there is a bit of work needed since both harness are routed completely different. So to route everything how I wanted it was going to take some cutting of the harness and extending wires.
Went back over the the exposed engine harness and found every connector I was keeping.
Throttle position
Idle control
MAF sensor
Coolant temp
All eight injector connectors
Map sensor
Cam sensor
Oil pressure sensor
Crank sensor
Knock sensors
Etc. Probably missing a few from the list. I cut all of these from the harness, leave 12in or so of wire on the connectors. With everything on the motor temporary mocked up I connected everything where they needed to be.
After that I went to the junk yard, with me I took a list of every connector I needed to extend with the color wires needed. Example I needed Light grey, Light green, Orange with black stripe wire to extend my Map sensor connector. Goal was to try and extend each connector by 3-5ft++ if I could find good lengths of wire from any GM donor car.
Now to splice these lengths of wire into connectors I cut from the harness
At first I thought soldering all the way!!! I've done a little of it, but that was for inside the car for use on non important things like my stereo, speakers etc. Who cares if a bad solder joint on these things break while I'm driving. But a bad solder joint on my fuel injectors while driving could leave me stranded somewhere.
Soldering is still good in my opinion if properly done, but not everyone is a professional at this. Or even know the proper procedures. I did a little of both solder and crimped.
I always kinda hated crimping myself but that was because I was using the wrong tools. Sometimes its not the user, it really is the tool. If crimping is good enough on air craft electrical systems its good enough for my car.
These are junk style crimper, stay away.
Get some like these. Klein 1005 look on amazon and ebay for best price.
Or Ratchet Crimping tool like this
Onto the types of butt connectors you have a few choices. Uninsulated connectors, insulated connectors, butt connectors with heat shrink on them, solder butt connectors.
I like the uninsulated butt connectors, and ones with heat shrink over them. Have yet to use the ones with the solder in them but I've read good things.
Butt connectors with a seam down the length of the connector make sure you crimp them correctly.
NOT MY PIC*
Note the seam is in the dished part of the crimping tool.
Properly finished crimp. After this use some Adhesive lined heat shrink over the connector for a water tight seal.
Heat shrink connectors, just crimp then heat and done. Water tight connection.
Solder butt connectors. Just slide onto one side of a wire. Twist the two wires together then slide the solder connector over the twisted wire. Heat up the connector and it shrinks and seals both wires. Solder will melt from the heat gun used and join the two wires together..
Once I got all my wires either soldered or crimped I started routing everything where I wanted it to go and tape everything up. I taped and labeled the end of each wire. Then bundled it all together at the back of the motor a couple feet out.
After that Solder and crimp these wires back into the rest of the wires from the harness.
When you anything or remove pins from the PCM connector make sure you label everything.
If you remove PIN# 30 from the blue connector then tape and label it "PIN#30 BLUE C1" If you forget what the wires does or goes to look up the pin# on lt1swap. com or for whatever reason you need to put the pin back into the connector you know where it goes.
When you go to cut the wires from the original fuse box connector label each wire before you cut it. That way when you are almost done with your harness you don't have left over wires hanging around and you have no idea where it goes to. It will all be labeled.

The biggest issues that you will find with DIY rewired harnesses are as follows, just try and avoid them and you should be ok.
-Know how to properly size wire for the current of the circuit. No, just because you know how to wire a house does not mean you can size wire for a DC automotive circuit. Two different standards. Melting wires can mean you just set your project on fire.
-Automotive Primary Wire. This is a NO NO. The coating on the wire is not high temp and is not intended for use on an Engine Harness. This includes the wire that you will find at your local parts store. TXL wire should be used. Primary wire coating will melt under soldering temperatures.
- Knock off connectors and terminals. These are cheap for a reason, Stay Away!
- Butt Splices. This is probably the biggest, ugliest thing that I see on re-wired harnesses. This is a big NO, even the weathertight ones. All connections should be SOLDERED. Personally I crimp and solder all splices and seal them with an adhesive lined thick walled heat shrink.
- Improper crimp tools. I cannot stress this enough- USE THE RIGHT TOOL FOR THE JOB. If someone offers to re-wire a harness for next to nothing then there is something wrong. Good tools cost money, and you cant work for nothing if your buying the right tools. I have over 1,500 dollars in crimpers and tooling.
I could go on and on, but those are the main ones I want to touch on. Like about the harnesses ive been sent with melted wiring, or wrapped in standard electrical tape.
I agree with all above except that all connections should be soldered. But I don't want to turn this into a Solder VS Crimp debate. God knows there are thousands of those throughout various forums/different sites.
Butt connectors with proper crimp tool will do just fine.
One thing about butt connectors if you can, stagger the connectors IF you can, don't cut a connector with lets say 4 leads of wire all the same length. If you cut it all the same length and use butt connectors then when you go to tape the harness you have a large bulge that looks terrible.
Stagger it like so (-----) is wire, (====) is butt connector.
--------====-------
-====--------------
------------====---
Try to avoid this
----====-----
----====-----
----====-----


^^ Same way I've done it for years, then seal them up with shrink wrap if need be.
Only ones I've soldered we're the Fuel Injector Connectors..not a whole lot of working room up there in that area.
Only ones I've soldered we're the Fuel Injector Connectors..not a whole lot of working room up there in that area.

Staging Lane
Joined: Dec 2010
Posts: 62
Likes: 0
From: Bakersfield CA
souljaboy9768,
Sry bout not getting back with you earlier. I agree we should keep in touch as to help each other and exchange ideas. check this out, I put my ECM behind the passenger wheel well, its like wheres waldo? its so snug in there its almost as if the space was made for it!
http://s1241.photobucket.com/albums/...d%20the%20ECM/
you will have to pound a little dent in the wheel well for the wires to clear. its best to use a rubber mallet, I think hit it only twice.
I have a great solution for clutch and pedals


