

86 Monte SS. 5.3, Single turbo, Megasquirt II. Lots of pics

 12-09-2012 | 03:55 PM
#22

Thread Starter
On The Tree
Joined: Nov 2012
Posts: 101
Likes: 0
Good news and bad news to report in this update! Lets start with the bad.
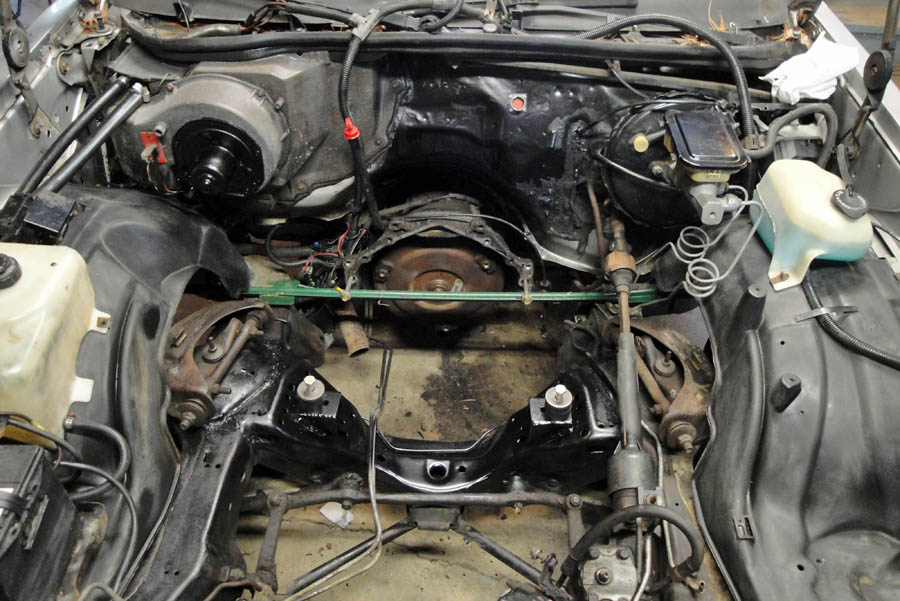
Once I squared the motor and got it sitting where it should with the motor mount perches in place the motor sat a bit to high for the stock hood so the truck intake manifold had to go! I got a smokin' deal on an LS1 intake manifold so that will be taking the place of the factory truck monstrosity.
The really bad news though was that I have early model 5.3 heads that have a notch cast into them that will only work with a certain style head gasket, and most definitely NOT work with the LS9 style gasket. I felt sick when I learned this as I had already assembled the heads and torqued down the one time use torque to yield head bolts and the heads were coming off again for sure. After much thought I decided I really wanted to use the LS9 head gaskets so I bought another set of heads that don't have the notch cast into them. I also bought a set of re-usable head bolts so if I have to pull the heads again I won't be **** canning another set of head bolts. This was supposed to be a budget build! Oh well.
The motor should be back together with the new heads and intake and going back in for good this week which is good because it has been in and out of the car at least ten times and I am sick of seeing it hanging on the hoist.
Now onto the good news.
The truck exhaust manifolds will definitely fit when the motor is squared up and sitting on the mounts. That is a major relief!
I have managed to get a lot more work done and man am I getting close hearing this thing bark! The truck oil pan does not hang too low once the motor is set up on the mounts! It is still below the crossmember but only by about an inch and half. So I am going to risk it and run this pan, if it gets smashed to **** and the car comes home on a wrecker then so be it. But if something comes up high enough to hit this pan then things have probably gone wrong anyway!
So let's get on to some pics.
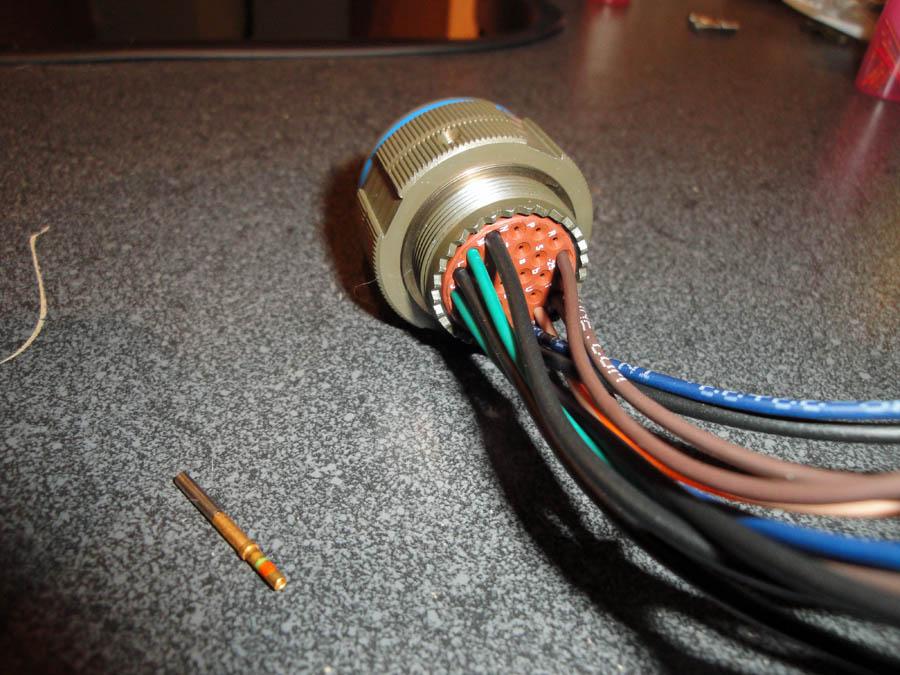
I finally was able to do the assembly on the cannon plug, this was a big day for me. Here is a picture in the middle of the assembly for the engine harness. You can see all the wires that have had the female pins crimped onto them and are inserted in the back of the circular connector. In the left of the pic is a pin that is waiting to be crimped onto a wire.
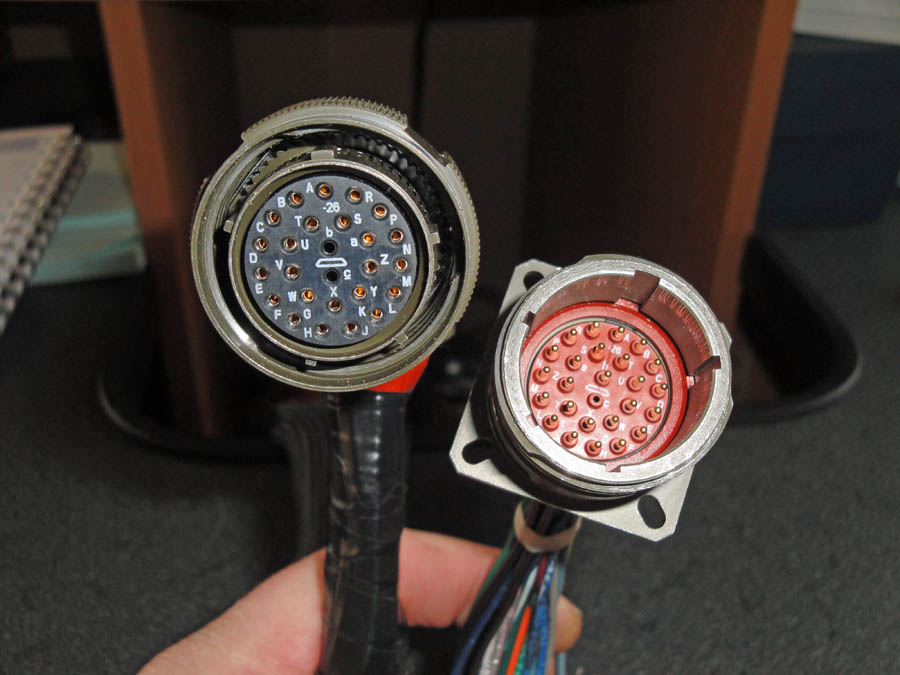
Here are the two plugs all assembled. Female on the left and male on the right.
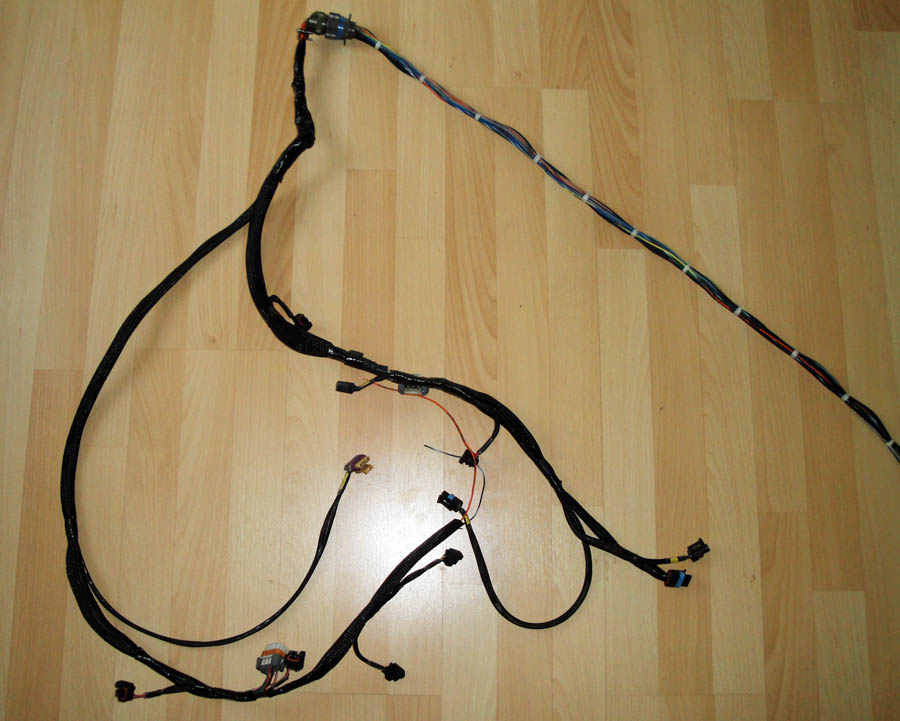
And here is the finished harness finally! At the top the circular connector is mating the two halves together, the engine harness is on the left and the passenger compartment harness is on the right.
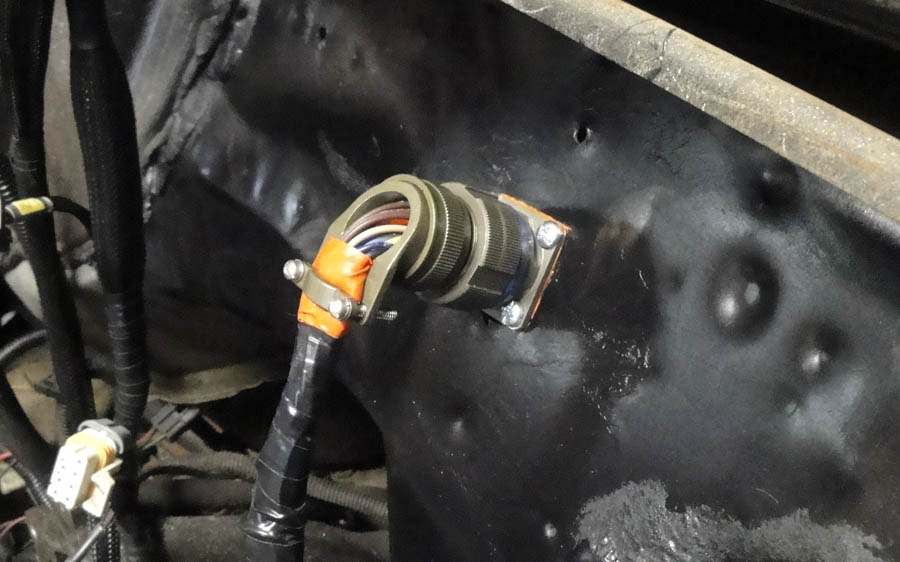
And finally installed on the firewall!
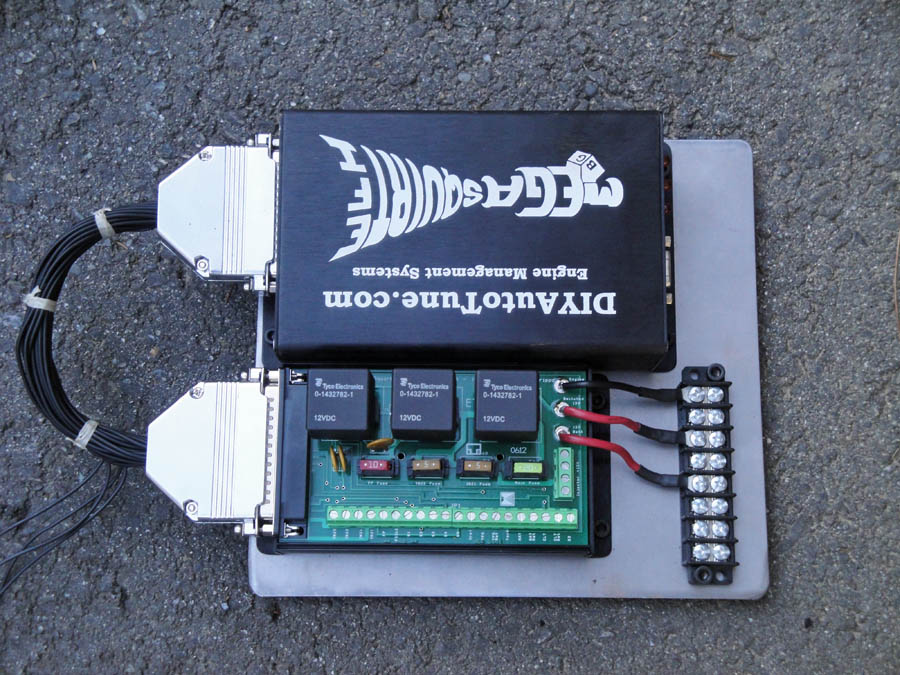
Here is the MegaSquirt mounted up on the sheet metal panel I made for it.
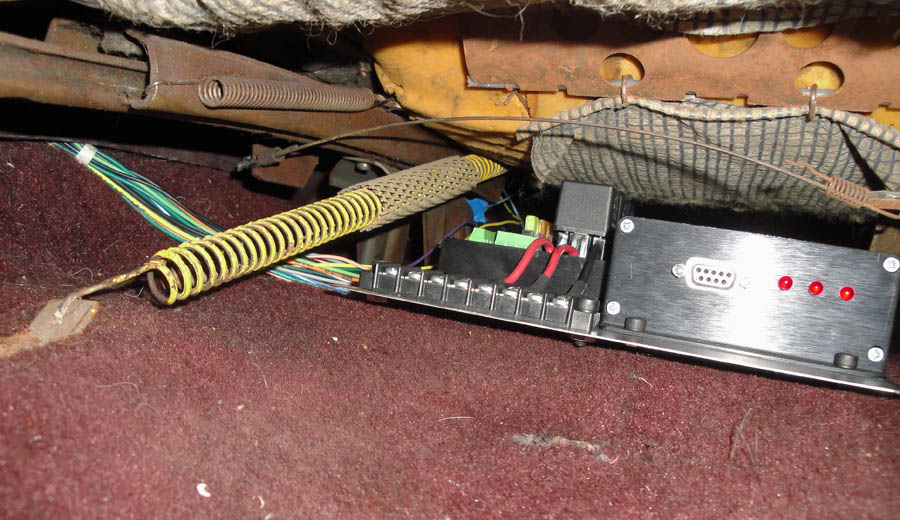
Safely tucked under the drivers seat. You can see the wiring harness coming down to meet it on the left. The seat has full travel front to back with no interference of the computer or harness. I obviously still need to bring the power and ground feeds to terminal strip.
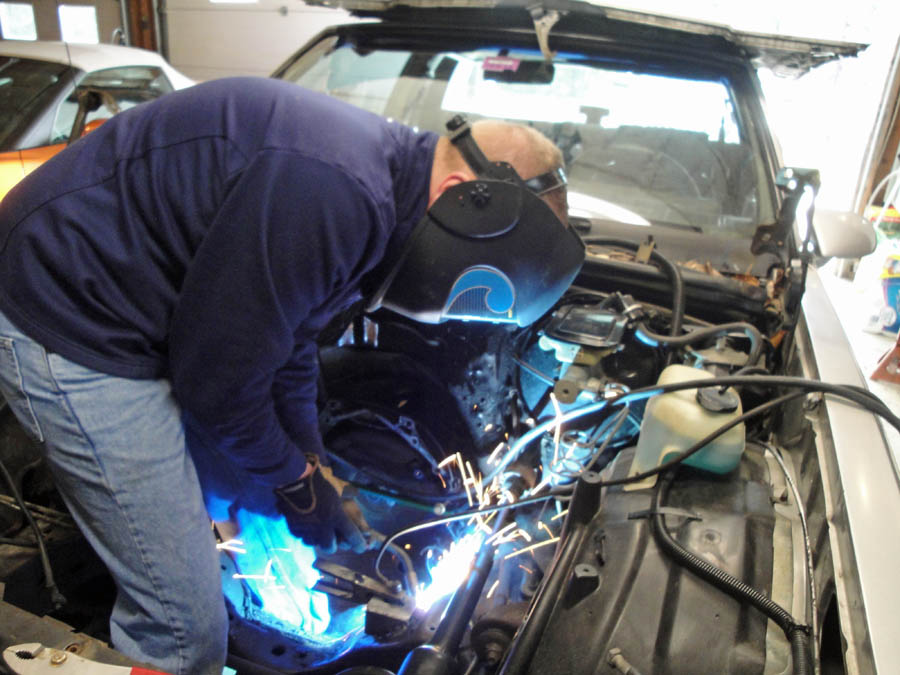
An action shot! Yours truly welding in the drivers side motor mount perch.
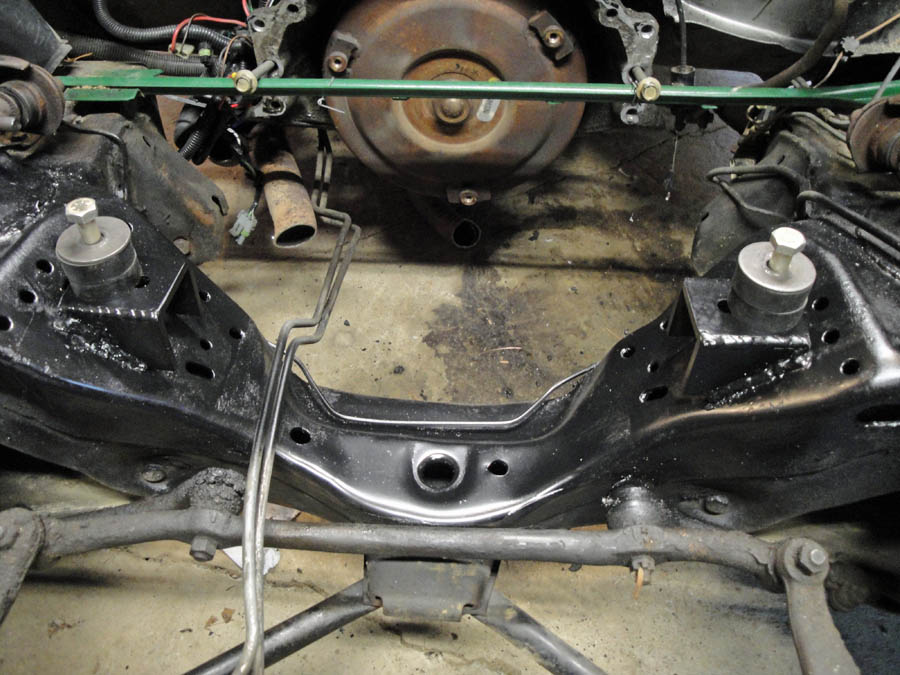
The finished product. Both perches are welded in and look great. These are a pretty neat motor mount.
And finally a shot showing what some elbow grease and a rattle can of satin black can do. It looks pretty decent in there to me. Cannon plug connector can be seen at the top of the firewall.
More to come this week. I gotta keep up with the work while we don't have any snow on the ground.
Once I squared the motor and got it sitting where it should with the motor mount perches in place the motor sat a bit to high for the stock hood so the truck intake manifold had to go! I got a smokin' deal on an LS1 intake manifold so that will be taking the place of the factory truck monstrosity.
The really bad news though was that I have early model 5.3 heads that have a notch cast into them that will only work with a certain style head gasket, and most definitely NOT work with the LS9 style gasket. I felt sick when I learned this as I had already assembled the heads and torqued down the one time use torque to yield head bolts and the heads were coming off again for sure. After much thought I decided I really wanted to use the LS9 head gaskets so I bought another set of heads that don't have the notch cast into them. I also bought a set of re-usable head bolts so if I have to pull the heads again I won't be **** canning another set of head bolts. This was supposed to be a budget build! Oh well.
The motor should be back together with the new heads and intake and going back in for good this week which is good because it has been in and out of the car at least ten times and I am sick of seeing it hanging on the hoist.
Now onto the good news.
The truck exhaust manifolds will definitely fit when the motor is squared up and sitting on the mounts. That is a major relief!
I have managed to get a lot more work done and man am I getting close hearing this thing bark! The truck oil pan does not hang too low once the motor is set up on the mounts! It is still below the crossmember but only by about an inch and half. So I am going to risk it and run this pan, if it gets smashed to **** and the car comes home on a wrecker then so be it. But if something comes up high enough to hit this pan then things have probably gone wrong anyway!
So let's get on to some pics.
I finally was able to do the assembly on the cannon plug, this was a big day for me. Here is a picture in the middle of the assembly for the engine harness. You can see all the wires that have had the female pins crimped onto them and are inserted in the back of the circular connector. In the left of the pic is a pin that is waiting to be crimped onto a wire.
Here are the two plugs all assembled. Female on the left and male on the right.
And here is the finished harness finally! At the top the circular connector is mating the two halves together, the engine harness is on the left and the passenger compartment harness is on the right.
And finally installed on the firewall!
Here is the MegaSquirt mounted up on the sheet metal panel I made for it.
Safely tucked under the drivers seat. You can see the wiring harness coming down to meet it on the left. The seat has full travel front to back with no interference of the computer or harness. I obviously still need to bring the power and ground feeds to terminal strip.
An action shot! Yours truly welding in the drivers side motor mount perch.
The finished product. Both perches are welded in and look great. These are a pretty neat motor mount.
And finally a shot showing what some elbow grease and a rattle can of satin black can do. It looks pretty decent in there to me. Cannon plug connector can be seen at the top of the firewall.
More to come this week. I gotta keep up with the work while we don't have any snow on the ground.

 12-20-2012 | 03:52 PM
#26
Thread Starter
On The Tree
Joined: Nov 2012
Posts: 101
Likes: 0
Well I'm getting there bit by bit!
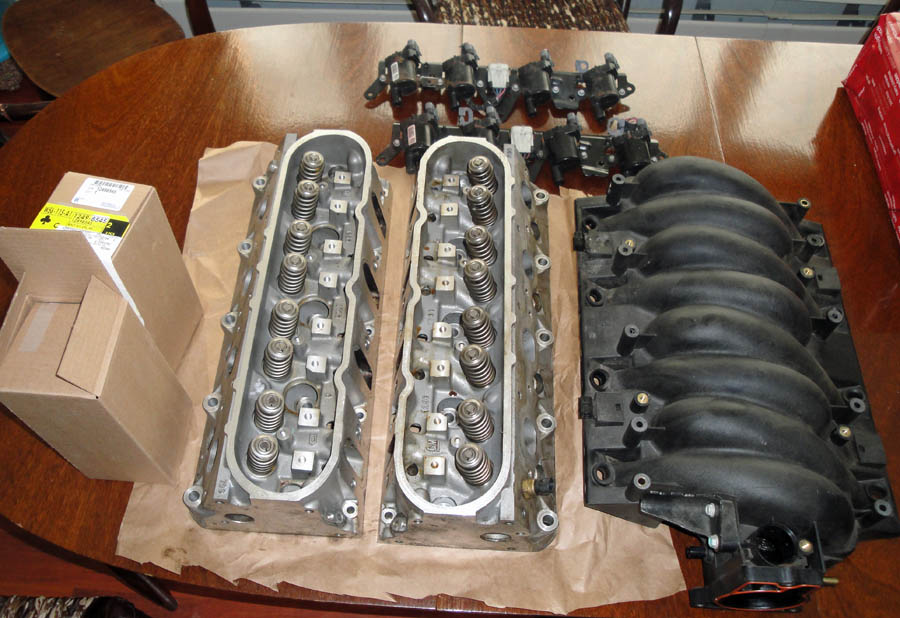
Last weeks parts haul. A new intake to do away with the truck mostrosity, a set of 706 heads, new head bolts, and a set of truck coils with the built in heat sinks. Coils and intake purchased from LS1Tech.com members.
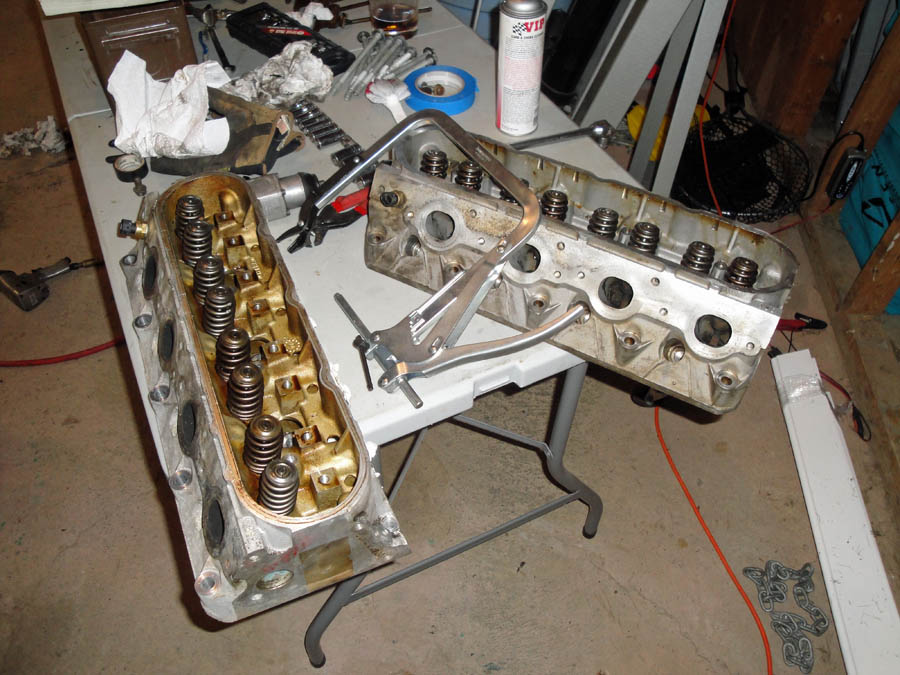
There is something awfully familiar about this....... Swapping Pac valve springs from old heads to the new ones.
The motor is all assembled again with the new heads and with the help of a couple of rattle cans of paint and some elbow grease is looking pretty sharp I think! Should be dropped back in permanently this weekend. The gray metal flake looks so good on the valve covers I am considering doing the intake as well.

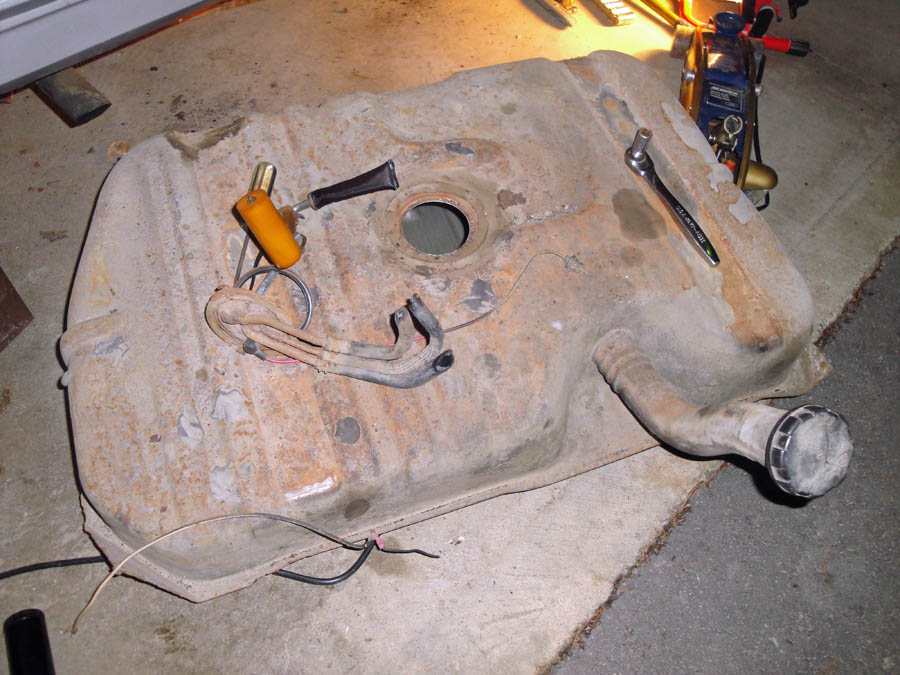
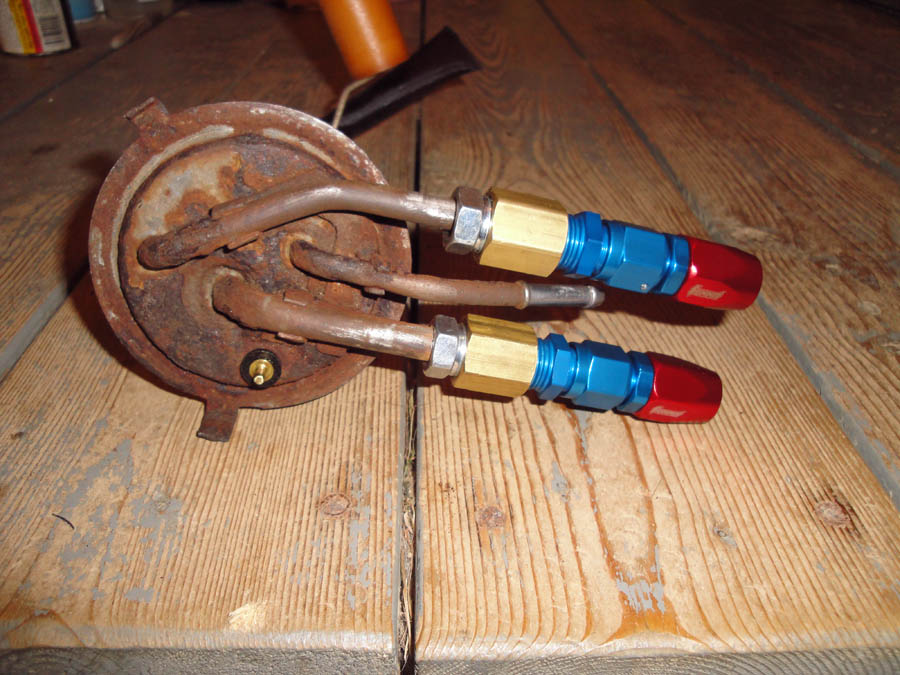
Nasty old rusty gas tank is out. What a mess! But it is very solid on the inside so no worries here other than cosmetics. Sending unit looks pretty gnarly too and I couldn't source one locally so I'm reusing it!
Sending unit after I modified it to accept -6 AN lines. It is almost a crime to put such pretty pieces of hardware on such an old POS isn't it?
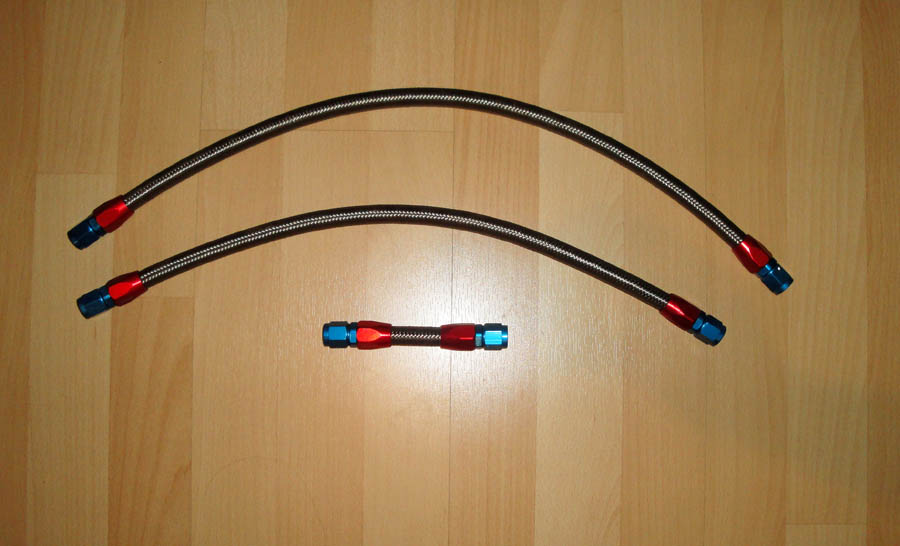
Made up some of the first fuel hoses! I love working with braided stainless and AN fittings.
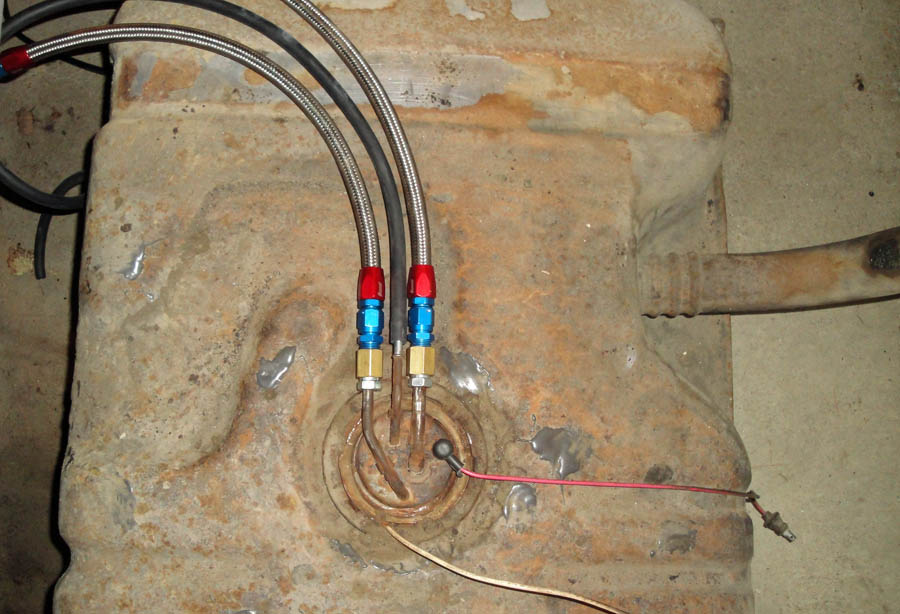
Hoses on the sending unit, sending unit in the tank, it's time to hang this baby back up. Black rubber hose between the braided hoses is being used as a vent.
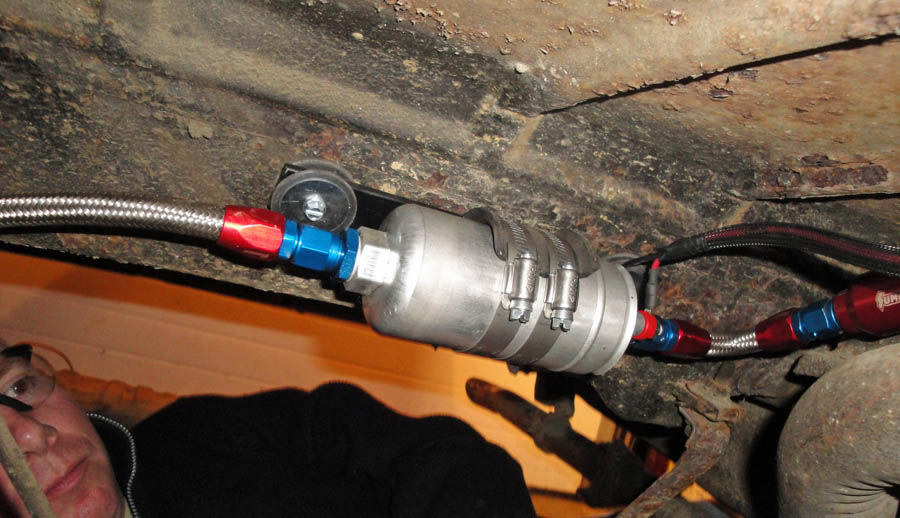
And finally the mighty Bosch 044 pump mounted on the front side of the trunk and wired in to boot. The mount is a low tech piece fabricated by me that hopefully will keep this thing relatively quiet. That's me in the lower left by the way. This was not an easy picture to get haha! And for those wondering about buying a car from the rust belt, this is what they look like after decades on salted roads. Believe it or not she is actually quite solid!
Stay tuned, more to come this weekend. Lots more parts are on the way. The "budget" portion of this build has gone to hell.
Last weeks parts haul. A new intake to do away with the truck mostrosity, a set of 706 heads, new head bolts, and a set of truck coils with the built in heat sinks. Coils and intake purchased from LS1Tech.com members.
There is something awfully familiar about this....... Swapping Pac valve springs from old heads to the new ones.
The motor is all assembled again with the new heads and with the help of a couple of rattle cans of paint and some elbow grease is looking pretty sharp I think! Should be dropped back in permanently this weekend. The gray metal flake looks so good on the valve covers I am considering doing the intake as well.
Nasty old rusty gas tank is out. What a mess! But it is very solid on the inside so no worries here other than cosmetics. Sending unit looks pretty gnarly too and I couldn't source one locally so I'm reusing it!
Sending unit after I modified it to accept -6 AN lines. It is almost a crime to put such pretty pieces of hardware on such an old POS isn't it?
Made up some of the first fuel hoses! I love working with braided stainless and AN fittings.
Hoses on the sending unit, sending unit in the tank, it's time to hang this baby back up. Black rubber hose between the braided hoses is being used as a vent.
And finally the mighty Bosch 044 pump mounted on the front side of the trunk and wired in to boot. The mount is a low tech piece fabricated by me that hopefully will keep this thing relatively quiet. That's me in the lower left by the way. This was not an easy picture to get haha! And for those wondering about buying a car from the rust belt, this is what they look like after decades on salted roads.
Believe it or not she is actually quite solid!Stay tuned, more to come this weekend. Lots more parts are on the way. The "budget" portion of this build has gone to hell.
12-21-2012 | 10:10 AM
#28


Looks great!! I had an 87 SS as a DD a while ago and it was way worse than that. Keep the pictures coming and when you get to the turbo build take lots more pictures. I am contemplating doing something like this next year and would want to get as much info and pictures as possible. Great build.
12-22-2012 | 09:52 PM
#29

Registered User
Joined: Sep 2012
Posts: 1
Likes: 0
Alright I may be stupid but by triple 9 connectors do you mean cannon plugs? haha! I have never heard that term before.
But if that is what you are talking about then I work with them every day so I have the crimping pliers. No soldering of connectors for me! And you are right, they are awesome!
But if that is what you are talking about then I work with them every day so I have the crimping pliers. No soldering of connectors for me! And you are right, they are awesome!
12-24-2012 | 06:13 PM
#30
Thread Starter
On The Tree
Joined: Nov 2012
Posts: 101
Likes: 0
Good progress has been made!
The fuel system is almost done! The tank is back in, and the feed and return lines are run. I put 12V to the pump and ran some fuel into a bottle. Damn does this thing move some fuel! It's a monster.
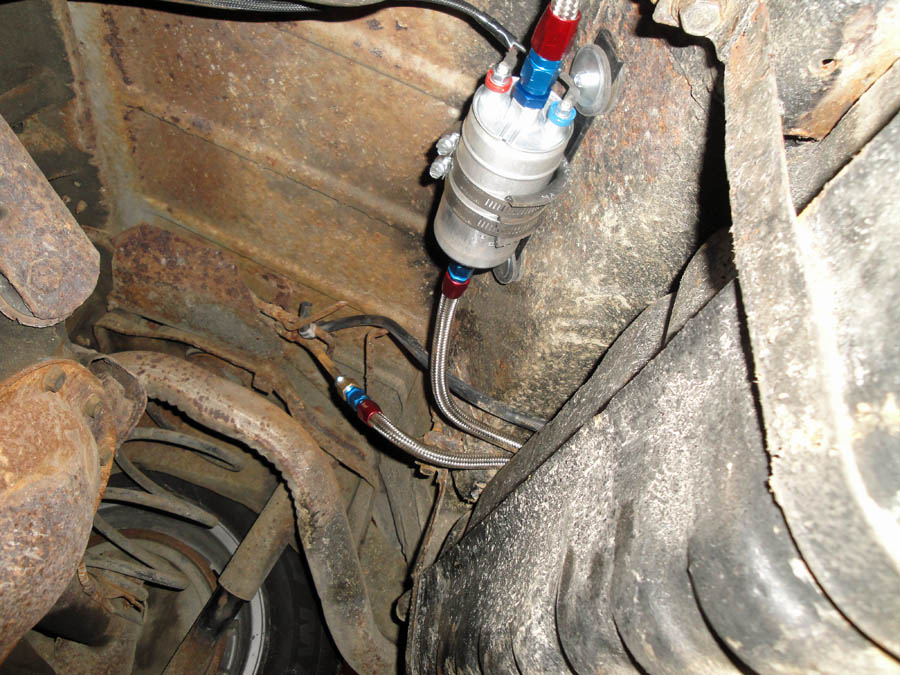
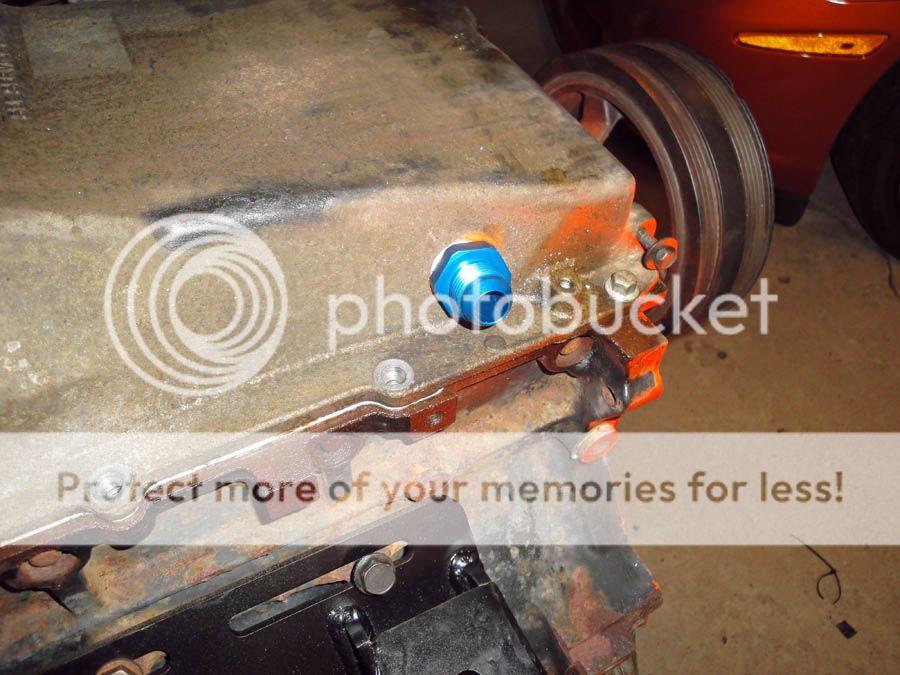
The turbo oil return is mounted in the pan. It comes in on the drivers side just forward of the crossmember.
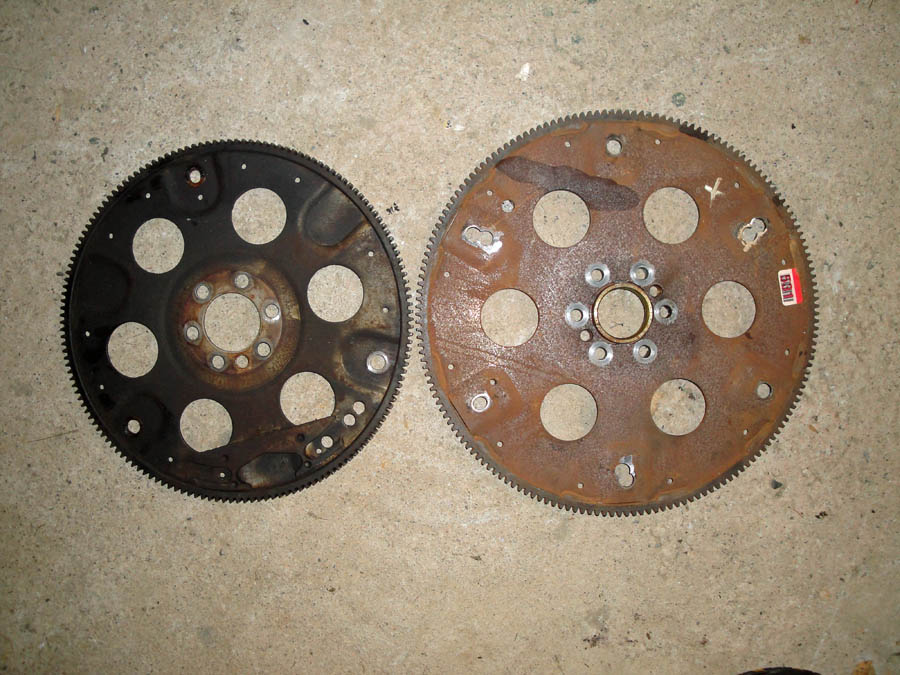
Using the old flexplate as a template I drilled a new set of holes in the 5.3 flexplate so I can bolt it up to the factory torque converter. It lines up perfectly.
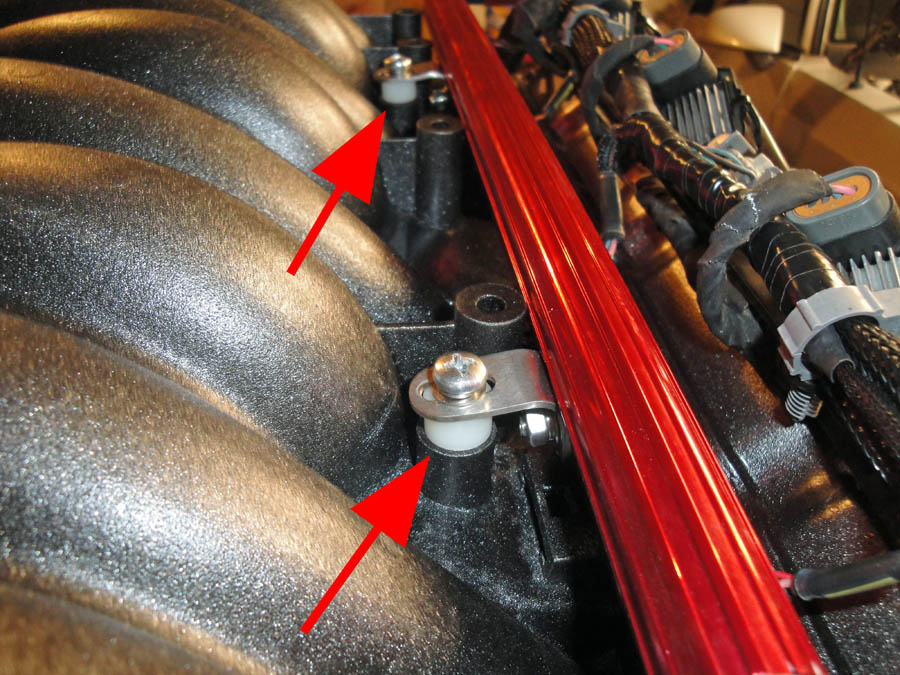
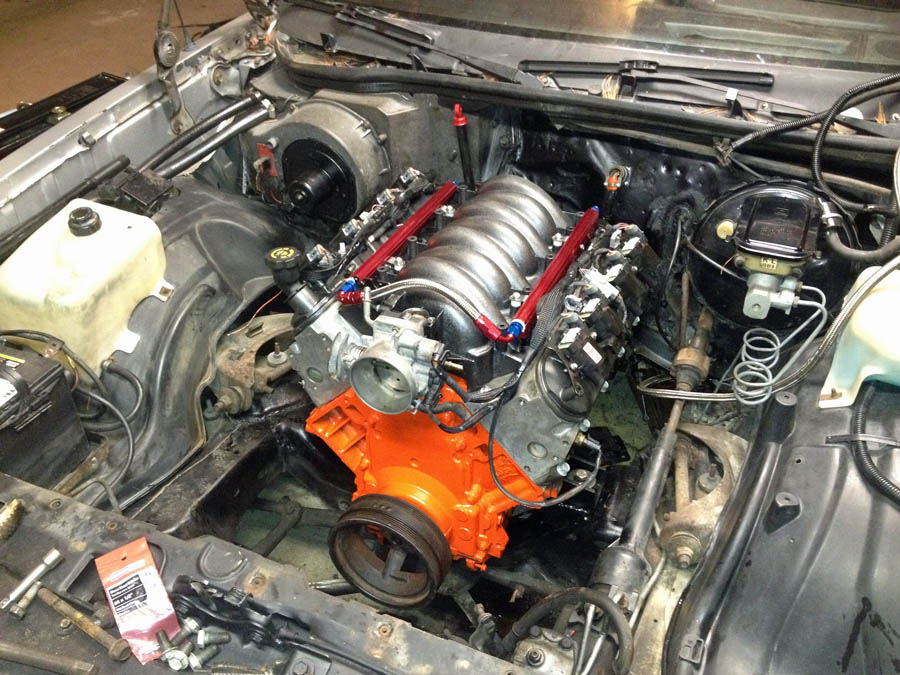
The stock truck fuel rails were just too damn ugly to go on this pretty motor so I ended buying a set of billet fuel rails along with a new external regulator. The rails look hot! They are designed for an LS1 which used a much taller injector than the truck injectors so I had to flip the mounting tabs and then space them up with some nylon spacers I got at Lowe's. I also painted the intake with the same metal flake textured paint I used on the valve covers. It came out great.
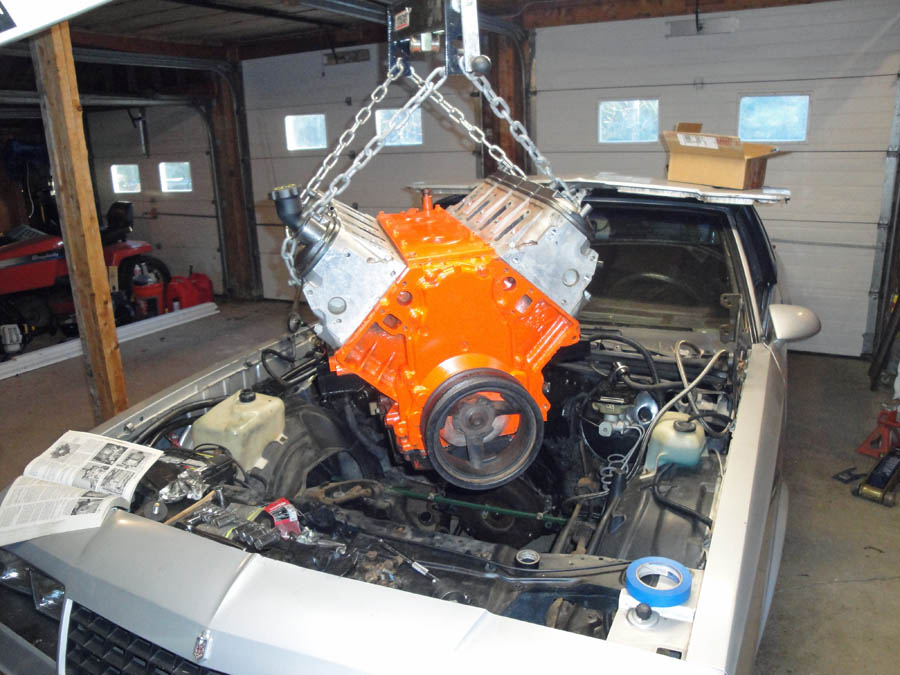
Hanging from the crane one last time before she gets lowered into her new home.
All bolted in and looking good! Wiring harness is in, coil packs are on, I'm getting so close now I can taste it.
As usual, more to come!
And finally, Merry Christmas to all!!
The fuel system is almost done! The tank is back in, and the feed and return lines are run. I put 12V to the pump and ran some fuel into a bottle. Damn does this thing move some fuel! It's a monster.
The turbo oil return is mounted in the pan. It comes in on the drivers side just forward of the crossmember.
Using the old flexplate as a template I drilled a new set of holes in the 5.3 flexplate so I can bolt it up to the factory torque converter. It lines up perfectly.
The stock truck fuel rails were just too damn ugly to go on this pretty motor so I ended buying a set of billet fuel rails along with a new external regulator. The rails look hot! They are designed for an LS1 which used a much taller injector than the truck injectors so I had to flip the mounting tabs and then space them up with some nylon spacers I got at Lowe's. I also painted the intake with the same metal flake textured paint I used on the valve covers. It came out great.
Hanging from the crane one last time before she gets lowered into her new home.
All bolted in and looking good! Wiring harness is in, coil packs are on, I'm getting so close now I can taste it.
As usual, more to come!
And finally, Merry Christmas to all!!

 12-24-2012 | 07:48 PM
#34
Thread Starter
On The Tree
Joined: Nov 2012
Posts: 101
Likes: 0
If the car had A/C this build would be A LOT more challenging!
I didn't even know they made a non A/C Monte SS until I bought this car. While I would love to have air for the summer months I can live without it.
I didn't even know they made a non A/C Monte SS until I bought this car. While I would love to have air for the summer months I can live without it.
12-25-2012 | 10:18 PM
#36

I read thru this twice and excellent job. I'll be following this thread close because I'm going to use a gbody for my build. I might have missed it but how are you going to control the 4l80e while using the ms2? The engine looks great


