

New Hooker 2nd-gen F-body LS swap components now released
 09-24-2014, 07:29 AM
#101
Teching In

Join Date: Aug 2014
Location: WV
Posts: 16
Likes: 0
Received 0 Likes
on
0 Posts

Agreed! One of the reasons I went with these mounts.
Swapped the mounts around. It is better, but the fit could be lower as shown in my pics below.
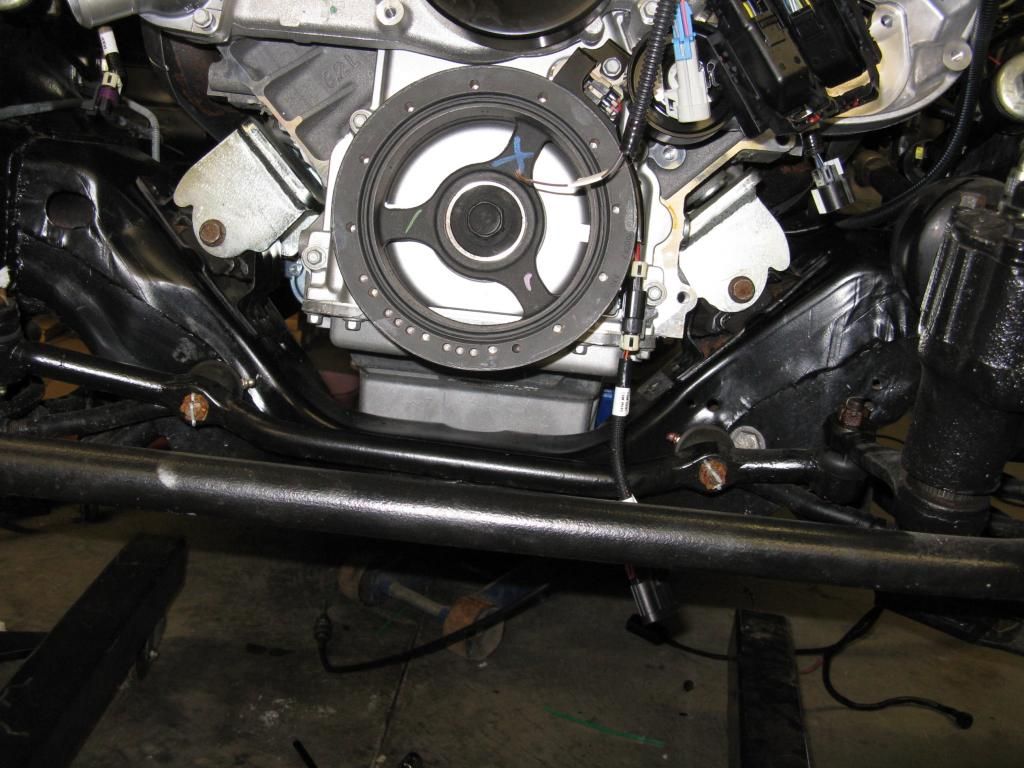
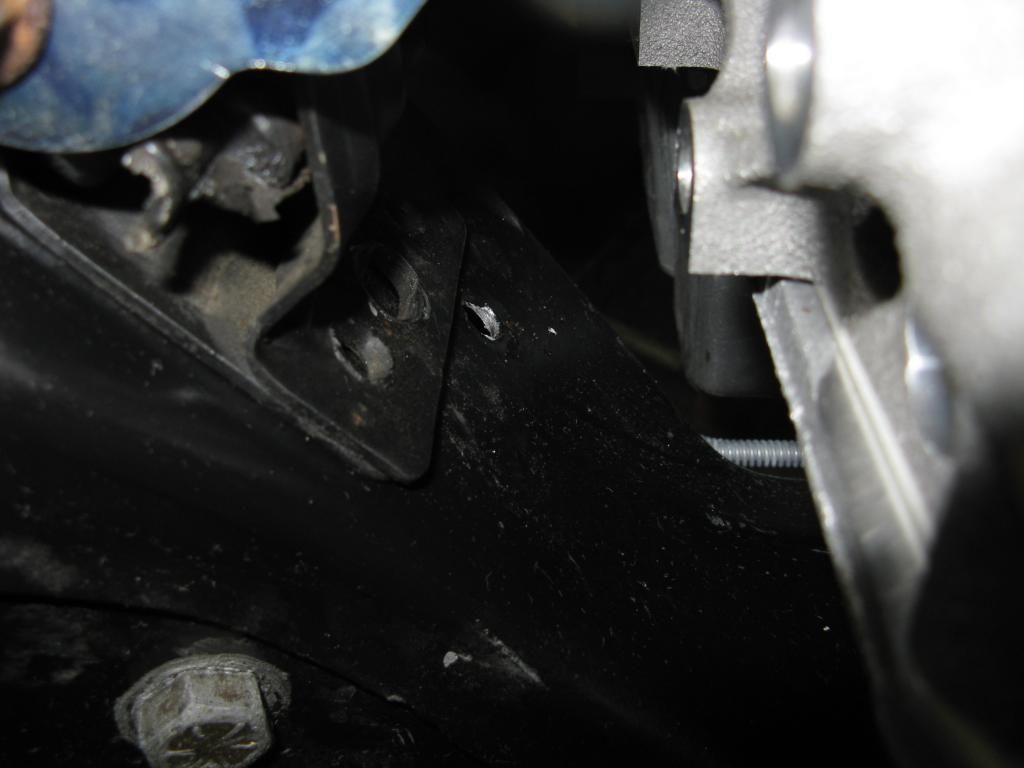
Still needs to come down an inch or so & an inch back to align up with the holes.
Now what? Is this as good as it gets? I hope not!
THANKS for the Support!
If we can get this to fit right I might spring for a set of long tubes! LOL
Stan
Update: Seems like these mounts want to bolt in further forward than stock. I assume this is engineered in the design. Looks like at a minumum I will have to drill some holes? (hope not)
I still need to lower it in some way. I have almost 2" of oil pan to subframe clearance.
Gettin' there!
Last edited by TransAm_Stan; 09-24-2014 at 07:52 AM.
 09-24-2014, 09:13 AM
#102

Agreed! One of the reasons I went with these mounts.
Swapped the mounts around. It is better, but the fit could be lower as shown in my pics below.
Still needs to come down an inch or so & an inch back to align up with the holes.
Now what? Is this as good as it gets? I hope not!
THANKS for the Support!
If we can get this to fit right I might spring for a set of long tubes! LOL
Stan
Update: Seems like these mounts want to bolt in further forward than stock. I assume this is engineered in the design. Looks like at a minumum I will have to drill some holes? (hope not)
I still need to lower it in some way. I have almost 2" of oil pan to subframe clearance.
Gettin' there!
Yes, the transmission will move forward slightly from the stock position to adjust for the shorter length of the LS block compared to the original Chevy SB.
09-24-2014, 09:29 AM
#103
Agreed! One of the reasons I went with these mounts.
Swapped the mounts around. It is better, but the fit could be lower as shown in my pics below.
Still needs to come down an inch or so & an inch back to align up with the holes.
Now what? Is this as good as it gets? I hope not!
THANKS for the Support!
If we can get this to fit right I might spring for a set of long tubes! LOL
Stan
Update: Seems like these mounts want to bolt in further forward than stock. I assume this is engineered in the design. Looks like at a minumum I will have to drill some holes? (hope not)
I still need to lower it in some way. I have almost 2" of oil pan to subframe clearance.
Gettin' there!
Swapped the mounts around. It is better, but the fit could be lower as shown in my pics below.
Still needs to come down an inch or so & an inch back to align up with the holes.
Now what? Is this as good as it gets? I hope not!
THANKS for the Support!
If we can get this to fit right I might spring for a set of long tubes! LOL
Stan
Update: Seems like these mounts want to bolt in further forward than stock. I assume this is engineered in the design. Looks like at a minumum I will have to drill some holes? (hope not)
I still need to lower it in some way. I have almost 2" of oil pan to subframe clearance.
Gettin' there!
 10-13-2014, 12:49 PM
#105
Toddoky, How about part numbers for a 2011 Corvette Ls3 and a 4L60E into a 71 Firebird that originally came with a 400. Will I have to drill any holes in the sub frame? I'm interested in the engine mounts, cross member and headers. Not sure if long tube will go in with minimal trouble. Will I need to drill or massage anything to make your components work?
10-14-2014, 04:29 AM
#106
Toddoky, How about part numbers for a 2011 Corvette Ls3 and a 4L60E into a 71 Firebird that originally came with a 400. Will I have to drill any holes in the sub frame? I'm interested in the engine mounts, cross member and headers. Not sure if long tube will go in with minimal trouble. Will I need to drill or massage anything to make your components work?
10-14-2014, 02:26 PM
#107
Engine bracket kit-12512HKR, 4L60 crossmember-12614HKR. You'll have to drill a couple of holes in your subframe since your car was originally equipped with frame stands, but a drilling template is included with the bracket kit to make it an easy operation. You'll also need to swap out your power steering pump pulley for one of a smaller diameter (I can't remember the application off hand, but many folks on this site can help you with that).
10-14-2014, 03:54 PM
#108
Thanks for chiming in Sebtarta, I remembered you we one of the users that had made the switch to the smaller pulley.
10-14-2014, 04:09 PM
#109
So what makes this setup better than say one like from here:
http://www.brphotrods.com/mm5/mercha...gory_Code=CNV2
where no holes need to be drilled?
http://www.brphotrods.com/mm5/mercha...gory_Code=CNV2
where no holes need to be drilled?
10-14-2014, 06:18 PM
#110
So what makes this setup better than say one like from here:
http://www.brphotrods.com/mm5/mercha...gory_Code=CNV2
where no holes need to be drilled?
http://www.brphotrods.com/mm5/mercha...gory_Code=CNV2
where no holes need to be drilled?
Here's a couple more...
The collectors on the Hooker headers are fully welded instead of being a slip-on configuration like the BRP headers. Using slip connectors is not a good idea on a fuel injected engine when they are located in front of 02 sensors as they quite frequently can leak and skew the O2 readings. If they are not loose enough to leak, they are a PITA to install.
The Hooker engine brackets are designed around common, off-the-shelf replacement mounts (clamshells), which are inexpensive and available from your local parts house should you need to replace them. You can also choose to run either rubber or poly mounts with the Hooker set-up. BRP-proprietary poly mount only.
The Hooker headers (both the mid-length and long-tubes) are available in both mild steel (painted or coated) or stainless steel. BRP-mild steel only
The Hooker crossmembers are CAD designed with a full FEA to ensure their strength and STIFFNESS in demanding performance situations. They also have higher exhaust routing arches for better ground clearance. The BRP crossmember has no arches under which to route your exhaust (it comes straight out from the subframe mounting pads).
If you choose, there are full 2.5" and 3" exhaust systems available from Hooker that connect to the Hooker headers in a bolt-on fashion. BRP-no
Based on the pricing shown in the link you posted, you can get your engine/trans mounted into your car for about $75 less with the Hooker set-up.
I could keep going with a few more, but I think this list is s a good primer for you to become familiar with some of the attributes of the Hooker set-up.
You might find the BRP works "better" for you based on your own purchase/use criteria and I certainly could not fault you for that.
Last edited by user 4737373; 10-14-2014 at 06:27 PM.
 11-05-2014, 06:40 AM
#113
Have a 73 trans am I am getting ready to drop a LQ4 turbo motor in. Due to having to figure out forward facing headers I cannot use your headers. But I am not totally clear on the engine mounts for my car. How is my subframe different from the 73 Camaro's? You mentioned "frame stands"? Not sure what you mean. I have the engine mounts on the engine and the ears on the subframe...is this what you mean by frame stands?
I had always assumed those who put a chevy engine in their Pontiacs just swapped out both of these parts from a 73 Camaro and it bolted right in...am I incorrect?
I had always assumed those who put a chevy engine in their Pontiacs just swapped out both of these parts from a 73 Camaro and it bolted right in...am I incorrect?
11-05-2014, 08:56 AM
#114
Have a 73 trans am I am getting ready to drop a LQ4 turbo motor in. Due to having to figure out forward facing headers I cannot use your headers. But I am not totally clear on the engine mounts for my car. How is my subframe different from the 73 Camaro's? You mentioned "frame stands"? Not sure what you mean. I have the engine mounts on the engine and the ears on the subframe...is this what you mean by frame stands?
I had always assumed those who put a chevy engine in their Pontiacs just swapped out both of these parts from a 73 Camaro and it bolted right in...am I incorrect?
I had always assumed those who put a chevy engine in their Pontiacs just swapped out both of these parts from a 73 Camaro and it bolted right in...am I incorrect?
For your knowledge, "frame stands" are what GM used in the 2nd-gen F-body cars before they switched to the clamshell mounts in 72/73.
11-05-2014, 09:41 AM
#117
The Hooker 1st-gen 4L80 crossmember is not yet available but will be soon. We will be designing/releasing a cantilevered adapter bracket in the near future that bolts to the center of the Hooker 12616HKR T56 crossmember and allows you 2nd-gen guys to install a 4L80 into your cars. If you have fabrications skills you can fashion a similar bracket yourself in the meantime to fit on the Hooker T56 crossmember; the mount attachment location on the 4L80 transmission is 3.8" further back and 1.6" higher than the mount attachment location on a T56.
11-05-2014, 06:08 PM
#118

wow thats awfully high in the air. Forget about regular driveshaft with those driveline angles. Can you say: CV driveshaft ?
11-05-2014, 06:55 PM
#119
I think you are thrown off by the asymmetrical offset of the brackets that is used to center the engine in the subframe as the 1st gen F-bodies are set-up from the factory Jimbo1367. The Hooker 2nd-gen mounting components actually install the engine at a 3.5 degrees of down angle with no issues with driveline/U-joint working angles; there is a ton of surplus clearance between the bottom of the oil pan and the crossmember on 2nd-gens compared to 1st-gen F-bodies. There are 2nd-gen swaps out there that are set-up with 5-6 degrees of engine inclination angle, but that's not what you get with the Hooker components.
Last edited by user 4737373; 11-05-2014 at 07:06 PM.