Old School LSx 1967 Camaro
#61
I have had a couple requests for engine pics/exhaust clips, etc. so I figured I'd take the Camaro out for a spin and get a little video at idle, cruise and WOT. As usual traffic was typical Boston, so I never got out of 3rd gear.
I did two videos, the first one is longer with engine bay footage and with music:
The second one is an abbreviated version with no music:
Best if watched with some decent speakers....
I did two videos, the first one is longer with engine bay footage and with music:
The second one is an abbreviated version with no music:
Best if watched with some decent speakers....
#62
Hey 67 Rally, Thank you for the console build up pics and description. I went out and bought a 4th gen console for mock up purposes but unfortunately, my seats are too wide to fit the console. It sucks because your pictures really had me motivated.
#64
The 4th gen console is fatter at the bottom and narrower at the top and the seats are narrower at the bottom and fatter at the top so they make a perfect fit, but you have to push the side bolsters out of the way first. Once they are out of the way, the console drops right in.
#65
I am using 3A Racing seats see attached. They are a pretty tight fit in the space. Using my original 1st gen console with the stock location they actually interfered with the side bolsters a little bit, but it was livable. Another guy gaveme a link to a site that makes semi-custom consoles. They have one that is only 5 1/2 inches wide int he back which is perfect because I only have 6 1/2 to work with.
#67
I am using 3A Racing seats see attached. They are a pretty tight fit in the space. Using my original 1st gen console with the stock location they actually interfered with the side bolsters a little bit, but it was livable. Another guy gaveme a link to a site that makes semi-custom consoles. They have one that is only 5 1/2 inches wide int he back which is perfect because I only have 6 1/2 to work with.
#68
One concern with them is that if you're 6' or over they may sit a little too high for your liking. I had a custom set of brackets/sliders made for them by Wedge Engineering, but I don't think they do custom stuff anymore. I'm just under 6'1 and have plenty of head and leg room.
#69
Love the detail and learned so much reading your posts...Do i really need to do the rockers the way you did,i just inserted the lifters,push rods,rockers and tightened then to about 30lb..is that bad?? I didnt get all technical like you did lol..
did you use a cam bolt locking system or just locktight,or just torqued to proper spec..
Great job..Dennis
did you use a cam bolt locking system or just locktight,or just torqued to proper spec..
Great job..Dennis
#70
Love the detail and learned so much reading your posts...Do i really need to do the rockers the way you did,i just inserted the lifters,push rods,rockers and tightened then to about 30lb..is that bad?? I didnt get all technical like you did lol..
did you use a cam bolt locking system or just locktight,or just torqued to proper spec..
Great job..Dennis
did you use a cam bolt locking system or just locktight,or just torqued to proper spec..
Great job..Dennis
For the rocker arms, if it a fairly stock size cam, you want to torque the rocker arm bolts to 22lbs. For a bigger cam, you can go 3-5lbs more. You should torque them down the sequence I did in this thread.
With the engine in the number one firing position, tighten the following valve rocker arm bolts:
Tighten exhaust valve rocker arm bolts 1, 2, 7, and 8 to 30 N·m (22 lb ft).
Tighten intake valve rocker arm bolts 1, 3, 4, and 5 to 30 N·m (22 lb ft).
Rotate the crankshaft 360 degrees.
Tighten the following valve rocker arm bolts:
Tighten exhaust valve rocker arm bolts 3, 4, 5, and 6 to 30 N·m (22 lb ft).
Tighten intake valve rocker arm bolts 2, 6, 7, and 8 to 30 N·m (22 lb ft).
If you just torque them all at the same time some will have spring pressure on the rocker arm and some won't. Many people have gotten away with doing like you (although I think 30lbs is a little high) with no problems at all. But it only takes a few extra minutes to do it the right way.
#72
Teching In
iTrader: (1)
WOW, awesome write up. Thank you so much for putting this together. It will help a lot with my build
I'm just beginning in the process on my 1967 SS Camaro, I'm waiting on my engine builder to get me a quote on the LS setup. I would love to do what you did but I just don't have the time to do it right. The car is completely disassembled in my garage and I'm just finishing up on the front sub-frame/ suspension build, then it will go to the auto restoration shop for a complete strip, paint, etc...
Thanks,
Rich
#75
WOW, awesome write up. Thank you so much for putting this together. It will help a lot with my build
I'm just beginning in the process on my 1967 SS Camaro, I'm waiting on my engine builder to get me a quote on the LS setup. I would love to do what you did but I just don't have the time to do it right. The car is completely disassembled in my garage and I'm just finishing up on the front sub-frame/ suspension build, then it will go to the auto restoration shop for a complete strip, paint, etc...
Thanks,
Rich
I'm just beginning in the process on my 1967 SS Camaro, I'm waiting on my engine builder to get me a quote on the LS setup. I would love to do what you did but I just don't have the time to do it right. The car is completely disassembled in my garage and I'm just finishing up on the front sub-frame/ suspension build, then it will go to the auto restoration shop for a complete strip, paint, etc...
Thanks,
Rich
#76
I'd highly recommend these brackets to anyone looking to relocate their accessories. Nicely made, and they come with all the right hardware. Customer service was top notch as well.
#78
If you're buying a new radiator for the swap, buy one with the upper radiator inlet on the correct side for where your waterpump outlet is. I had to swap water pumps so that I didn't have to run a radiator hose in front of the engine. Call BeCool and ask them if you're in doubt, they had good customer service when I called. I ordered through Summit as well.
#79
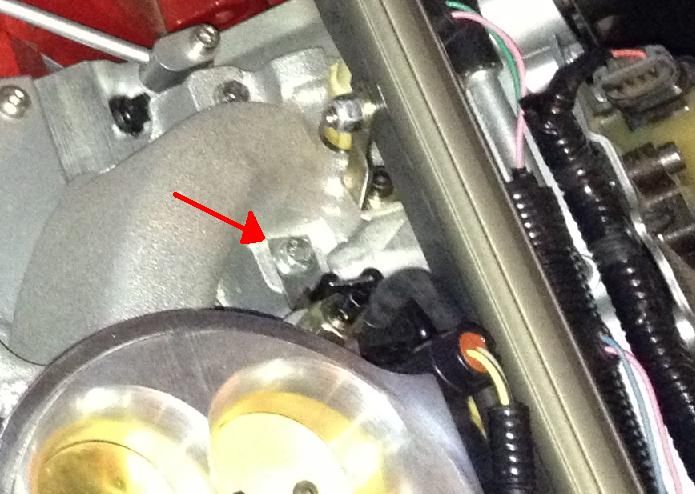
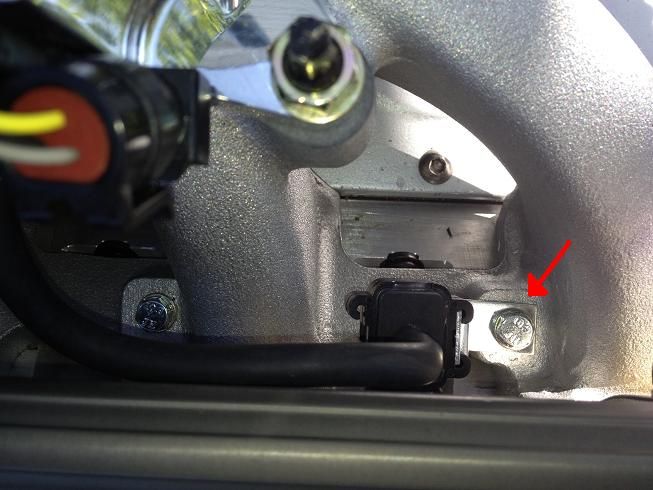
I will do that thank you also I forgot to ask can you take a closer picture of how the MAP sensor is configured I can almost figure it out from one of the shots but I can't tell what sensor it is and how it is installed in the intake, is it threaded? also to get one from my local auto parts store what year make and model car is it from?
thanks for your help and your build is outstanding im just starting mine its a very similar combination lq9 with 243's similar cam t56 going in a 1968 true RS
thanks for your help and your build is outstanding im just starting mine its a very similar combination lq9 with 243's similar cam t56 going in a 1968 true RS
#80
I will do that thank you also I forgot to ask can you take a closer picture of how the MAP sensor is configured I can almost figure it out from one of the shots but I can't tell what sensor it is and how it is installed in the intake, is it threaded? also to get one from my local auto parts store what year make and model car is it from?
thanks for your help and your build is outstanding im just starting mine its a very similar combination lq9 with 243's similar cam t56 going in a 1968 true RS
thanks for your help and your build is outstanding im just starting mine its a very similar combination lq9 with 243's similar cam t56 going in a 1968 true RS
Looking forward from above the TB:

Top view, front of engine on right side of pic:


 But does not mean I will not change down the road.
