70 Camaro with 98LS1 (hopefully)

 04-19-2014, 10:31 PM
#42
Teching In
Thread Starter

Join Date: Jan 2014
Posts: 41
Likes: 0
Received 0 Likes
on
0 Posts
Got another long day into the Camaro. I had some great help from my cousin Brian, who was the owner of the car from 84 to 88 when I bought it. The people who owned it before him had it in Arizona, and I have the original manual and metal card that shows it was purchased in Louisianna. The owners before my cousin owned it for a few years, and did none of the body work to it.
So basically, the patched quarters, brazed passenger quarter, and repop fenders were all done by around 1980. I can only assume this was the most unlucky 70 camaro ever built. It seems as though it was parked in a marsh, hit numerous times and washed with salt water on a regular basis.
I am still trying to get my head around how much damage this car has, I was not expecting this, and have to sit down and try to determine how much money it's going to take to get this car together.
Today, I removed most of the drivers side quarter, and melted the lead at the sail panels to expose the quarter/roof joint. I got the passenger side out, but the driver side is giving me fits. I also now have to remove the remnants of the quarters and begin to work on removing the tail panel. My method is to wire wheel the area, look for spot welds, then drill them out. IS this how I do it on places like the trunk dropoff, and tail panel attachment areas? It seems like it will be hard to work in those tight spots. Any tips would be appreciated.
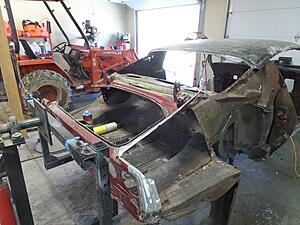
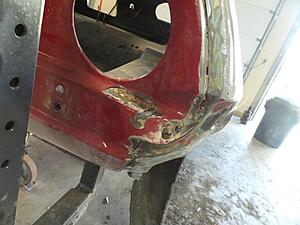
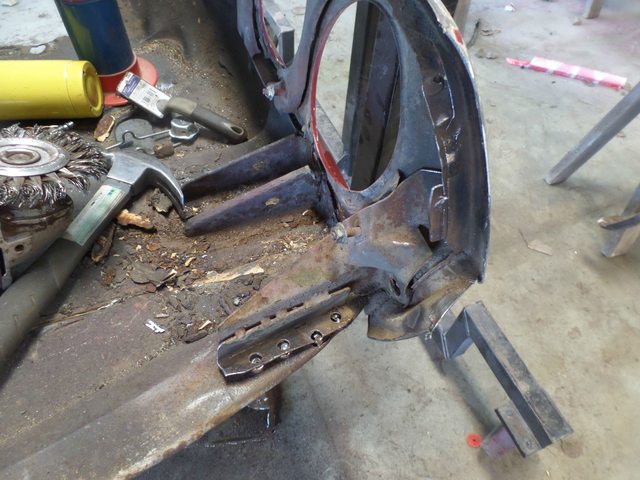
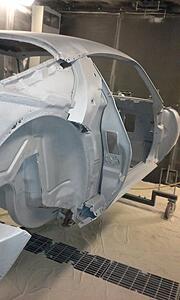
Here are some pics of the damage done today.

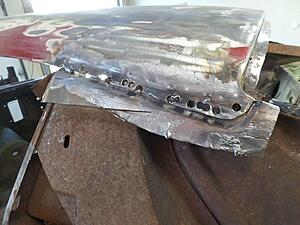
Passenger side quarter roof joint after melting the lead. I screwed up and cut the rear corner of the roof off before melting the lead. Rats!

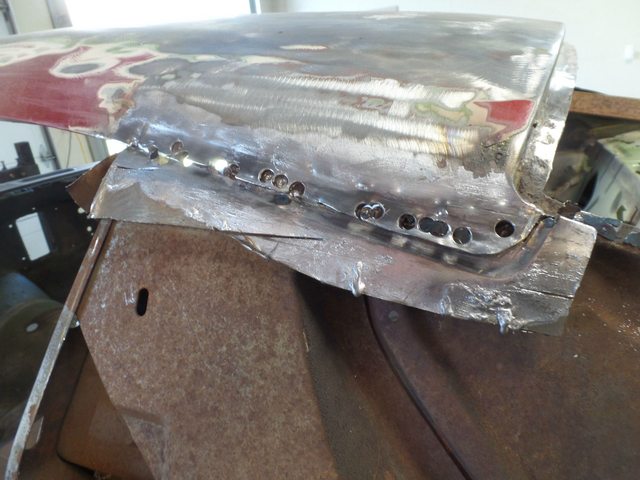
Drivers side quarter\roof seam after I drilled out the spot welds and tried to separate the quarter from under the roof. This was unsuccessful, I will have another go.
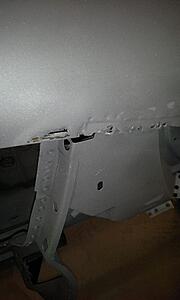
This does not look like its going to fun to separate the tail panel. Not sure how\where to begin
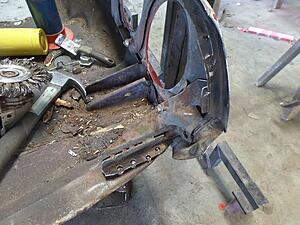
This thing has corrosion everywhere. How it didn't pop out before I'll never know.
So, how am I doing? Any advice to ease the dismantling of this car? I am beginning to be concerned this will cost more than it's worth. I've owned the car for 26 years, so I don;t want to give up if I don't have to!
So basically, the patched quarters, brazed passenger quarter, and repop fenders were all done by around 1980. I can only assume this was the most unlucky 70 camaro ever built. It seems as though it was parked in a marsh, hit numerous times and washed with salt water on a regular basis.
I am still trying to get my head around how much damage this car has, I was not expecting this, and have to sit down and try to determine how much money it's going to take to get this car together.
Today, I removed most of the drivers side quarter, and melted the lead at the sail panels to expose the quarter/roof joint. I got the passenger side out, but the driver side is giving me fits. I also now have to remove the remnants of the quarters and begin to work on removing the tail panel. My method is to wire wheel the area, look for spot welds, then drill them out. IS this how I do it on places like the trunk dropoff, and tail panel attachment areas? It seems like it will be hard to work in those tight spots. Any tips would be appreciated.
Here are some pics of the damage done today.


Passenger side quarter roof joint after melting the lead. I screwed up and cut the rear corner of the roof off before melting the lead. Rats!
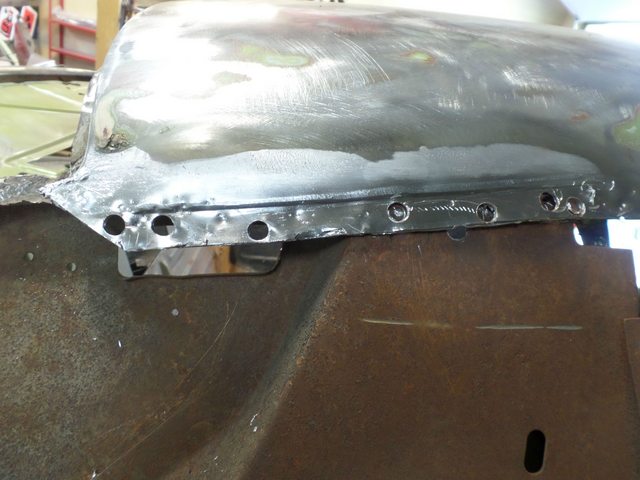
Drivers side quarter\roof seam after I drilled out the spot welds and tried to separate the quarter from under the roof. This was unsuccessful, I will have another go.
This does not look like its going to fun to separate the tail panel. Not sure how\where to begin
This thing has corrosion everywhere. How it didn't pop out before I'll never know.

So, how am I doing? Any advice to ease the dismantling of this car? I am beginning to be concerned this will cost more than it's worth. I've owned the car for 26 years, so I don;t want to give up if I don't have to!
04-20-2014, 07:31 AM
#43
Launching!

Wow you really opened up a can of worms. It's not too uncommon for a car that didn't seem too bad to have plenty of hidden problems. So it that regard don't get too bummed out about it. Not sure how much of the sheet metal work you plan on doing yourself, but if I was doing it, I would leave the tail panel on for now until I installed one of the quarter panels. As I'm sure you know- the reproductions panels need plenty of persuasion to get them to fit right, and it's always good to have an adjacent panel in place to line things up. With the entire back end being new panels it may be hard to line everything up and things can get off real quick. I would also re install the trunk lid to give you gap lines for the quarter panels. Good luck and don't get discouraged.
04-20-2014, 08:54 PM
#44
Teching In
Thread Starter
Join Date: Jan 2014
Posts: 41
Likes: 0
Received 0 Likes
on
0 Posts
Happy Easter everyone! today after church and some time with relatives, I looked around the garage and decided it was a mess. I dragged everything out, cleaned up and organized the place. Now I am ready for the next step, more grinding and drilling!
 04-29-2014, 07:49 AM
#46
Wow you really opened up a can of worms. It's not too uncommon for a car that didn't seem too bad to have plenty of hidden problems. So it that regard don't get too bummed out about it. Not sure how much of the sheet metal work you plan on doing yourself, but if I was doing it, I would leave the tail panel on for now until I installed one of the quarter panels. As I'm sure you know- the reproductions panels need plenty of persuasion to get them to fit right, and it's always good to have an adjacent panel in place to line things up. With the entire back end being new panels it may be hard to line everything up and things can get off real quick. I would also re install the trunk lid to give you gap lines for the quarter panels. Good luck and don't get discouraged.
05-15-2014, 08:54 PM
#47
Teching In
Thread Starter
Join Date: Jan 2014
Posts: 41
Likes: 0
Received 0 Likes
on
0 Posts
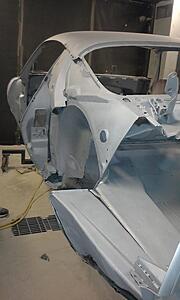
OK! It has been a while since I updated. But in reality, nothing much has happened. I finished pulling all the minor bits off the car, stiffened up my rotisserie, and finally was able to borrow a trailer so I could get my shell and panels to a media blaster.
I think I was able to do a pretty good job myself, so the cost should be less to have it blasted. I am hoping they get all the nooks and crannies. I am also having them epoxy prime everything when they are done. It should give me a good point to start metal repair and panel attachment. I received all my panels from New England Motorsports last week, and dealing with them was great.
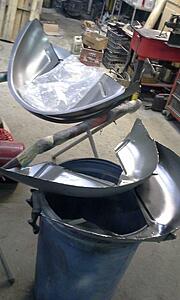
Here are some pics of the whole show loaded up and ready to go and get blasted...
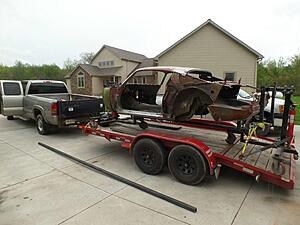
Unloaded at the blasting facility.
I think I was able to do a pretty good job myself, so the cost should be less to have it blasted. I am hoping they get all the nooks and crannies. I am also having them epoxy prime everything when they are done. It should give me a good point to start metal repair and panel attachment. I received all my panels from New England Motorsports last week, and dealing with them was great.
Here are some pics of the whole show loaded up and ready to go and get blasted...

Unloaded at the blasting facility.
 05-16-2014, 03:32 AM
#48

It might of been a good idea to remove the roof panel too prior to blasting. If you have that much of a problem with rust, I can guarantee you have a lot of rust on the inside of the roof and skeleton/structure. It sure would suck to go this far only to have it rust through the roof in five year.
Keep up the good work!!!!
Keep up the good work!!!!
05-16-2014, 04:09 AM
#49
Made some more progress on stripping the car. I picked up a 7 inch electric grinder and some coarse pads. It went a lot faster than the DA. It was way to cold to push the car outside, so I striped it inside. What a huge mess it made. I will be cleaning my garage for several years now...

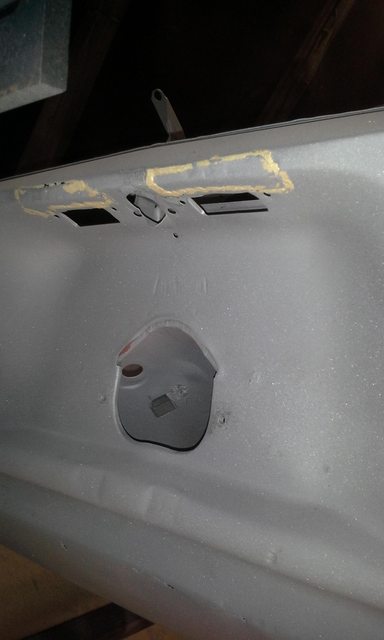
So this is kind of odd. When we removed the glass today, we noted that the area in the far back of the package tray was a darker metallic green. We can't think of a reason for this. With the work on the rear quarters and the signs of collision on the back end, we wonder if the car got smoked bad back in the day and they replaced it with some OEM parts from a darker green Camaro? Could be wrong? These are some pics of the area.


So this is kind of odd. When we removed the glass today, we noted that the area in the far back of the package tray was a darker metallic green. We can't think of a reason for this. With the work on the rear quarters and the signs of collision on the back end, we wonder if the car got smoked bad back in the day and they replaced it with some OEM parts from a darker green Camaro? Could be wrong? These are some pics of the area.
Anyway, looks like you're making good progress. Keep up the good work.
05-25-2014, 08:58 PM
#50
Teching In
Thread Starter
Join Date: Jan 2014
Posts: 41
Likes: 0
Received 0 Likes
on
0 Posts
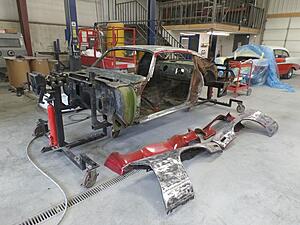
Took some pics of the progress on the shell so far. There were some spots I didn't realize were problematic, and there were some small areas of brazed in metal replacement in odd areas. How does the tail panel above the license plate rust out? Such a strange story this car is telling. Hopefully I can pick it up this Tuesday and get some epoxy primer and POR 15 into all the nooks and crannies that they can't get there.
Then it's off to the metal fab shop to have the new panels installed. They said I should have it back by the ind of the year! Yikes.

Then it's off to the metal fab shop to have the new panels installed. They said I should have it back by the ind of the year! Yikes.


 01-03-2015, 10:23 AM
#51
Teching In
Thread Starter
Join Date: Jan 2014
Posts: 41
Likes: 0
Received 0 Likes
on
0 Posts
Ok, reviving an old thread. I didn't post since nothing was actually done to the car since I dropped it off. Bummer. But today, could be the day. I am taking it to my buddies shop where we will start the metal repair. I have received all my new panels and seem to be ready.
This is not something I am skilled at, so my pal will be doing the heavy lifting on this portion. We will see how fast this progresses. I am not holding my breath as he is pretty slow, but I will admit his work is excellent.
I am also going to begin mocking up the front subframe. I am thinking of going with DSE parts for the front and rear suspension, as well as subframe connectors, but will take any advice or opinions anyone has to offer.
Another question I have is does anyone have reduced size subframe mounts for second gens? I see them for first gens to lower the car, but I was told second gens couldn't get them as they would cause interference with drivetrain parts. Any advice.
Thanks in advance. Eric
01-03-2015, 01:08 PM
#52
SPINEDOC,
Why did you leave a pc. of metal from the pass quart panel from tail panel to upper trunk? If you have since removed this, did you nitice the rear unibody being more flimsy while on the rotissery?
I am doing the same to my 70 Camaro soon and I was figuring I had to brace this area. I would appreciate any advice here since you just did this. Would you mind PMing me ballpark what blasting cost? One local guy wants $1250-$1550. alot
thanks,
Jim
Last edited by Jimbo1367; 01-03-2015 at 01:37 PM.
01-03-2015, 08:58 PM
#53
Teching In
Thread Starter
Join Date: Jan 2014
Posts: 41
Likes: 0
Received 0 Likes
on
0 Posts
I left the trunk edge to support ti rear a little bit and to give me a point to help set the quarters and rear panel. Not quite sure how useful it will be, but I didn't want to just leave the rear hanging.
I am sure it adds some strength, but not sure how much. This is my first time as well.
Good luck to you.
I am sure it adds some strength, but not sure how much. This is my first time as well.
Good luck to you.
01-04-2015, 02:16 AM
#55
Thanks spinedoc,
Thats more what I was hoping. The price I mentioned was just the shell how you have it. Inside and out.
What kind of Doctor are you?
Thanks,
Jim
Thats more what I was hoping. The price I mentioned was just the shell how you have it. Inside and out.
What kind of Doctor are you?
Thanks,
Jim
01-04-2015, 04:44 PM
#56
Teching In
Thread Starter
Join Date: Jan 2014
Posts: 41
Likes: 0
Received 0 Likes
on
0 Posts
So, another question. What wiring harness have you guys used to put LS engines in these cars?
I need a new one for the car itself, and then something to wire up the LS.
Jim, I am a chiropractor.
I need a new one for the car itself, and then something to wire up the LS.
Jim, I am a chiropractor.
 01-14-2015, 01:56 PM
#58
Teching In
Thread Starter
Join Date: Jan 2014
Posts: 41
Likes: 0
Received 0 Likes
on
0 Posts
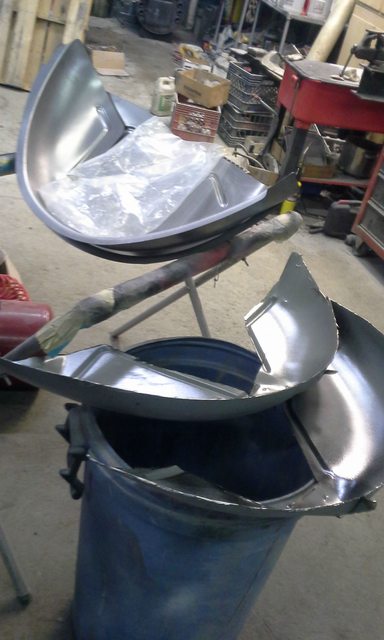
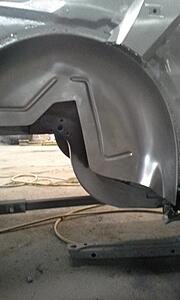
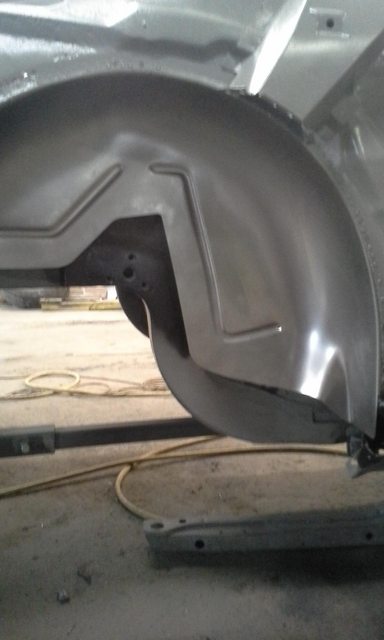
I began the DSE deep tubs install last night. It went just like a DSE instructional video, except it was longer, messier and required more first aid items.
The old and the new.
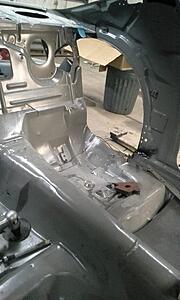
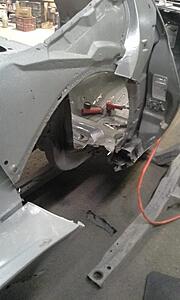
I will continue with it tomorrow.
The old and the new.

I will continue with it tomorrow.
01-15-2015, 09:11 PM
#59
Teching In
Thread Starter
Join Date: Jan 2014
Posts: 41
Likes: 0
Received 0 Likes
on
0 Posts
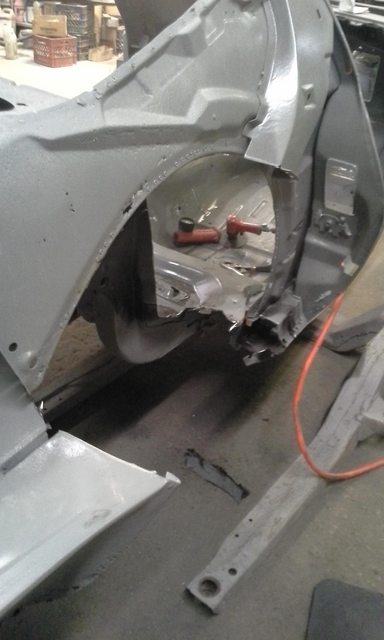
Got some more work done on the Deep tubs today. Definitely a big job, I cringe to think of what a shop would charge for this. But I suppose they could do it in A LOT quicker. But still, it's not half bad.
I also dented the credit card a bit
I ordered the Ridetech kit Level 2 for the car. I decided to go with it because it seemed like you got a lot for your dollar. I heard plenty of good and bad about the system, and was sort of disappointed I couldn't find more people who had the system to talk with. Nonetheless, I think it will work well. I got it from GNS performance, and Scott was great to deal with.
I also spoke with Keith at Custom Works. I wanted a total kit for the LS install, and was looking at the Holley/Hooker kit. I saw online that some people had trouble with the headers hanging too low. Anyway, Keith has a combination of parts from Hooker and Holley he feels works best for packaging the LS, so I went with those along with his subframe connectors and solid bushings. I feel the tech support I can get from Keith will be very valuable.
01-20-2015, 09:06 PM
#60
Teching In
Thread Starter
Join Date: Jan 2014
Posts: 41
Likes: 0
Received 0 Likes
on
0 Posts
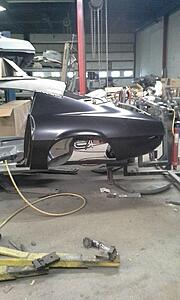
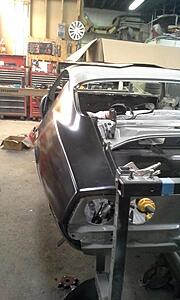
I am slooowly assembling the deep tubs and fitting the rear panels. I got my panels from AMD, as I heard they were the best(?)
I will say that I expected some difficulty getting the pieces to fit, but this has been worse than I'd thought. The fit is crap. It's gonna take a lot of monkeying around to get this to look right.
I have seriously been considering using fiberglass for the nose pieces and possibly the fenders. Does anyone have any experience with fiberglass for a street driven car? I would really appreciate any opinions on this. Thanks.