
70 RSZ28 Camaro 5.3 Turbo Build


 10-15-2014, 03:22 AM
#62
Thanks! No kit. I went over to http://www.coneeng.com/ and bought all the pieces we thought we would need for the build. Its similar to one of their kits but with a couple more bends.
 10-15-2014, 02:05 PM
#64
Staging Lane
Thread Starter

Join Date: Oct 2013
Location: Hollywood of Dreams
Posts: 84
Likes: 0
Received 0 Likes
on
0 Posts
Thanks cam and m6. cant wait to get it tuned and able to hear it through a full pull.
its all stainless and cost roughly 1k in parts for headers and crossover to the turbo. that doesnt include the flanges though.
can be done for way less if using mild.
can be done for way less if using mild.
10-16-2014, 04:29 AM
#66
TECH Fanatic

Join Date: Aug 2005
Posts: 1,004
Likes: 0
Received 0 Likes
on
0 Posts

Couple questions.
Where did you get the tight bend elbow for the air filter?
Have you tried fitting the hood on?
You have a cam in it? I may have missed it.
Im currently on a 1980 and my turbo is placed in a similar spot. Your build is way nicer than mine .
.
I figure if i dont put a bulge in the aftermarket hood then i may reconfigure the hotside a bit but i kept the turbo a little high as i was kinda thinking about oil drainback to the engine.
Seeing you sumped the tank. I ran into an issue with mine. i have been fighting a fuel issue and my tank i had done about a decade ago. Just dropped my tank the other day to see wtf was going on????? Yeah, found the guy who did the work for me had layed a shop towel in the tank and it was coming apart filling my filters and lines with ****. Also found quite a bit of metal shavings. **** me off.
ANyhow, nice build. It looks great.
Where did you get the tight bend elbow for the air filter?
Have you tried fitting the hood on?
You have a cam in it? I may have missed it.
Im currently on a 1980 and my turbo is placed in a similar spot. Your build is way nicer than mine
.I figure if i dont put a bulge in the aftermarket hood then i may reconfigure the hotside a bit but i kept the turbo a little high as i was kinda thinking about oil drainback to the engine.
Seeing you sumped the tank. I ran into an issue with mine. i have been fighting a fuel issue and my tank i had done about a decade ago. Just dropped my tank the other day to see wtf was going on????? Yeah, found the guy who did the work for me had layed a shop towel in the tank and it was coming apart filling my filters and lines with ****. Also found quite a bit of metal shavings. **** me off.
ANyhow, nice build. It looks great.
10-16-2014, 01:44 PM
#67
Staging Lane
Thread Starter
Join Date: Oct 2013
Location: Hollywood of Dreams
Posts: 84
Likes: 0
Received 0 Likes
on
0 Posts
Couple questions.
Where did you get the tight bend elbow for the air filter?
Have you tried fitting the hood on?
You have a cam in it? I may have missed it.
Im currently on a 1980 and my turbo is placed in a similar spot. Your build is way nicer than mine.
I figure if i dont put a bulge in the aftermarket hood then i may reconfigure the hotside a bit but i kept the turbo a little high as i was kinda thinking about oil drainback to the engine.
Seeing you sumped the tank. I ran into an issue with mine. i have been fighting a fuel issue and my tank i had done about a decade ago. Just dropped my tank the other day to see wtf was going on????? Yeah, found the guy who did the work for me had layed a shop towel in the tank and it was coming apart filling my filters and lines with ****. Also found quite a bit of metal shavings. **** me off.
ANyhow, nice build. It looks great.
Where did you get the tight bend elbow for the air filter?
Have you tried fitting the hood on?
You have a cam in it? I may have missed it.
Im currently on a 1980 and my turbo is placed in a similar spot. Your build is way nicer than mine
.I figure if i dont put a bulge in the aftermarket hood then i may reconfigure the hotside a bit but i kept the turbo a little high as i was kinda thinking about oil drainback to the engine.
Seeing you sumped the tank. I ran into an issue with mine. i have been fighting a fuel issue and my tank i had done about a decade ago. Just dropped my tank the other day to see wtf was going on????? Yeah, found the guy who did the work for me had layed a shop towel in the tank and it was coming apart filling my filters and lines with ****. Also found quite a bit of metal shavings. **** me off.
ANyhow, nice build. It looks great.
Thanks! Its been quite a long build so far and I am excited to start finalizing everything.
We did a hood test fitting with the turbo where it currently is and it fits in stock form. The only thing that we havnt tested is the alternator with the hood, but it appears that it will also fit.
That 90* airfilter bend is just a temp that was at the shop. I ordered a "cobra head elbow" from intakehoses.com but I ordered the wrong size. Thats what I will be running.
It currently has a ls6 cam in it.
Yeah sumping is important. Sounds like a dolt did your gas tank if he left shavings and a towel in there. hopefully you can get it cleaned out and fixed without to much of a hassle.
12-02-2014, 05:18 PM
#68
Staging Lane
Thread Starter
Join Date: Oct 2013
Location: Hollywood of Dreams
Posts: 84
Likes: 0
Received 0 Likes
on
0 Posts
I havnt been posting updates lately but thats mostly because ive been to lazy to take photos. Most of the work I have been doing is tedious boring not fun to photograph work. Like pressing in new wheel studs.
After the car started, I took a bunch of stuff off and sent it to powder coat. That took about 3 weeks because for what ever reason 1 week doesnt mean 1 week anymore. I also received my breaks.
Teaser:

I wish I could just run the engine like this. looks so mean.


Firewall prepped for some sexiness. I completed this but those photos are on a different phone.

parts back from powder coating. loooking sexy and awesome.

front end bolt kit. all individually labelled. quite useful.

Has to reuse some of the old clipbolts and they were a little dirty. got to use the cabinet sand blaster for the first time. thing works well.

inner fenderwells and rad support installed. looking good.


rotors installed with ARP extended wheel studs. mostly for aesthetics.


wilwoods installed.


this is the rear disc from summit installed. kinda sad i had to go with this but this is the only rear kit i found that will work with stock rims. I wanna get this beast on the road and now wait another few months to save up for rims + bigger breaks.

all new steering parts being installed.

will post some more photos tomorrow.
After the car started, I took a bunch of stuff off and sent it to powder coat. That took about 3 weeks because for what ever reason 1 week doesnt mean 1 week anymore. I also received my breaks.
Teaser:
I wish I could just run the engine like this. looks so mean.
Firewall prepped for some sexiness. I completed this but those photos are on a different phone.
parts back from powder coating. loooking sexy and awesome.
front end bolt kit. all individually labelled. quite useful.
Has to reuse some of the old clipbolts and they were a little dirty. got to use the cabinet sand blaster for the first time. thing works well.
inner fenderwells and rad support installed. looking good.
rotors installed with ARP extended wheel studs. mostly for aesthetics.
wilwoods installed.
this is the rear disc from summit installed. kinda sad i had to go with this but this is the only rear kit i found that will work with stock rims. I wanna get this beast on the road and now wait another few months to save up for rims + bigger breaks.
all new steering parts being installed.
will post some more photos tomorrow.
12-02-2014, 06:23 PM
#70
Staging Lane
Thread Starter
Join Date: Oct 2013
Location: Hollywood of Dreams
Posts: 84
Likes: 0
Received 0 Likes
on
0 Posts
I might. Let me scour my phone and ill to get some up tomorrow. If not, what photos you looking for? The brackets I imagine? Ill take a couple this and get them up. They seem sturdy enough. But not very impressive compared to the wilwood/stoptech front setup.
 01-12-2015, 01:37 PM
#75
Staging Lane
Thread Starter
Join Date: Oct 2013
Location: Hollywood of Dreams
Posts: 84
Likes: 0
Received 0 Likes
on
0 Posts
m6! im a bad thread updated! im sorry. I have been putting in time but I did not get any photos of the rear brakes for you. I will forsure this weekend.
Hey Mod, thanks! Tell him good luck with the swap. Its going to be awesome.
Update: All suspension has been installed. The rear took quite a bit of time. I planned on a single day but it ended up taking nearly 4 days of work. Removing 45 year old rubber and leaf springs is not easy or enjoyable. Also, you have to remove (or lower) the gas tank to do all this. Plus it involved welding the new leaf springs with the fancy bushing I bought from hotchkis. The front suspension is also installed. Steering is done. Brake lines are ran to 95% of the car. I just need to terminate the rear end hard lines and hook up the soft lines.
I started working on the breather system. This involves a complete remodel of the valve covers. Its been a bit of work but I feel the finished product is going to look super awesome.
No pictures today but next time I am there I am going to do a full write up on the valve covers and get photos of the rear brake set up for m6 and all the suspension goodies. Its almost on wheels!
Left to do list:
- Finish Valve Covers
- Get new T56 line made/installed
- Instal boost controller
- Install IAT sensor
- Wire Headlights/blinkers/front end things
- Put on sheet metal
- Tires
- Drivetrain
- Tune
01-21-2015, 01:59 PM
#76
Staging Lane
Thread Starter
Join Date: Oct 2013
Location: Hollywood of Dreams
Posts: 84
Likes: 0
Received 0 Likes
on
0 Posts
2 shots for M6:

Here is the best picture I could get without taking the caliper off. you have a spacer that goes between a new bracket thats bolted on, and the caliper gets bolted to that. wasnt to sure how steady it would be but feels real solid using the "shake" method.

getting to the rear suspension. unbolted the 45 yr old leaf springs and started installing the new ones. i took all the brackets off and sanded/painted them.
leaf to axel
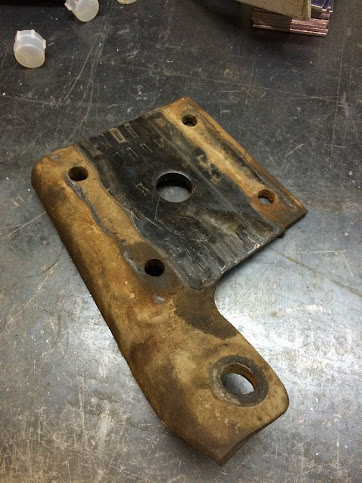

front leaf to body


sand blasted


painted


It is basically impossible to drill the holes into the rear end with it still in the car. I unbolted everything and slide it over so that I could drill down instead of trying to drill up. The hotchkis kit requires a lot of modification to get it to fit, its definitely not an easy 1 day install.

drilled

I paid for the upgraded bushings. Didnt see that they needed to be welded in. So got them prepped and welded.

weld new bushings

Then I started the project of valve covers. Looking back I should have just paid for new ones because I spent way too much time trying to get these things right. I am happy with the final product but it took forever and could have spent my time doing other things.
I bought a mightymouse catch can and wanted to run -10AN fittings from both valve covers. Also, my coil packs are relocated and I wanted to smooth out the oem bolt holes.
pass side valve cover
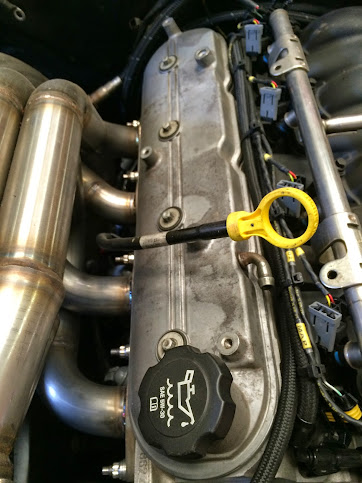
I removed the driver side valve cover to find that there was a bit of sediment in the head. I cleaned out all of this and then found that the inside of the valve cover had been quite dirty and was overlooked when bolting them on the first time. I must have thought it was discolored oil, but there was a lot of ugliness inside there:

interior:

with plate removed:


welded:

grinding

first welds removed/drilled

baking to get the cast alum hot

polished.


sand blasted:


wrinkle paint wet:

finished:


Here is the best picture I could get without taking the caliper off. you have a spacer that goes between a new bracket thats bolted on, and the caliper gets bolted to that. wasnt to sure how steady it would be but feels real solid using the "shake" method.
getting to the rear suspension. unbolted the 45 yr old leaf springs and started installing the new ones. i took all the brackets off and sanded/painted them.
leaf to axel
front leaf to body
sand blasted
painted
It is basically impossible to drill the holes into the rear end with it still in the car. I unbolted everything and slide it over so that I could drill down instead of trying to drill up. The hotchkis kit requires a lot of modification to get it to fit, its definitely not an easy 1 day install.
drilled
I paid for the upgraded bushings. Didnt see that they needed to be welded in. So got them prepped and welded.
weld new bushings
Then I started the project of valve covers. Looking back I should have just paid for new ones because I spent way too much time trying to get these things right. I am happy with the final product but it took forever and could have spent my time doing other things.
I bought a mightymouse catch can and wanted to run -10AN fittings from both valve covers. Also, my coil packs are relocated and I wanted to smooth out the oem bolt holes.
pass side valve cover
I removed the driver side valve cover to find that there was a bit of sediment in the head. I cleaned out all of this and then found that the inside of the valve cover had been quite dirty and was overlooked when bolting them on the first time. I must have thought it was discolored oil, but there was a lot of ugliness inside there:
interior:
with plate removed:
welded:
grinding
first welds removed/drilled
baking to get the cast alum hot
polished.
sand blasted:
wrinkle paint wet:
finished:
 01-22-2015, 01:36 AM
#80
Love your build. Trying to decide if I want to pull the fresh 1200+ hp 462 turboed Pontiac in my 73 trans am to put in an LS engine. I have an LQ4 built for a member from this forum sitting on a stand. It was built and dynoed at over 1000 hp with a mild tune and I kind of bought it on a whim. Its an expensive dust collector at the moment.
I have put so much into the Pontiac engine though that I'm torn, including over 100 hrs polishing the heads and intake myself 3 winters ago, smoothing the block, painting with House of Kolor base/clear coat, etc. lol
Part of me thinks I just need to find another car for the LS engine.
I'd love to do my own mounts, but a little afraid of not getting the proper height and driveline angle, as that's not something I've done before. Did you have help with that or do it on your own?