

metal fabricators...need help with making an electric fan shroud
 03-07-2014 | 07:17 PM
#1
I am trying to make a fan shroud for a 16" electric fan. I am planning on trying to bend the aluminum without a brake. Ill take any and all advice any of you want to offer. Below is the shape of the what I want to achieve so that I can attach the shroud to the bottom and top of the radiator. I need some help on the sequence of how to shape the aluminum sheet.

Sent from my SAMSUNG-SGH-I747 using IB AutoGroup

Sent from my SAMSUNG-SGH-I747 using IB AutoGroup


 03-07-2014 | 08:29 PM
#4
I am using 18 gauge aluminum. Any thoughts on using this to make the bends?
http://m.harborfreight.com/30-inch-b...t#.UxqABqUo7qA
Sent from my SAMSUNG-SGH-I747 using IB AutoGroup
http://m.harborfreight.com/30-inch-b...t#.UxqABqUo7qA
Sent from my SAMSUNG-SGH-I747 using IB AutoGroup


Trending Topics
03-07-2014 | 11:30 PM
#8
Another option is to clamp it to the edge of a workbench and hammer it over, making the furthest bend first and flipping as you go. Since you have that hook shape you will need a workbench edge thin enough that it can clear as you make the second bend, but otherwise it will work okay. Hammering it over can give you a good edge if you are patient. However a brake is your friend.
If you want to do a real nice shroud, check this out: http://www.offroadfabnet.com/forums/...ad.php?t=10186
I plan to make mine with radius edges using a hammer form.
If you want to do a real nice shroud, check this out: http://www.offroadfabnet.com/forums/...ad.php?t=10186
I plan to make mine with radius edges using a hammer form.
03-08-2014 | 03:55 AM
#10

On The Tree
Joined: Aug 2012
Posts: 190
Likes: 0
Not sure if you have the original fan shroud, or have the room to do it, but I used my original fan shroud for my electric fan. I bought a fan that was a pusher/puller and mounted it using a doughnut shape piece of sheet metal to the old shroud. It's in the pusher configuration but on the engine side of the radiator if that makes sense. That way it doesn't stick out past the shroud. This is on an 82 c10 but will probably work on every car. I've had it this way for a couple years in New Mexico/ Arizona and haven't had a problem yet.
03-08-2014 | 07:52 AM
#11

Agreed with the others, you will need a brake. Unless your handy with using a couple of 2x4 hunks of wood. Walk into a shop that has a break. Bring a box of donuts or muffins with you. Will be worth it in the end. Not afan of the cookie sheet. I wouldn't be opening my hood to shw others ( no offense) seeing rivets or screw for something like that just screams cheap.

 03-08-2014 | 05:57 PM
#14
I have made bends like that without a brake. I use to have a piece of angle iron along the edge of my workbench. would put sheetmetal over that edge then clamp another piece of angle iron down on top of that. You can then make the bends with a piece of wood and a hammer.
It would be pretty easy to start from the outside bends and work in. Clamp it in the fixture, bend the outer most bend, move it and do the next bend, flip the piece over and do the third bend, then finally flip it one last time to do the last.
If you want all 4 sides that way then you need to make your angle iron fixture the width of one of the sides. Start with a square sheet, notch the 4 corners so it looks like a big + sign, then do each side one at a time.
Last edited by Pop N Wood; 03-08-2014 at 08:04 PM.
03-08-2014 | 07:27 PM
#15
Thanks for the replies, very helpful info here. The shroud will be mounted to the radiator by bending it over the the radiator on the bottom and top. There are are two holes on the top and two on the bottom of the rad that I will use by putting a small bolt through the shroud into the holes in the rad, through the shroud again and secured with a nyloc nut. This will be done after, of course, after the bends are made shown in the first post. One more question, how close should the shroud be to the rad fins?
03-09-2014 | 04:07 AM
#16
 03-09-2014 | 11:27 AM
#17
03-09-2014 | 12:29 PM
#18

Launching!
Joined: Jun 2011
Posts: 253
Likes: 0
From: Canada
Here is another idea for making a shroud.
http://forums.bimmerforums.com/forum...omemade-shroud
http://forums.bimmerforums.com/forum...omemade-shroud
03-20-2014 | 09:45 PM
#19
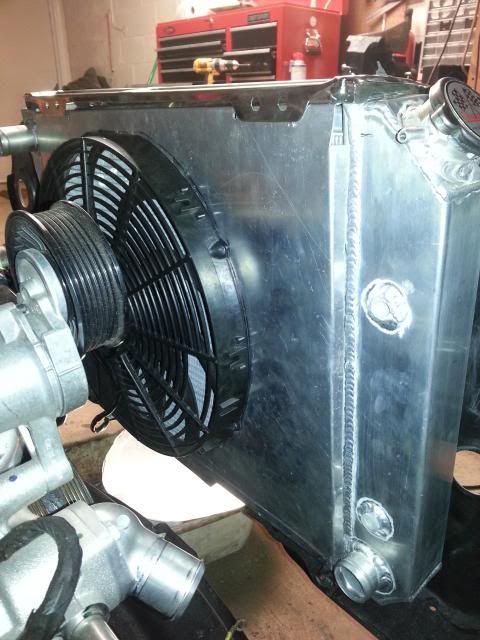
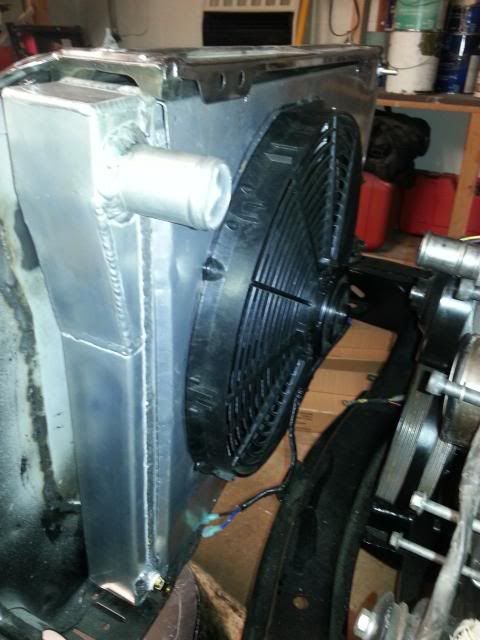
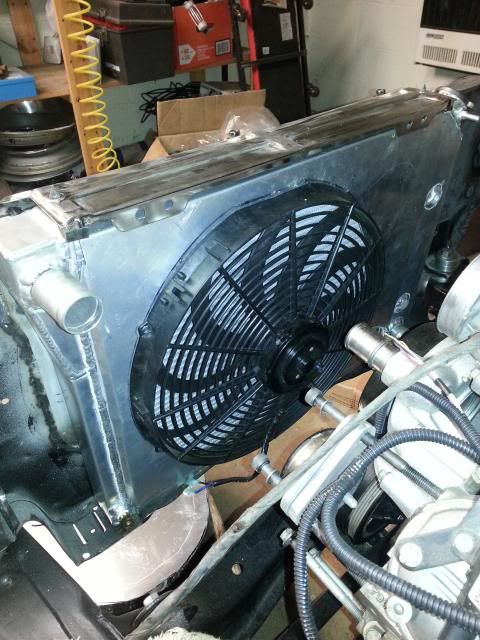
Here is how it turned out. I bought the 30" brake from Harbor Freight. I figured there have been quite a few times I could have used a small brake in the past so I think I'll get some use out of it in the future to. All in all with the cost of the brake I am into it for about $70. Less expensive than a shroud from Champion and I have a cheap brake sitting under my workbench.


 03-21-2014 | 08:53 AM
#20

TECH Resident
Joined: Feb 2014
Posts: 954
Likes: 9
From: Encinitas CA
I made mine out of 1/8" 5052 aluminum. No brake. But I scored the bends on my table saw. Cut about 1/2 the material. I know aluminum cracks, but I see no sign yet of cracking. We will see.
Doug
Doug