
1967 Cougar build (over 500 pictures and videos)
 10-25-2023, 03:31 PM
#1321
TECH Senior Member
Thread Starter
iTrader: (7)

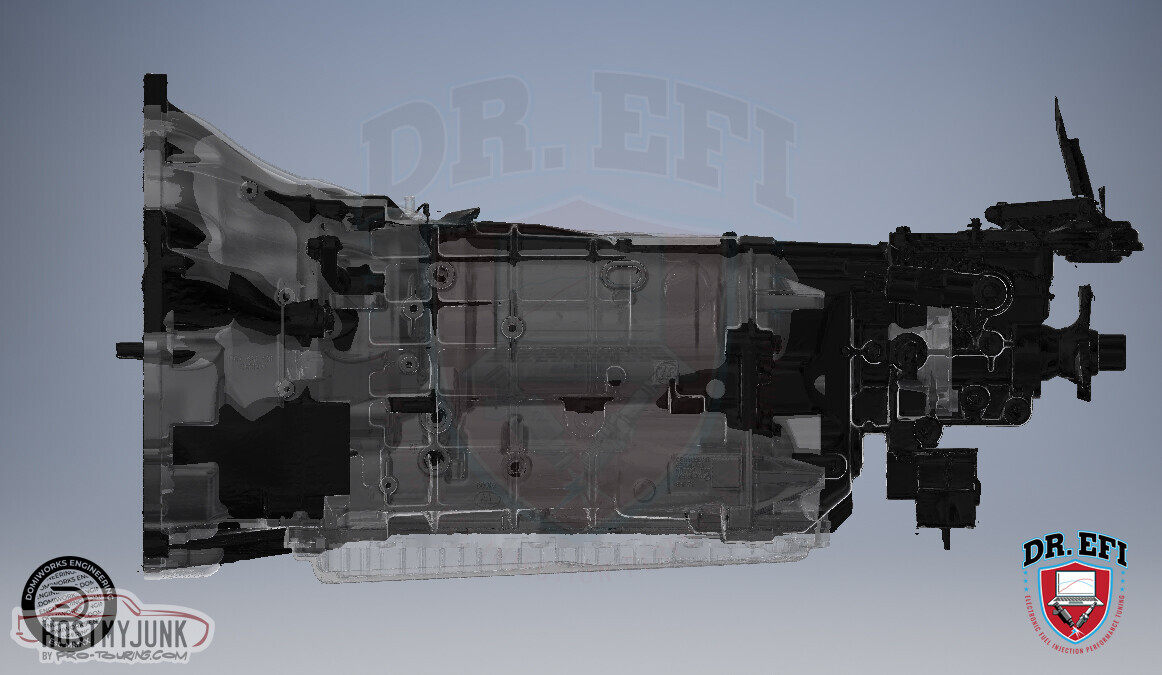
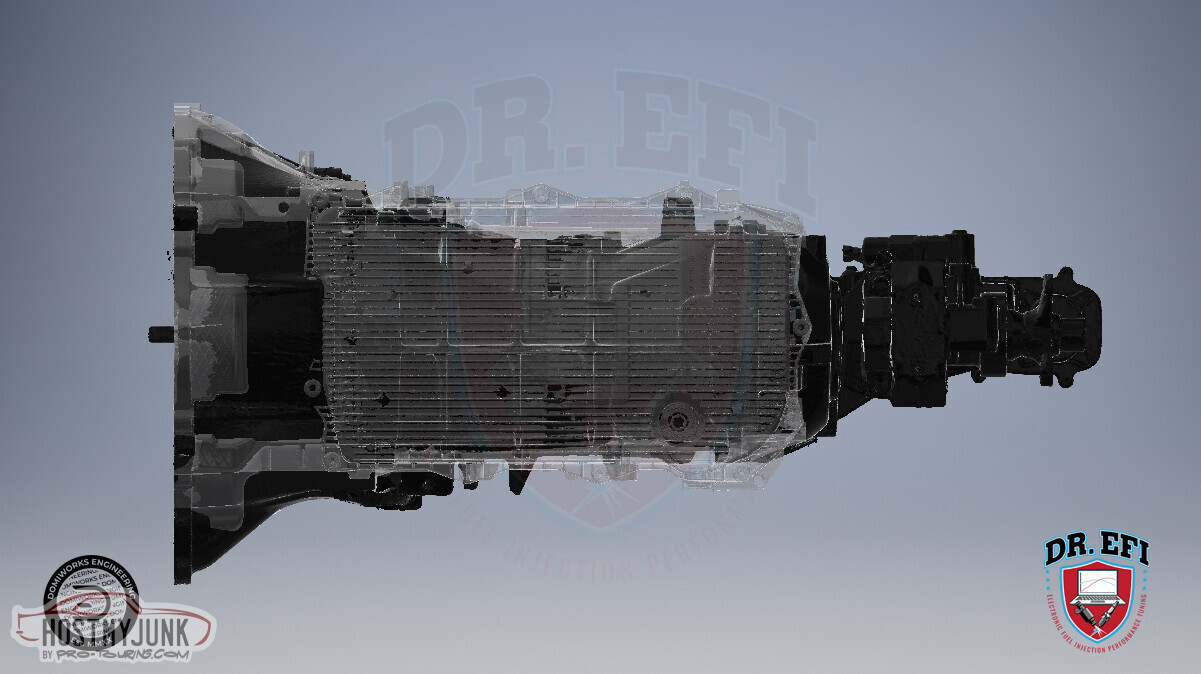
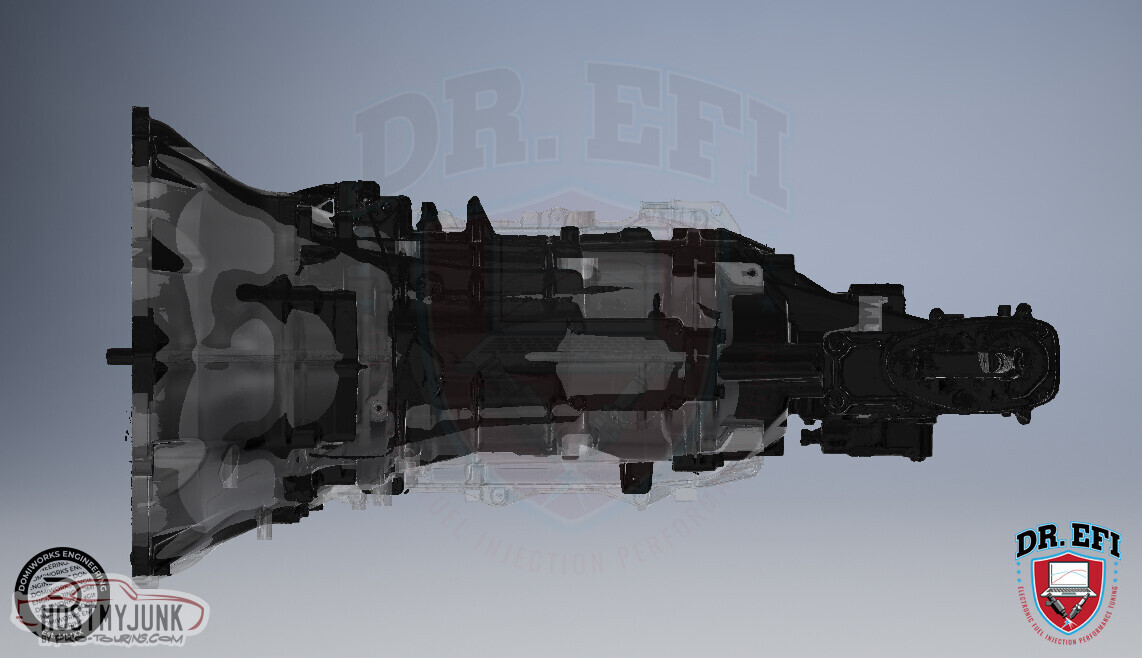
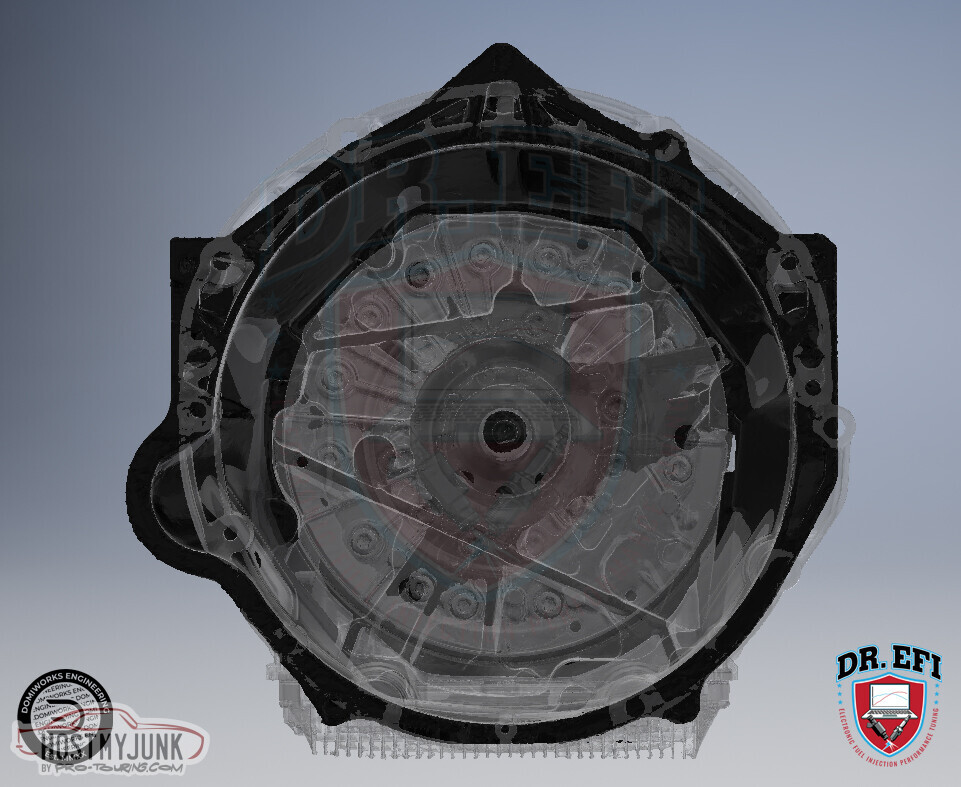
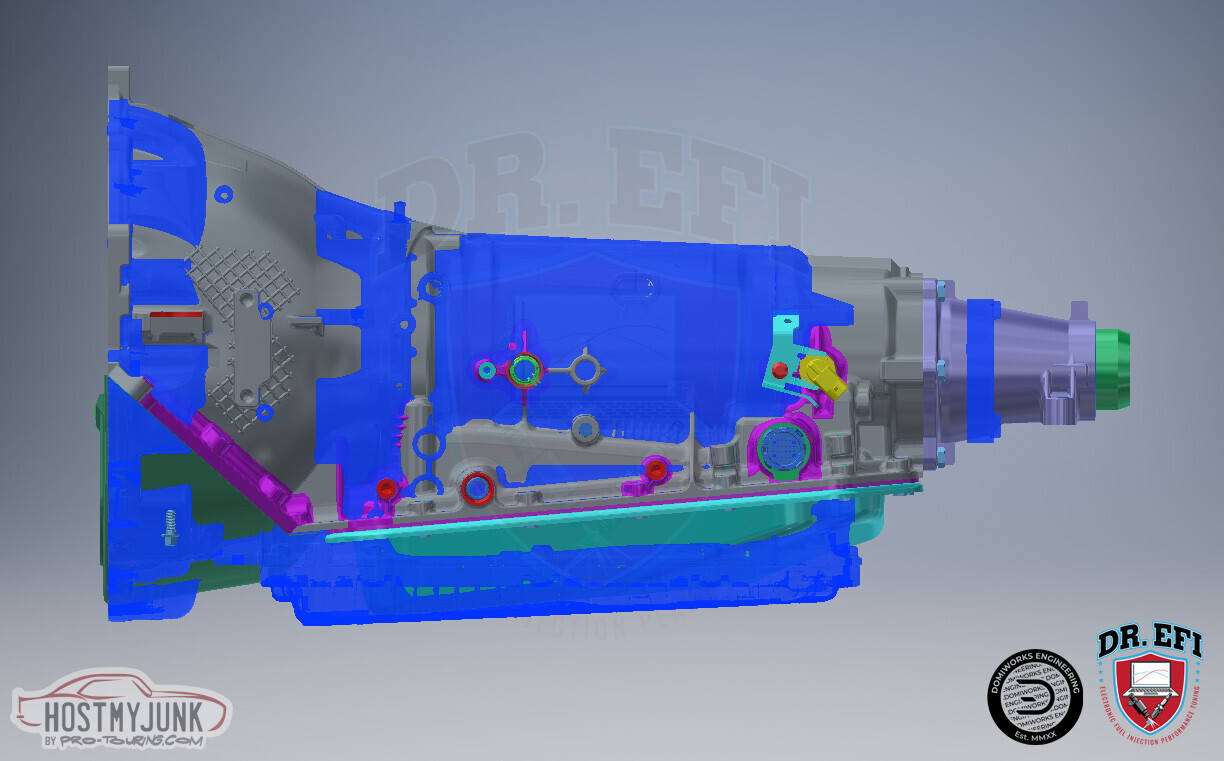
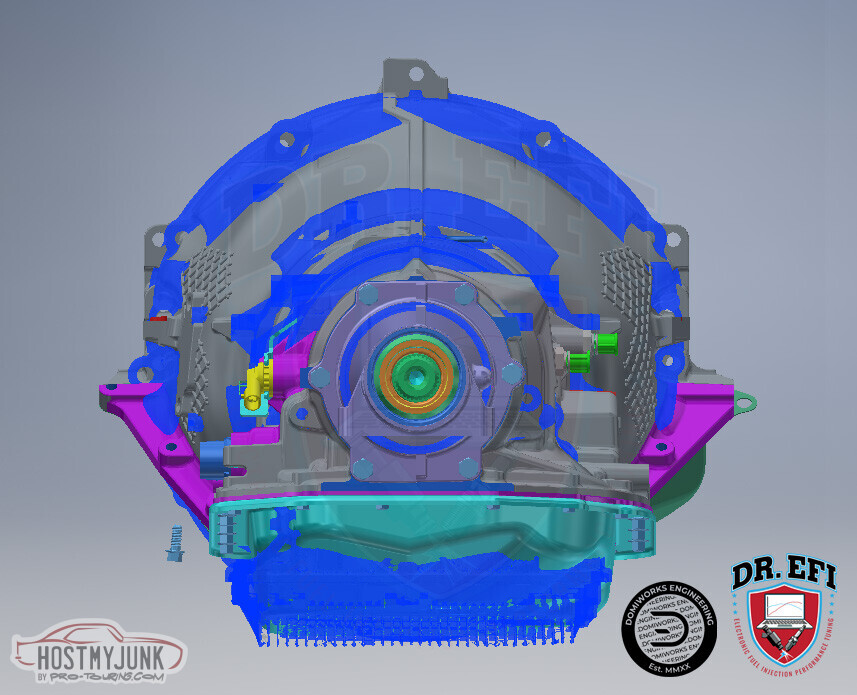
Today I got the images that I have been talking about. This was a collaborative effort between myself, one of my customers, and Domi-Works. The images compare a Dodge 8HP70 with a GTO T-56. The 8HP70 is the gray outline and the T56 in black.
Here is the side view and you can see how the top profiles of the 8HP70 are about the same as a T56. Keep in mind that this will change a little bit with the 1" adapter installed, as the 8HP70 will sit one inch back.
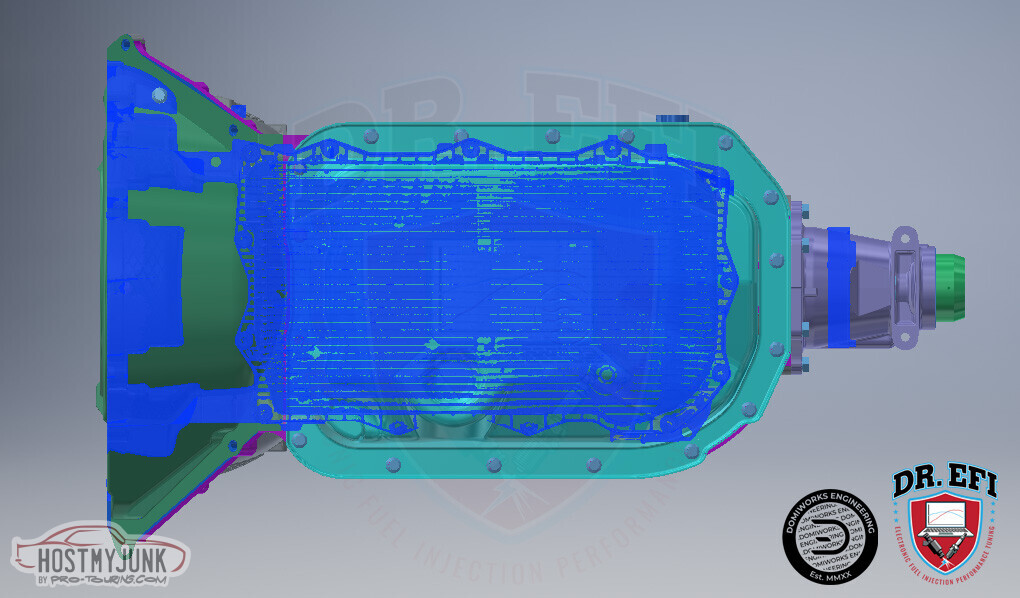
This is the bottom view, and obviously the pan is wide, but the case profile is slim.
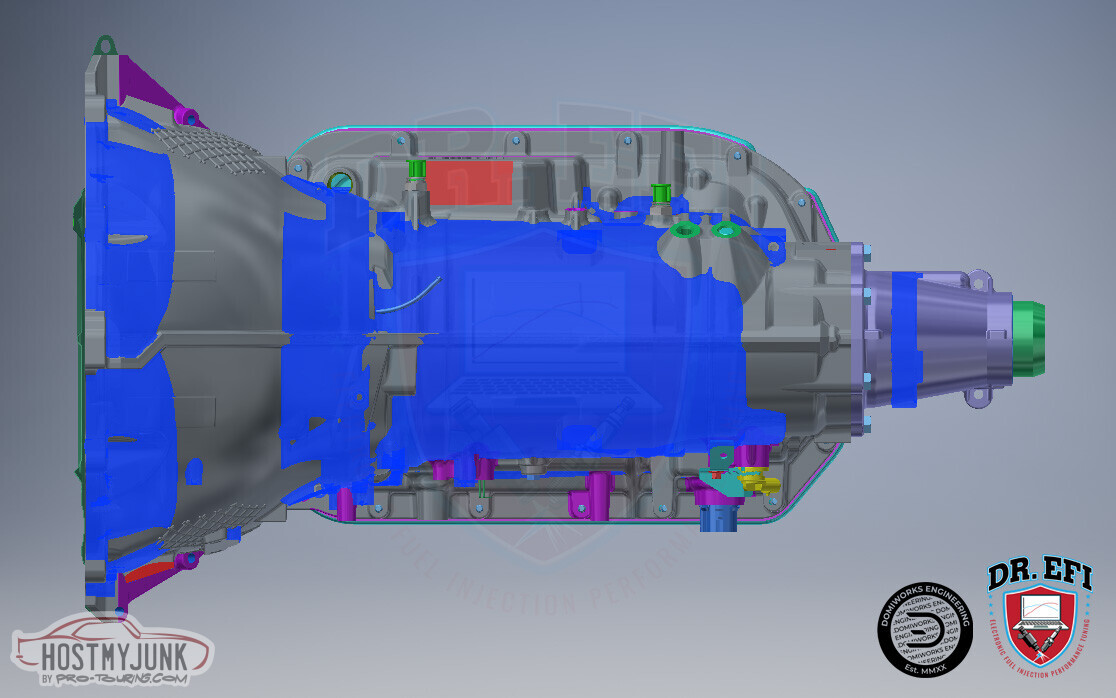
You can see that the case is slimmer in this top view.
This is the view from the rear...
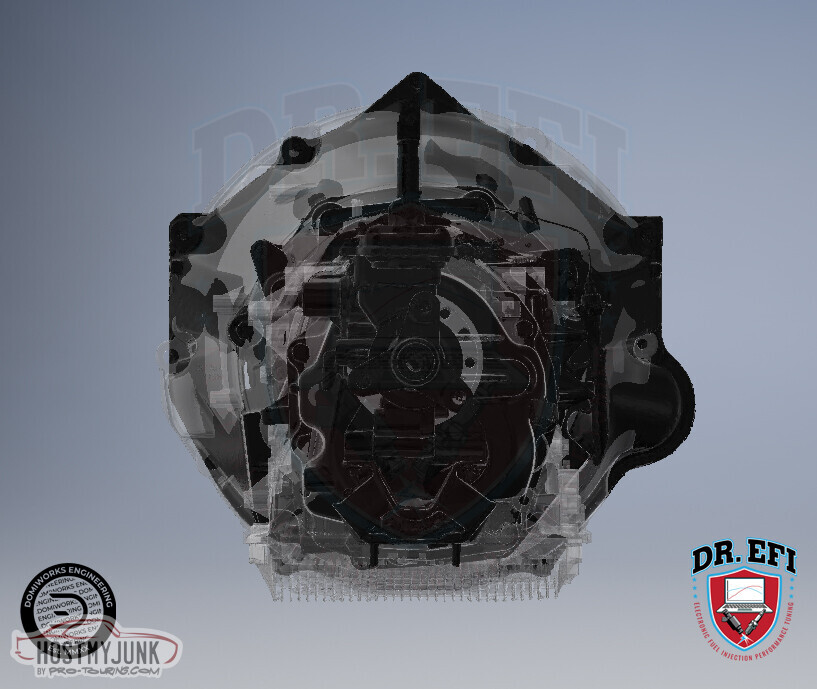
The front view shows that the bellhousing overall diameter is about the same. This view also shows how much the 8HP pan extends down. I can tell by looking at this that the 8HP oil pan will be about 1" below a Holley 302-2/3 oil pan, which is very common for GM A-body LS swaps.
and lastly a couple of 3/4 views from two different angles...

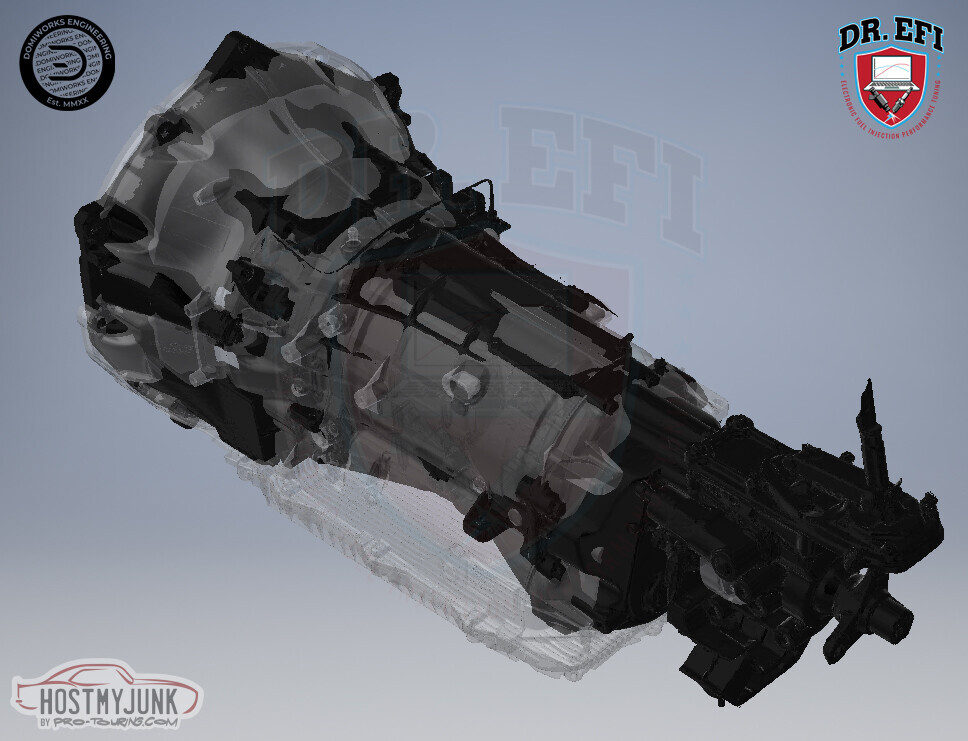
I hope these images can help people better understand the fitment requirements. Judging by these pictures, I don't think that I will have to do anything to the tunnel in the Cougar to make this work. It actually looks like the transmissions mounts are very closely aligned.
Andrew
Here is the side view and you can see how the top profiles of the 8HP70 are about the same as a T56. Keep in mind that this will change a little bit with the 1" adapter installed, as the 8HP70 will sit one inch back.
This is the bottom view, and obviously the pan is wide, but the case profile is slim.
You can see that the case is slimmer in this top view.
This is the view from the rear...
The front view shows that the bellhousing overall diameter is about the same. This view also shows how much the 8HP pan extends down. I can tell by looking at this that the 8HP oil pan will be about 1" below a Holley 302-2/3 oil pan, which is very common for GM A-body LS swaps.
and lastly a couple of 3/4 views from two different angles...
I hope these images can help people better understand the fitment requirements. Judging by these pictures, I don't think that I will have to do anything to the tunnel in the Cougar to make this work. It actually looks like the transmissions mounts are very closely aligned.
Andrew
 10-26-2023, 07:23 AM
#1322
TECH Fanatic
iTrader: (27)


Those are fantastic reference photos Andrew! Looks like it shouldn't take too much to fit them in place of the T56. Where do the electronics and trans cooler lines come out on those transmissions? Could that be an issue with the tunnel?

The following users liked this post:
rkupon1 (12-08-2023)
10-26-2023, 09:06 AM
#1323

Andrew,
do you know the rated torque limits of the stock trans? What about the higher versions? ( 70/80/90)
thanks
do you know the rated torque limits of the stock trans? What about the higher versions? ( 70/80/90)
thanks
10-26-2023, 09:27 AM
#1324
TECH Senior Member
Thread Starter
iTrader: (7)
Andrew
10-26-2023, 02:03 PM
#1325
TYVM
jim
jim
The following users liked this post:
Project GatTagO (10-26-2023)
10-26-2023, 02:44 PM
#1326
TECH Senior Member
Thread Starter
iTrader: (7)
The connector is located low on the passenger side and faces the rear. Look at the images and look for a round thing back there. It is fairly easily accessible, or it should be. The fluid fill is also in the same area in the rear, just above the pan. These transmissions are filled with the engine running and the transmission temperature has to be at a certain point, then you fill until fluid runs out of the fill and cap it.
Also, the pans are a wear item and get replaces with the filter, which is molded into the pan. There are billet pans available, but they are deeper, and this transmission doesn't need to get any deeper.
Andrew
The following users liked this post:
kwhizz (10-31-2023)
10-26-2023, 08:56 PM
#1327
Teching In

Here is my last attempt at the clear coat. I am done messing with it and I am pleased with the final results.
Yesterday I gave the car a full wash and after it was dry, I wiped it down with wax and grease remover. I then used some of the satin sheen Poppy's Patina clear. The flat, horizontal surfaces like the hood, roof and trunk really needed a thick coat to lay flat. I bought a flat paint applicator at Home Depot, but the clear started to attack the styrofoam handle of the applicator almost immediately. That turned into a damn mess and I had to scramble...
Anyway, I muddled through it and I am happy with the results:
This is after a couple of hours drying time.
The streaks on the flat surfaces are almost gone and are only visible when looking at certain angles.
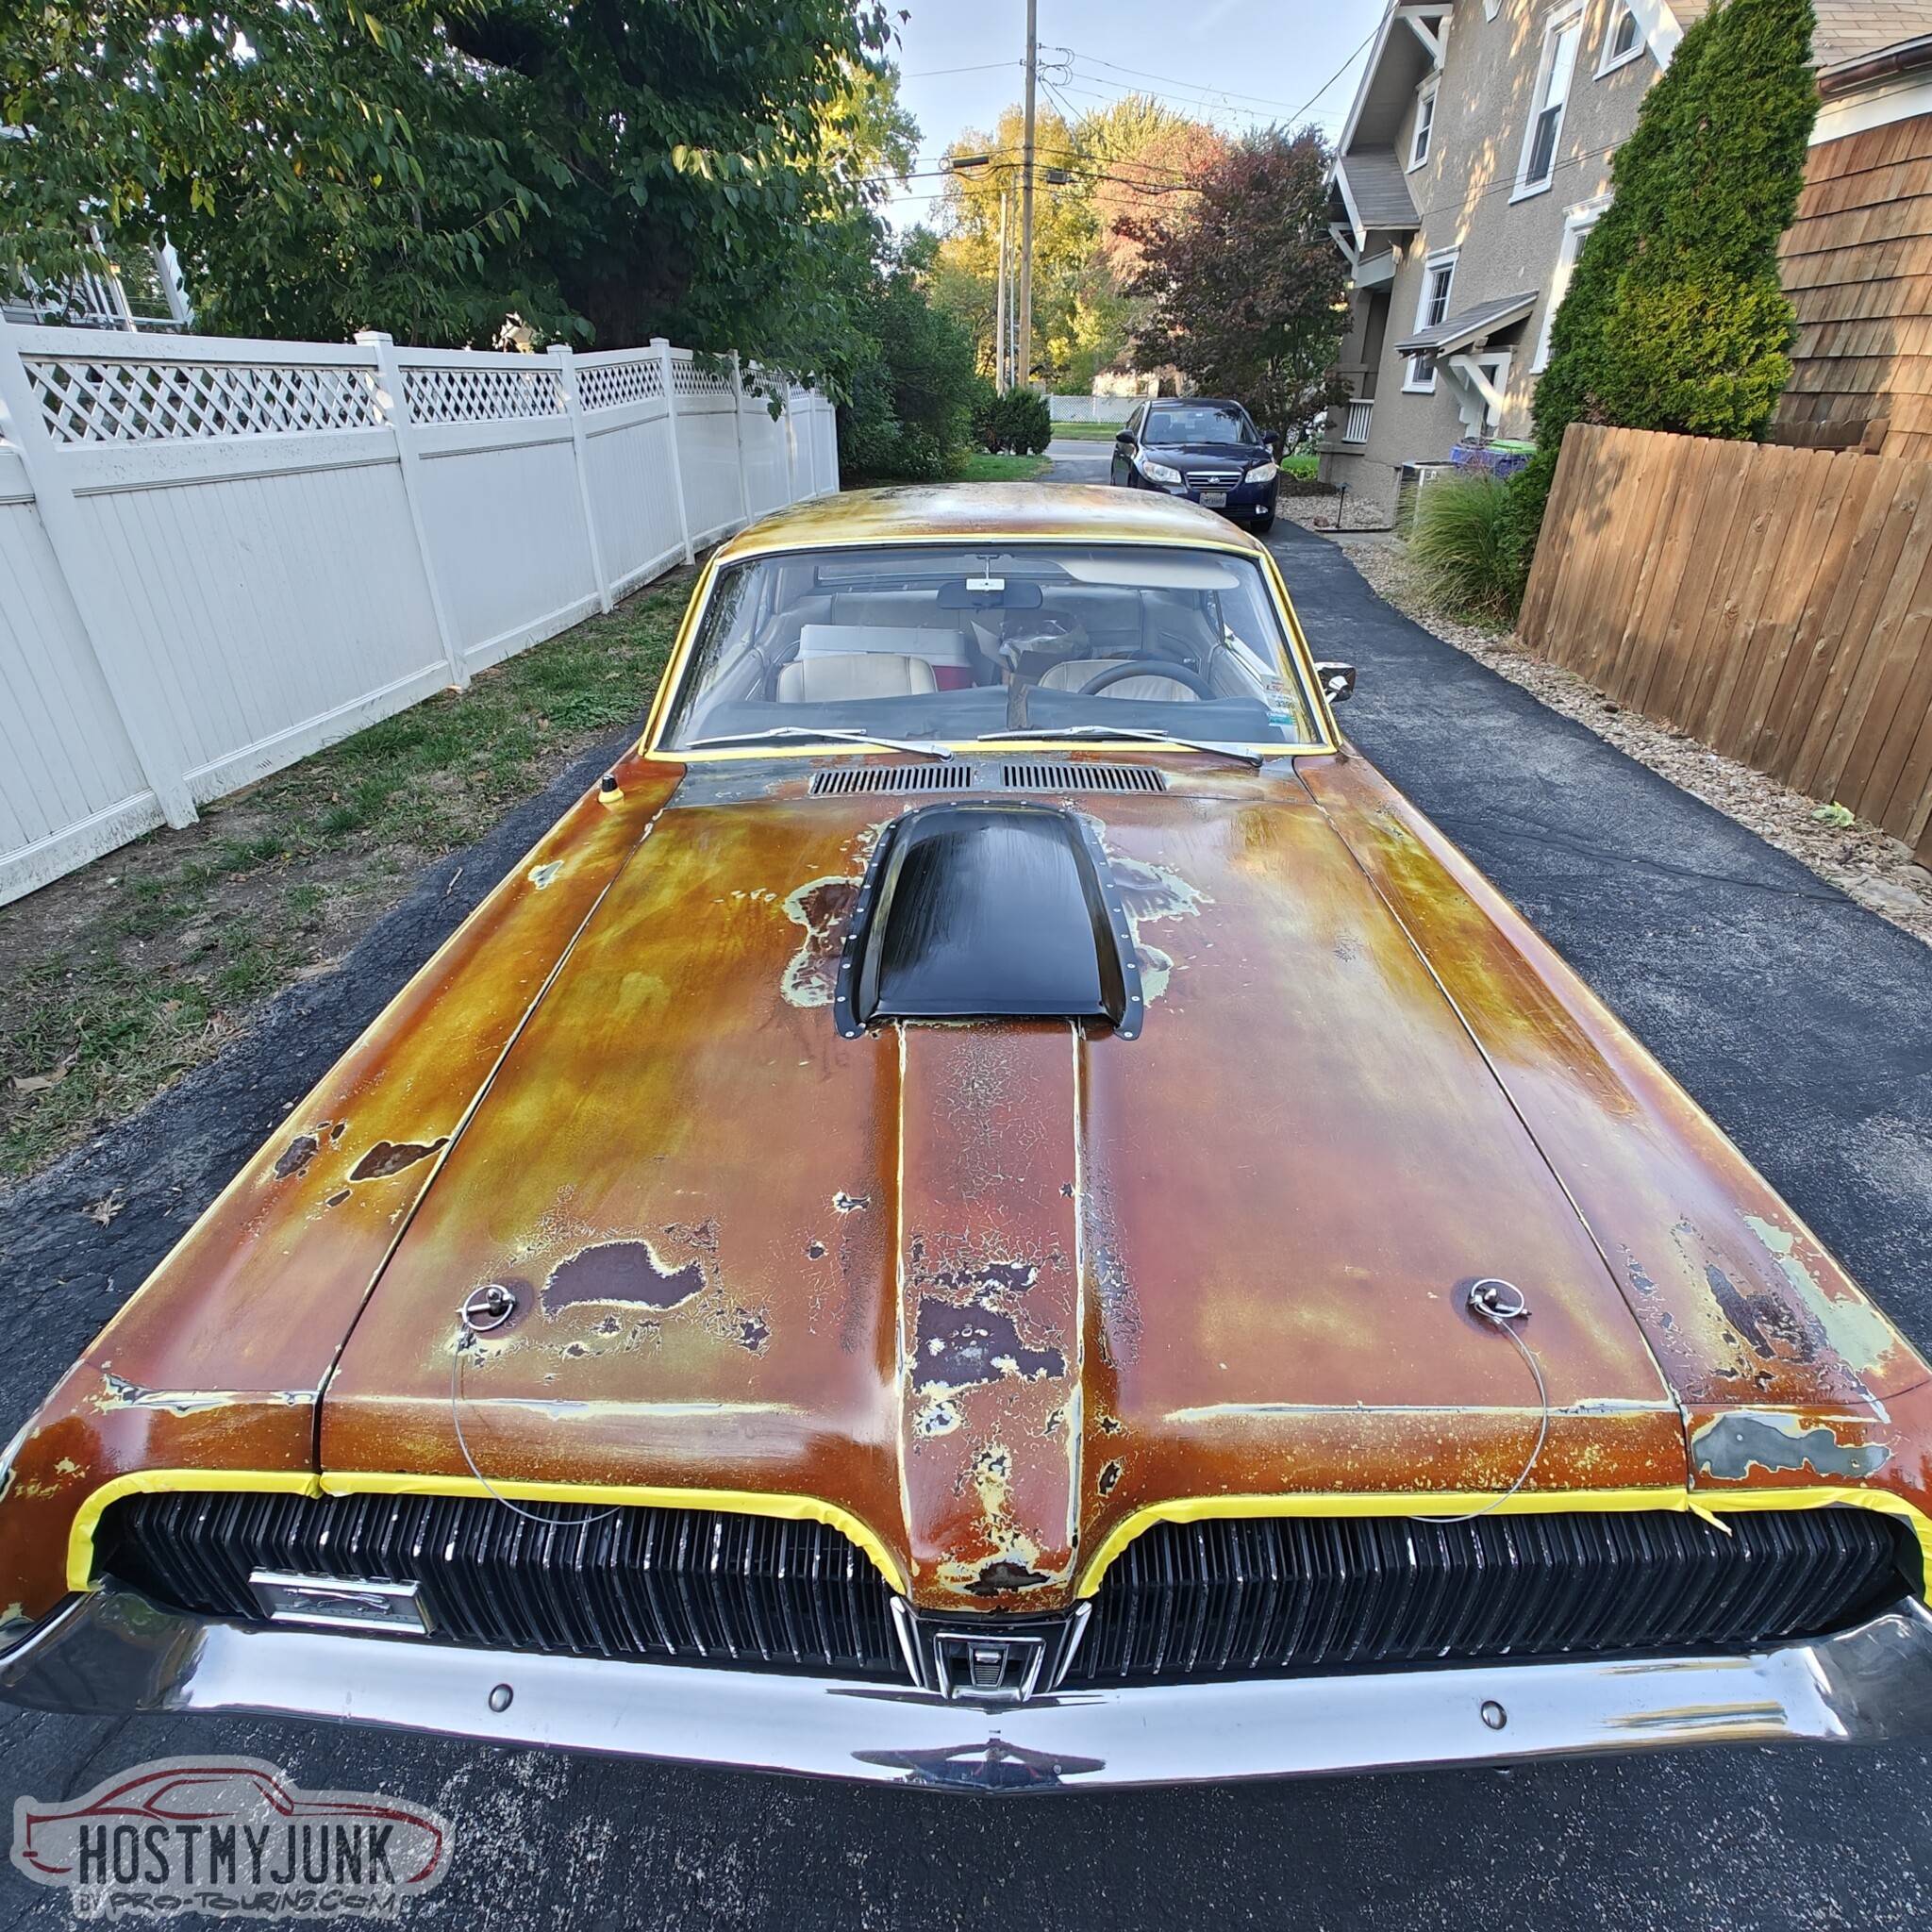
Overall I like the satin sheen vs. the matte and I am very happy with how it turned out. I might even wax it! LOL
Andrew
Yesterday I gave the car a full wash and after it was dry, I wiped it down with wax and grease remover. I then used some of the satin sheen Poppy's Patina clear. The flat, horizontal surfaces like the hood, roof and trunk really needed a thick coat to lay flat. I bought a flat paint applicator at Home Depot, but the clear started to attack the styrofoam handle of the applicator almost immediately. That turned into a damn mess and I had to scramble...
Anyway, I muddled through it and I am happy with the results:
This is after a couple of hours drying time.
The streaks on the flat surfaces are almost gone and are only visible when looking at certain angles.
Overall I like the satin sheen vs. the matte and I am very happy with how it turned out. I might even wax it! LOL
Andrew
The following 2 users liked this post by lsxponcho:
kwhizz (10-31-2023), Project GatTagO (10-28-2023)
10-28-2023, 04:49 PM
#1328
TECH Senior Member
Thread Starter
iTrader: (7)
Here are the images comparing the Dodge 8HP70 with a 4L80e.
Looking at the side view, you can see that the top profile of the 8HP70 basically follows the outline of the 4L80e.
The bottom view shows how the 8HP pan has a much smaller foot print.
From the top view you can see that the 8HP is a little wider in the area where the bellhousing transitions into the main art of the case.
The rear view shows the depth of the 8HP oil pan in the rear.
From looking at these pictures, I am pretty sure that the 8HP70 will fit where ever a 4L80e fits. If your particular vehicle needs to have the tunnel modified to use a T56 or a 4L80e, then similar modifications will be required for the 8HP70.
It also looks like the transmission mount will be very similar to the 4L80e location and to the T56 location. I will be using a TCP weld together crossmember kit. It has a universal transmission mount pad that needs to be welded in place.
Andrew
The following 2 users liked this post by Project GatTagO:
02redchevy (10-28-2023), kwhizz (10-31-2023)
10-29-2023, 12:23 PM
#1329
TECH Enthusiast
I'll have you know andrew I stayed up half the night a few days ago reading the last 20 pages or so of this thread haha. WOW!
So cool to see you got the LSA up and running. and how quick it went.
We have the 8HP70 in our 2017 Grand Cherokee SRT and I can say it's probably one of the best factory transmissions I've ever owned and driven.
So cool to see you got the LSA up and running. and how quick it went.
We have the 8HP70 in our 2017 Grand Cherokee SRT and I can say it's probably one of the best factory transmissions I've ever owned and driven.
The following 2 users liked this post by Mr. Black:
kwhizz (10-31-2023), Project GatTagO (10-29-2023)
10-29-2023, 10:07 PM
#1330
TECH Senior Member
Thread Starter
iTrader: (7)
I'll have you know andrew I stayed up half the night a few days ago reading the last 20 pages or so of this thread haha. WOW!
So cool to see you got the LSA up and running. and how quick it went.
We have the 8HP70 in our 2017 Grand Cherokee SRT and I can say it's probably one of the best factory transmissions I've ever owned and driven.
So cool to see you got the LSA up and running. and how quick it went.
We have the 8HP70 in our 2017 Grand Cherokee SRT and I can say it's probably one of the best factory transmissions I've ever owned and driven.
I am pretty excited for this 8HP70 swap.
Andrew
10-30-2023, 09:27 PM
#1331
TECH Senior Member
Thread Starter
iTrader: (7)
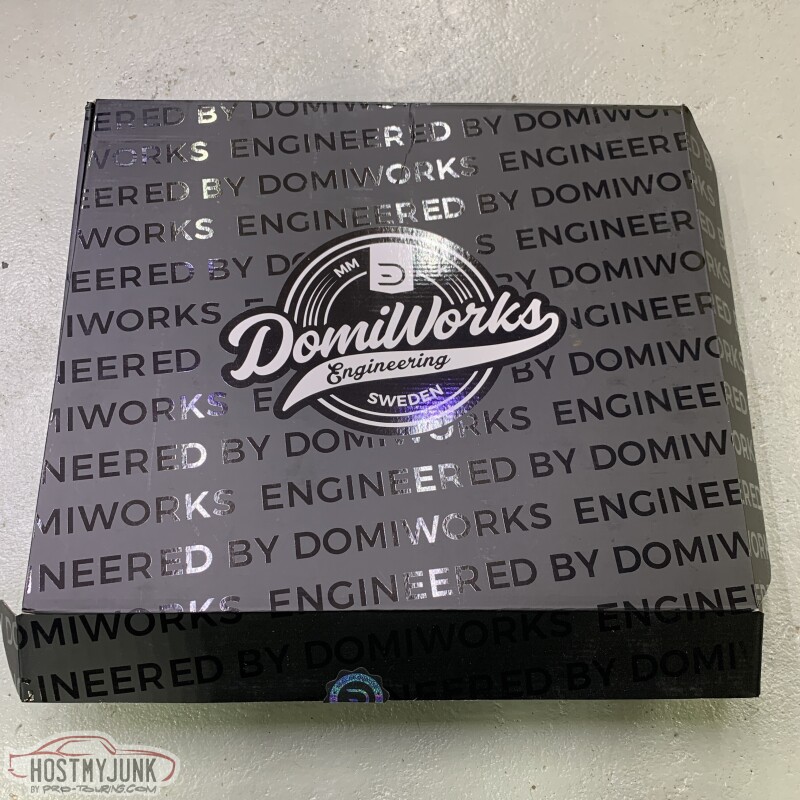
Today Tom received a little care package from Sweden. We received all three kits and everything was packaged very nicely.
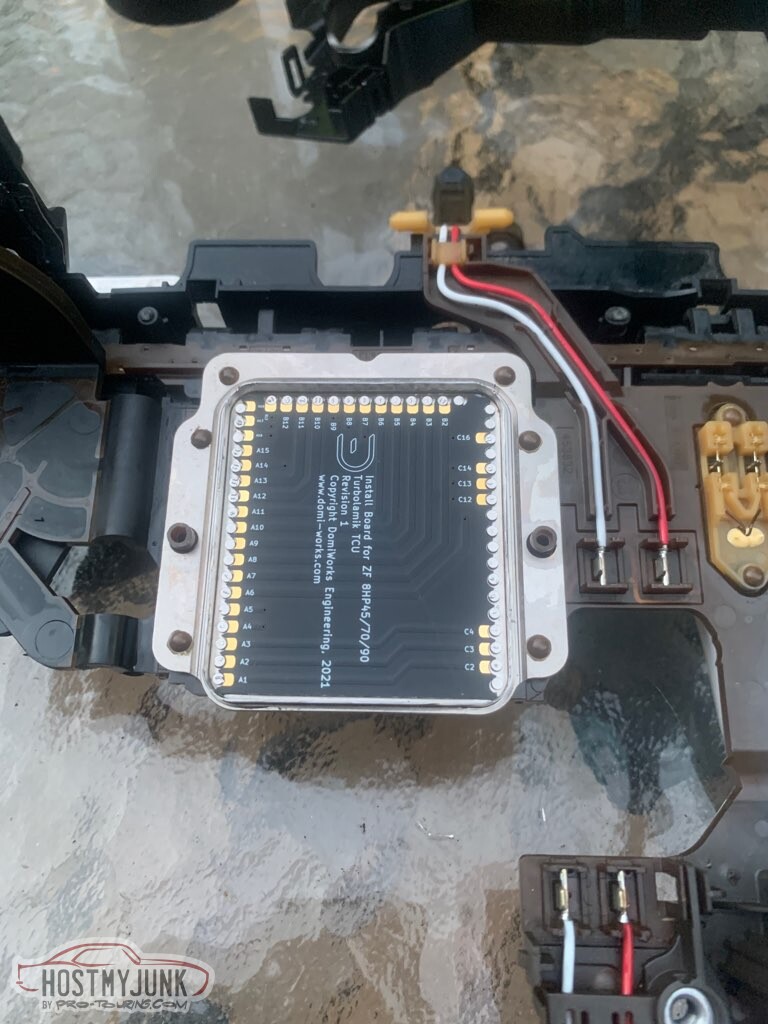
This is the little PCB board that needs to be soldered in place where the stock TCU lives.
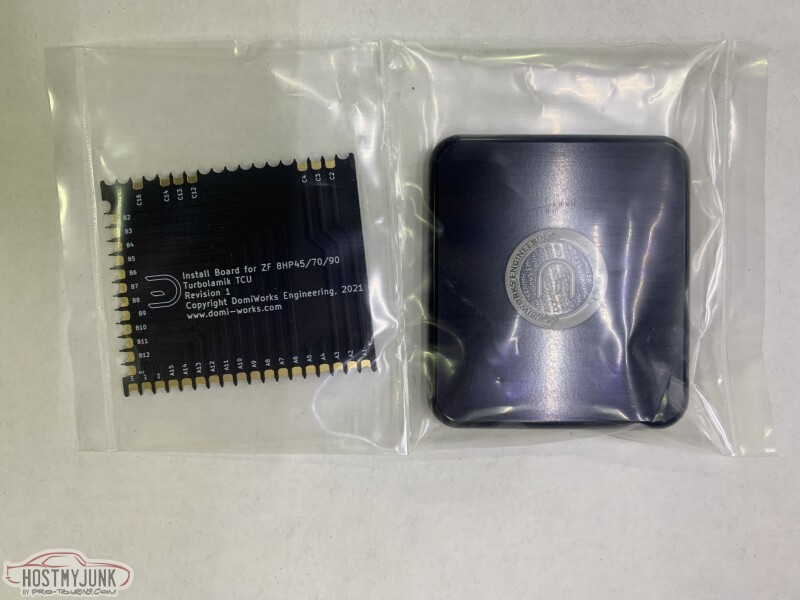
I was actually shocked to see how small the PCB board is. The TurboLamik TCU is not huge, but it is quite a bit larger than the stock TCU. I suspect that ZF has a lot of very talented electronics hardware engineers working for them and that the stock TCU probably uses some ASICs, while the TurboLamik uses more readily available, larger, general purpose chip sets. I also suspect that this si why everyone that tries to get around the stock TCU limits eventually hits a wall. That is because the ASICs have built in hardware limits that just can't be exceeded with software hacking. The TurboLamik has no such limitations and thus is more flexible.
The sleeve on the left is the adapter to use an earlier transmission where the converter snouts had a smaller diameter. We won't need them, but it is nice that they it is included. All of the hardware is included and individually packaged.

Andrew
This is the little PCB board that needs to be soldered in place where the stock TCU lives.
I was actually shocked to see how small the PCB board is. The TurboLamik TCU is not huge, but it is quite a bit larger than the stock TCU. I suspect that ZF has a lot of very talented electronics hardware engineers working for them and that the stock TCU probably uses some ASICs, while the TurboLamik uses more readily available, larger, general purpose chip sets. I also suspect that this si why everyone that tries to get around the stock TCU limits eventually hits a wall. That is because the ASICs have built in hardware limits that just can't be exceeded with software hacking. The TurboLamik has no such limitations and thus is more flexible.
The sleeve on the left is the adapter to use an earlier transmission where the converter snouts had a smaller diameter. We won't need them, but it is nice that they it is included. All of the hardware is included and individually packaged.
Andrew
The following users liked this post:
kwhizz (10-31-2023)
11-05-2023, 09:08 PM
#1332
TECH Senior Member
Thread Starter
iTrader: (7)
Today Tom sent me some pictures of the preparations that he is doing to the stock TCU in order to use the TurboLamik. This is the part that has to be removed from the valve body. Here it is sitting upside down and you can see the shiny plate, which is the case of the stock TCU. This top of this case must be cut off carefully by using e Dremel with a cut off disk.
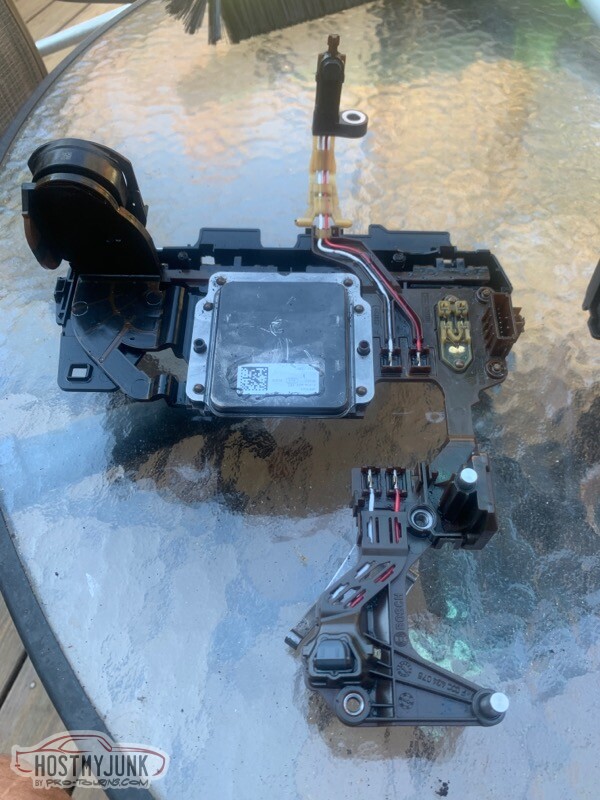
Here is the stock TCU with the cover cut off. You can see how impressively small the electronics are inside the TCU.
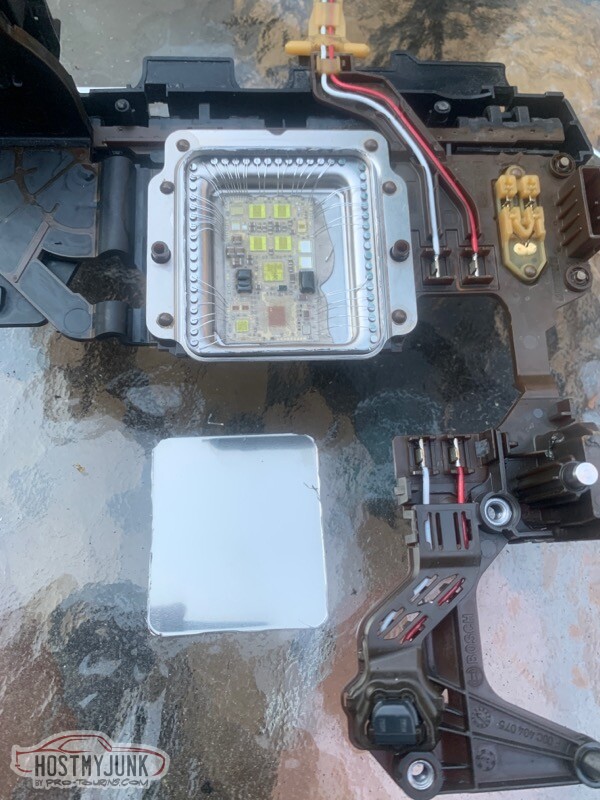
Sadly, we can't use any of it, so all of the little wires that you to go from the circuit board to the pins have to be cut off and bent back.
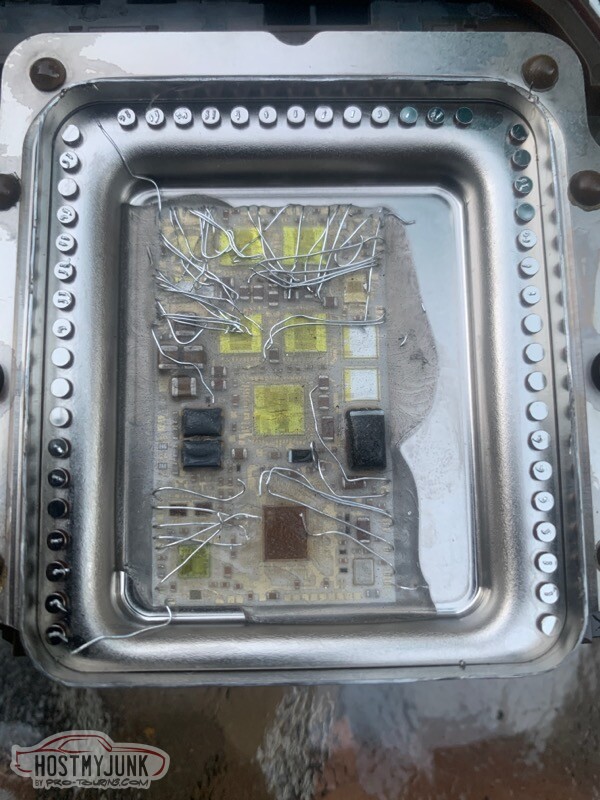
Here is the Domi-works PCB board. It will get soldered in place to bridge the appropriate pins so that the TurboLamik TCU can be used externally.
Once the PCB is soldered in place, the little billet cover has to be glued in place. Tom found a local electronics repair place that will do the soldering at a very good price. We felt that this job was important enough to have a professional do it.
Andrew
Here is the stock TCU with the cover cut off. You can see how impressively small the electronics are inside the TCU.
Sadly, we can't use any of it, so all of the little wires that you to go from the circuit board to the pins have to be cut off and bent back.
Here is the Domi-works PCB board. It will get soldered in place to bridge the appropriate pins so that the TurboLamik TCU can be used externally.
Once the PCB is soldered in place, the little billet cover has to be glued in place. Tom found a local electronics repair place that will do the soldering at a very good price. We felt that this job was important enough to have a professional do it.
Andrew
The following users liked this post:
kwhizz (11-09-2023)
11-28-2023, 06:07 PM
#1333
TECH Senior Member
Thread Starter
iTrader: (7)
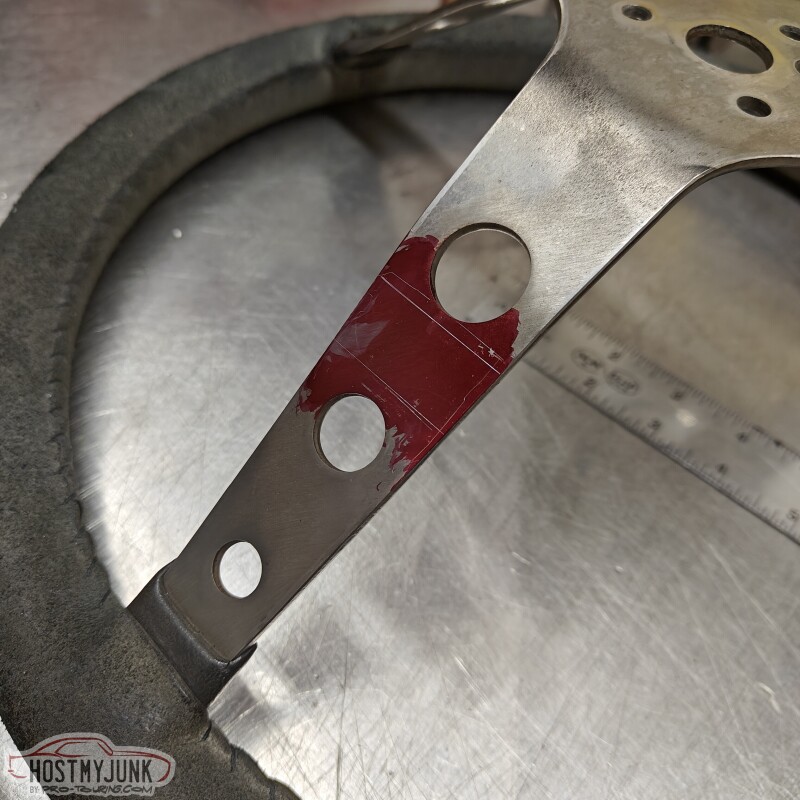
Today I visited Vic, not just for lunch but to see if he can help with a small project.
I got these paddle shifters from DomiWorks a while back. I was actually going to use them on my GTO, but it seemed more appropriate to repurpose them for the Cougar in anticipation of the 8HP70 swap.
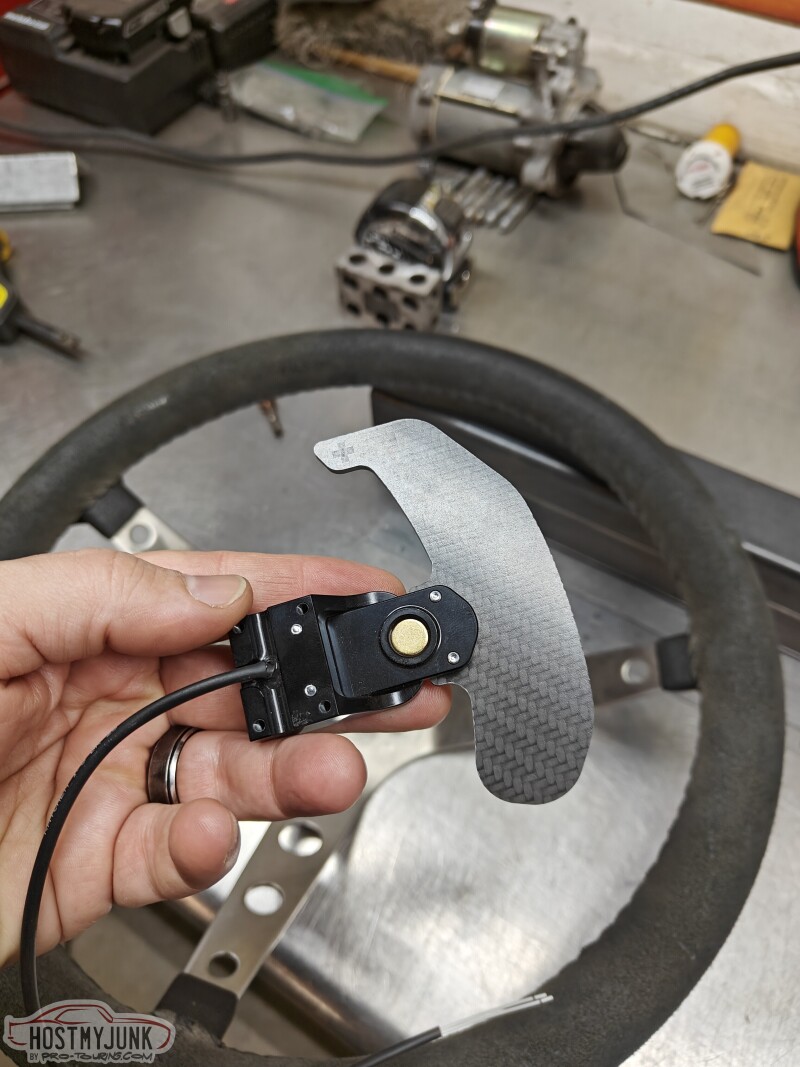
We decided to keep it simple and just mount the paddles to the spokes of the steering wheel. Before taking off the steering wheel I actually mocked up the paddles against the steering when when it was still installed in the car.
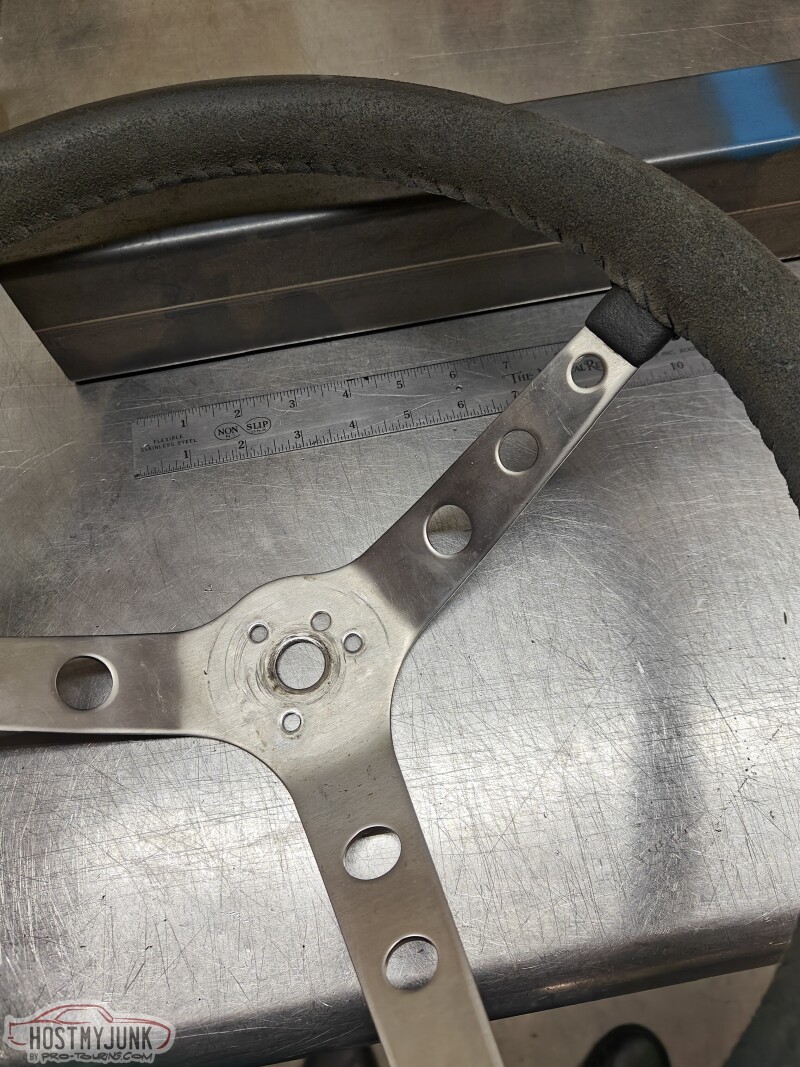
This was the chosen location. It puts the paddles at the fingertips but keeps them tucked nicely and the left side one does not interfere with the turn signal stalk.
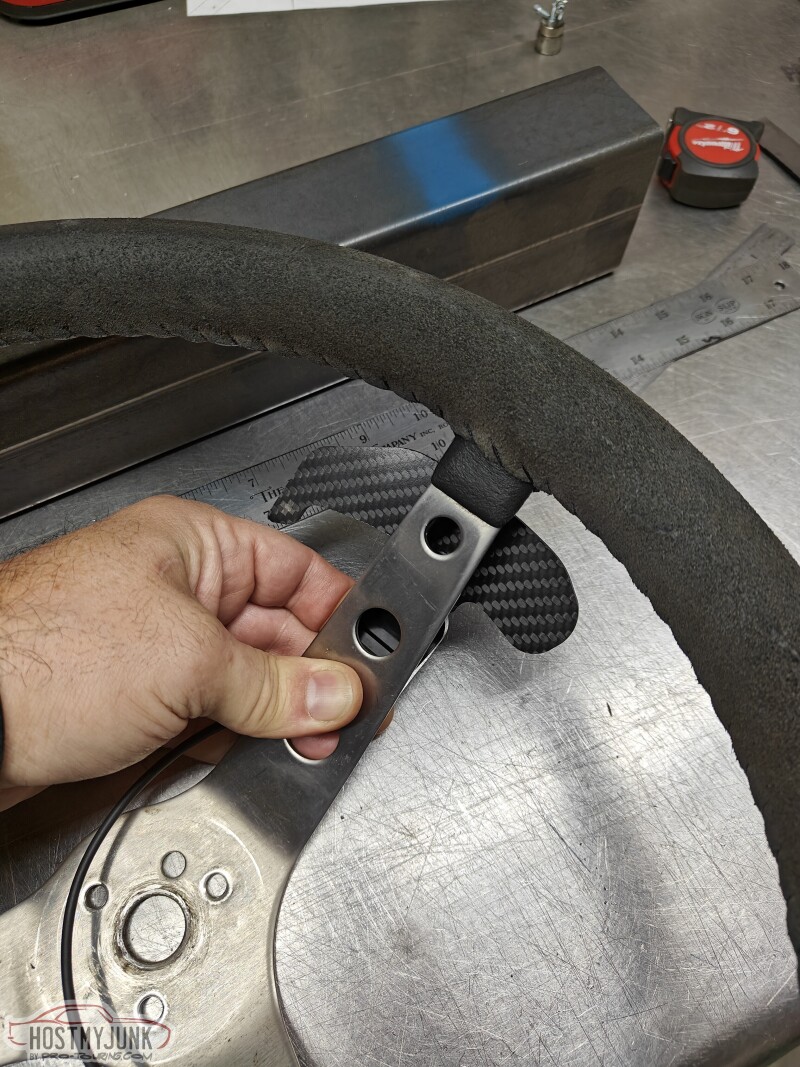
The location for the holes was laid out and the holes were drilled.
Apparently I forgot to take more pictures along the way, but here is a little video that shows one of the paddles in action.
https://youtube.com/shorts/BiOfqDUWygM?feature=share
Andrew
I got these paddle shifters from DomiWorks a while back. I was actually going to use them on my GTO, but it seemed more appropriate to repurpose them for the Cougar in anticipation of the 8HP70 swap.
We decided to keep it simple and just mount the paddles to the spokes of the steering wheel. Before taking off the steering wheel I actually mocked up the paddles against the steering when when it was still installed in the car.
This was the chosen location. It puts the paddles at the fingertips but keeps them tucked nicely and the left side one does not interfere with the turn signal stalk.
The location for the holes was laid out and the holes were drilled.
Apparently I forgot to take more pictures along the way, but here is a little video that shows one of the paddles in action.
https://youtube.com/shorts/BiOfqDUWygM?feature=share
Andrew
The following 4 users liked this post by Project GatTagO:
12-08-2023, 05:25 PM
#1334
The 8HP range have cooler lines that are located approximately where the hydraulic lines would connect if it was a T56. They are on the driver's side, just past what you might call the bellhousing. Different flavors of the 8HP70 require adapters which are offered by Domi-Works, but the Dodge version seems to use simpler threaded lines, so that remains to be addressed. I will also need to add a transmission oil cooler. This has to be done correctly because these transmissions need the fluid temperature to remain in a specific range for optimal operation. Too cold is just as bad as too hot, so a thermostat must be used with the oil cooler to precisely control the transmission temperature.
The connector is located low on the passenger side and faces the rear. Look at the images and look for a round thing back there. It is fairly easily accessible, or it should be. The fluid fill is also in the same area in the rear, just above the pan. These transmissions are filled with the engine running and the transmission temperature has to be at a certain point, then you fill until fluid runs out of the fill and cap it.
Also, the pans are a wear item and get replaces with the filter, which is molded into the pan. There are billet pans available, but they are deeper, and this transmission doesn't need to get any deeper.
Andrew
The following 2 users liked this post by rkupon1:
kwhizz (12-09-2023), Project GatTagO (12-14-2023)
12-14-2023, 01:35 PM
#1335
TECH Senior Member
Thread Starter
iTrader: (7)
Time flies when you are having fun, and it is shaping up to be a great year for Dr. EFI...
Last Wednesday I woke up way to early and figured I should just get on the road and head to Indianapolis for the PRI show. This picture was taken somewhere in the middle of Missouri at about 4:30am. The show was great and if you guys follow me on IG (@projectgattago), I am posting just a few things that I thought were cool.
The Holley RetroBright headlights are fantastic and really transform the driving experience at night. Totally worth it!
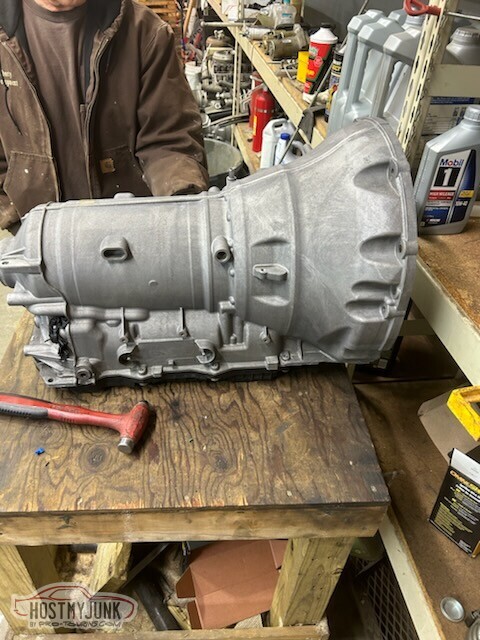
The ZF 8HP swap journey continues as well. Tom is working on prepping these transmissions for us. These two were probably the worst looking on the outside.
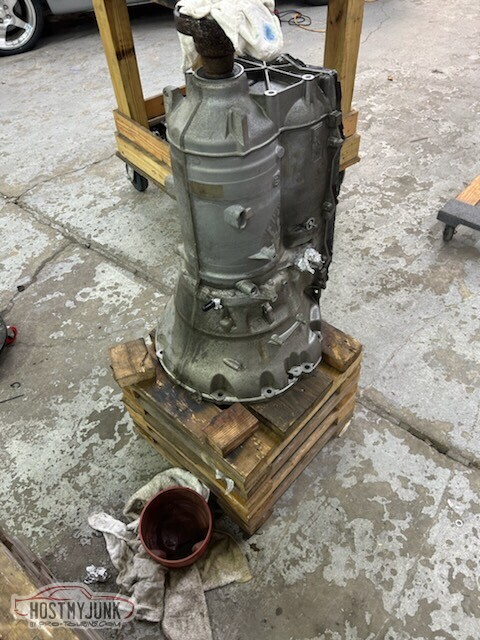
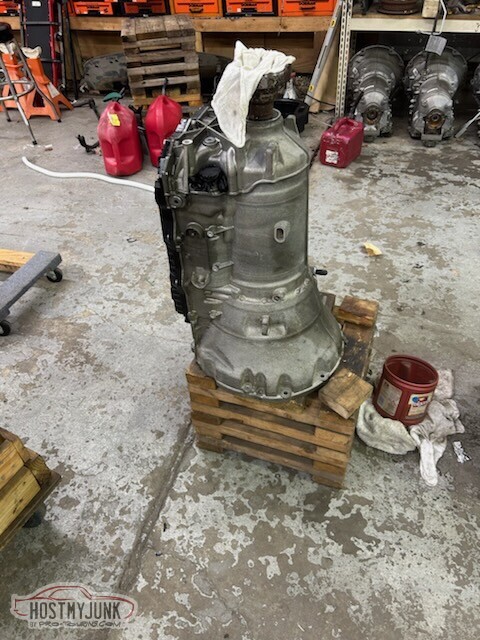
But they sure cleaned up nicely!
The really cool part about these transmissions is that they already have a CV cup on the output! If you guys recall, I was basically the one that popularized the use of modern CV driveshafts in older cars. My Cougar has had a dual CV driveshaft since I built it in 2015.
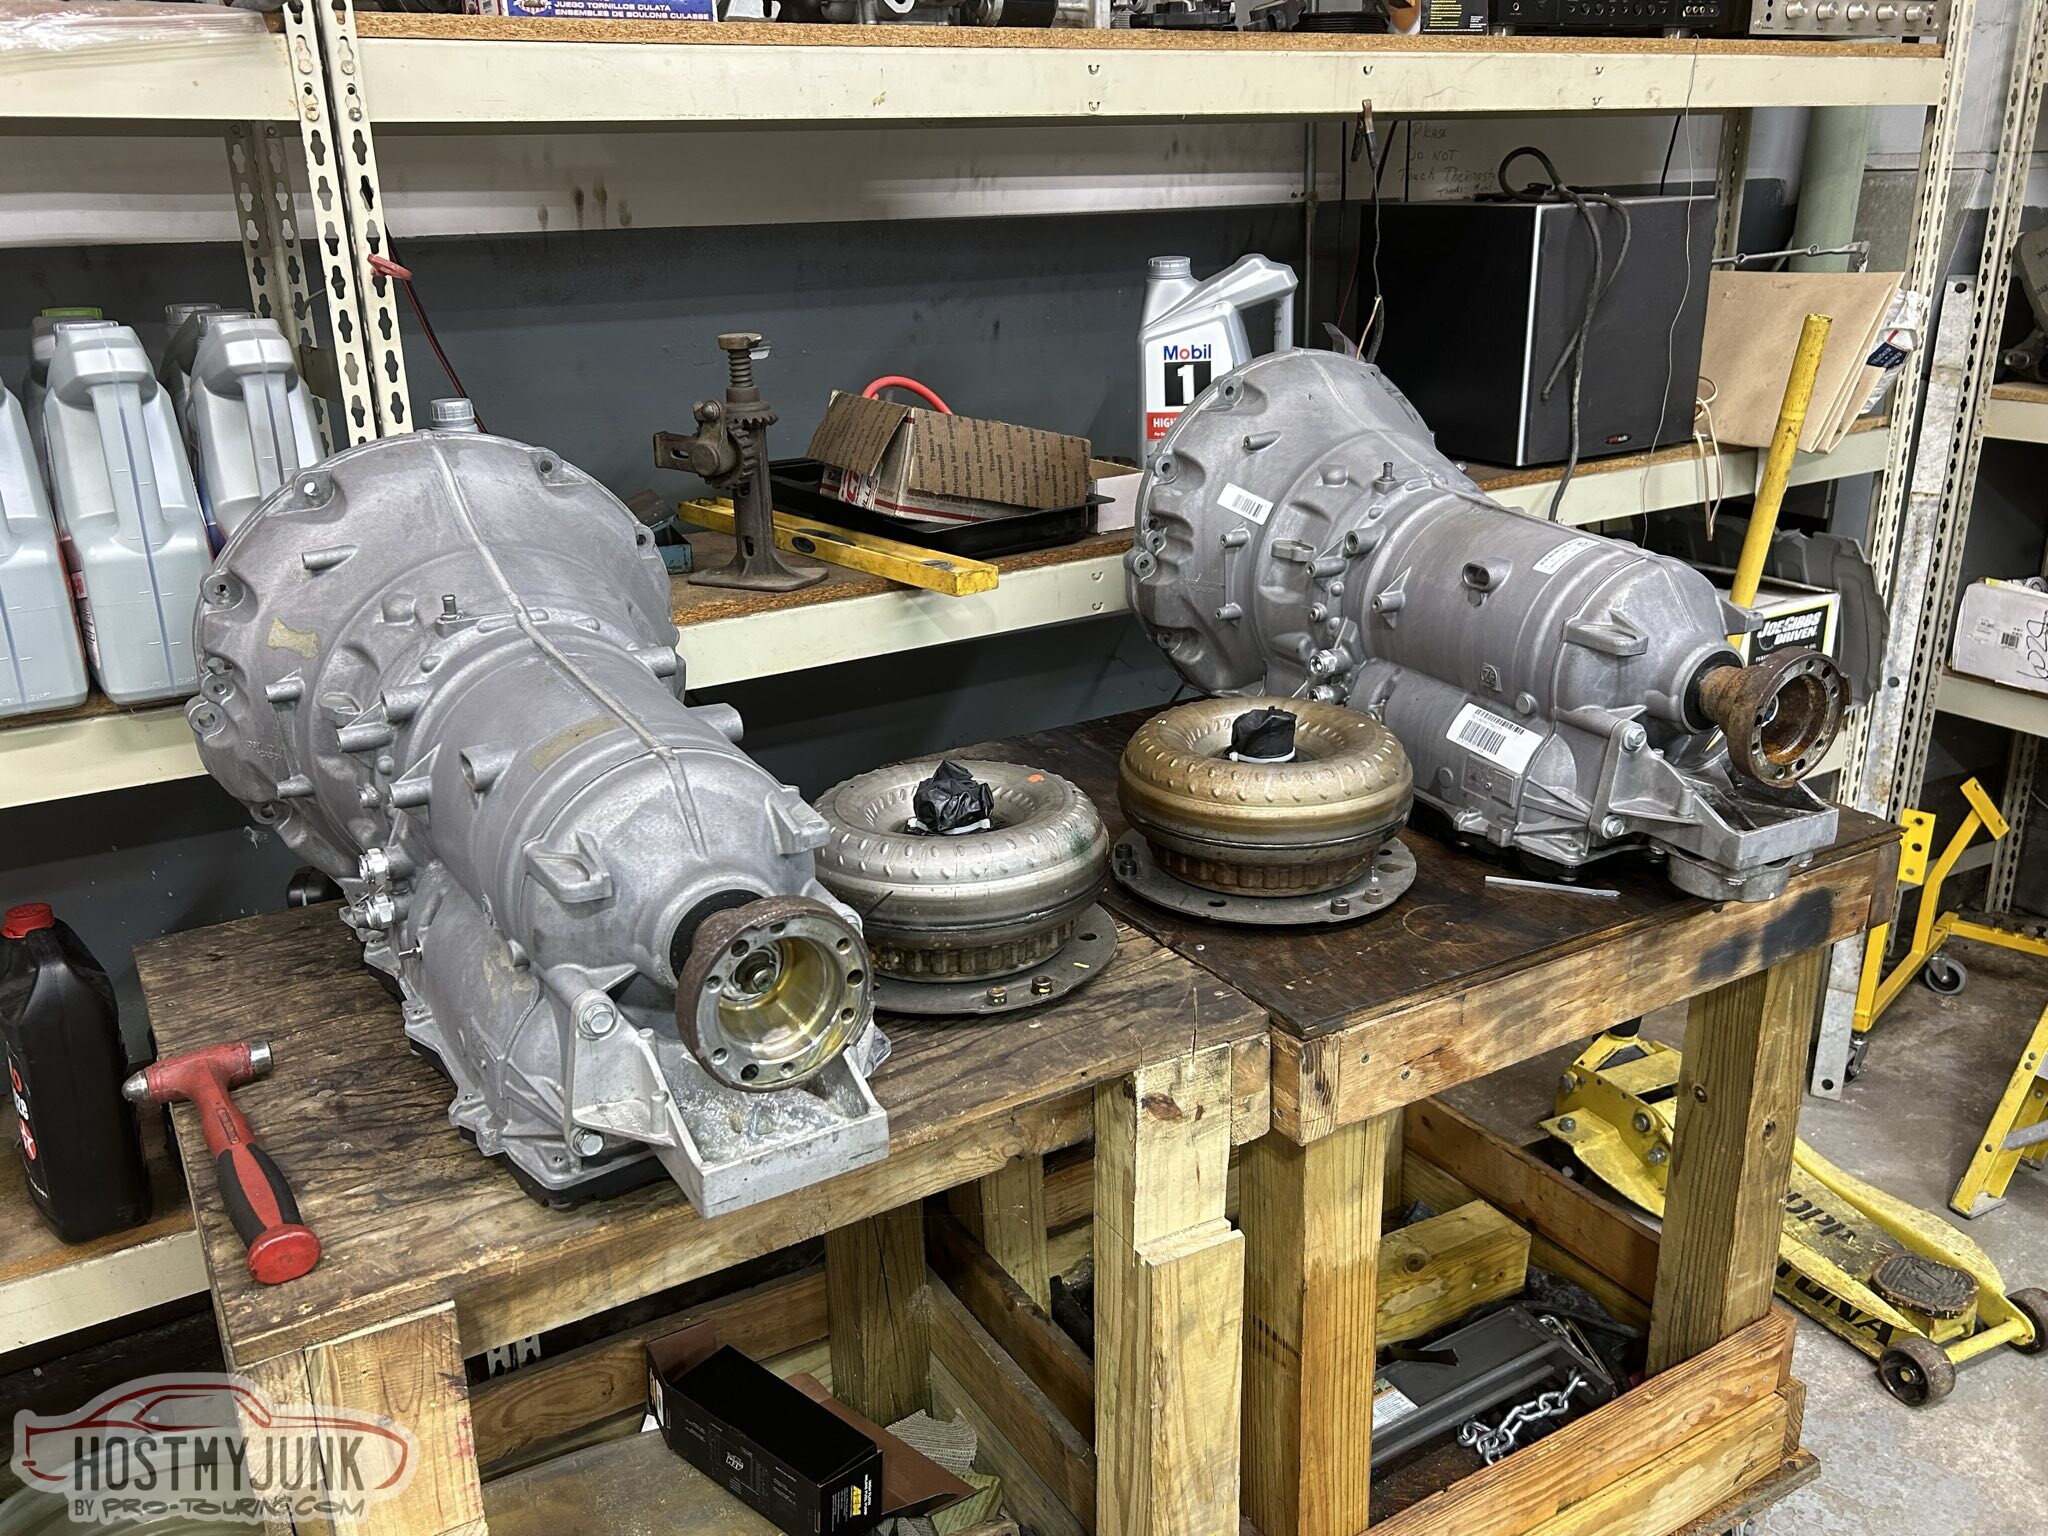
The GTO has had a CV driveshaft in it since about 2012-2013ish...Both driveshafts use a carbon fiber tube.
So when using the 8HP in an older car, the front CV is already to go! I met with The DriveShaft Shop at the PRI show and they assured me that they can build driveshafts for these swaps.
Andrew
Last Wednesday I woke up way to early and figured I should just get on the road and head to Indianapolis for the PRI show. This picture was taken somewhere in the middle of Missouri at about 4:30am. The show was great and if you guys follow me on IG (@projectgattago), I am posting just a few things that I thought were cool.
The Holley RetroBright headlights are fantastic and really transform the driving experience at night. Totally worth it!
The ZF 8HP swap journey continues as well. Tom is working on prepping these transmissions for us. These two were probably the worst looking on the outside.
But they sure cleaned up nicely!
The really cool part about these transmissions is that they already have a CV cup on the output! If you guys recall, I was basically the one that popularized the use of modern CV driveshafts in older cars. My Cougar has had a dual CV driveshaft since I built it in 2015.
The GTO has had a CV driveshaft in it since about 2012-2013ish...Both driveshafts use a carbon fiber tube.
So when using the 8HP in an older car, the front CV is already to go! I met with The DriveShaft Shop at the PRI show and they assured me that they can build driveshafts for these swaps.
Andrew
The following users liked this post:
rkupon1 (01-02-2024)

The following users liked this post:
Project GatTagO (12-14-2023)
01-01-2024, 10:12 AM
#1337
01-01-2024, 10:39 AM
#1338
TECH Senior Member

And to you, Andrew! Always an educational pleasure reading your threads and posts!
The following 2 users liked this post by rkupon1:
G Atsma (01-02-2024), Project GatTagO (01-02-2024)
01-06-2024, 10:34 PM
#1340
TECH Senior Member
Thread Starter
iTrader: (7)
Two days ago I made a trip to the Chicago area to accomplish a couple of things. First of all, I needed to deliver an 8HP70 transmission to my friend Brian. Second of all, I needed to have a meeting with the guys from TurboLamik to nail down exactly how the necessary data from the Holley ECU was going to get to the TCU.
Brian's car is one of the three cars that are being converted to the 8HP70. He has a 66 Fairlane that has been LS swapped for a while now:
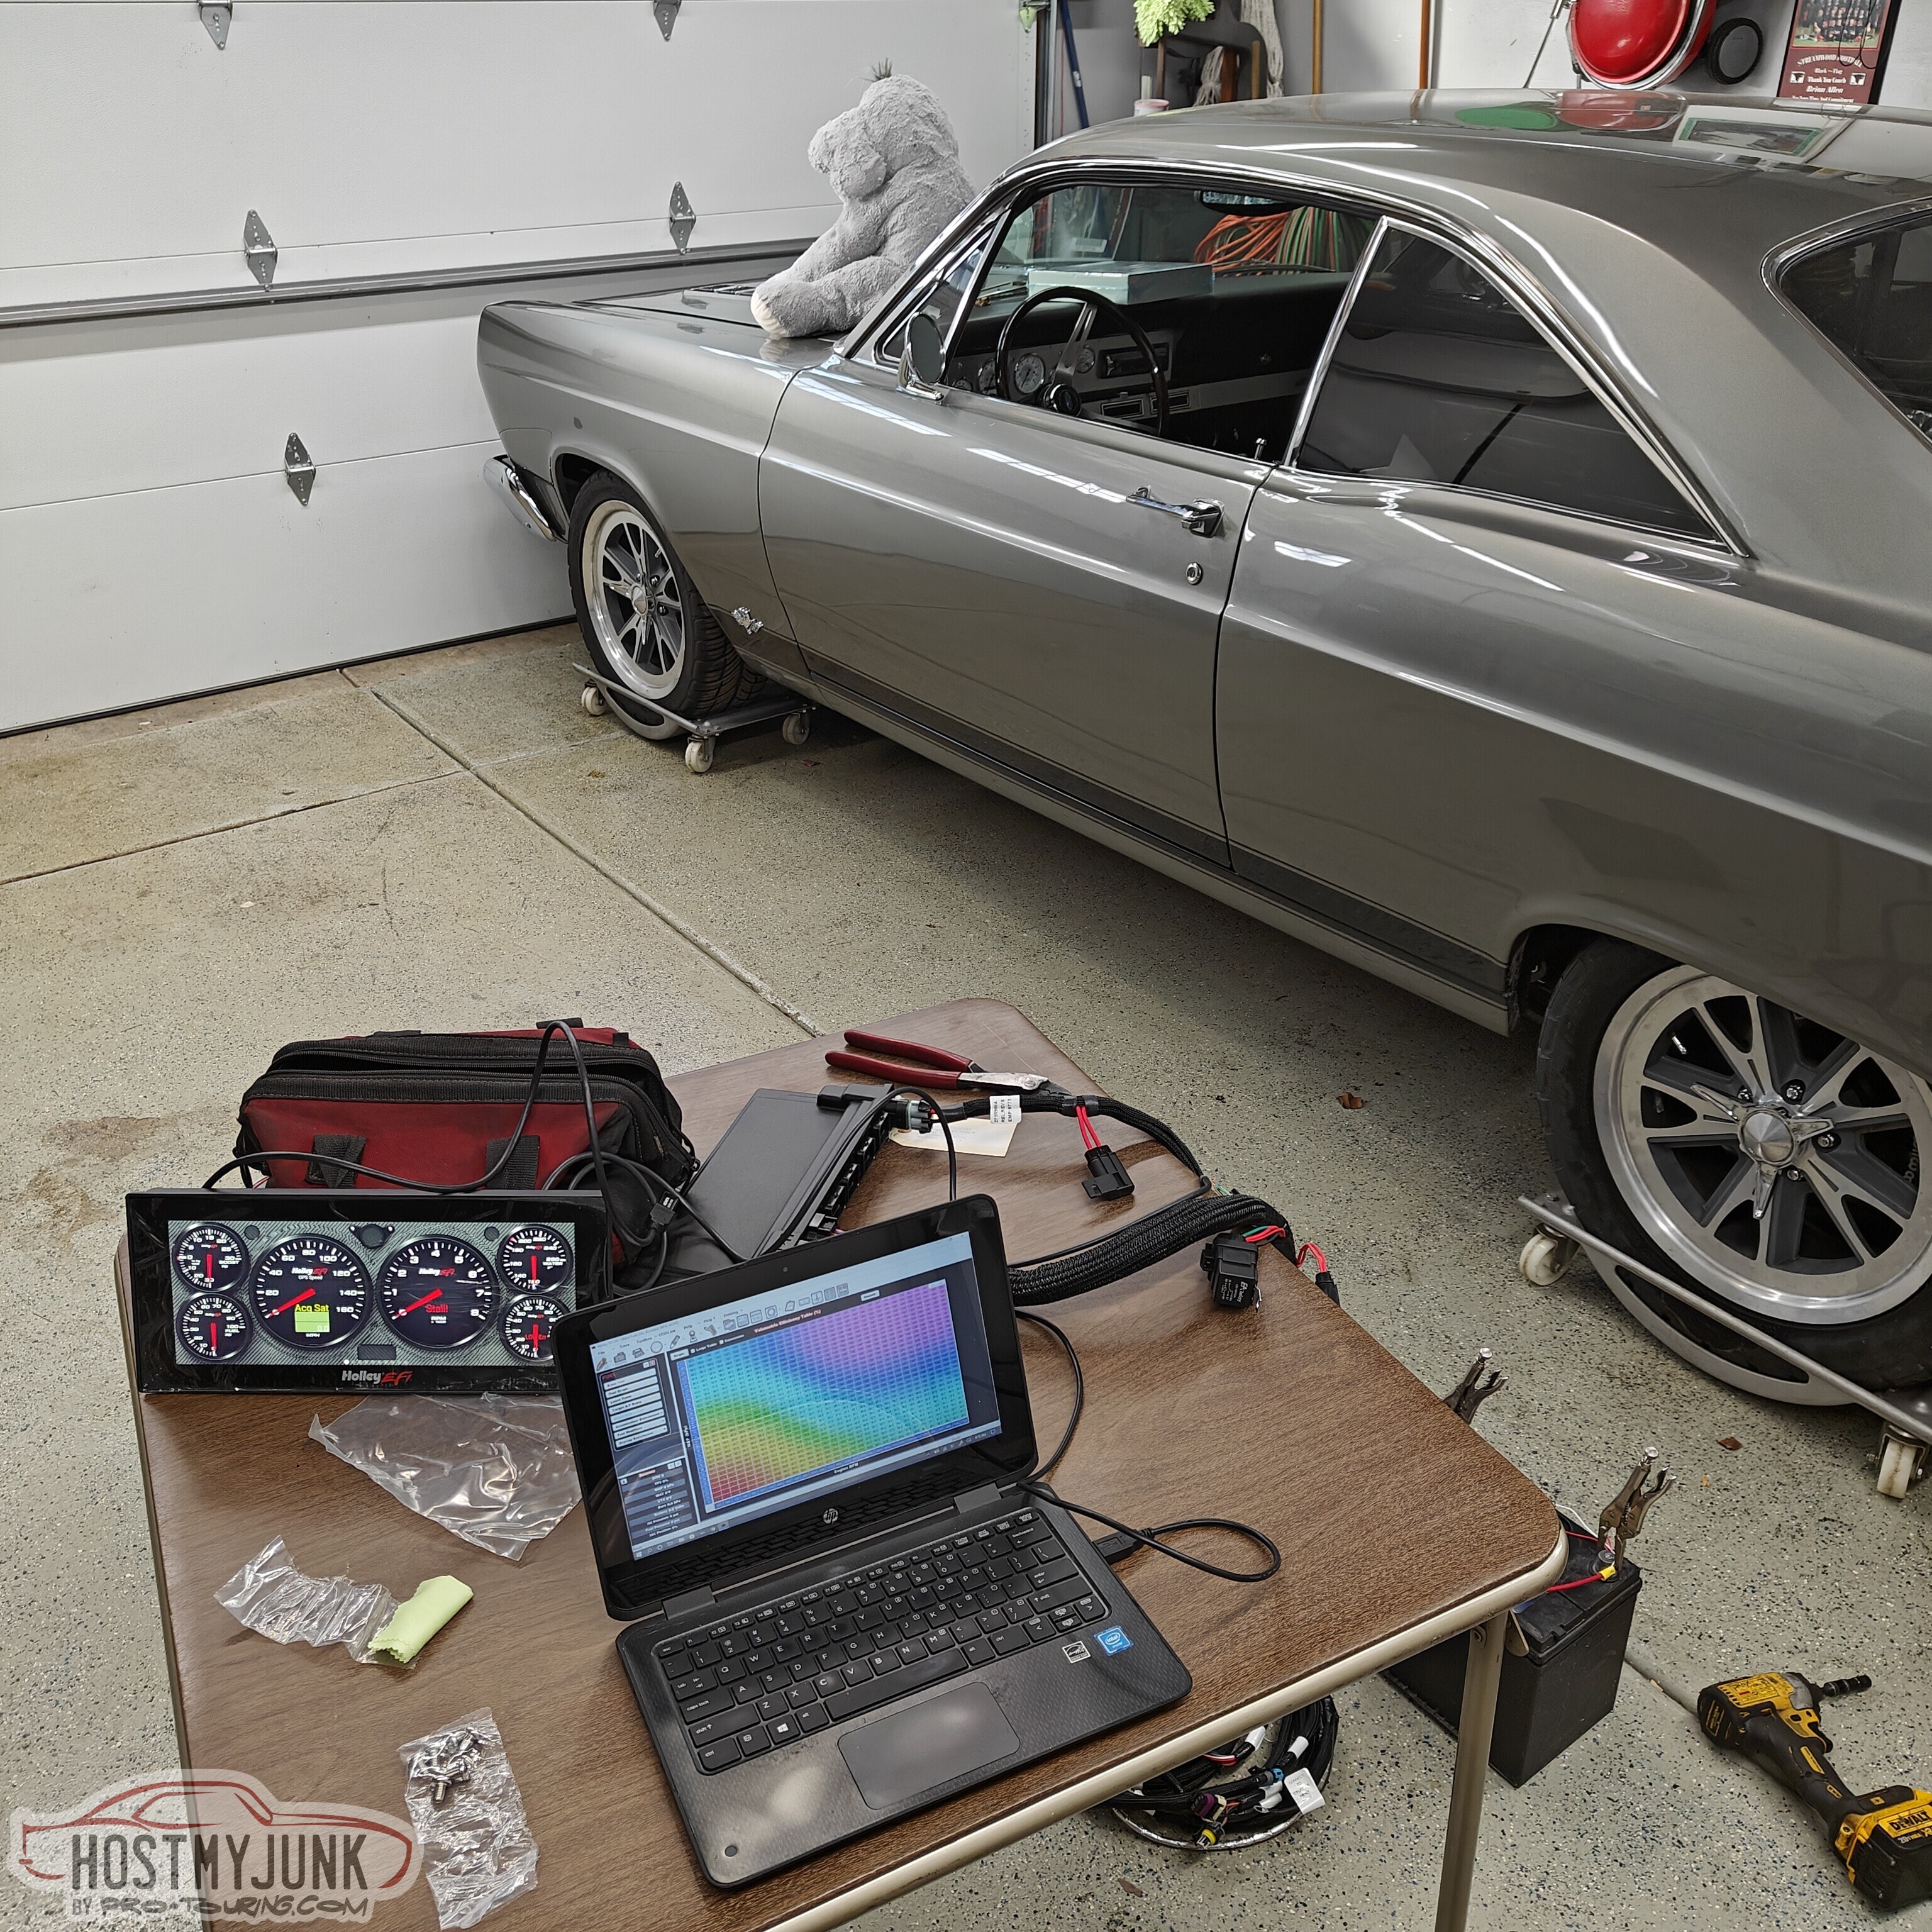
This was done today and it really took the efforts of numerous people to get here:
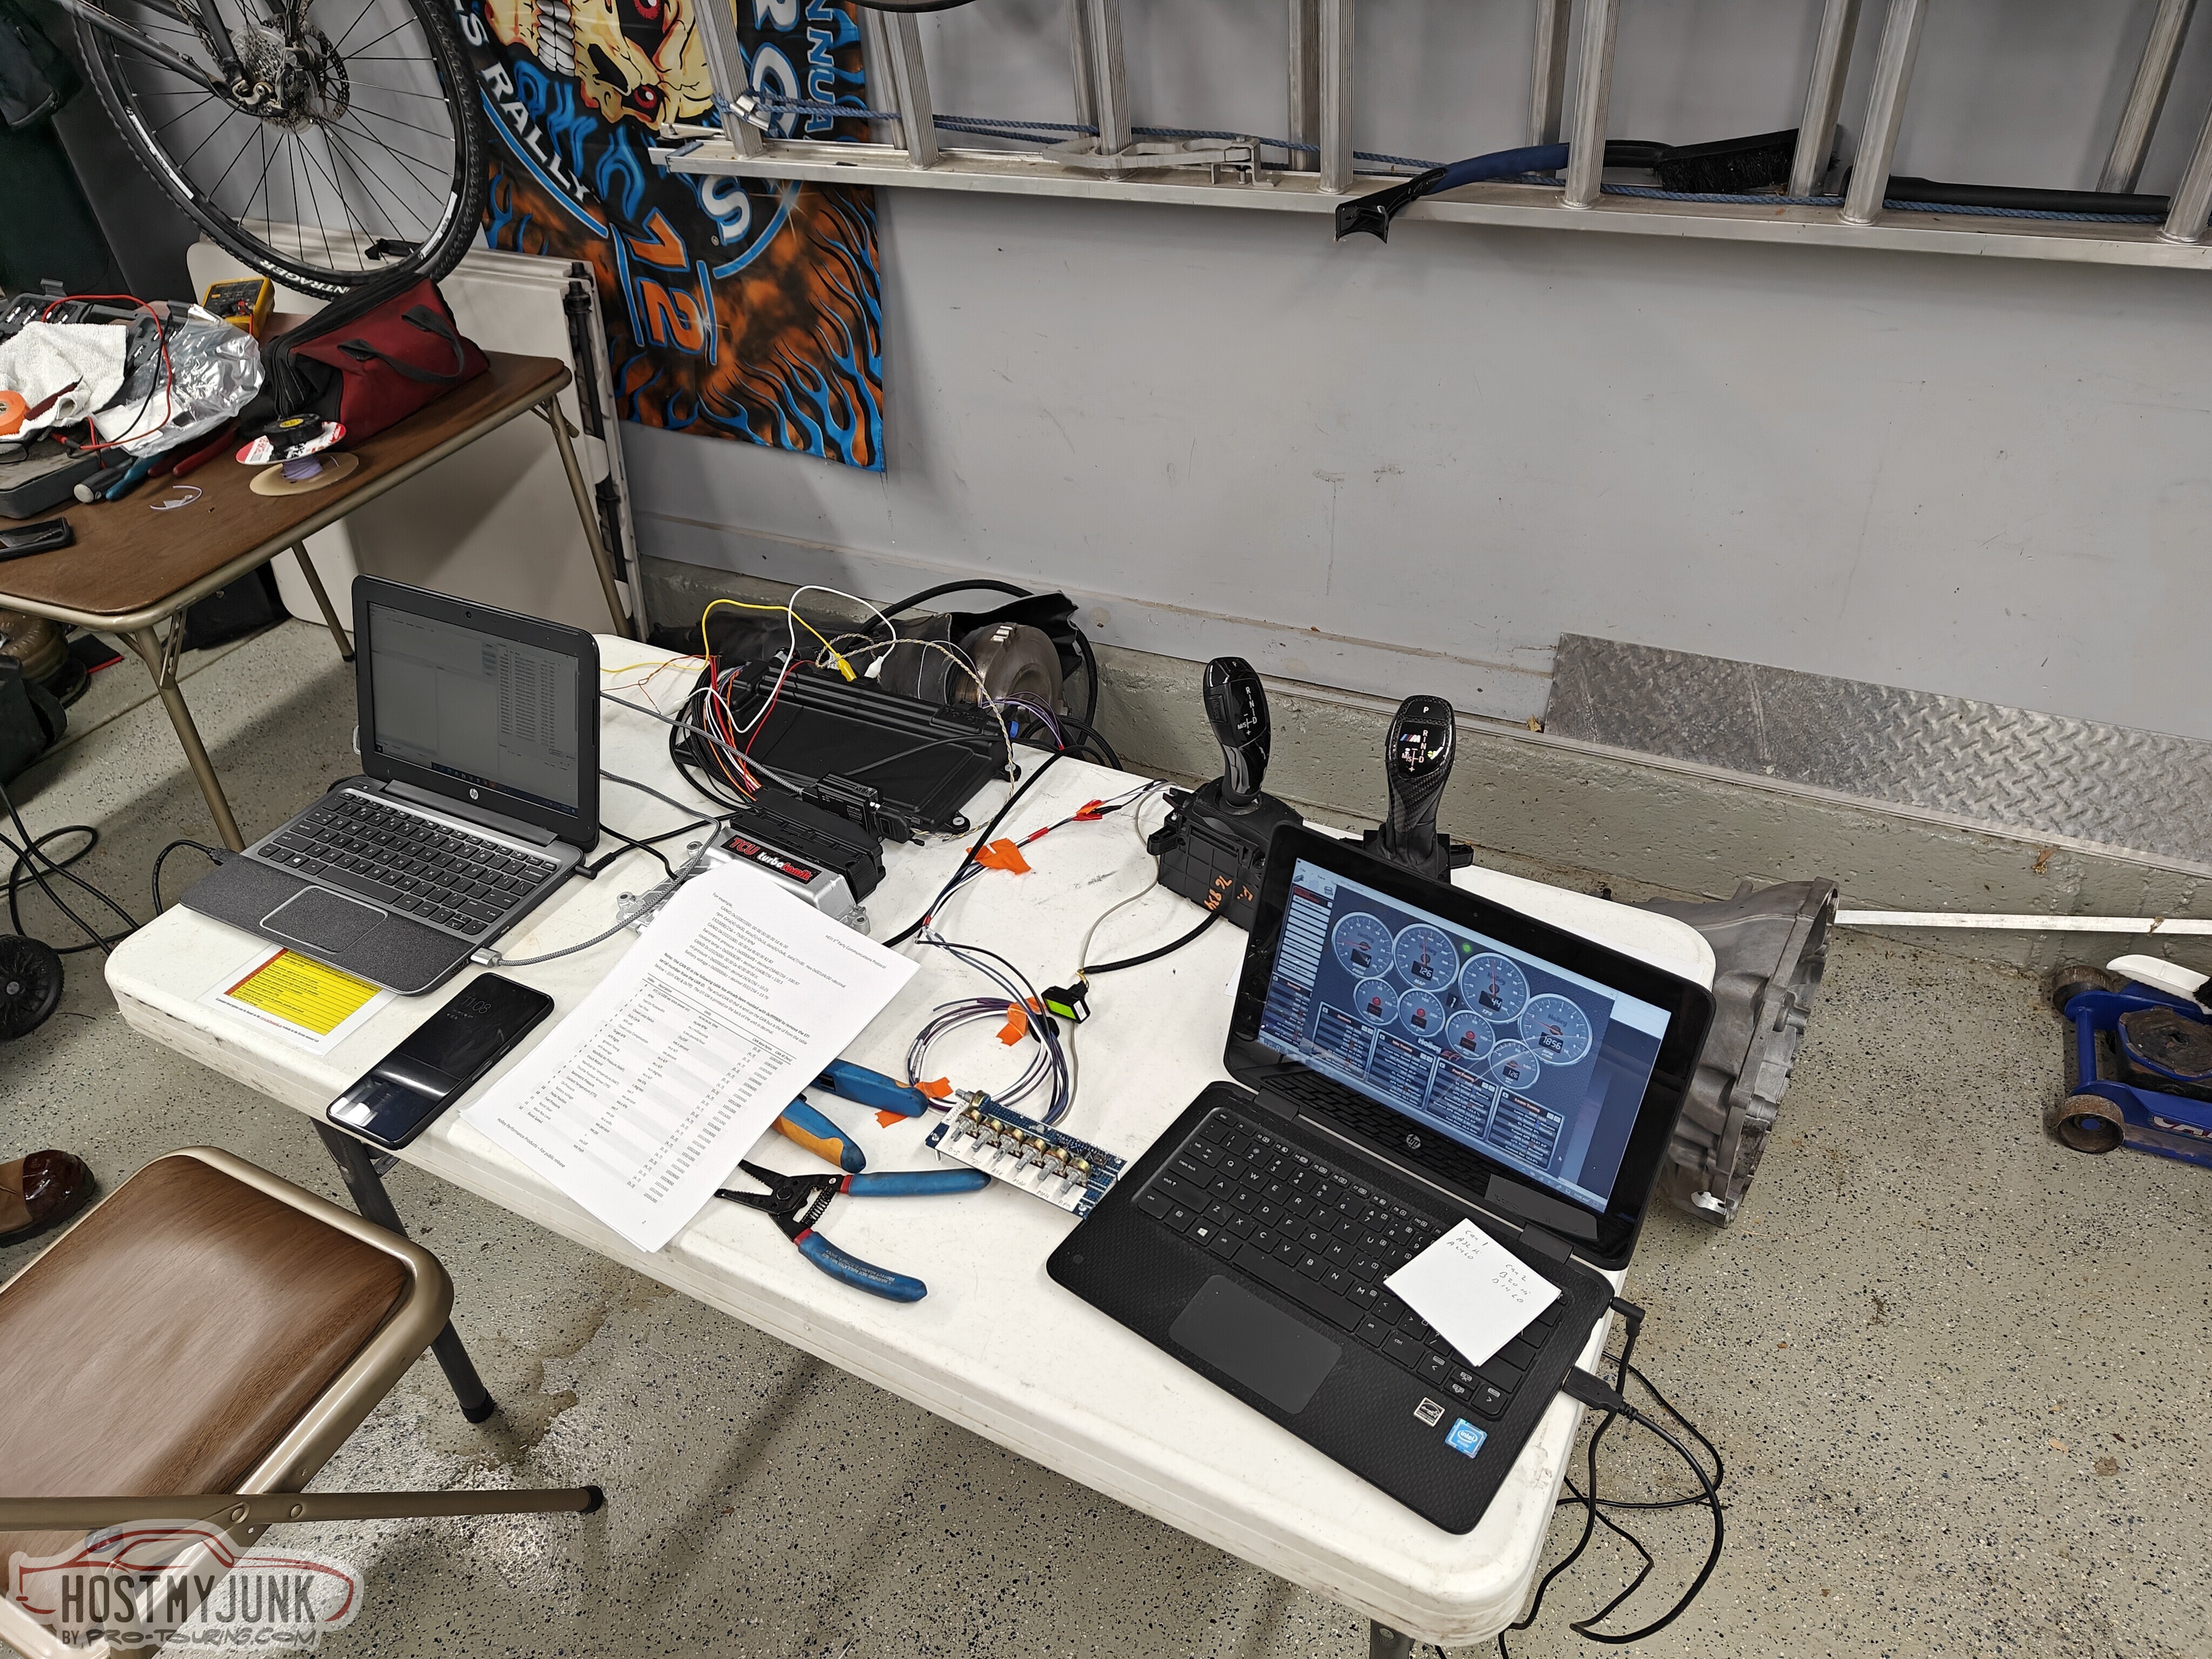
What you see here is a Holley Dominator ECU connected via CAN to the TurboLamik TCU. The laptop on the right is running the Holley software while the laptop on the left is hooked up to the TurboLamik.
The little controller next to the Holley EFI laptop is an engine simulator that was put together by my buddy Carl. It is connected to the Holley Dominator and in its current configuration is feeding RPM, TPS and MAP sensor data to the Dominator ECU. These are the three main parameters that the TurboLamik needs in order to control the transmission.
The Dominator ECU is connected via CAN to the TurboLamik TCU, which is able to read the relevant signals off the CAN bus in order to make its shifting decisions.
This process required Lucas from TurboLamik logging in remotely and actually making new firmware to support Holley EFI. These changes will be rolled into the next release of TurboLamik TCU firmware.
Progress is being made...
Andrew
Brian's car is one of the three cars that are being converted to the 8HP70. He has a 66 Fairlane that has been LS swapped for a while now:
This was done today and it really took the efforts of numerous people to get here:
What you see here is a Holley Dominator ECU connected via CAN to the TurboLamik TCU. The laptop on the right is running the Holley software while the laptop on the left is hooked up to the TurboLamik.
The little controller next to the Holley EFI laptop is an engine simulator that was put together by my buddy Carl. It is connected to the Holley Dominator and in its current configuration is feeding RPM, TPS and MAP sensor data to the Dominator ECU. These are the three main parameters that the TurboLamik needs in order to control the transmission.
The Dominator ECU is connected via CAN to the TurboLamik TCU, which is able to read the relevant signals off the CAN bus in order to make its shifting decisions.
This process required Lucas from TurboLamik logging in remotely and actually making new firmware to support Holley EFI. These changes will be rolled into the next release of TurboLamik TCU firmware.
Progress is being made...
Andrew
The following users liked this post:
Keith (01-14-2024)