
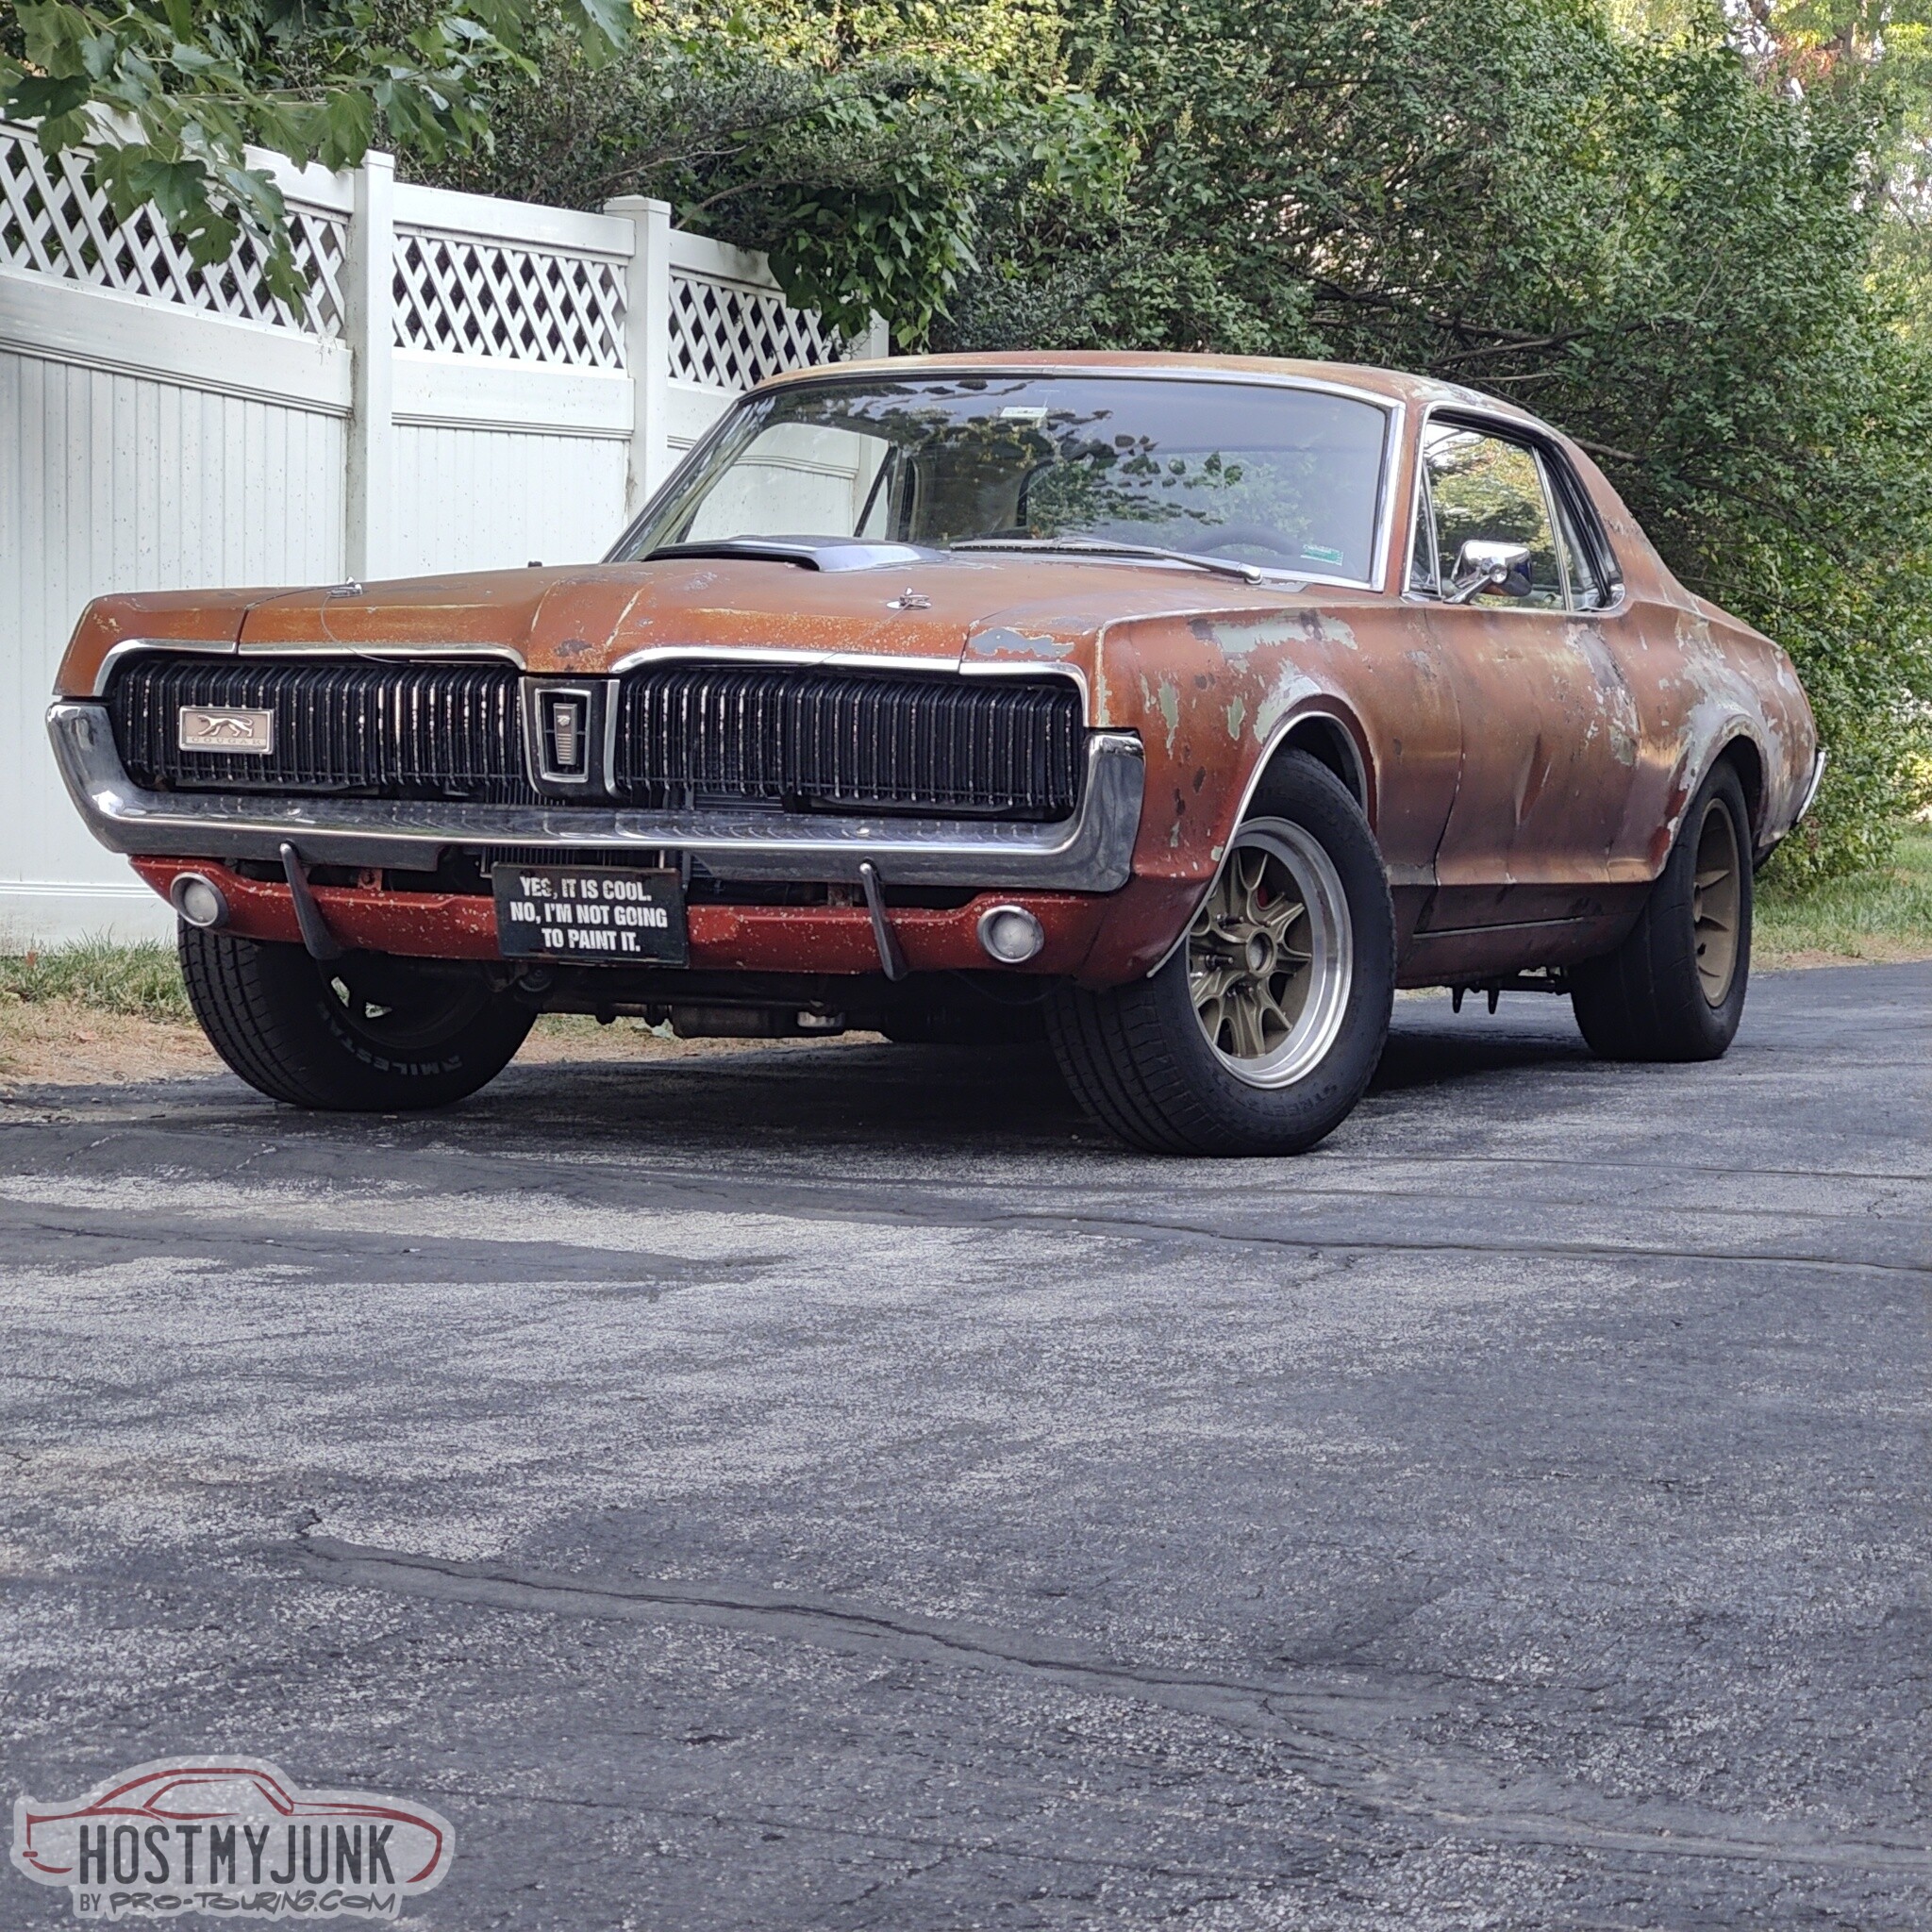
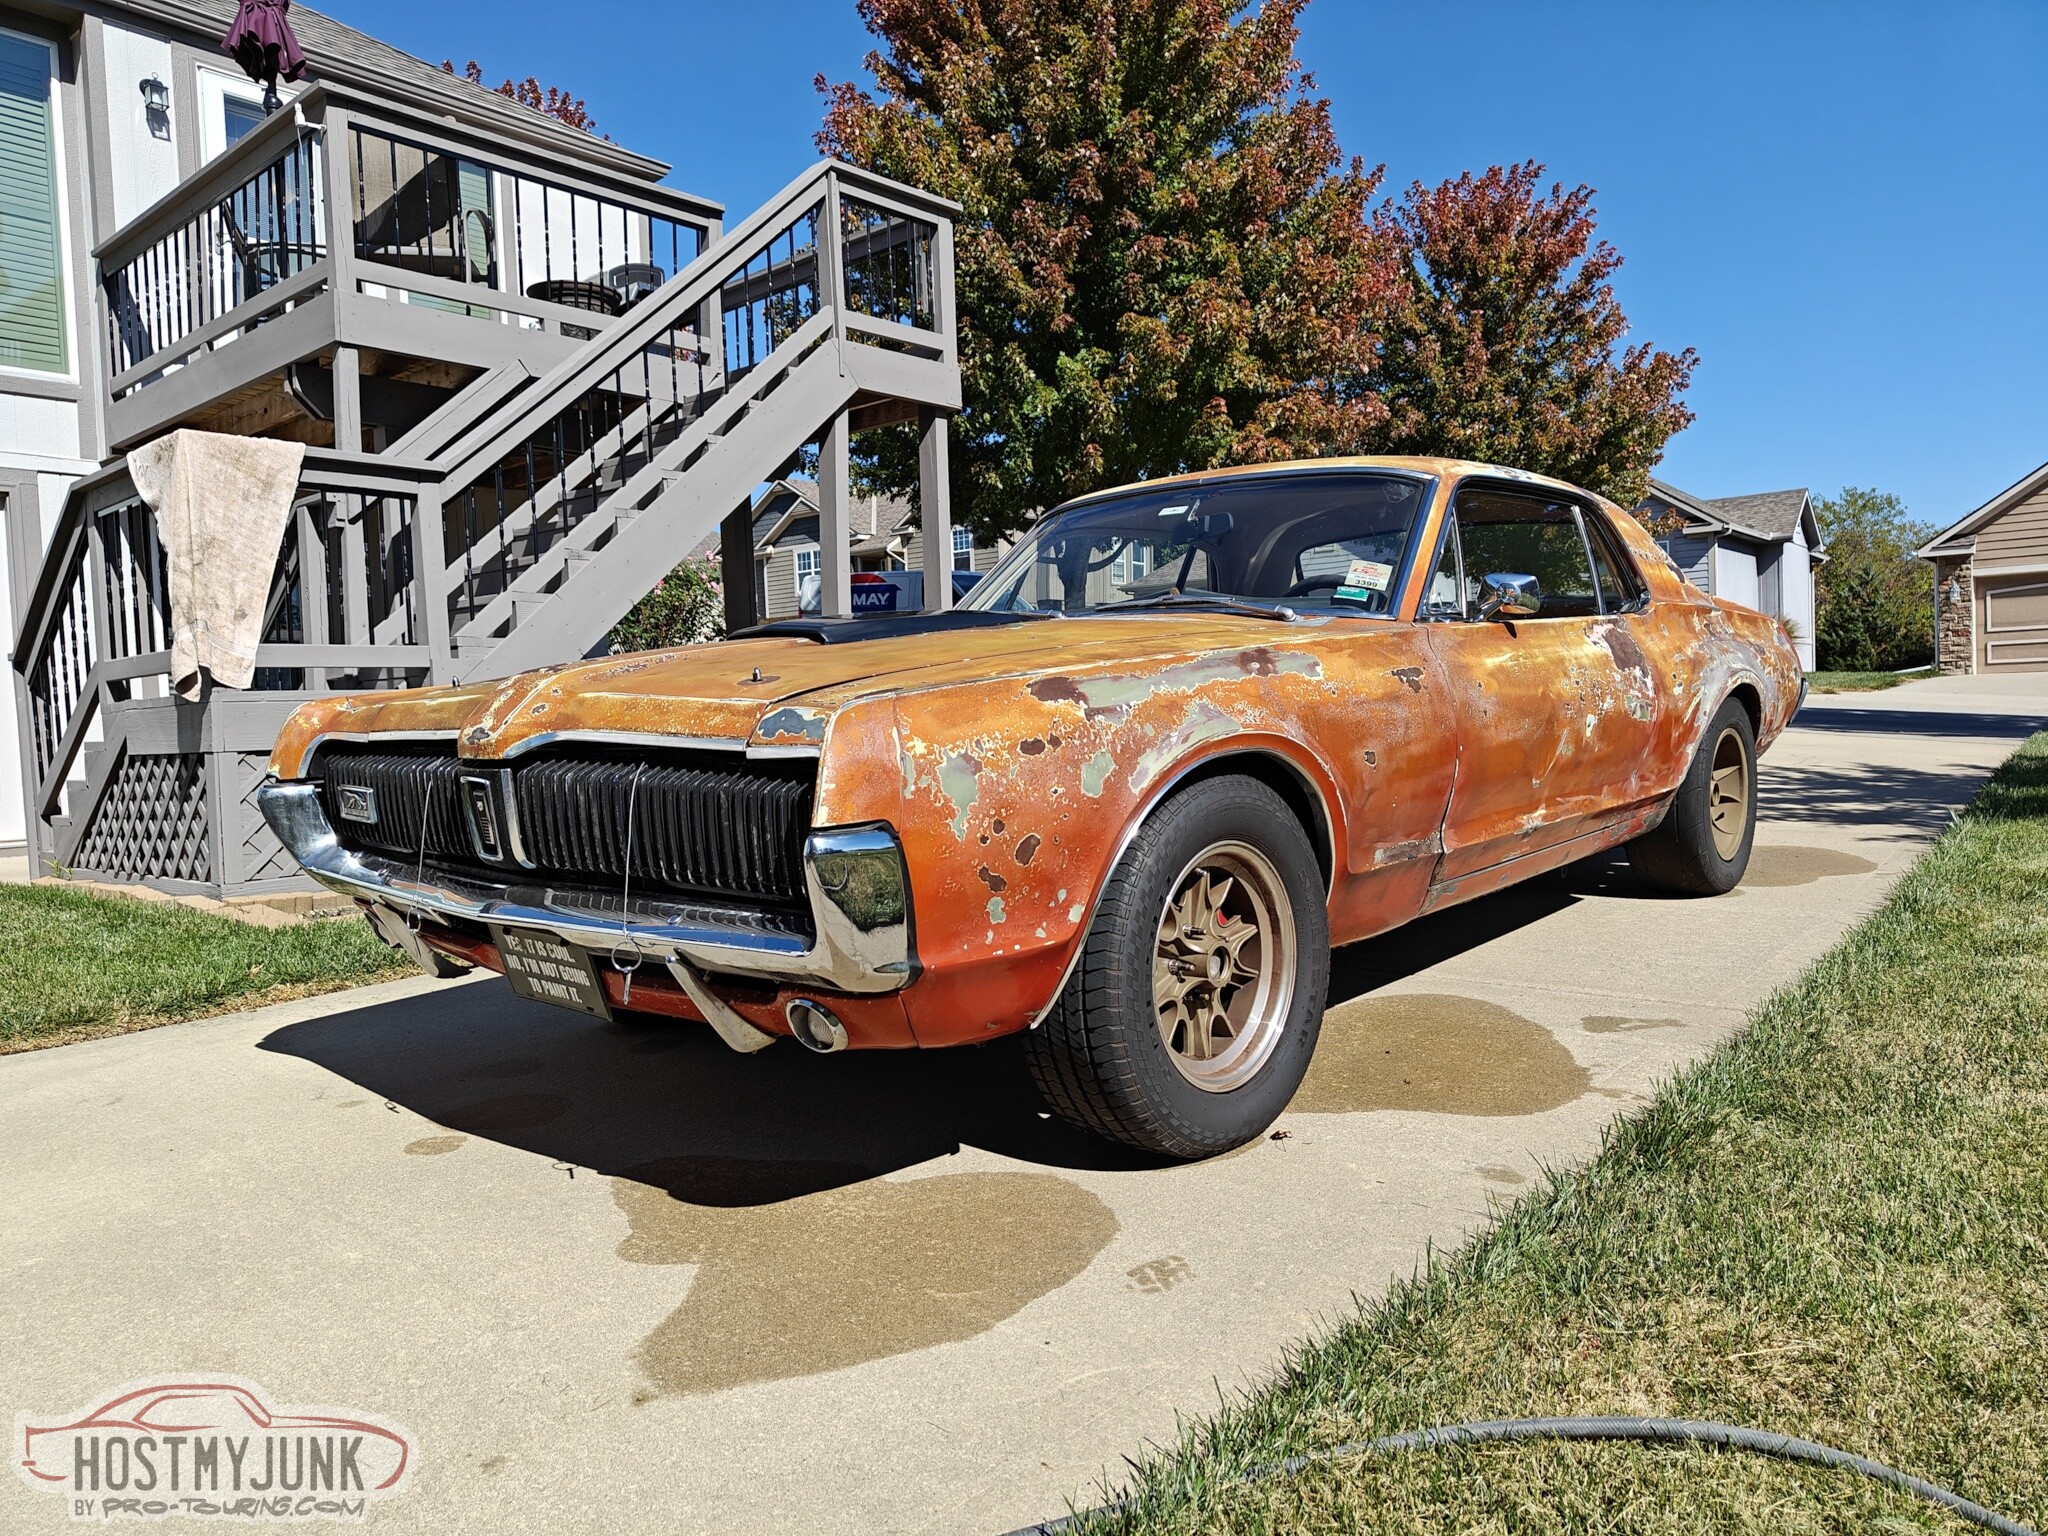
1967 Cougar build (over 500 pictures and videos)
 10-03-2023, 09:48 PM
#1301
TECH Senior Member
Thread Starter
iTrader: (7)

Wiring the flex fuel sensor to the ECU requires +12v, sensor ground and sensor signal. Holley also recommends adding a 10k pull-up resistor between the signal wire and a 5v reference source.
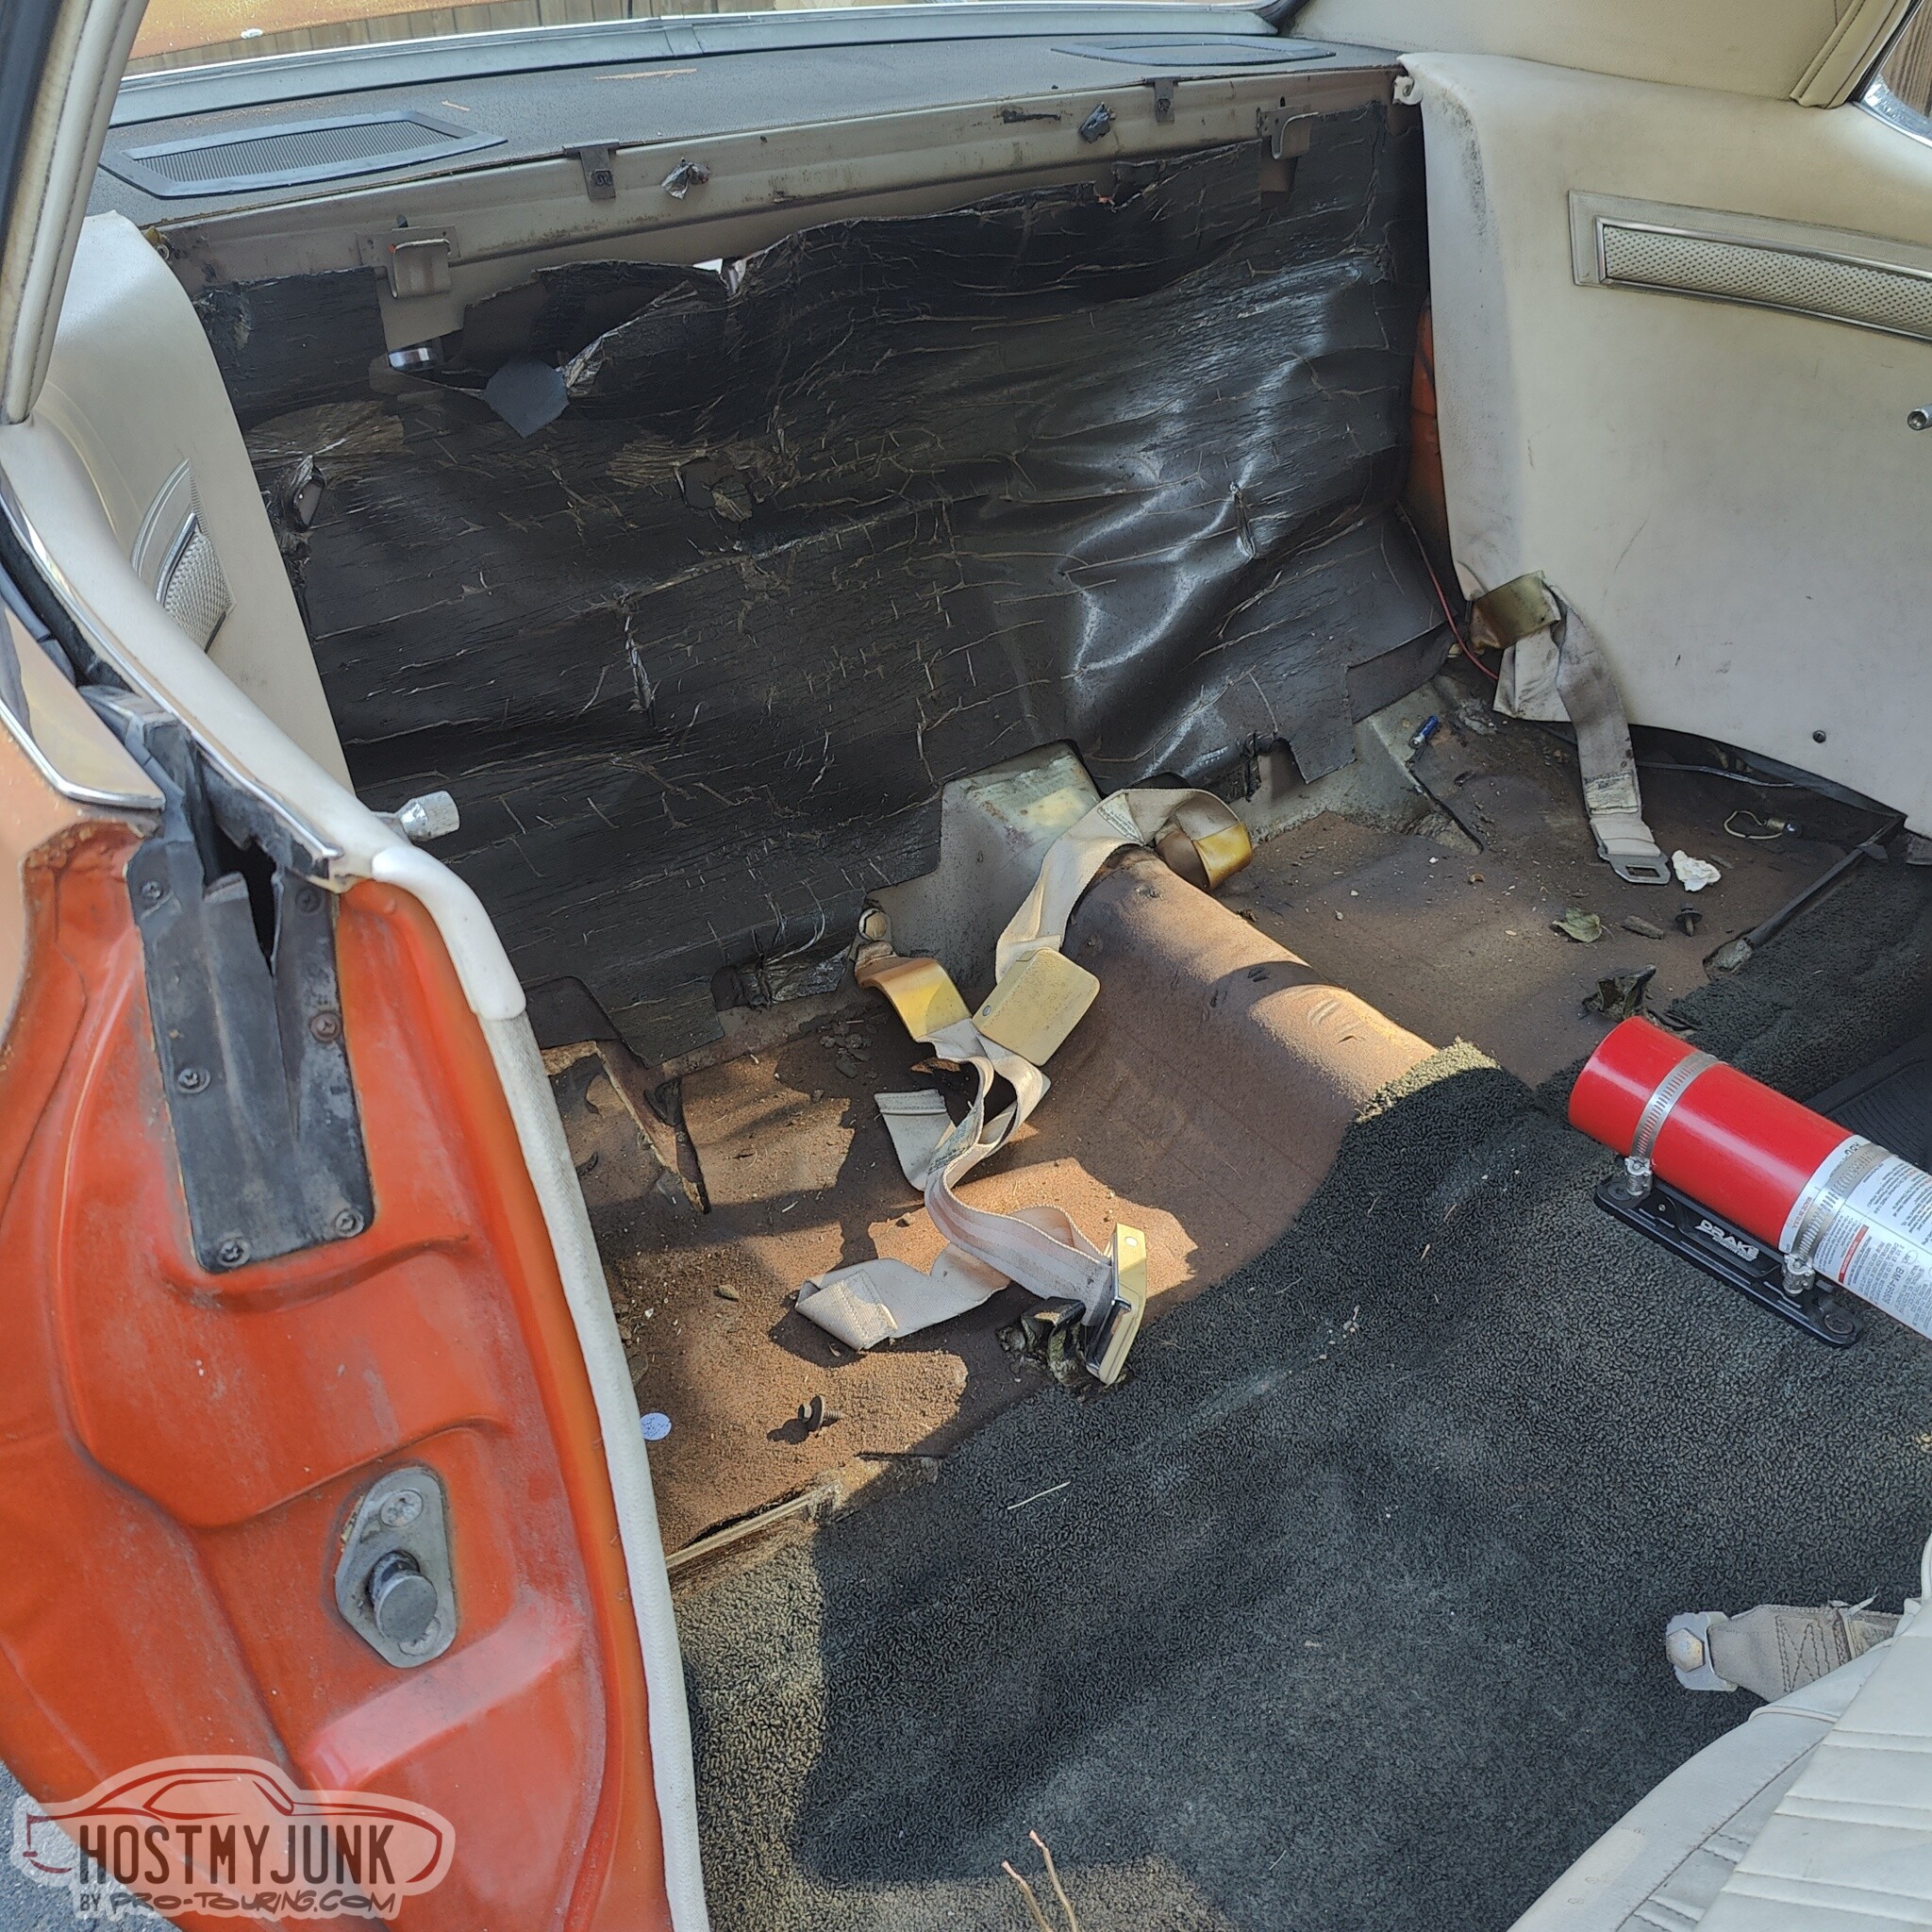
The first step was to remove the rar seat so that I can get access to run the wires. The rear seats come out with two bolts.
As I mentioned before, I like using shielded cable for runs like this. It is a little more bulky, but the cable is super durable. This is the same cable that Holley uses for the cam and crank sensor wiring and it is technically a 5 strand cable. There are 3 insulated conductors, a bare ground, and also a foil shield that wraps around all of it.
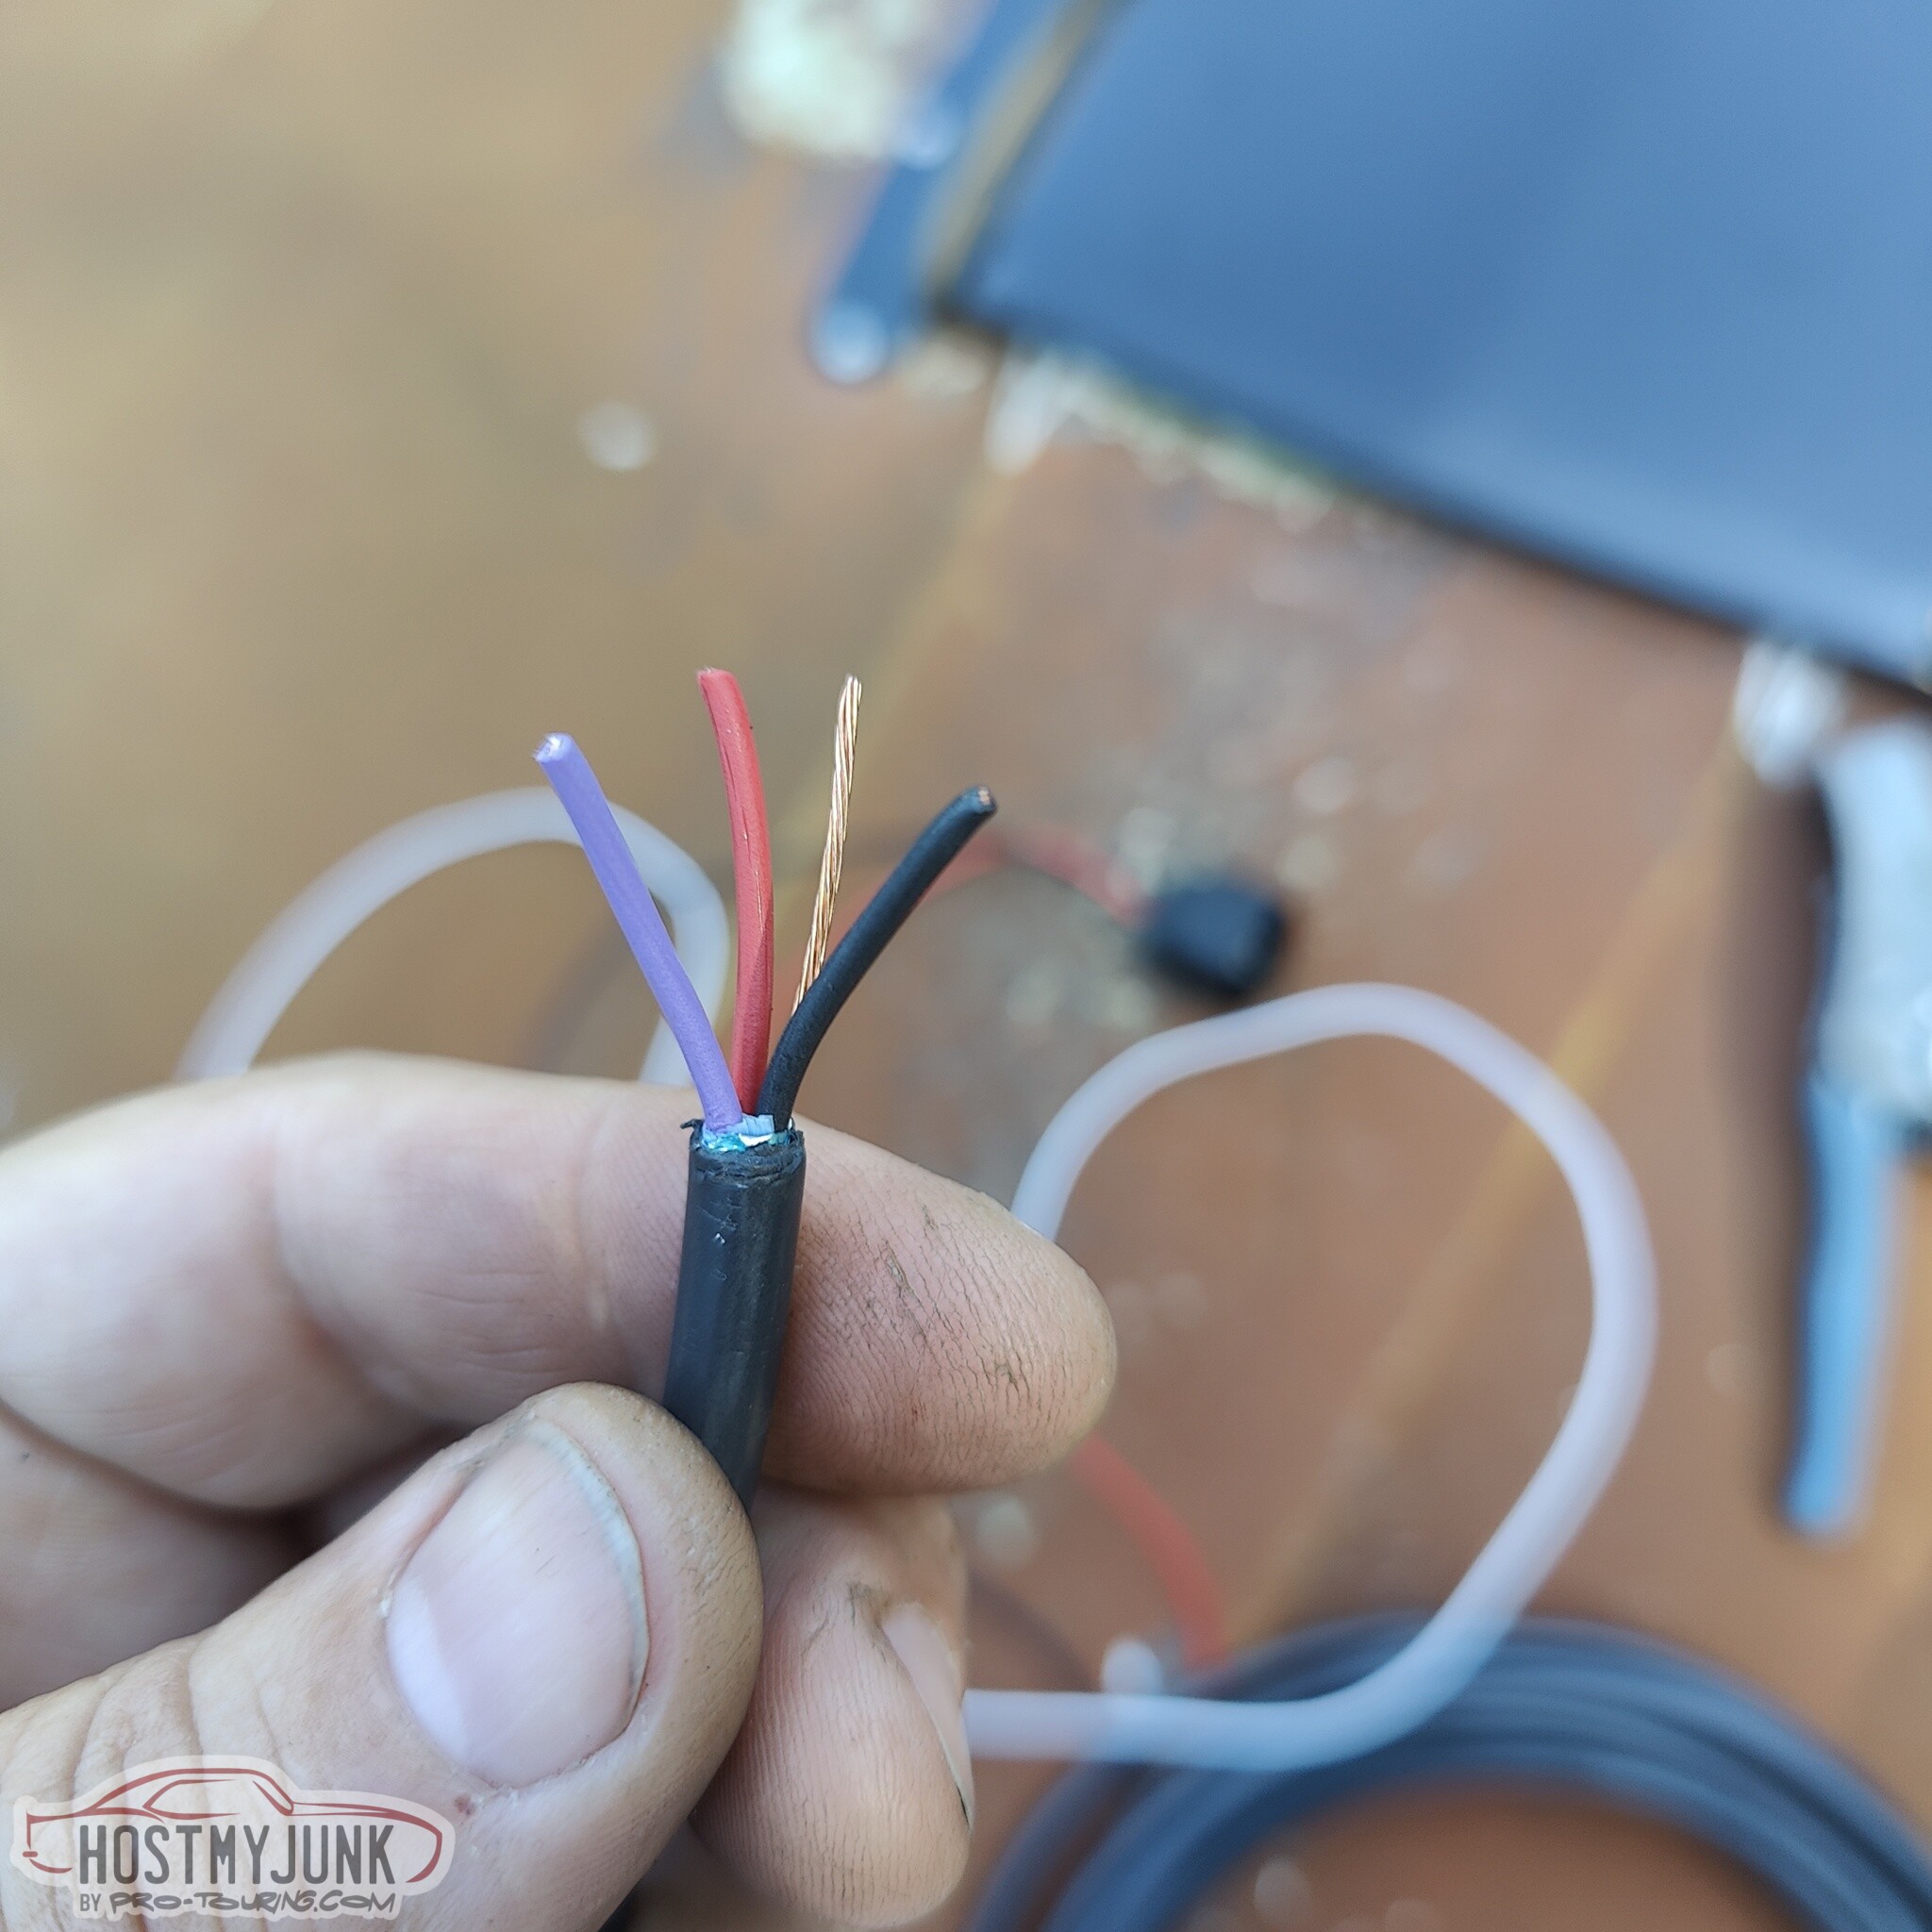
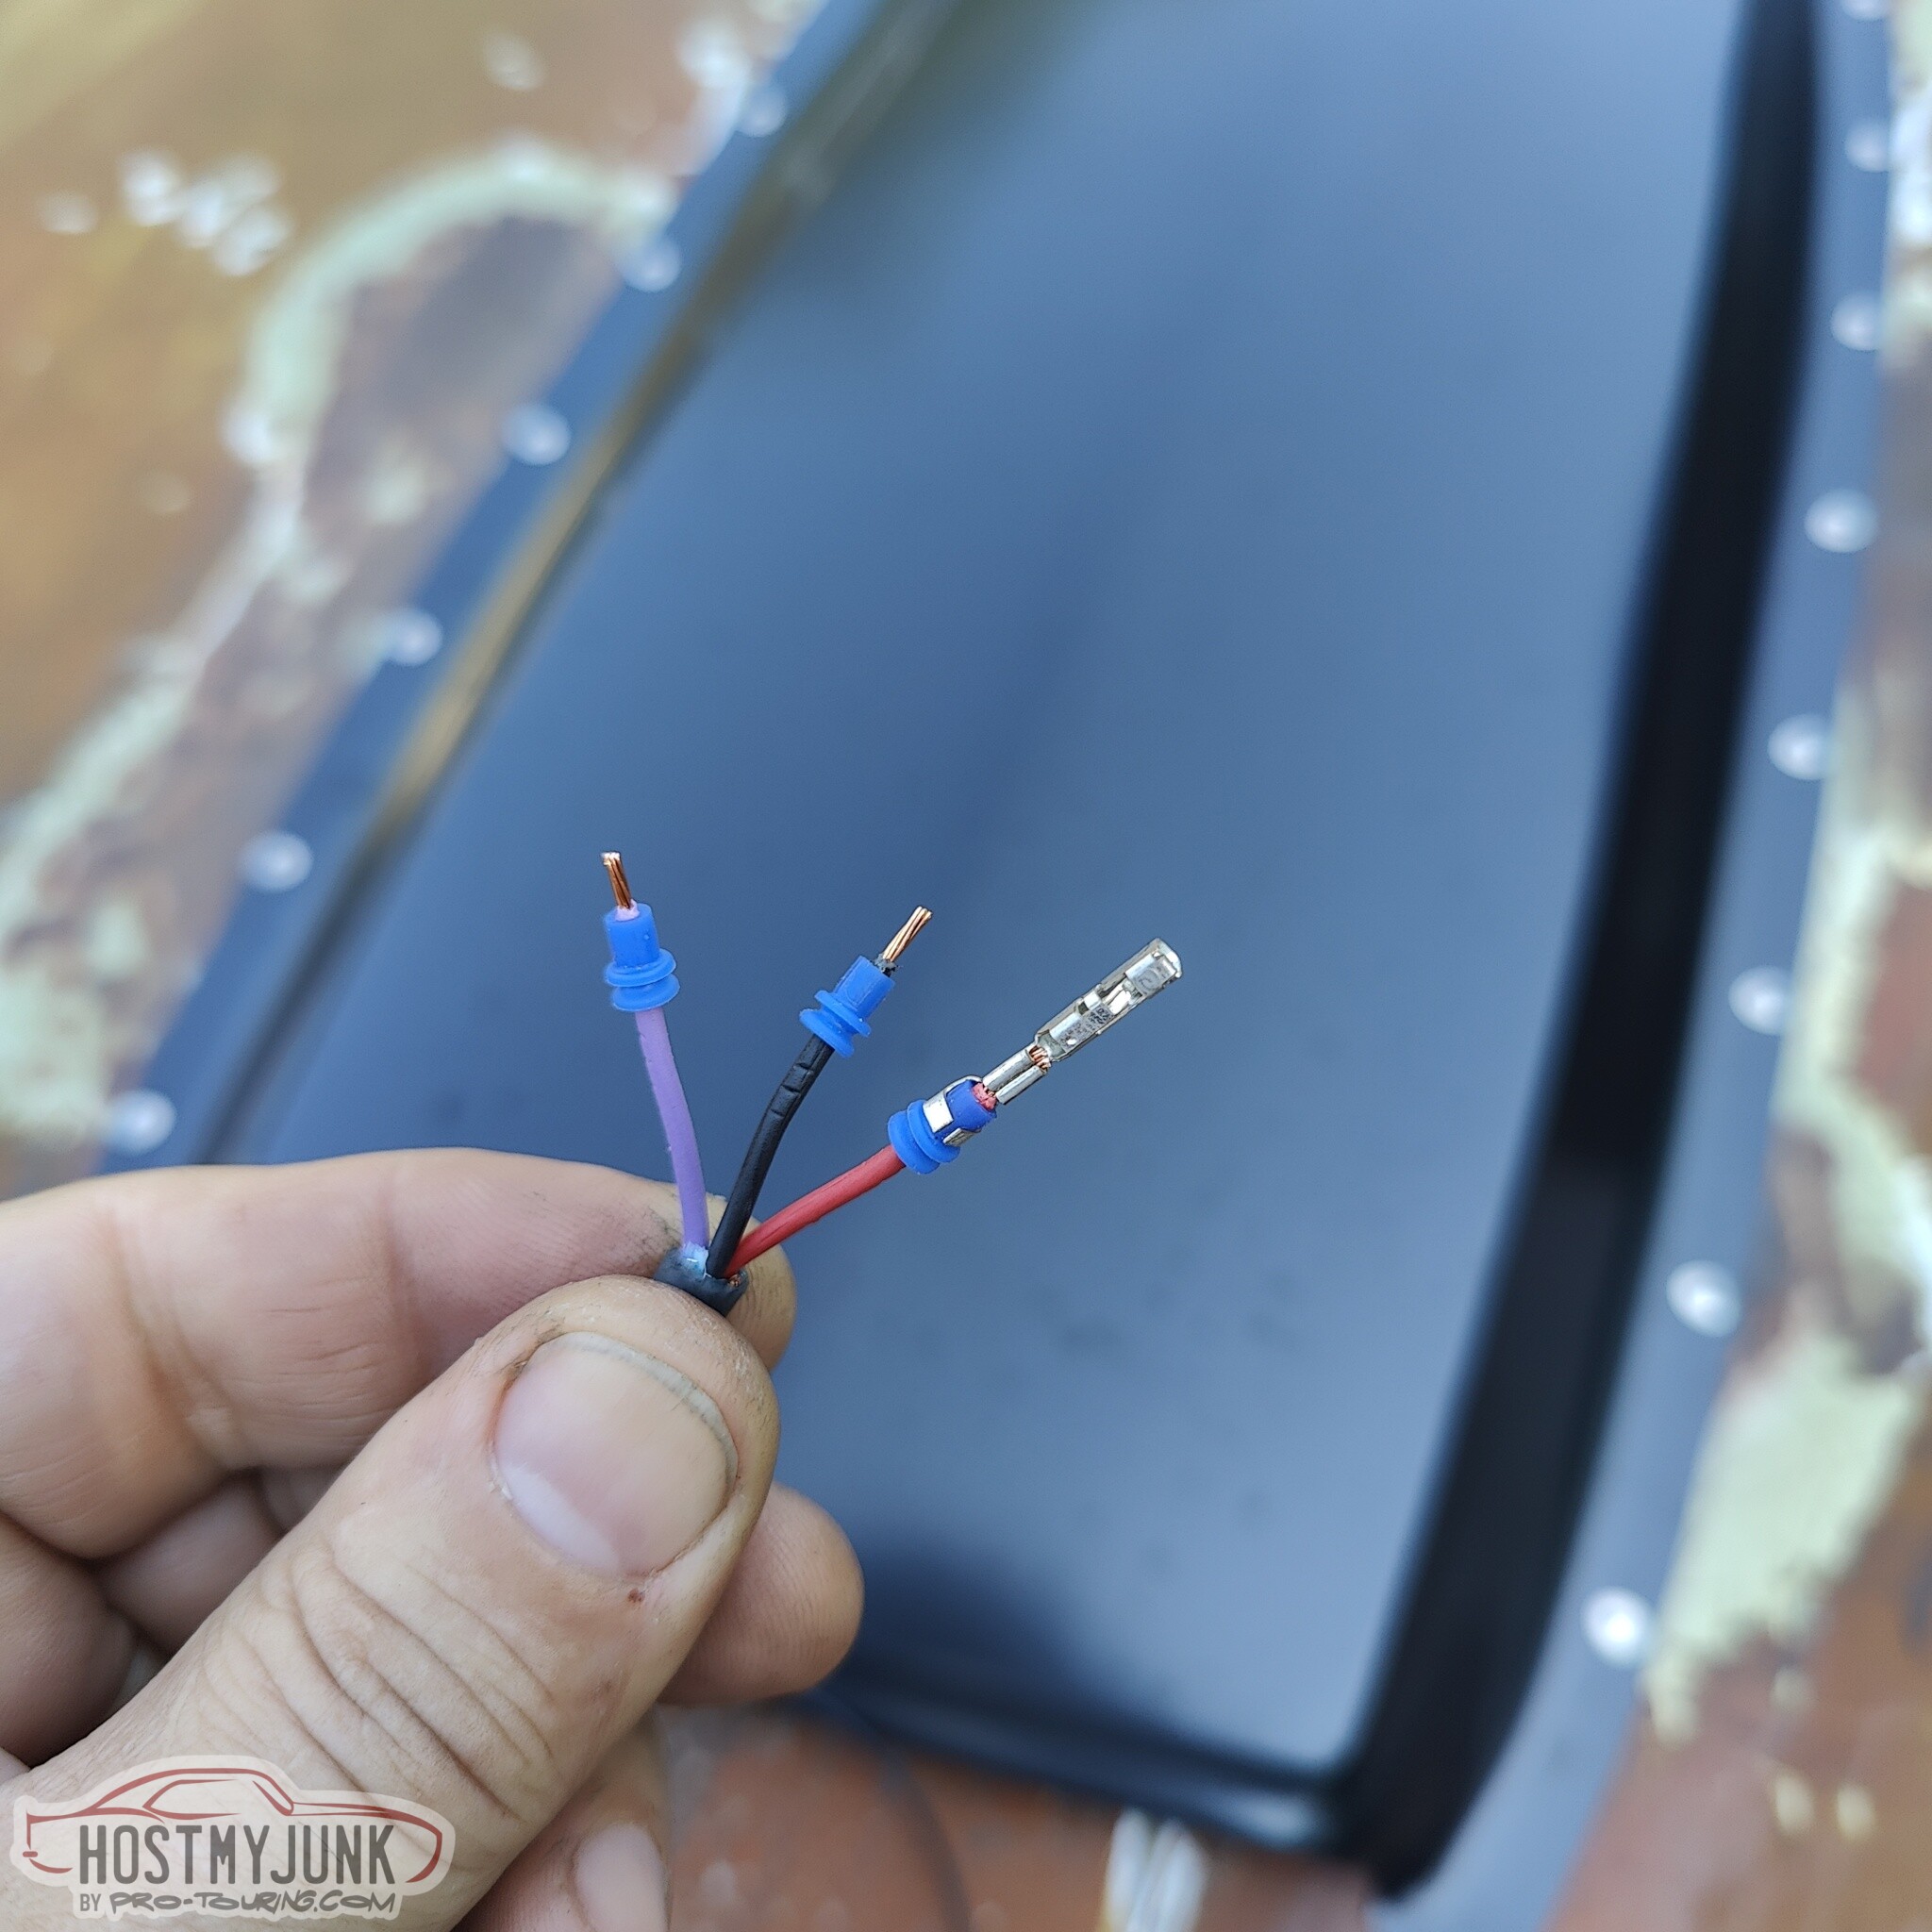
The wires are stripped and the appropriate terminals and cable seals are crimped on the wires.
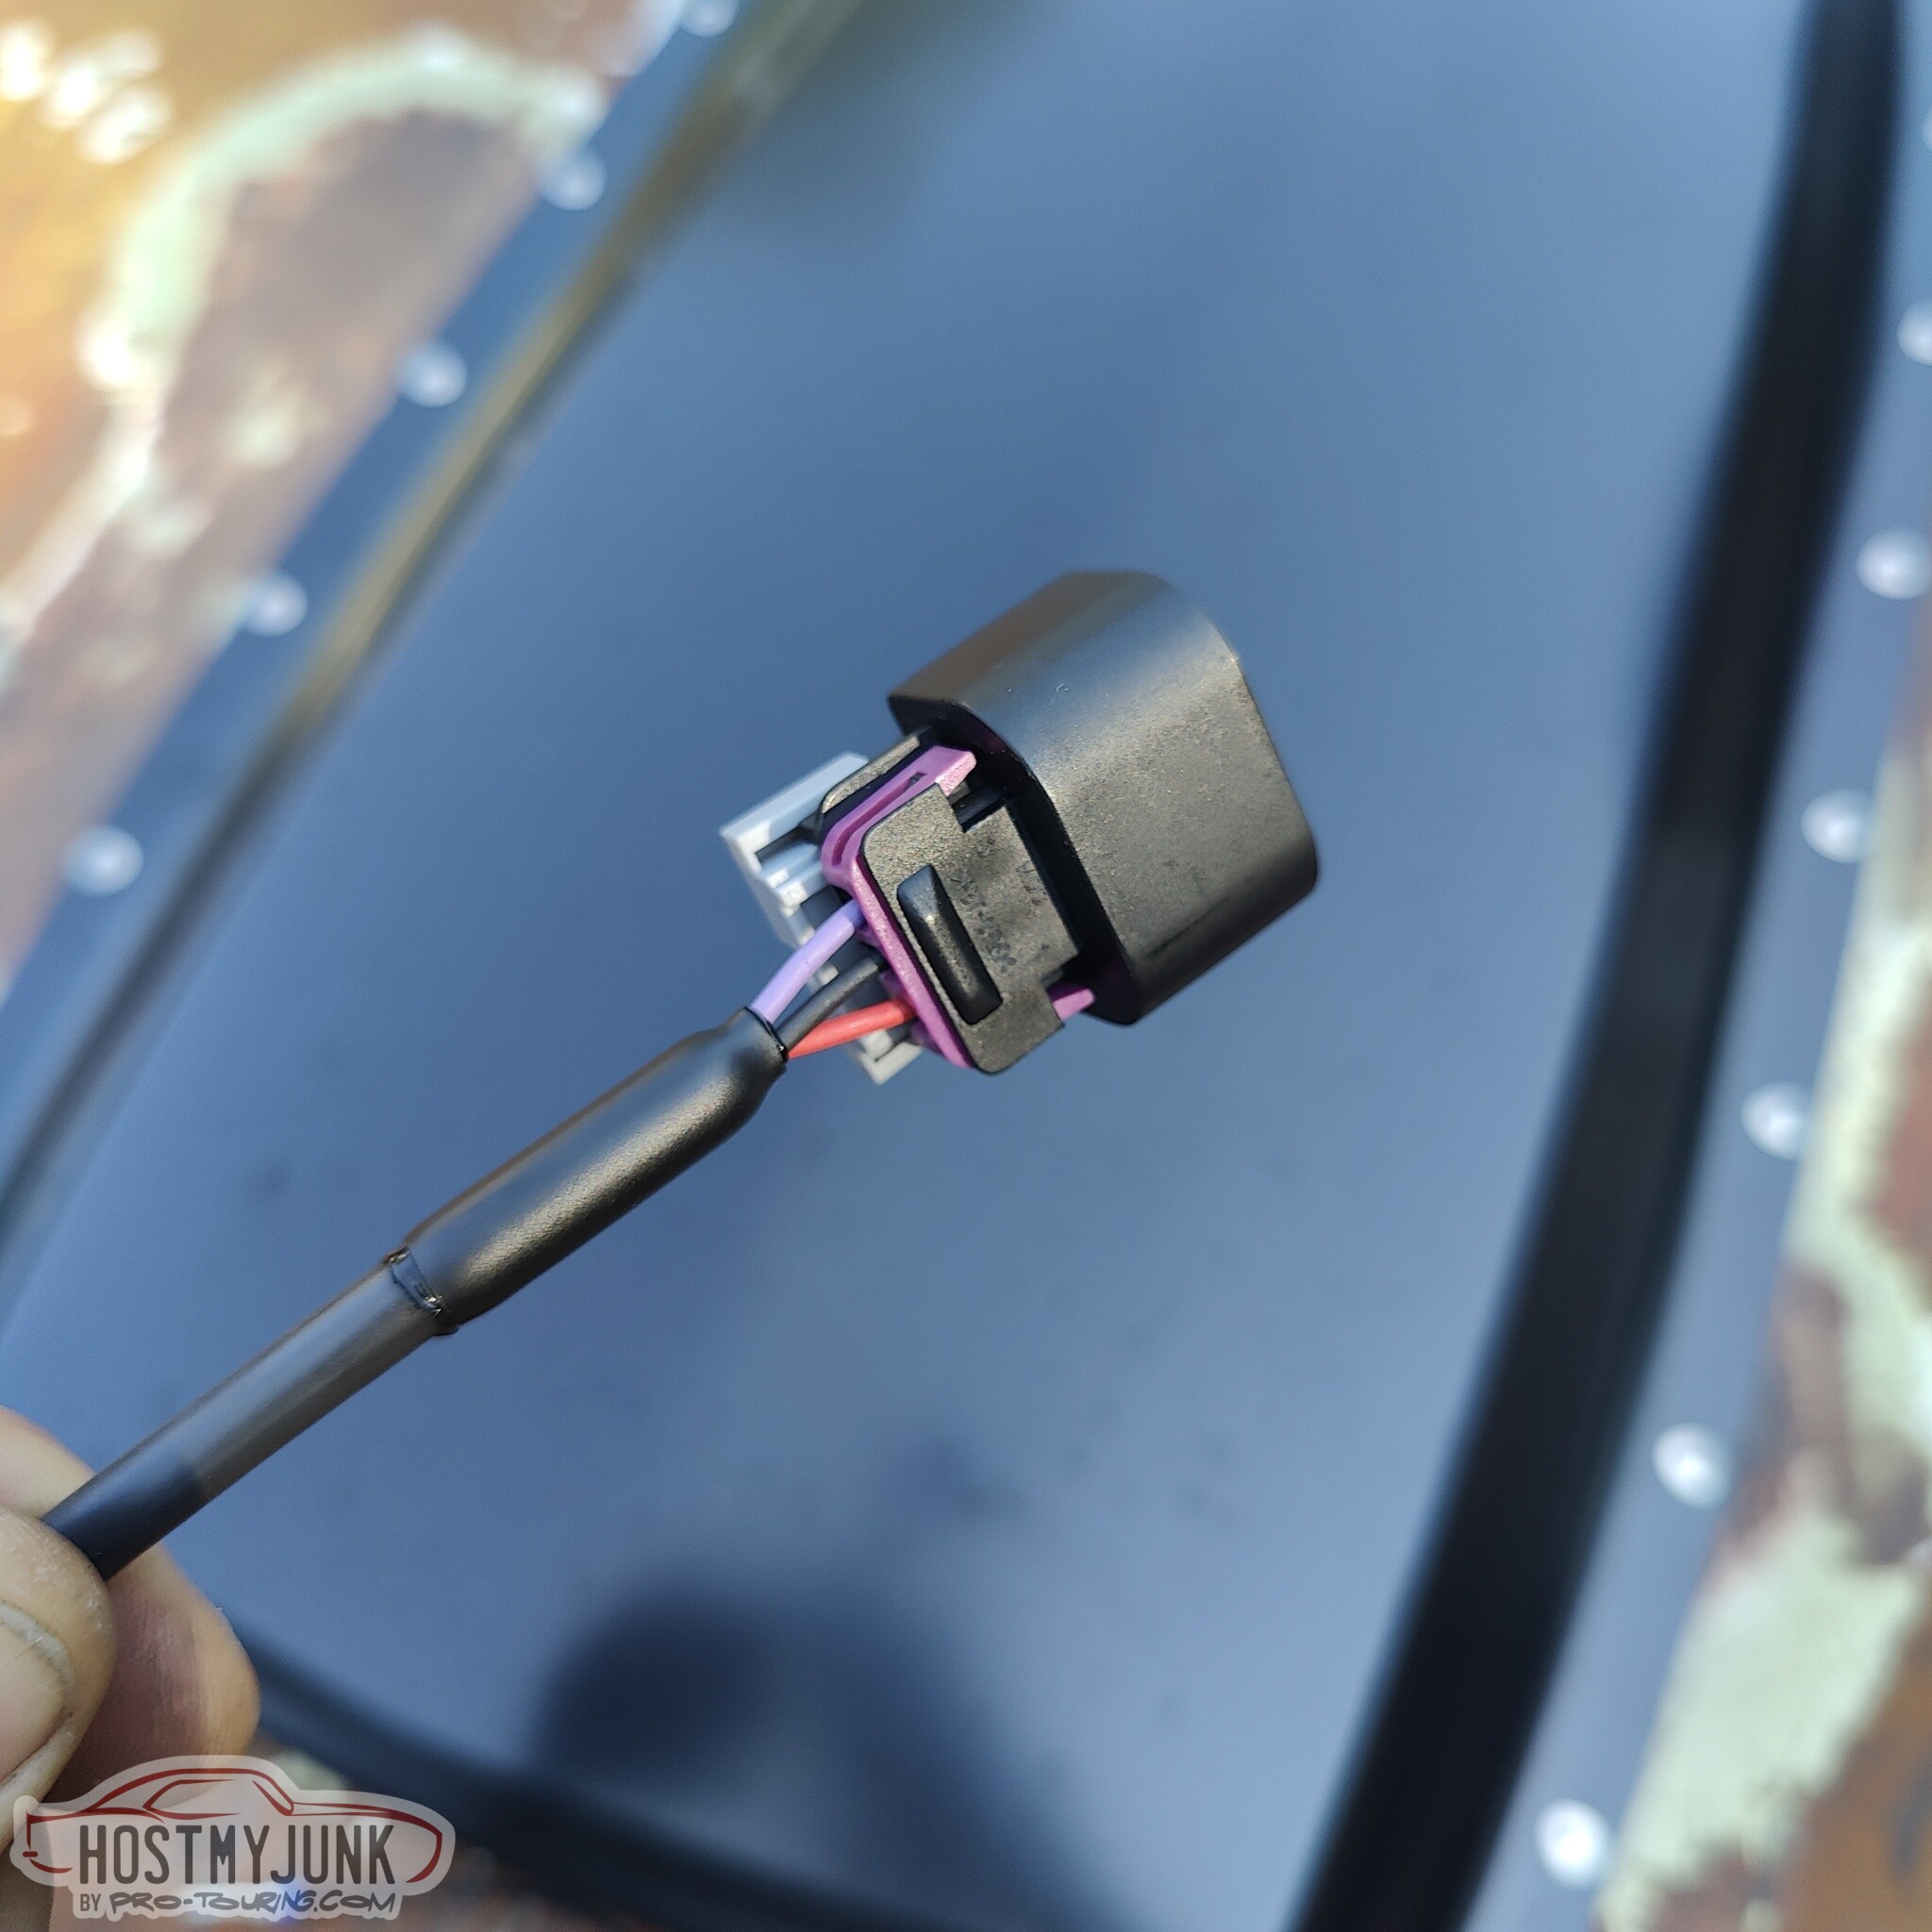
Here is the finished sensor connector...
In addition to the cable for the flex fuel sensor, I also decided to run a new 12 gauge power wire for the fuel pump. In order to kep the wires together, I use some masking tape along the whole length of the cable.

I snaked the wire bundle from the trunk and into the passenger compartment...

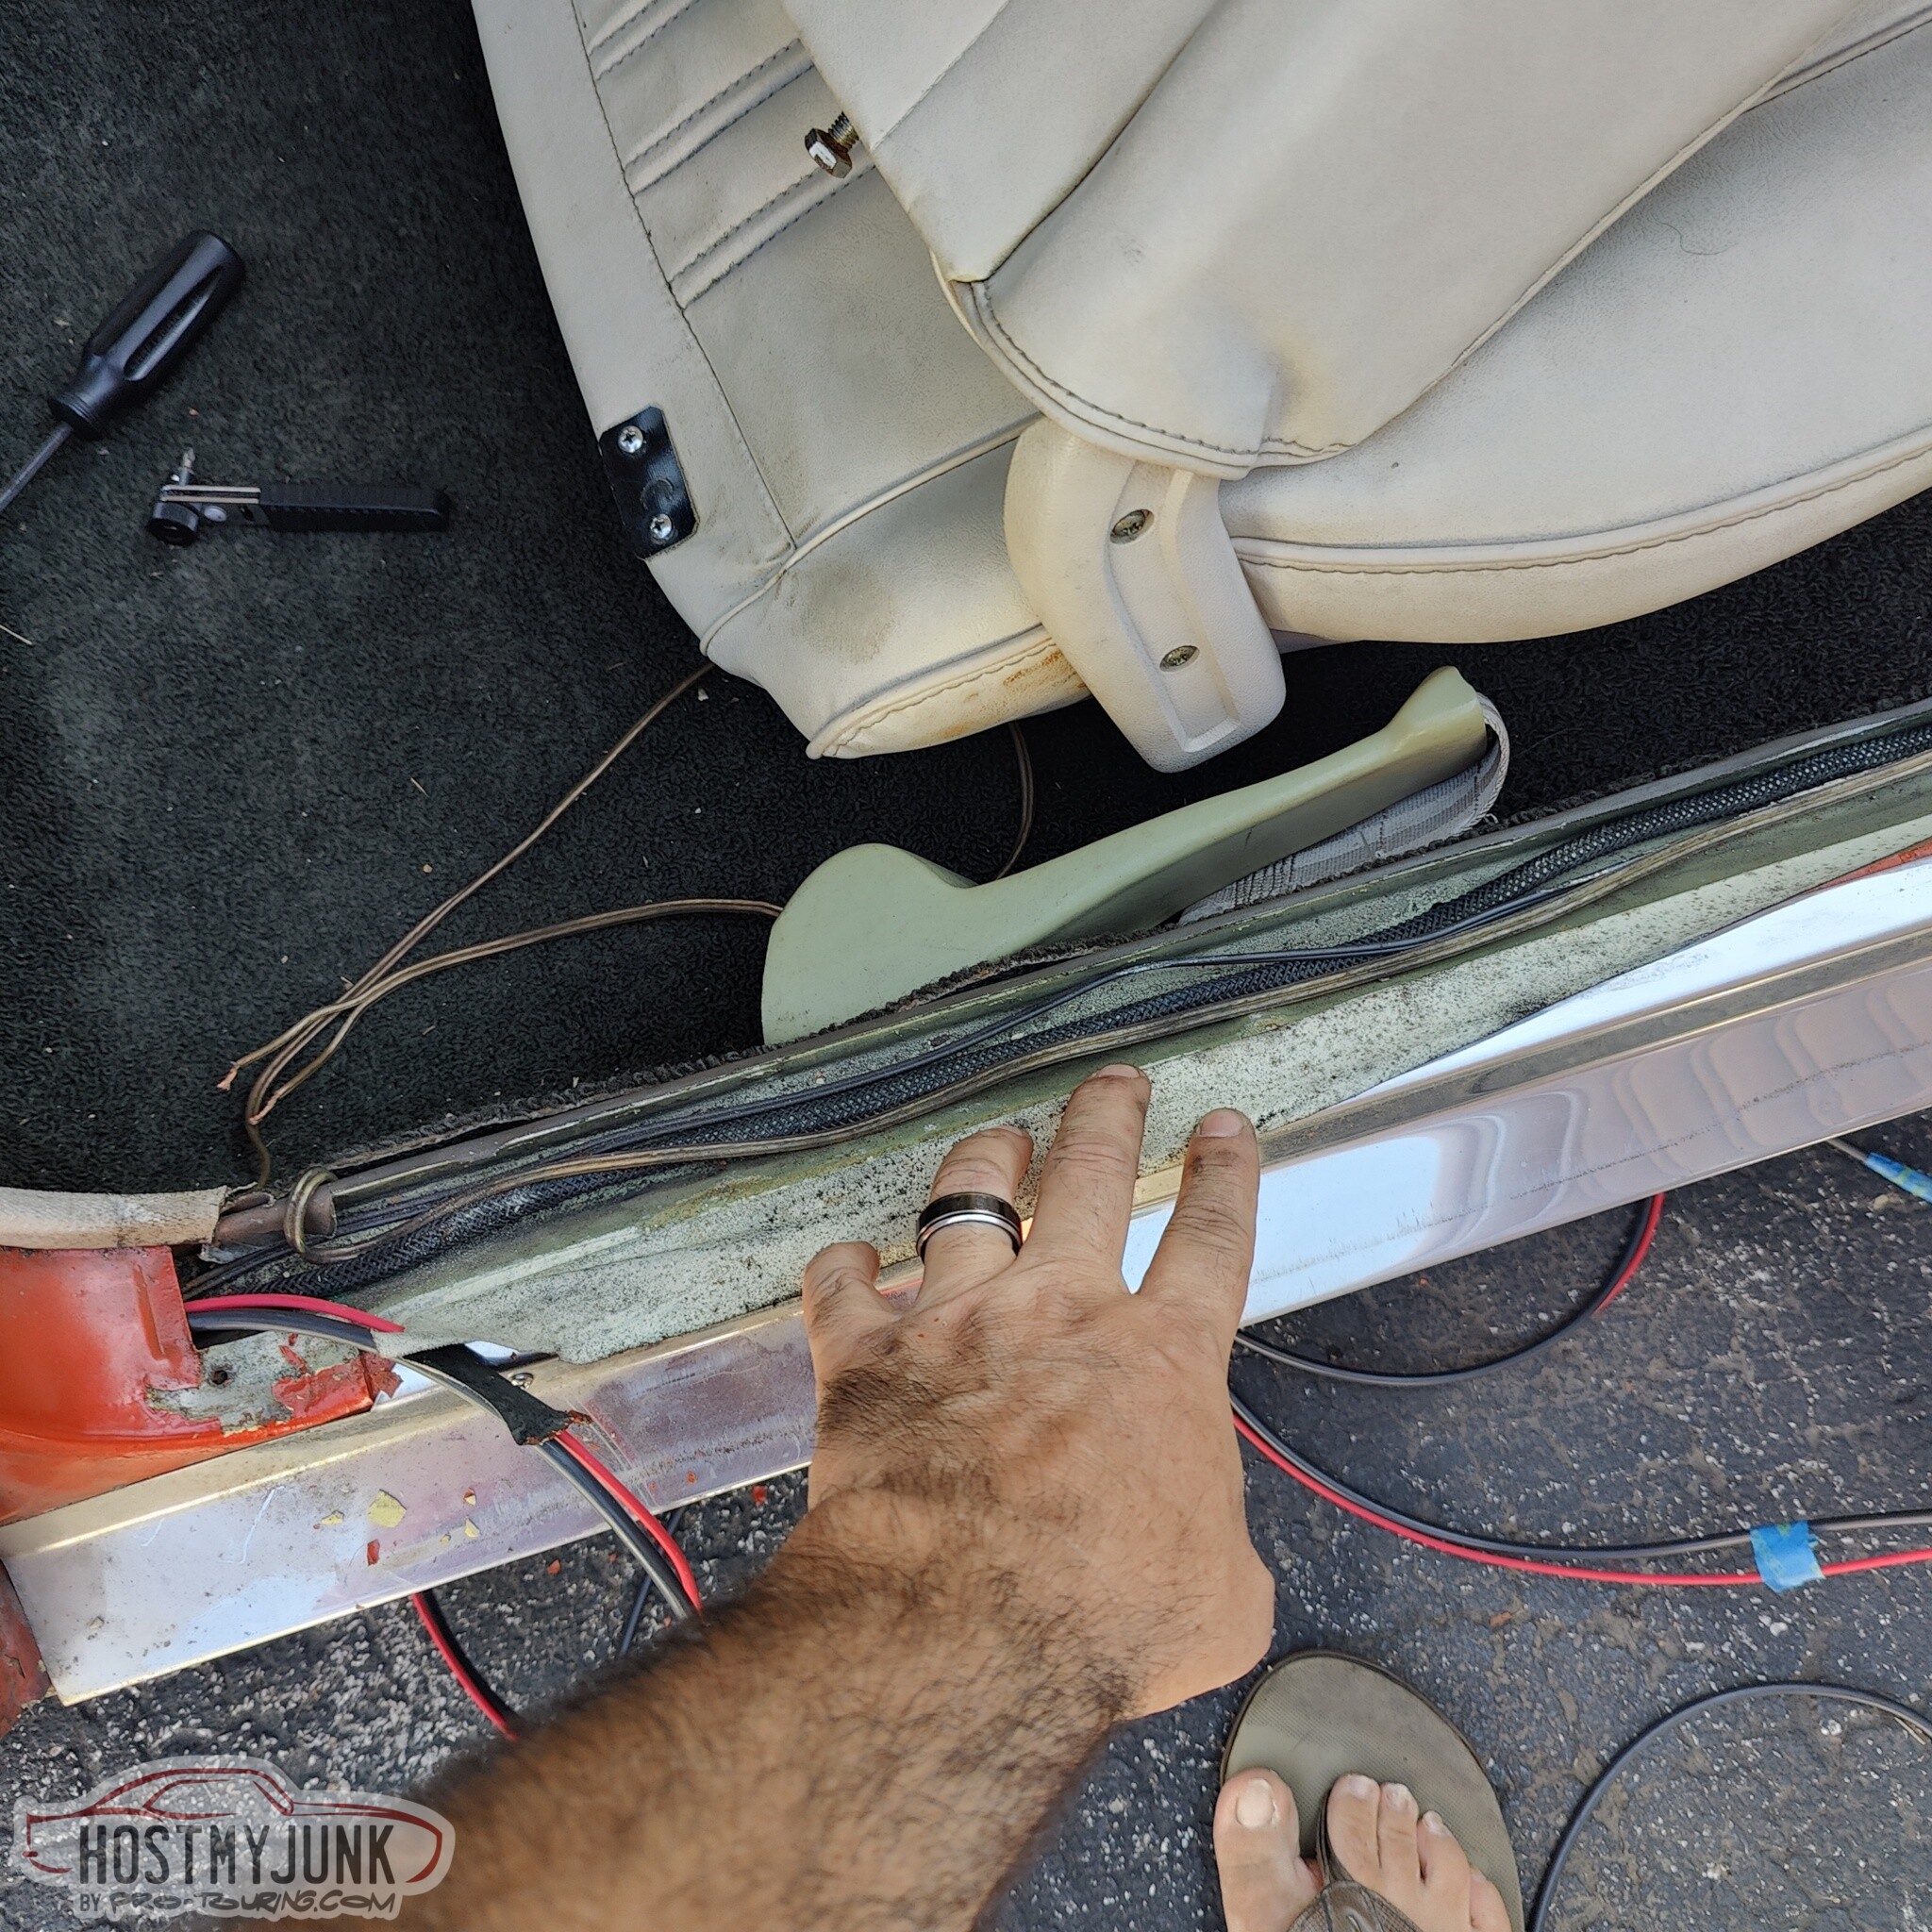
Then through the area where the rear window lives...Ford was nice enough to make a trough on top of the rocker to run wires through.
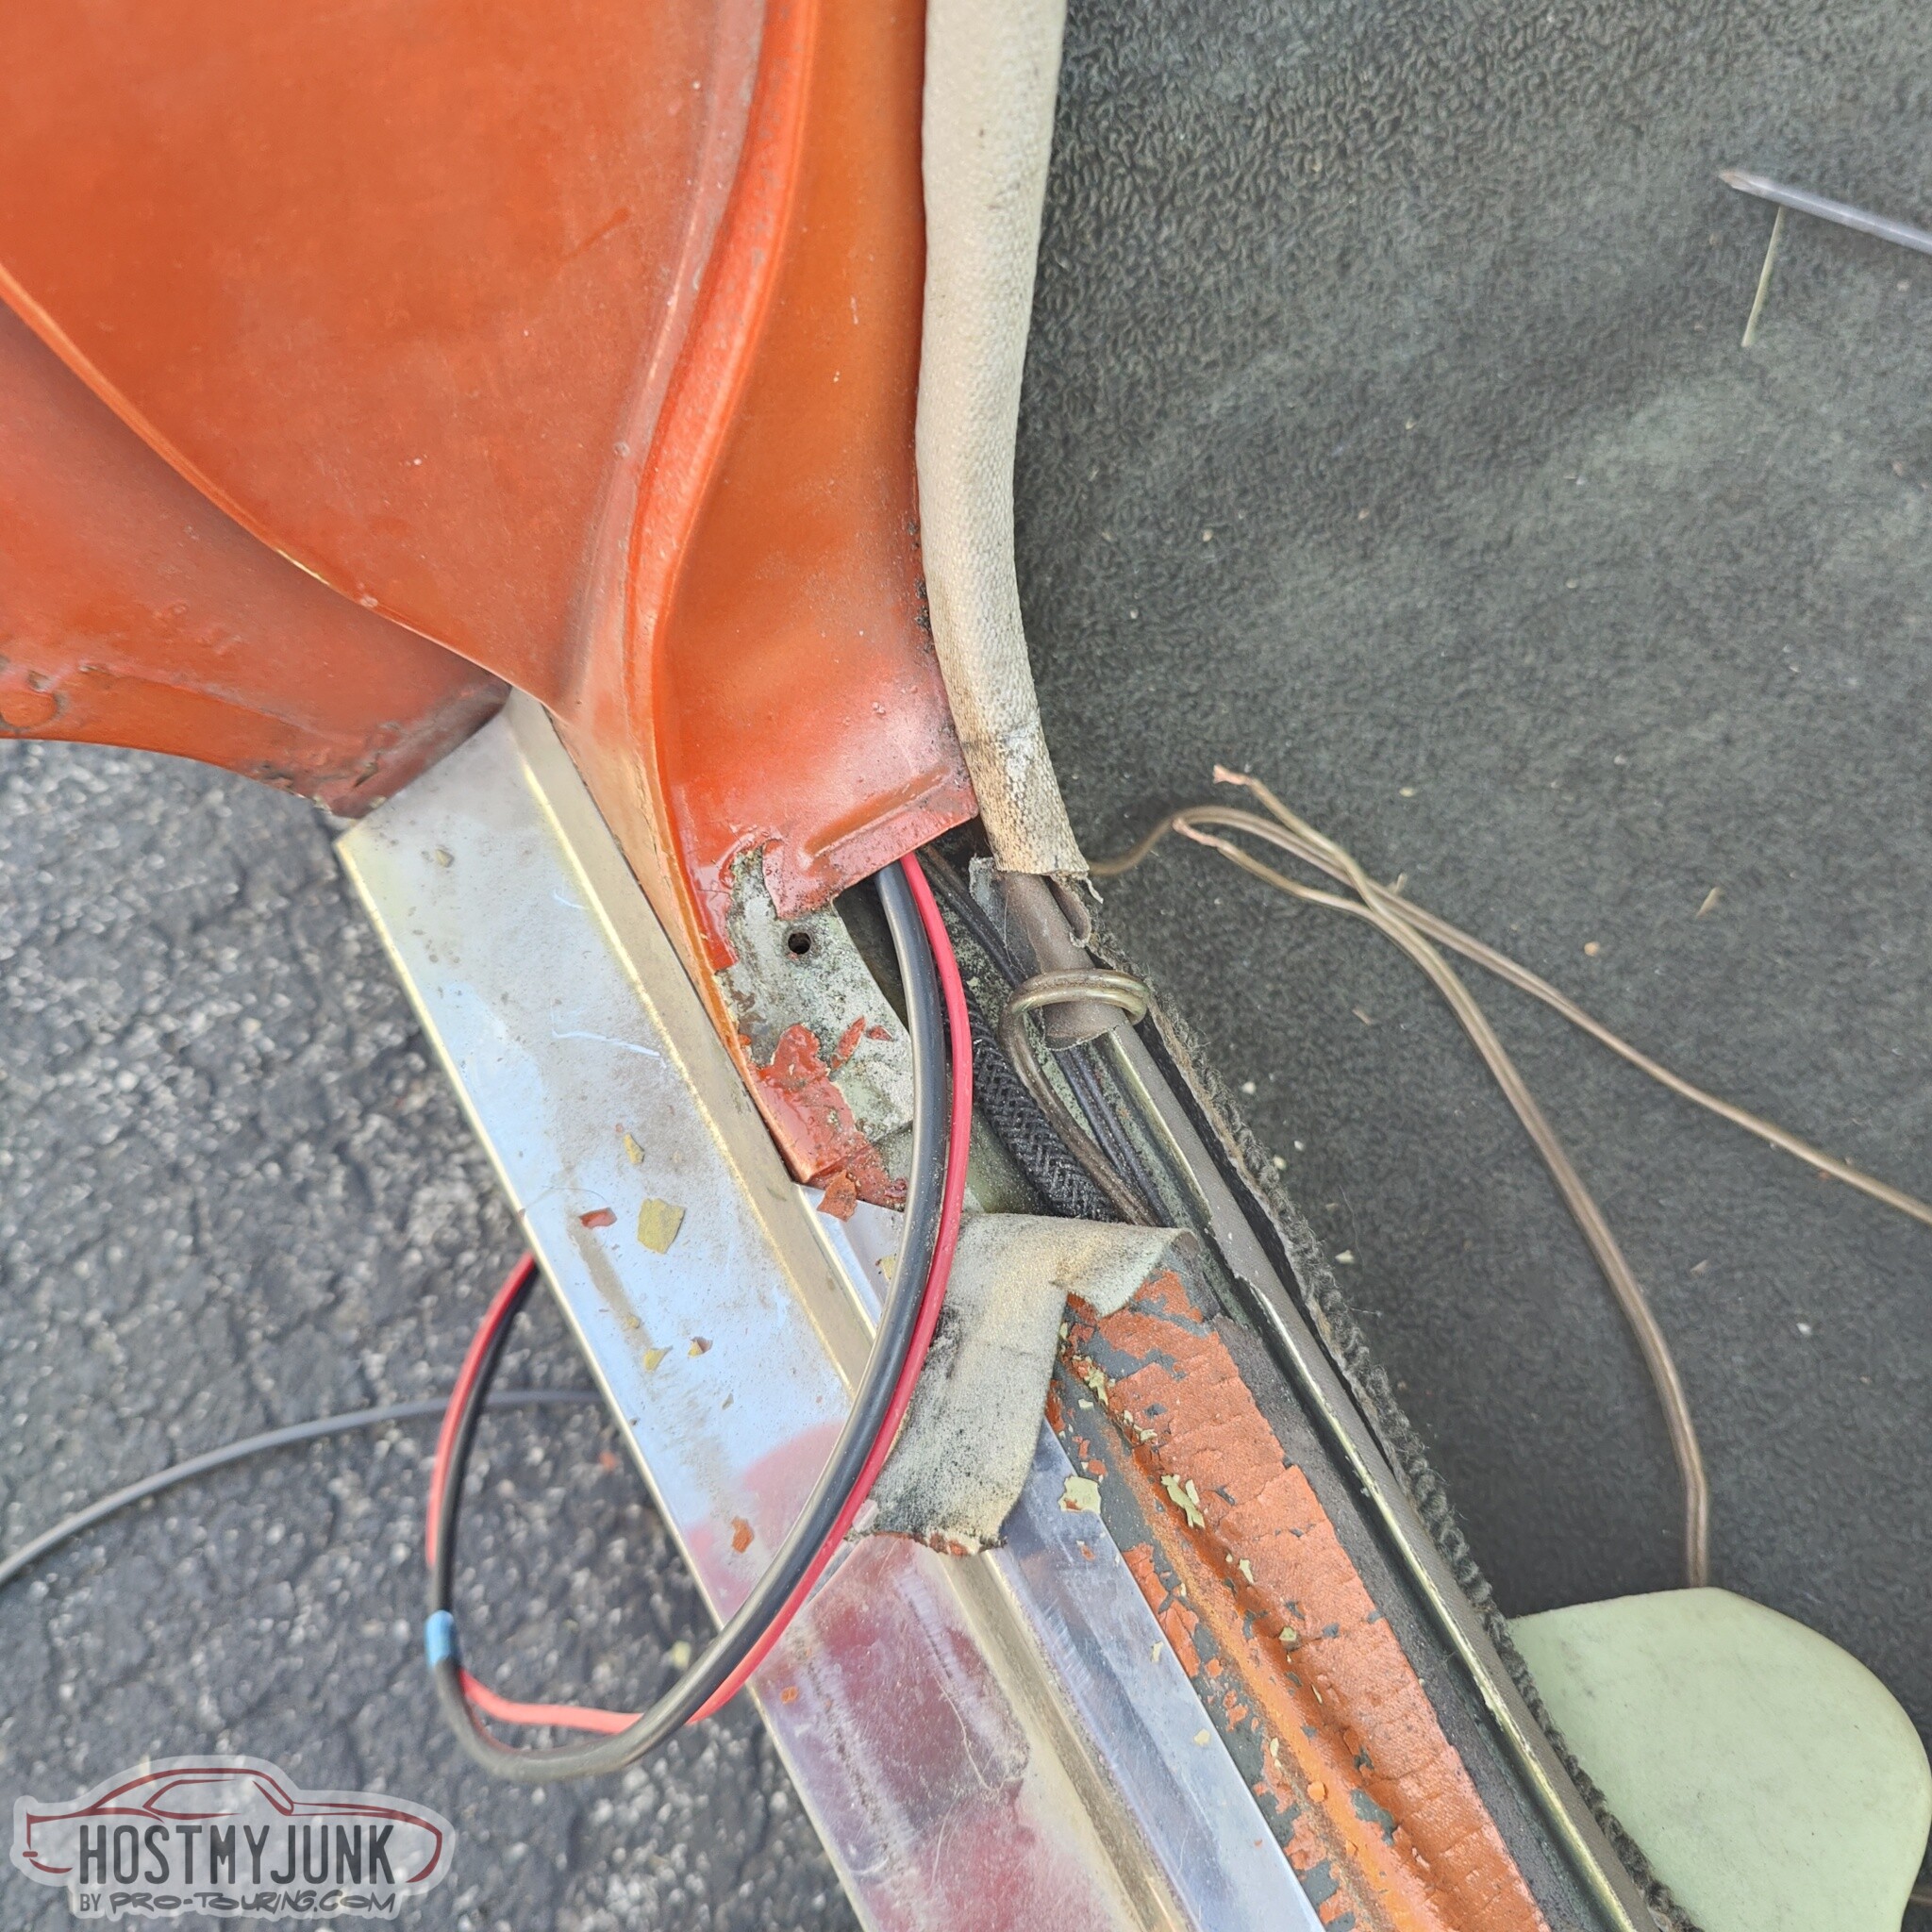
I ran the wires down the trough along with the existing wires.
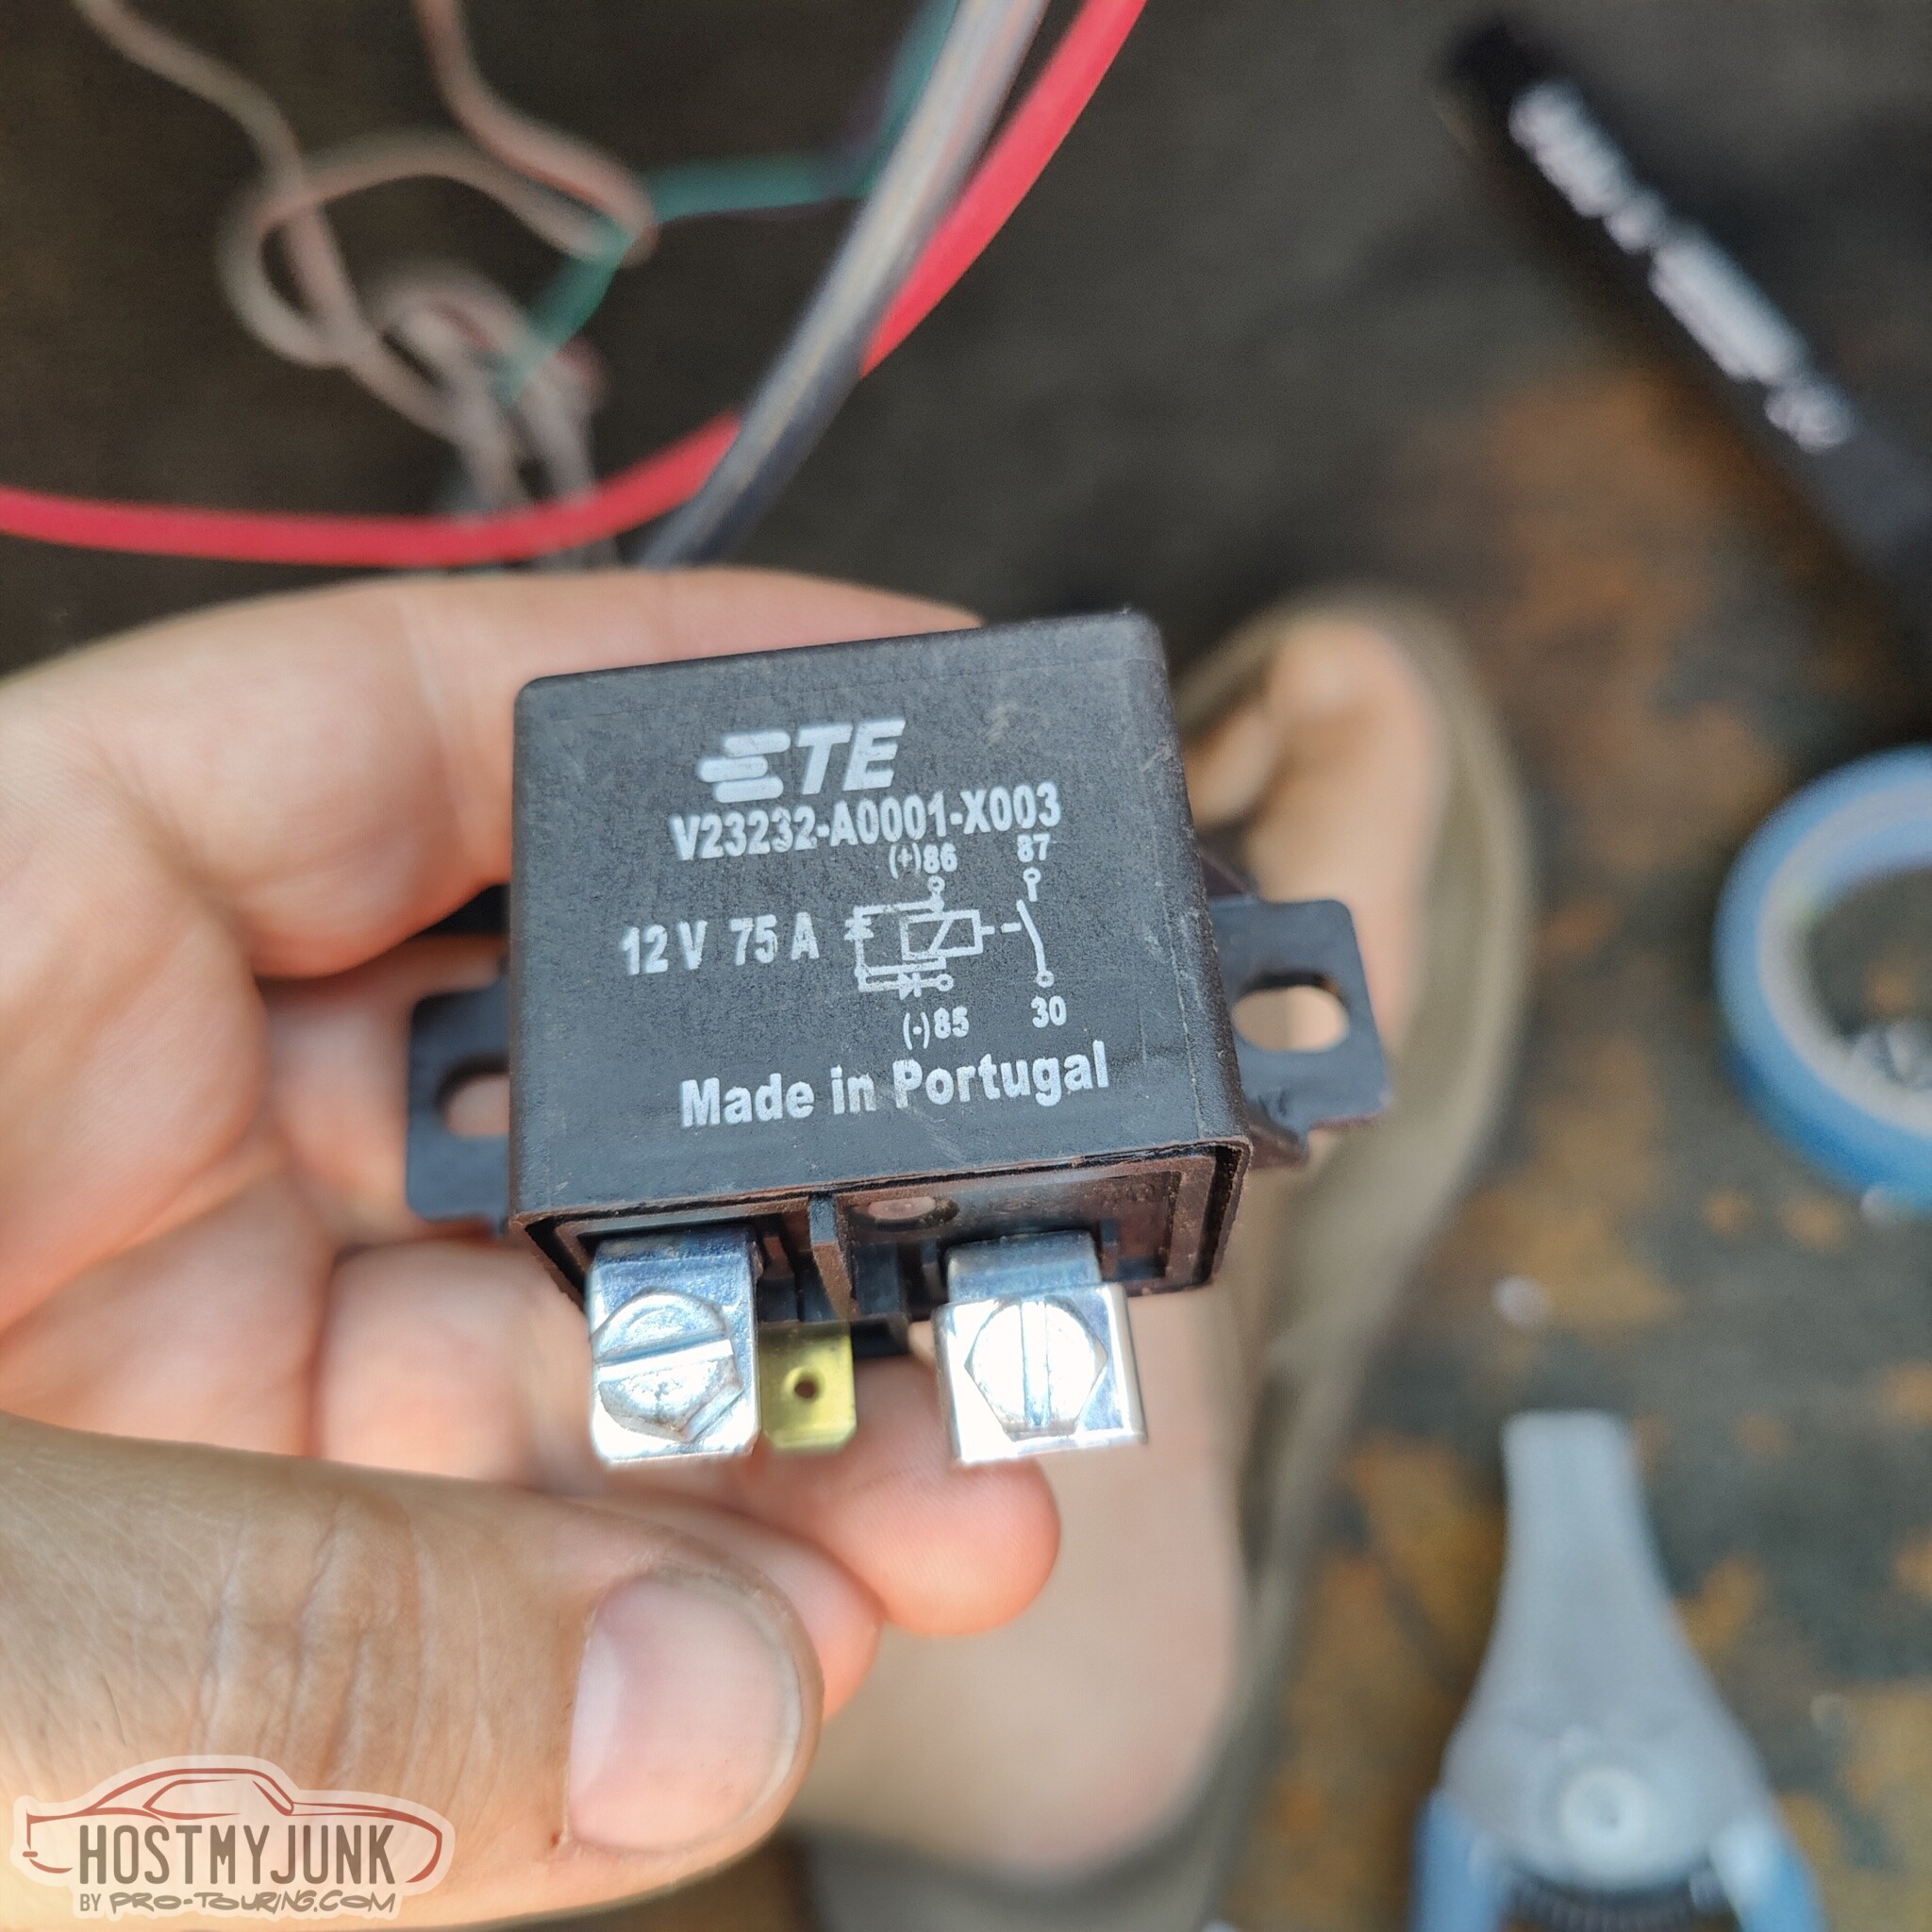
I sure am glad that I checked this relay holder. This was for my fuel pump and it clearly got really hot at some point. I am glad this didn't strand me at some point.
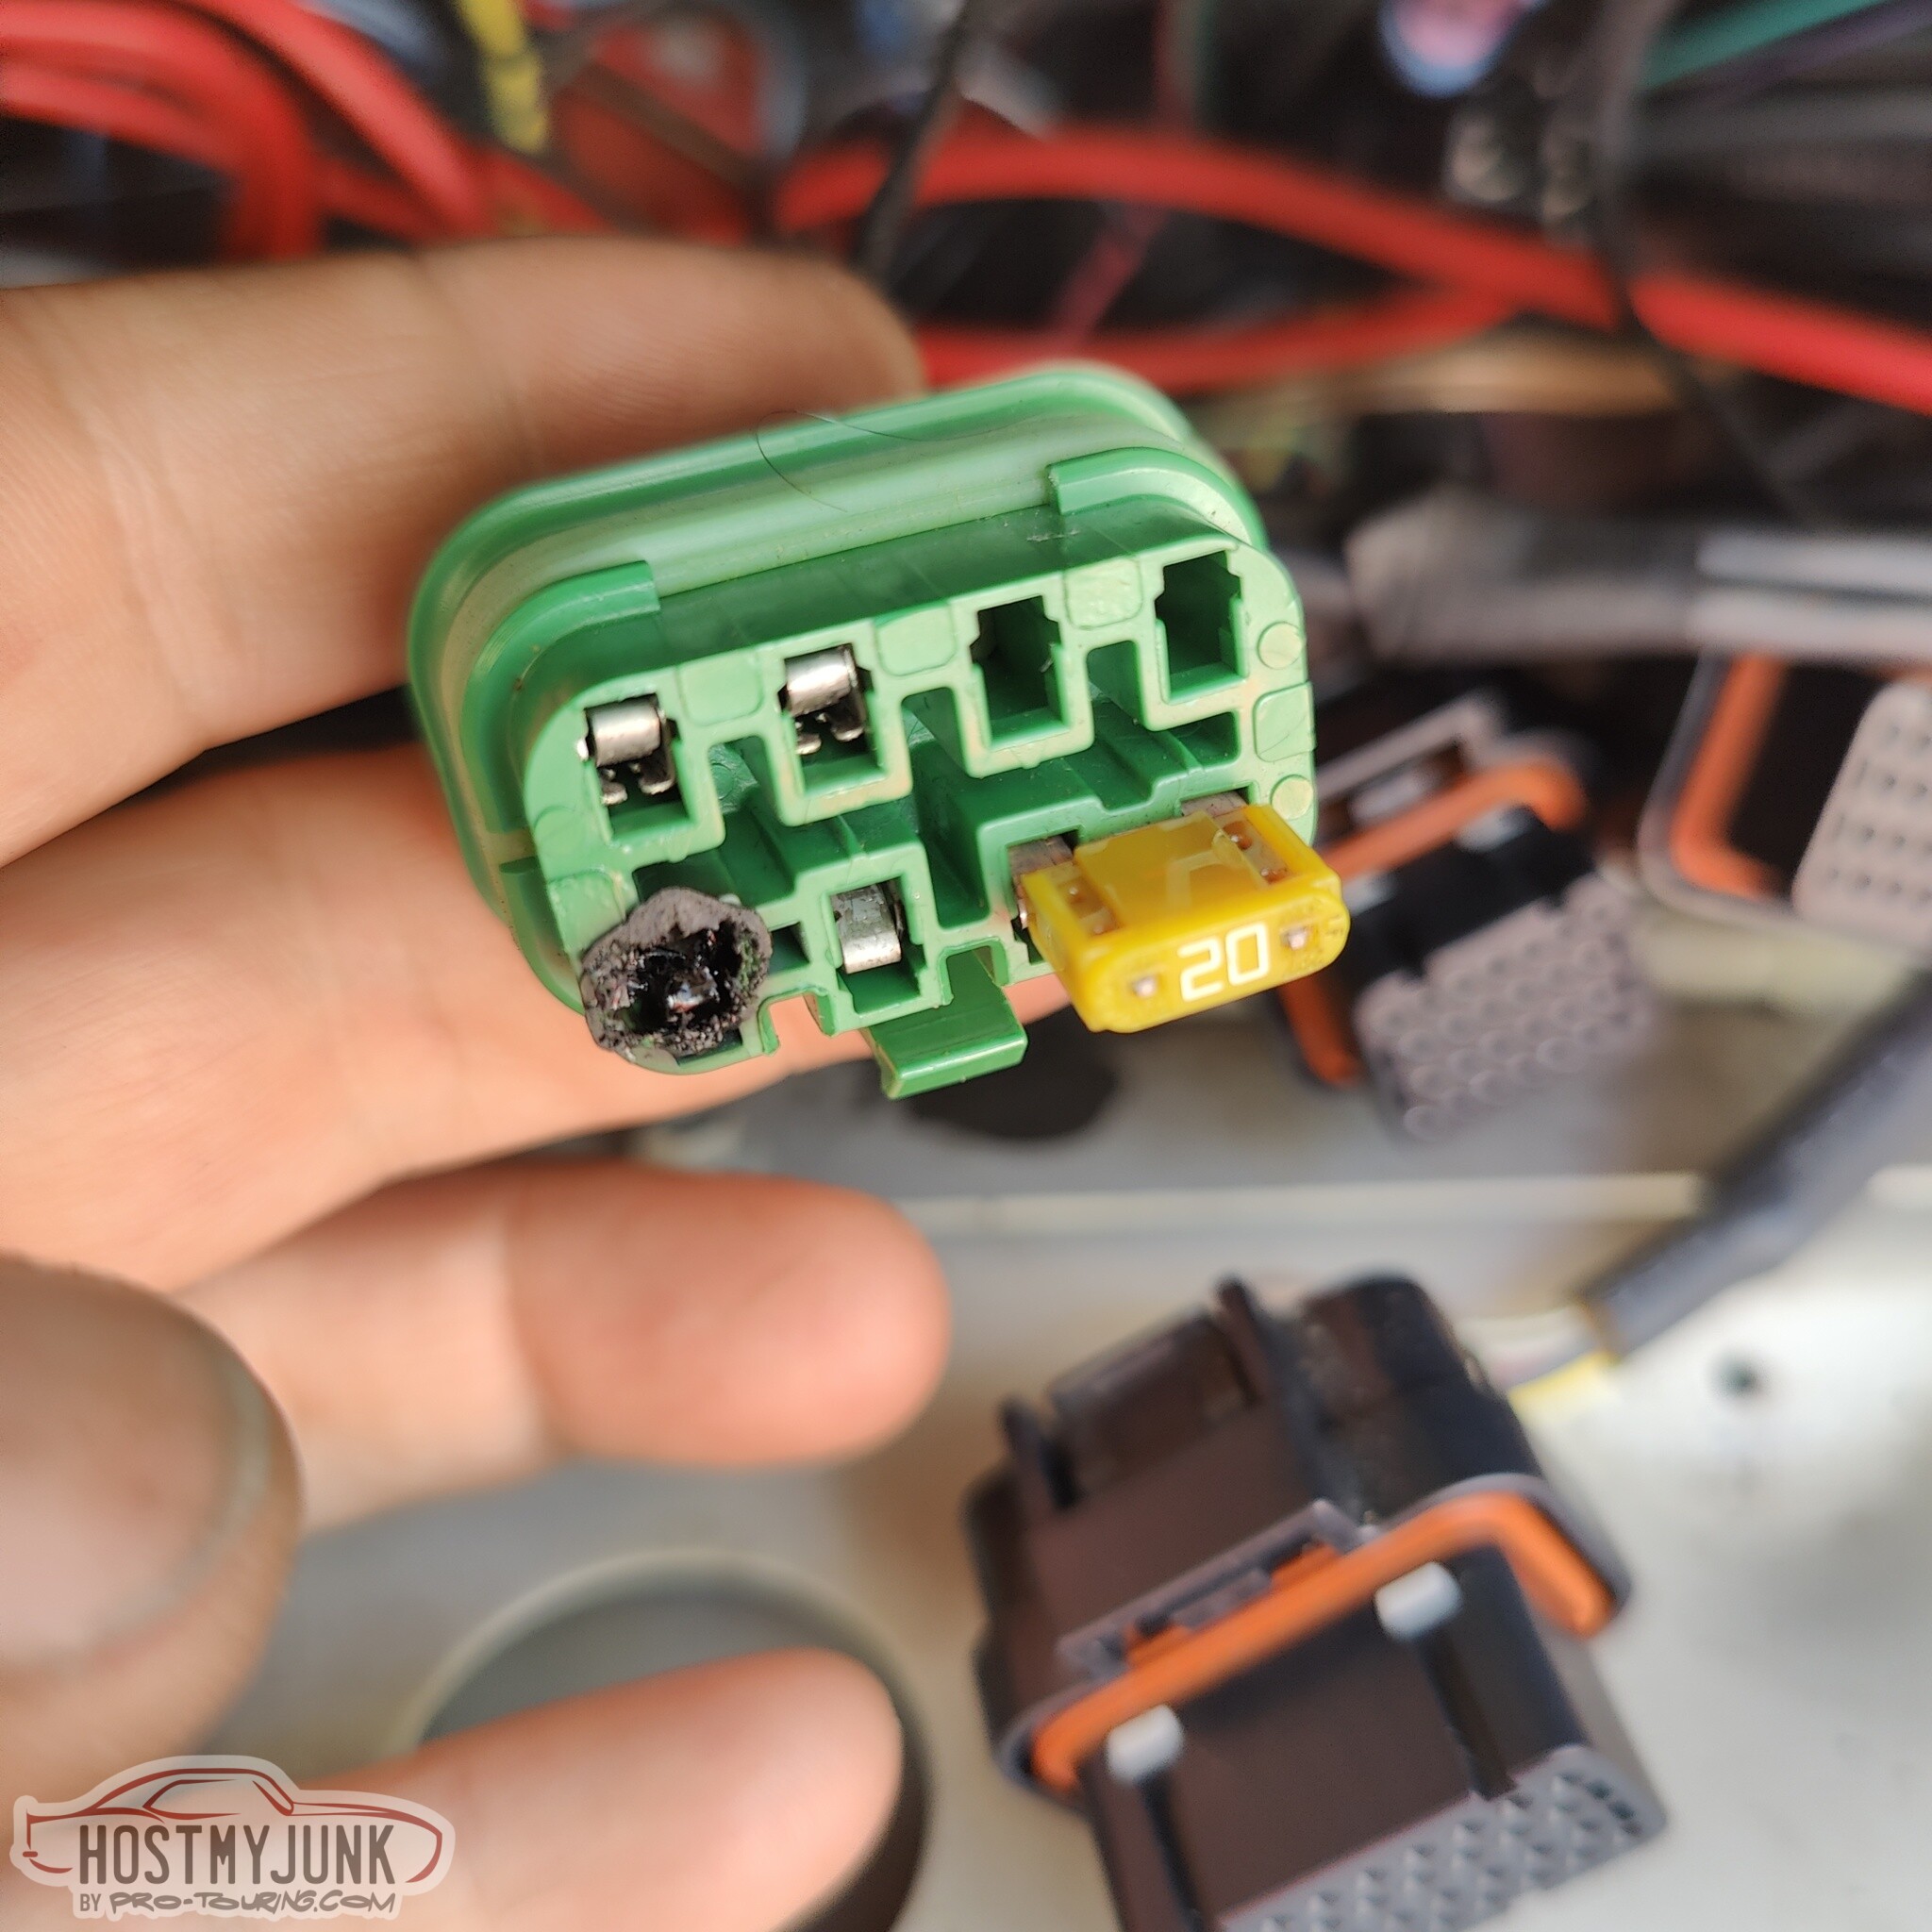
I had this sucker in my box of goodies. It is totally overkill, but that is what I had and I used it to replace the damaged relay holder.
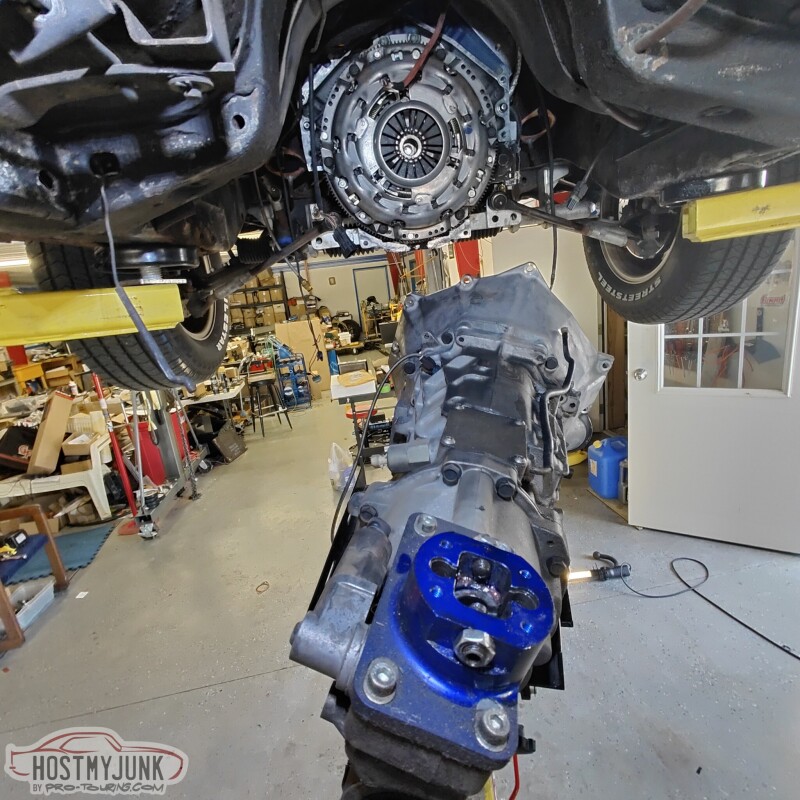
Once the flex fuel sensor wiring was done, I drove the car to one of my customer's shops. He was kind enough to let me use his lift to do the new clutch installation...

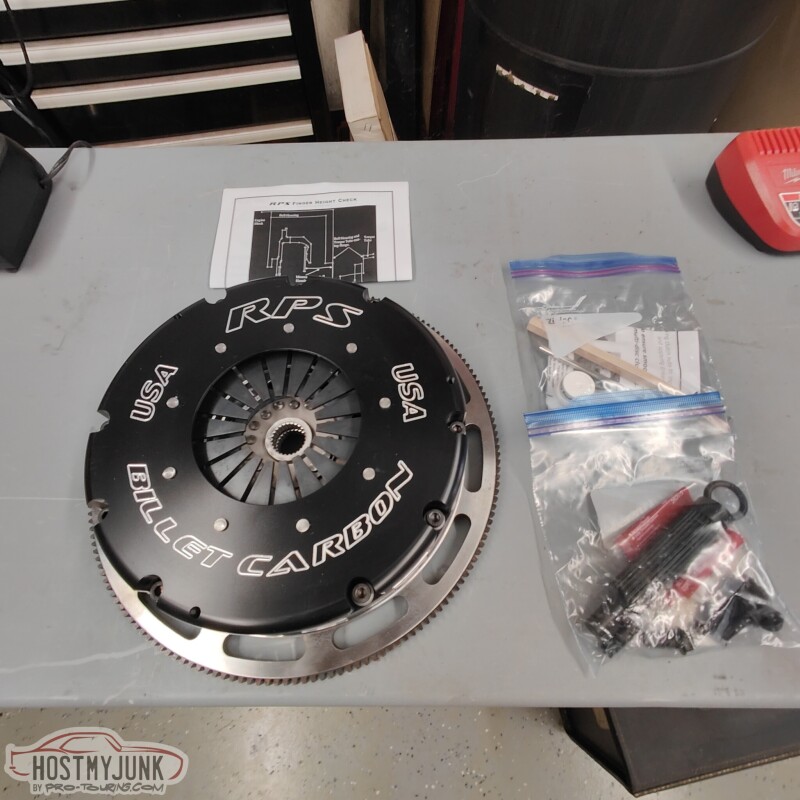
This is the clutch that will be getting installed.
More to come...
Andrew
The first step was to remove the rar seat so that I can get access to run the wires. The rear seats come out with two bolts.
As I mentioned before, I like using shielded cable for runs like this. It is a little more bulky, but the cable is super durable. This is the same cable that Holley uses for the cam and crank sensor wiring and it is technically a 5 strand cable. There are 3 insulated conductors, a bare ground, and also a foil shield that wraps around all of it.
The wires are stripped and the appropriate terminals and cable seals are crimped on the wires.
Here is the finished sensor connector...
In addition to the cable for the flex fuel sensor, I also decided to run a new 12 gauge power wire for the fuel pump. In order to kep the wires together, I use some masking tape along the whole length of the cable.
I snaked the wire bundle from the trunk and into the passenger compartment...
Then through the area where the rear window lives...Ford was nice enough to make a trough on top of the rocker to run wires through.
I ran the wires down the trough along with the existing wires.
I sure am glad that I checked this relay holder. This was for my fuel pump and it clearly got really hot at some point. I am glad this didn't strand me at some point.
I had this sucker in my box of goodies. It is totally overkill, but that is what I had and I used it to replace the damaged relay holder.
Once the flex fuel sensor wiring was done, I drove the car to one of my customer's shops. He was kind enough to let me use his lift to do the new clutch installation...
This is the clutch that will be getting installed.
More to come...
Andrew
 10-03-2023, 09:49 PM
#1302
TECH Senior Member
Thread Starter
iTrader: (7)
In order to handle the extra power as well as having many other benefits, I chose to go with the RPS Twin disk carbon-carbon clutch from @Tony @ Mamo Motorsports
I don't have a big garage, yet alone a lift, but one of my local customers was gracious enough to let me use his shop space. David is in his 80s and is a regular racer in his 2015 Shelby GT 350, with a Coyote topped with a huge Whipple and running with a Holley Dominator ECU. Anyways...
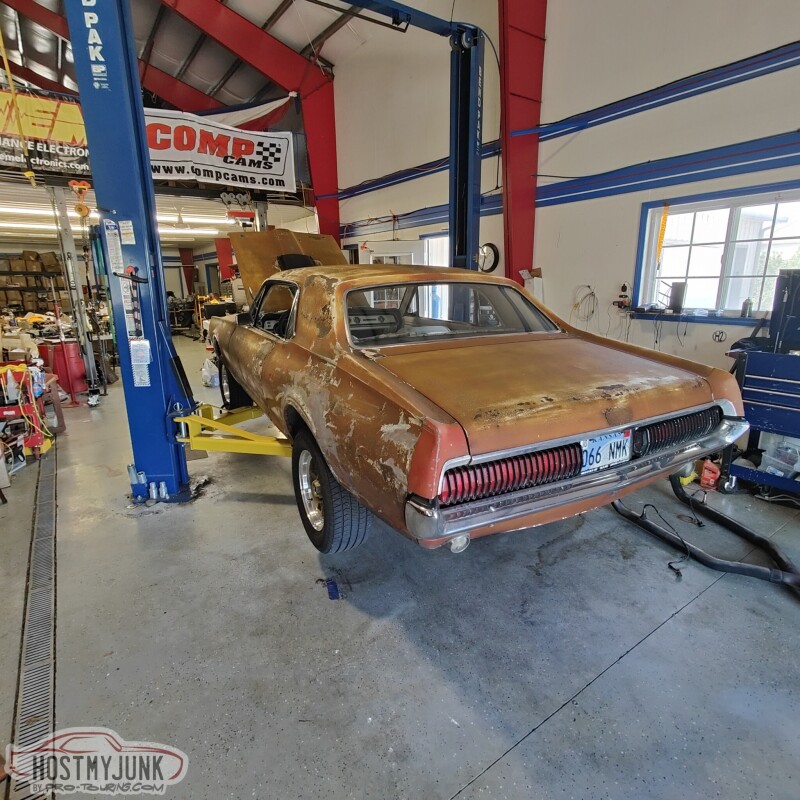
Here is the Cougar getting to have the transmission removed:
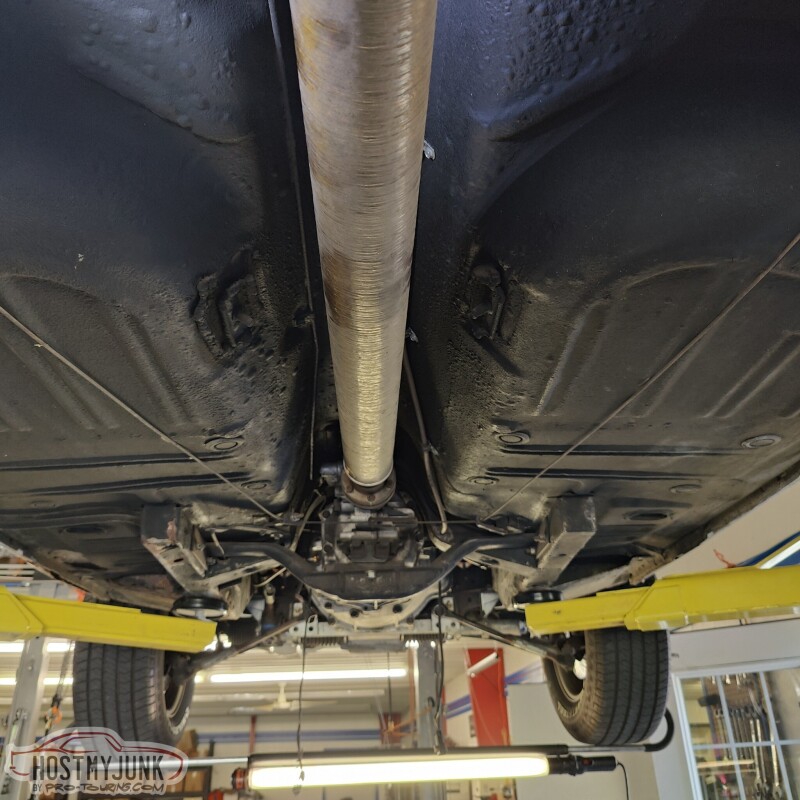
Here is a little peak at the underside. You can see the dual CV carbon fiber driveshaft from The DriveShaft Shop. Notice how much the front wheels droop. This will come to haunt us later...
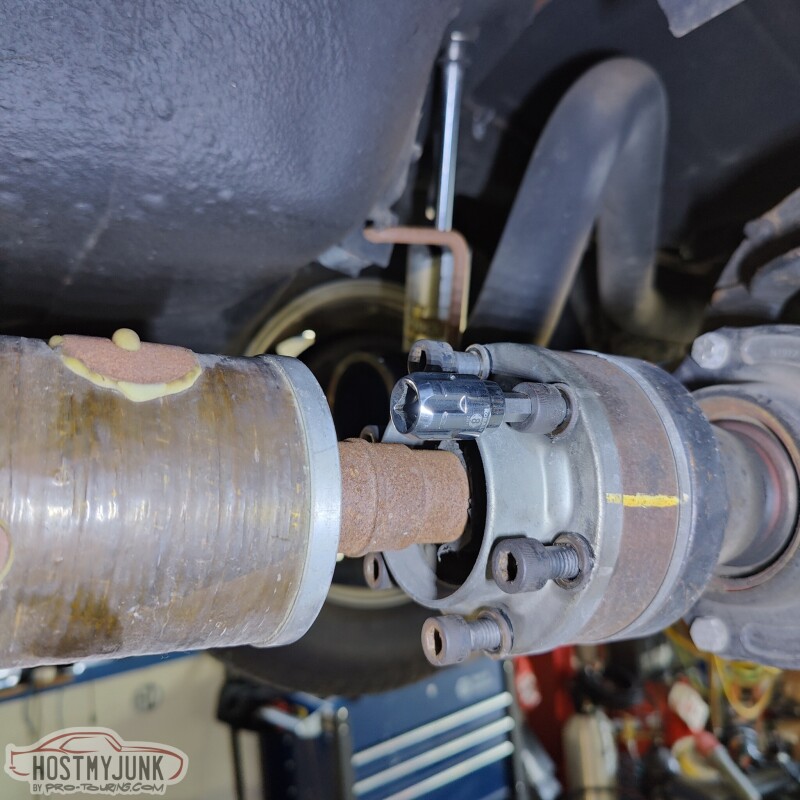
Here is the rear CV, which must be taken off in order to remove the driveshaft.
Once the driveshaft is out, crossmember, and the transmission can be removed. It sure was nice working under a lift and having a proper transmission jack. We will get very, very good at removing this transmission in just a while, because we eventually did it a half dozen times.
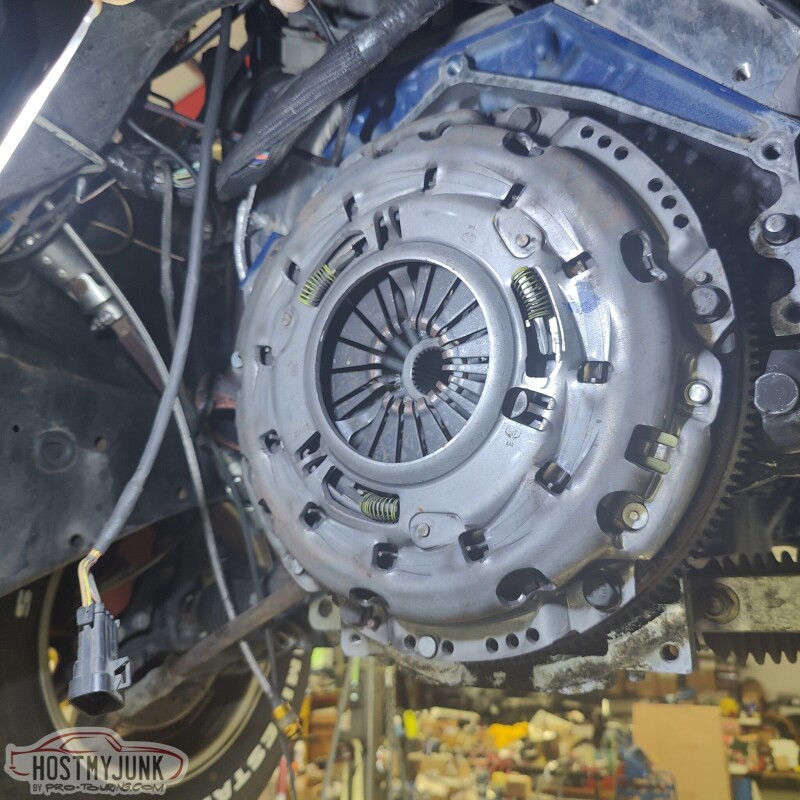
This is the LS7 clutch that I was using before. There was nothing wrong with it and it has only been installed for two years. If anyone local to me, (Kansas City area) wants it, come get it for $50. It is in perfect condition.
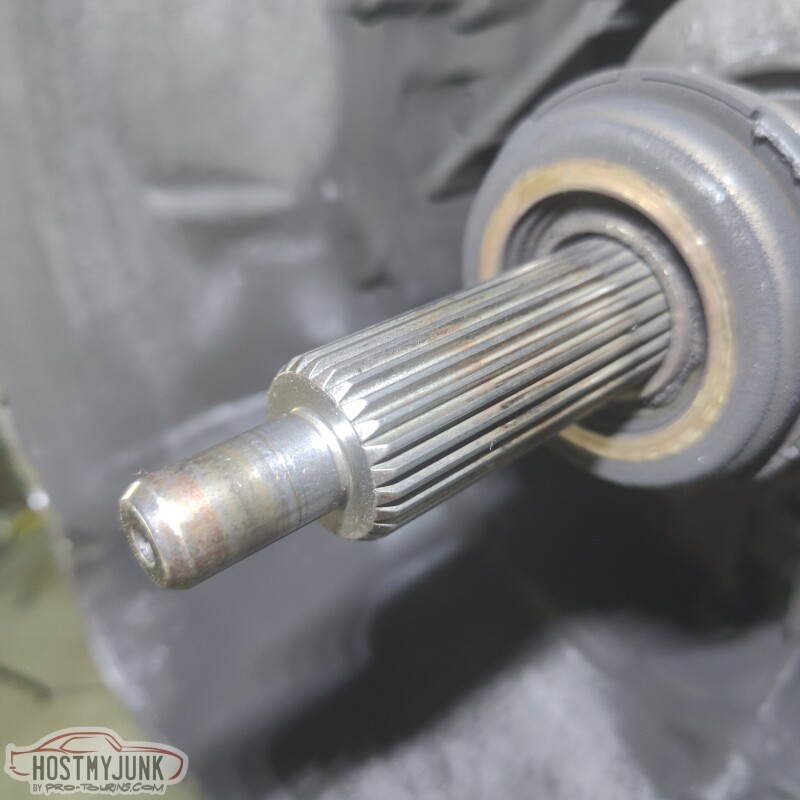
No signs of any issues on the input shaft. If there were any sort of concentricity or other bellhousing alignment issues, there would likely be signs of odd wear on the input shaft or the pilot bearing, which in this case was perfect as well.
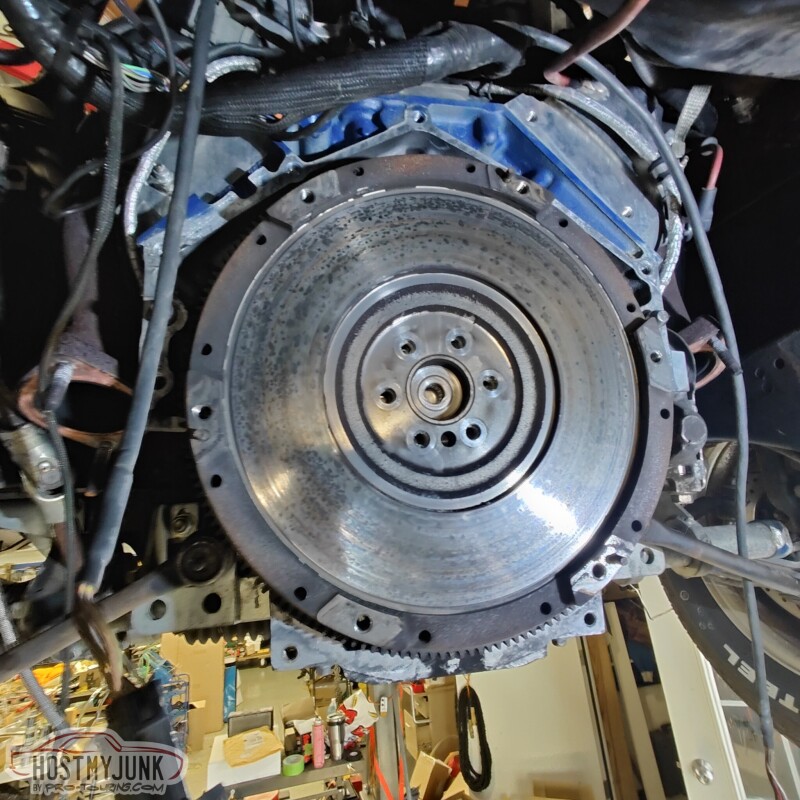
This is a pretty normal heat wear pattern on a flywheel. The hot spots are pretty evenly distributed, which means no one area got any excessive heat build up. It also indicates an even distribution of clutch disk material into the flywheel, which means the clutch was broken in well, or at the very least wasn't abused within 2 miles of being new.
After a little clean-up with break clean, everything is looking very nice here. One thing I always do is run my hand across all of the block to transmission mating surfaces. What I am looking for are any burrs that might be sticking up that might cause bellhousing misalignment. If I feel something with my hand, I will take a stone and make the surface as smooth and flat as possible.
I also take a red or gray ScotchBrite pad with some WD40 on it and go over the dowel pins and and the block to bellhousing mating surface. I also use the ScotchBrite pads to clean the crank to flywheel surface. This removes any surface rust and again gives us the best chance of maintaining runout and concentricity.
Now that everything is removed, it is time for this little piece of jewelry...
More about this in the next installment...
Andrew
I don't have a big garage, yet alone a lift, but one of my local customers was gracious enough to let me use his shop space. David is in his 80s and is a regular racer in his 2015 Shelby GT 350, with a Coyote topped with a huge Whipple and running with a Holley Dominator ECU. Anyways...
Here is the Cougar getting to have the transmission removed:
Here is a little peak at the underside. You can see the dual CV carbon fiber driveshaft from The DriveShaft Shop. Notice how much the front wheels droop. This will come to haunt us later...
Here is the rear CV, which must be taken off in order to remove the driveshaft.
Once the driveshaft is out, crossmember, and the transmission can be removed. It sure was nice working under a lift and having a proper transmission jack. We will get very, very good at removing this transmission in just a while, because we eventually did it a half dozen times.
This is the LS7 clutch that I was using before. There was nothing wrong with it and it has only been installed for two years. If anyone local to me, (Kansas City area) wants it, come get it for $50. It is in perfect condition.
No signs of any issues on the input shaft. If there were any sort of concentricity or other bellhousing alignment issues, there would likely be signs of odd wear on the input shaft or the pilot bearing, which in this case was perfect as well.
This is a pretty normal heat wear pattern on a flywheel. The hot spots are pretty evenly distributed, which means no one area got any excessive heat build up. It also indicates an even distribution of clutch disk material into the flywheel, which means the clutch was broken in well, or at the very least wasn't abused within 2 miles of being new.
After a little clean-up with break clean, everything is looking very nice here. One thing I always do is run my hand across all of the block to transmission mating surfaces. What I am looking for are any burrs that might be sticking up that might cause bellhousing misalignment. If I feel something with my hand, I will take a stone and make the surface as smooth and flat as possible.
I also take a red or gray ScotchBrite pad with some WD40 on it and go over the dowel pins and and the block to bellhousing mating surface. I also use the ScotchBrite pads to clean the crank to flywheel surface. This removes any surface rust and again gives us the best chance of maintaining runout and concentricity.
Now that everything is removed, it is time for this little piece of jewelry...
More about this in the next installment...
Andrew
10-03-2023, 09:58 PM
#1303
TECH Senior Member
Thread Starter
iTrader: (7)
Following the RPS instructions, I brushed the supplied lapping compound on the input shaft splines.
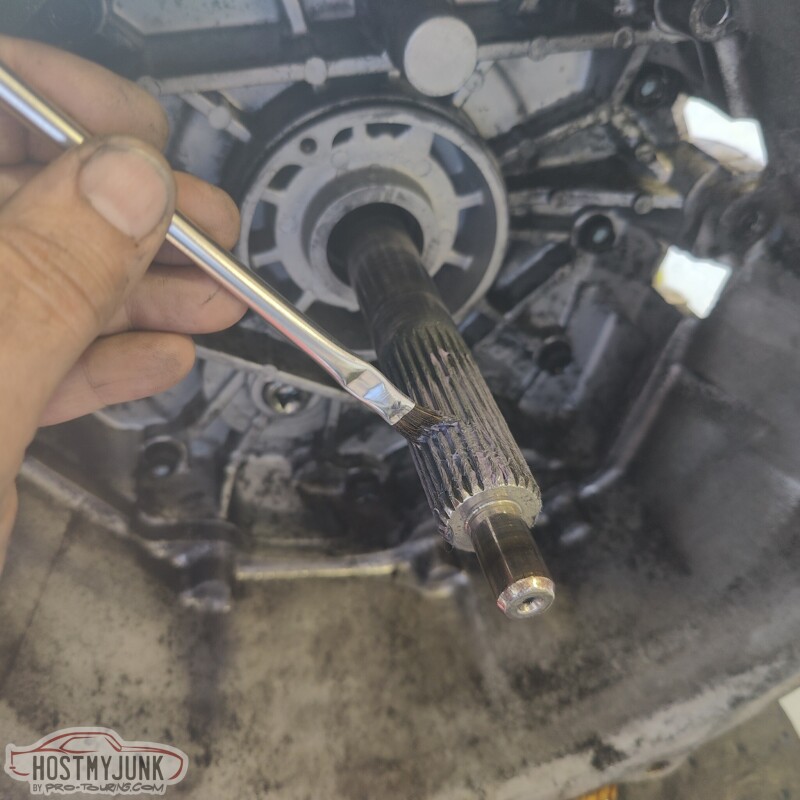
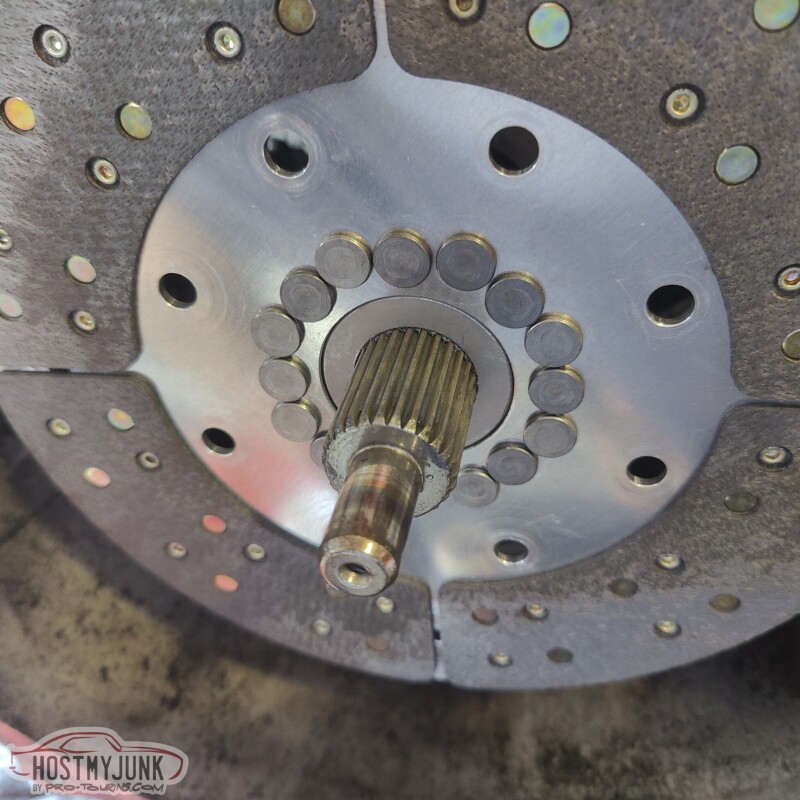
Then I took both of the disks, one by one, and I slid them back and forth so that the splines on the input shaft would have a nice fit on the splines of the disk hubs.
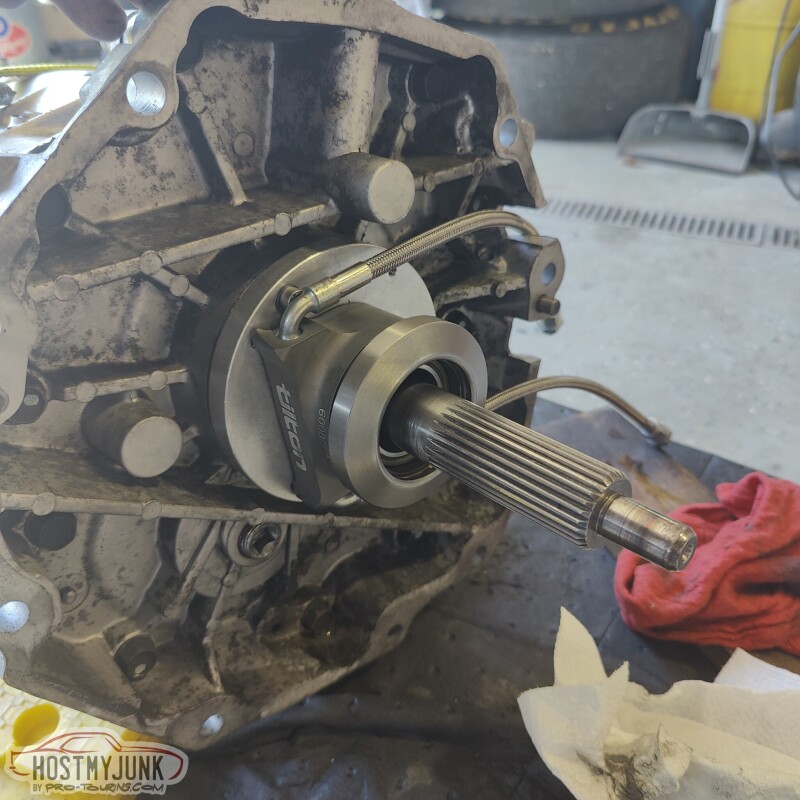
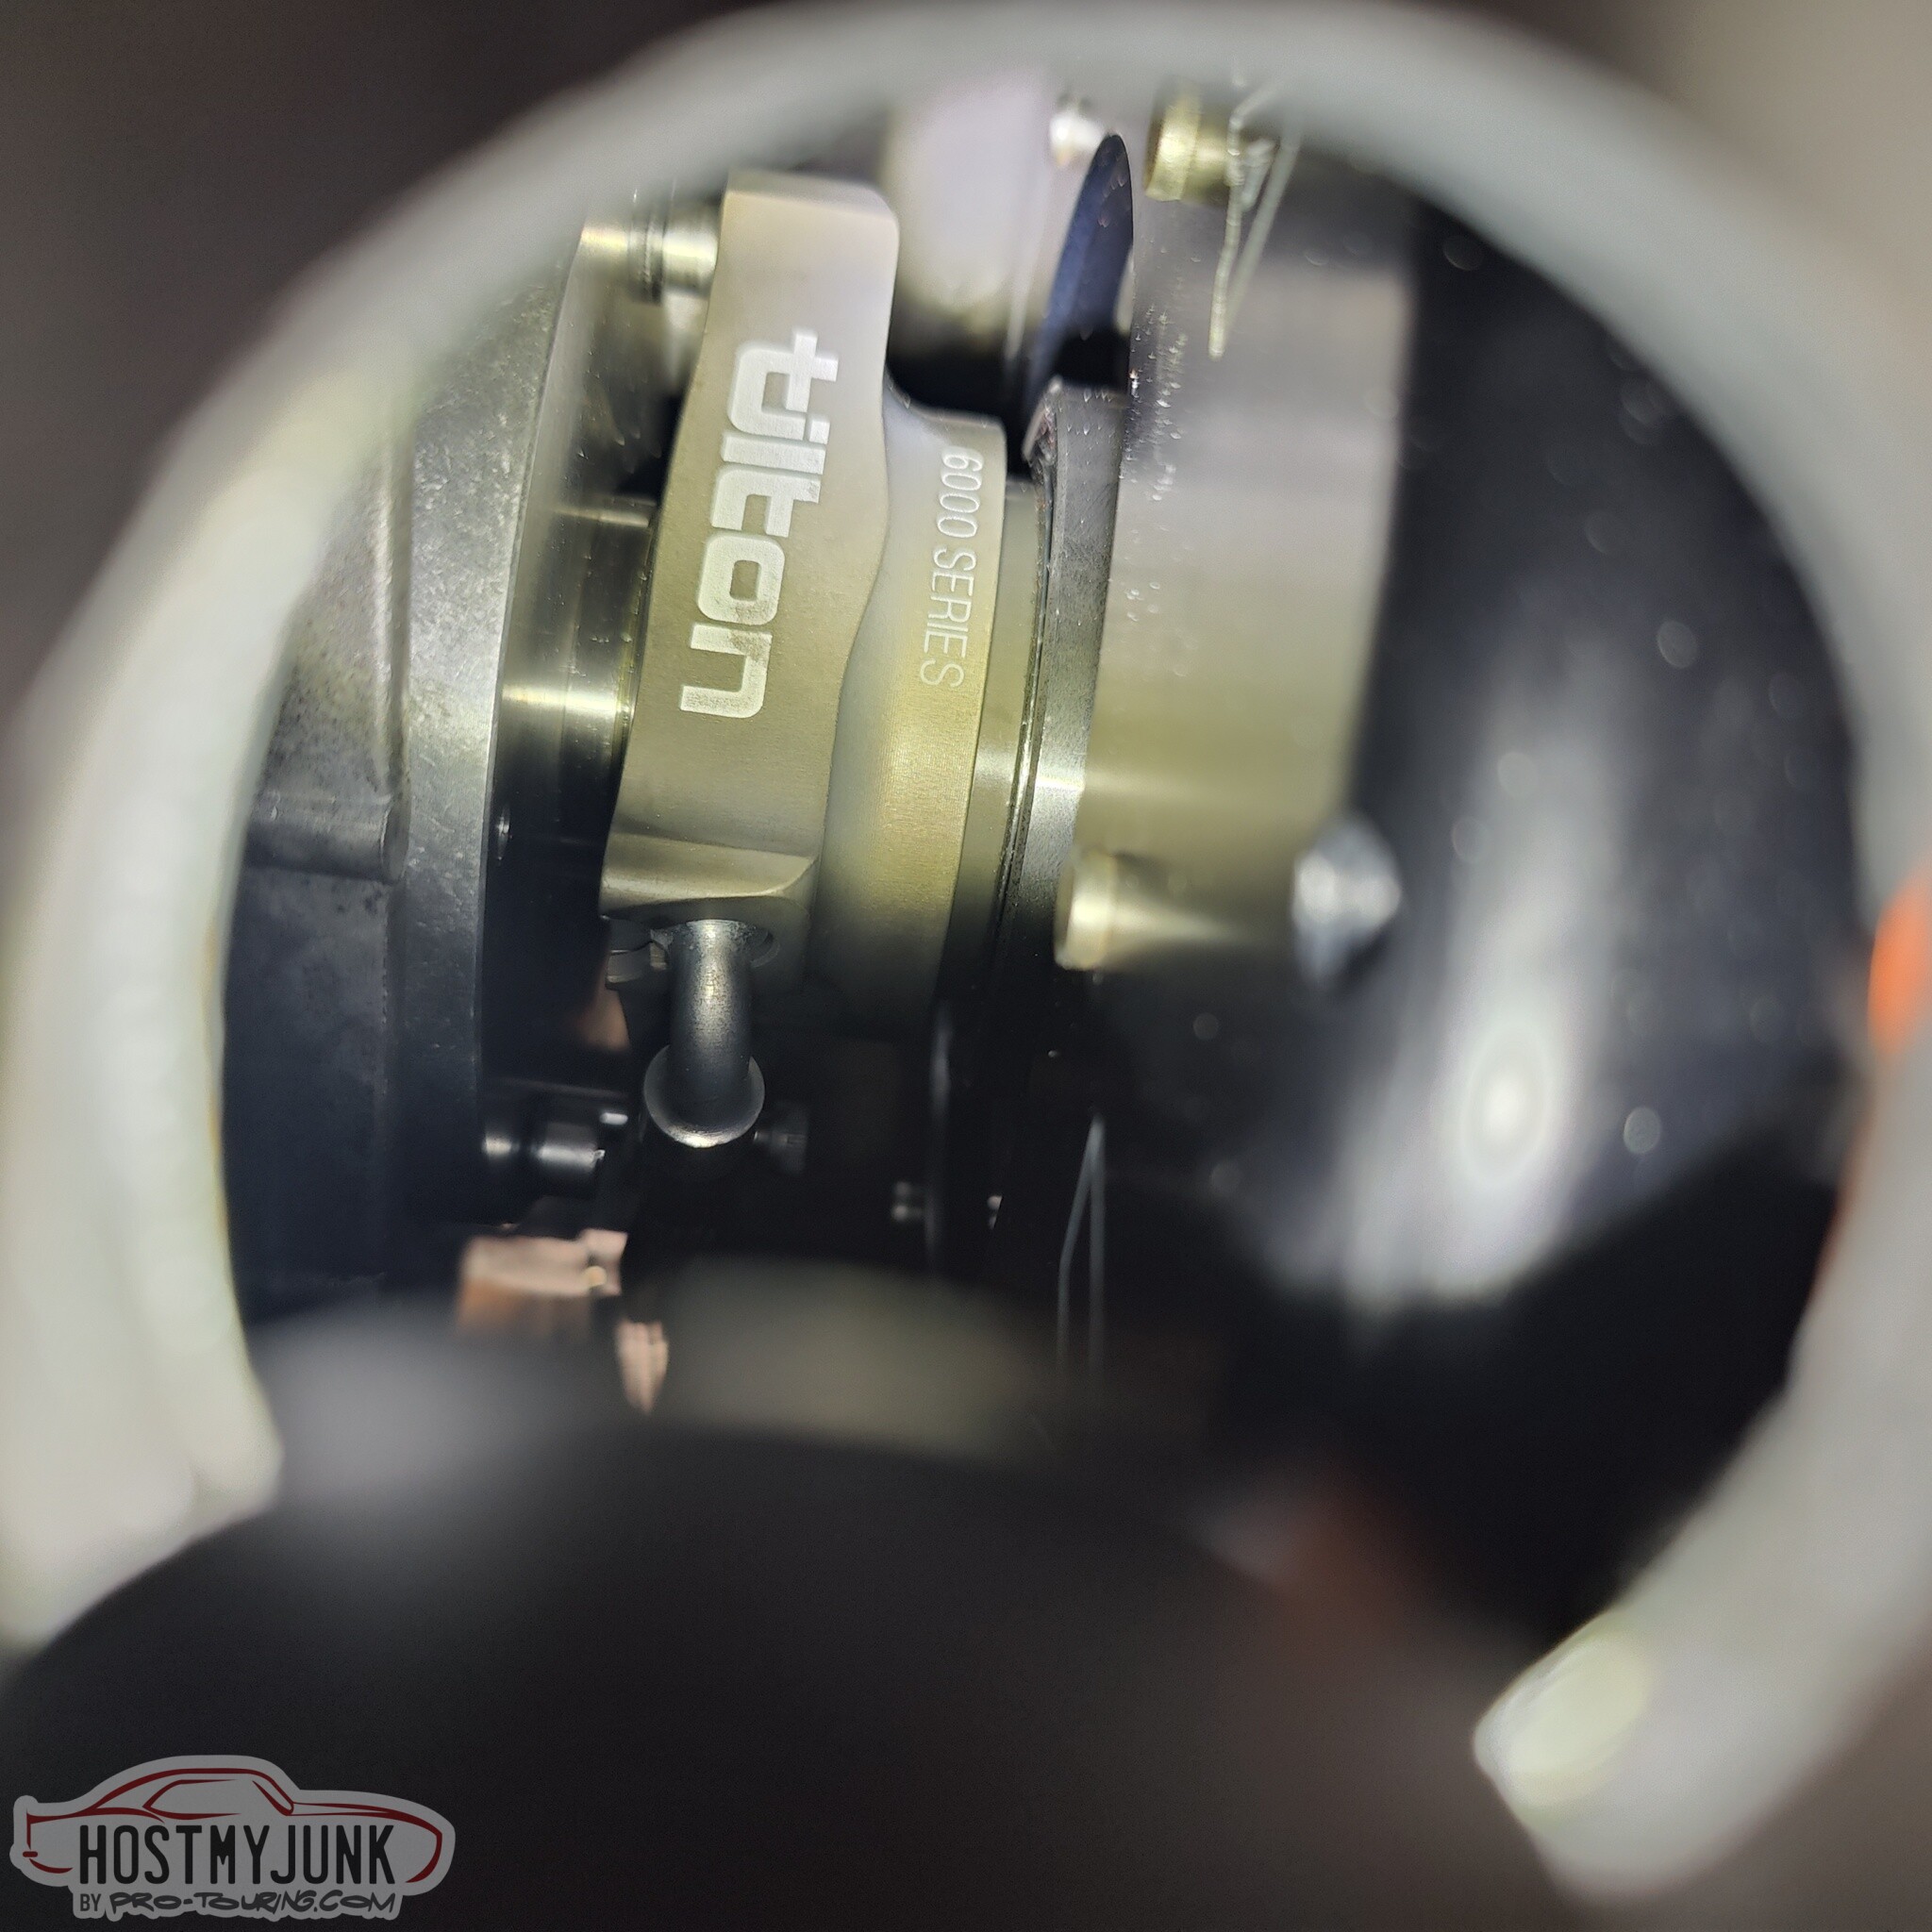
I then test fitted the adapter for the Tilton 6100 series release bearing. The kit includes two anti-rotation studs, but only one is used, in this case, the short one.
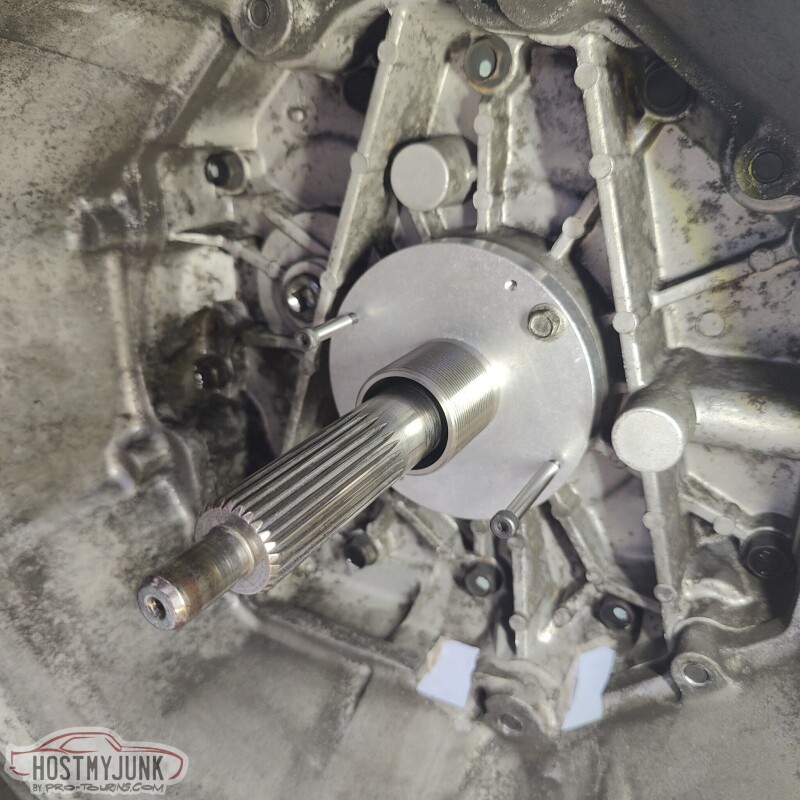
Here is the Tilton bearing installed on the adapter. The depth of the bearing is set by spinning the bearing housing onto the adapter. Once the depth is set, the anti-rotation pin keeps it from spinning. The other thing that some may notice is that the bearing face is not flat. I also ordered the 54mm radius face bearing. A radius face bearing is needed when the clutch has a flat diaphragm spring, like the RPS clutch uses. A typilcal OEM clutch would use a spring with curled fingers, so a flat faced bearing is used. In both cases the goal is to provide a single point of contact between the release bearing and the clutch spring fingers.
More to come...
Andrew
Then I took both of the disks, one by one, and I slid them back and forth so that the splines on the input shaft would have a nice fit on the splines of the disk hubs.
I then test fitted the adapter for the Tilton 6100 series release bearing. The kit includes two anti-rotation studs, but only one is used, in this case, the short one.
Here is the Tilton bearing installed on the adapter. The depth of the bearing is set by spinning the bearing housing onto the adapter. Once the depth is set, the anti-rotation pin keeps it from spinning. The other thing that some may notice is that the bearing face is not flat. I also ordered the 54mm radius face bearing. A radius face bearing is needed when the clutch has a flat diaphragm spring, like the RPS clutch uses. A typilcal OEM clutch would use a spring with curled fingers, so a flat faced bearing is used. In both cases the goal is to provide a single point of contact between the release bearing and the clutch spring fingers.
More to come...
Andrew
The following users liked this post:
rkupon1 (10-04-2023)
10-05-2023, 09:28 PM
#1304
TECH Senior Member
Thread Starter
iTrader: (7)
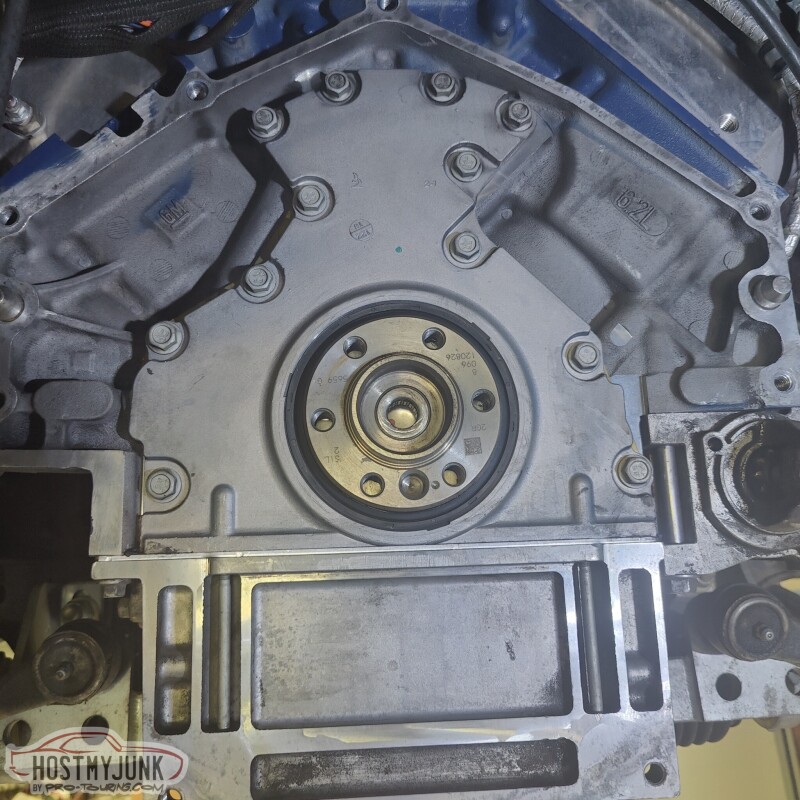
After removing the LS7 clutch, it was time to install the new RPS flywheel. I am not sure on the exact weight of the flywheel, but the whole clutch assembly is about 32 pounds. I wasn't particularly interested in the weight savings, but it sure is nice offsetting the weight of the supercharger and its supporting bits. Maybe Tony @Tony @ Mamo Motorsports can chime in with the weight.
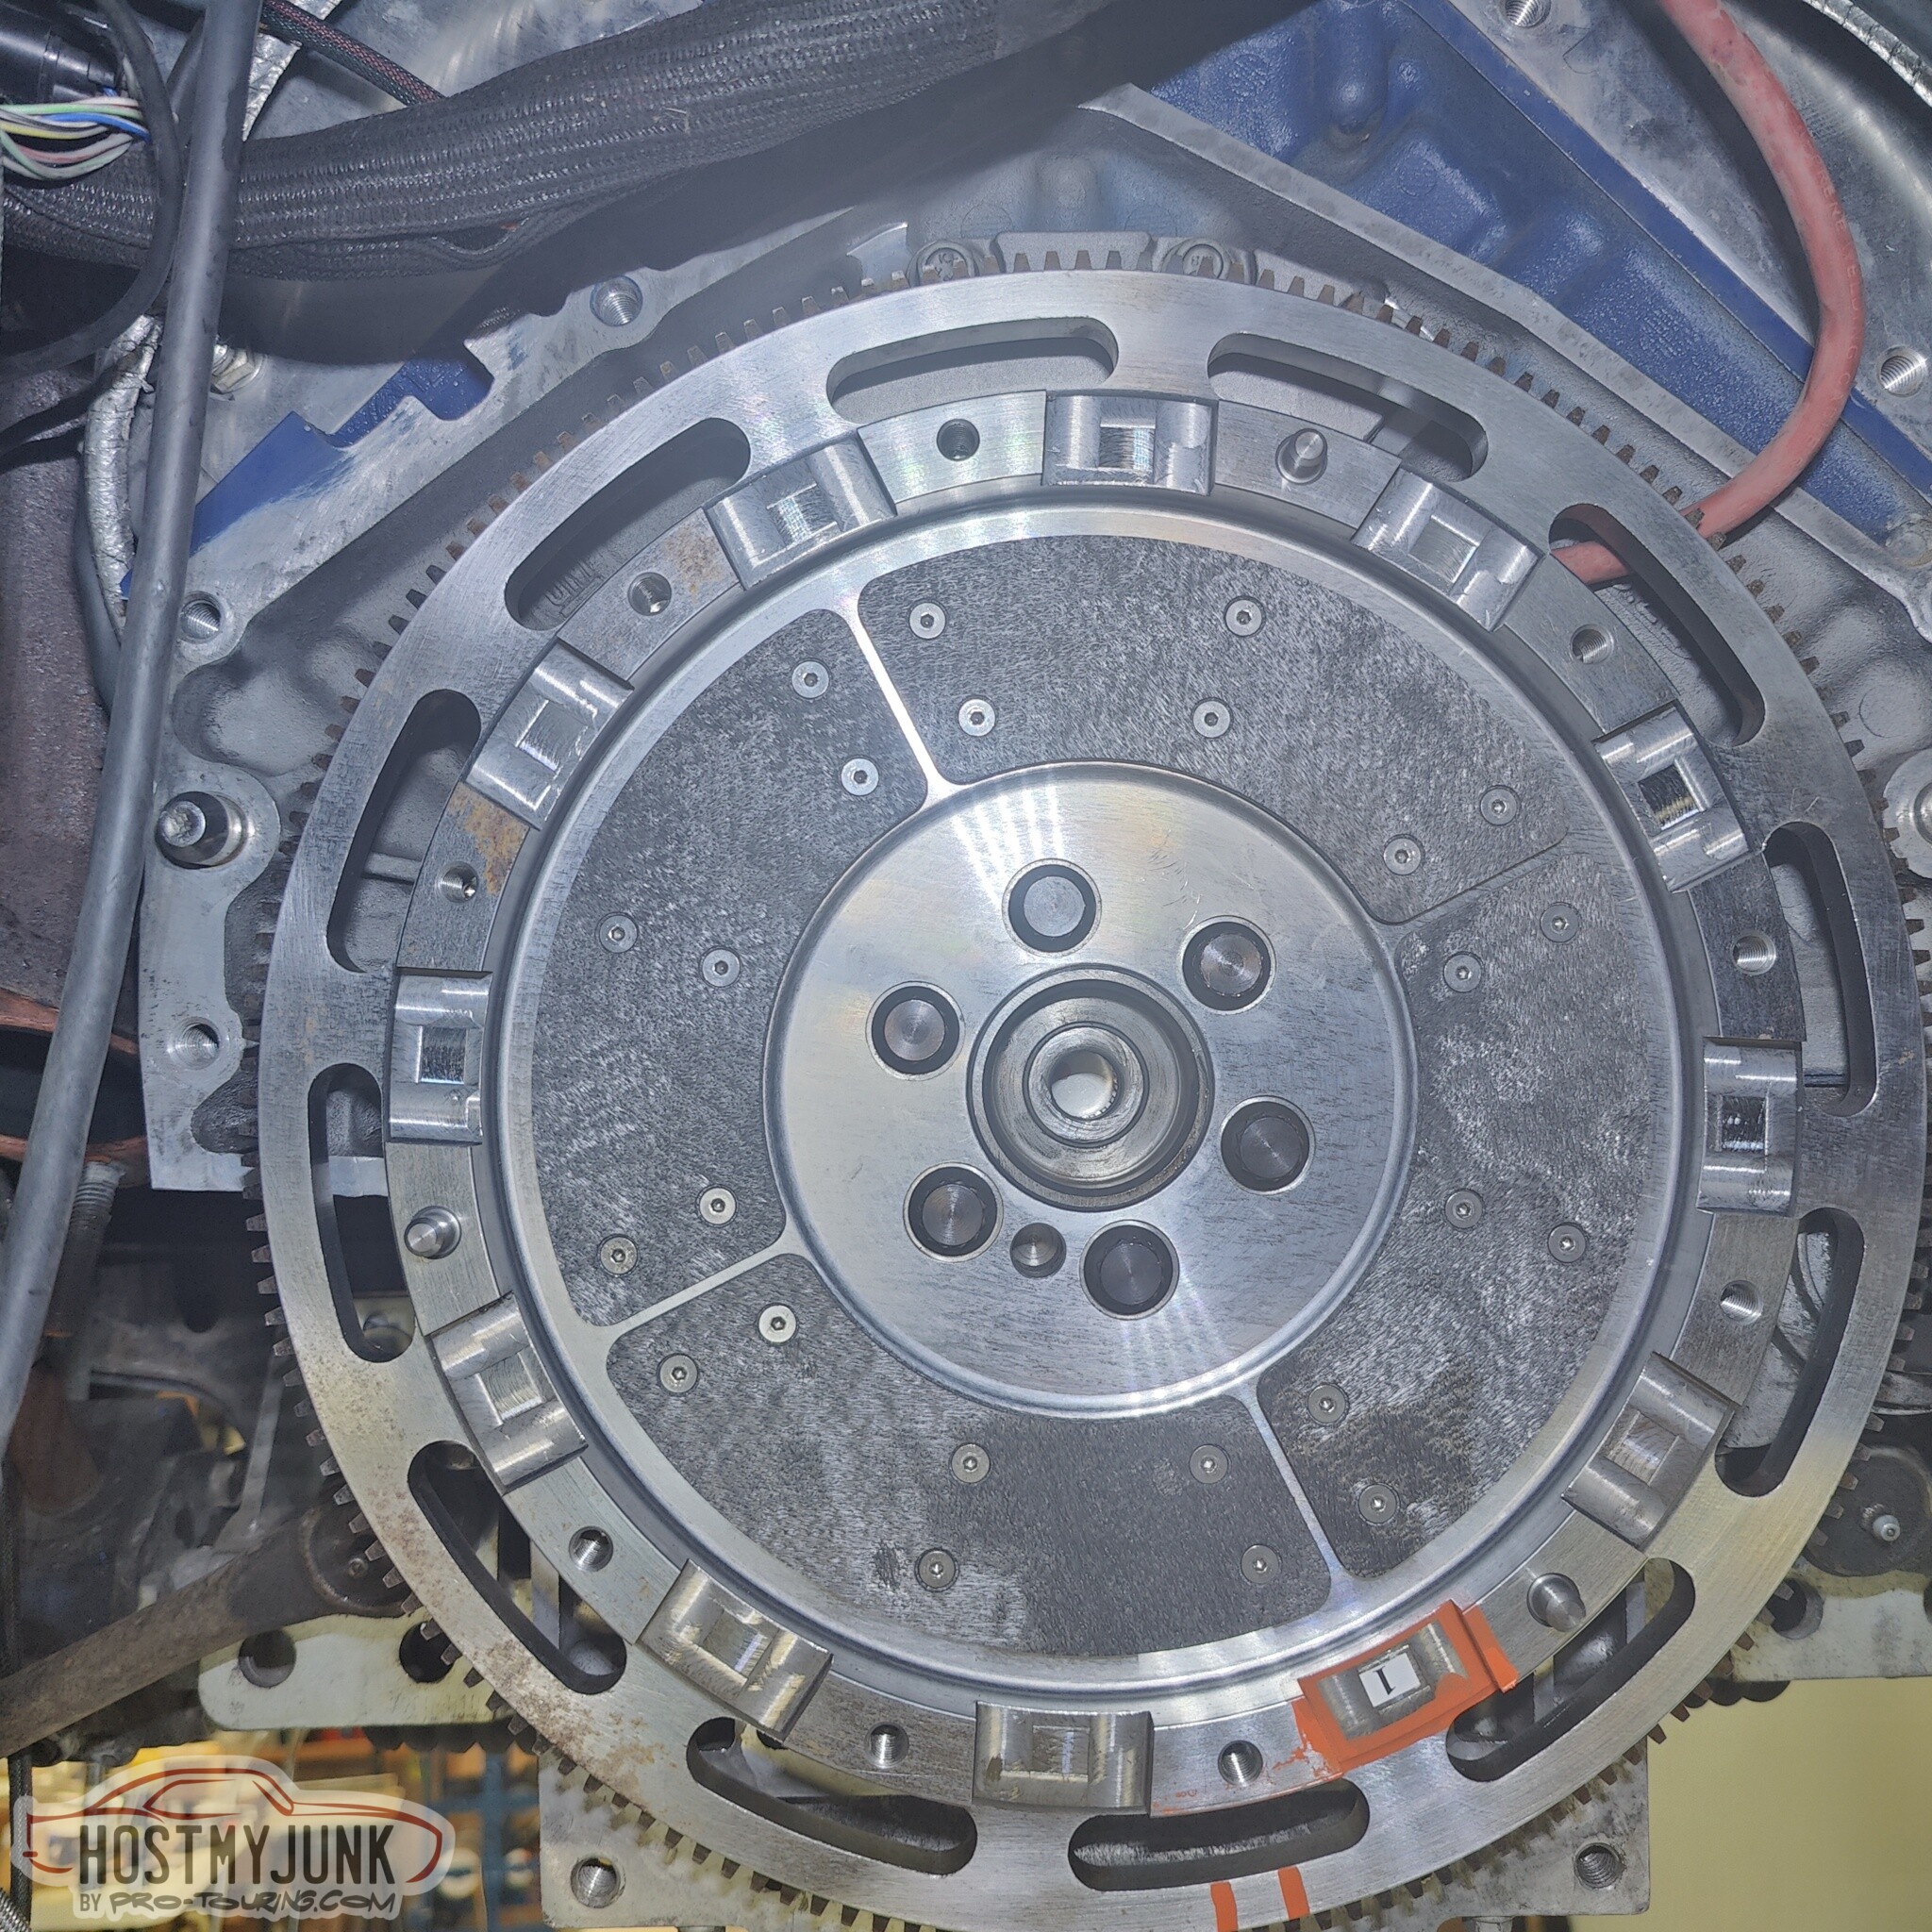
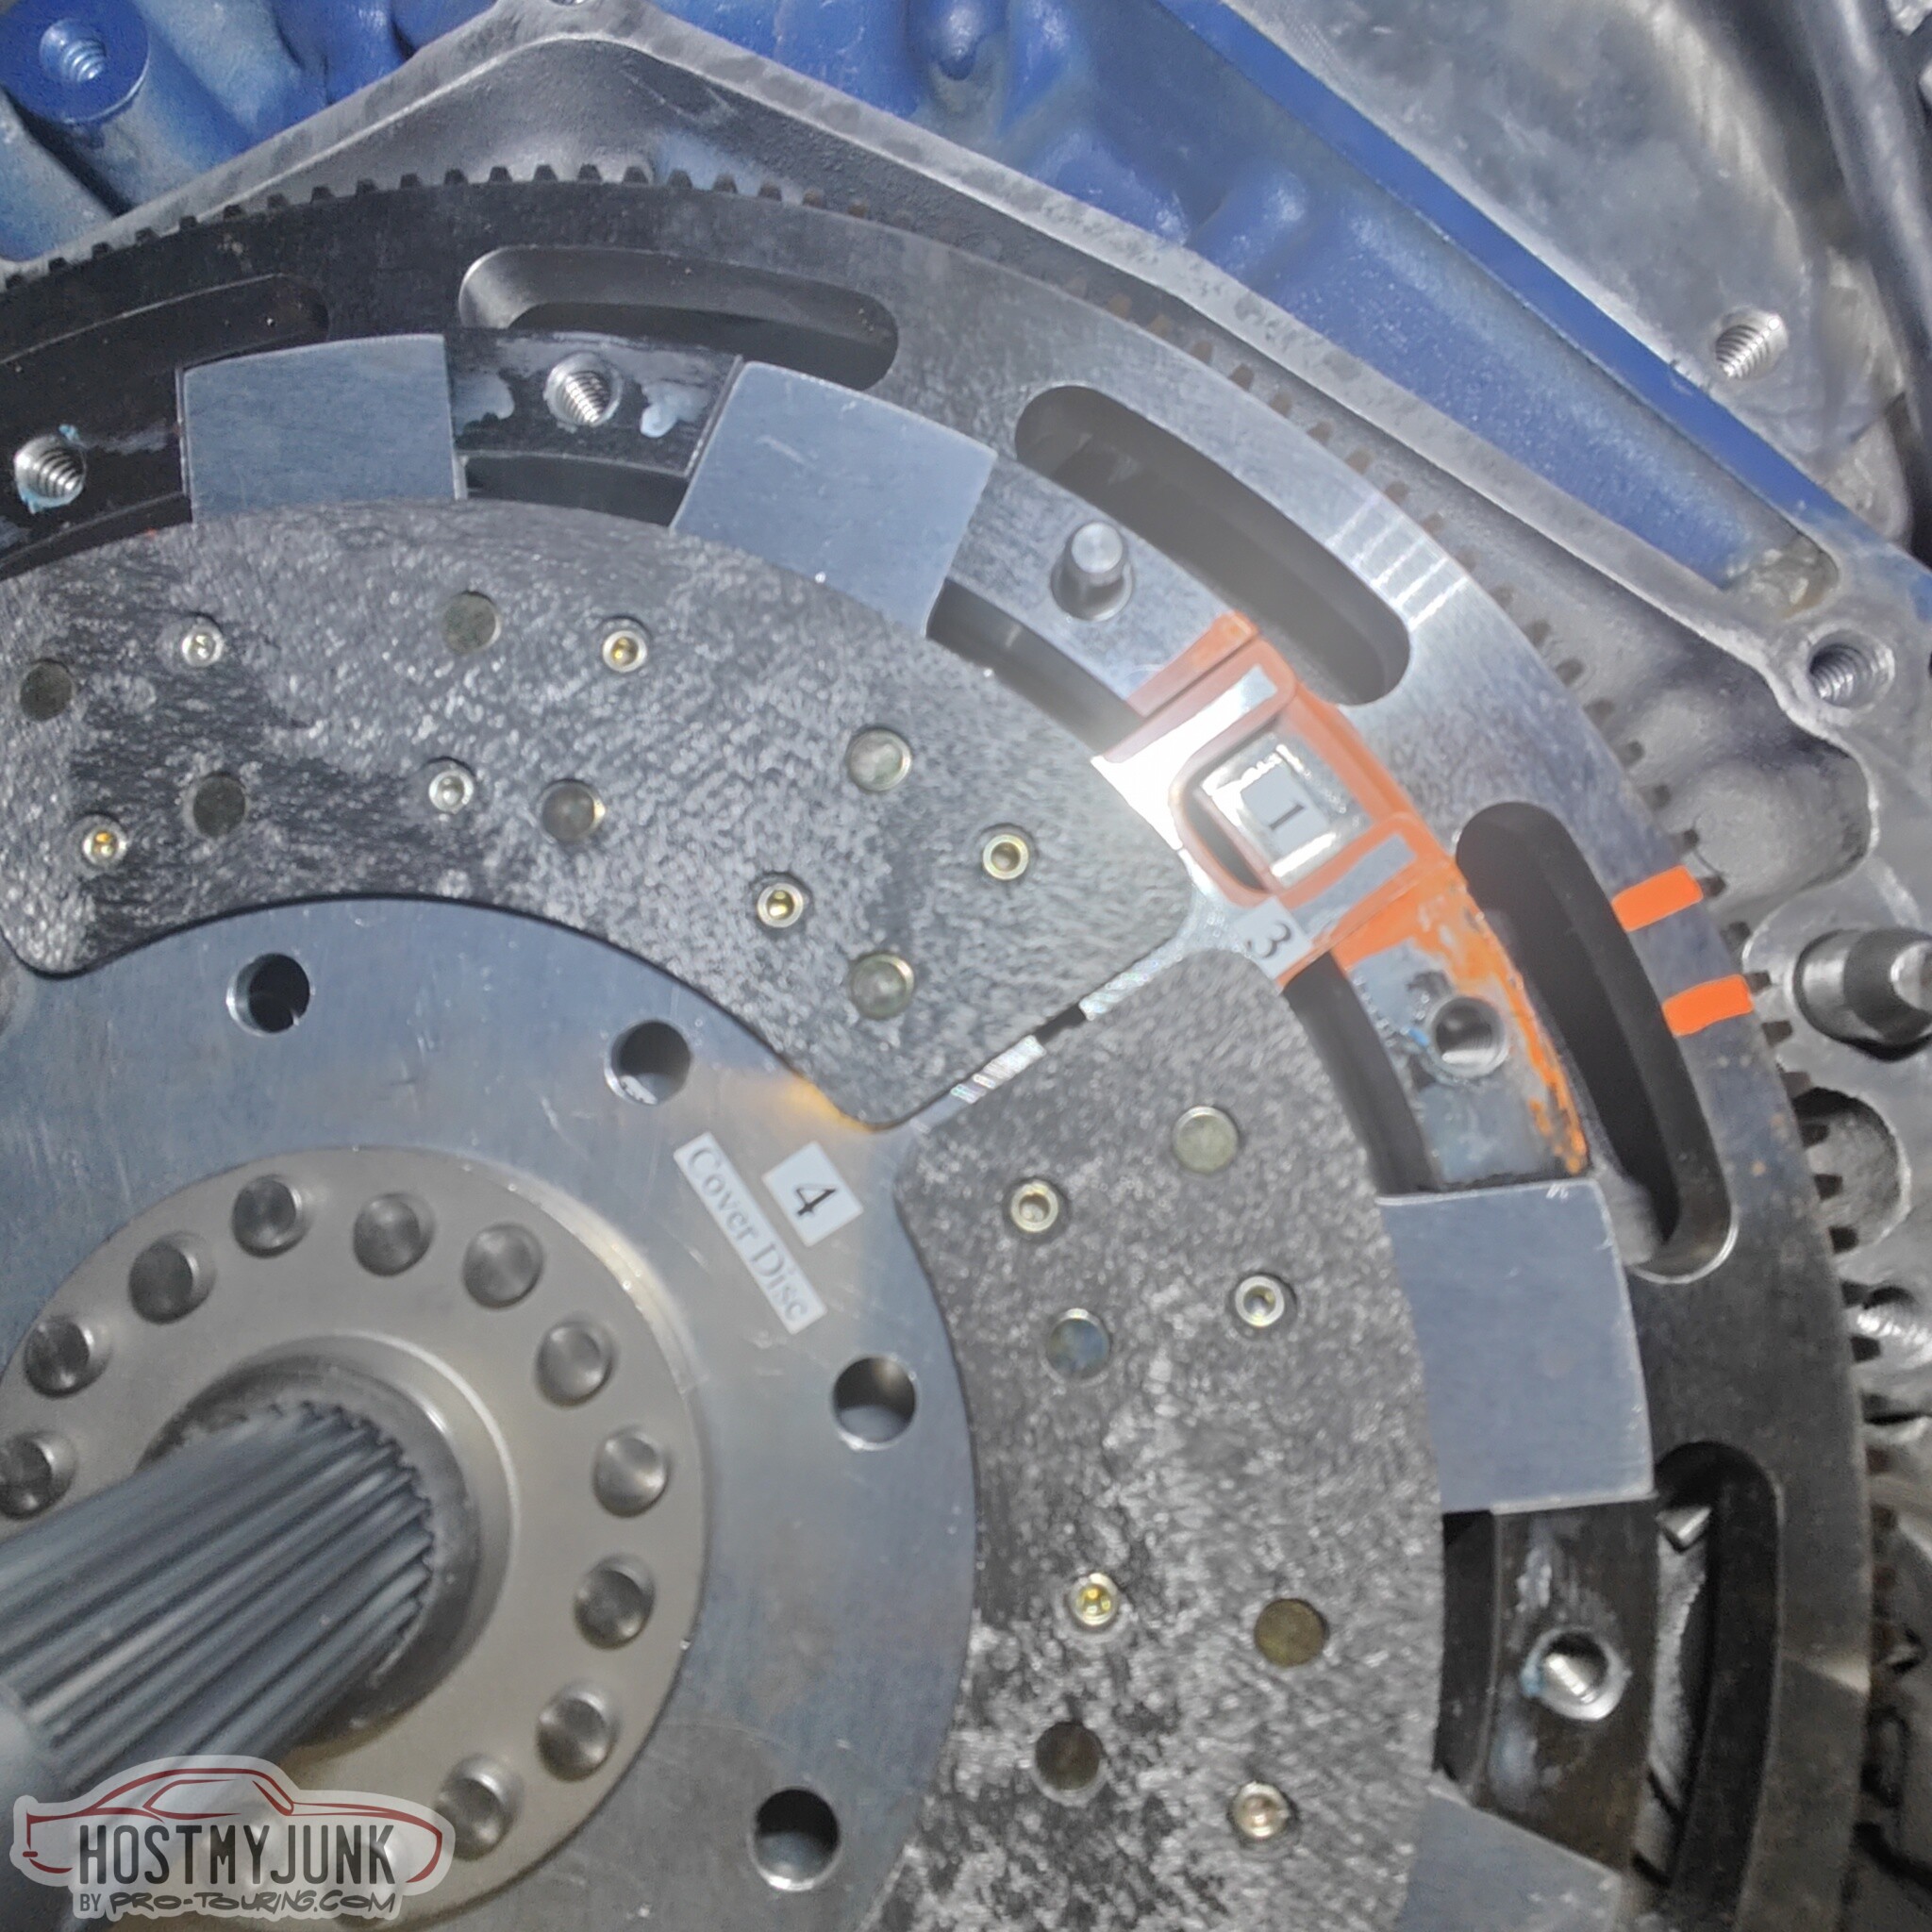
The next step was to install the two disks with the floater plate in between them. The clutch kit included a plastic clutch alignment tool. This alignment tool is not adequate for this task. Multi disk clutches need to be aligned with a proper, steel alignment tool. For as much as this clutch costs, surely one can be included.
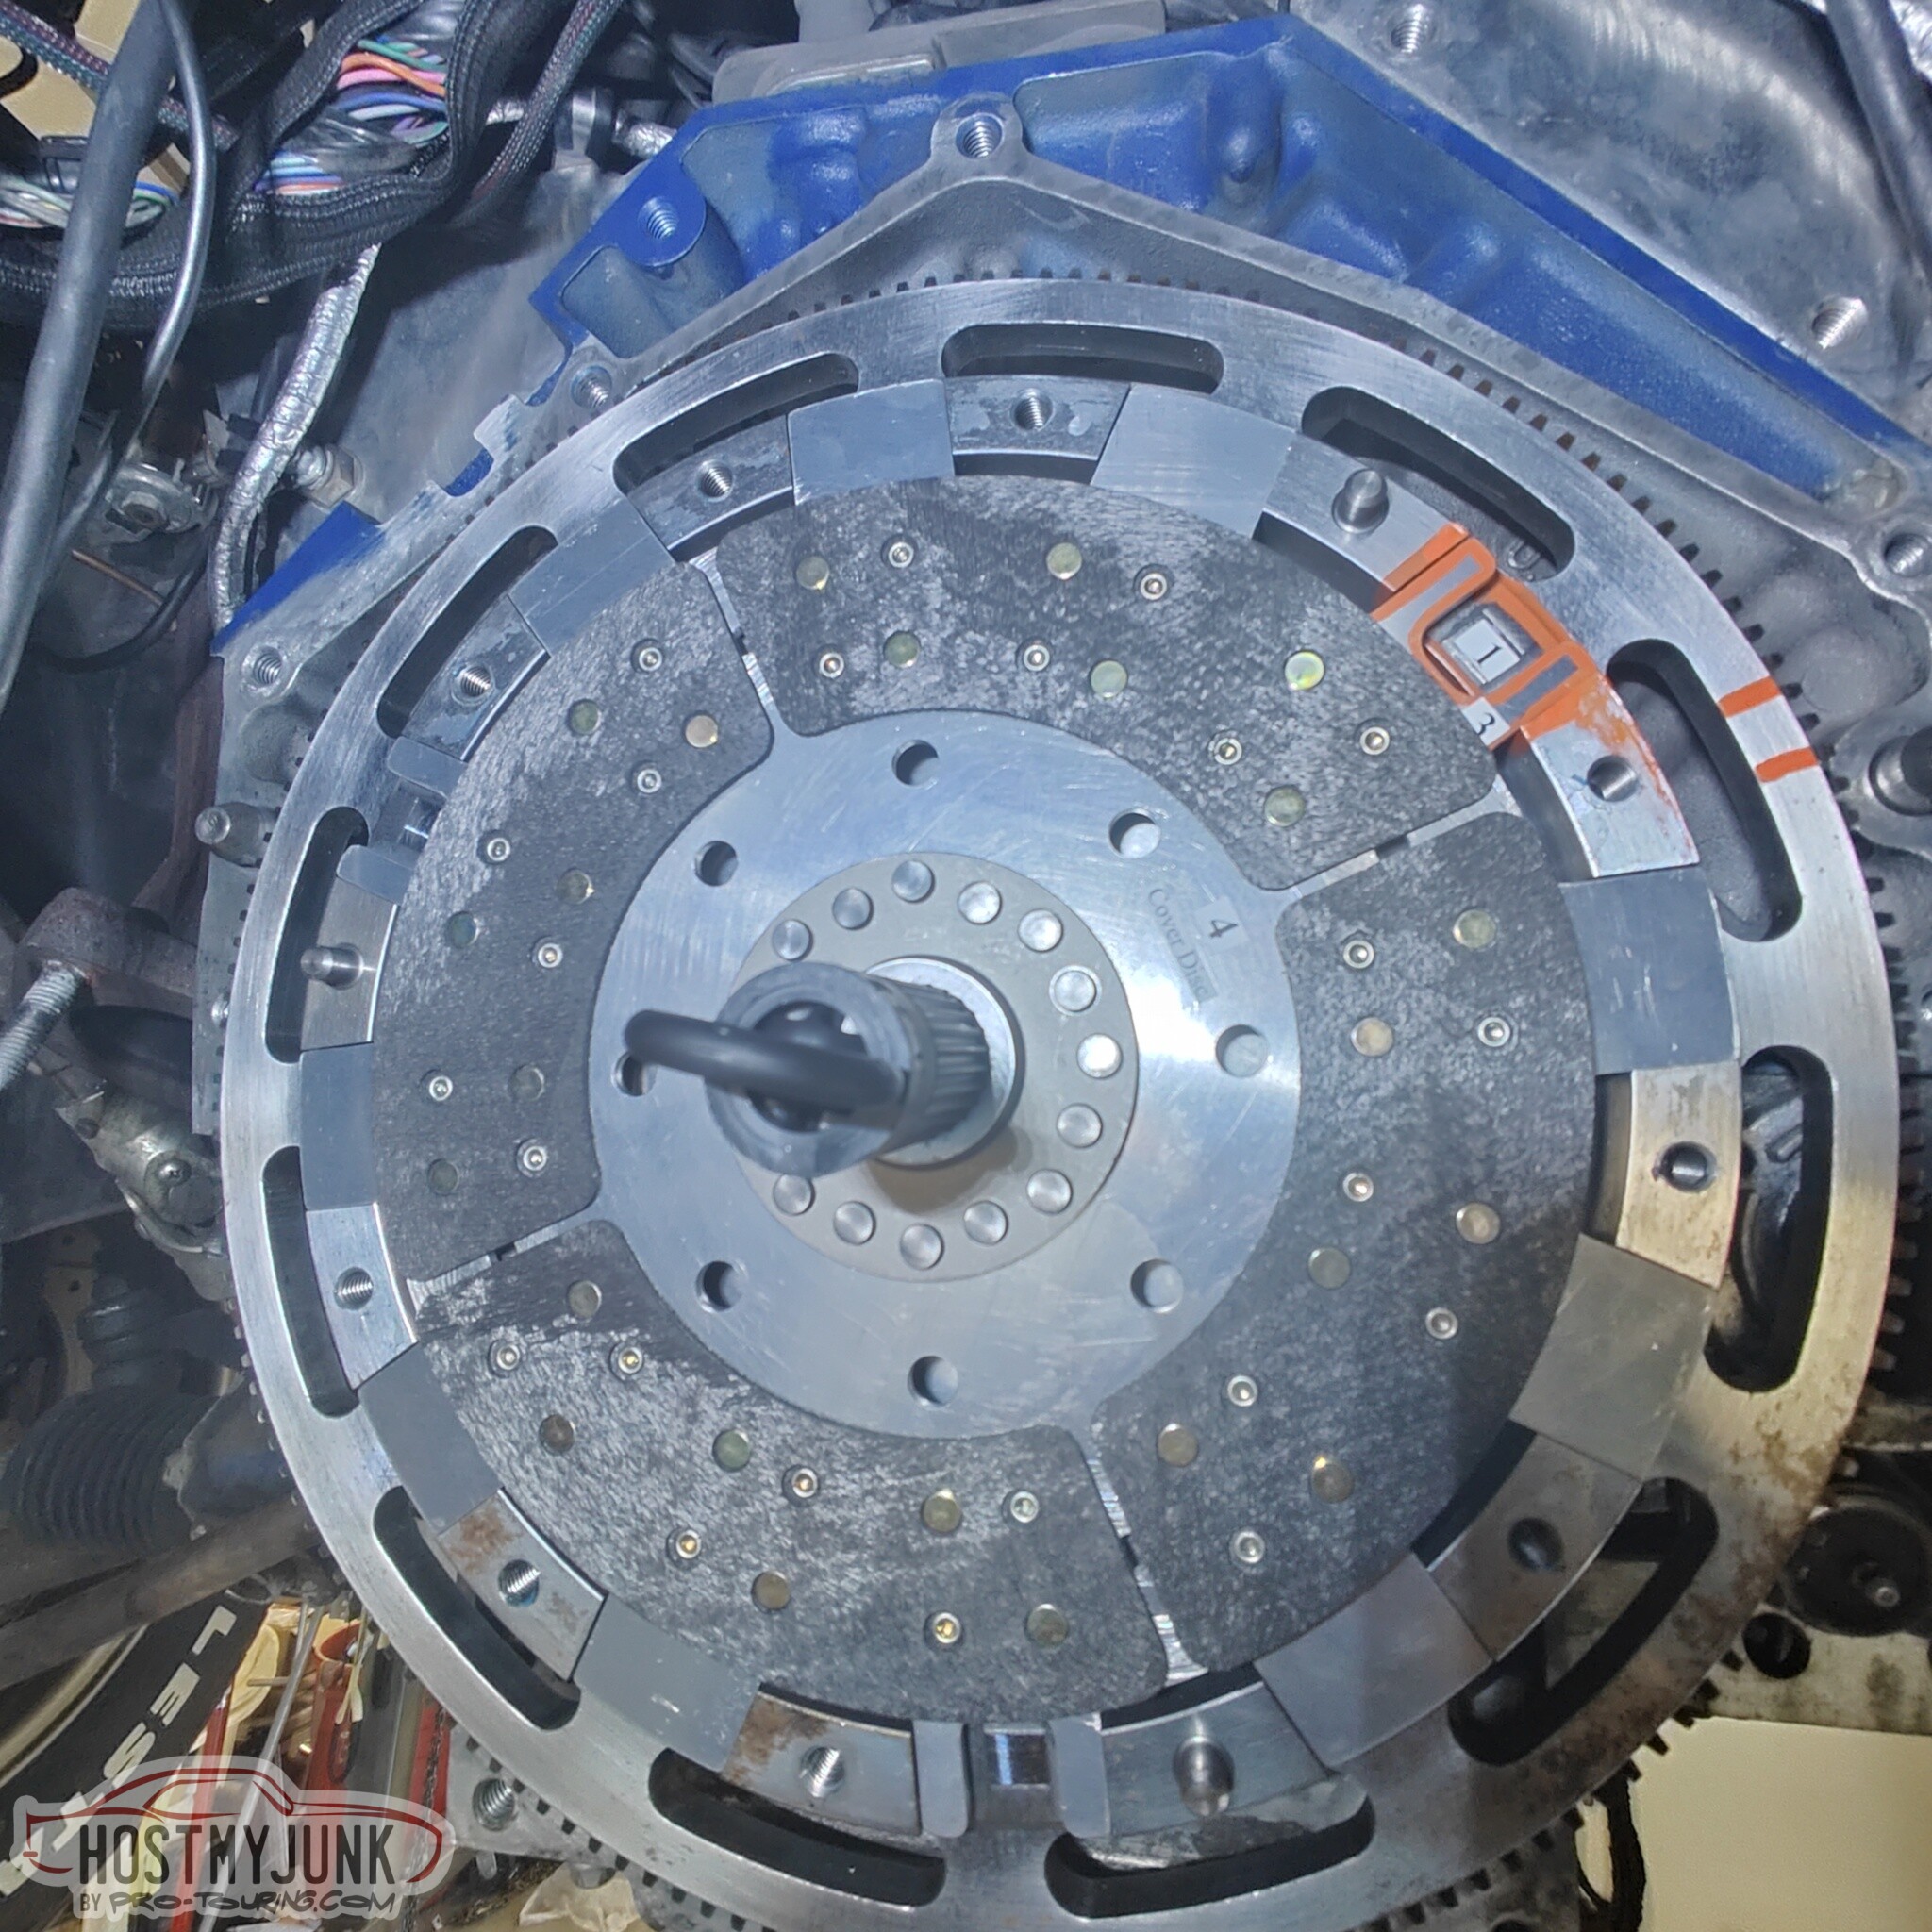
Nothing is left to chance, with these bright marking showing how everything should be aligned. You can also see the decals on the various parts indicating the order of assembly and in which direction the components should be facing. Very simple and clever, and even I can follow those instructions.
I suppose here is where I should start telling the whole story of this clutch installation. Everything was proceeding as expected. I torqued everything to spec, I measured the height of bearing and the spring fingers, etc...All of the components bolted together great.
The transmission slid in without too much of a problem. The last 1/4" was a bit of a struggle. I think a better alignment tool would solve this problem. I bolted the crossmember back in place, exhaust was installed, and I was ready to start it up for the first time. I turned the key and it was cranking, but not starting. It was also sounding very different. Like there was some sort of metal to metal rubbing noise and the engine was cranking noticeably slower. In fact, it was only cranking at about 70 RPM, which is why it would not start. I was able to determine this by doing a system log with my Holley Dominator ECU.
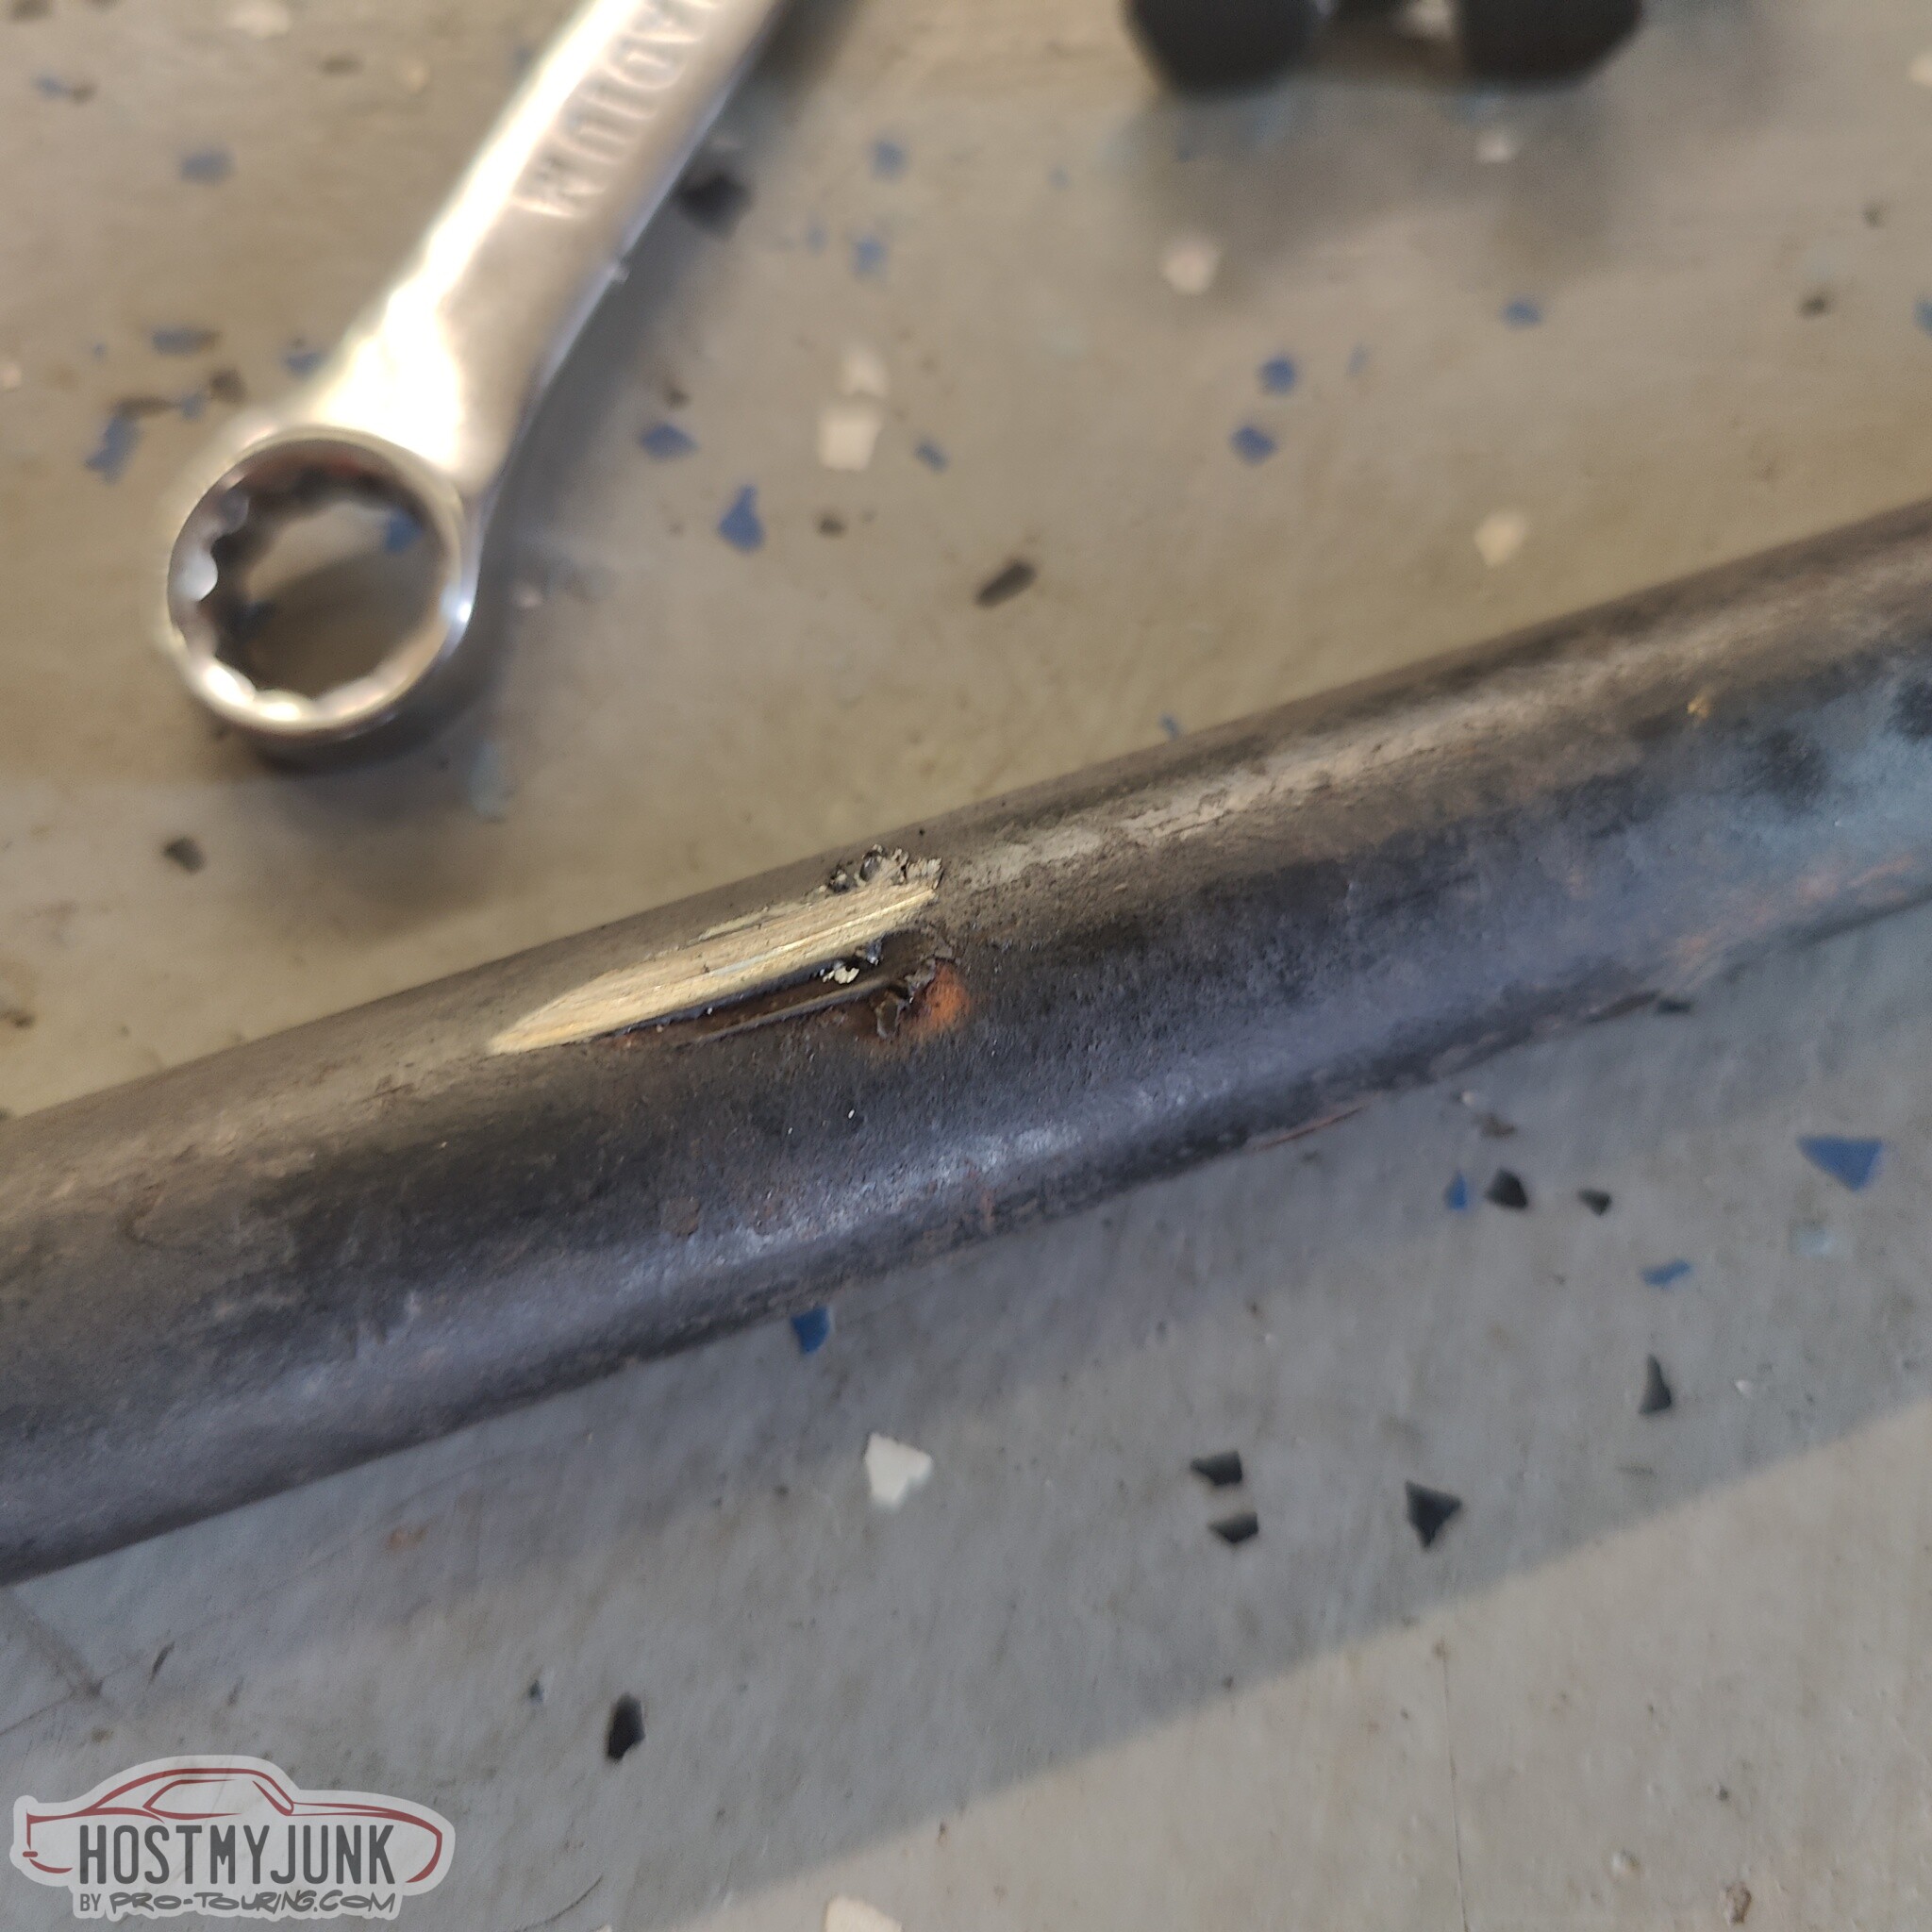
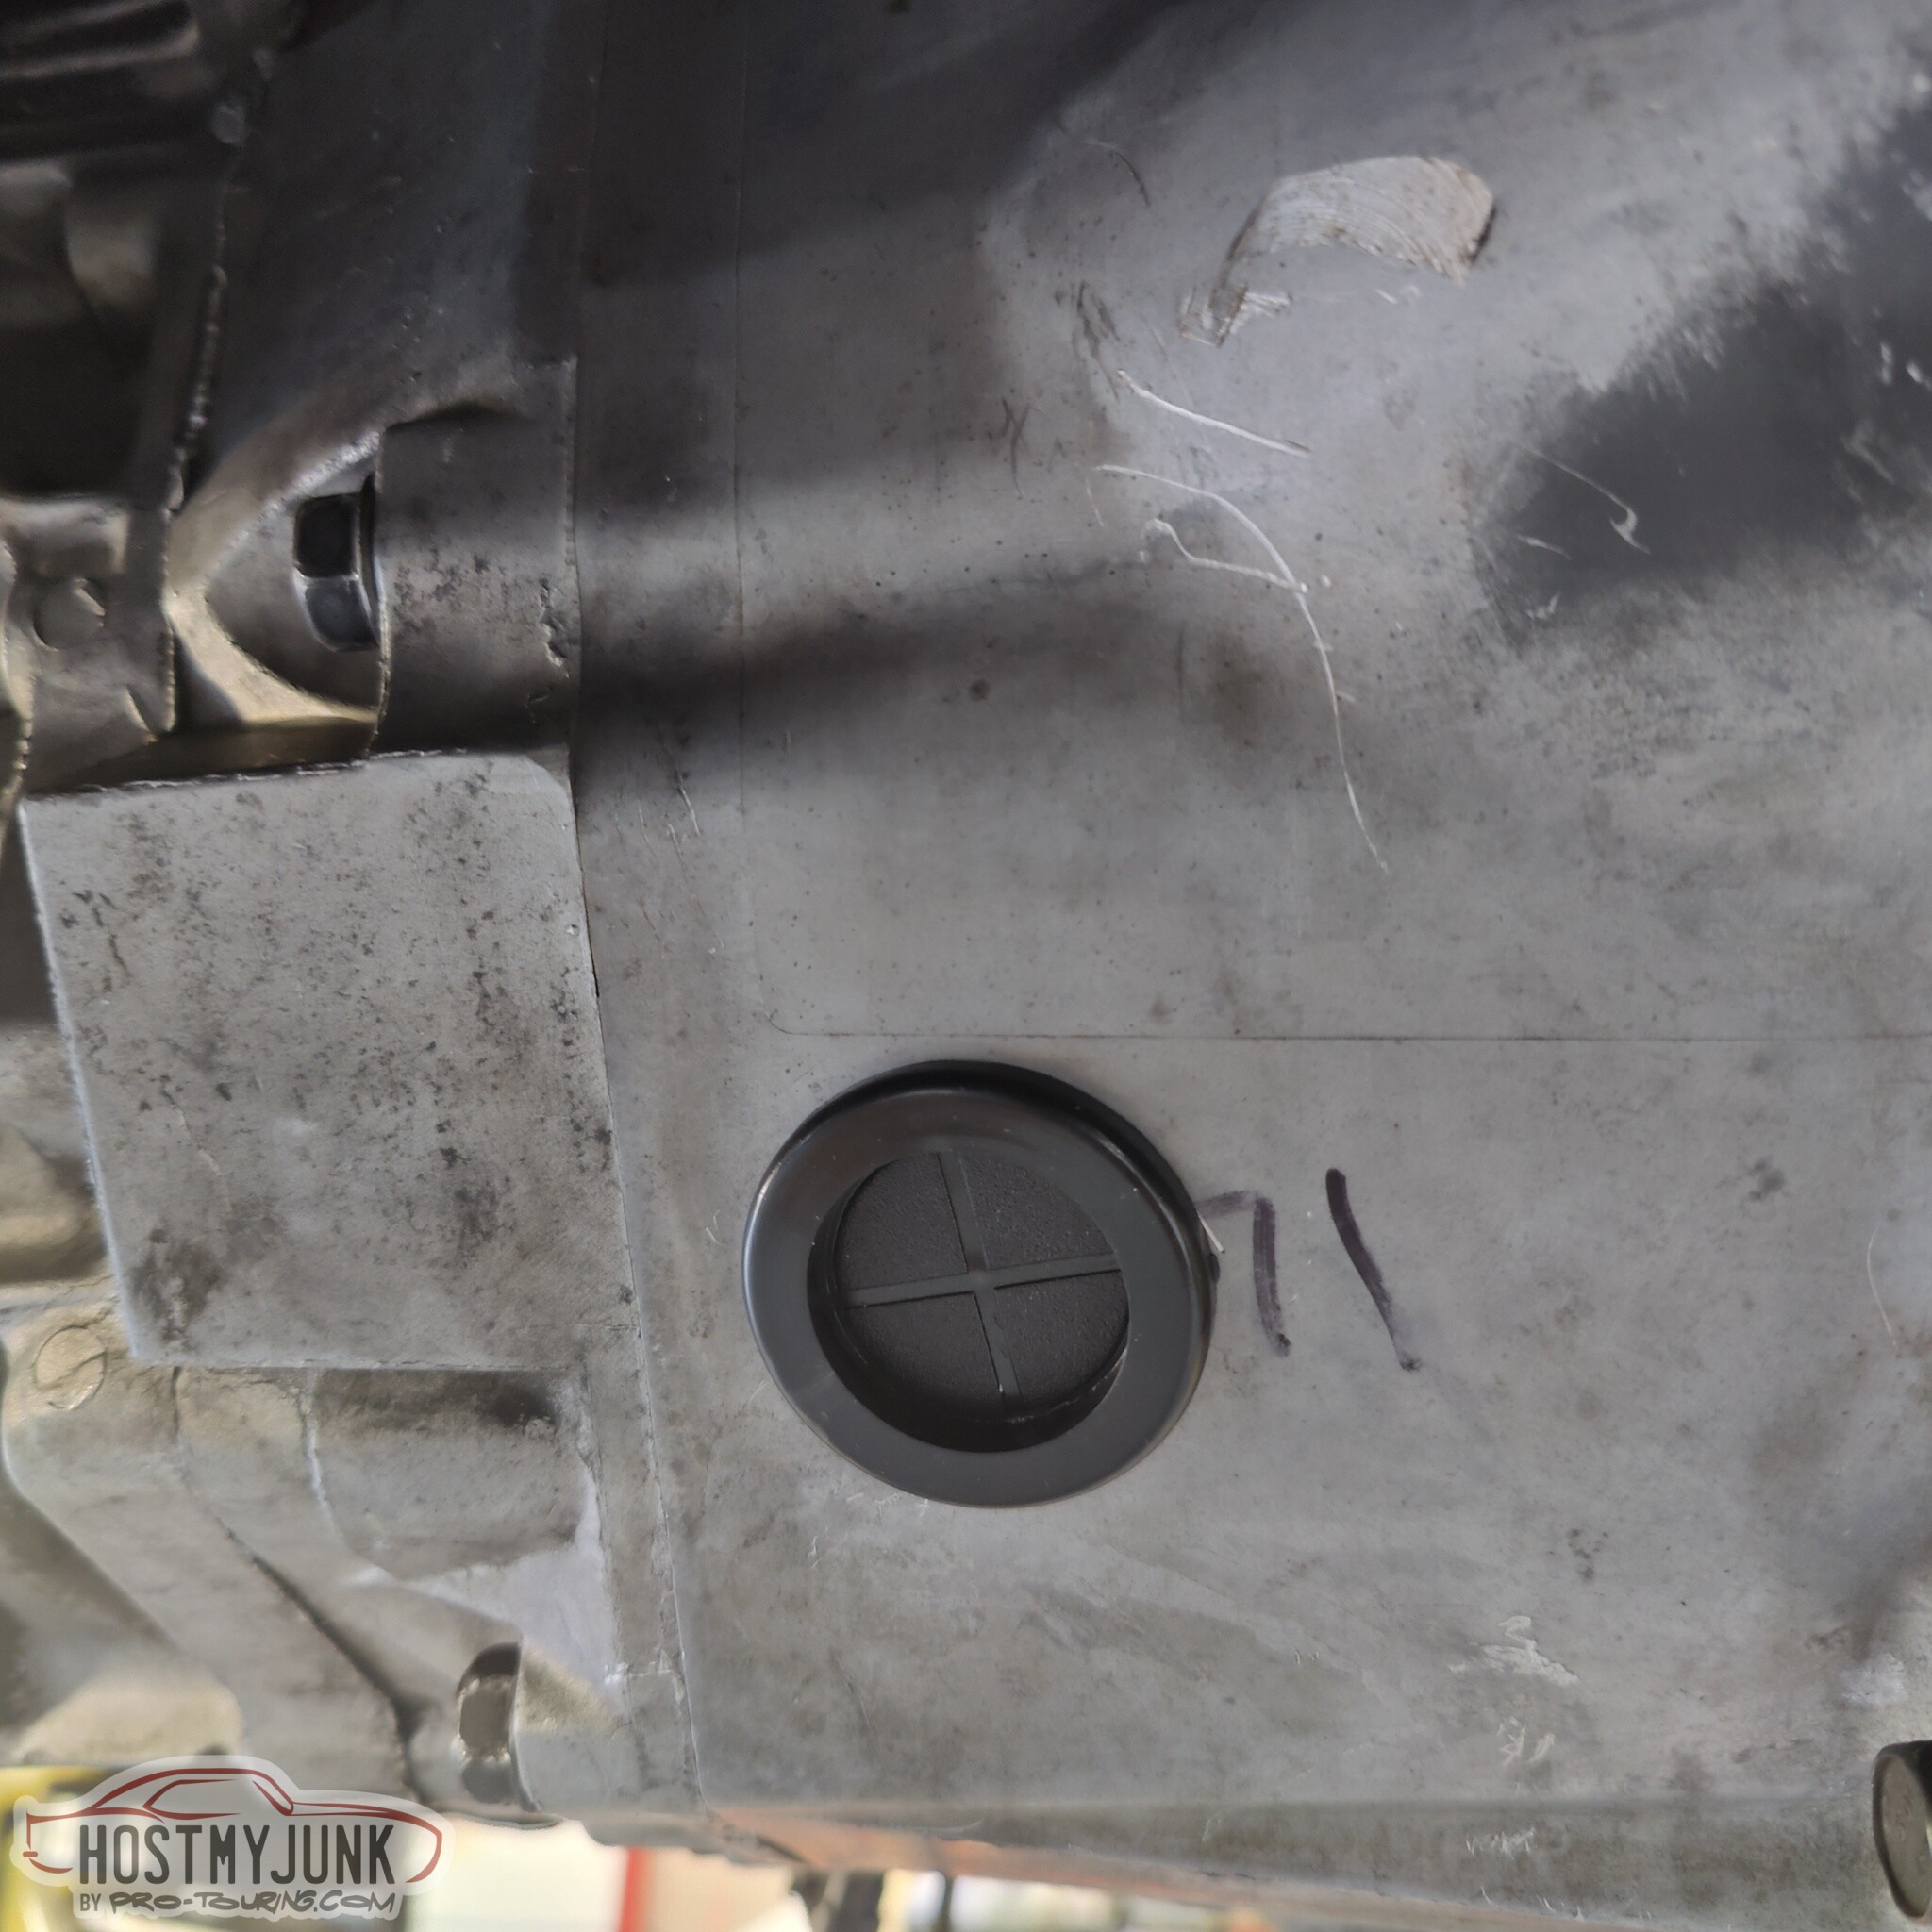
I was truly stumped. My mind started going to crazy places, while also simultaneously realizing the errors in my own logic. This turned into a 2 day long quest during which we installed and removed the transmission a total of 6 times. I even went so far as to drill a 1.5" hole in the side of the bellhousing so I could see what was going on inside. I have actually wanted to do this for a long time and I highly recommend it.
The hole is on the passenger side of the bellhousing at about the 5 o'clock position. Here you can see the Tilton throw out bearing at rest against the clutch fingers. The visible portion of the piston is actually out measured air gap, which was right at .200".
Long story short, here is the problem...Do you see it? It's not super obvious at first glance, is it?
How about now, is that more clear?
Surely, now it all makes sense!!!
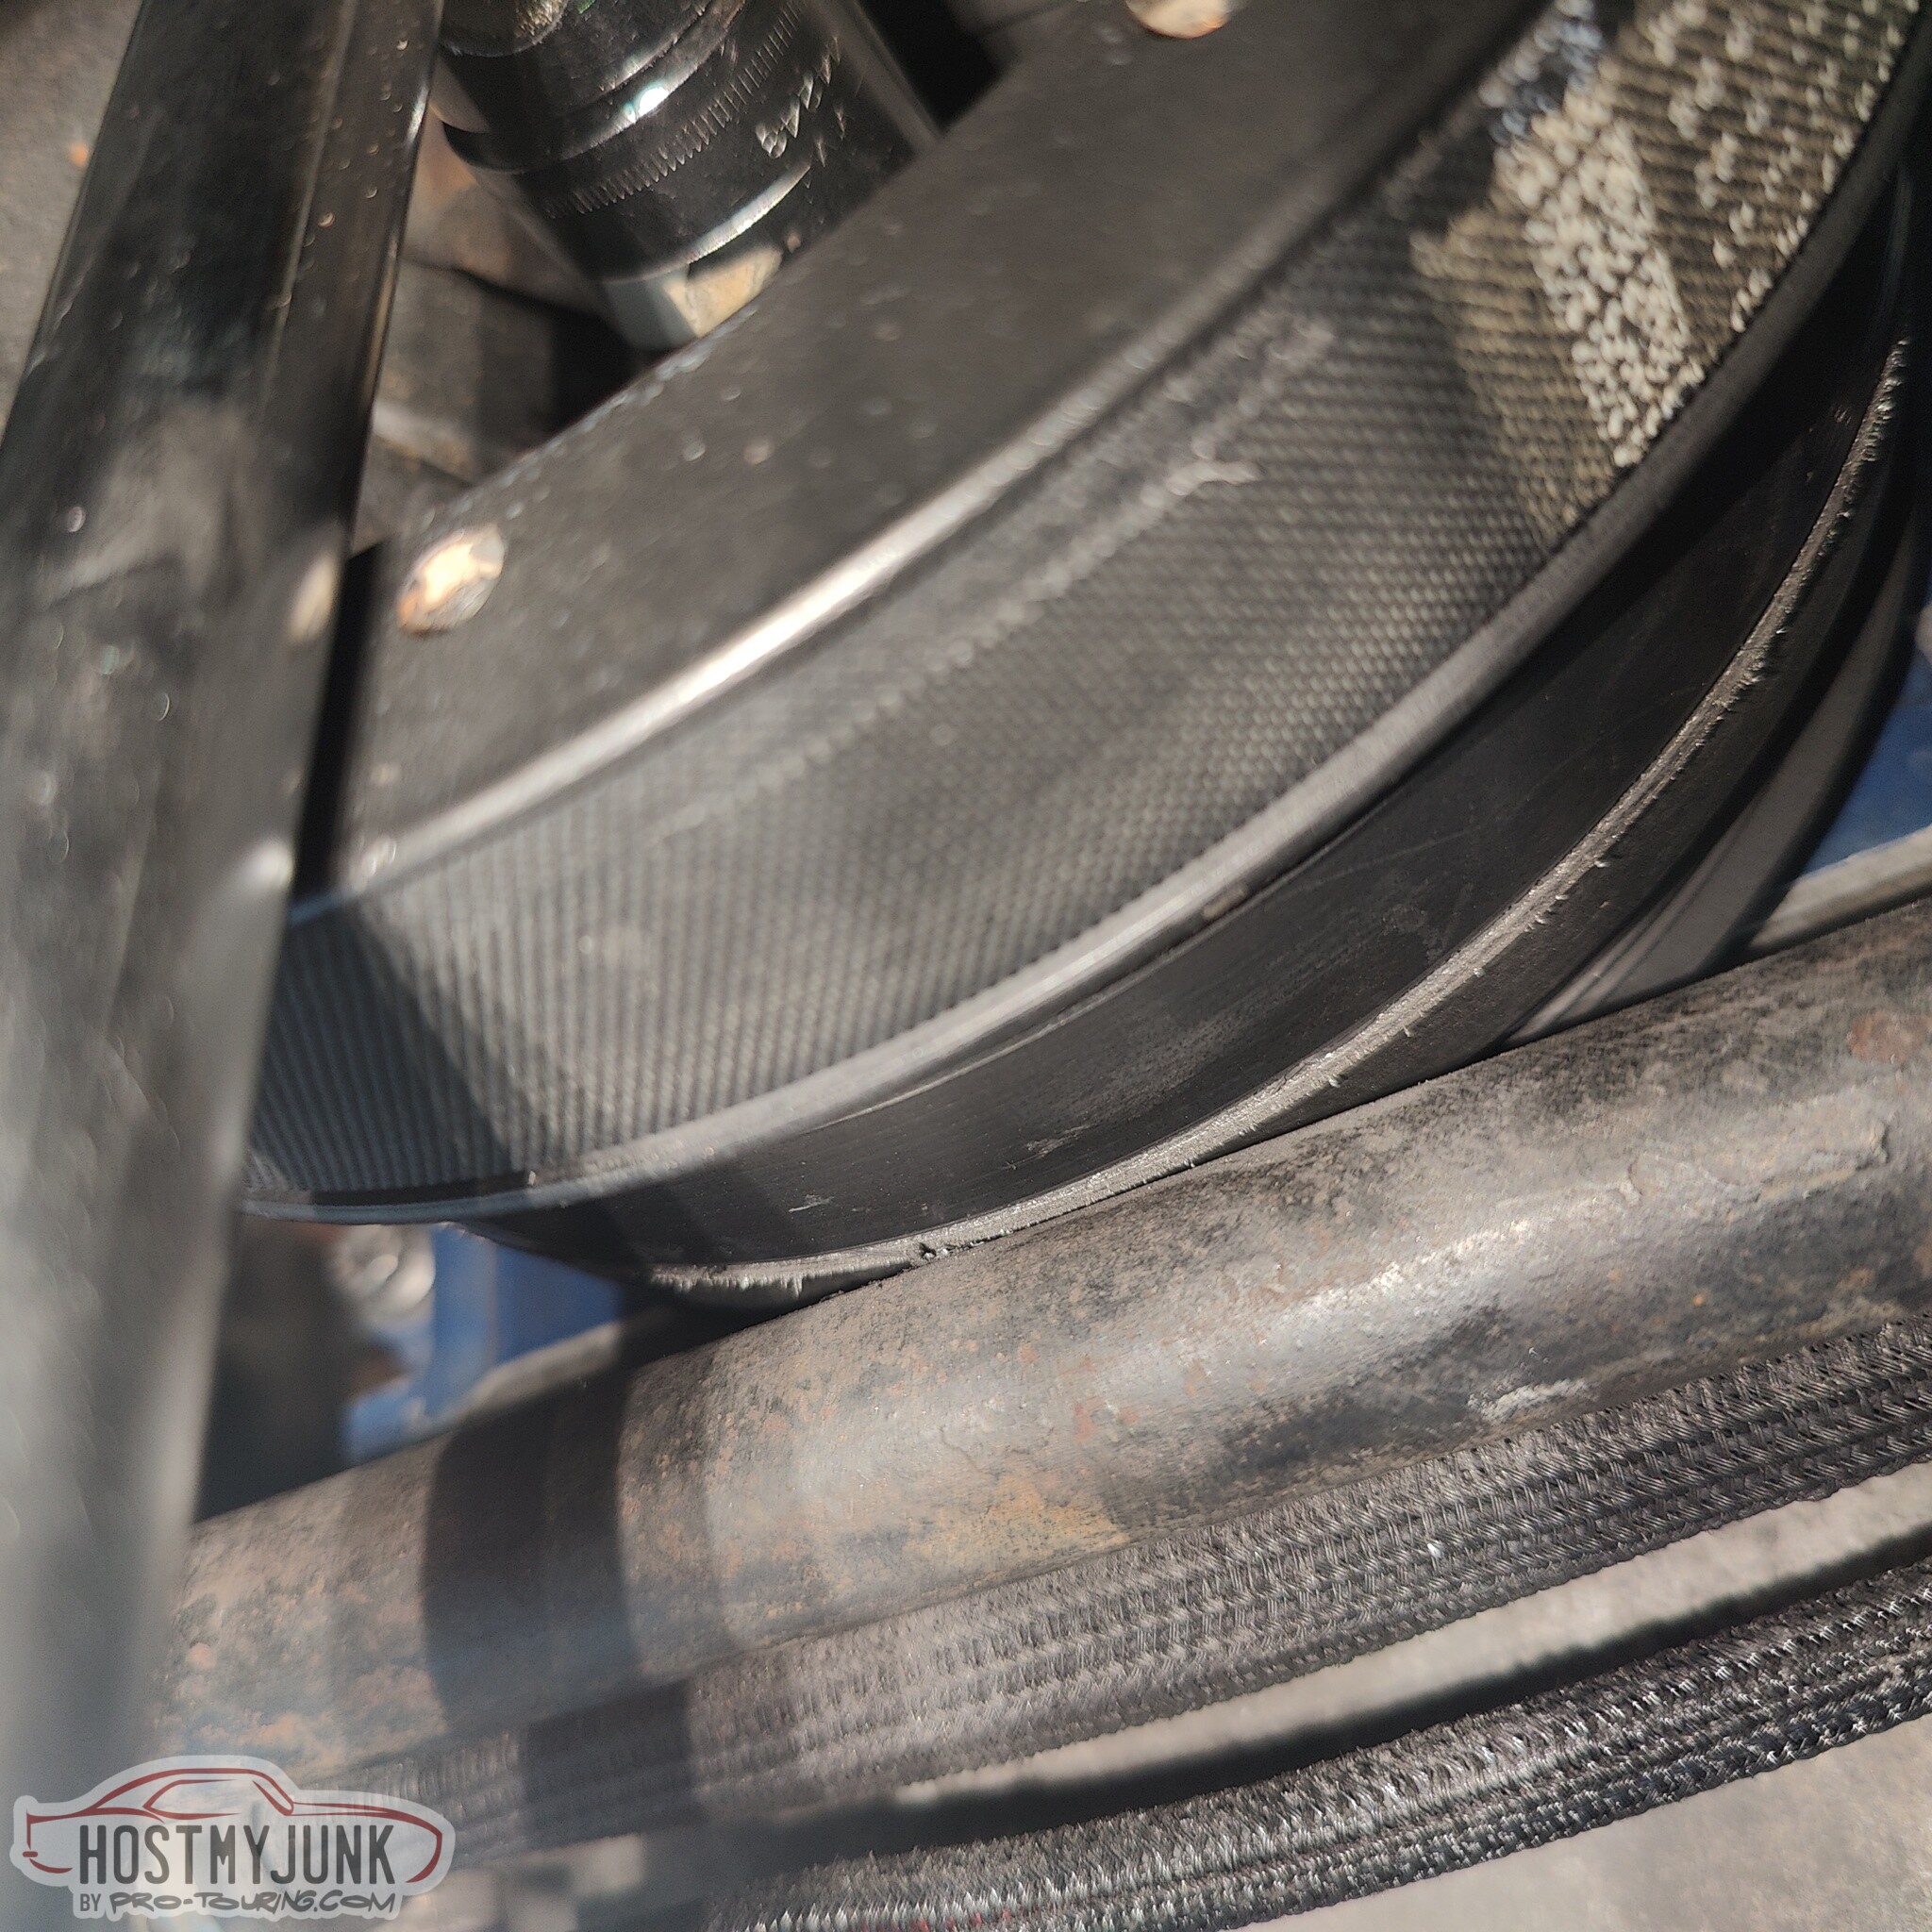
Remember how earlier I said that this car has never been on a lift? Well, apparently, when both front wheels are in full droop, the swaybar rotates right into the crank shaft pulley. It never occurred to me that this might be a problem, because when I installed the balancer there was about 4 inches between the swaybar and the balancer! What a humbling moment. As Ken @kwhizz likes to say, this car stuff is hard...
Now it was really time to button everything up. I had just ordered this kit, which has these plugs/grommets. Here it is being used as a plug. To use them as a grommet, you simply cut out the inside. I used these as grommets for the intercooler hoses.
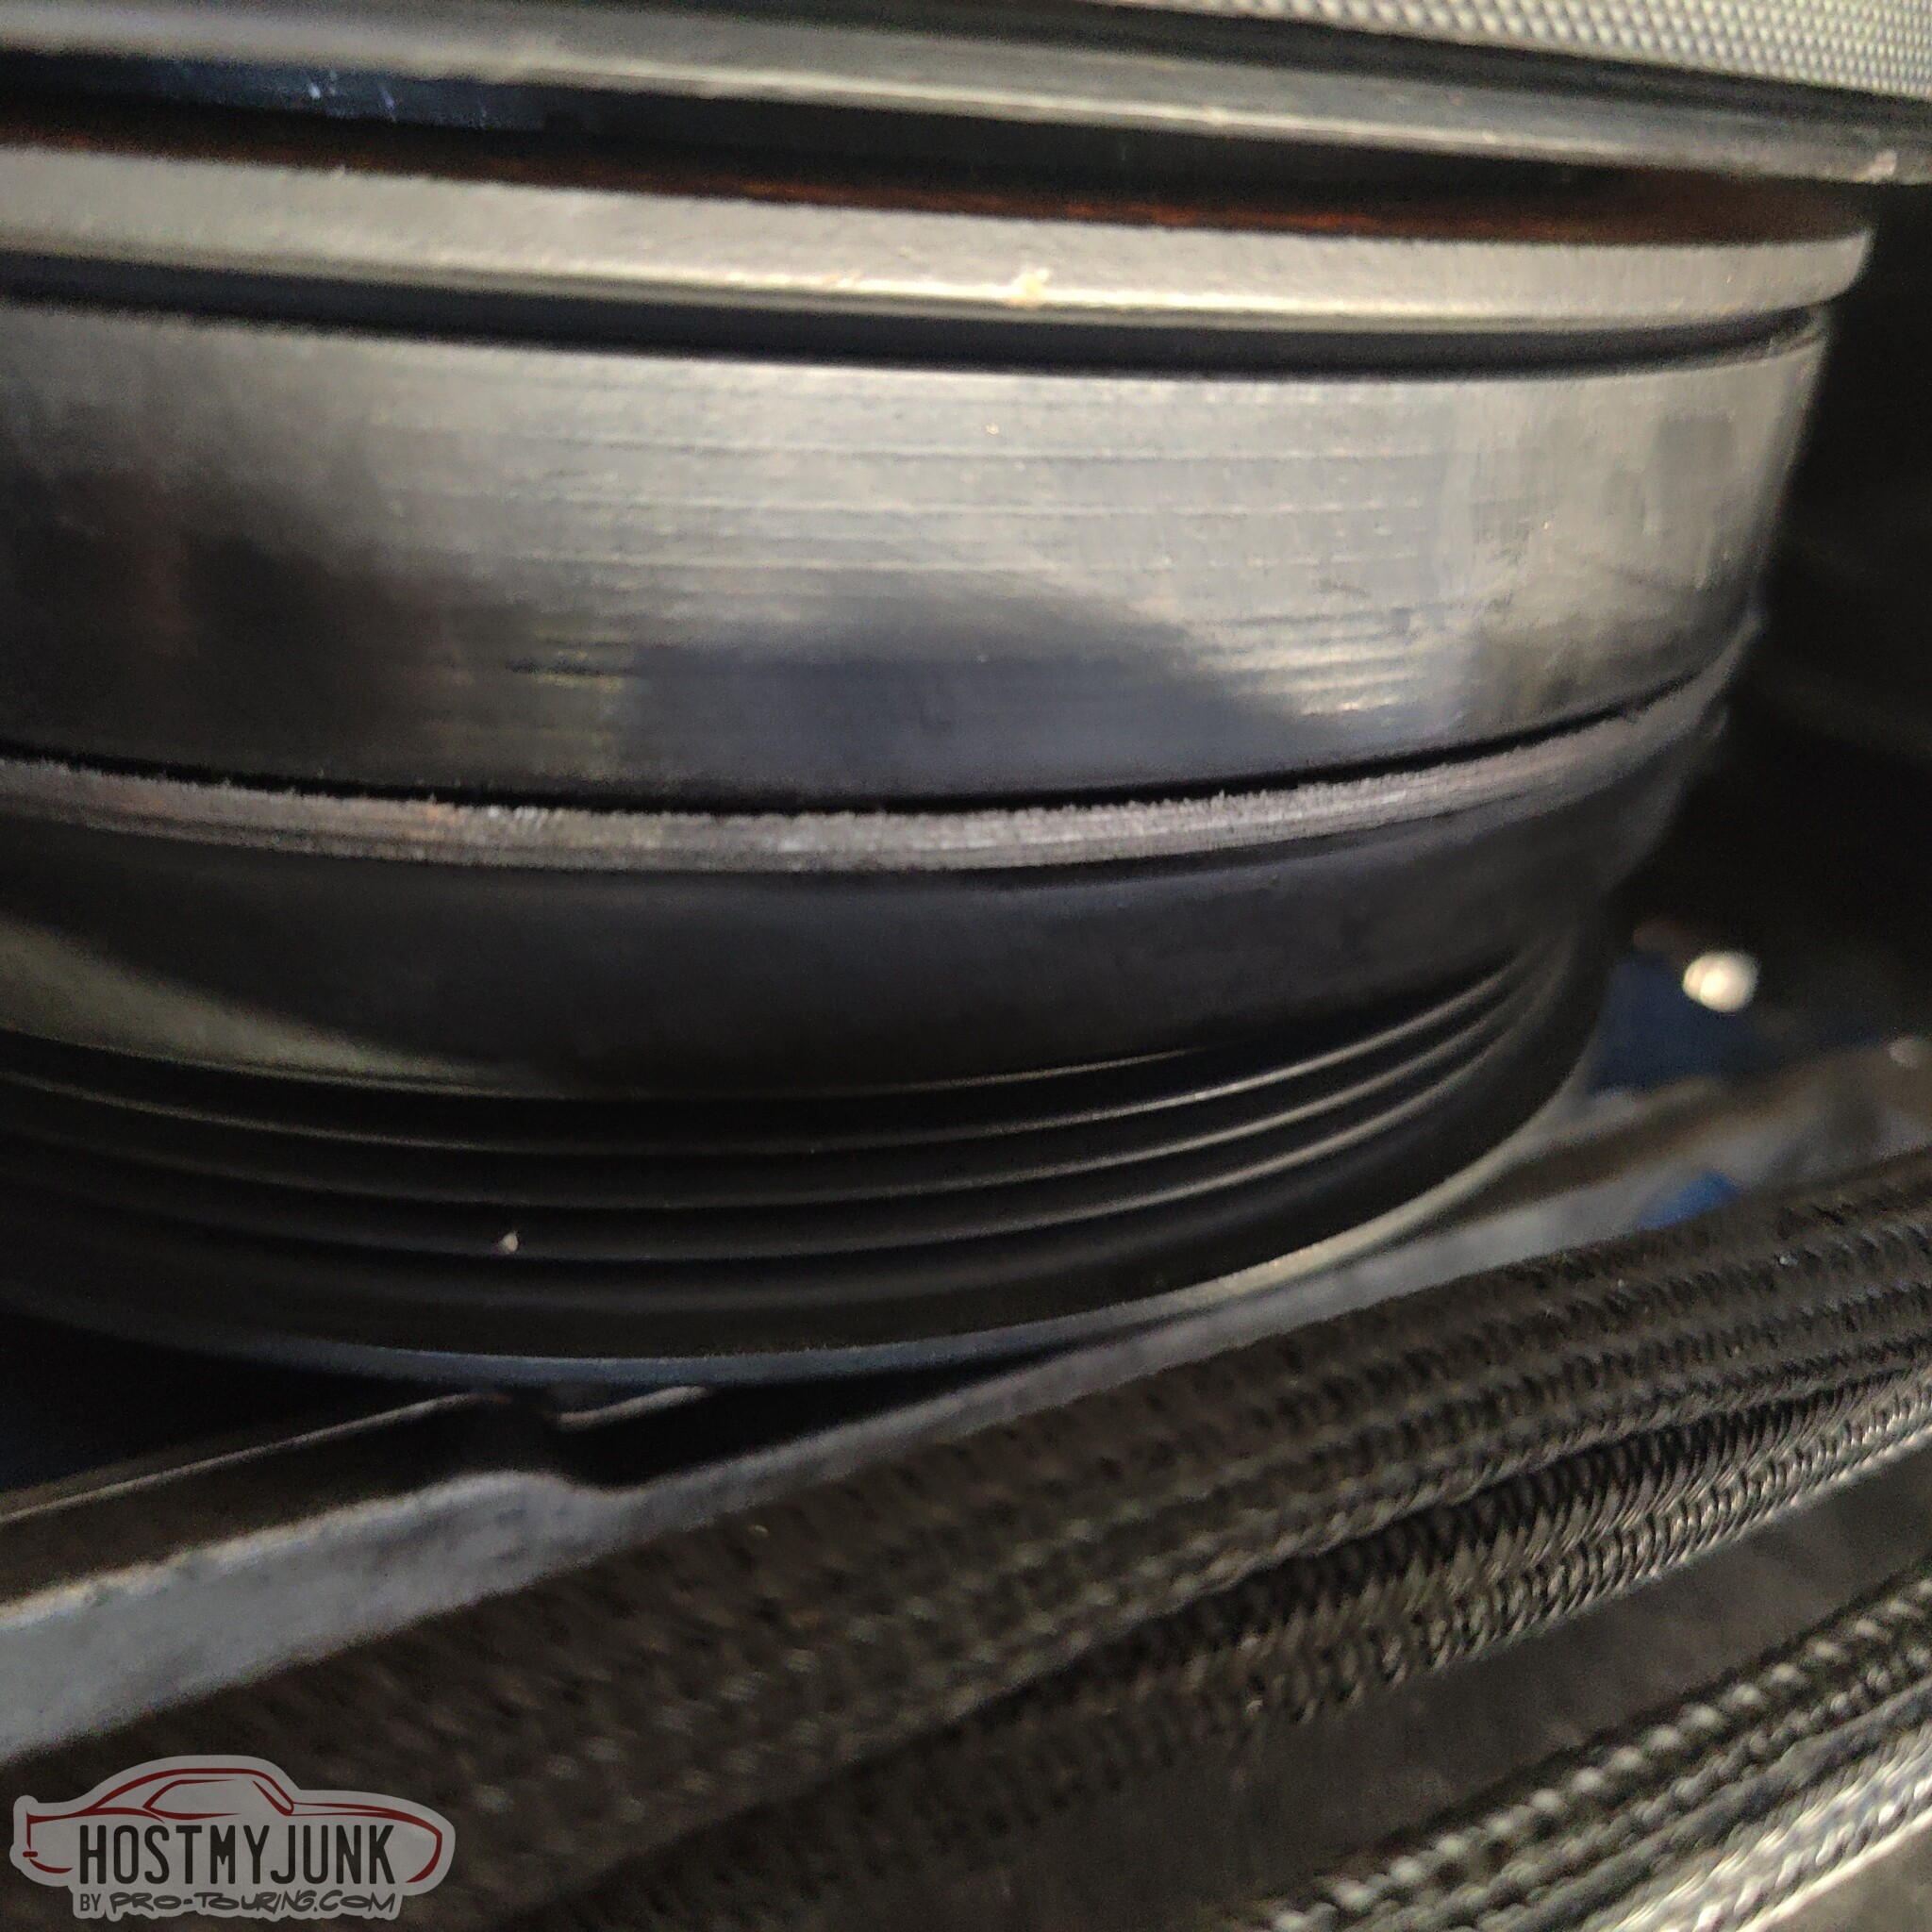
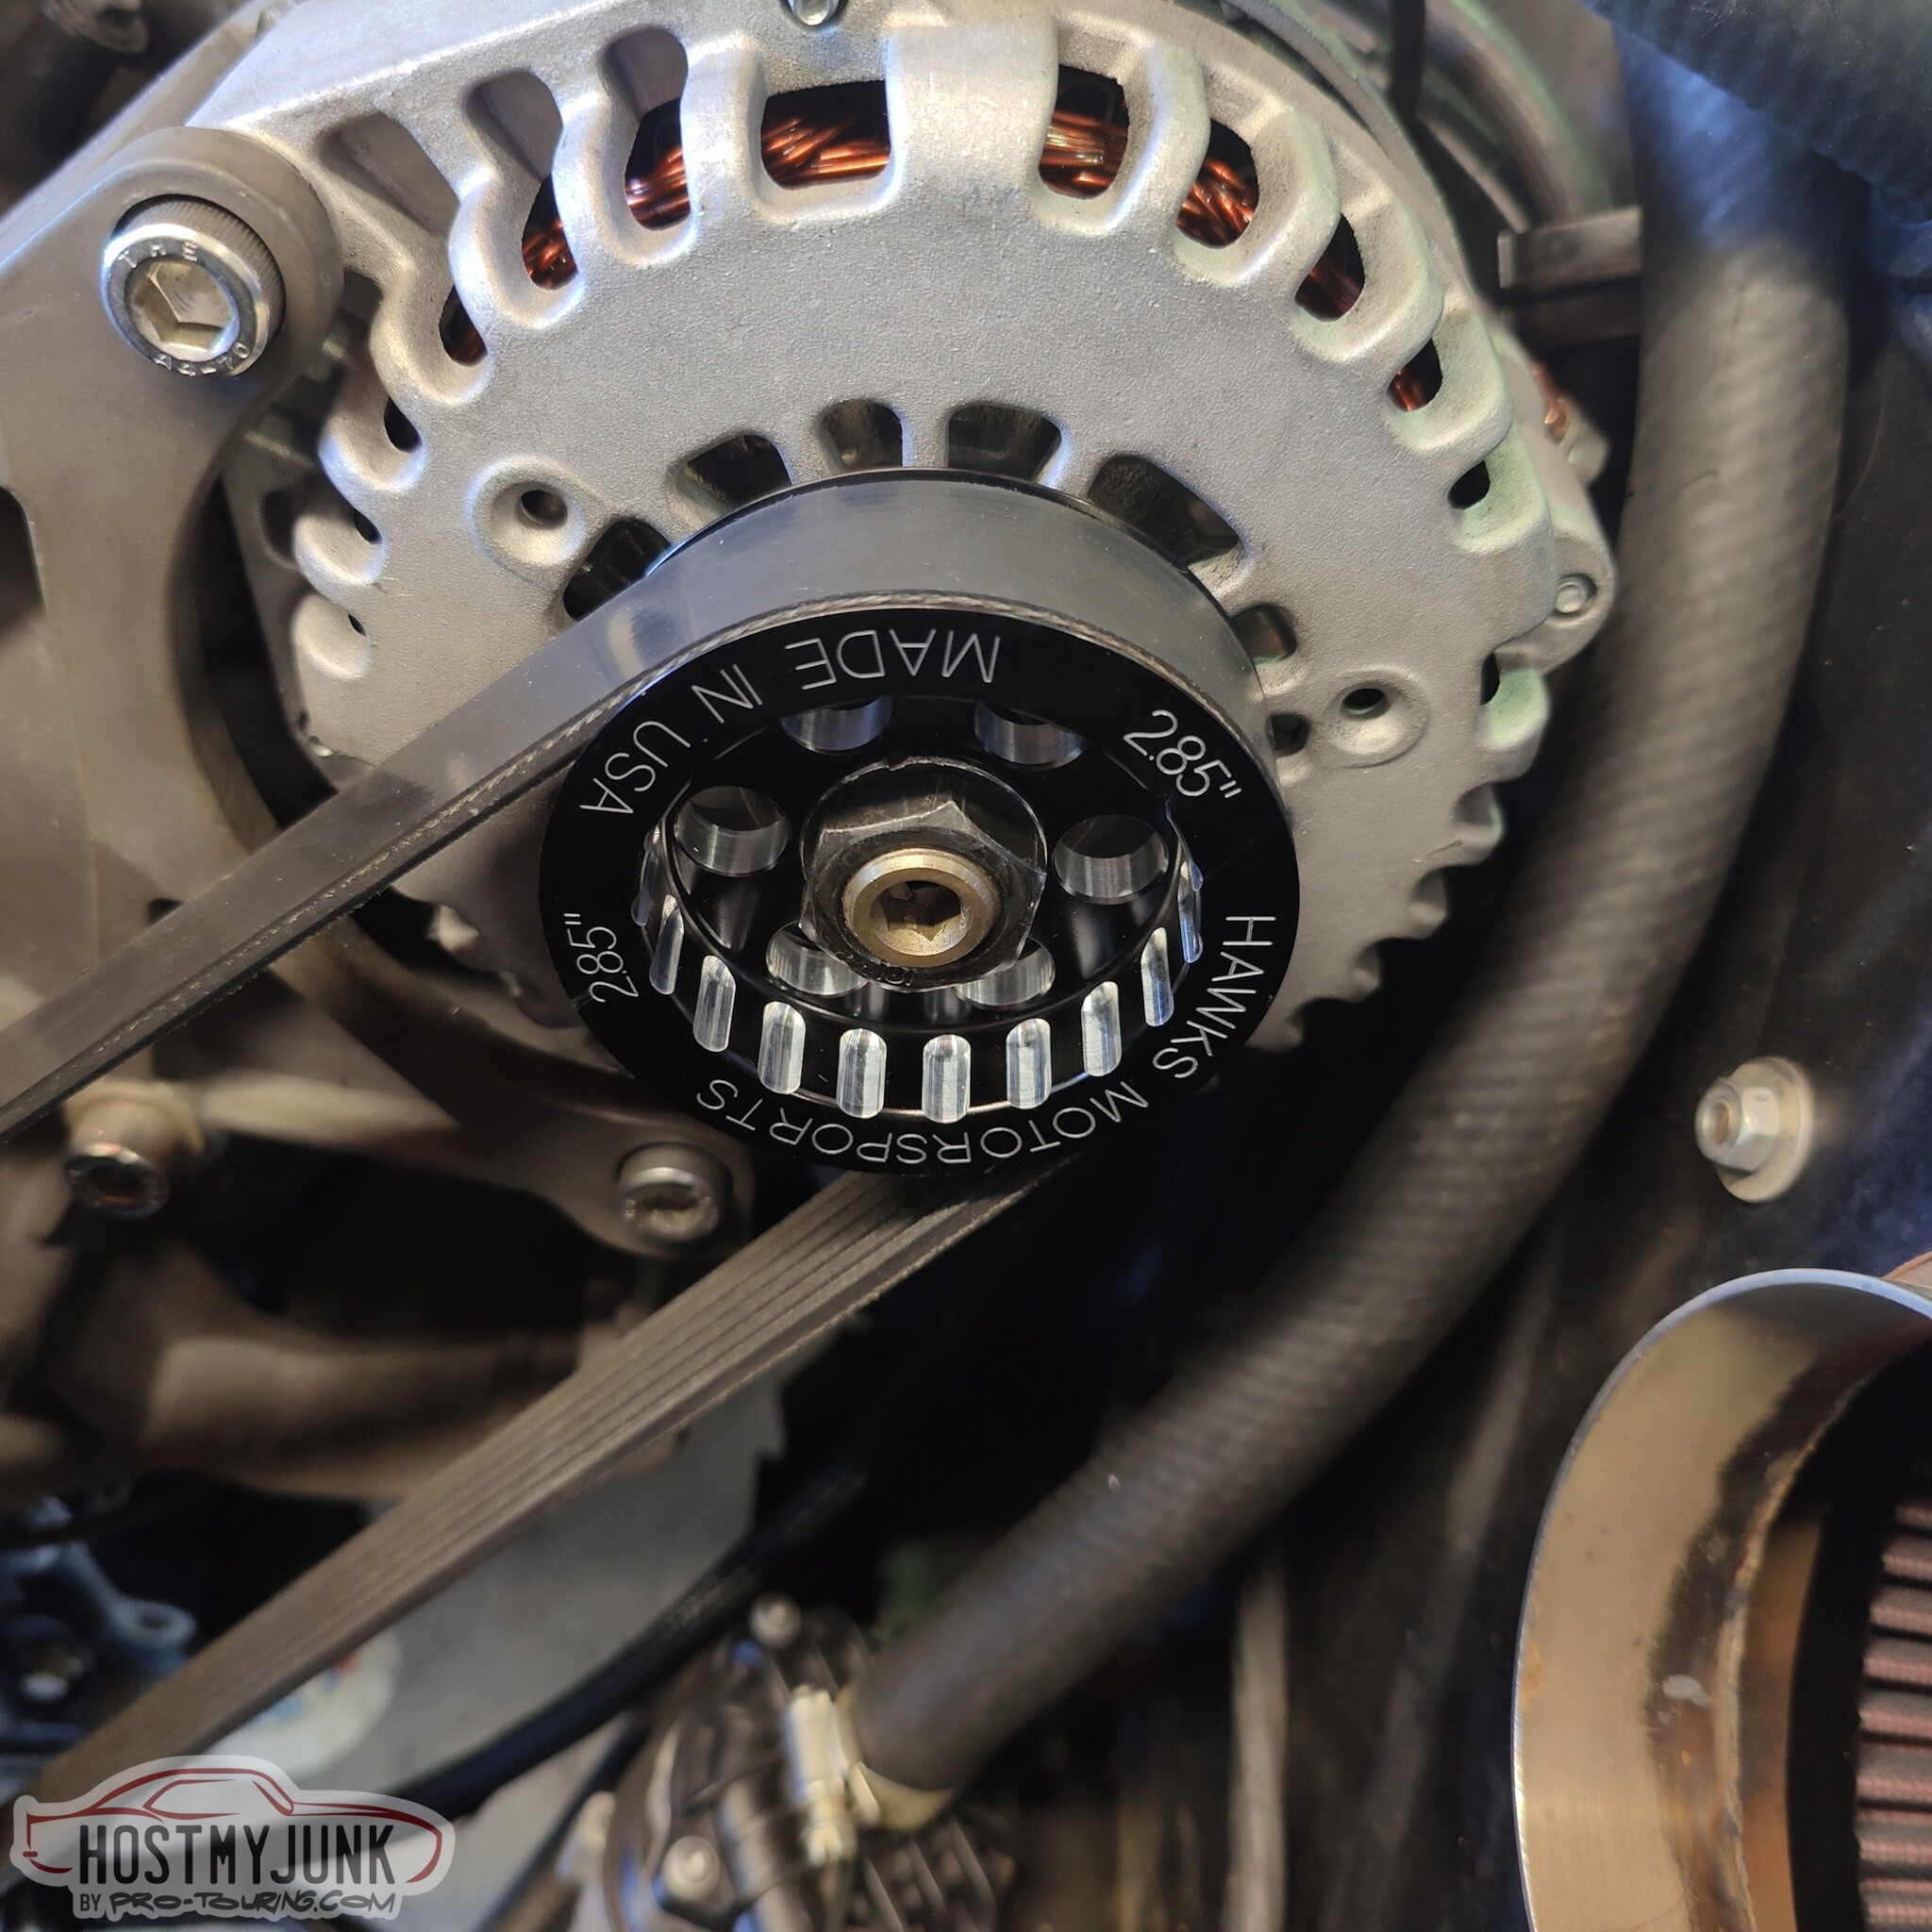
Earlier I also mentioned that the new Powermaster alternator came with a smaller than stock pulley (2 inches in diameters). The Powermaster instructions clearly stated that the alternator should not exceed 18,500RPM. I called their tech support line and the gentleman was very helpful. He stated how LS engines present a bit of a challenge because of their broad operating RPM range. It all made sense and he said that if I could find a 2.75" pulley, that would be a good compromise. There are many options for 3" pulleys, but this was the closest I could find to a 2.75" pulley. This one is obviously from Hawks PMotorsports and it is a 2.85" pulley. It also came with two precision ground shims that could be stacked behind the pulley to optimize pulley alignment. We actually used both of them and the belt alignment was spot on. (it hasn't thrown a belt even after repeated 7000RPM rev limiter hits).
I also installed a new battery. I met the sales rep for this company at SEMA last year. Supposedly they are as good as the well known brand that used to be really good 20 years ago, but not so good now, but is still very popular. We shall see, because this thing was really expensive.
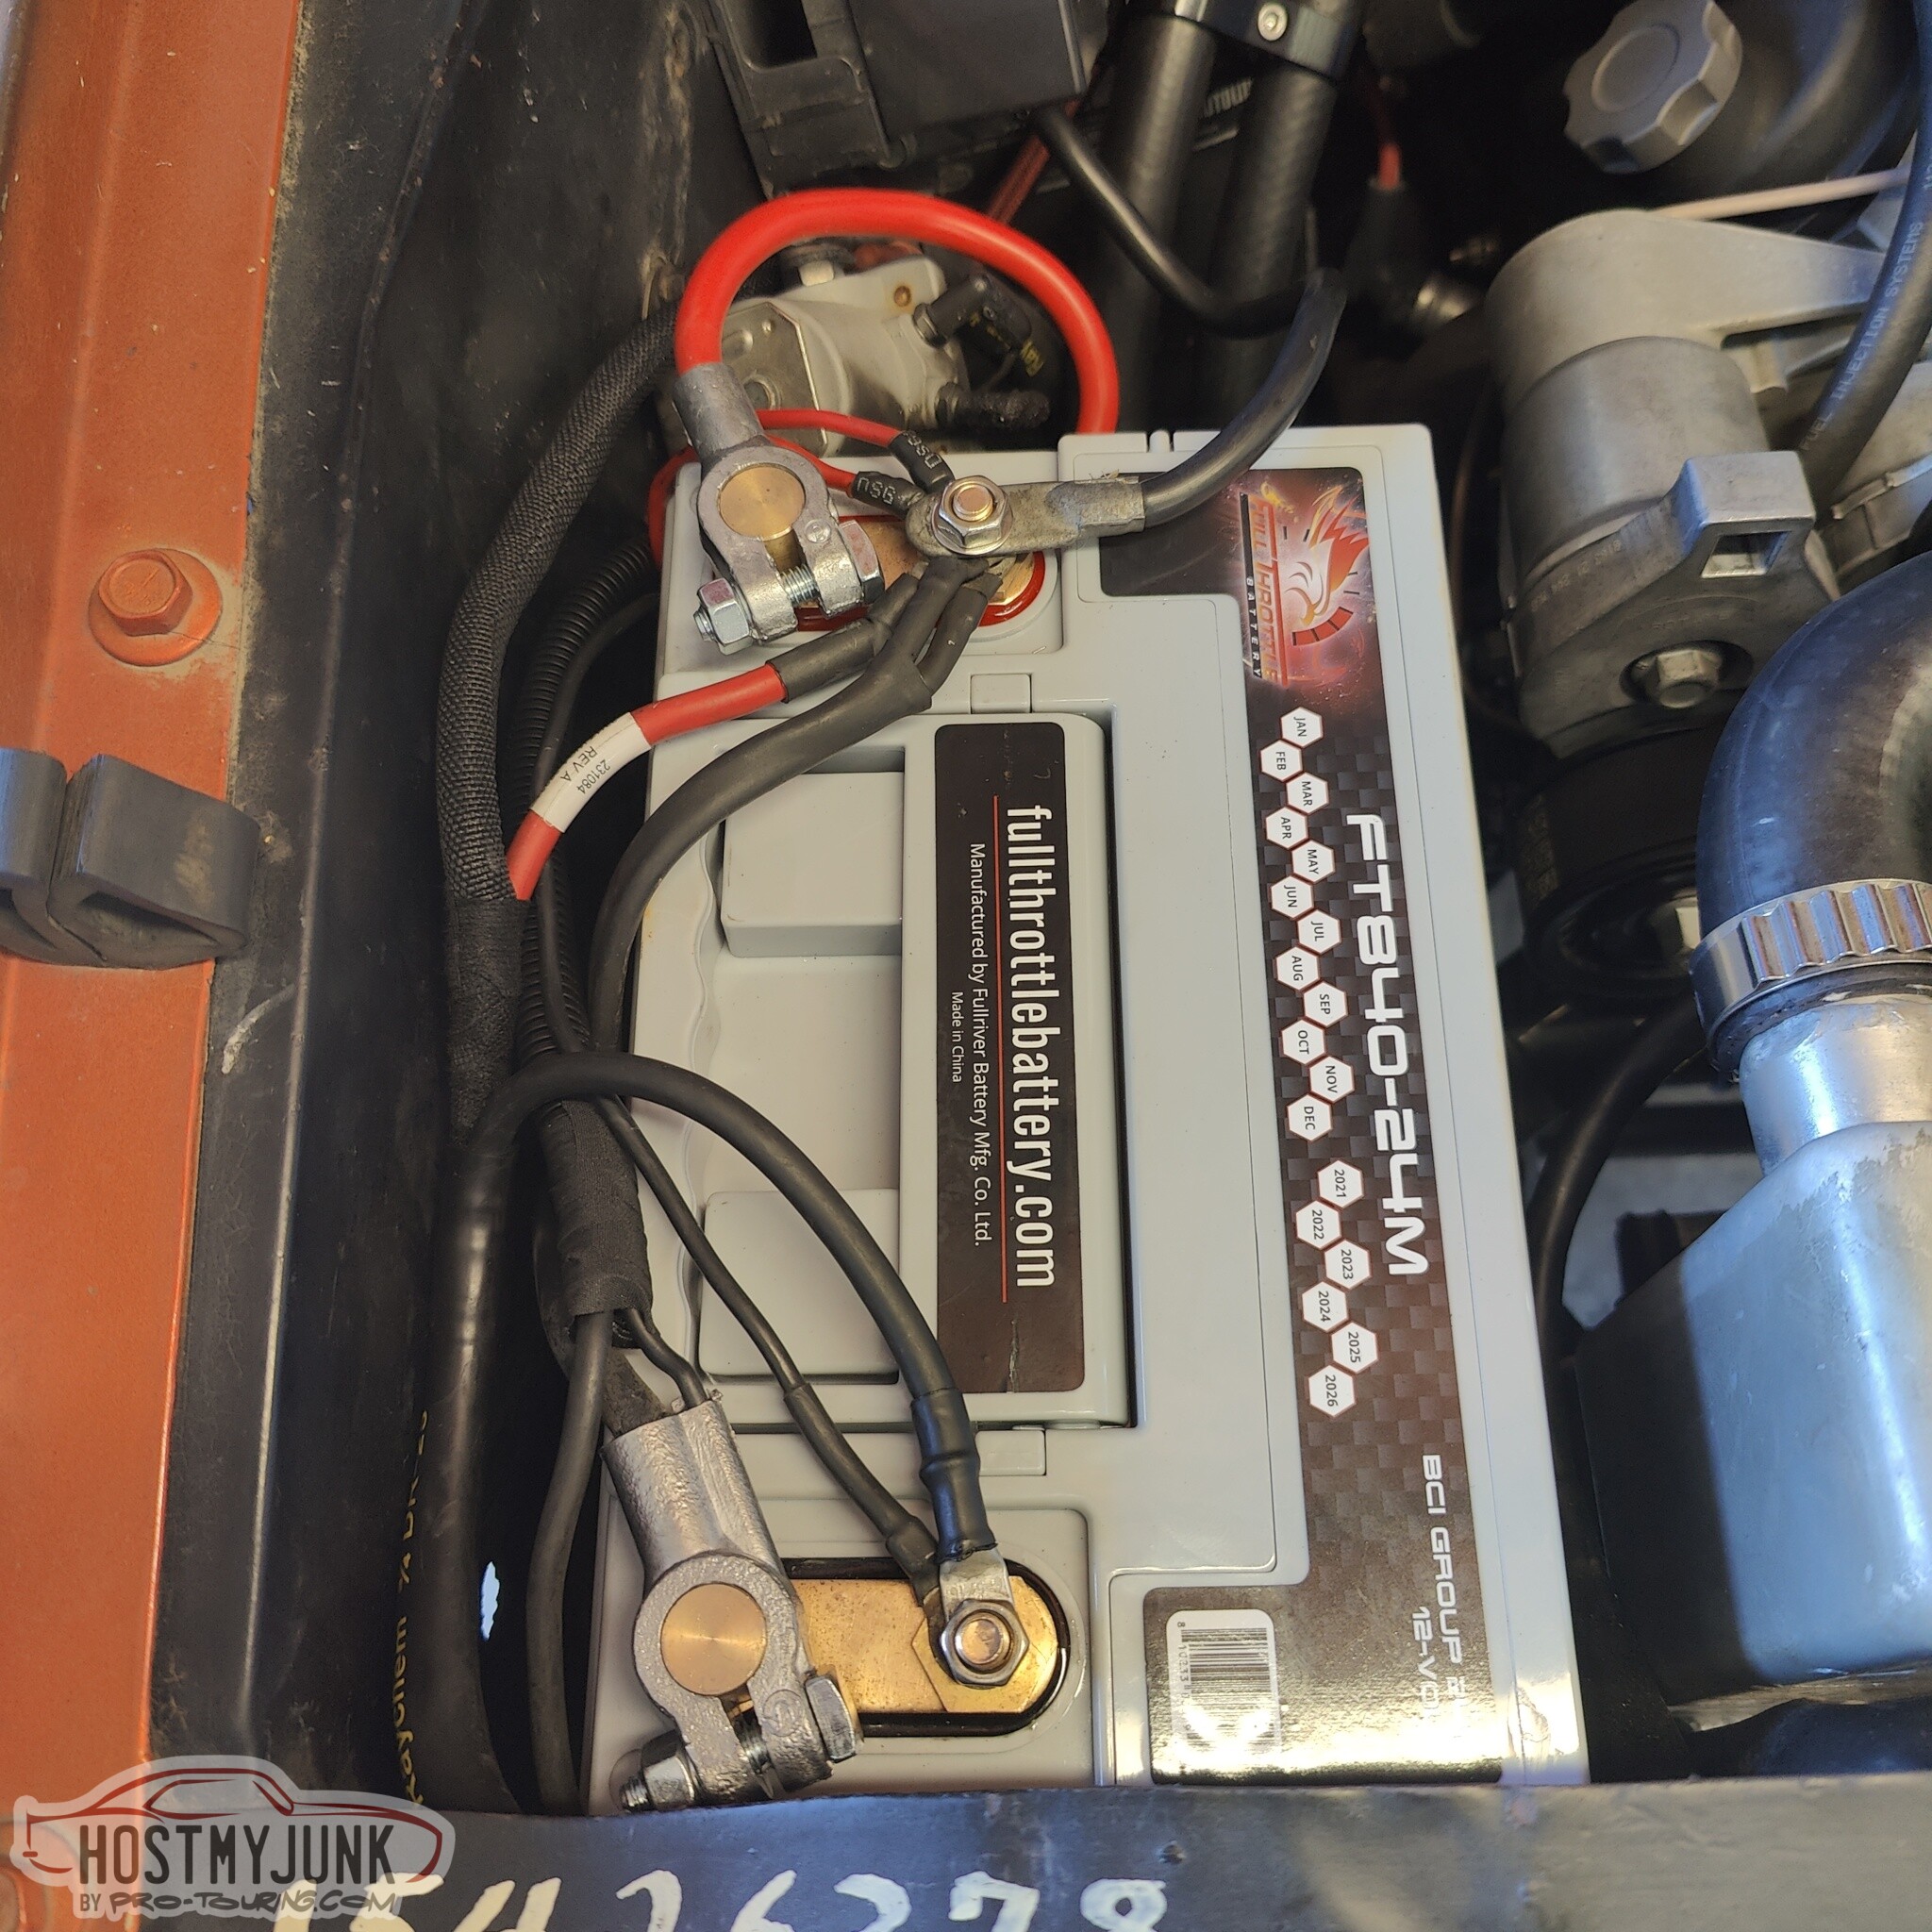
With the new alternator and the 2.85" pulley the voltage at an 800RPM idle, with the engine fan at full speed, is 13.8v, which is fantastic. Without the fan running and cruising on the highway at 1600RPM, it is at a steady 14.3v. After reviewing some datalogs from LS Fest, the voltage never dropped below 14.2v, even at 7000RPM. I think the 2.85" pulley is the sweet spot for this particular combination.
Andrew
The next step was to install the two disks with the floater plate in between them. The clutch kit included a plastic clutch alignment tool. This alignment tool is not adequate for this task. Multi disk clutches need to be aligned with a proper, steel alignment tool. For as much as this clutch costs, surely one can be included.
Nothing is left to chance, with these bright marking showing how everything should be aligned. You can also see the decals on the various parts indicating the order of assembly and in which direction the components should be facing. Very simple and clever, and even I can follow those instructions.
I suppose here is where I should start telling the whole story of this clutch installation. Everything was proceeding as expected. I torqued everything to spec, I measured the height of bearing and the spring fingers, etc...All of the components bolted together great.
The transmission slid in without too much of a problem. The last 1/4" was a bit of a struggle. I think a better alignment tool would solve this problem. I bolted the crossmember back in place, exhaust was installed, and I was ready to start it up for the first time. I turned the key and it was cranking, but not starting. It was also sounding very different. Like there was some sort of metal to metal rubbing noise and the engine was cranking noticeably slower. In fact, it was only cranking at about 70 RPM, which is why it would not start. I was able to determine this by doing a system log with my Holley Dominator ECU.
I was truly stumped. My mind started going to crazy places, while also simultaneously realizing the errors in my own logic. This turned into a 2 day long quest during which we installed and removed the transmission a total of 6 times. I even went so far as to drill a 1.5" hole in the side of the bellhousing so I could see what was going on inside. I have actually wanted to do this for a long time and I highly recommend it.
The hole is on the passenger side of the bellhousing at about the 5 o'clock position. Here you can see the Tilton throw out bearing at rest against the clutch fingers. The visible portion of the piston is actually out measured air gap, which was right at .200".
Long story short, here is the problem...Do you see it? It's not super obvious at first glance, is it?
How about now, is that more clear?
Surely, now it all makes sense!!!
Remember how earlier I said that this car has never been on a lift? Well, apparently, when both front wheels are in full droop, the swaybar rotates right into the crank shaft pulley. It never occurred to me that this might be a problem, because when I installed the balancer there was about 4 inches between the swaybar and the balancer! What a humbling moment. As Ken @kwhizz likes to say, this car stuff is hard...
Now it was really time to button everything up. I had just ordered this kit, which has these plugs/grommets. Here it is being used as a plug. To use them as a grommet, you simply cut out the inside. I used these as grommets for the intercooler hoses.
Earlier I also mentioned that the new Powermaster alternator came with a smaller than stock pulley (2 inches in diameters). The Powermaster instructions clearly stated that the alternator should not exceed 18,500RPM. I called their tech support line and the gentleman was very helpful. He stated how LS engines present a bit of a challenge because of their broad operating RPM range. It all made sense and he said that if I could find a 2.75" pulley, that would be a good compromise. There are many options for 3" pulleys, but this was the closest I could find to a 2.75" pulley. This one is obviously from Hawks PMotorsports and it is a 2.85" pulley. It also came with two precision ground shims that could be stacked behind the pulley to optimize pulley alignment. We actually used both of them and the belt alignment was spot on. (it hasn't thrown a belt even after repeated 7000RPM rev limiter hits).
I also installed a new battery. I met the sales rep for this company at SEMA last year. Supposedly they are as good as the well known brand that used to be really good 20 years ago, but not so good now, but is still very popular. We shall see, because this thing was really expensive.
With the new alternator and the 2.85" pulley the voltage at an 800RPM idle, with the engine fan at full speed, is 13.8v, which is fantastic. Without the fan running and cruising on the highway at 1600RPM, it is at a steady 14.3v. After reviewing some datalogs from LS Fest, the voltage never dropped below 14.2v, even at 7000RPM. I think the 2.85" pulley is the sweet spot for this particular combination.
Andrew
The following users liked this post:
kwhizz (10-06-2023)
The following 2 users liked this post by LSswap:
kwhizz (10-06-2023), Project GatTagO (10-06-2023)
10-06-2023, 08:58 PM
#1306
TECH Senior Member
Thread Starter
iTrader: (7)
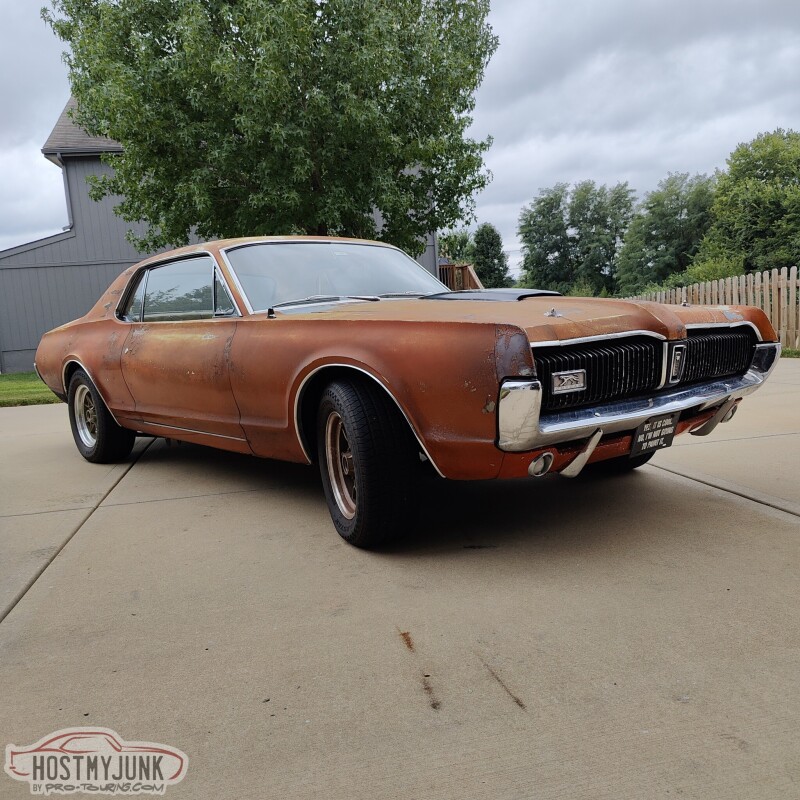
That brings us up to speed with the technical details. Here are a couple beauty shots that I took the day before I left for Bowling Green, Ky to attend the Holley LS Fest.

You might notice that I installed my drag radial on the rear and drive to LS Fest. I really did not want to mess around with swapping wheels around at the track. I did that last year and it sucked.
Here I am, east bound and down on I-70, just outside Kansas City with the sun about to rise.
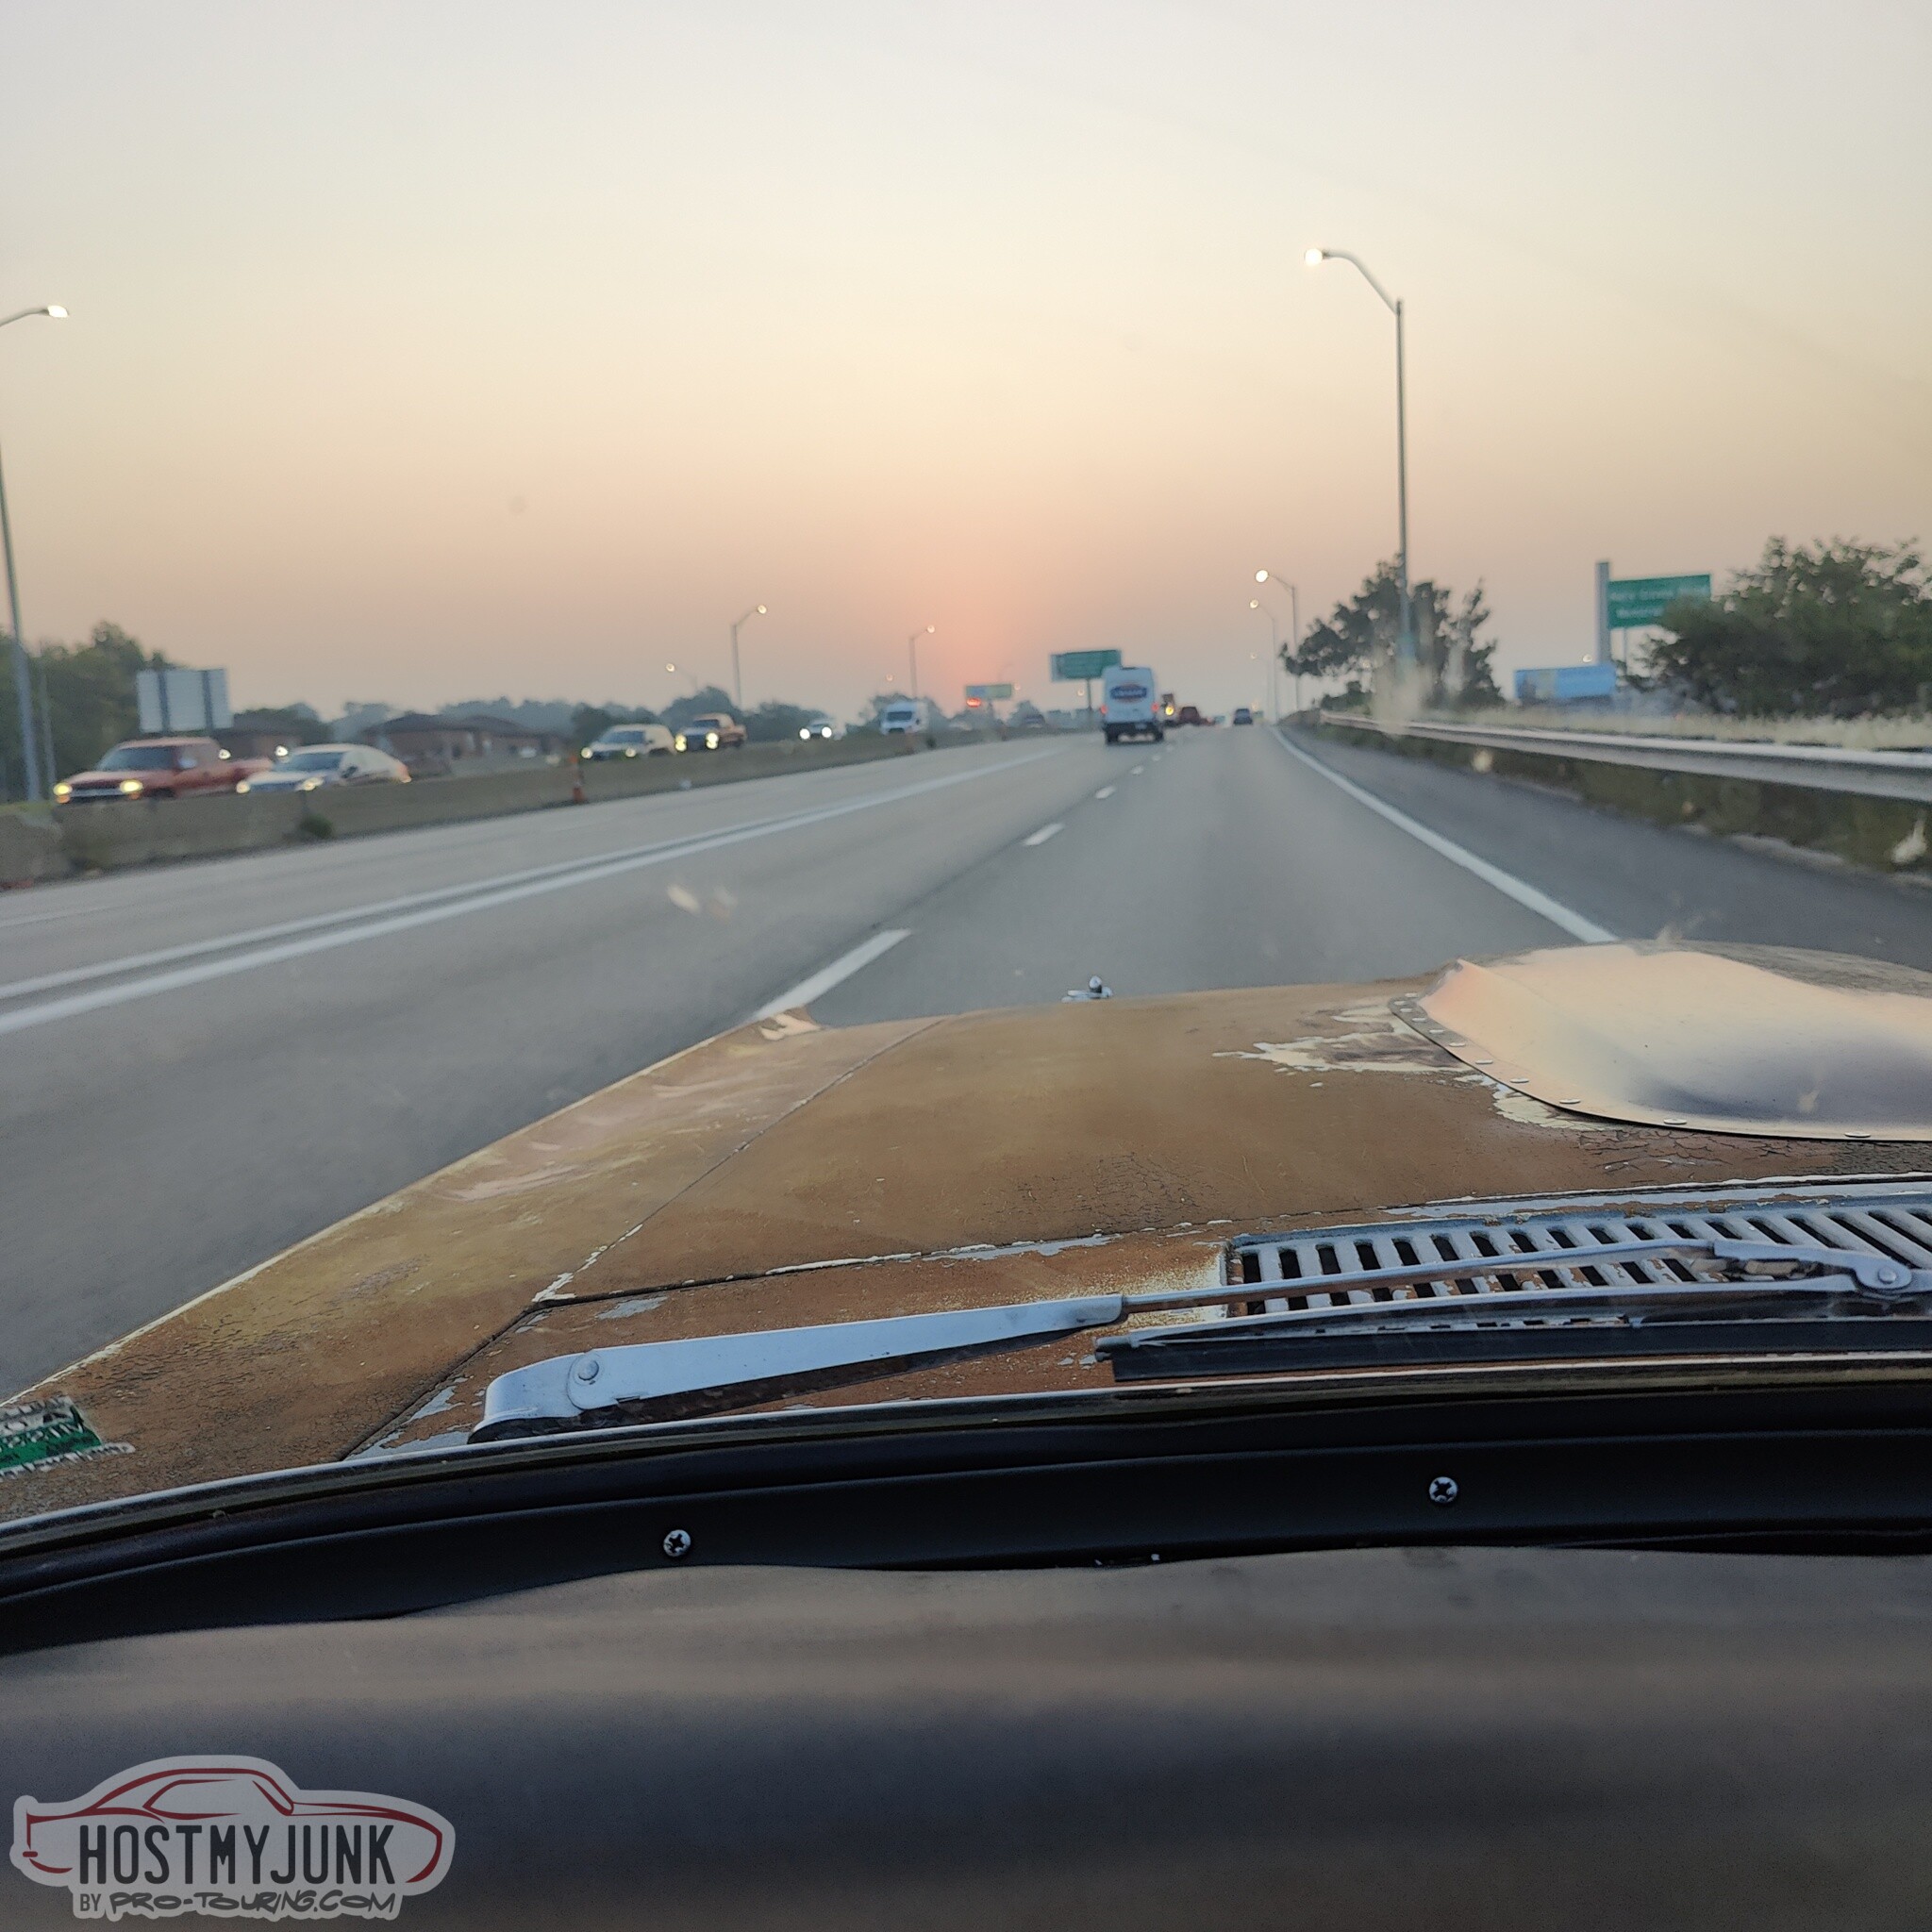
Life is good.
Andrew
You might notice that I installed my drag radial on the rear and drive to LS Fest. I really did not want to mess around with swapping wheels around at the track. I did that last year and it sucked.
Here I am, east bound and down on I-70, just outside Kansas City with the sun about to rise.
Life is good.
Andrew
The following users liked this post:
G Atsma (10-06-2023)


The following users liked this post:
Project GatTagO (10-07-2023)
10-08-2023, 09:29 PM
#1308
TECH Senior Member
Thread Starter
iTrader: (7)
Obviously, I been holding back on posting this latest upgrade to the Cougar, but now that LS Fest is behind us, I can let the cat (see what I did there? LOL) out of the bag. To recap:
About 2 months ago I started collecting parts for a LSA blower upgrade. The engine was a stock LS3 with a BTR Stage 2 LS3 cam, with good valve springs and pushrods, but it was otherwise stock, with the exception of the Holley Hi-Ram intake and the dual DBW throttle bodies on top.
I swapped out the cam for a Cam Motion PDS Stage 2 cam, which is pretty awesome for what I want to do with the car. Here is a short idle clip that I made right after swapping the cam:
After the cam swap, I started with the LSA blower installation. I got all of the parts from Dale at the Pro-Touring Store. I have known Dale for 20 years and he delivered all of the parts as a complete package. I used a stock LSA balancer, stock blower pulley and retained my Holley Hi-Mount alternator (I don't have a power steering pump). I also installed a flex fuel sensor so I can run e85 when it is available.
Here is a video of my first 10 second pass:
I also ended up running a 10.79 on a later pass, at just under 127mph. Both passes were on e60. The car race weight, with me driving, is 3625 pounds, so y'all can guess the power numbers. It makes 7-8 psi...
Here is the video of the 10.79 pass:
I drove 500 miles to LS Fest on drag radials, made passes all weekend, ran 10s, drove 500 miles home, and got over 20 mpg. Not too bad for this old girl...
Andrew
The following 5 users liked this post by Project GatTagO:
G Atsma (10-09-2023), Jimbo1367 (10-09-2023), kwhizz (10-09-2023), Mr. Black (10-08-2023), Rick Dorion (10-09-2023)
10-09-2023, 02:05 PM
#1309

Andrew,
what gears do you have in the rear? That�s quick!!!
what gears do you have in the rear? That�s quick!!!
10-09-2023, 04:28 PM
#1311
Wow. U must be making so really good HP/TQ
 10-09-2023, 10:12 PM
#1313
TECH Senior Member
Thread Starter
iTrader: (7)
Andrew
The following users liked this post:
G Atsma (10-10-2023)
10-10-2023, 09:00 PM
#1314
TECH Senior Member
Thread Starter
iTrader: (7)
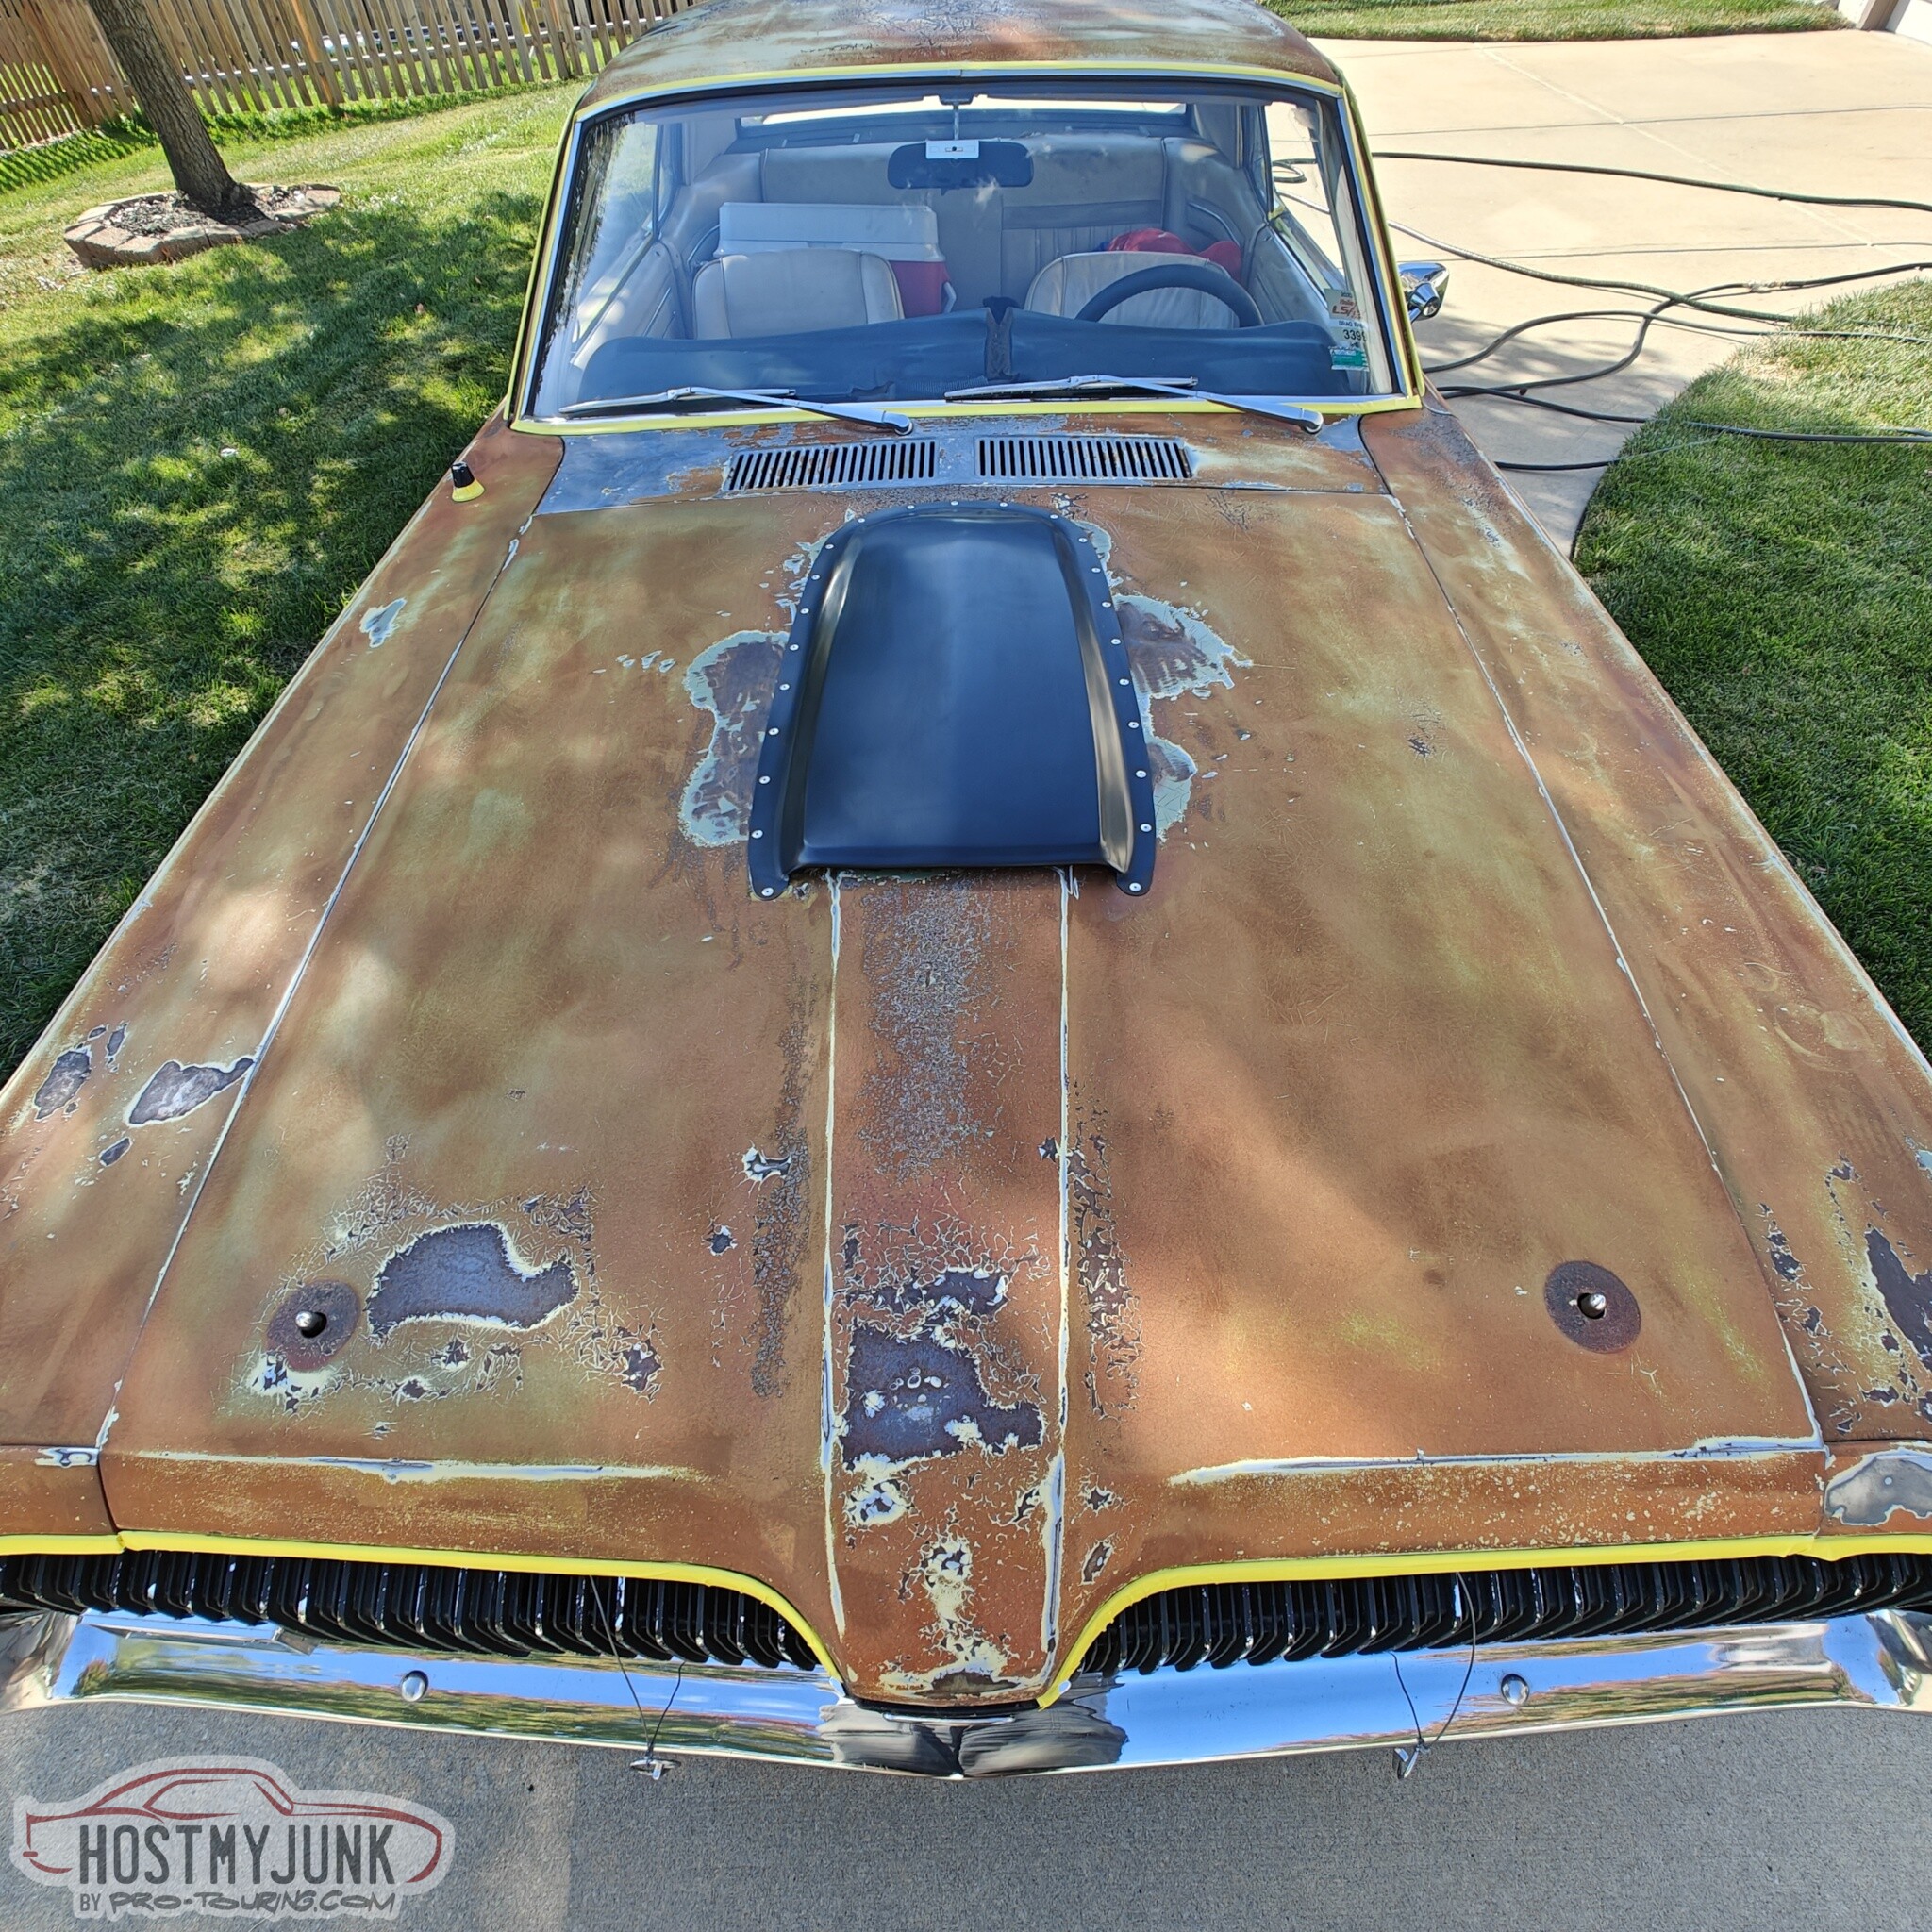
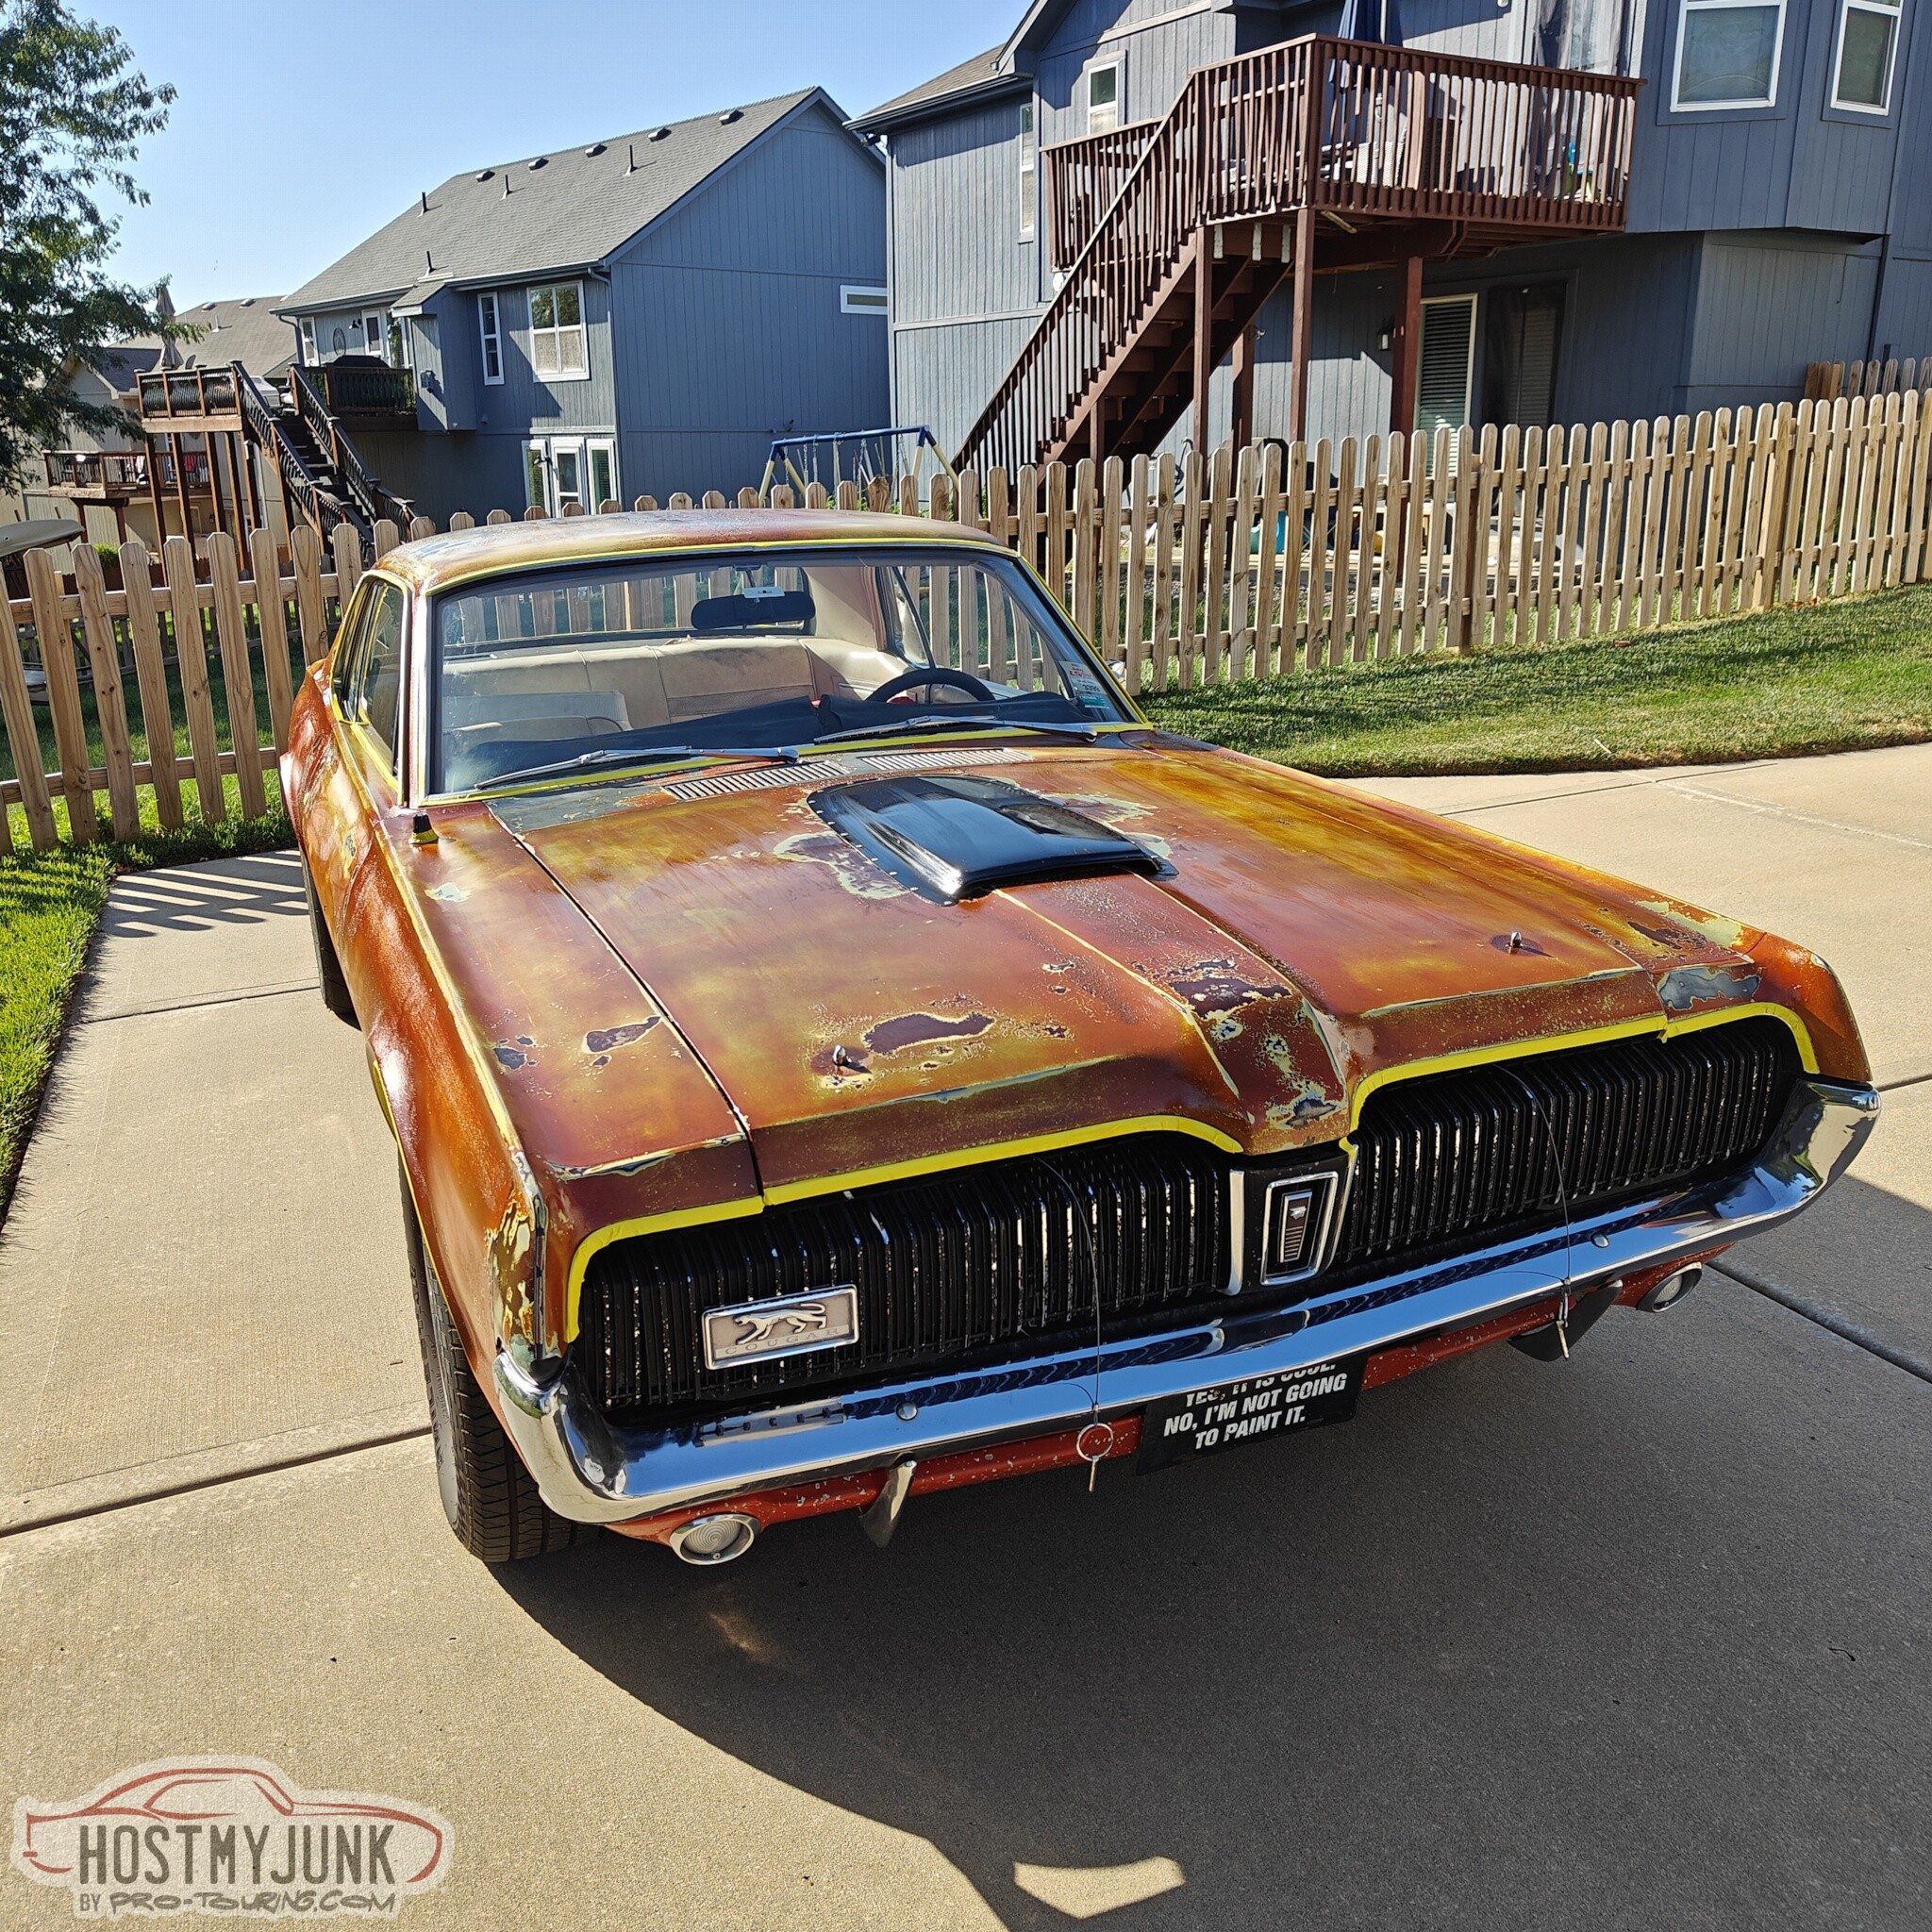
When I was at LS Fest numerous people commented on how much better the paint would look with a little shine to it. I happen to agree. So I went looking for options. I finally settles on Poppy's Patina wipe-on clear coat. The clear coat will last a lot longer than the oil based solutions and it will seal against water.
I went to Vic's house for this because he has shop air, which I used for the DA sander. I lightly went over the whole car, especially the hood, roof and trunk with the DA sander. The paint was very rough and some places had loose flakes, which the sanding took care of. Here it is after the sanding and washing.
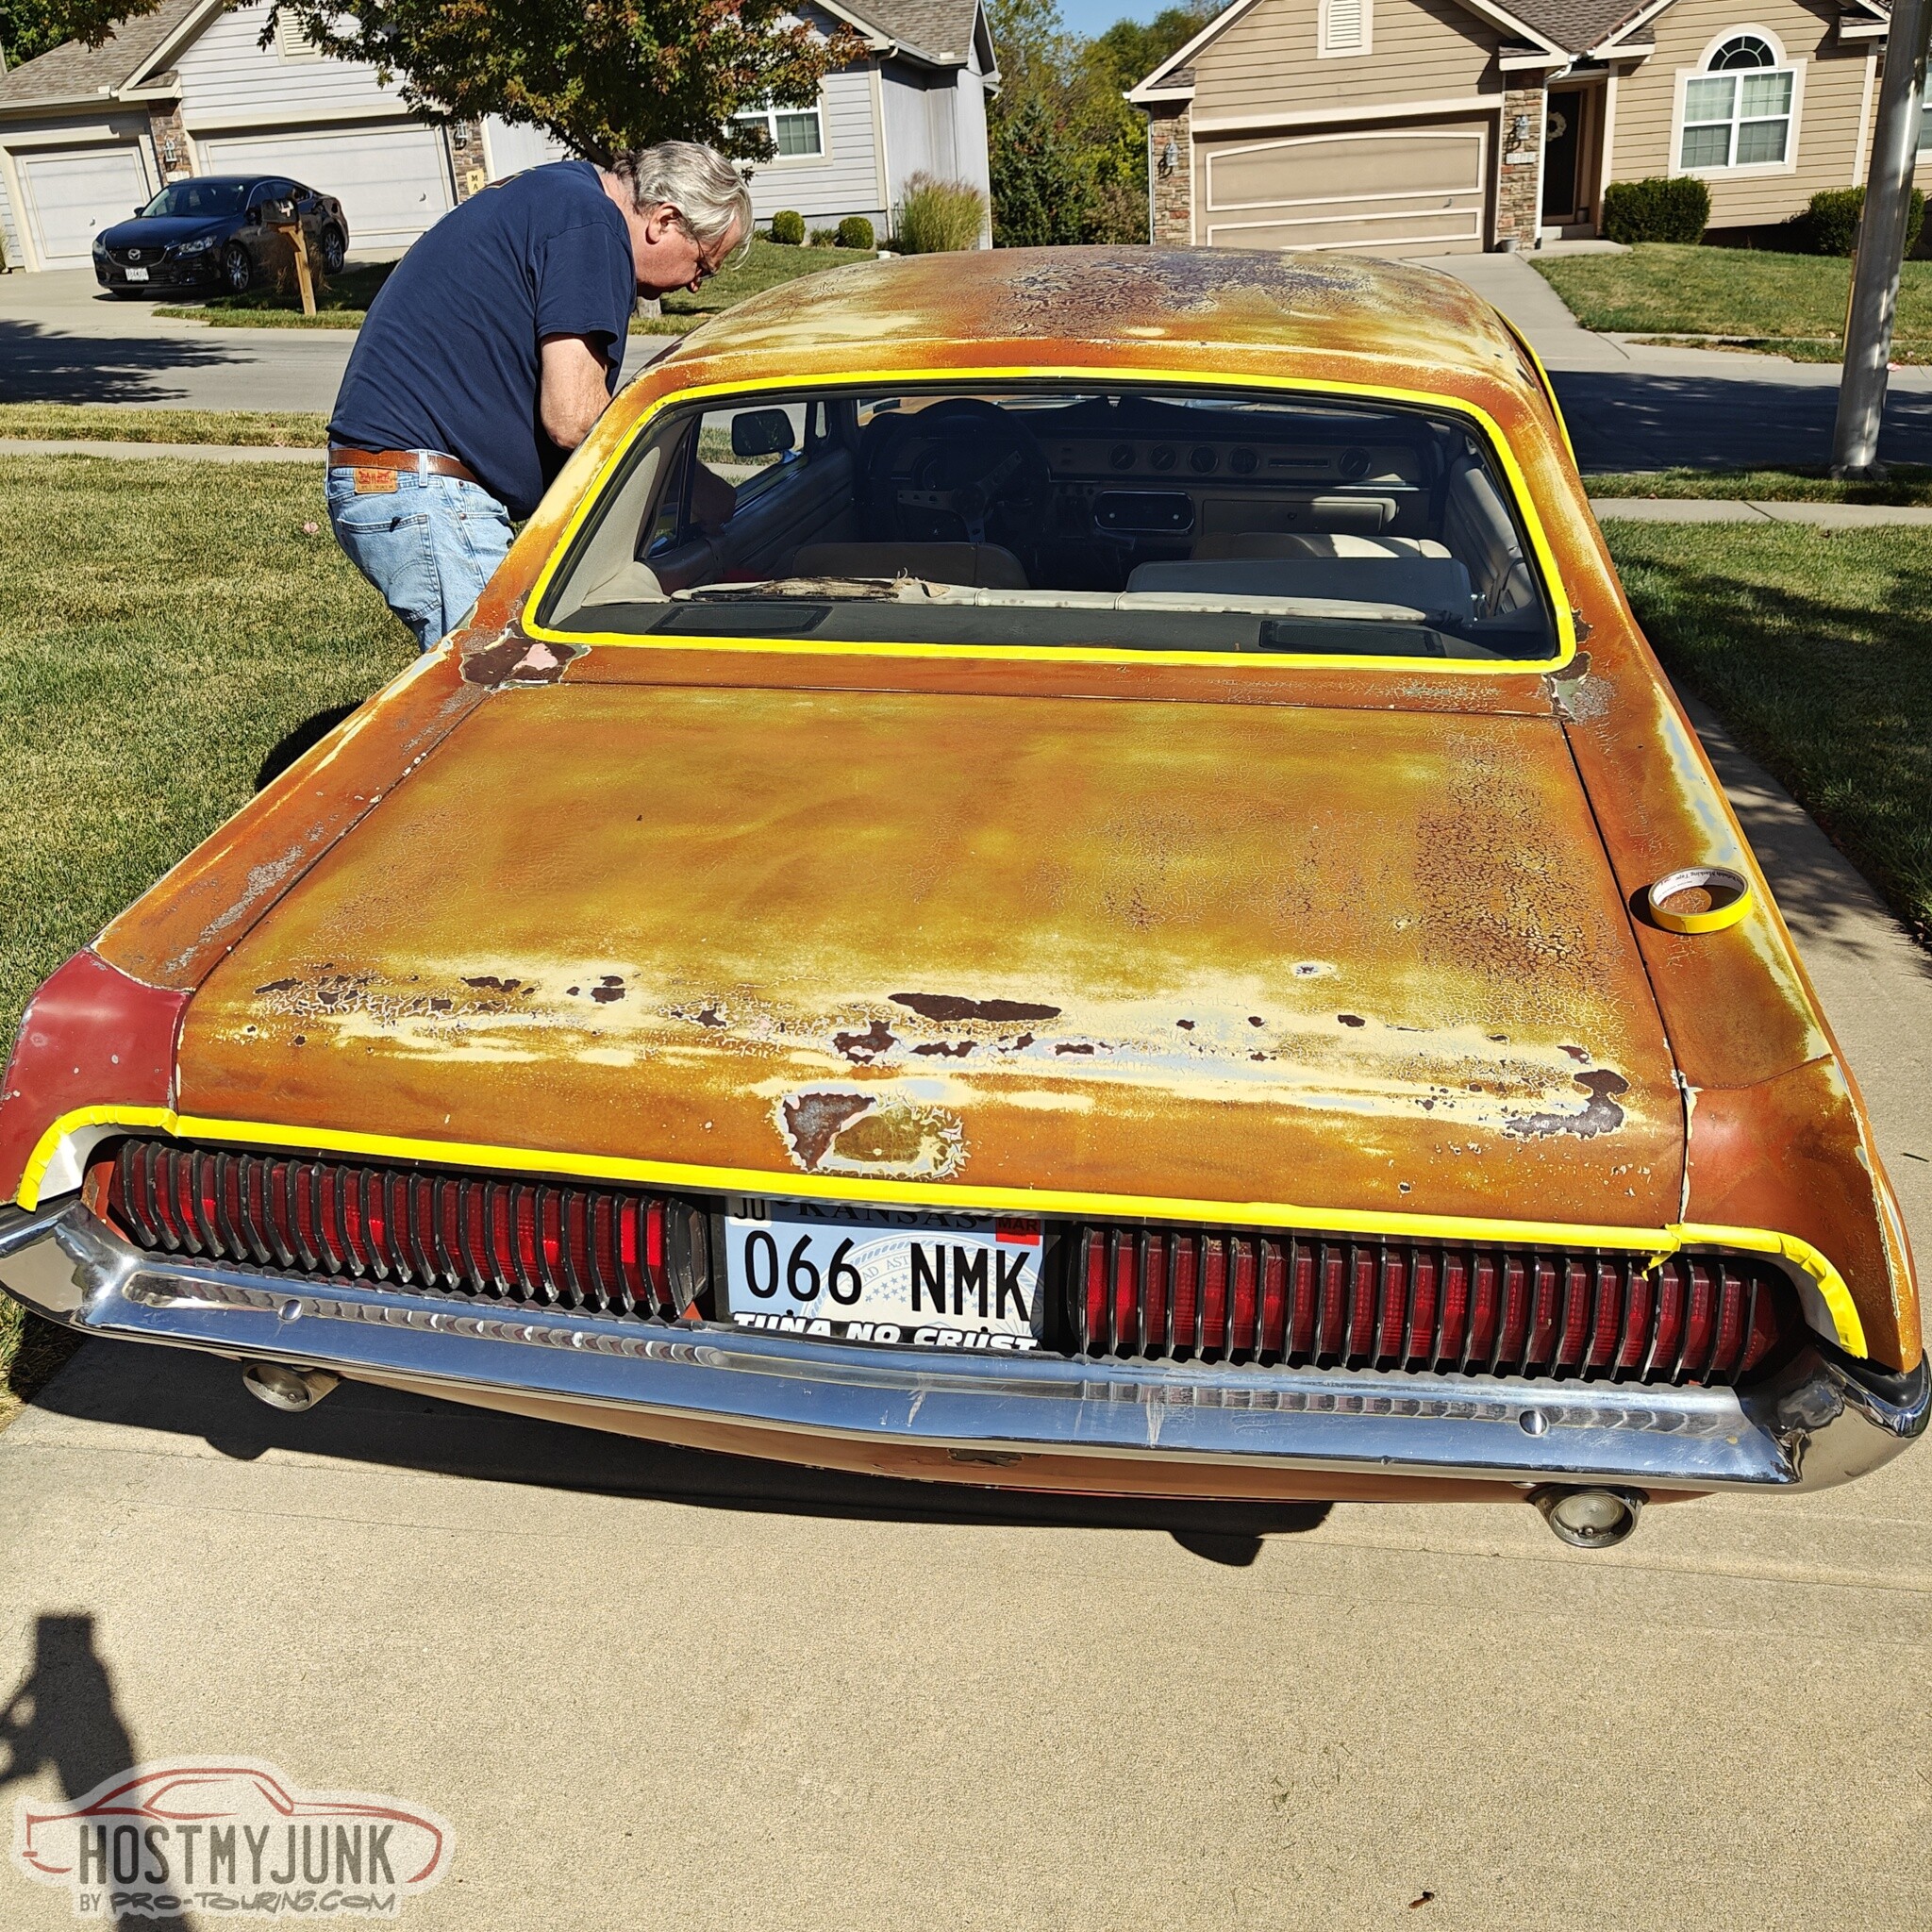
Here Vic is finishing up the taping of the stainless trim. This isn't strictly necessary, but my trim is in good shape and shiny, so I did not want to get any clear on it.
Then we rolled it into the shade and used wax and grease remover to make sure everything was as clean as possible.
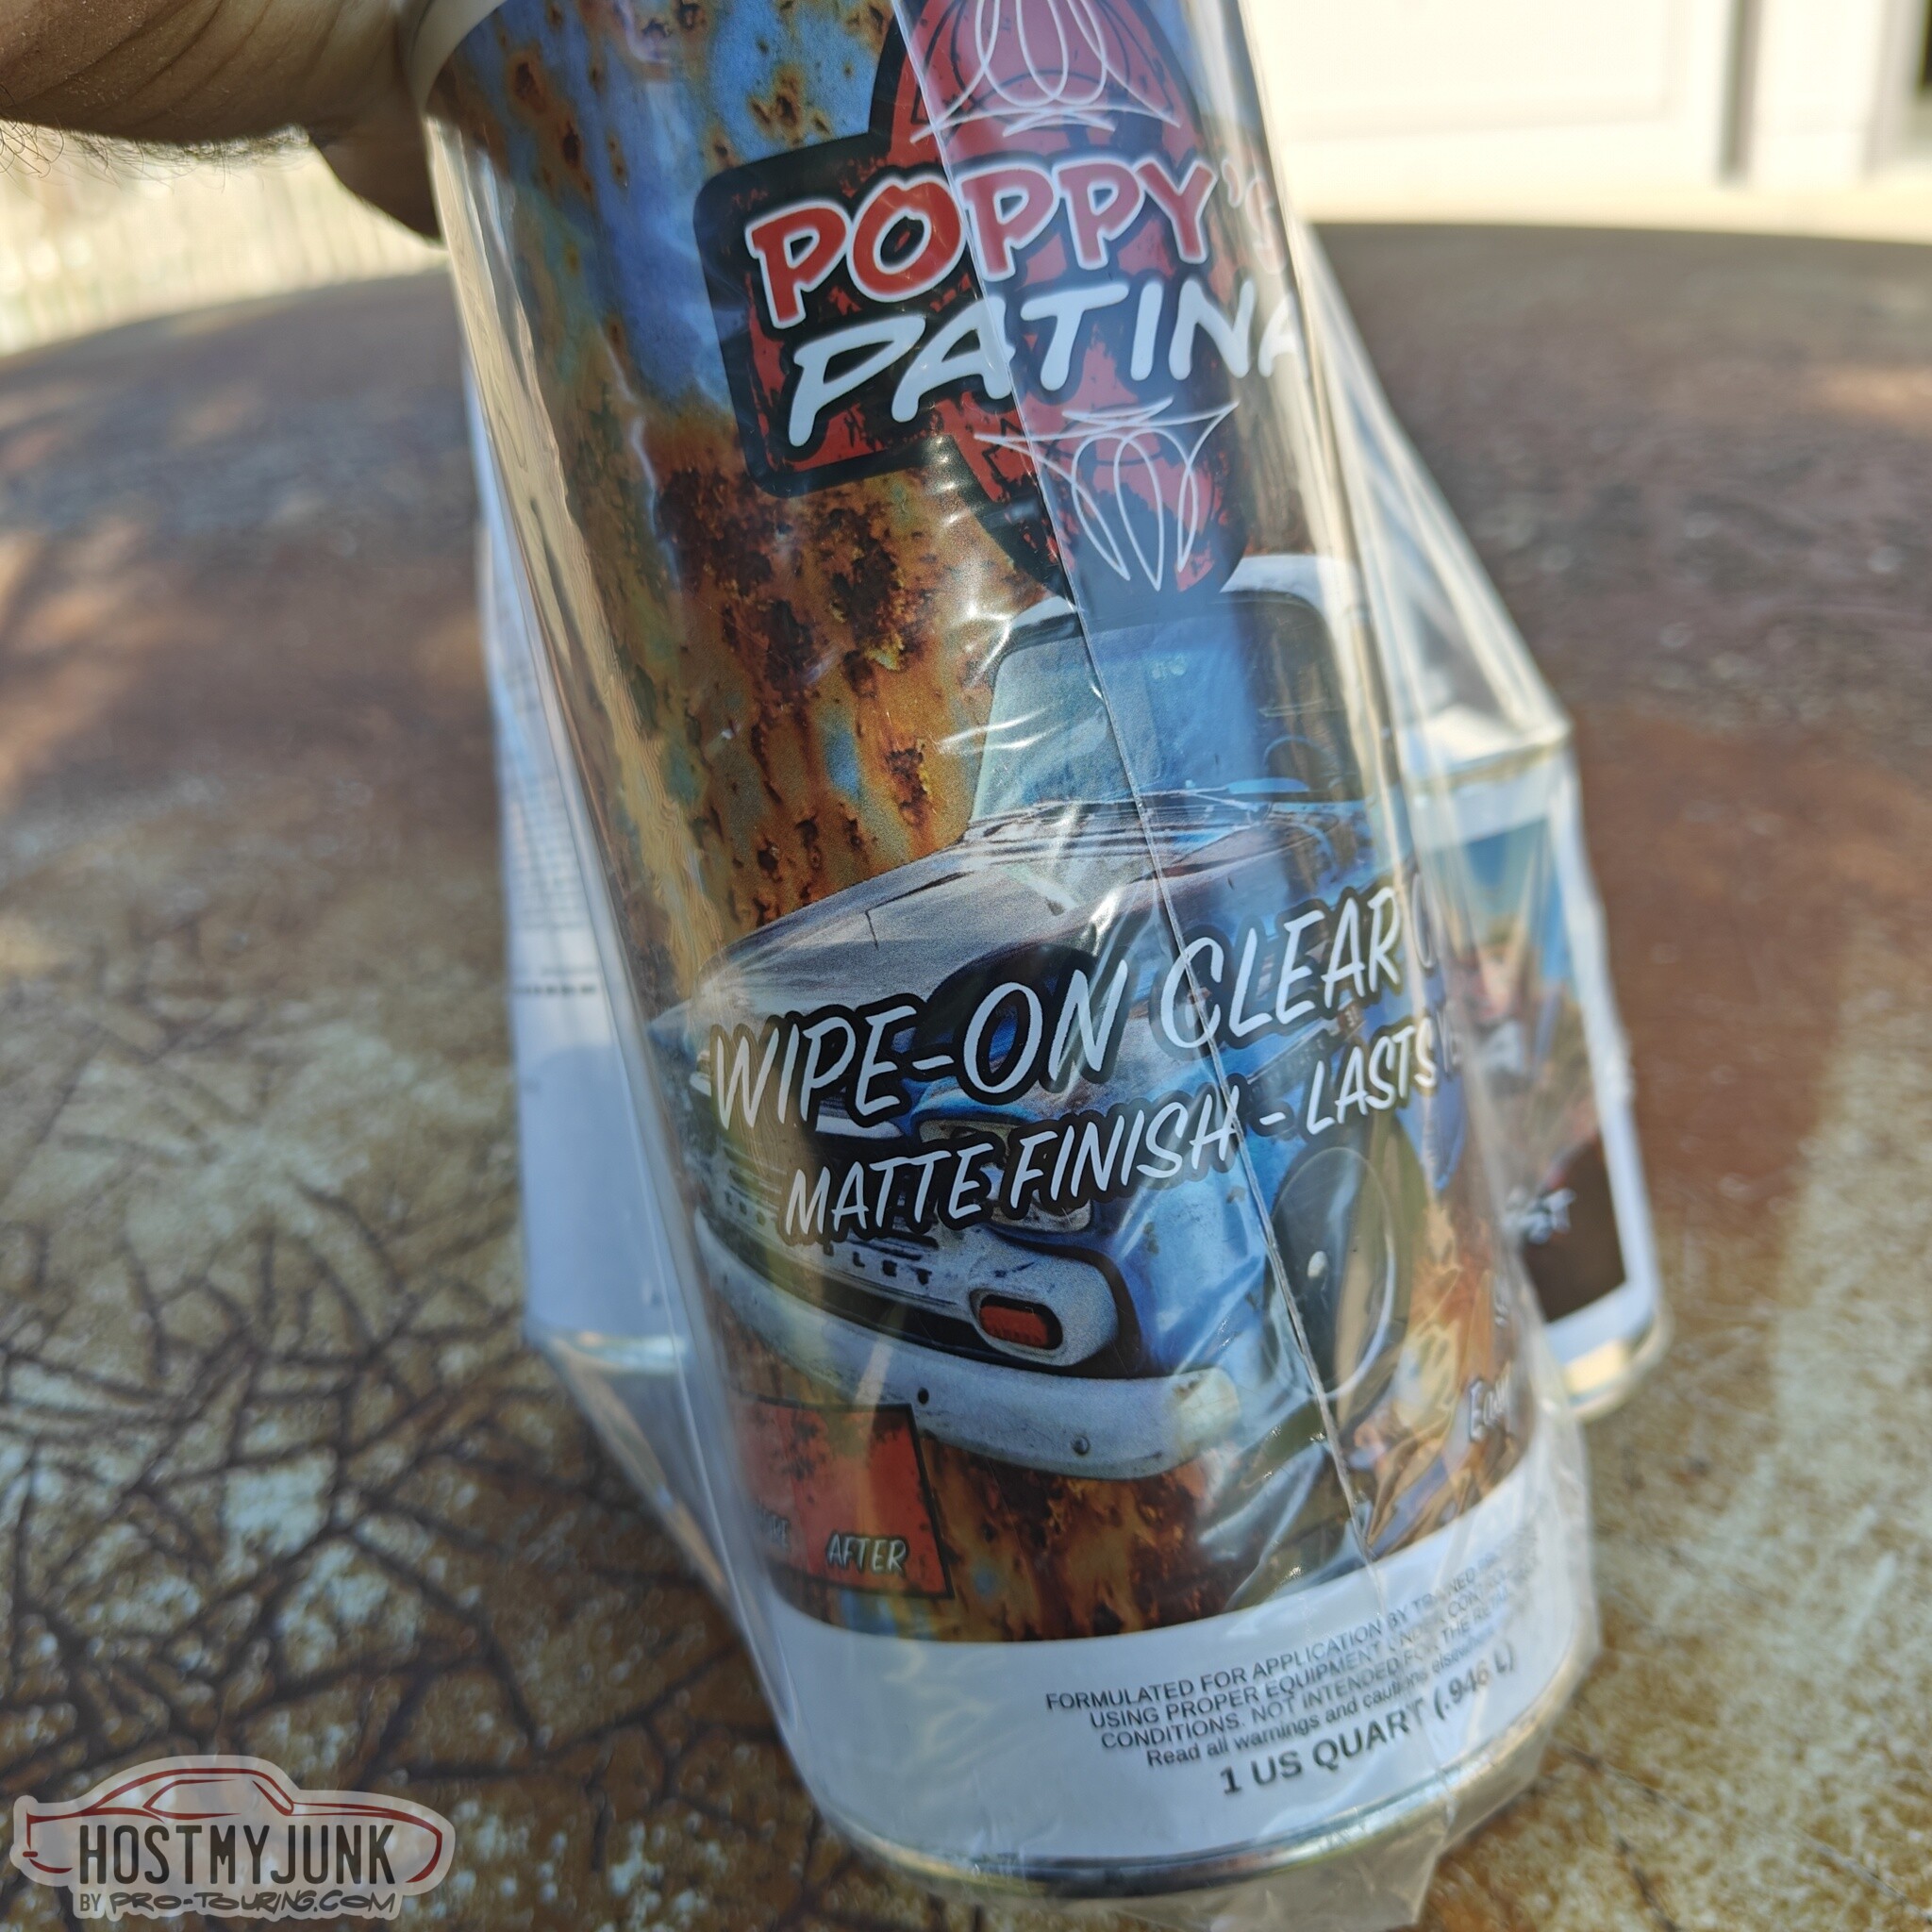
This is the bottle of clear and it includes a bottle of catalyst.
It took a lot more clear coat than expected. The instructions say that a single bottle is enough to do a long bed truck, so I expected half a bottle to give good coverage. I ended up using the whole bottle. The surface of the car just soaked up the clear like a sponge. After applying it as best as I could, we rolled it into the sun.
Here it is still wet and looks a lot glossier than it is.
I let it dry at Vic's for about 45 minutes then I hit the road home. All the surfaces were dry to the touch at that point. There are a few streaks on the hood and trunk. I don't think I used enough and as I said, the paint just sucked it in.
I have since contacted Poppy's and they said not to worry. They said to let it dry a couple of days, then hit it with a stochbrite pad and do another coat.
I kind of like how it looked more glossy when it was wet, so I am thinking of doing the next coat with the satin clear instead of the matte.
What do y'all think? Stay matte or go a with just a little more sheen?
Andrew
I went to Vic's house for this because he has shop air, which I used for the DA sander. I lightly went over the whole car, especially the hood, roof and trunk with the DA sander. The paint was very rough and some places had loose flakes, which the sanding took care of. Here it is after the sanding and washing.
Here Vic is finishing up the taping of the stainless trim. This isn't strictly necessary, but my trim is in good shape and shiny, so I did not want to get any clear on it.
Then we rolled it into the shade and used wax and grease remover to make sure everything was as clean as possible.
This is the bottle of clear and it includes a bottle of catalyst.
It took a lot more clear coat than expected. The instructions say that a single bottle is enough to do a long bed truck, so I expected half a bottle to give good coverage. I ended up using the whole bottle. The surface of the car just soaked up the clear like a sponge. After applying it as best as I could, we rolled it into the sun.
Here it is still wet and looks a lot glossier than it is.
I let it dry at Vic's for about 45 minutes then I hit the road home. All the surfaces were dry to the touch at that point. There are a few streaks on the hood and trunk. I don't think I used enough and as I said, the paint just sucked it in.
I have since contacted Poppy's and they said not to worry. They said to let it dry a couple of days, then hit it with a stochbrite pad and do another coat.
I kind of like how it looked more glossy when it was wet, so I am thinking of doing the next coat with the satin clear instead of the matte.
What do y'all think? Stay matte or go a with just a little more sheen?
Andrew
10-11-2023, 09:33 PM
#1315
TECH Senior Member
Thread Starter
iTrader: (7)
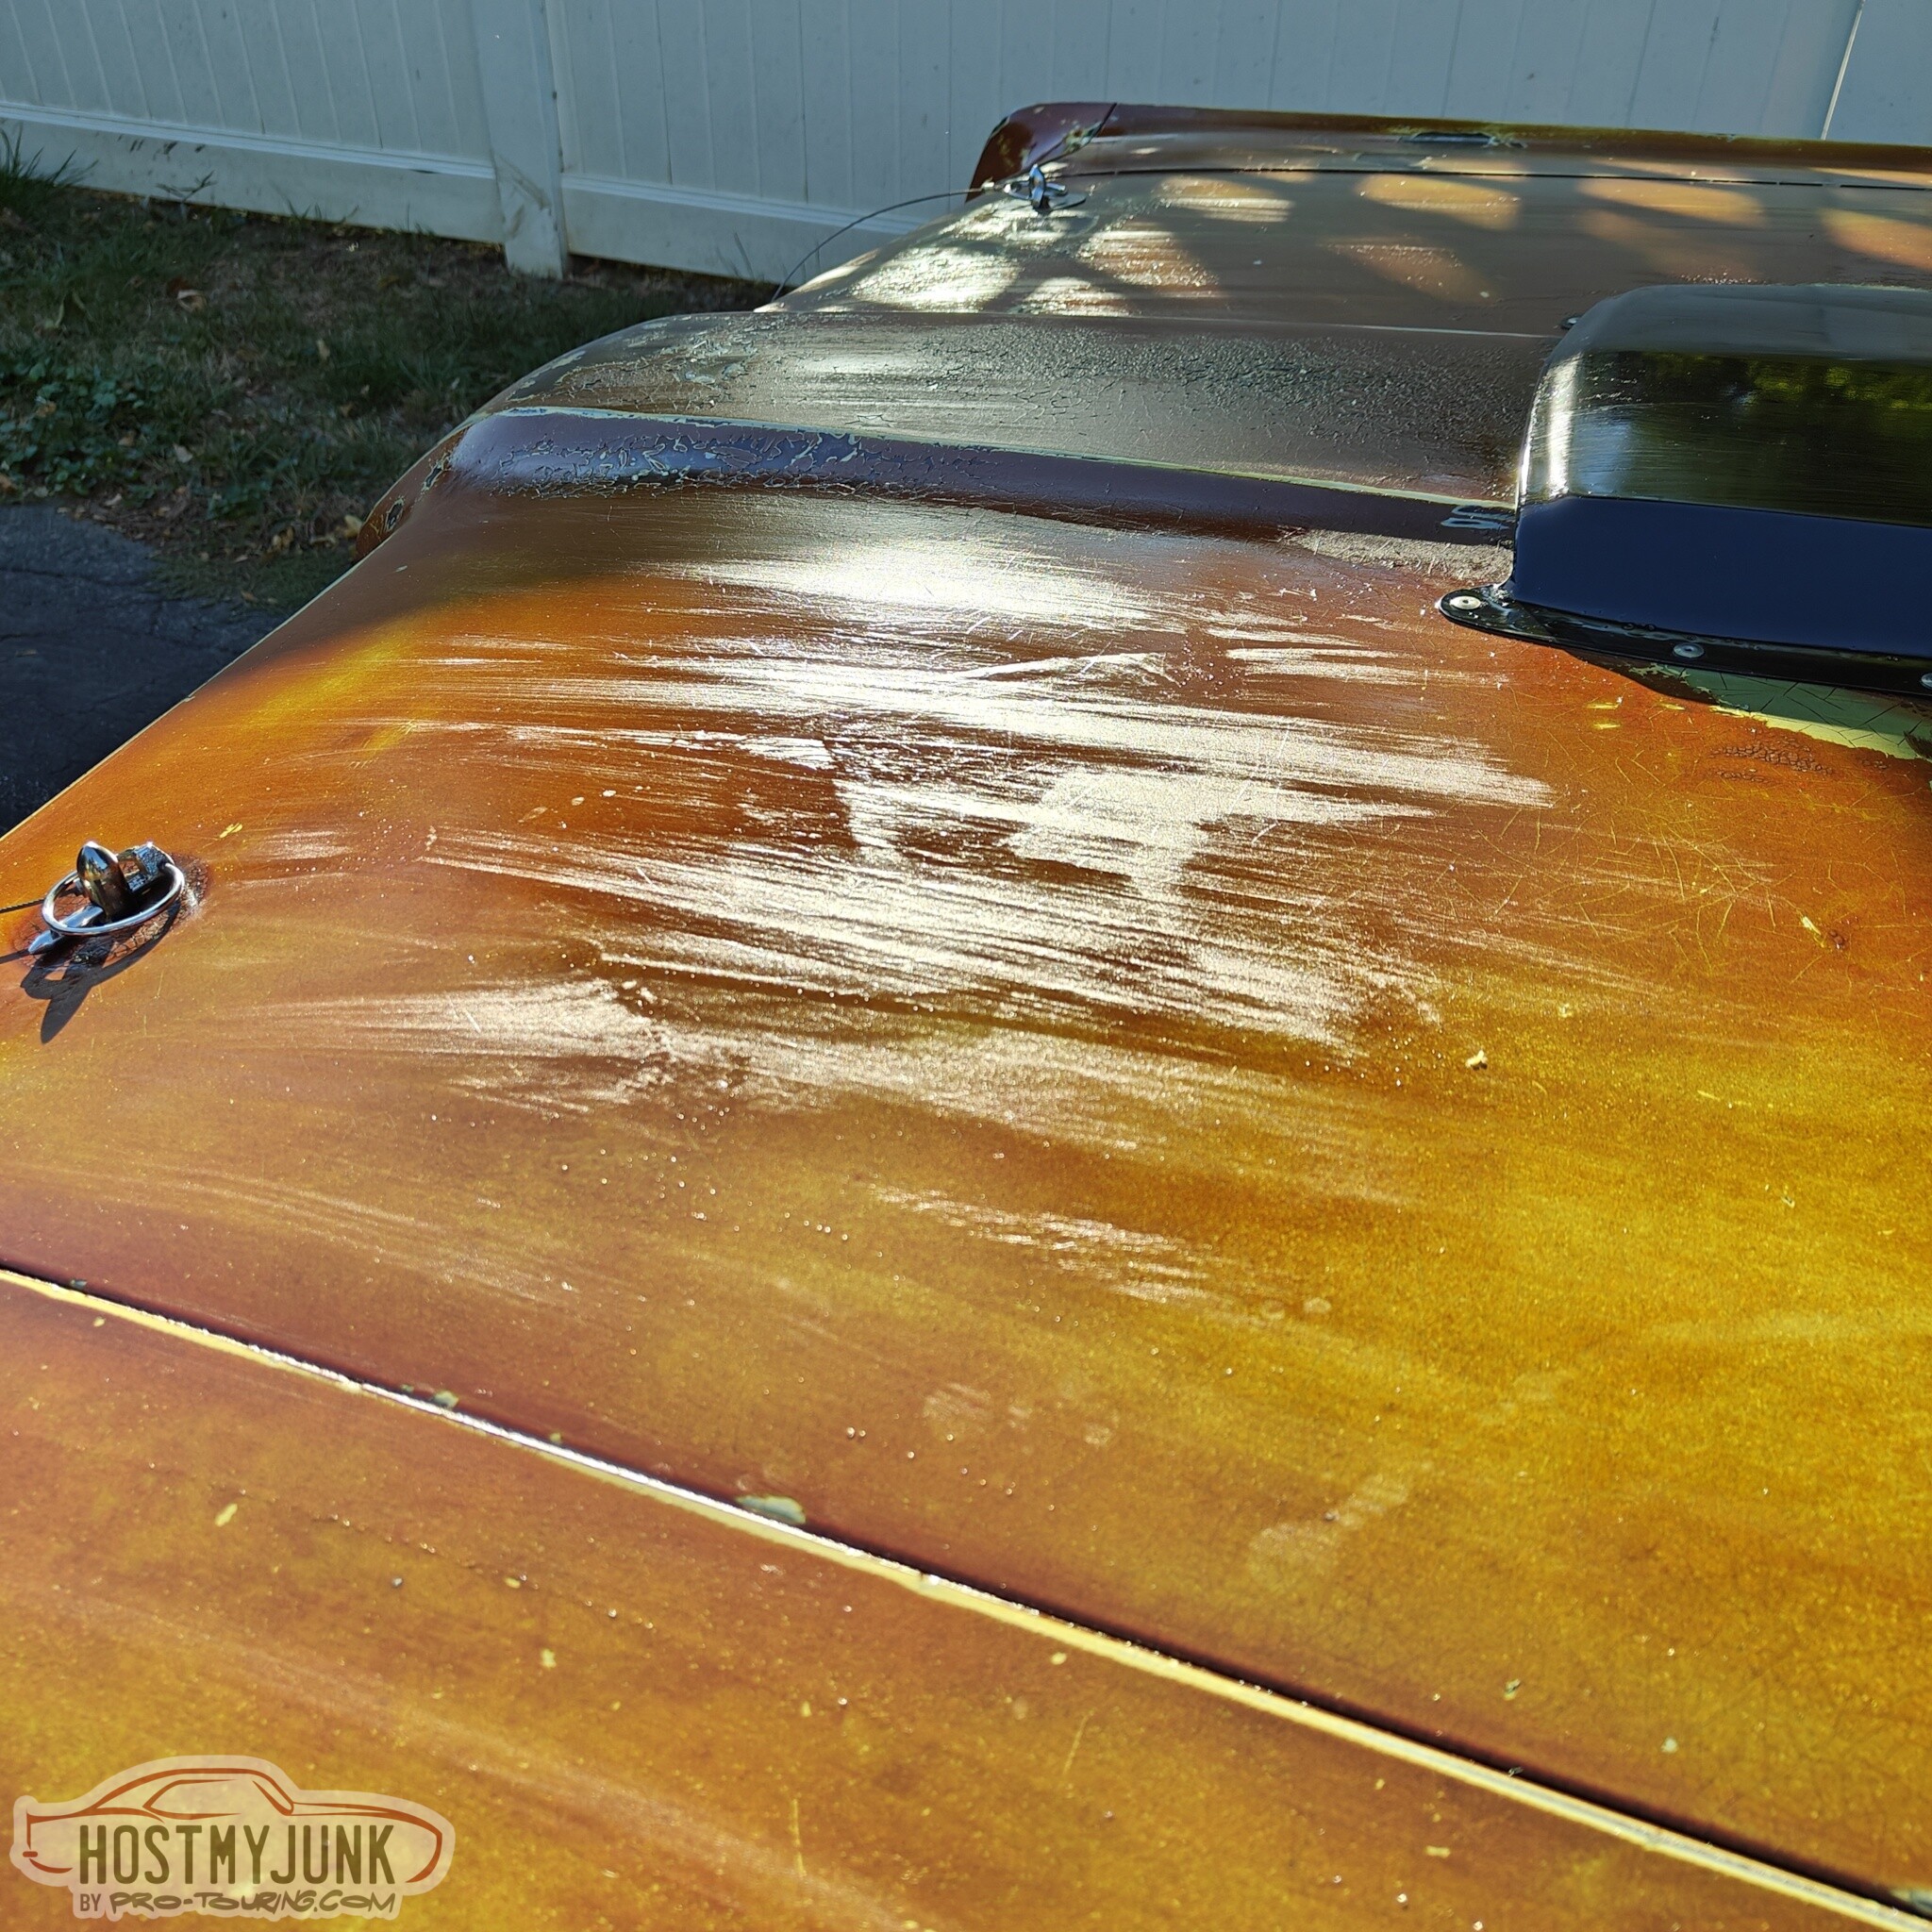
Last night we got a little rain and I went out this morning to see what the clear looked like. I was pleasantly surprised...
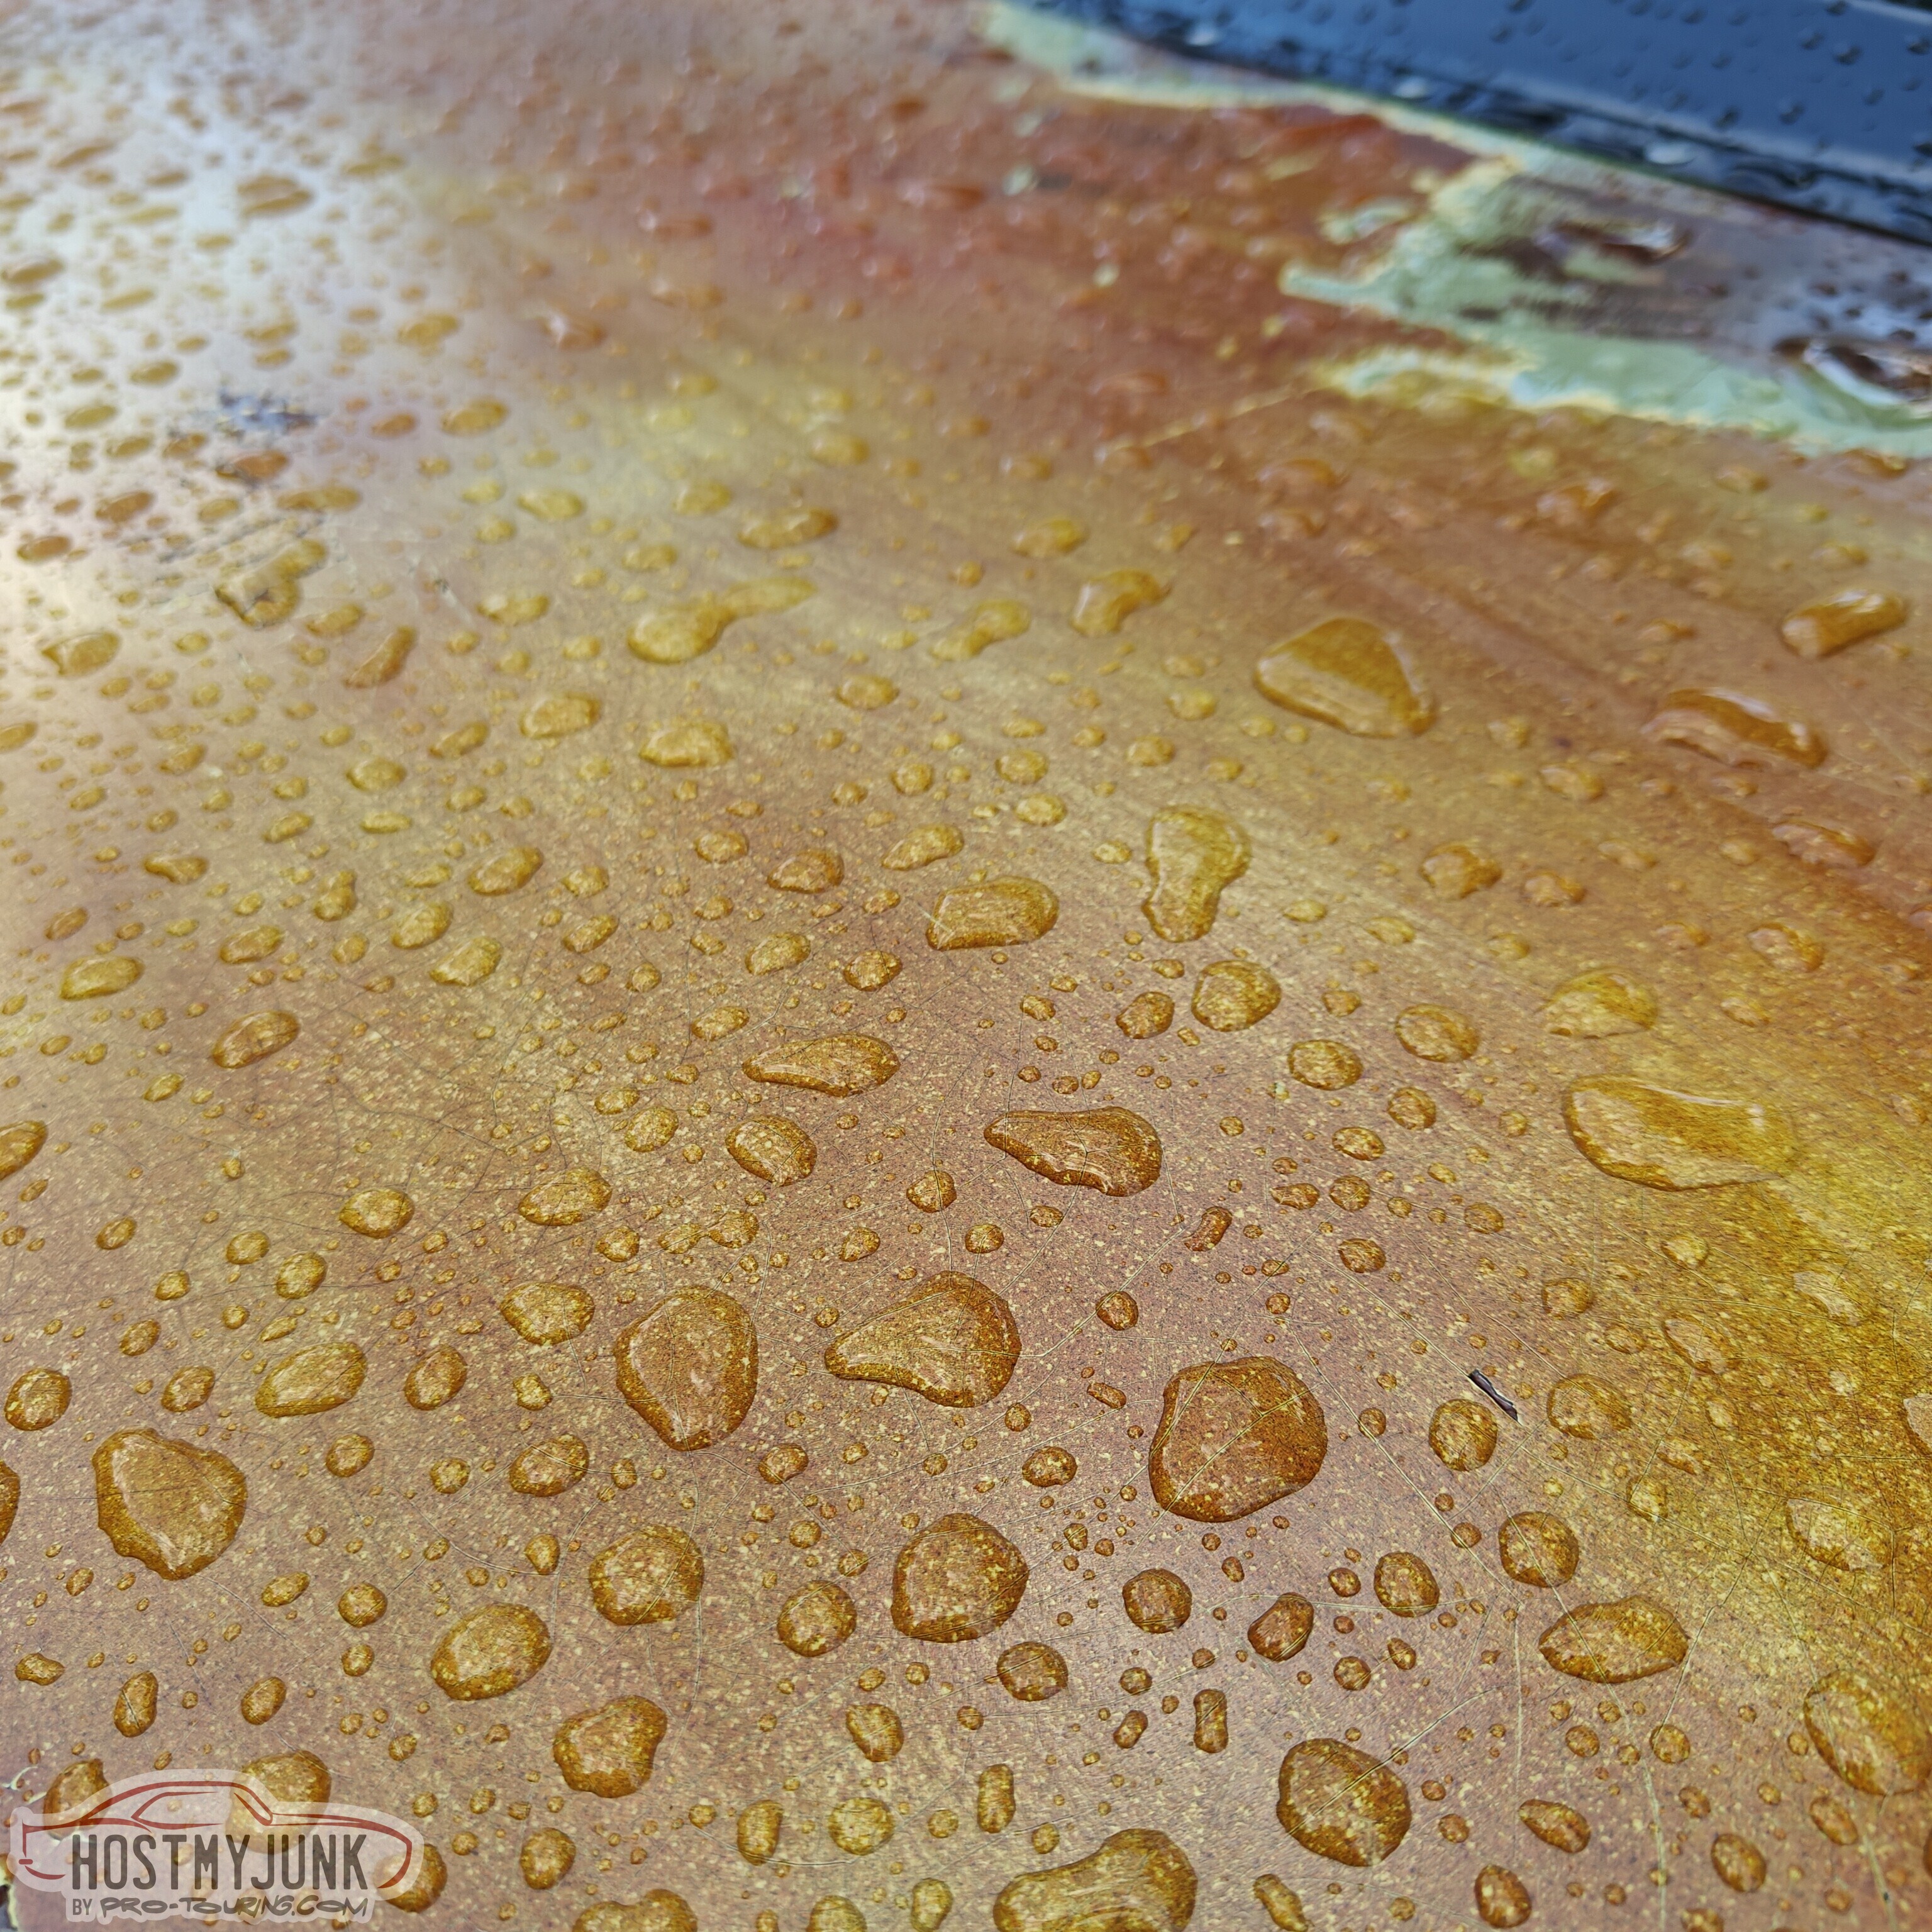
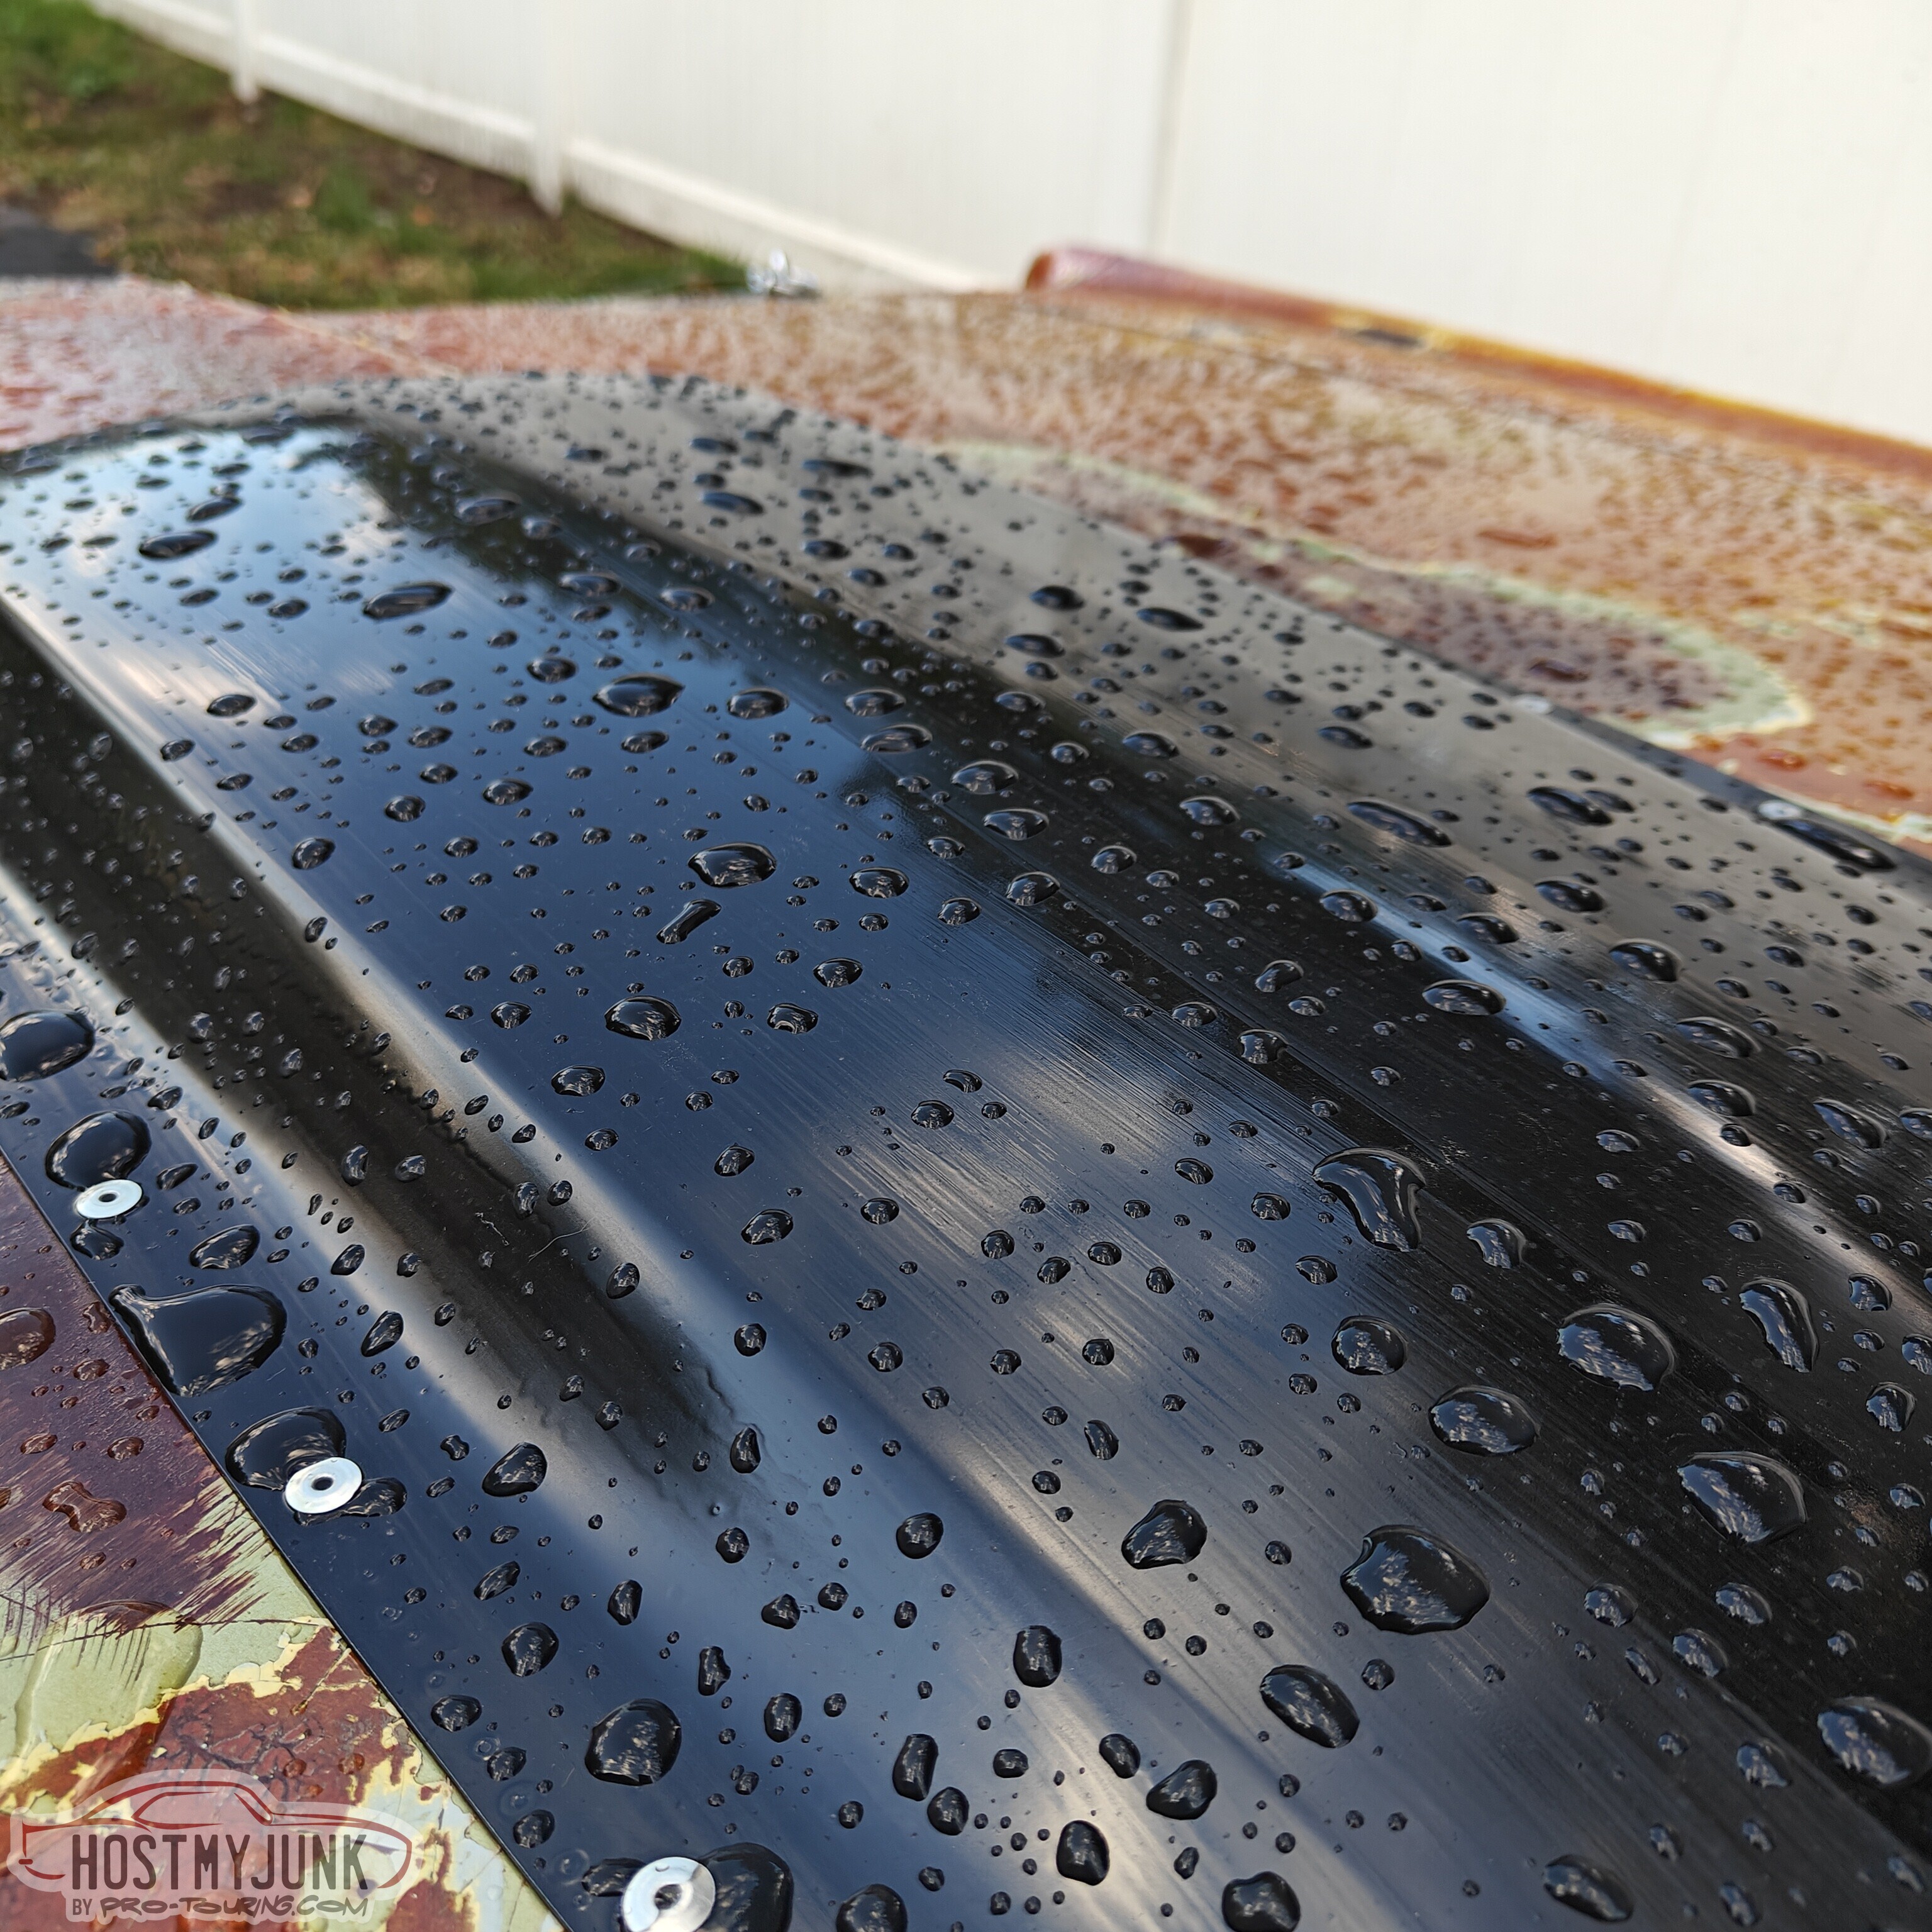
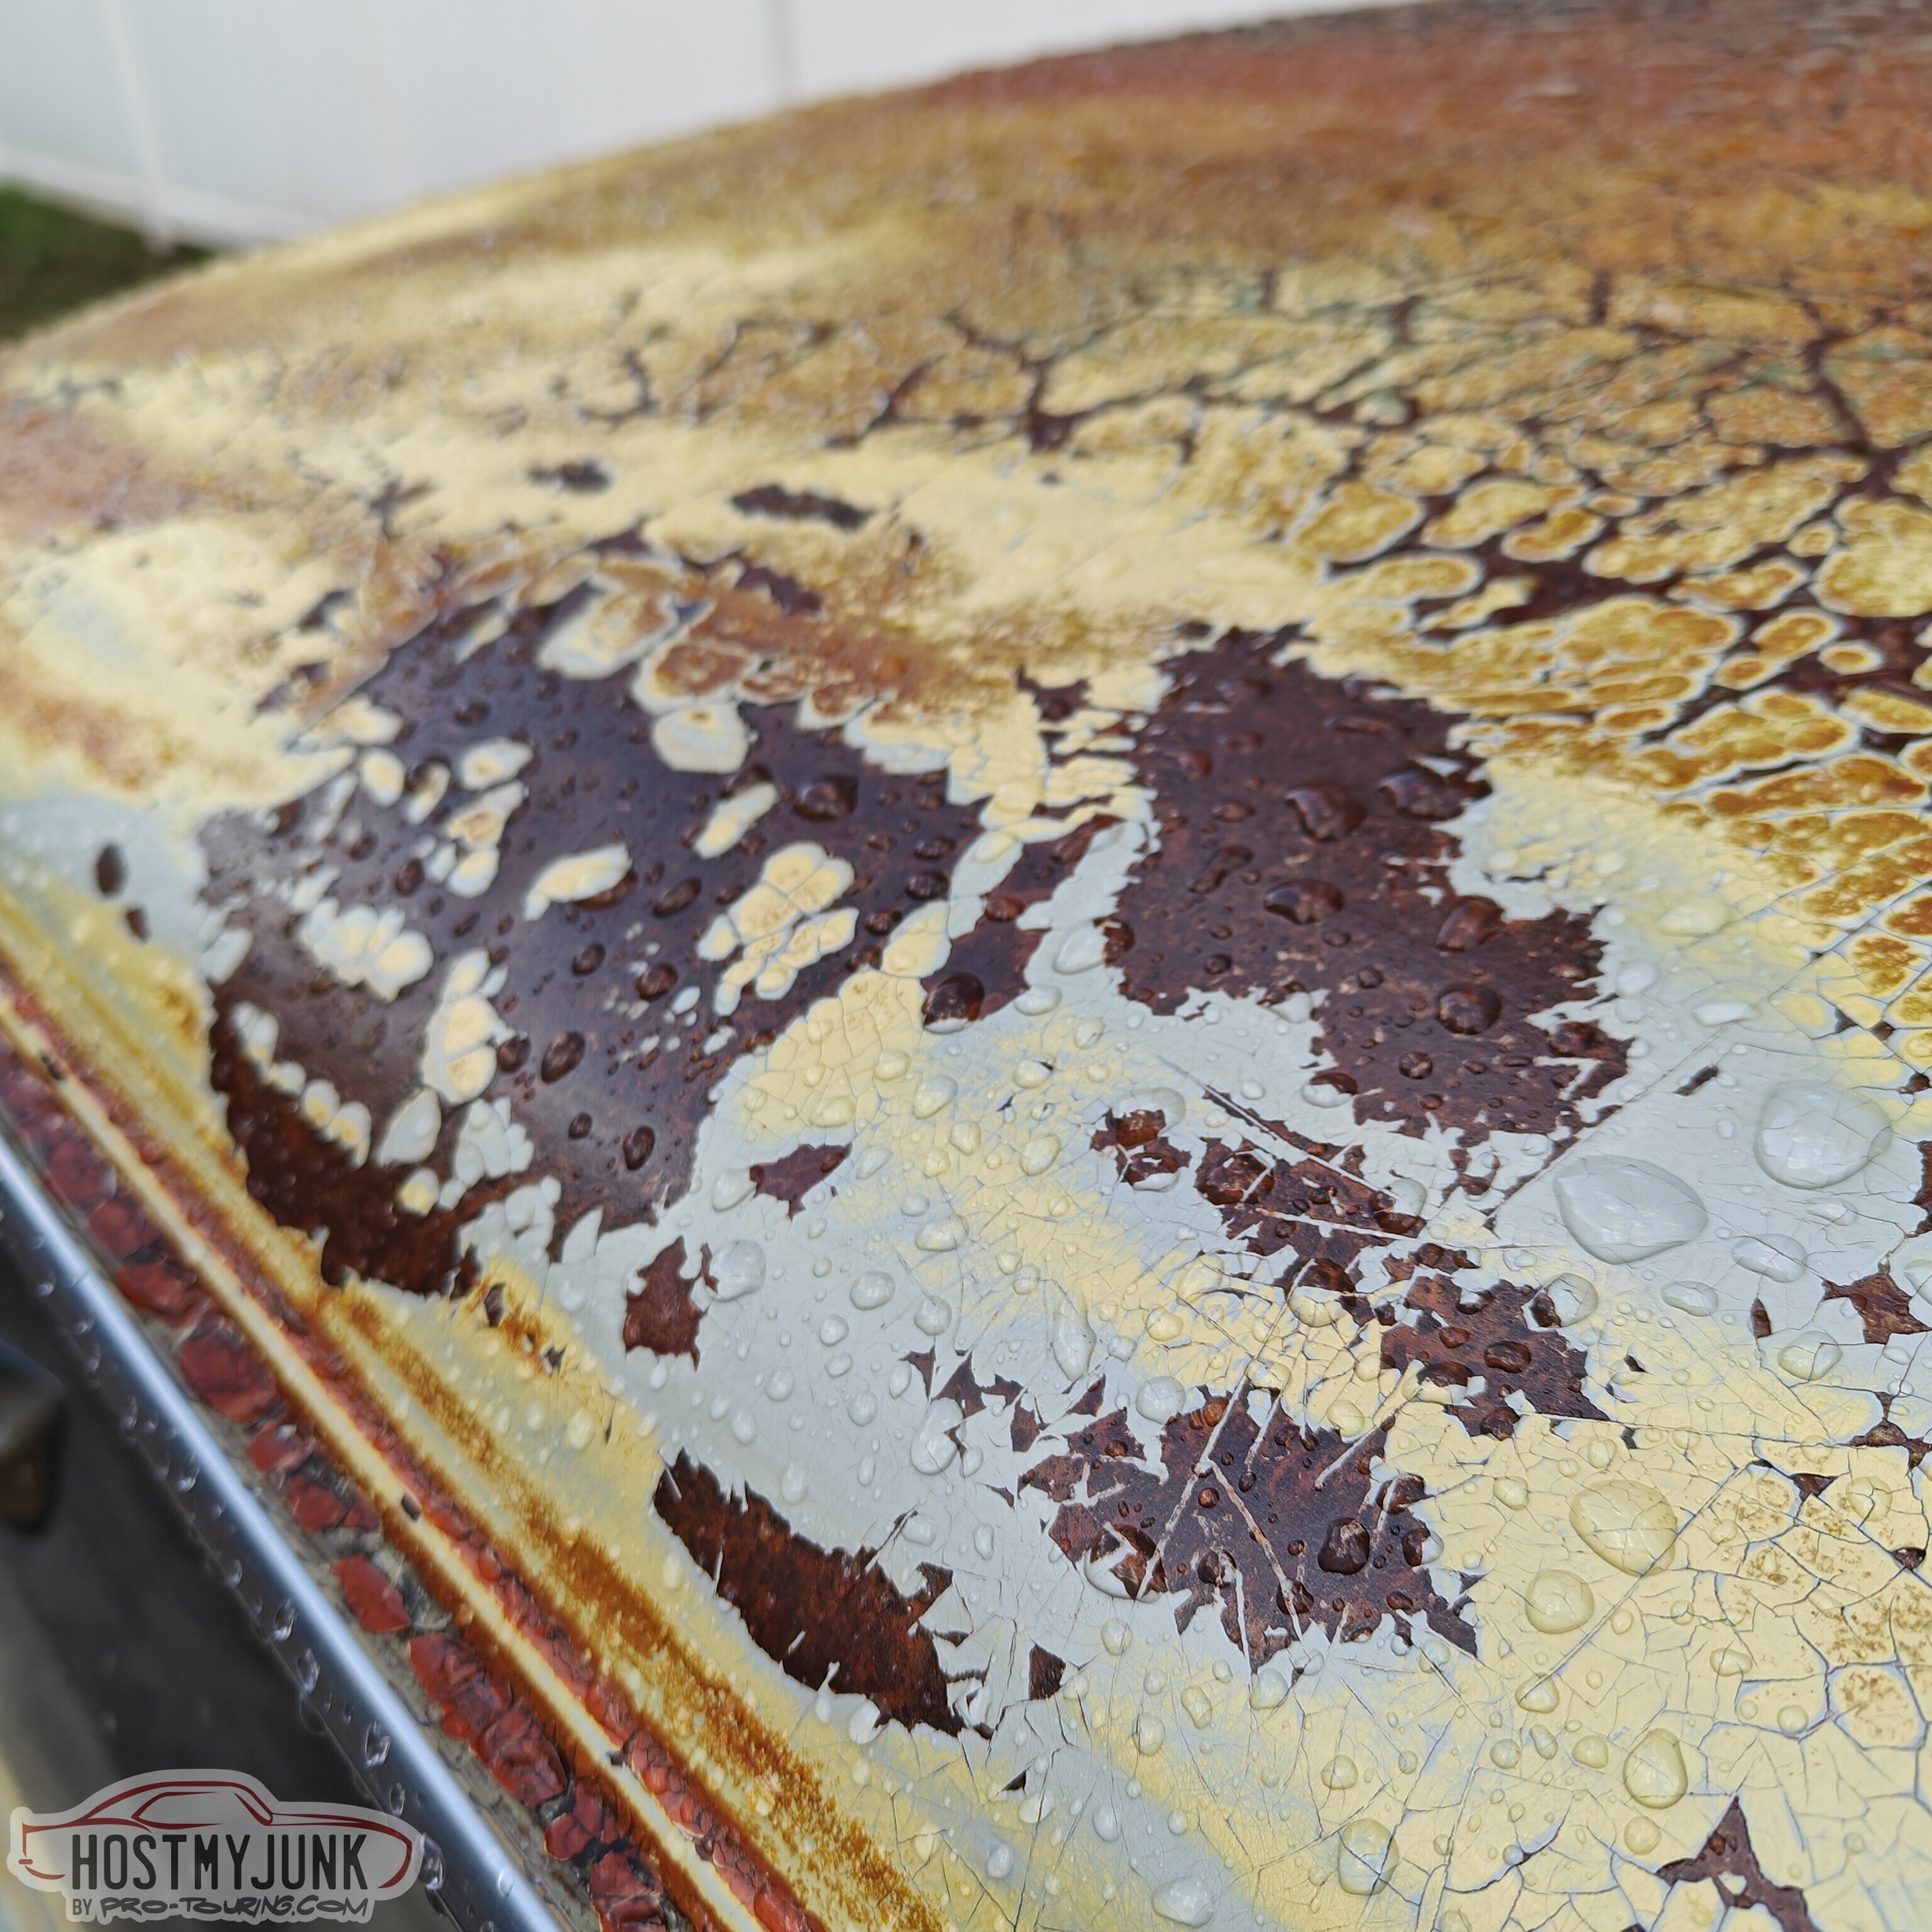
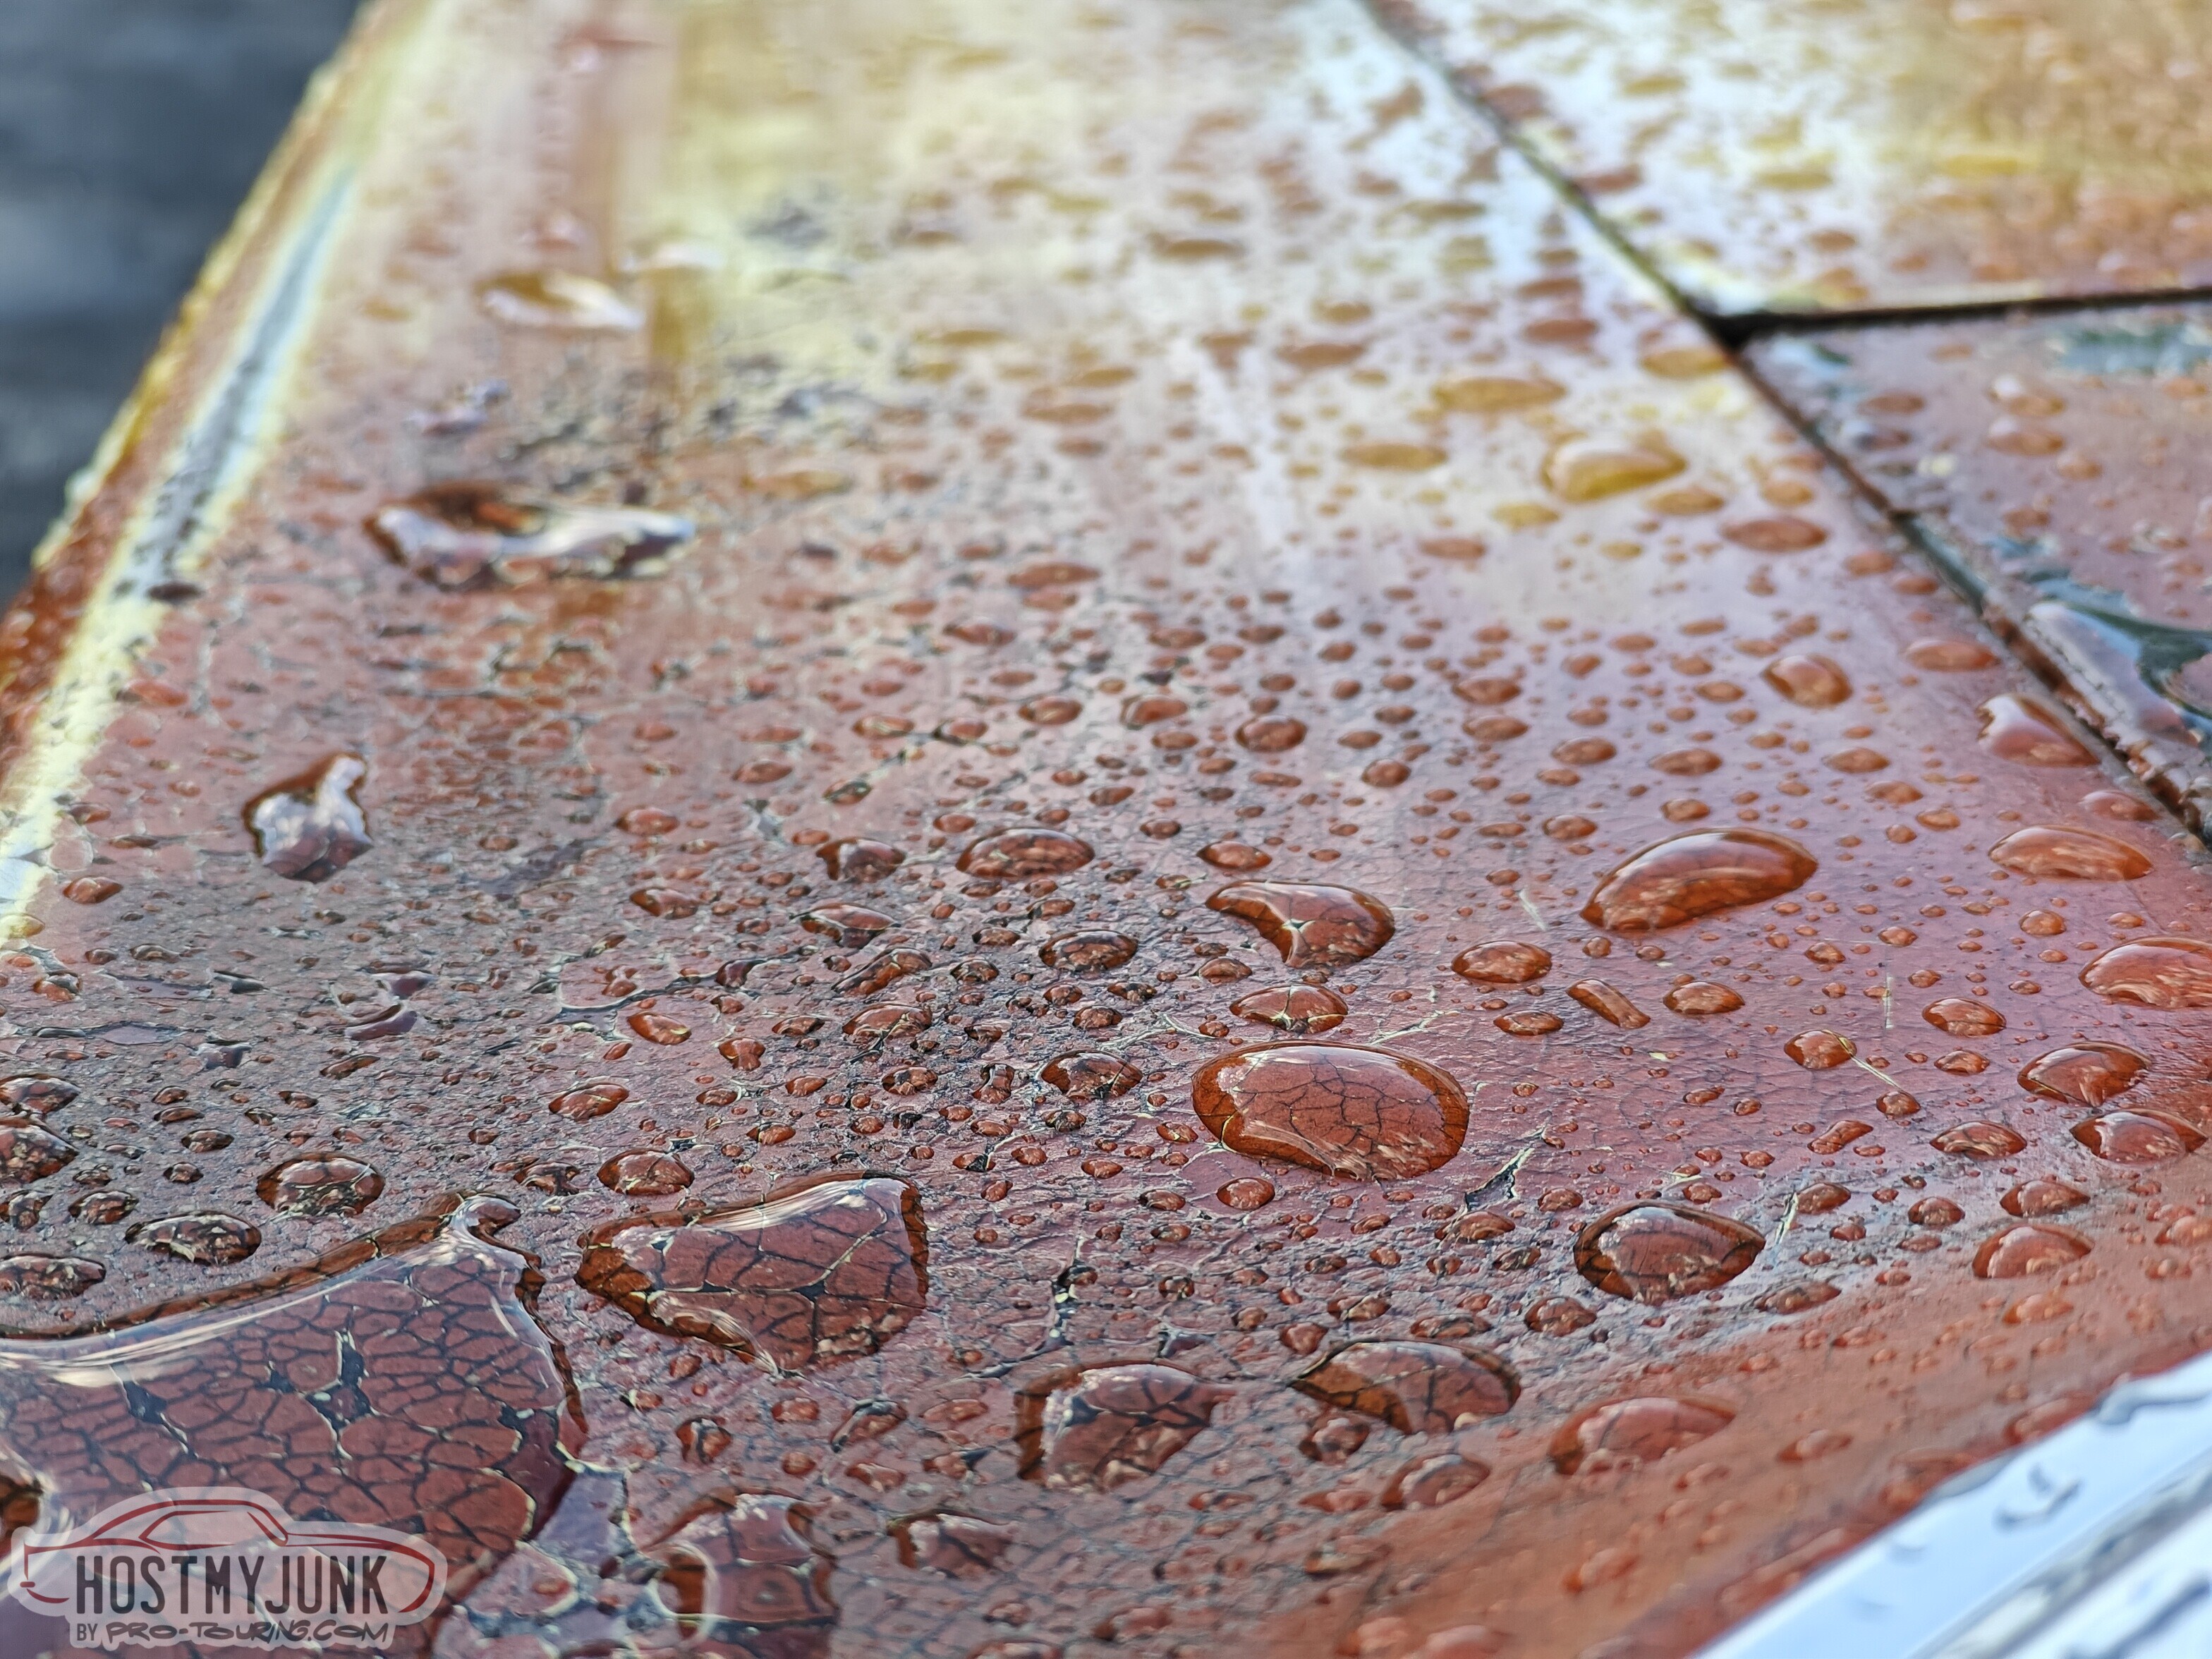
I am just happy that the paint is no longer absorbing water. The streaks that I showed yesterday are still there. I have more clear on order in the glossier satin sheen. The plan is to go over the whole car with some ScotchBrite pads or maybe even 400 grit, and then go over the whole car with a thick coat of the satin clear.
In one of their videos, Poppy's shows them using a flat paint applicator. I am going to give this technique a try, since I feel that the coating will lay down smoother and it will be easier to keep a wet edge.
Andrew
10-18-2023, 01:43 PM
#1316
TECH Senior Member
Thread Starter
iTrader: (7)
Here is my last attempt at the clear coat. I am done messing with it and I am pleased with the final results.
Yesterday I gave the car a full wash and after it was dry, I wiped it down with wax and grease remover. I then used some of the satin sheen Poppy's Patina clear. The flat, horizontal surfaces like the hood, roof and trunk really needed a thick coat to lay flat. I bought a flat paint applicator at Home Depot, but the clear started to attack the styrofoam handle of the applicator almost immediately. That turned into a damn mess and I had to scramble...
Anyway, I muddled through it and I am happy with the results:
This is after a couple of hours drying time.
The streaks on the flat surfaces are almost gone and are only visible when looking at certain angles.
Overall I like the satin sheen vs. the matte and I am very happy with how it turned out. I might even wax it! LOL
Andrew
The following users liked this post:
G Atsma (10-18-2023)
10-18-2023, 02:05 PM
#1317
Next thing ya know, you will be getting a nice paint job , ha
The following users liked this post:
Project GatTagO (10-18-2023)
10-18-2023, 02:08 PM
#1318
TECH Senior Member

The following users liked this post:
Project GatTagO (10-18-2023)
The following users liked this post:
ryeguy2006a (10-26-2023)
10-23-2023, 09:52 AM
#1320
TECH Senior Member
Thread Starter
iTrader: (7)
I like technical challenges, and the next thing to dig into is the transmission. The dog-ring T56 and the RPS clutch work great, but the world moves on. I have been reading up on various modern transmission like the ZF DCT and the ZF 8HP. After LS Fest my buddies Tom and Brian drank the ZF 8HP KoolAid with me. Tom found a smoking deal on 3 take out 8HP70 transmission and he is starting to dig into them in preparation for doing the needed modifications to use the TurboLamik TCU.
These transmissions are simultaneously complex yet simple. Here is the main case after the valve body has been removed.
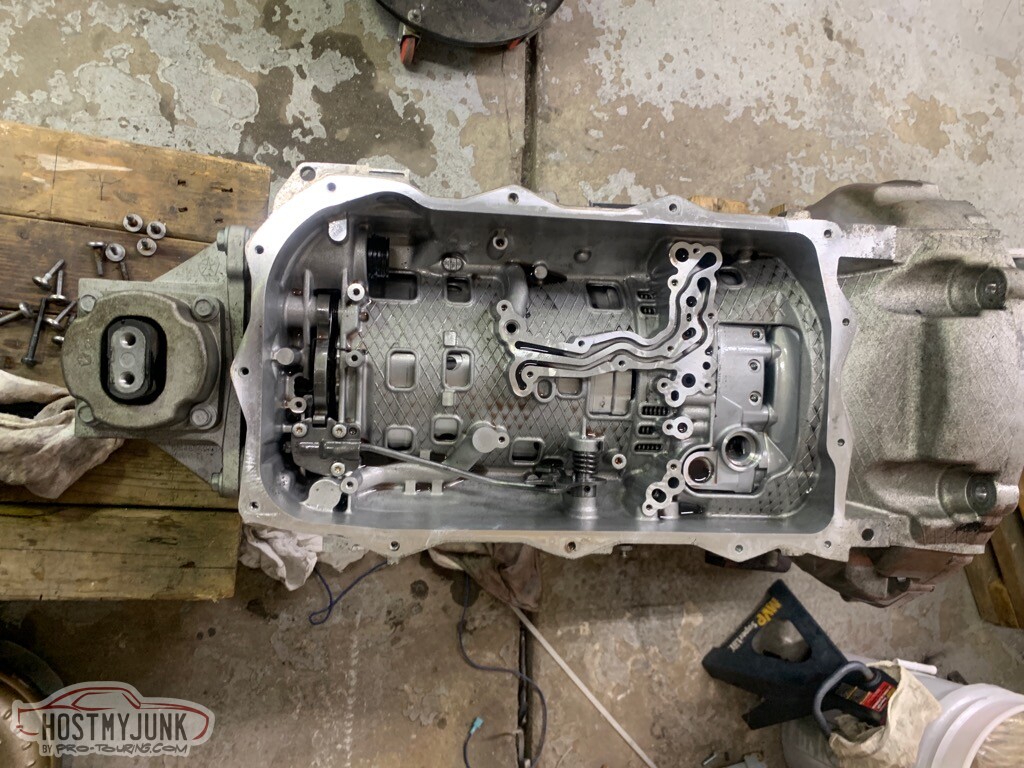
This is the valve body with a total of 9 solenoids.
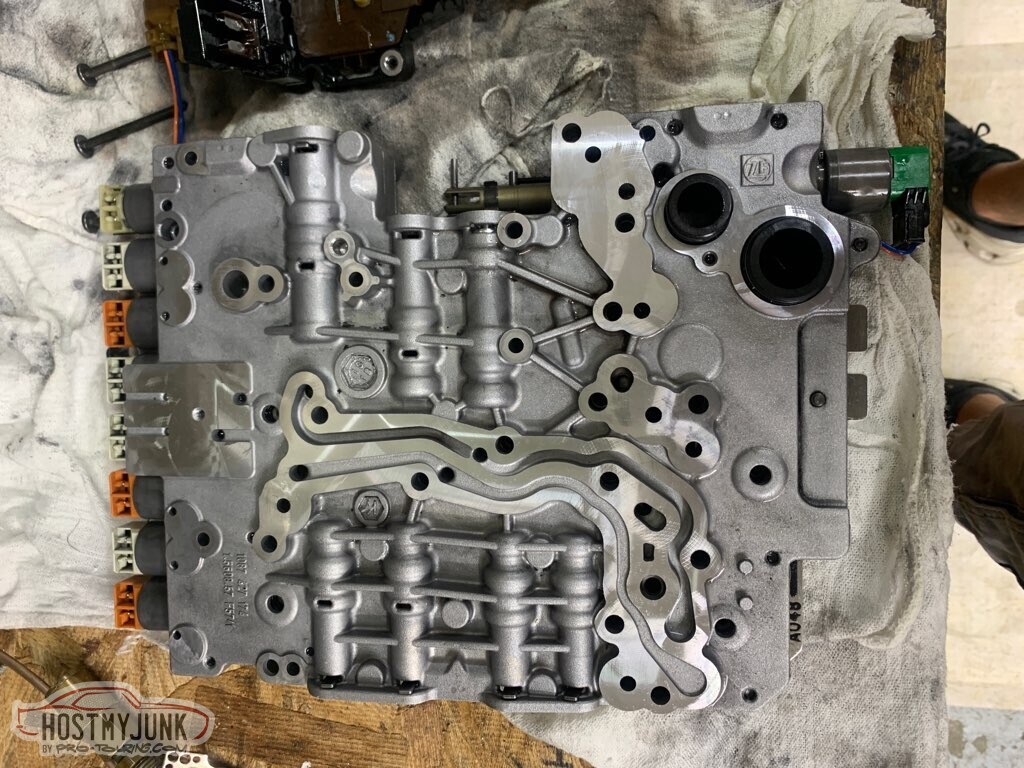
This is the part that needs to be modified.
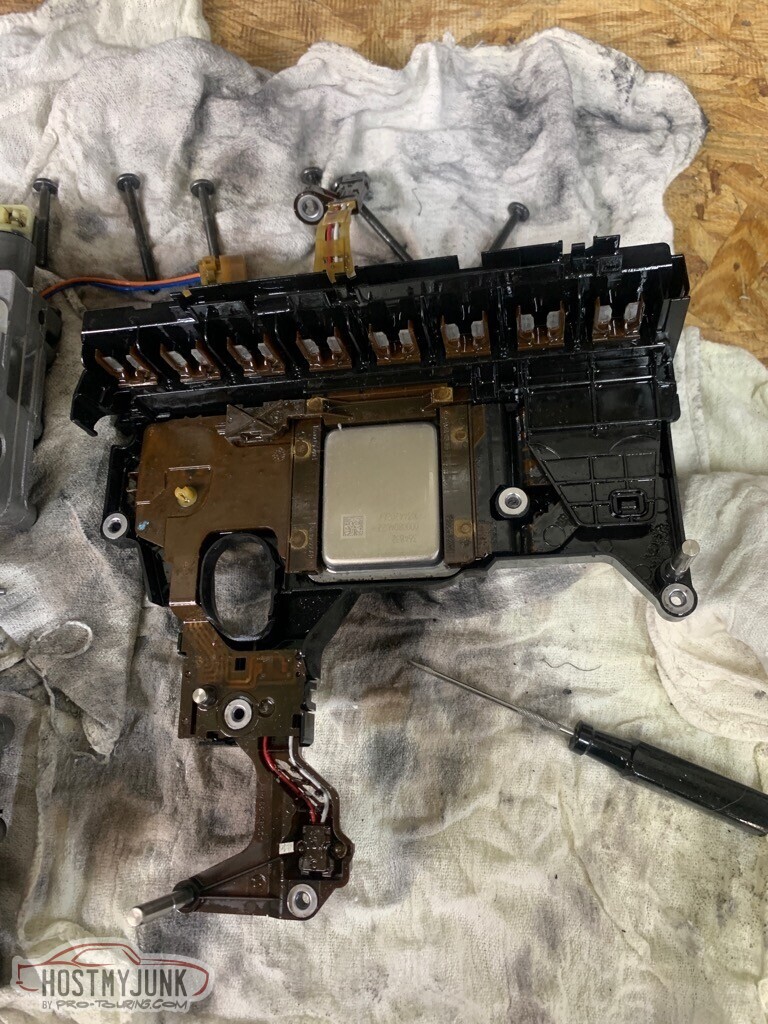
The shiny plate is the OEM TCU cover. That cover gets cut off and a PCB board gets soldered in place that allows the use of an externally mounted TCU.
Andrew
These transmissions are simultaneously complex yet simple. Here is the main case after the valve body has been removed.
This is the valve body with a total of 9 solenoids.
This is the part that needs to be modified.
The shiny plate is the OEM TCU cover. That cover gets cut off and a PCB board gets soldered in place that allows the use of an externally mounted TCU.
Andrew
The following 2 users liked this post by Project GatTagO:
kwhizz (10-29-2023), ryeguy2006a (10-24-2023)