

1968 Impala Turbo LY6/4L80e Swap - 798 RWHP @ 17 PSI
 09-03-2015, 12:14 PM
#101


I'm trying to cross one thing out a day. Got the converter issue squared away and confirmed that the dipstick level is accurate on the Allstar unit. It's right on the money. The middle of hot is even with the pan rail.

The rear gears were installed by a local racer and we put all new bearings and had the tubes welded. The Moser 1350 yoke is pretty. The original plugs welds were seeping so I sealed them up with some chemical resistant JB Weld. It will get epoxy primer, filler primer to smooth the pitting, and a final coat of black epoxy.


Downpipe mocked up. I'm glad I went with the T4 turbine housing because 5" pipe on the T6 would have been possible but a PIA.

I put some of the parts stickers on my toolbox. My 6 year old has no idea what the alternate meaning of these but for some reason gravitates to them.

The rear gears were installed by a local racer and we put all new bearings and had the tubes welded. The Moser 1350 yoke is pretty. The original plugs welds were seeping so I sealed them up with some chemical resistant JB Weld. It will get epoxy primer, filler primer to smooth the pitting, and a final coat of black epoxy.
Downpipe mocked up. I'm glad I went with the T4 turbine housing because 5" pipe on the T6 would have been possible but a PIA.
I put some of the parts stickers on my toolbox. My 6 year old has no idea what the alternate meaning of these but for some reason gravitates to them.
 09-05-2015, 08:45 AM
#102
Finishing the prep for the rear end install. Since I ran out of epoxy I decided to skip the high build primer to smooth the housing. I am also being lazy because I don't want to lug it back out and prep it for paint 2 more times.


The fuel pressure and Innovate SCG-1 boostcontroller/AFR gauges are mounted but not fully wired. I painted the SCG-1 bezel flat black to match the Spek gauge as closely as possible. I really don't like under dash gauges but I had no other options. I might fiberglass a panel to put the gauges where the stock radio is since it does not get used. That a perfect winter project. The one good thing about the ashtray mount is I will leave enough slack in the wiring so I can just remove it from the dash for programming in my lap.


The fuel pressure and Innovate SCG-1 boostcontroller/AFR gauges are mounted but not fully wired. I painted the SCG-1 bezel flat black to match the Spek gauge as closely as possible. I really don't like under dash gauges but I had no other options. I might fiberglass a panel to put the gauges where the stock radio is since it does not get used. That a perfect winter project. The one good thing about the ashtray mount is I will leave enough slack in the wiring so I can just remove it from the dash for programming in my lap.
Last edited by alocker; 09-06-2015 at 08:37 AM.

 09-06-2015, 06:51 PM
#108
The wastegate is tacked in. The pipe coming off the crossover is a compound angle attaching were it bends up into the log. That took about 100 trips back and forth from underneath the car to the grinder. The abs got a workout for that one. The piece into the downpipe went much smoother since it goes straight into the tube. I used some spray paint to make the initial cuts and after about 20 round trips to the grinder it was tacked in.


The downpipe fits nicely with plenty of room all around.


The rearend went back into the car smoothly. I had to install a new brake line from the distribution block to the axle since the factory flex hose was seized on the hard line and I had a braided one sitting around to install. I am waiting for UMI adjustable uppers before I can button up the rear end. I rushed to get this in because I just found out The Driveshaft Shop is 4-5 weeks out on build time and I need to get a CV shaft ordered ASAP!

All that work making it shiny and you can't even see it.

The downpipe fits nicely with plenty of room all around.
The rearend went back into the car smoothly. I had to install a new brake line from the distribution block to the axle since the factory flex hose was seized on the hard line and I had a braided one sitting around to install. I am waiting for UMI adjustable uppers before I can button up the rear end. I rushed to get this in because I just found out The Driveshaft Shop is 4-5 weeks out on build time and I need to get a CV shaft ordered ASAP!
All that work making it shiny and you can't even see it.
09-09-2015, 09:40 PM
#109
I have been happy with the rate of progress. I want it off the jackstands by October 1st.
I put about 12 quarts of John Deere Hydraulic Fluid in the trans and fired it up. I verified I have both reverse and forward gears which makes me happy
I had Midwest Drive Shaft make me an aluminum driveshaft today. My driveline angles are good (I can zero everything if I wanted to) so I hope this shaft will be vibration free. I upgraded to a Sonnax billet 1350 slip yoke to compliment the billet pinion yoke. I also finished the rearend by installing the UMI upper arms. The shaft and pinion are set both down at 1 degree resulting in a 2 degree nose down setting. Should work fine for the street.
09-12-2015, 08:47 PM
#110
I had a buddy help me out in his sheetmetal fab shop in the city. I made the template for the ECM and fuse box mount and gave it to him to make in 14 gauge steel. I was also thinking about the air filter tube I need to make in 5.5" and my high school math came rushing back. All I needed was to have him cut a 4x17.25" plate, roll it, and weld the seam (5.5 x 3.1415 = 17.27). Free intake tube


 09-13-2015, 05:13 AM
#112
Here is the elbow, you can get them in other bends too.
http://www.ebay.com/itm/5-1-2-ID-45-Degree-EPDM-Rubber-Air-Intake-Elbow-Kit-with-T-Bolt-Clamps-5-5-/181128217073?hash=item2a2c1541f1
Using this to drive the stock speedo. Its not hooked up yet but I mounted it. See post #85.
http://www.dakotadigital.com/index.c...rod/prd886.htm
The turbo log is from KB racing. The driver side header is a Hooker First Gen camaro mid length 1 3/4 swap header 2473HKR. These are very nice headers and I know everyone says dont use midlength but I would use these for sure on a NA build. It's like they were made for the car and very well put together.
https://www.holley.com/products/exha.../parts/2473HKR
The split loom looks so much nicer than the plastic stuff. It's not easy to install but once on it stays put. The nice thing is it expands a certain range to fit the wire bundle better unlike the plastic split loom. Some places sell it for a lot of money but good ole McMaster Carr has it in stock at a reasonable price.
http://www.mcmaster.com/#standard-ca...eeving/=yx2fdt
09-13-2015, 07:46 PM
#113
Thanks man.
Here is the elbow, you can get them in other bends too.
5 1 2" ID 45 Degree EPDM Rubber Air Intake Elbow Kit with T Bolt Clamps 5 5" | eBay
Using this to drive the stock speedo. Its not hooked up yet but I mounted it. See post #85.
http://www.dakotadigital.com/index.c...rod/prd886.htm
The turbo log is from KB racing. The driver side header is a Hooker First Gen camaro mid length 1 3/4 swap header 2473HKR. These are very nice headers and I know everyone says dont use midlength but I would use these for sure on a NA build. It's like they were made for the car and very well put together.
https://www.holley.com/products/exha.../parts/2473HKR
The split loom looks so much nicer than the plastic stuff. It's not easy to install but once on it stays put. The nice thing is it expands a certain range to fit the wire bundle better unlike the plastic split loom. Some places sell it for a lot of money but good ole McMaster Carr has it in stock at a reasonable price.
http://www.mcmaster.com/#standard-ca...eeving/=yx2fdt
09-18-2015, 07:52 AM
#114
Another no fun task was the Hydroboost. They are notorious for leaking out of the front piston seal and you will get a drip of PS fluid between the master and power unit. I purchased a seal kit to replace that seal along with the pushrod seal and the case seal. Overall it was actually easy to do. There was a varnish covering all of the internals so I am glad I took it apart to clean it. The pushrod is crimped on and no real good way to remove it. It must come off to do the pushrod seals but I needed to weld on my brake pedal end anyways. I also welded on a ground stud since will bolt to the inside dash structure which is a perfect body ground and I avoided drilling another hole.

Cut pushrod with my pedal adapter welded on.

Ground down header bolt welded on.

Cut pushrod with my pedal adapter welded on.
Ground down header bolt welded on.
09-18-2015, 07:13 PM
#116
I did not. You need a tool for the 4th piston lip seals but I left mine since it was a very low mile and clean unit. I had a trans shop hot tank it and do the bushings. Other than that there are no other tools required other than basic hand tools. I used a set of Irwin clamps and sockets to compress the spring packs but that's it.
09-18-2015, 10:21 PM
#117
Finished up the Hydroboost with a fresh coat of paint and new hoses. Pedal and brake switch all hooked up.

My signature swap ZF power steering reservoir mounted. I found one of these on a Range Rover when I did my first LT1 swap back in 2006. I used one on the last LS swap too. Cheap and easy to configure.

Got the SCG-1 wired up and working. I could not get my phone to take a crisp photos of the displays but they are both nice and clear. The SCG-1 wiring is kinda ridiculous. The manual recommends running it off of a relay which is ok but the thing has 4 subharnesses that all go to the gauge. Major props to the few guys I have seen mount these in a pillar. Figuring out how to run that huge bundle takes patience.


Waiting on a belt and some hose clamps before I can add coolant.

My signature swap ZF power steering reservoir mounted. I found one of these on a Range Rover when I did my first LT1 swap back in 2006. I used one on the last LS swap too. Cheap and easy to configure.
Got the SCG-1 wired up and working. I could not get my phone to take a crisp photos of the displays but they are both nice and clear. The SCG-1 wiring is kinda ridiculous. The manual recommends running it off of a relay which is ok but the thing has 4 subharnesses that all go to the gauge. Major props to the few guys I have seen mount these in a pillar. Figuring out how to run that huge bundle takes patience.
Waiting on a belt and some hose clamps before I can add coolant.
09-19-2015, 02:43 PM
#118
BIG A.
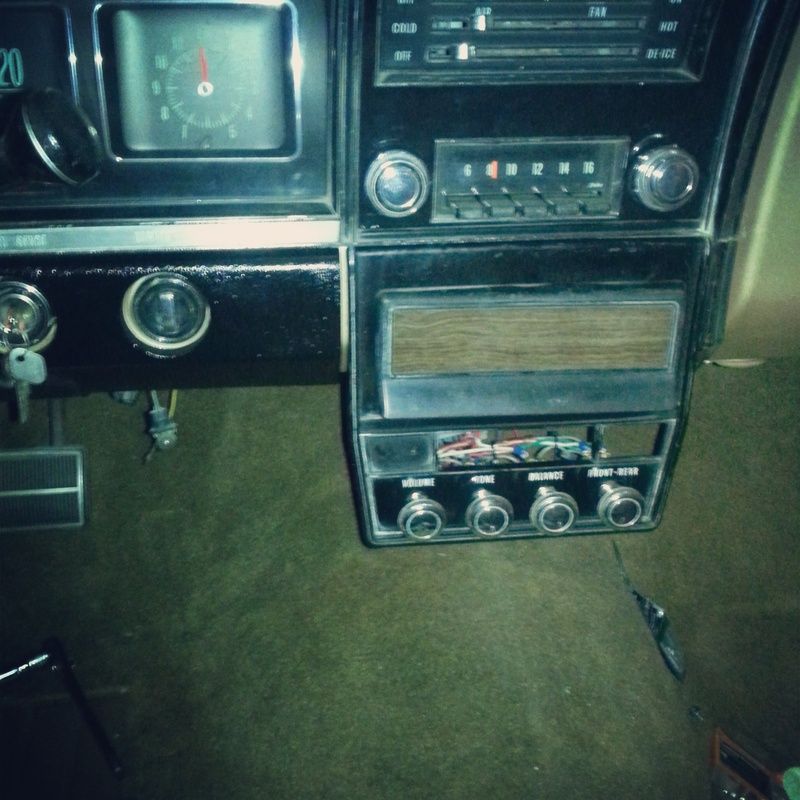
not sure if you would want to add a 8track setup and modify the face for gauges. i have seen them with the red / green interiors but are always black.
would be cool to see one in red with a black face and gauges to match the cluster.
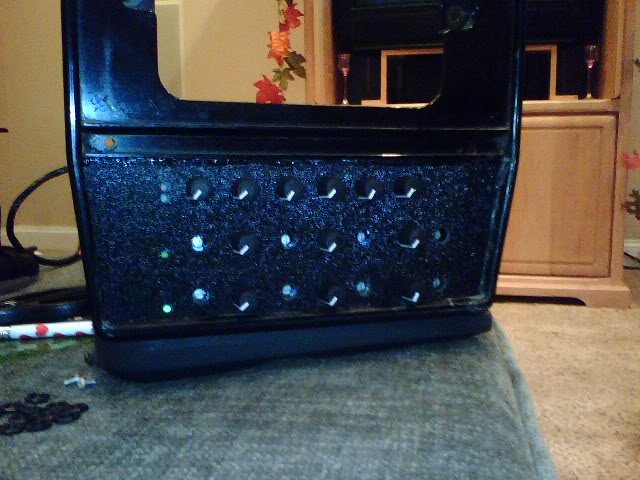
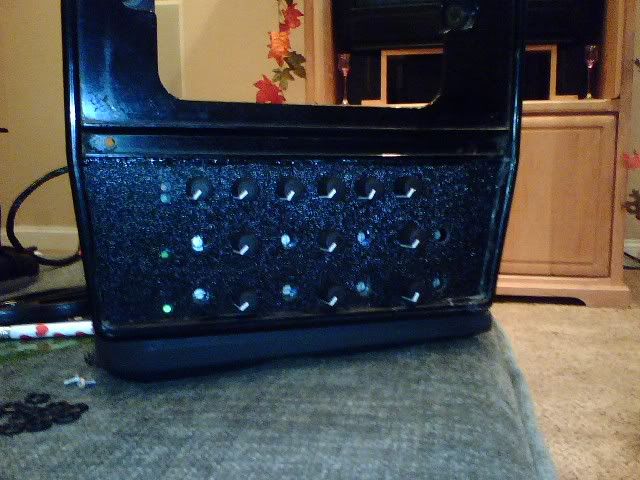
original

modified for my sound processing units
http://www.impalass427.com/72res/MY68WHEEL.jpg
http://www.impalass427.com/72res/68Benchseat.jpg
not sure if you would want to add a 8track setup and modify the face for gauges. i have seen them with the red / green interiors but are always black.
would be cool to see one in red with a black face and gauges to match the cluster.
original

modified for my sound processing units

http://www.impalass427.com/72res/MY68WHEEL.jpg
http://www.impalass427.com/72res/68Benchseat.jpg
09-19-2015, 04:15 PM
#119
BIG A.
not sure if you would want to add a 8track setup and modify the face for gauges. i have seen them with the red / green interiors but are always black.
would be cool to see one in red with a black face and gauges to match the cluster.
original
modified for my sound processing units
http://www.impalass427.com/72res/MY68WHEEL.jpg
http://www.impalass427.com/72res/68Benchseat.jpg
09-19-2015, 09:01 PM
#120

Great work !!!