


LS70SS Build Thread
Thread Starter
Teching In
Joined: Mar 2014
Posts: 35
Likes: 0
Been at this build for a couple months now and thought I would toss up some pics that may be helpful to others. I know I started out looking at a ton of pics and ideas that worked out great on my build thus far...figured I would share.
Started out a 70 Nova SS with a fairly decent Vortec head 350 and a Muncie 4 spd. Car ran pretty hard and was a blast to drive but...I was ready for more power and drivability. I took the plunge. With the help and guidance of HookemDevils...we built the motor while enjoying the car as it was. Once the motor was together, it was time to start the swap. LQ4 block with Ls3 intake and 823 heads. Had the cam custom spec'd through Pat G.(228/234 .626".626") Also swapping to a TKO600 trans
Bare with me as I have never started a thread on here...Ill add pics as I can
Last edited by 70NovaSS; Aug 9, 2015 at 03:10 AM.
Thread Starter
Teching In
Joined: Mar 2014
Posts: 35
Likes: 0
Following Bandits thread, I started working on the subframe notches to run the fbody accessories and clear the low mount alt and (future) a/c. I went in with the idea of 2 separate pieces...bending a piece and keeping it a bit cleaner. Using the 3 pieces was just easier. While I was in the engine bay, I figured that I would work on the seam across the firewall. I wish body work was one of my specialties. This took me a couple tries. Its not perfect but its so much better than the nasty seem in these cars
Thread Starter
Teching In
Joined: Mar 2014
Posts: 35
Likes: 0
For the fuel system, I went with the tanks inc. I wish I would have taken pics as I was cutting down the sending unit and pump stuff. It was fairly easy. Directions are decent but I did have to email them about something on the sending unit. You end up only using one screw instead of 2. This allows you to get down to the length needed. I decided to use the original hardline that follows under the car. I used a compression fitting on each end. I did have to cut back towards the firewall in the front to get it away from the header. As for the rear fitting, its a little close to the exhaust. I figure I will wrap it just to be on the safe side.
Thread Starter
Teching In
Joined: Mar 2014
Posts: 35
Likes: 0
Block is 2003 LQ4. 823 Heads and LS3 intake. The pistons were in great shape so I decided to stick with them for the build. I used the Holley 302-2 oil pan and I couldn't be happier so far. Clearance is spot on all the way around. Headers were a challenge for me. Everything I found online hung way too low for my liking so I decided on the mid length. I have a little concern about clutch linkage and the clearance but Ill deal with that shortly when I get to that point. I wanted to do the 1" setback but as you can see on the steering clearance...that wasn't happening. Oh well
Thread Starter
Teching In
Joined: Mar 2014
Posts: 35
Likes: 0
Now that the LS block has officially touched the subframe...I ordered my new plates.
On to the trans. I was really worried about this part. I figured that I was going to have to do major mods to the trans xmember to get this to fit. I have limited room between the ebrake cable and my exhaust cutouts. Believe it or not, I didn't have to modify a single thing. It bolted right up...WHEW
Since I was going to have to redo the trans tunnel, I pulled all the interior. The trans came through the tunnel a little further than I really expected but it was still doable. Took me a couple tries to get the shape right so my center console would fit over top.
With the tunnel finally welded up, I put down all new Cool-It to help with sound and also this lovely Az heat. Then new carpet. It feels good to get some interior back in the car. Its starting to feel like a car again.
The shifter location is only a couple inches back from the muncie and centered more. I had to modify the top half of the console which was ok because this way I could fill in the old gauge locations while I was at it.
Shifter just came in yesterday so I stuck it on quickly to see how my reach was going to be. On the muncie, I felt that I had to lean forward to put in 3rd. The shifter is a 10" and as of right now(front seats are not bolted yet but close) the reach is perfect and I love the looks of the shifter itself. Console is coming along better than expected, now I need to sand a little and see if I can match old fabric or just start from scratch and get all new.
Trending Topics
LS1 Tech Stories
The Best V8 Stories One Small Block at Time

Topdon ONE vs. Artidiag 800 BT2: Which is the Diagnostic Tablet For You?
Pouria Savadkouei
Gas Monkey Built a 6-Wheel Ferrari Testarossa With a Corvette LT4 Engine
Verdad Gallardo
7 Most Reliable High-Performance Engines GM Has Ever Built
Verdad Gallardo
Amazing '71 Camaro Restomod Is Modern Muscle Car Under the Skin
Verdad Gallardo
6 Common C5 Corvette Failures and What's Involved In Repairing Them
Pouria Savadkouei
Retro Modern Bandit Pontiac Trans AM Comes With Burt Reynolds' Autograph
Verdad Gallardo
Top 10 Greatest Cadillac V Series Performance Models Ever, Ranked
Pouria Savadkouei
Top 10 Most Powerful Chevy Trucks Ever Made!

Hennessey's New Supercharged Silverado ZR2 Has 700 HP
Verdad Gallardo Thread Starter
Teching In
Joined: Mar 2014
Posts: 35
Likes: 0

Got the valley pan on up back together this weekend. Painted the fuel rail black as well. Need to order one more fuel fitting and then make my last line down to the hardline and the fuel side is basically done.
That console looks wicked. I mocked up my ECU last night and cut a hole for the MIL connector; there should be enough meat in the harness to mount it just under the front of the console (where your gauges sat), especially since you don't have to worry about an AC evaporator.
Thread Starter
Teching In
Joined: Mar 2014
Posts: 35
Likes: 0
Got a lil bit of work done today. Prob go back out in the garage a little later. Got the console all sanded down where I glassed it together and also where the gauges and switch were filled in. Now it just needs to be wrapped but I think I am going to wait a little while to make sure I dont need to add any switches or anything to it. I do need to find a spot for line lock again but not quite sure what I wanna do. Also found a spot for the computer to be mounted.
On the motor I mounted the coil packs and also go the heater box cover remounted. It all baby steps but it feel like its on the downhill slope
On the motor I mounted the coil packs and also go the heater box cover remounted. It all baby steps but it feel like its on the downhill slope


Nice project!
I noticed a couple of things you might want to address. First the AN fuel rail adapter looks to be the older Russell fitting with the plastic clip. Get rid of it before it burns your car to the ground. The new Russell fitting is much better and Earl's also makes a very nice adapter with an extra safety clip.
I see your Tanks Inc. tank has the rubber gaskets. Get rid of them as they will swell almost immediately with today's fuel. Tanks Inc sells cork gaskets, get a set, and use Permatex 80019 aviation sealer on both sides of the cork.
Andrew
Thread Starter
Teching In
Joined: Mar 2014
Posts: 35
Likes: 0
I received a response today from tanks inc. and this is what they said..
Hi Jason,
Thank you for your email, we have had better luck with cork. It seems that some fuels on the west coast have caused our rubber gaskets to swell. But this has not been a widespread problem. We did change our gaskets recently to a different grade of rubber that handles a higher alcohol content fuel. So I would suggest either, just a person preference. They both do the job, the biggest hint would be to make sure to use a fuel rated gasket sealer such as Permatex, brand and make sure to only finger tighten the screws.

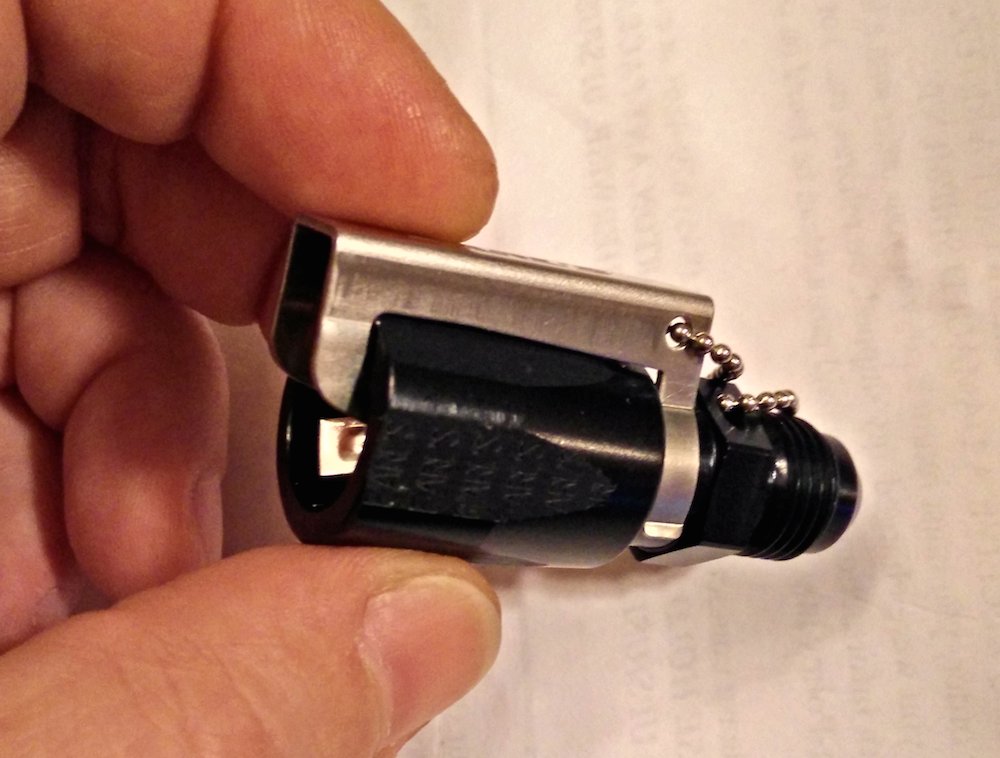
One is the 5/16" the other is 3/8". There is no plastic clip, but instead, the back screws into the housing and retains the fitting firmly.
Here is the Earl's fitting:
It uses internal metal clip to retain the fitting, plus an extra clip over the top. It is only available in 3/8".
Andrew
I received a response today from tanks inc. and this is what they said..
Hi Jason,
Thank you for your email, we have had better luck with cork. It seems that some fuels on the west coast have caused our rubber gaskets to swell. But this has not been a widespread problem. We did change our gaskets recently to a different grade of rubber that handles a higher alcohol content fuel. So I would suggest either, just a person preference. They both do the job, the biggest hint would be to make sure to use a fuel rated gasket sealer such as Permatex, brand and make sure to only finger tighten the screws.
Hi Jason,
Thank you for your email, we have had better luck with cork. It seems that some fuels on the west coast have caused our rubber gaskets to swell. But this has not been a widespread problem. We did change our gaskets recently to a different grade of rubber that handles a higher alcohol content fuel. So I would suggest either, just a person preference. They both do the job, the biggest hint would be to make sure to use a fuel rated gasket sealer such as Permatex, brand and make sure to only finger tighten the screws.
I suppose you can try using the aviation sealer with the rubber gaskets, but just make sure you coat them completely. It'll make a mess, but alcohol cleans up the aviation sealer nicely. I personally ditched the little o-rings on the screws as I did not feel that was a good design. When using o-rings there should be a receiving groove in the plate, but there are none in this case. Instead, I used the aviation sealer directly on the threads of the bolts.
Andrew

Thread Starter
Teching In
Joined: Mar 2014
Posts: 35
Likes: 0
Jason,
I suppose you can try using the aviation sealer with the rubber gaskets, but just make sure you coat them completely. It'll make a mess, but alcohol cleans up the aviation sealer nicely. I personally ditched the little o-rings on the screws as I did not feel that was a good design. When using o-rings there should be a receiving groove in the plate, but there are none in this case. Instead, I used the aviation sealer directly on the threads of the bolts.
Andrew