

LS1 & T56 into a 95 S14


Thread Starter
Teching In
Joined: Nov 2008
Posts: 24
Likes: 0
From: San Antonio, TX
Just finally finishing up my LS1 swap into my 95 240sx. This has been a small project I've been doing on my free time over the past 2 years. I have had a few LS cars over the year so I'm very familiar with the platform.
The car when i got it was in decent shape, no major dents except in the hood and fender which are going to replaced for a Kouki swap eventually. Frame rails were all 100% straight and no rust at all which seems to be a common problem on S13/S14's.
Everything is up and running on the car now, and the tune is scheduled for Monday (12/10) at JMS racing. Hoping to break 400rwhp but we will see.
1995 240SX original Auto Car
Engine:
LS1 (60k miles out of a C5)
F-Body Accessories
LS6 intake manifold
BTR Stage 3 turbo cam 230/235
243 Heads
Speedmaster head studs
Hooker swap mounts
1 7/8 Hooker LS swap 240sx headers
Custom true dual 3 inch exhaust with Vibrant Resonators
Wiring Specialties Harness
Canton Oil pan
Holley EFI fuel rails
Lokar 36 inch throttle cable
8an feed
6an return
Dual intank Walbro 450 (Only one wired for now. Second will be run on a hobbs down the road)
Mishimoto radiator and fans
10an fittings on valve covers to a VTA Catch can
Drivetrain:
Built T56
Megan Coilovers
ACT clutch
Q45 Rear diff (3.69 Gear)
Chase Bays brake lines
Z32 front brakes


While everything was stripped out decided to paint the engine bay. Nardo Grey is the color, and eventually the rest of the car will get the same color.


Rear Subframe pulled out to change to SPL solid rear subframe bushings. Also changed to a Q45 VLSD diff with 3.69 gears using J30 axles.


Not sure how Sikky expects this to fit their clutch master cylinder adapter plate. Just grinded off the edges a little to make it fit. Not exactly thrilled about doing that to something that should be "plug and play".


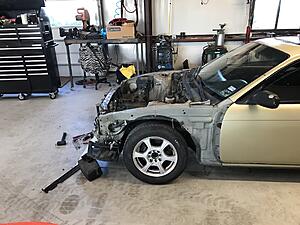
Time to put the motor in, and it fits really nice in the engine bay too.


tapped the top of the water pump for the steam port.

Mishimoto radiator and fans work perfect, haven't had any cooling issues yet.

Wiring Specialties Harness was a super easy install and everything works as it should. Quality was really good also.


3 inch dual exhaust made using Vibrant resonators as mufflers.

Testing fitting my drag radials, hopefully get some 1/4 mile passes soon.

Time to put the interior all back together now.

Used a Coverlay on the dash to cover the cracks, and can barely notice its there.

Found out the car had a alarm, so i decided to get rid of it and clean up all the wiring for it.


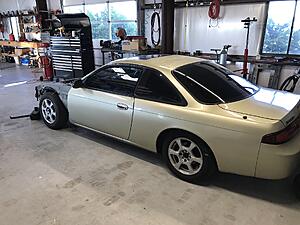
And now to reassemble the rest of the car.


It's not the prettiest right now, but I'll eventually work on doing the Kouki conversion and paint. I just want to enjoy it for a little bit first.
The car when i got it was in decent shape, no major dents except in the hood and fender which are going to replaced for a Kouki swap eventually. Frame rails were all 100% straight and no rust at all which seems to be a common problem on S13/S14's.
Everything is up and running on the car now, and the tune is scheduled for Monday (12/10) at JMS racing. Hoping to break 400rwhp but we will see.
1995 240SX original Auto Car
Engine:
LS1 (60k miles out of a C5)
F-Body Accessories
LS6 intake manifold
BTR Stage 3 turbo cam 230/235
243 Heads
Speedmaster head studs
Hooker swap mounts
1 7/8 Hooker LS swap 240sx headers
Custom true dual 3 inch exhaust with Vibrant Resonators
Wiring Specialties Harness
Canton Oil pan
Holley EFI fuel rails
Lokar 36 inch throttle cable
8an feed
6an return
Dual intank Walbro 450 (Only one wired for now. Second will be run on a hobbs down the road)
Mishimoto radiator and fans
10an fittings on valve covers to a VTA Catch can
Drivetrain:
Built T56
Megan Coilovers
ACT clutch
Q45 Rear diff (3.69 Gear)
Chase Bays brake lines
Z32 front brakes


While everything was stripped out decided to paint the engine bay. Nardo Grey is the color, and eventually the rest of the car will get the same color.


Rear Subframe pulled out to change to SPL solid rear subframe bushings. Also changed to a Q45 VLSD diff with 3.69 gears using J30 axles.


Not sure how Sikky expects this to fit their clutch master cylinder adapter plate. Just grinded off the edges a little to make it fit. Not exactly thrilled about doing that to something that should be "plug and play".


Time to put the motor in, and it fits really nice in the engine bay too.


tapped the top of the water pump for the steam port.

Mishimoto radiator and fans work perfect, haven't had any cooling issues yet.

Wiring Specialties Harness was a super easy install and everything works as it should. Quality was really good also.


3 inch dual exhaust made using Vibrant resonators as mufflers.

Testing fitting my drag radials, hopefully get some 1/4 mile passes soon.

Time to put the interior all back together now.

Used a Coverlay on the dash to cover the cracks, and can barely notice its there.

Found out the car had a alarm, so i decided to get rid of it and clean up all the wiring for it.


And now to reassemble the rest of the car.


It's not the prettiest right now, but I'll eventually work on doing the Kouki conversion and paint. I just want to enjoy it for a little bit first.


clean swap! cant wait to see the kouki conversion, probably my favorite s chassis front end. I'd love to build an ls swapped s chassis someday, but need more than a 1 car garage space which is already taken up by my Camaro.
Thread Starter
Teching In
Joined: Nov 2008
Posts: 24
Likes: 0
From: San Antonio, TX
Yeah same for me, the Kouki has got to be my favorite S chassis front end.


Thread Starter
Teching In
Joined: Nov 2008
Posts: 24
Likes: 0
From: San Antonio, TX
Thanks, i tried to tuck everything as best as i could. The car's exterior will probably stay like this for a while as I'm going to keep it "sleeper" until i gather everything needed for the front end.
Thread Starter
Teching In
Joined: Nov 2008
Posts: 24
Likes: 0
From: San Antonio, TX
Car made 425rwhp on the dyno which is a dynojet, I'm going to try and get the dyno sheet but we didn't get a torque reading since the RPM pickup went out.
Went to drive it the other day and the fuel pressure dropped to 20lbs leaving my house, still investigating as to why that is happening, seems to be something inside the tank.
Also having a problem with the clutch not fully disengaging. Getting locked out at high RPM and i noticed that when i rev it up to 5k rpm while the clutch is in and in 1st gear the car will creep forward a little bit.


Andrew
Trending Topics
Thread Starter
Teching In
Joined: Nov 2008
Posts: 24
Likes: 0
From: San Antonio, TX
Thread Starter
Teching In
Joined: Nov 2008
Posts: 24
Likes: 0
From: San Antonio, TX
Found out my fuel pressure problem, One of the fuel lines inside the gas tank came loose. Got everything put back on and it runs normal again.
Here are some videos of the car i finally got around to uploading.
Here are some videos of the car i finally got around to uploading.
Thread Starter
Teching In
Joined: Nov 2008
Posts: 24
Likes: 0
From: San Antonio, TX
Replaced the Master Cylinder with Willwood 260-1304 and it is still doing the same thing. At about 4,500-5,000 RPM the car will move forward. Next step is going to be pulling the trans and replacing the Slave Cylinder and measuring to see if I need shims or not.

On The Tree
Joined: Dec 2013
Posts: 182
Likes: 11
From: North Vanacouver , BC
Lol I have had that happen to me , car would start then die if you gave it any gas .
Thread Starter
Teching In
Joined: Nov 2008
Posts: 24
Likes: 0
From: San Antonio, TX
After looking it over again today I noticed my master cylinder had a lot of flex in it when the clutch pedal is depressed. Maybe that could be the problem?
Here's a video showing the amount its flexing.
Here's a video showing the amount its flexing.
Yeah, that is unacceptable amount of flexing. I would reinforce the mounting location and I bet your problems go away. The flexing will also eventually fatigue the metal and start cracking.
Andrew
Andrew
Thread Starter
Teching In
Joined: Nov 2008
Posts: 24
Likes: 0
From: San Antonio, TX
After investigating farther of why my MC flexes so much i found how that my clutch pedal hole is probably drilled out too much. The previous owner decided to drill one of the clutch pedal holes out to run alarm system wiring through and did it very crooked. Now I'm stuck with a hole too big and that is causing the clutch pedal studs to move around when pushed in. Not sure what to do from here to fix it.


Thread Starter
Teching In
Joined: Nov 2008
Posts: 24
Likes: 0
From: San Antonio, TX
Drill the odd holes with a stepped bit to make them nice and of a known size. Make a plate for the backside that has bushing to match the studs and the new holes.
Andrew
Andrew


