

1968 Camaro Resto-mod LS3/6 speed; Project Penny Pincher
 09-28-2021, 09:09 AM
#201


Agreed. Your more worried about engine noises and such. I really dig having your son work on the car. Cute kid and pic.
jim
jim

The following users liked this post:
G Atsma (09-28-2021)
09-28-2021, 10:14 AM
#202
TECH Senior Member

Just Isn't there a bolt in the spring that seats in a hole on the mounting bracket, to prevent what happened? Just curious....
10-04-2021, 07:55 AM
#203
TECH Fanatic
Thread Starter
iTrader: (27)

I've been looking to update my seats for a long time, but have been getting along find with the stock 53 year old seats for 5 years now. I guess the biggest reason for me keeping the seats (other than my budget), is that the seats were born with this car. They are far from perfect, but are in much better shape than most after that long. That said, I had been thinking of updating my seats recently and sent a message to my buddy Don. He has a 1967 Camaro that he pulled these out of in favor of some dedicated racing seats since his car is more oriented towards Auto X. He gave me a deal on the seats, first gen brackets and a matching rear seat cover. He lives a little over 2 hours from me, but he was going to be at an AutoX event this past weekend and said he'd bring them along. I was considering going to the event anyway, so it was a great opportunity to take the car out and the weather was a beautiful upstate, NY fall day. Changing leaves and all. Unfortunately I didn't grab any pictures...
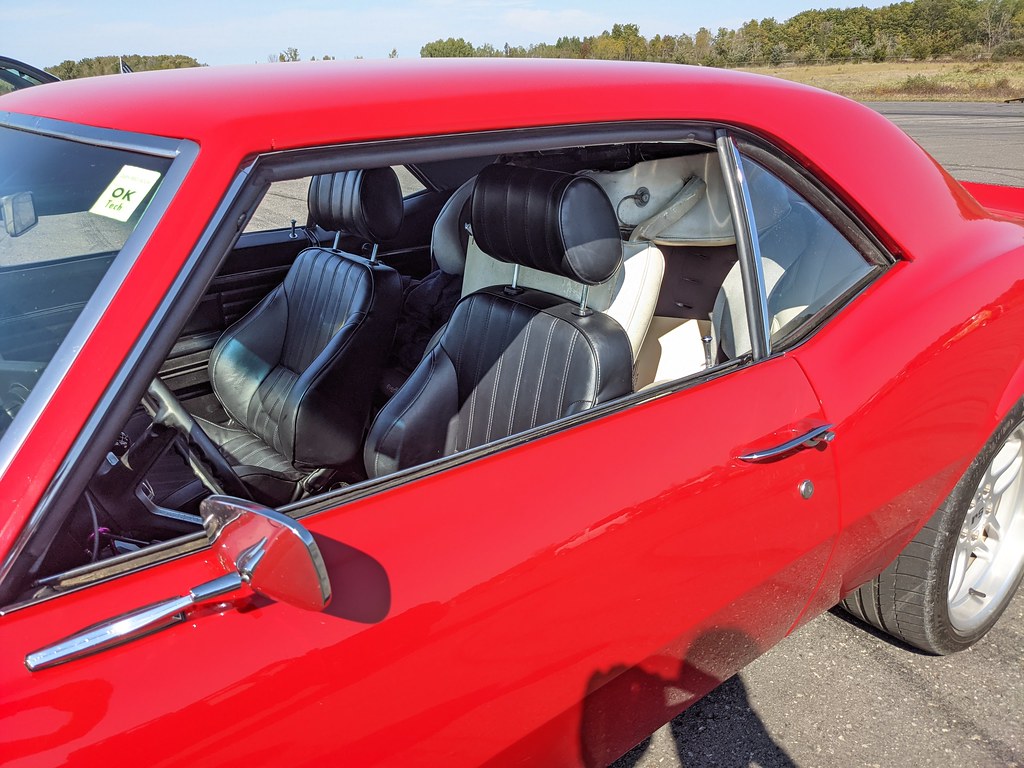
Anyway, drove up to the event and swapped the seats right in the parking lot haha. My brother-in-law rode up with me and we had them swapped out in about 20 mins. Got to watch Don and the others race a few times and then hit the road back home. Next year I'll get my car out to an event. It took me most of the summer to dial in the car, but it will be ready for next year. Here's the car loaded up with the new seats installed and the old seats in the back. Driver's seat fit in the trunk and the passenger had to go behind my seat.
We had a great ride home, but after I filled up I smelled some raw gas. I didn't think much of it because I had done a few hard accelerations and figured it was coming out of the filler neck or something. But then we got about 20 mins from home and it got interesting. Was cruising along, then all of a sudden my wideband started flashing yellow/red on my 3.5" screen and it died. Tried cranking it over and nothing. Fuel pressure is only reading about 15 psi?? I got the car pulled over to the side of the road then after a little troubleshooting, I tried it again and it went right back to 43psi where I have it tuned for. That was strange??
Ran fine, but I went easy on it. Then after I dropped off my BOL, I was about a mile from the house and it got bad. It would only build about 10-25 psi, and wouldn't stay consistent. I was thankfully able to limp the car home. I haven't had time to diagnose the issue, but I'm leaning towards bad fuel pumps or possibly a cracked fuel fitting on the assembly which is very common on the CTS-V pumps. I'm not happy about the fueling issue, but I will say that without the Terminator X system I would have had to get a tow truck. What is simply amazing about this system is because of the learning features, it added 50% fuel across my fuel tables which enabled the car to run enough to get me home. I was already thrilled with the ECU/software already, but for me this was just amazing. I can only imagine the many other situations where this system could save engines by it's learning capabilities.
After I got home, I unloaded the car and then grabbed some pictures of the seats. I'm in love with them, and they look right at home. Love the bolstering and how much more connected I feel to the car. You feel so much more planted and even the clutch engagement feels more solid now. Very pleased! Thanks Don.

I need to do a little tweaking on the seats because they seem to be interfering with my seat belt retractor. I had to pop off the little covers so that I could get them to fit and slide without hitting. I'll address that soon.


The other big win is that the seats allow me to have more leg room, while keeping my son's seat at the same location! I think that if I could find a different car seat for him, we would both be much more comfortable.

I need to dig into the issue with the fuel pump because I'd really like to do so cruising this fall. I hooked up the heater in the car this spring so that I could drive it later into the fall! I'm hoping it is a simple fix, but we will have to see.
Cheers,
Ryan
Anyway, drove up to the event and swapped the seats right in the parking lot haha. My brother-in-law rode up with me and we had them swapped out in about 20 mins. Got to watch Don and the others race a few times and then hit the road back home. Next year I'll get my car out to an event. It took me most of the summer to dial in the car, but it will be ready for next year. Here's the car loaded up with the new seats installed and the old seats in the back. Driver's seat fit in the trunk and the passenger had to go behind my seat.
We had a great ride home, but after I filled up I smelled some raw gas. I didn't think much of it because I had done a few hard accelerations and figured it was coming out of the filler neck or something. But then we got about 20 mins from home and it got interesting. Was cruising along, then all of a sudden my wideband started flashing yellow/red on my 3.5" screen and it died. Tried cranking it over and nothing. Fuel pressure is only reading about 15 psi?? I got the car pulled over to the side of the road then after a little troubleshooting, I tried it again and it went right back to 43psi where I have it tuned for. That was strange??
Ran fine, but I went easy on it. Then after I dropped off my BOL, I was about a mile from the house and it got bad. It would only build about 10-25 psi, and wouldn't stay consistent. I was thankfully able to limp the car home. I haven't had time to diagnose the issue, but I'm leaning towards bad fuel pumps or possibly a cracked fuel fitting on the assembly which is very common on the CTS-V pumps. I'm not happy about the fueling issue, but I will say that without the Terminator X system I would have had to get a tow truck. What is simply amazing about this system is because of the learning features, it added 50% fuel across my fuel tables which enabled the car to run enough to get me home. I was already thrilled with the ECU/software already, but for me this was just amazing. I can only imagine the many other situations where this system could save engines by it's learning capabilities.
After I got home, I unloaded the car and then grabbed some pictures of the seats. I'm in love with them, and they look right at home. Love the bolstering and how much more connected I feel to the car. You feel so much more planted and even the clutch engagement feels more solid now. Very pleased! Thanks Don.
I need to do a little tweaking on the seats because they seem to be interfering with my seat belt retractor. I had to pop off the little covers so that I could get them to fit and slide without hitting. I'll address that soon.
The other big win is that the seats allow me to have more leg room, while keeping my son's seat at the same location! I think that if I could find a different car seat for him, we would both be much more comfortable.
I need to dig into the issue with the fuel pump because I'd really like to do so cruising this fall. I hooked up the heater in the car this spring so that I could drive it later into the fall! I'm hoping it is a simple fix, but we will have to see.
Cheers,
Ryan
10-04-2021, 02:12 PM
#205
Rye guy,
I thought Terminator X used the standard LS 58 PSI fuel pressure ? Do you have a option within the tables? I haven�t even looked at my Xmas yet.
im digging the seats. Great find
I thought Terminator X used the standard LS 58 PSI fuel pressure ? Do you have a option within the tables? I haven�t even looked at my Xmas yet.
im digging the seats. Great find
10-04-2021, 02:22 PM
#206
TECH Fanatic
Thread Starter
iTrader: (27)
Hey Clint, I'll look into that, but I also want to check to see if there is some adjustment that I may be able to make in the seats themselves first. I'll have to pull one of the seats, but I'll be that I can loosen everything and shift both towards the center of the car to gain 1/2". If not, I may need to slot the mounts or something.
Jim, all stock LS motors run at 58psi, but since I'm running 95lb injectors and I wasn't going to need the duty cycle yet, I opted to run at 43psi and tuned my VE tables accordingly. There is an option in the software that you can change your operating PSI, which I've done. I have the larger injectors so that if/when I can find an e85 station near me, I can run it without running out of injector. At that point I'll bump my operating pressure back to 58 psi.
Jim, all stock LS motors run at 58psi, but since I'm running 95lb injectors and I wasn't going to need the duty cycle yet, I opted to run at 43psi and tuned my VE tables accordingly. There is an option in the software that you can change your operating PSI, which I've done. I have the larger injectors so that if/when I can find an e85 station near me, I can run it without running out of injector. At that point I'll bump my operating pressure back to 58 psi.
10-06-2021, 04:51 AM
#208
Rye guy,
ok. That makes perfect sense. It�s really nice you can do that with the cheaper priced Terminator X stuff.
ok. That makes perfect sense. It�s really nice you can do that with the cheaper priced Terminator X stuff.
10-07-2021, 09:35 PM
#209

Can count on one hand how many sheared bolts I've seen. Easily replaceable.
The following users liked this post:
G Atsma (10-07-2021)
10-11-2021, 07:53 AM
#211
TECH Fanatic
Thread Starter
iTrader: (27)
I was told by Hotckhis that they recommend a Grade 8 3/8 x 2" bolt. So I got some new hardware and will be pulling it apart to investigate shortly.
Cramer, the seats are aftermarket. Procar Rally seats made by Scat. I wished that I had a little more seat time in them before my fuel pump issues. Hopefully I'll have an update for that by this weekend.
Cramer, the seats are aftermarket. Procar Rally seats made by Scat. I wished that I had a little more seat time in them before my fuel pump issues. Hopefully I'll have an update for that by this weekend.
The following users liked this post:
G Atsma (10-11-2021)
10-25-2021, 09:01 AM
#212
TECH Fanatic
Thread Starter
iTrader: (27)
It's been a little bit since my last update. I haven't been able to drive the car because of the fuel issue. After further investigation, I determined that unfortunately the fuel pump outlet has some micro-cracks and is weeping fuel. So that explains why I was losing pressure and got a slight gas smell after I drove the car and parked it in the garage.
It was really hard to capture in a picture, but there are a few hairline cracks on the top. The real issue I found later on though.

Rather than buying a whole new fuel pump assembly for $1k+, I opted to buy an ALM Performance replacement hat that is machined from billet aluminum and comes with a full flow -6AN fitting. It was a little pricey, but much cheaper than buying a whole new pump. It's a shame that it will be hidden under the car too. I'll have to open up my hatch from time to time and look at it.


Speaking of the fuel pump hatch, I'm SOO glad that I installed that hatch now. It was incredibly easy to remove the fuel pump. A few wiring connections, the fuel line, locking ring and it popped right out. Took me less than 3 minutes.

In order to remove the hat, you have to pop out these little c-clips. I made a little hook on the end of a piece of mechanics wire to grab and pop them off.

Pulled it all apart and cut the stock hose off.


Then to get to the other side of the hose, I had to pull apart the assembly. Started with a few little clips that retain the pumps to the bucket.

Popped off this hose.

Had to carefully pull up on this piece. There's an o-ring that seals it together tightly, so it took a little effort to pop off.

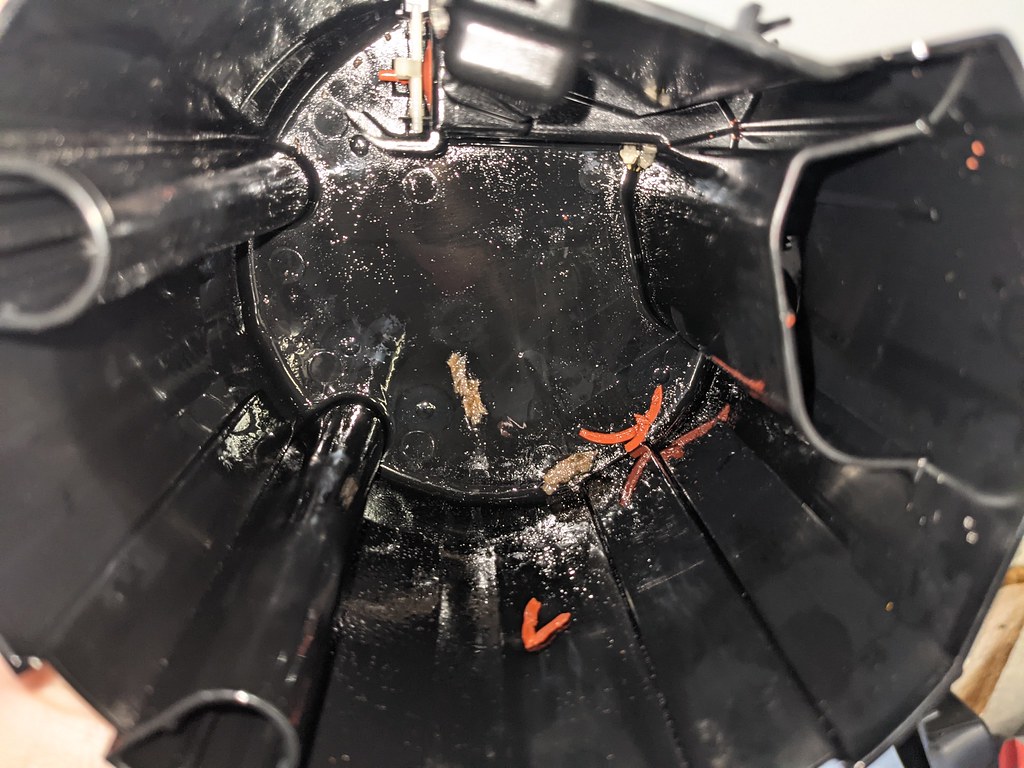
Then here's where I found the real issue with my fuel pressure. When I removed the fuel pumps, I found this junk in the bottom of the fuel bucket! Looks like a rubber band and some cardboard remnants! Upon further investigation, there was a piece even wedged in the pump inlet at the bottom of the fuel bucket!

To top that off, the fuel pump sock was disgusting. There were little bits of that cardboard among other junk. It was a used pump and I could blame the guy I bought it from, but he gave me a great price on it because it was in unknown condition. It's on me for not inspecting it more closely. There is also the possibility that the cardboard could have fallen into my tank at some point. regardless, I'm glad I found this out now before I grenaded my motor.

Huge shout out to Carl with Vaporworx! I had mentioned to him the issues with fueling that I was having and he offered to test out my module at no charge. It fit in my timeframe and he turned it around within 24 hours. It was back to me within a week, so I'm very grateful for that. Then to top it off, when I found this fuel sock I wasn't able to find a replacement. He had one in stock and got it shipped to me right away! I had it in a few days and it got me back together. If you need anything fuel related, go to Carl!


It was really hard to capture in a picture, but there are a few hairline cracks on the top. The real issue I found later on though.
Rather than buying a whole new fuel pump assembly for $1k+, I opted to buy an ALM Performance replacement hat that is machined from billet aluminum and comes with a full flow -6AN fitting. It was a little pricey, but much cheaper than buying a whole new pump. It's a shame that it will be hidden under the car too. I'll have to open up my hatch from time to time and look at it.
Speaking of the fuel pump hatch, I'm SOO glad that I installed that hatch now. It was incredibly easy to remove the fuel pump. A few wiring connections, the fuel line, locking ring and it popped right out. Took me less than 3 minutes.
In order to remove the hat, you have to pop out these little c-clips. I made a little hook on the end of a piece of mechanics wire to grab and pop them off.
Pulled it all apart and cut the stock hose off.
Then to get to the other side of the hose, I had to pull apart the assembly. Started with a few little clips that retain the pumps to the bucket.
Popped off this hose.
Had to carefully pull up on this piece. There's an o-ring that seals it together tightly, so it took a little effort to pop off.
Then here's where I found the real issue with my fuel pressure. When I removed the fuel pumps, I found this junk in the bottom of the fuel bucket! Looks like a rubber band and some cardboard remnants! Upon further investigation, there was a piece even wedged in the pump inlet at the bottom of the fuel bucket!
To top that off, the fuel pump sock was disgusting. There were little bits of that cardboard among other junk. It was a used pump and I could blame the guy I bought it from, but he gave me a great price on it because it was in unknown condition. It's on me for not inspecting it more closely. There is also the possibility that the cardboard could have fallen into my tank at some point. regardless, I'm glad I found this out now before I grenaded my motor.
Huge shout out to Carl with Vaporworx! I had mentioned to him the issues with fueling that I was having and he offered to test out my module at no charge. It fit in my timeframe and he turned it around within 24 hours. It was back to me within a week, so I'm very grateful for that. Then to top it off, when I found this fuel sock I wasn't able to find a replacement. He had one in stock and got it shipped to me right away! I had it in a few days and it got me back together. If you need anything fuel related, go to Carl!
10-25-2021, 10:03 AM
#213
TECH Senior Member
Wow, Ryeguy, nice lesson in fuelpumpology! lol. I, and I hope others, got educated!
And yeah, Carl Casanova is an asset to the automotive aftermarket! Kudos!
And yeah, Carl Casanova is an asset to the automotive aftermarket! Kudos!
The following users liked this post:
Jimbo1367 (10-26-2021)
10-25-2021, 10:08 AM
#214
TECH Fanatic
Thread Starter
iTrader: (27)
After I replaced the fuel sock with the new one, I moved on to installing the new fuel hose provided with the kit. I carefully sliced the old hose with a fresh razor blade and it split right open.


Clamp down the hose tightly. I happen to have a pair of the crimpers that are made for these style clamps. (I'll edit this in the future, but I'm having a fuel pressure drop at WOT that I think is from not clamping this hard enough. Will update when I find a solution)

Then I moved on to installing the new hat. It is installed in the reverse of how it was disassembled. I had to pop in those little c-clips into the guide rod, put the pump assembly back into the fuel bucket and the springs into the pocket of the bucket.


There are also a few wiring components that need to be de-pinned and put into new connectors. They are all provided with the kit.

One thing I didn't like was that this connector is bulkier and to get full compression needs to sit outside the bucket. It's not a "problem" since you can remove and install it like this, but worth noting.

Now I have a complete assembly again with much better fuel fittings. The full flow fittings should allow the pumps to flow fuel more easily so in theory should be easier on the pumps and potentially more at full duty cycle. I also measured the new outlet just for fun and it is substantially larger. By my calculations it's roughly 37% larger ID.


Next up was reinstalling the pump. I grabbed a cheap pump ring installation tool on Amazon and this is well worth the money. I popped it on and it clicked right into the slot easily with my breaker bar.

The last thing that needed to be done was swapping over the connect for the pumps. Because the mating connector for the fuel pump side isn't made, it is necessary to de-pin and reassemble using the new connector.

Good news is I was able to get in the car and after a few cycles of the fuel pump I had full pressure again. Fired up the car and had full fuel pressure! Took the car out for a spin and it performed flawlessly. What better way to break in a new fuel pump than a 2nd gear rolling burnout?
I didn't get any pictures but last night I finally got around to wiring up the manifold referenced signals to the PressureWorx module. I'm hoping to get out tonight and test it out. Should provide more fuel pressure as the boost increases. Should ensure I have no fueling issues up top. I got lazy. I ran the wires front to rear, but never took the time to hook them up. I also extended the wires for my flex fuel connector, connected it and ran it into the car. Now let's see how long it takes me to actually hook it up haha. The closest e85 station to me is about 45 mins so I'm not in a huge rush to finish the install.
Cheers,
Ryan
Clamp down the hose tightly. I happen to have a pair of the crimpers that are made for these style clamps. (I'll edit this in the future, but I'm having a fuel pressure drop at WOT that I think is from not clamping this hard enough. Will update when I find a solution)
Then I moved on to installing the new hat. It is installed in the reverse of how it was disassembled. I had to pop in those little c-clips into the guide rod, put the pump assembly back into the fuel bucket and the springs into the pocket of the bucket.
There are also a few wiring components that need to be de-pinned and put into new connectors. They are all provided with the kit.
One thing I didn't like was that this connector is bulkier and to get full compression needs to sit outside the bucket. It's not a "problem" since you can remove and install it like this, but worth noting.
Now I have a complete assembly again with much better fuel fittings. The full flow fittings should allow the pumps to flow fuel more easily so in theory should be easier on the pumps and potentially more at full duty cycle. I also measured the new outlet just for fun and it is substantially larger. By my calculations it's roughly 37% larger ID.
Next up was reinstalling the pump. I grabbed a cheap pump ring installation tool on Amazon and this is well worth the money. I popped it on and it clicked right into the slot easily with my breaker bar.
The last thing that needed to be done was swapping over the connect for the pumps. Because the mating connector for the fuel pump side isn't made, it is necessary to de-pin and reassemble using the new connector.
Good news is I was able to get in the car and after a few cycles of the fuel pump I had full pressure again. Fired up the car and had full fuel pressure! Took the car out for a spin and it performed flawlessly. What better way to break in a new fuel pump than a 2nd gear rolling burnout?
I didn't get any pictures but last night I finally got around to wiring up the manifold referenced signals to the PressureWorx module. I'm hoping to get out tonight and test it out. Should provide more fuel pressure as the boost increases. Should ensure I have no fueling issues up top. I got lazy. I ran the wires front to rear, but never took the time to hook them up. I also extended the wires for my flex fuel connector, connected it and ran it into the car. Now let's see how long it takes me to actually hook it up haha. The closest e85 station to me is about 45 mins so I'm not in a huge rush to finish the install.
Cheers,
Ryan
The following users liked this post:
G Atsma (10-25-2021)
10-25-2021, 10:14 AM
#215
TECH Fanatic
Thread Starter
iTrader: (27)
Oh and for those who are interested. Here is a picture of my fuel learn table after I drove home with the low fuel pressure. It added fuel where I was trying to keep the car running. This is an important thing to remember when you have the EFI systems that have learning capabilities. I made sure to reset the table and reflashed it back to my ECU, because if not it would be adding all that fuel and be wayyy rich. It would have probably fouled plugs and generally been bad for the motor. Similar issues happen to guys when the wideband O2 fails. When you install the new part you have to remember to reset the fuel learn tables.

The following 2 users liked this post by ryeguy2006a:
G Atsma (10-25-2021), Project GatTagO (07-03-2023)
10-26-2021, 03:34 AM
#216
Great update Ryan
you should be getting pretty good navigating the Terminator X system by now.
you should be getting pretty good navigating the Terminator X system by now.
Last edited by Jimbo1367; 10-26-2021 at 04:40 AM.
10-26-2021, 04:36 PM
#217
Then here's where I found the real issue with my fuel pressure. When I removed the fuel pumps, I found this junk in the bottom of the fuel bucket! Looks like a rubber band and some cardboard remnants! Upon further investigation, there was a piece even wedged in the pump inlet at the bottom of the fuel bucket!
10-27-2021, 07:11 AM
#218
The following users liked this post:
Jimbo1367 (10-27-2021)
10-27-2021, 09:07 AM
#219
Ryan,
is that a CTSV pump? Are they the refit for a 5Gen?
thanks
jiimbo
is that a CTSV pump? Are they the refit for a 5Gen?
thanks
jiimbo
10-27-2021, 09:25 AM
#220
TECH Fanatic
Thread Starter
iTrader: (27)
Hey Jim,
Yes, I'm running a CTS-V pump which is a great unit. It has twin 190LPH pumps and I believe is rated for 750-800 HP on pump gas. The fuel pumps use the same common USCAR design which has the same diameter so they are interchangeable, but the fuel outlet on the hat is clocked differently and I believe the centering tab is different as well. I had to trim my tab on the top so that I could clock it in my Rick's Tank.
Yes, I'm running a CTS-V pump which is a great unit. It has twin 190LPH pumps and I believe is rated for 750-800 HP on pump gas. The fuel pumps use the same common USCAR design which has the same diameter so they are interchangeable, but the fuel outlet on the hat is clocked differently and I believe the centering tab is different as well. I had to trim my tab on the top so that I could clock it in my Rick's Tank.