

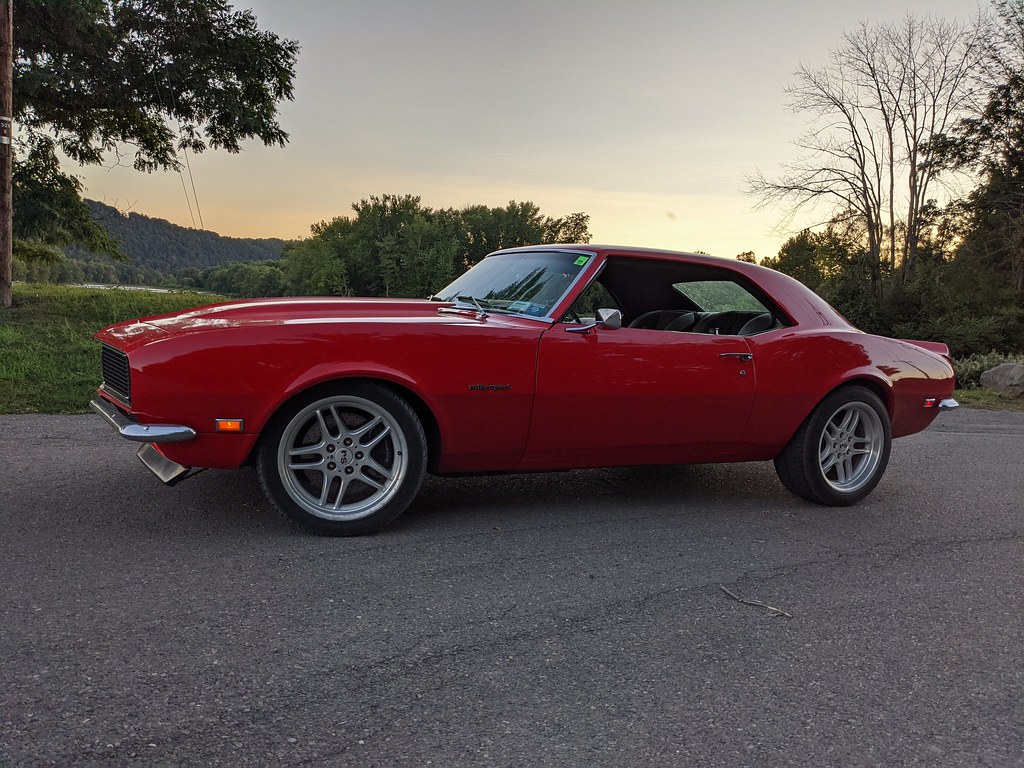
1968 Camaro Resto-mod LS3/6 speed; Project Penny Pincher
 01-07-2021, 02:23 PM
#1
TECH Fanatic
Thread Starter
iTrader: (27)


Hey LS1tech,
I haven't posted my build here before, but I was inspired by Andrew's V3 build. I'm not going to post the whole build, but will post a link to the build from the beginning. I'm going to post this retroactive from the fall when I sold my LS1/T56 in favor of building up an L92 and TR6060. Here goes nothing. I'll copy and paste my posts over here to bring me up to current day.
Hopefully the mods don't mind that I'm linking to another site. IF so I'll remove it, but here it is from Day 1 https://www.pro-touring.com/threads/...-Penny-Pincher
Thanks for looking.
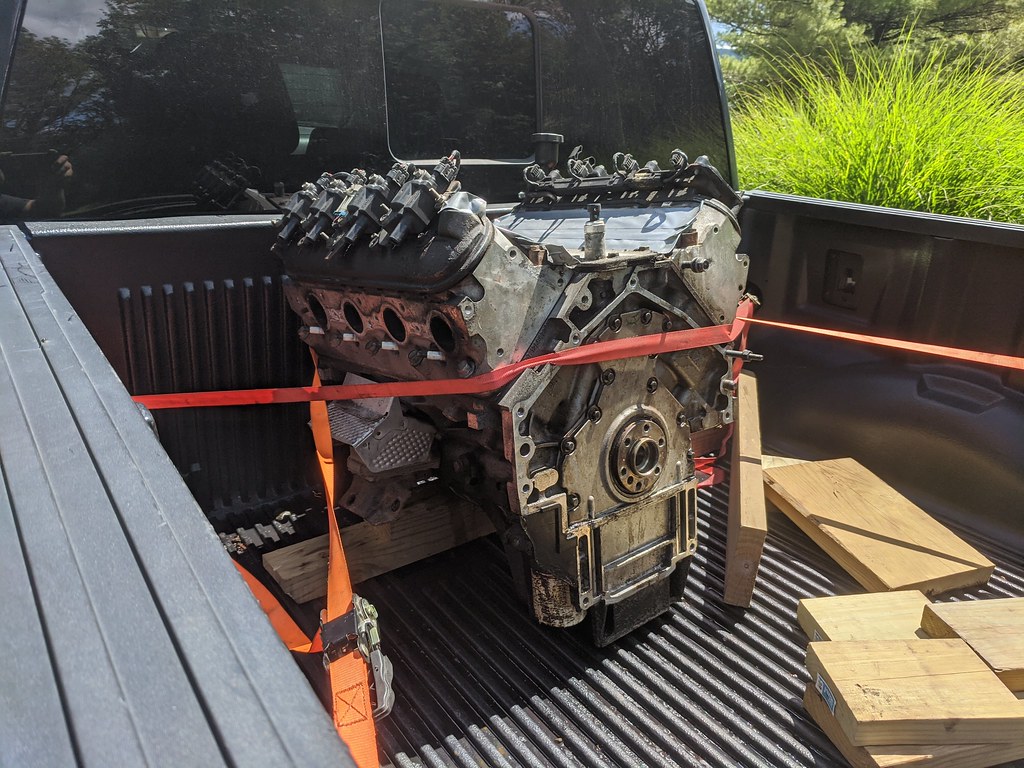
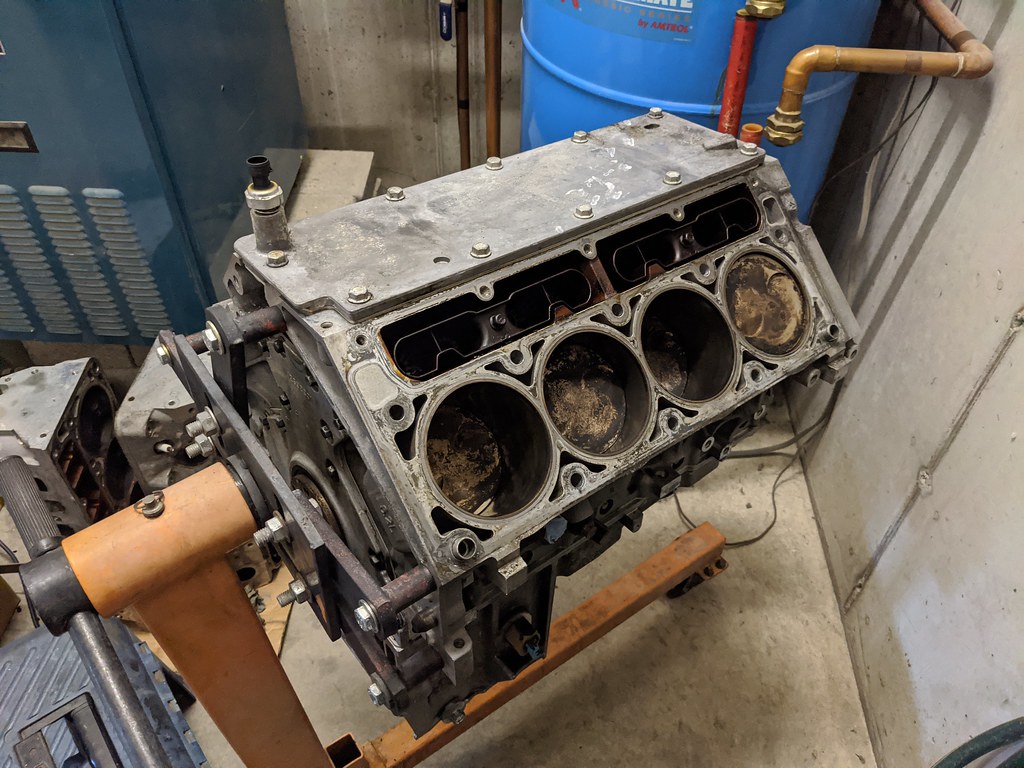
I had a buddy of mine pick up a 07 Denali several months ago, and I called dibs on the 6.2 L92. I've been keeping my eyes out for one for a while since I've really always wanted at least a 6.2 for this car. He gave me a great deal on the long block and I finally picked it up last week. There was some strange issue with the title of the truck which is the reason that it was being parted out, so the engine is in great shape and running the day that he pulled it over to his garage to pull the motor. He said he spun 3 of the 4 tires when he drove it over and was quite impressed with the power it made stock.
I'm planning to disassemble the motor down to the short block, check everything out and replace everything other than the block, covers and rotating assembly. I'm planning on deleting VVT with a stage 3 cam, LS7 lifters, new oil pump, new timing chain, and etc. for the short block. For the heads, I'm running a pair of LS3 821 heads I picked up a while ago and doing some light porting on the exhaust side and possibly some bowl clean up, but nothing crazy. I'll be leaving the intake runners completely stock. I'm in the process of cleaning up the FAST 102 intake I picked up and will be getting a set of LS9 injectors to top off that package. While I have the intake separated, I'm planning on assessing the ports for any potential light matching they would require, but again nothing crazy.
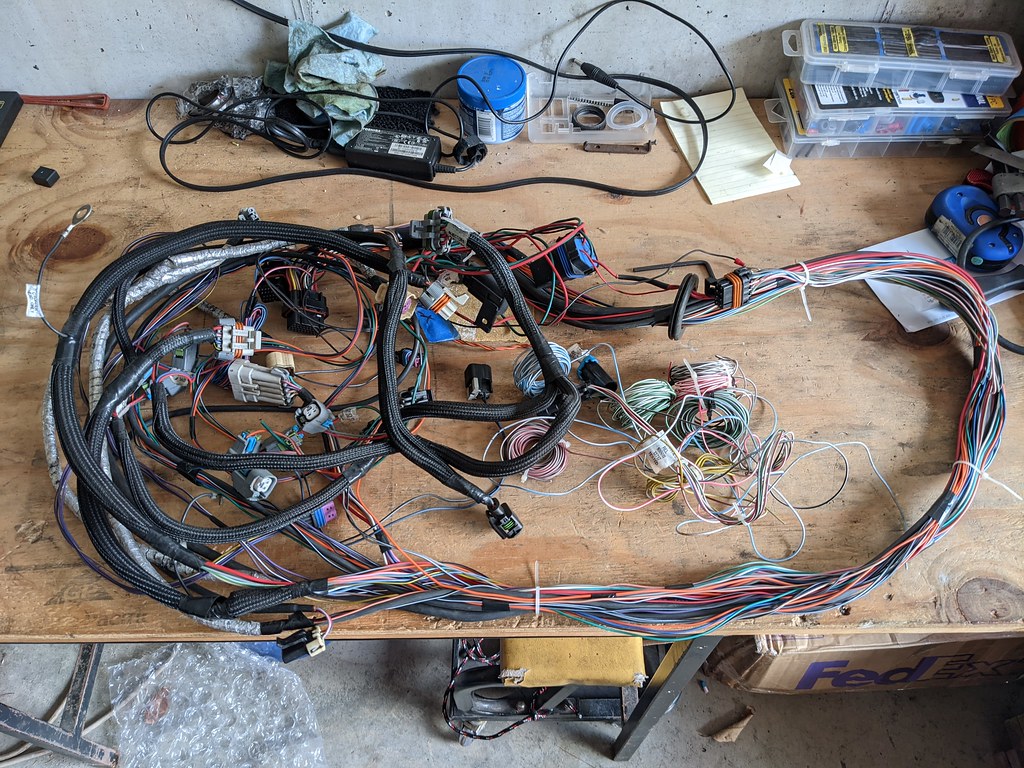
One of the great things about the Terminator X EFI is I can simply change a few boxes and convert from 24x/1x signals to 58x/4x signals for the crank/cam. It's really that simple for the tune. Now on the harness side I am deciding now if I want to modify the one wire in the harness to give the crank/cam sensors the gen4 5v rather than the 12v signal in the gen3 sensors. The other possibility is just selling my harness/ecu outright and purchasing the same thing, but set up for the LS3 style injectors and crank/cam voltage. I'm really leaning toward just modifying what I have since it was a PITA to install in the first place. Time will tell though.
Day I brought it home.
First step was cleaning up the short block. I sprayed it multiple times with oven cleaner and used the power washer to get the bulk of it off. Overall I'm pretty happy with the way that it's cleaning up. I'm debating on whether or not to clean it up and get some VHT engine enamel or leave it natural.
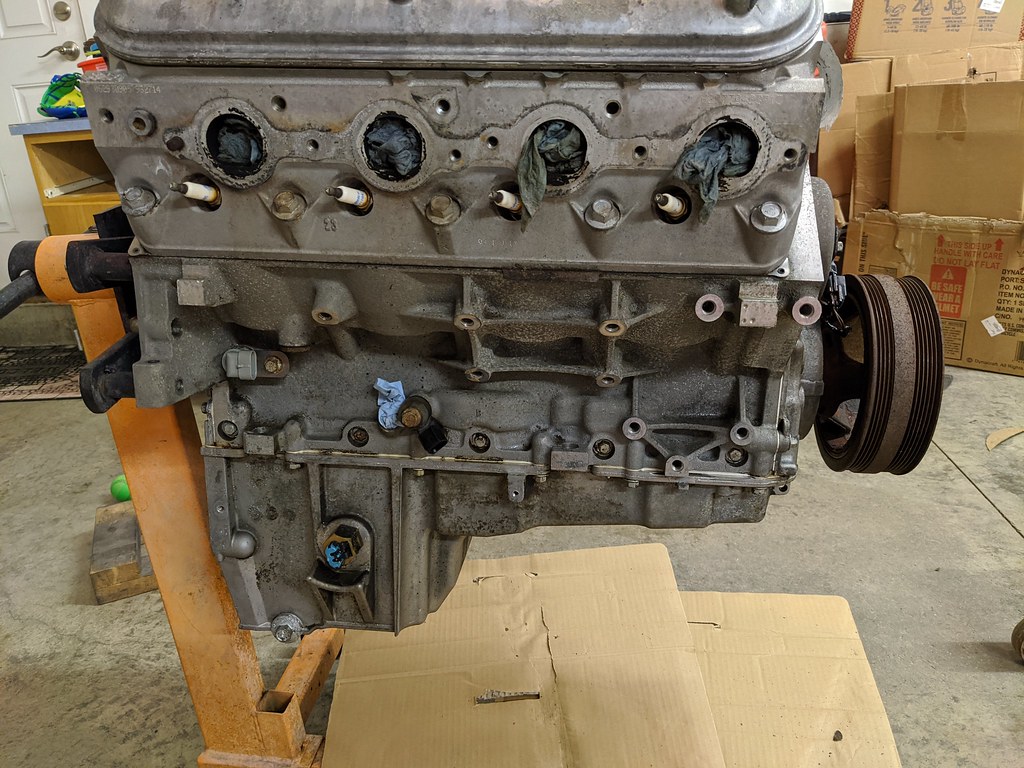
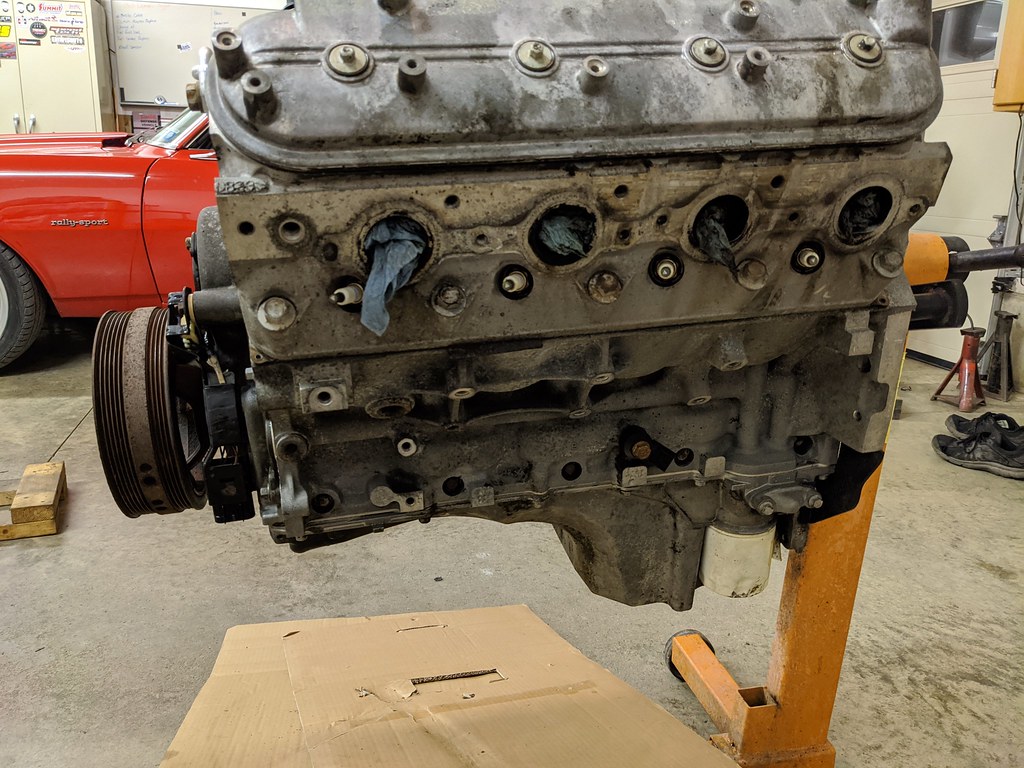
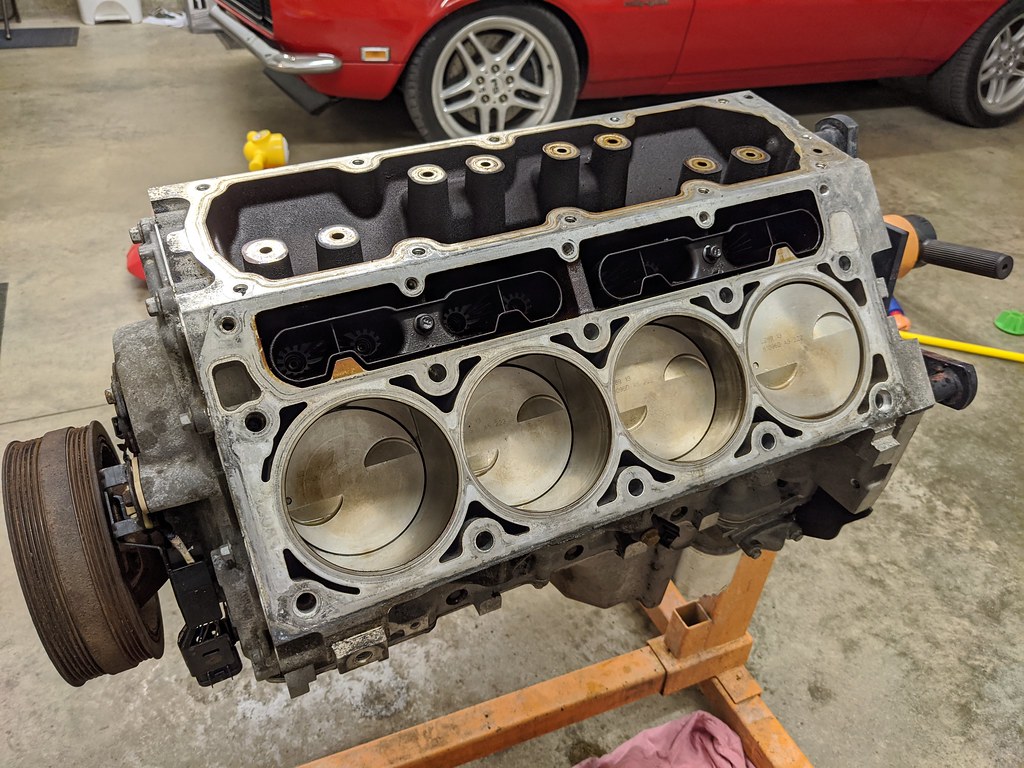
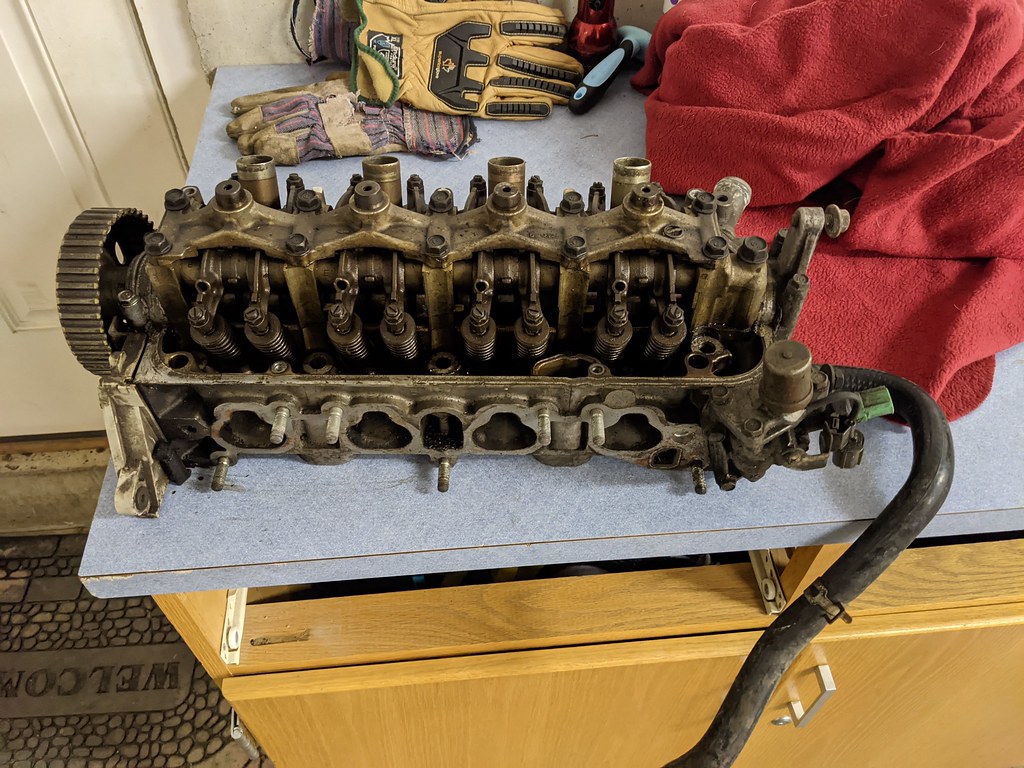
After I cleaned it up, I was like a kid in a candy store. I had to rip it apart and see what I was working with. I wasn't thrilled to see that much gunk in the motor, but it did have solid oil pressure when it was parked. I'm not going to use these heads, so I'm not too concerned.
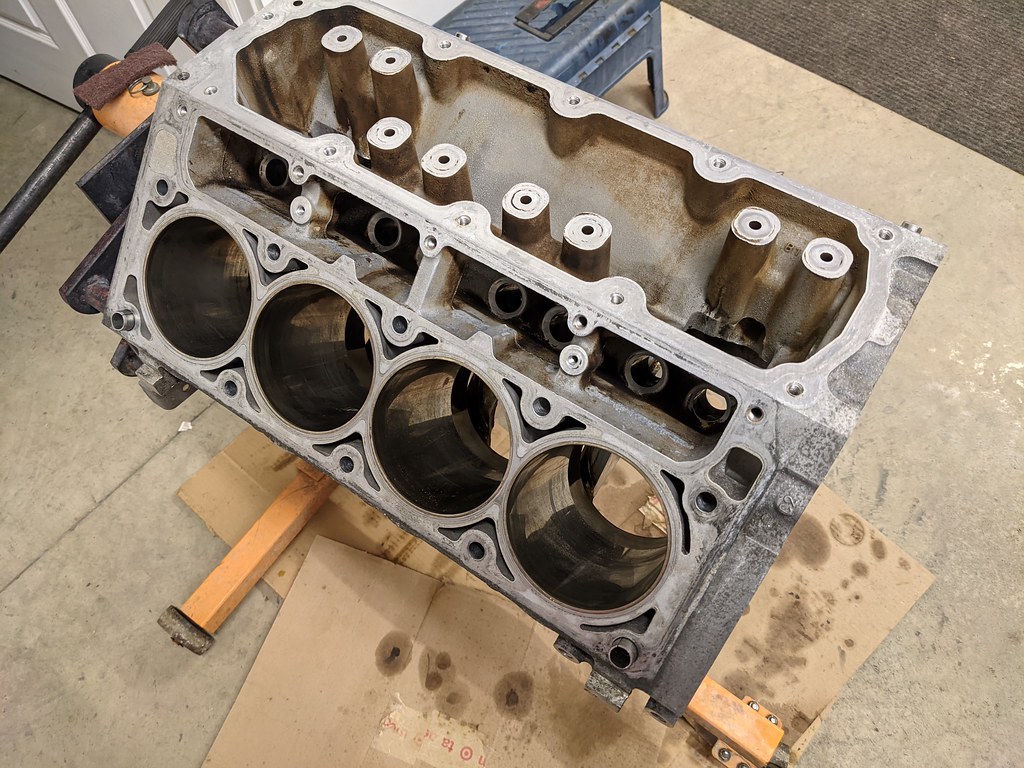
First head is off. I was very pleased to see that the cylinder walls were all in great shape and all had visible cross hatching.
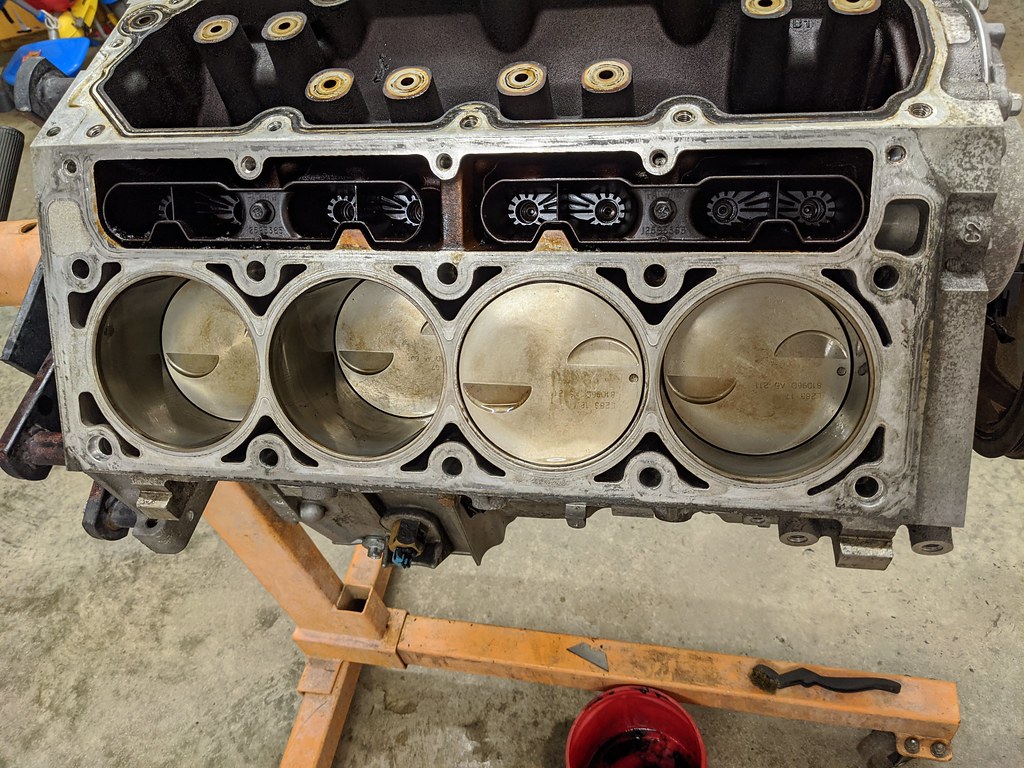
I hate posting pictures like this because it doesn't give a good representation of the actual condition as the camera picks up things that I can't even see. There wasn't any thing that I could catch with a fingernail. this isn't even cleaned up and there was some debris in there from pulling the head. Once I get everything cleaned up I'll follow-up with some better pictures.

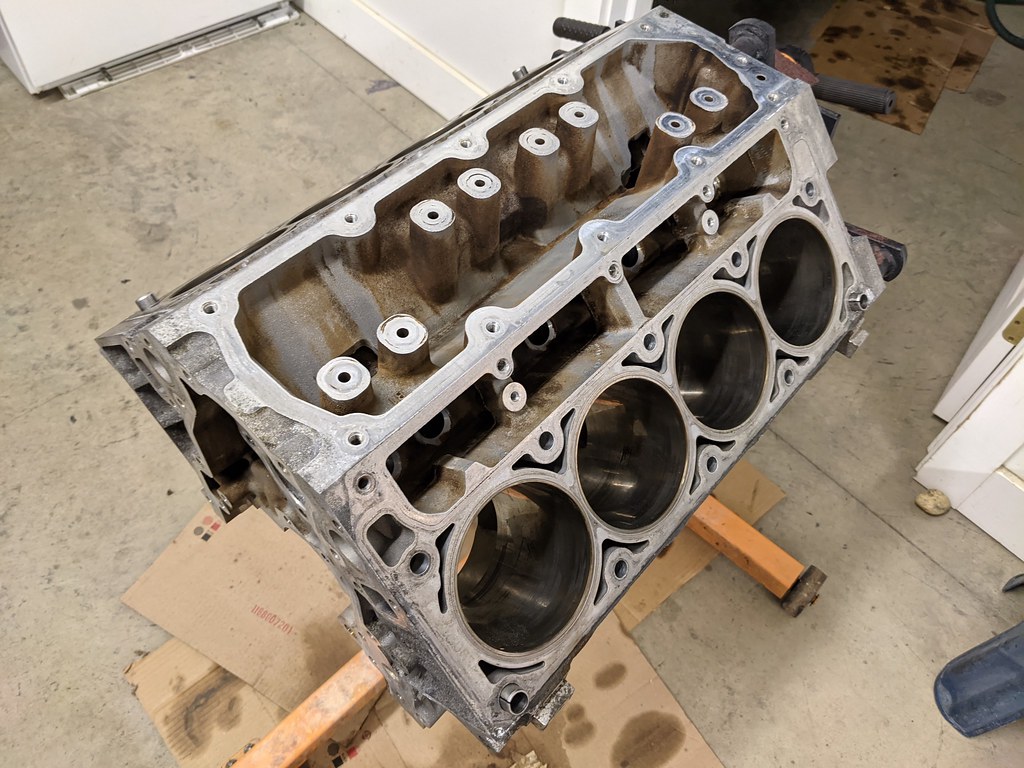
Here is the same picture above but all cleaned up.
I'd love the outside of the motor to come out like the spot behind the bell-housing. Any tips other than painting the block of how to clean it up?
Pushed to the side for when I have time to clean it up and prep it for parts.
It's been storming lately so I took that opportunity to fix my fuel leak and while it was out I was going to fix my fuel sender. I was using the 5th gen fuel sender and the OHMs were different.
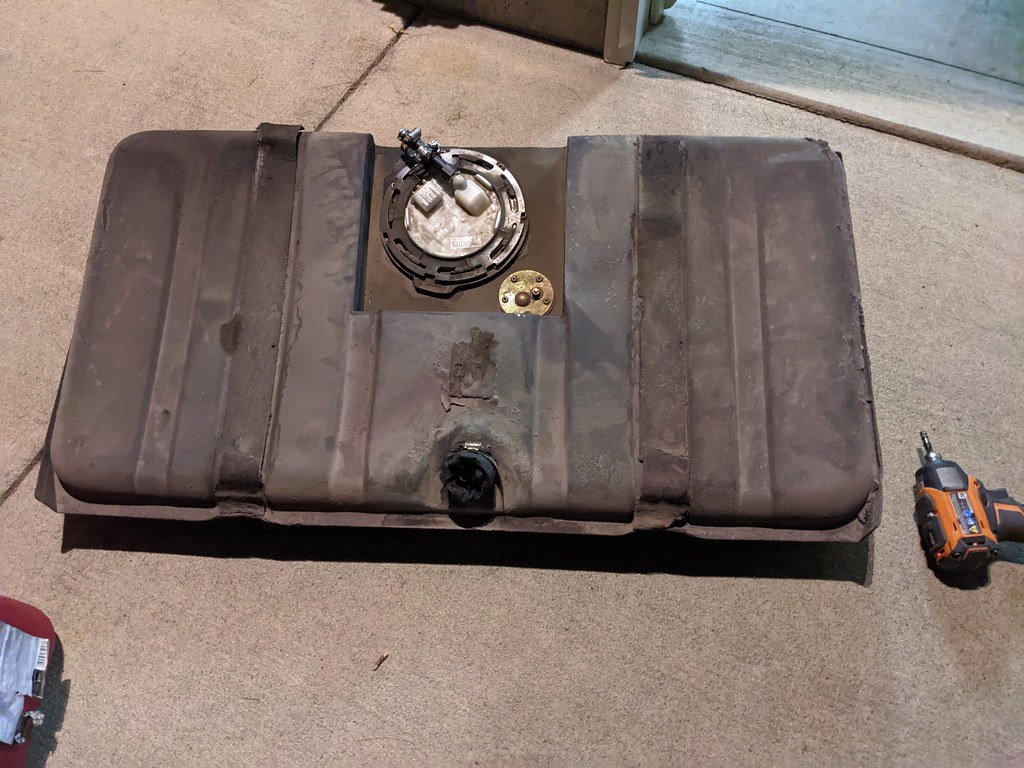
You can see where it was leaking.
I siphoned out as much of the gas as I could to avoid smelling like a gas can every time I worked on it.

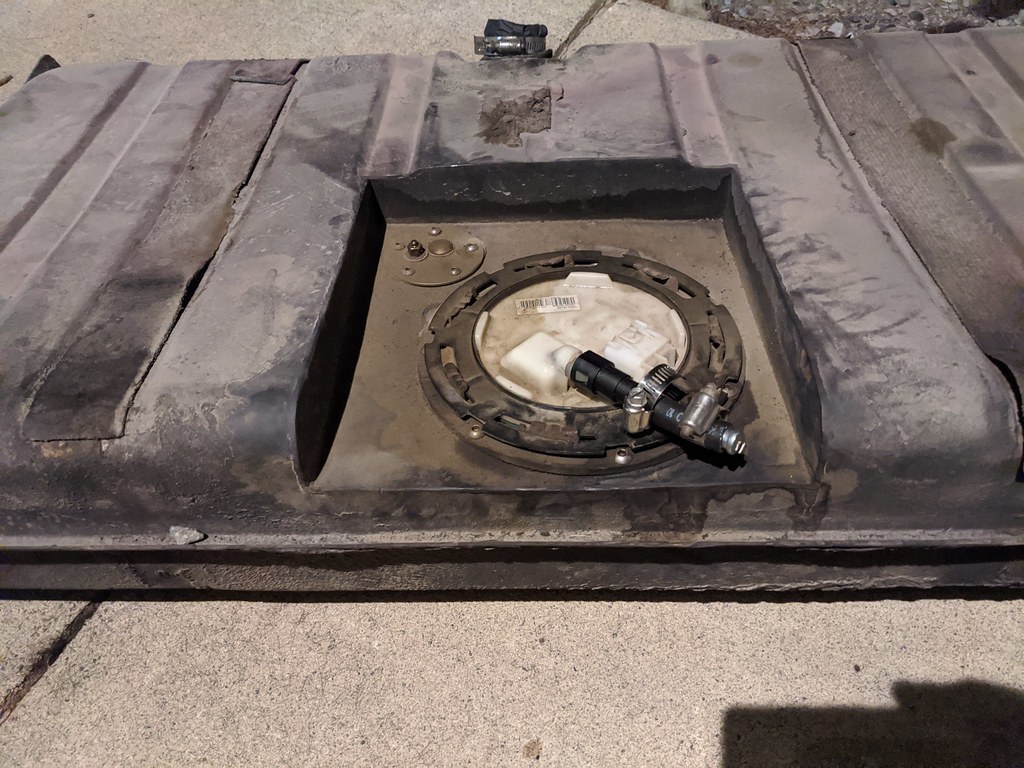
I confirmed that the fuel level sender worked properly for my car and then I played around with getting the float in the right spot to read correctly full and empty. It's actually much more difficult than it sounds. I should have paid more attention to where I placed the level sender for a better shot for the fuel level sender. A trick I used was the copper wire from house wiring. It is so much easier to bent and tweak than the stainless wire on the float. Then I copied it over to the stainless rod.
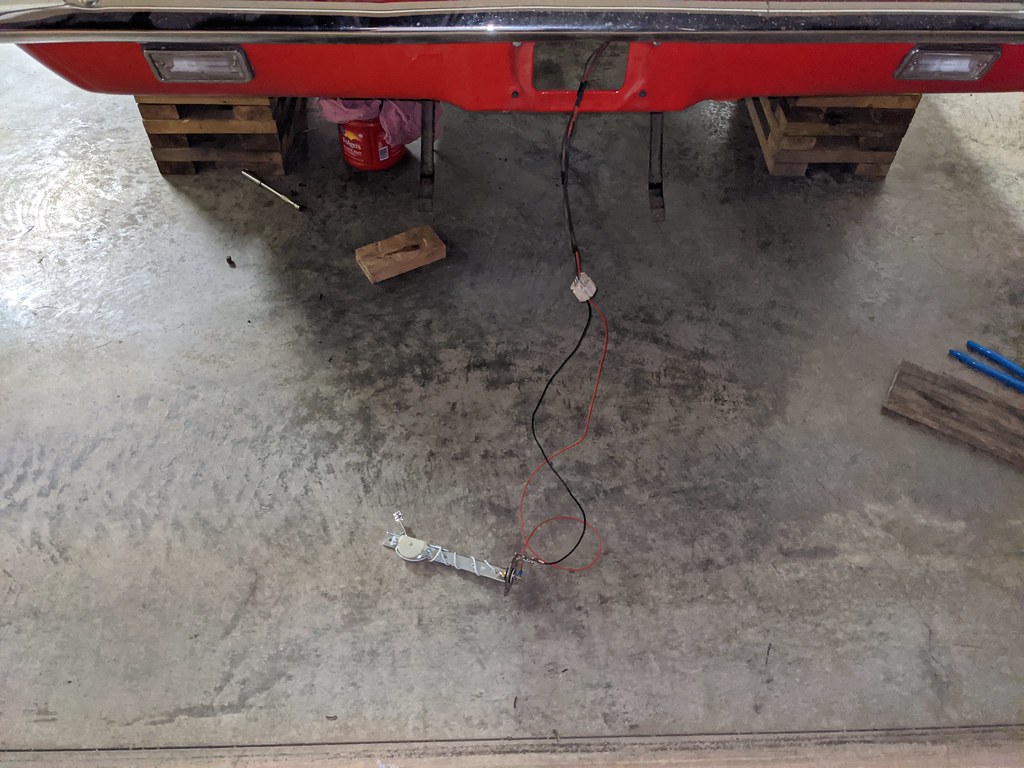

I didn't get any picture of the finished sender, but it's pretty unique to my car. I then came up with this system to put pressure on my fuel tank to check for leaks. It's a typical house sprayer for round-up and I added a nozzel to go to a 1/4" NPT and grabbed a PVC pipe that I could do the same for the fuel filler. It worked great and showed me all the spots where it was leaking. The picture below is when I was testing for current leaks. Wow, there were a lot. The bubbles around the outside of the fuel recess aren't leaks, they are just collected there. All the one's around the fuel ring are leaks.
Cheers,
Ryan
I haven't posted my build here before, but I was inspired by Andrew's V3 build. I'm not going to post the whole build, but will post a link to the build from the beginning. I'm going to post this retroactive from the fall when I sold my LS1/T56 in favor of building up an L92 and TR6060. Here goes nothing. I'll copy and paste my posts over here to bring me up to current day.
Hopefully the mods don't mind that I'm linking to another site. IF so I'll remove it, but here it is from Day 1 https://www.pro-touring.com/threads/...-Penny-Pincher
Thanks for looking.
I had a buddy of mine pick up a 07 Denali several months ago, and I called dibs on the 6.2 L92. I've been keeping my eyes out for one for a while since I've really always wanted at least a 6.2 for this car. He gave me a great deal on the long block and I finally picked it up last week. There was some strange issue with the title of the truck which is the reason that it was being parted out, so the engine is in great shape and running the day that he pulled it over to his garage to pull the motor. He said he spun 3 of the 4 tires when he drove it over and was quite impressed with the power it made stock.
I'm planning to disassemble the motor down to the short block, check everything out and replace everything other than the block, covers and rotating assembly. I'm planning on deleting VVT with a stage 3 cam, LS7 lifters, new oil pump, new timing chain, and etc. for the short block. For the heads, I'm running a pair of LS3 821 heads I picked up a while ago and doing some light porting on the exhaust side and possibly some bowl clean up, but nothing crazy. I'll be leaving the intake runners completely stock. I'm in the process of cleaning up the FAST 102 intake I picked up and will be getting a set of LS9 injectors to top off that package. While I have the intake separated, I'm planning on assessing the ports for any potential light matching they would require, but again nothing crazy.
One of the great things about the Terminator X EFI is I can simply change a few boxes and convert from 24x/1x signals to 58x/4x signals for the crank/cam. It's really that simple for the tune. Now on the harness side I am deciding now if I want to modify the one wire in the harness to give the crank/cam sensors the gen4 5v rather than the 12v signal in the gen3 sensors. The other possibility is just selling my harness/ecu outright and purchasing the same thing, but set up for the LS3 style injectors and crank/cam voltage. I'm really leaning toward just modifying what I have since it was a PITA to install in the first place. Time will tell though.
Day I brought it home.
First step was cleaning up the short block. I sprayed it multiple times with oven cleaner and used the power washer to get the bulk of it off. Overall I'm pretty happy with the way that it's cleaning up. I'm debating on whether or not to clean it up and get some VHT engine enamel or leave it natural.
After I cleaned it up, I was like a kid in a candy store. I had to rip it apart and see what I was working with. I wasn't thrilled to see that much gunk in the motor, but it did have solid oil pressure when it was parked. I'm not going to use these heads, so I'm not too concerned.
First head is off. I was very pleased to see that the cylinder walls were all in great shape and all had visible cross hatching.
I hate posting pictures like this because it doesn't give a good representation of the actual condition as the camera picks up things that I can't even see. There wasn't any thing that I could catch with a fingernail. this isn't even cleaned up and there was some debris in there from pulling the head. Once I get everything cleaned up I'll follow-up with some better pictures.
Here is the same picture above but all cleaned up.
I'd love the outside of the motor to come out like the spot behind the bell-housing. Any tips other than painting the block of how to clean it up?
Pushed to the side for when I have time to clean it up and prep it for parts.
It's been storming lately so I took that opportunity to fix my fuel leak and while it was out I was going to fix my fuel sender. I was using the 5th gen fuel sender and the OHMs were different.
You can see where it was leaking.
I siphoned out as much of the gas as I could to avoid smelling like a gas can every time I worked on it.
I confirmed that the fuel level sender worked properly for my car and then I played around with getting the float in the right spot to read correctly full and empty. It's actually much more difficult than it sounds. I should have paid more attention to where I placed the level sender for a better shot for the fuel level sender. A trick I used was the copper wire from house wiring. It is so much easier to bent and tweak than the stainless wire on the float. Then I copied it over to the stainless rod.
I didn't get any picture of the finished sender, but it's pretty unique to my car. I then came up with this system to put pressure on my fuel tank to check for leaks. It's a typical house sprayer for round-up and I added a nozzel to go to a 1/4" NPT and grabbed a PVC pipe that I could do the same for the fuel filler. It worked great and showed me all the spots where it was leaking. The picture below is when I was testing for current leaks. Wow, there were a lot. The bubbles around the outside of the fuel recess aren't leaks, they are just collected there. All the one's around the fuel ring are leaks.
Cheers,
Ryan
 01-07-2021, 02:24 PM
#2
TECH Fanatic
Thread Starter
iTrader: (27)
Thanks, I'm pretty excited too. I've been slowly collecting parts to complete this swap.
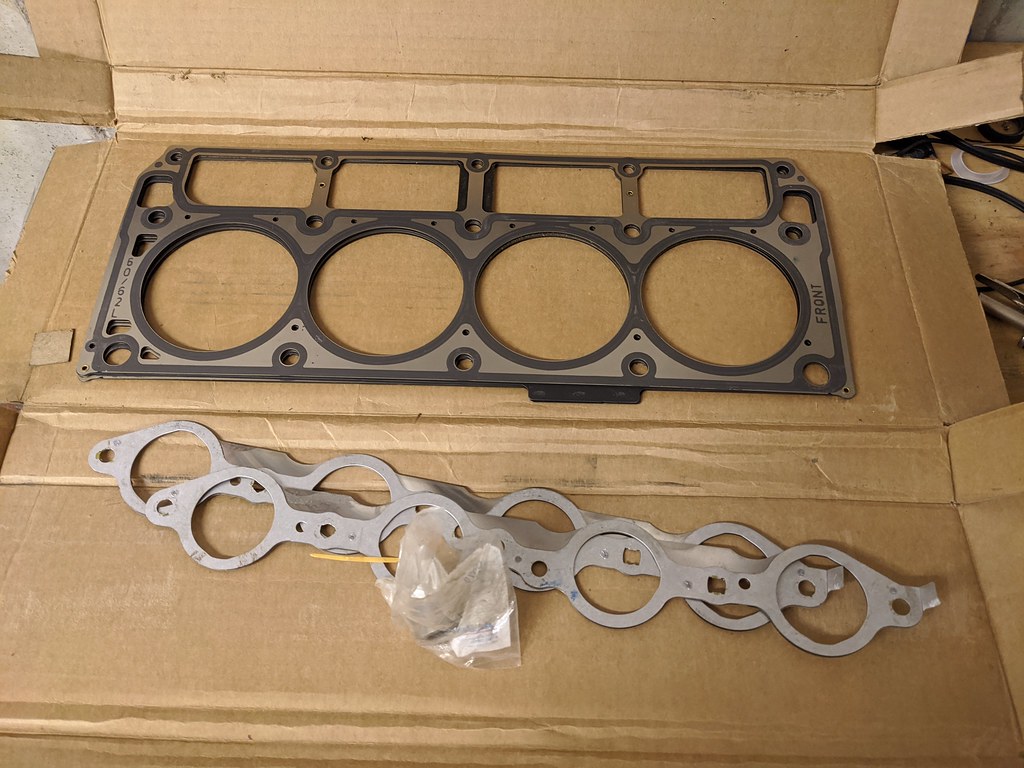
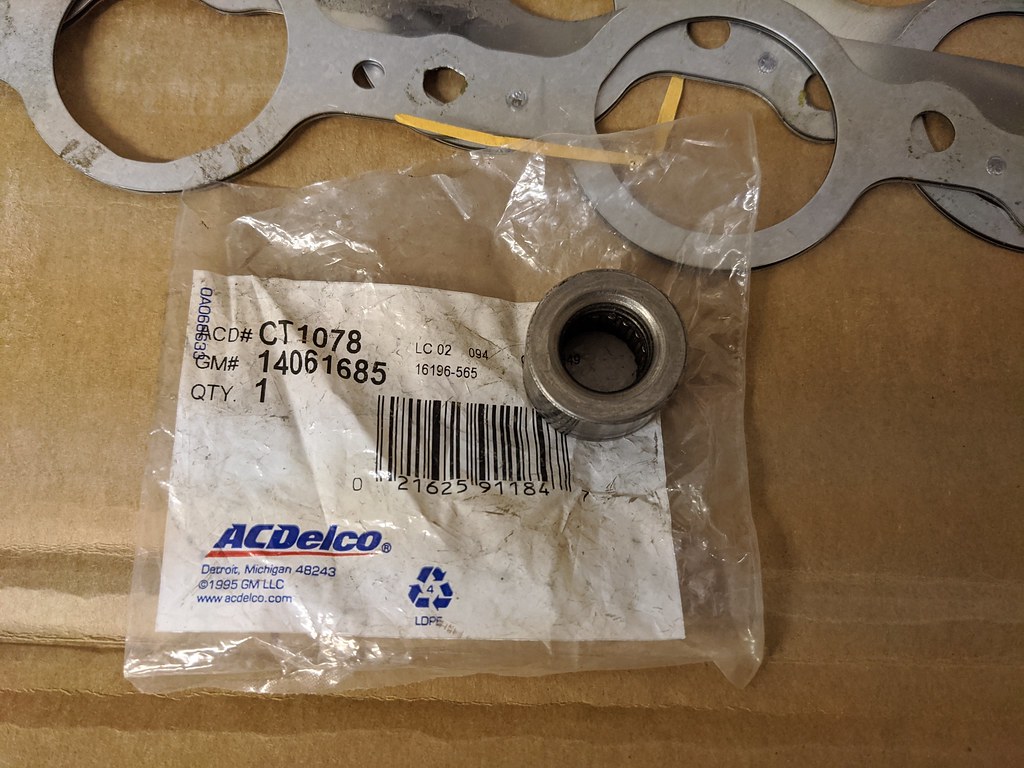
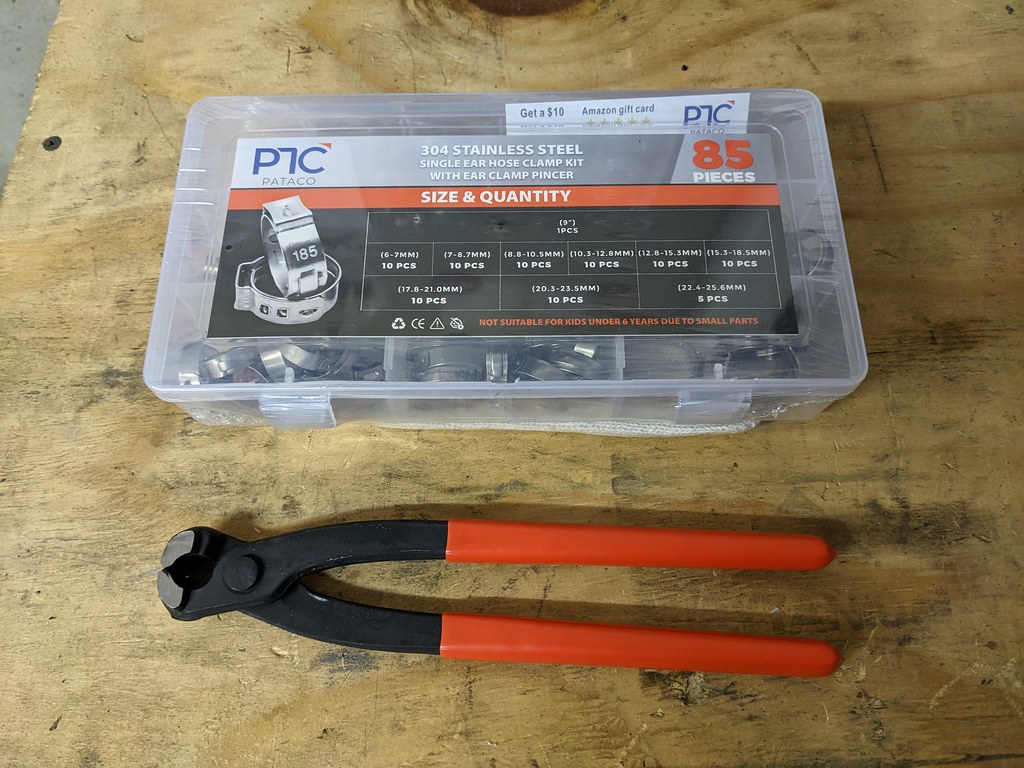
Some head gaskets, exhaust gaskets and a new pilot bearing (small bearing).
I likely won't end up using it, but I picked up a zero mile stock LS3 cam and sprocket that someone pulled out to do a full top end build on a new crate motor. At the very least, I can put this motor together with VVT delete now.
I also grabbed some lightly used PAC .650 lift springs and all associated components. Now, I'm in the market for a stage 2 or 3 cam to complete the package.
I've needed one enough times that I decided to just buy one of the damper pullers. Now I just have one and don't need to run to the parts store, and this one comes with the rods to do the job right. Very highly rated on Amazon. Also grabbed a cheap flywheel locking tool. I need to grab a flexplate from a buddy and then I can pull the rest of the motor apart.
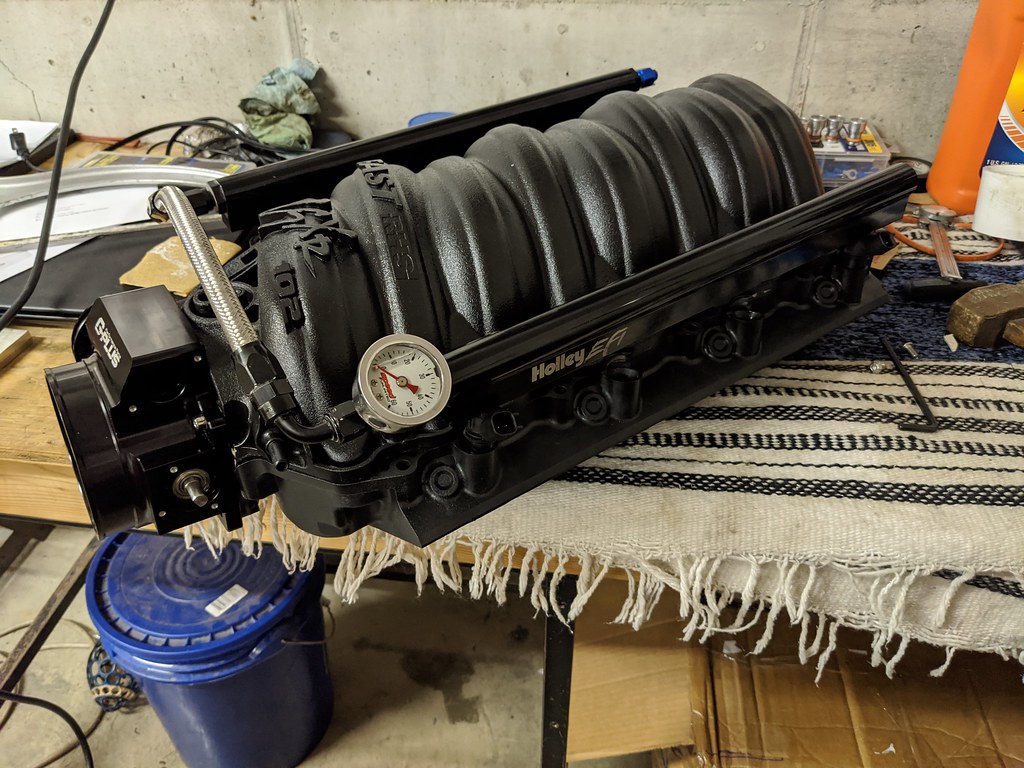
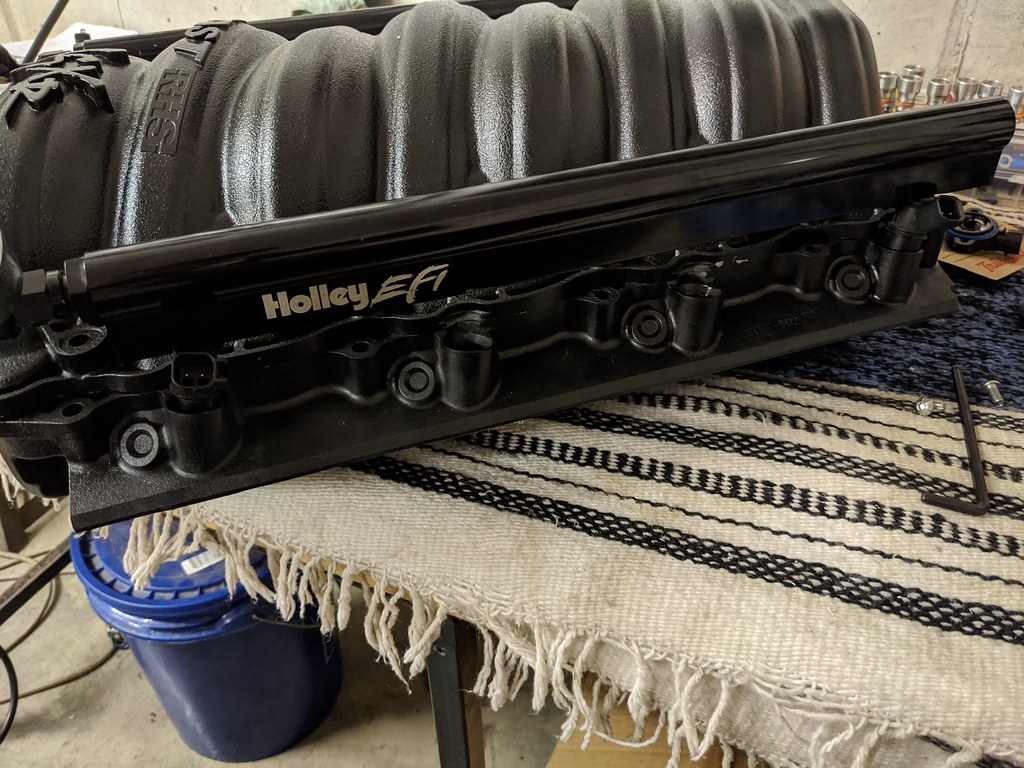
I was also missing some of the hardware for the FAST intake and the fuel rail bolts came in so I could do a test fit for the rails and see how they look. I'm torn between those rails or the Holley EFI rails I picked up a while ago. Decisions....

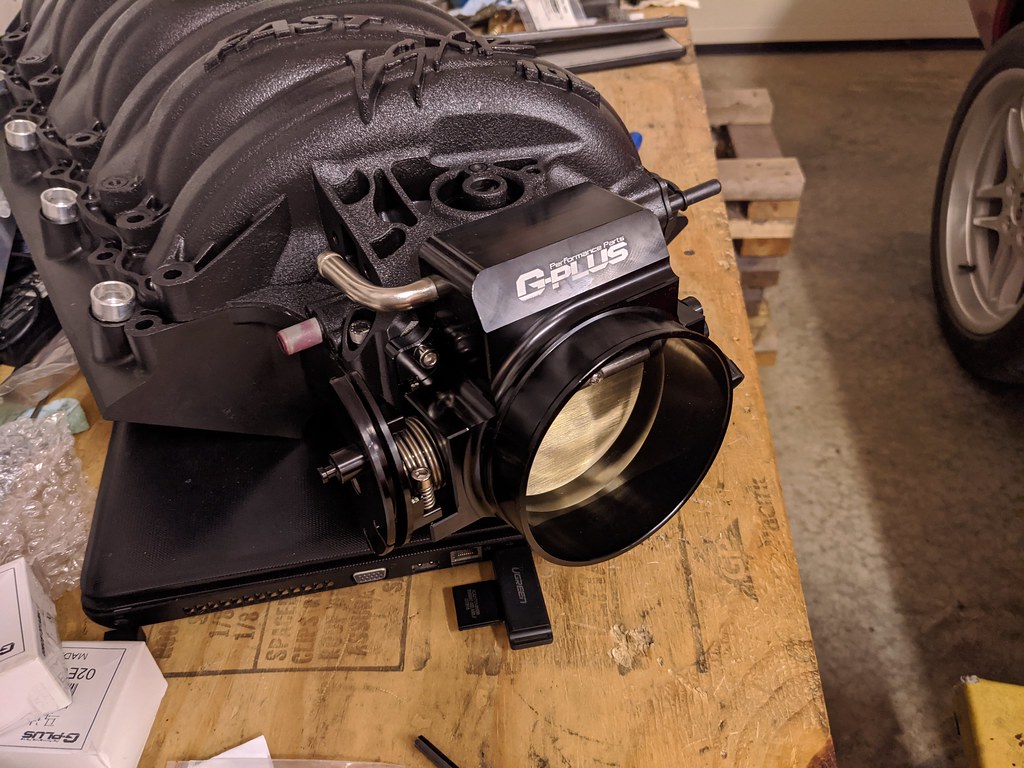
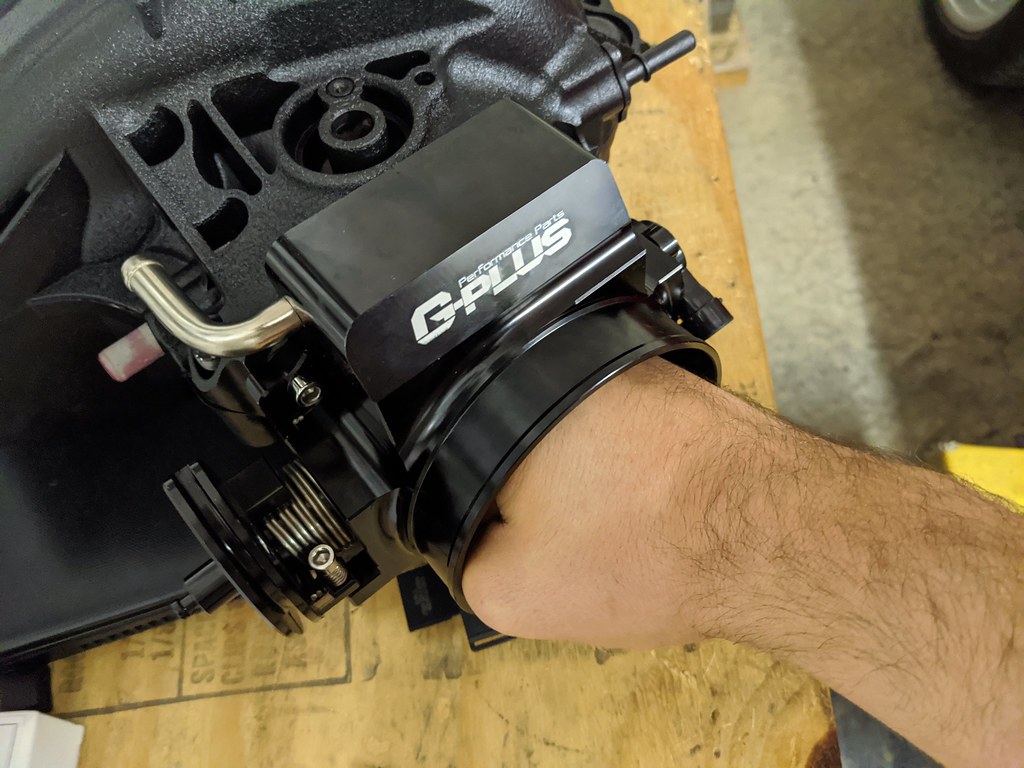
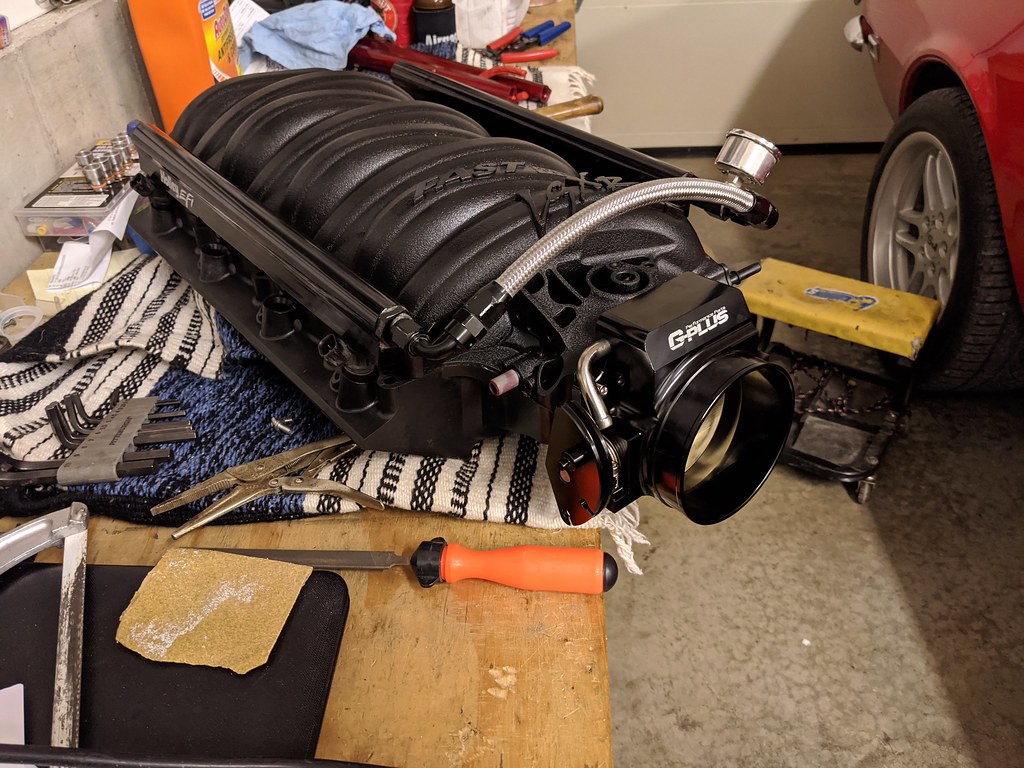
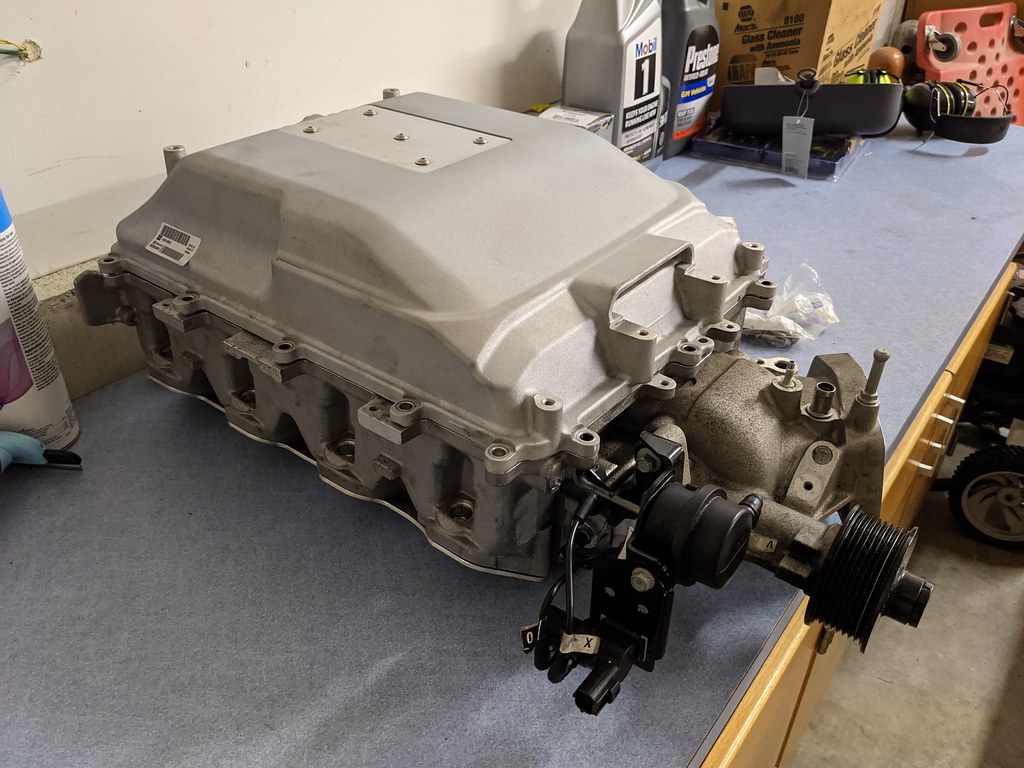
I've heard a lot of good feedback on the GPlus throttle bodies so I thought I'd give it a try for $60 bucks. First impressions are that I'm very impressed with the quality. It seems to be quite well made for the price, but the real test will be how it responds when the car is up and running. And wow, 102mm is huge!
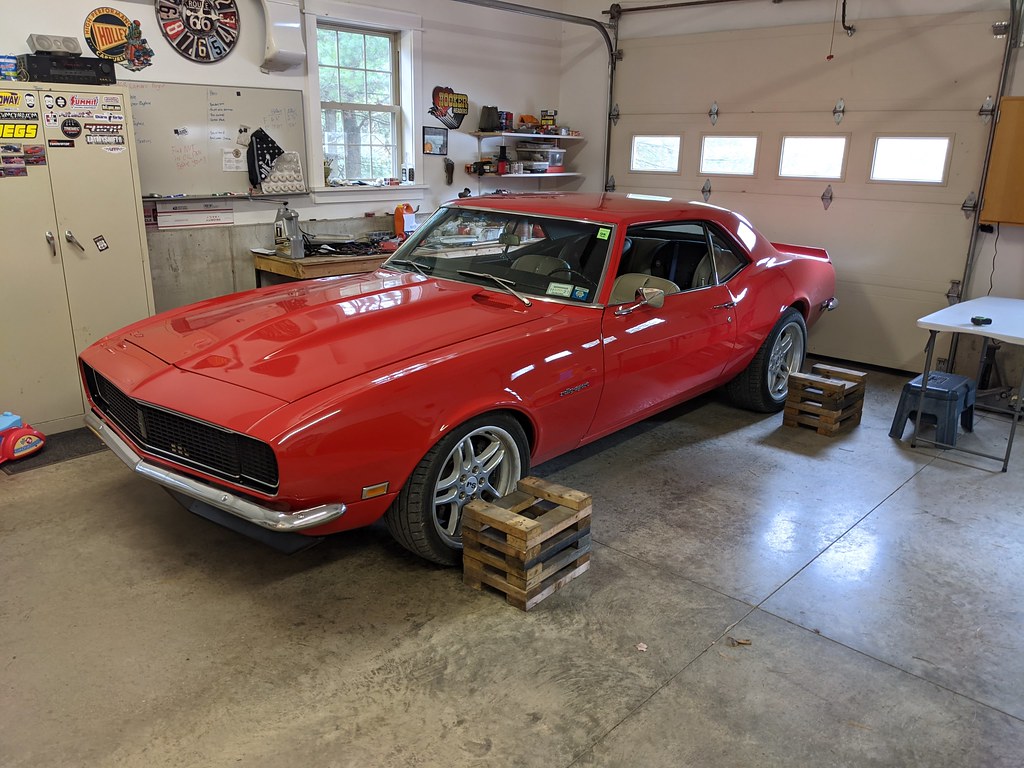
I have really just been driving the car and haven't been working on it, which is a nice change.
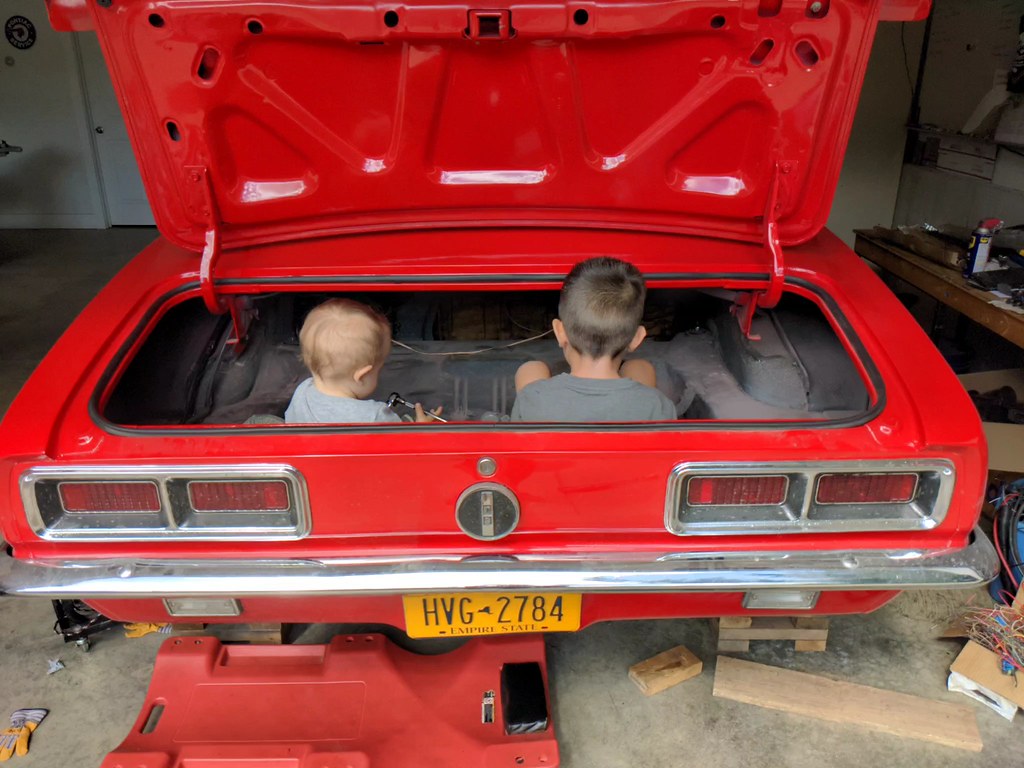
Snapped this cool picture of my two boys. Trying to get them involved as much as I can right now.
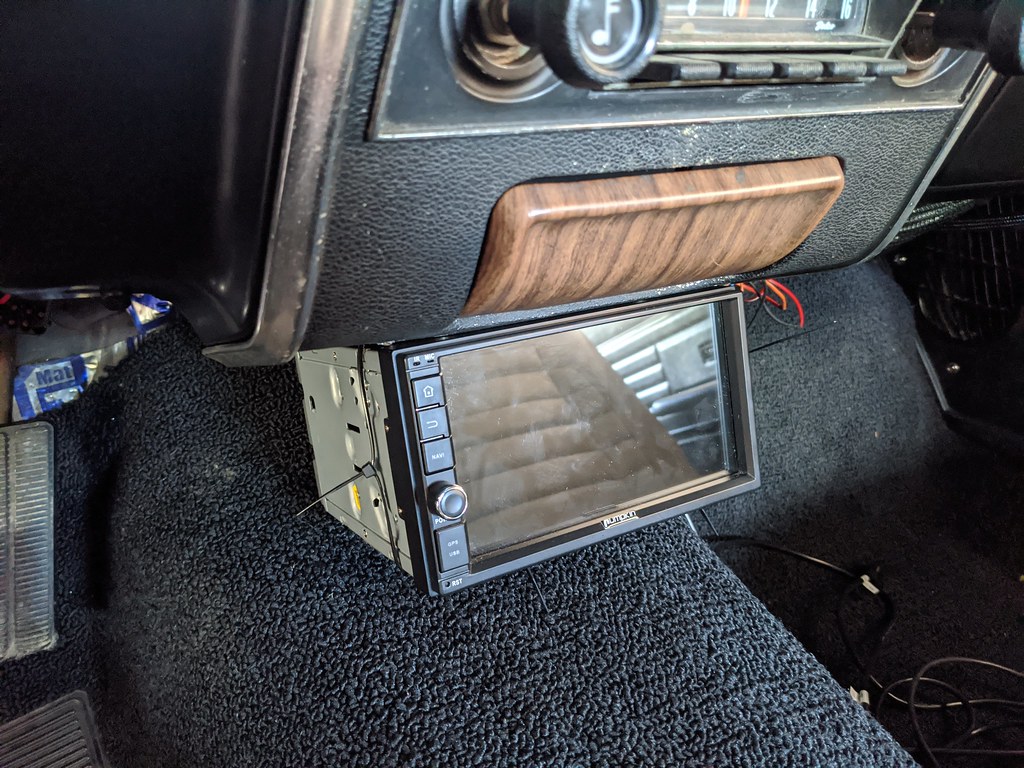
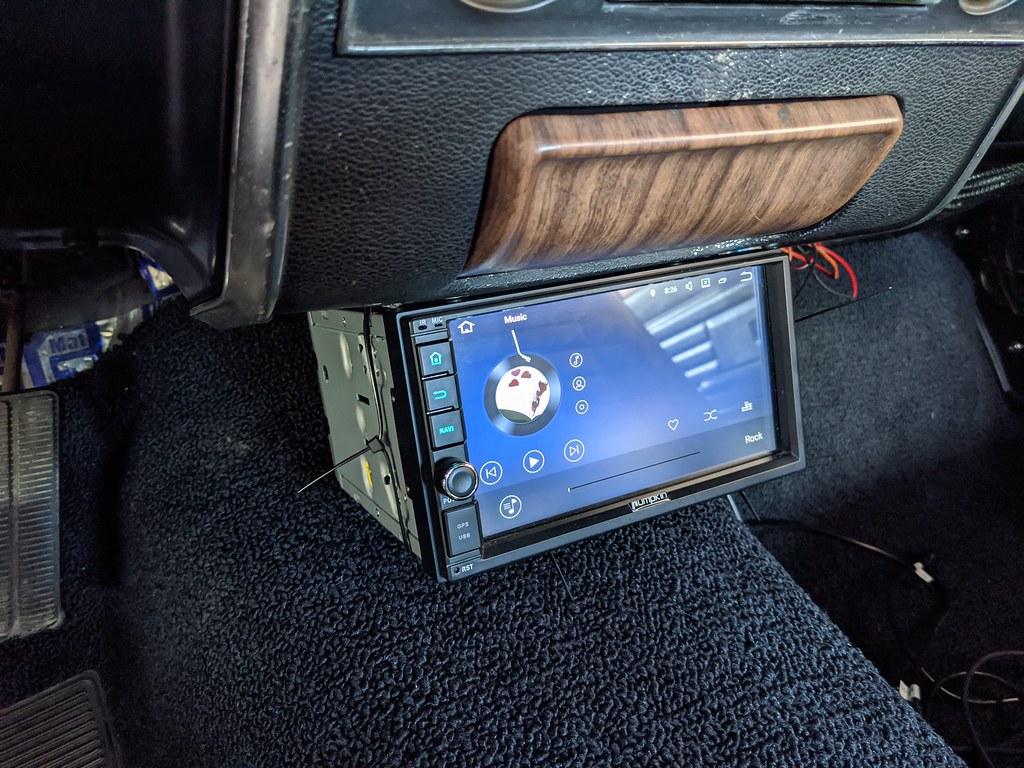
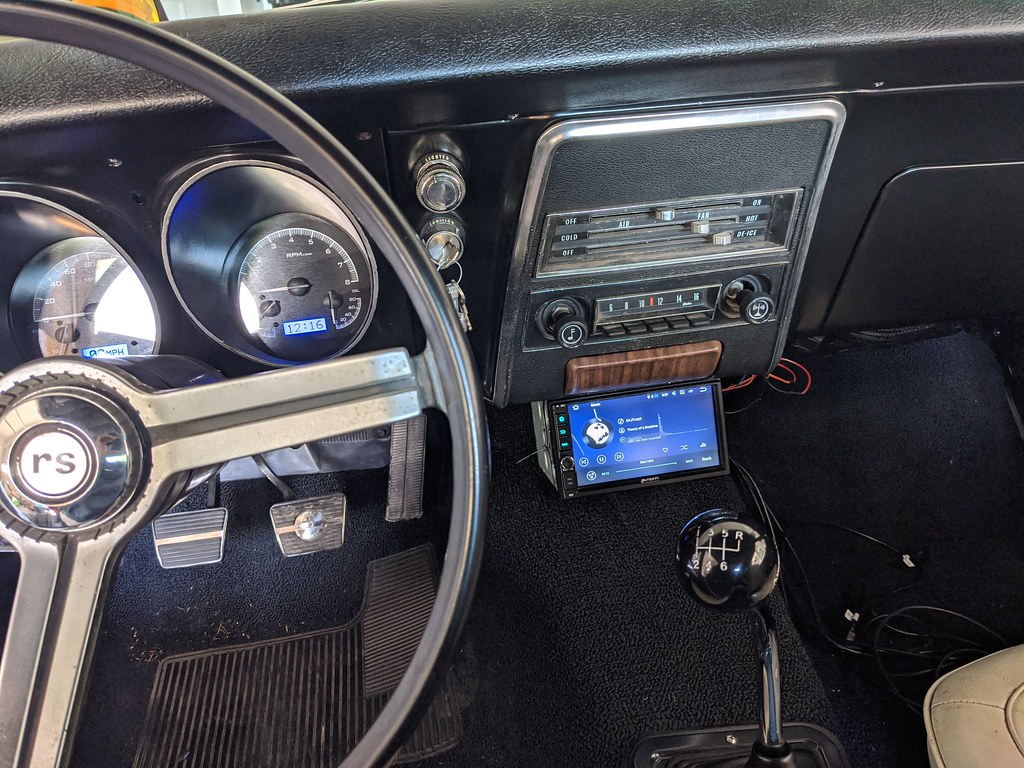
I was however getting tired of listening to just engine noises, so I tossed in an extra stereo I had on my shelf so that I had some tunes. I also did it to see how I would like a double din and if it was worth the effort to install one. Still up in the air, but for the time being zip ties to the rescue!!
I've also been playing around with the Holley software and learning a lot with the help of Andrew, (andrewb70). He's a wizard with the Holley software and my car runs the best it has with his help.
We were addressing some of the funky VE table issues and got it smoothed out now.
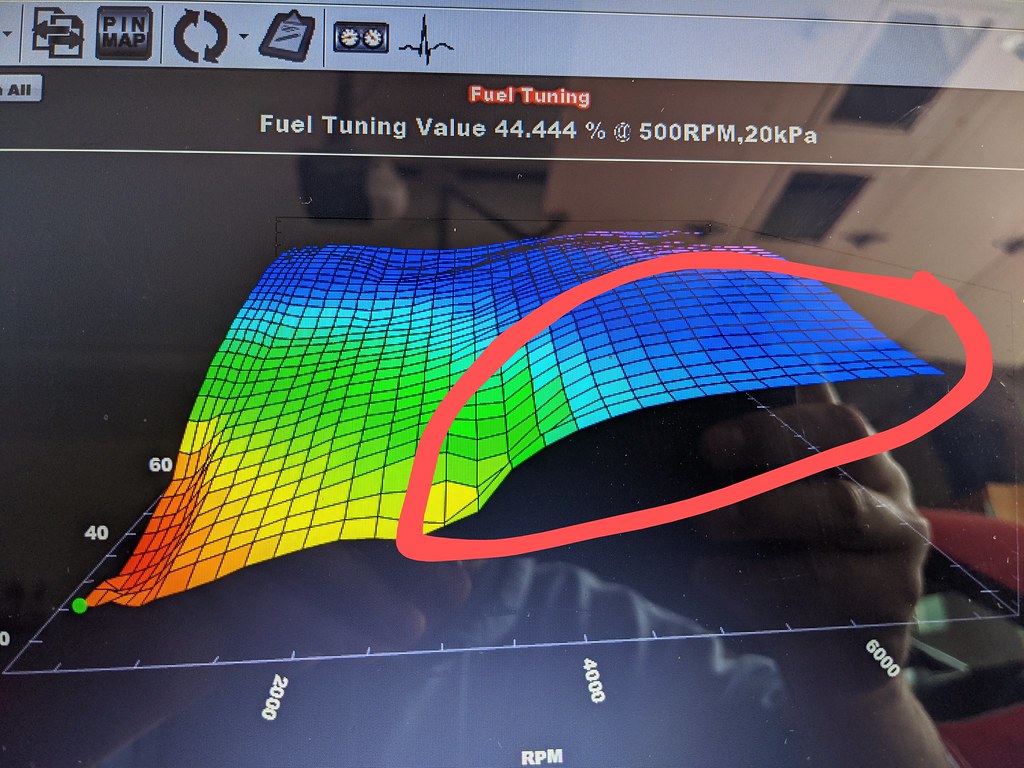
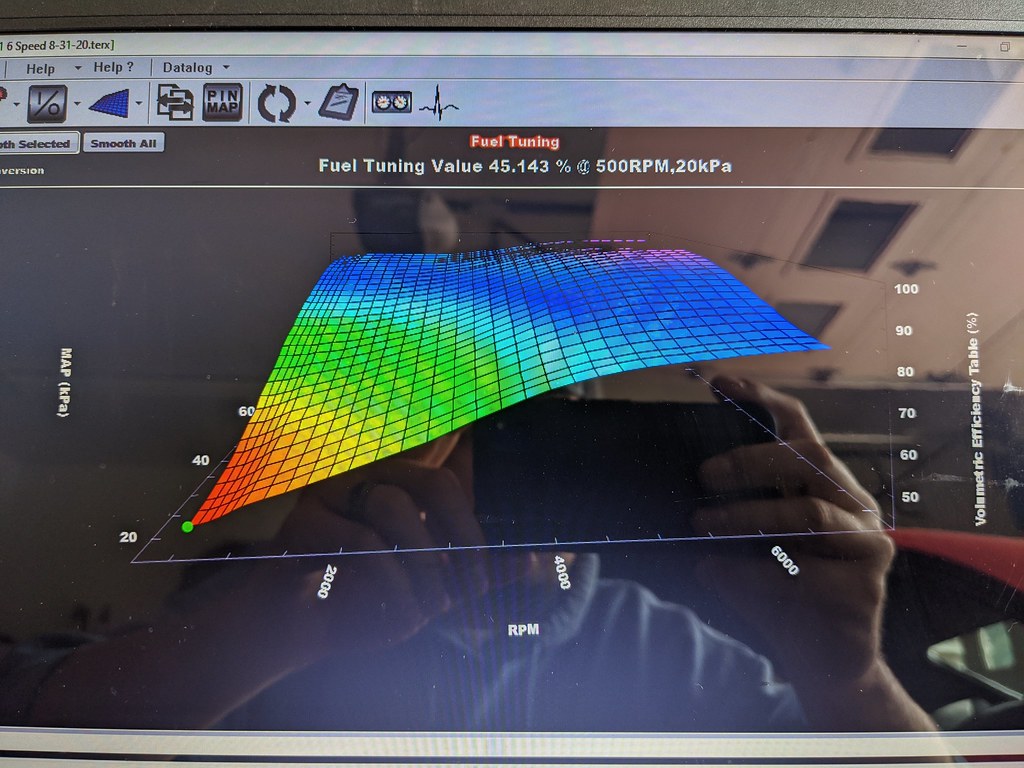
Here is the learn table which is where the system will self tune. It's now within 5% which is good in my books.
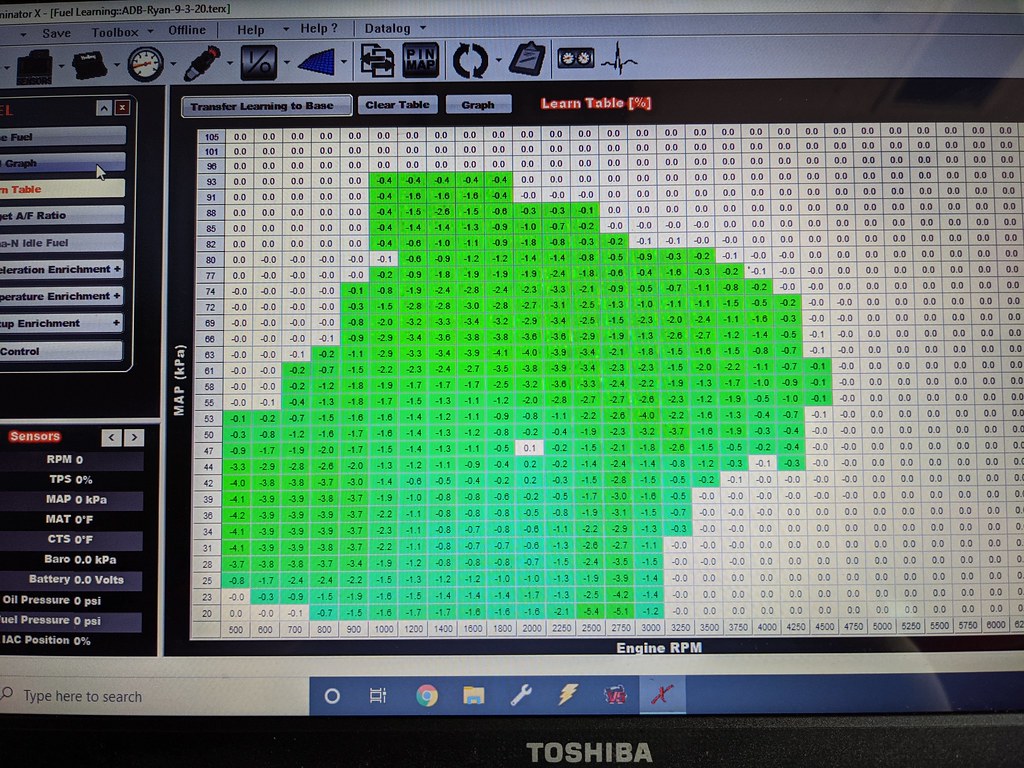
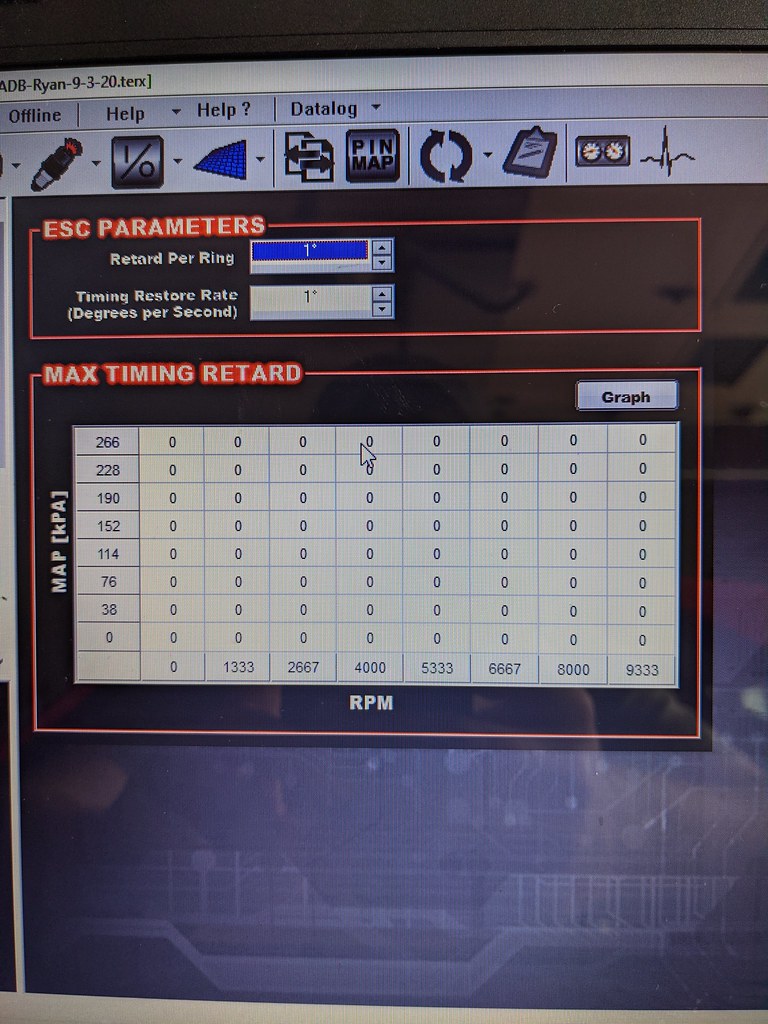
I'm going to start playing around with the timing tables to get a little more out of the car. I first wanted to make sure that my knock sensors are functional, and noticed that this table is zero'd out. I'll need to get in and add some Knock Retard before I start adding timing.
Then last night I went out and decided to see what I could do about getting the engine cleaned up further. It turned out really well for just a little elbow grease. More to come!
Cheers,
Ryan
Some head gaskets, exhaust gaskets and a new pilot bearing (small bearing).
I likely won't end up using it, but I picked up a zero mile stock LS3 cam and sprocket that someone pulled out to do a full top end build on a new crate motor. At the very least, I can put this motor together with VVT delete now.
I also grabbed some lightly used PAC .650 lift springs and all associated components. Now, I'm in the market for a stage 2 or 3 cam to complete the package.
I've needed one enough times that I decided to just buy one of the damper pullers. Now I just have one and don't need to run to the parts store, and this one comes with the rods to do the job right. Very highly rated on Amazon. Also grabbed a cheap flywheel locking tool. I need to grab a flexplate from a buddy and then I can pull the rest of the motor apart.
I was also missing some of the hardware for the FAST intake and the fuel rail bolts came in so I could do a test fit for the rails and see how they look. I'm torn between those rails or the Holley EFI rails I picked up a while ago. Decisions....
I've heard a lot of good feedback on the GPlus throttle bodies so I thought I'd give it a try for $60 bucks. First impressions are that I'm very impressed with the quality. It seems to be quite well made for the price, but the real test will be how it responds when the car is up and running. And wow, 102mm is huge!
I have really just been driving the car and haven't been working on it, which is a nice change.
Snapped this cool picture of my two boys. Trying to get them involved as much as I can right now.
I was however getting tired of listening to just engine noises, so I tossed in an extra stereo I had on my shelf so that I had some tunes. I also did it to see how I would like a double din and if it was worth the effort to install one. Still up in the air, but for the time being zip ties to the rescue!!
I've also been playing around with the Holley software and learning a lot with the help of Andrew, (andrewb70). He's a wizard with the Holley software and my car runs the best it has with his help.
We were addressing some of the funky VE table issues and got it smoothed out now.
Here is the learn table which is where the system will self tune. It's now within 5% which is good in my books.
I'm going to start playing around with the timing tables to get a little more out of the car. I first wanted to make sure that my knock sensors are functional, and noticed that this table is zero'd out. I'll need to get in and add some Knock Retard before I start adding timing.
Then last night I went out and decided to see what I could do about getting the engine cleaned up further. It turned out really well for just a little elbow grease. More to come!
Cheers,
Ryan
01-07-2021, 02:25 PM
#3
TECH Fanatic
Thread Starter
iTrader: (27)
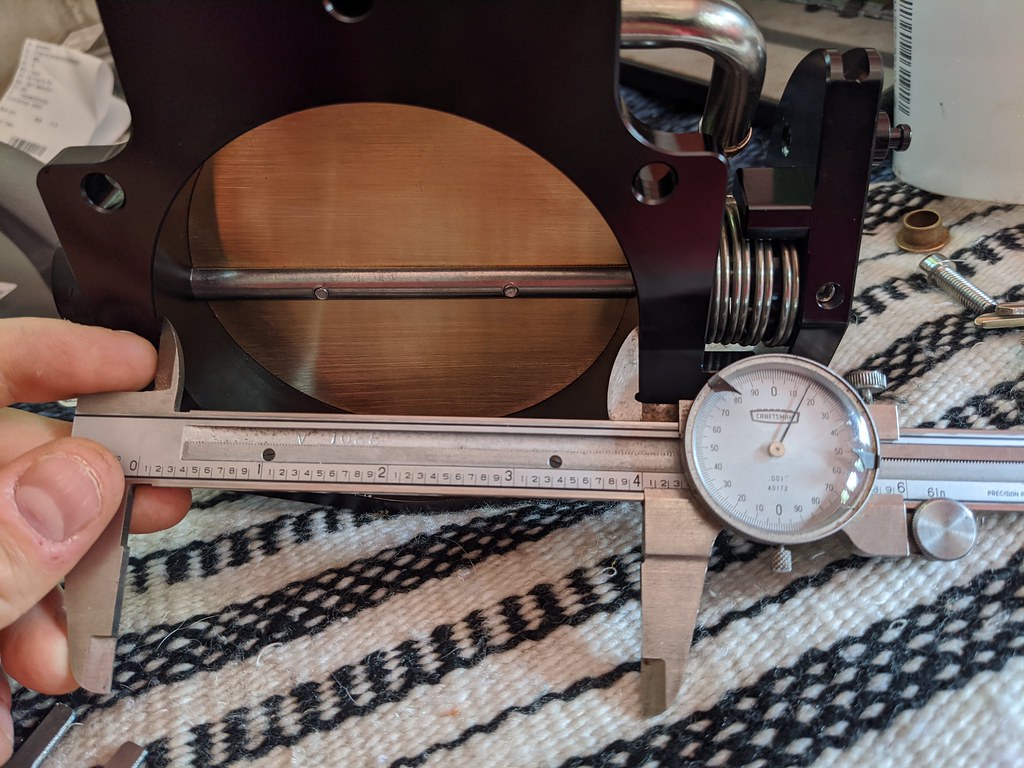
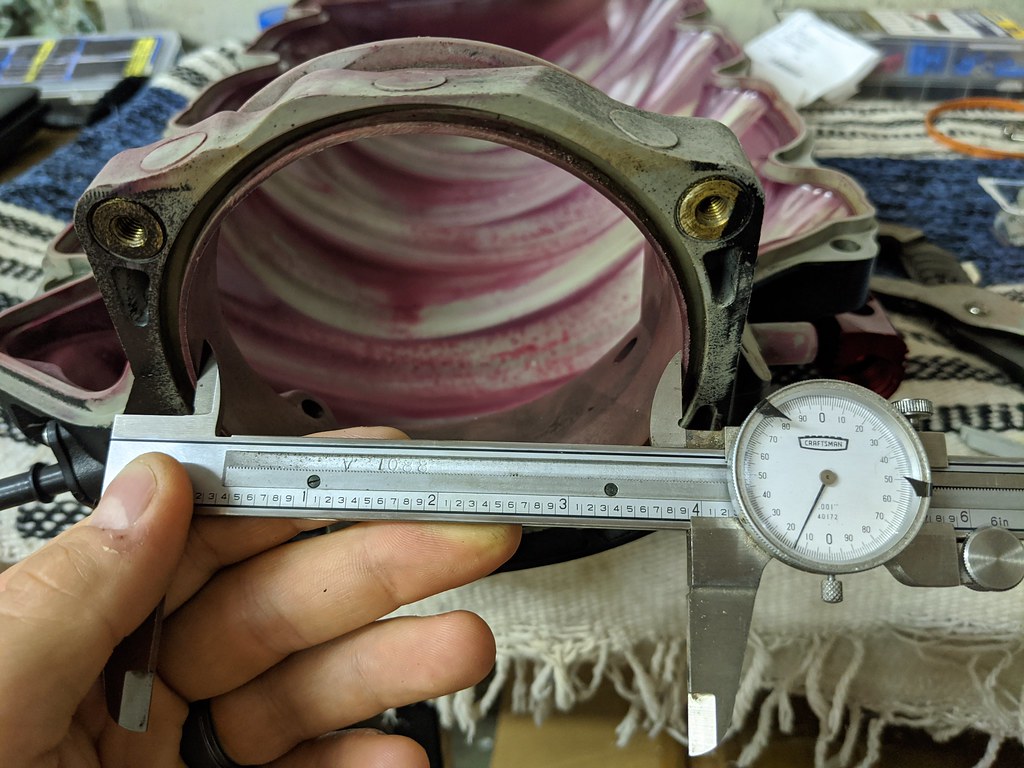
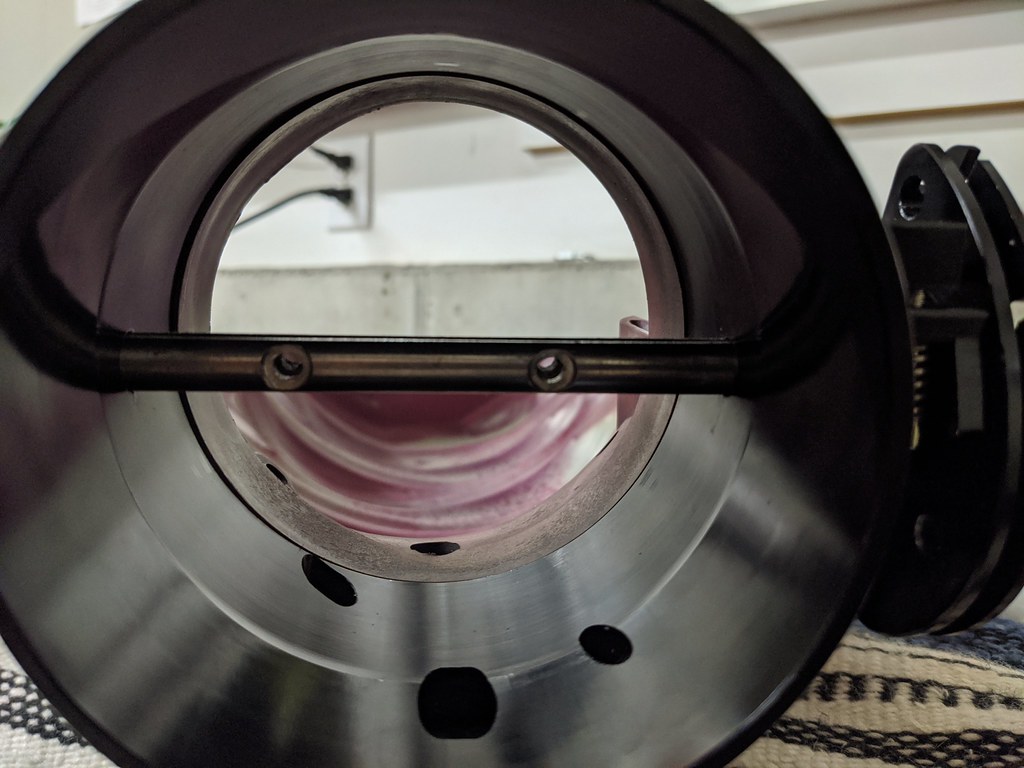
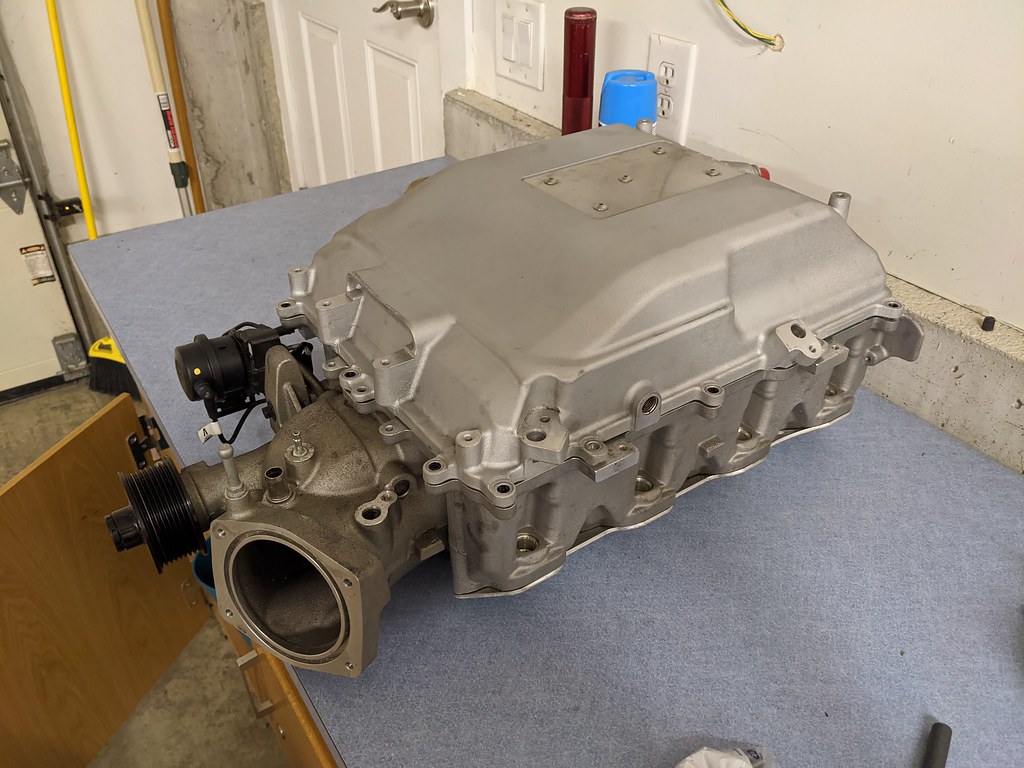
Still plugging away and seeing how all of the parts are going to work together. I started taking some measurements and noticed that the opening for the FAST intake wasn't a true 102mm horizontally, but was vertically. So after a quick call to FAST, they informed me that this can be common when the throttle bodies are over-tightened. After looking a little closer the sides of the intake opening were cupped towards the center. After I took measurements from the throttlebody vs the opening of the intake it confirmed that. So I started the process of slowly heating it up and straightening it. Not sure if I buy the over-tightened story, but it was straight from FAST so it is what it is.
I found out that a 3" PVC pipe has almost exactly a 4" outer diameter, so I used that as a starting point to get it back to where it should be. I didn't get a picture of the measurements before I started but it was around 3.870", which is much smaller than 4.016"(converted from 102mm). I cut about 1" off of the end of the PVC pipe and then cut a section out of it. I heated it up and slowly added some body shims I had to help this stretch back into place.
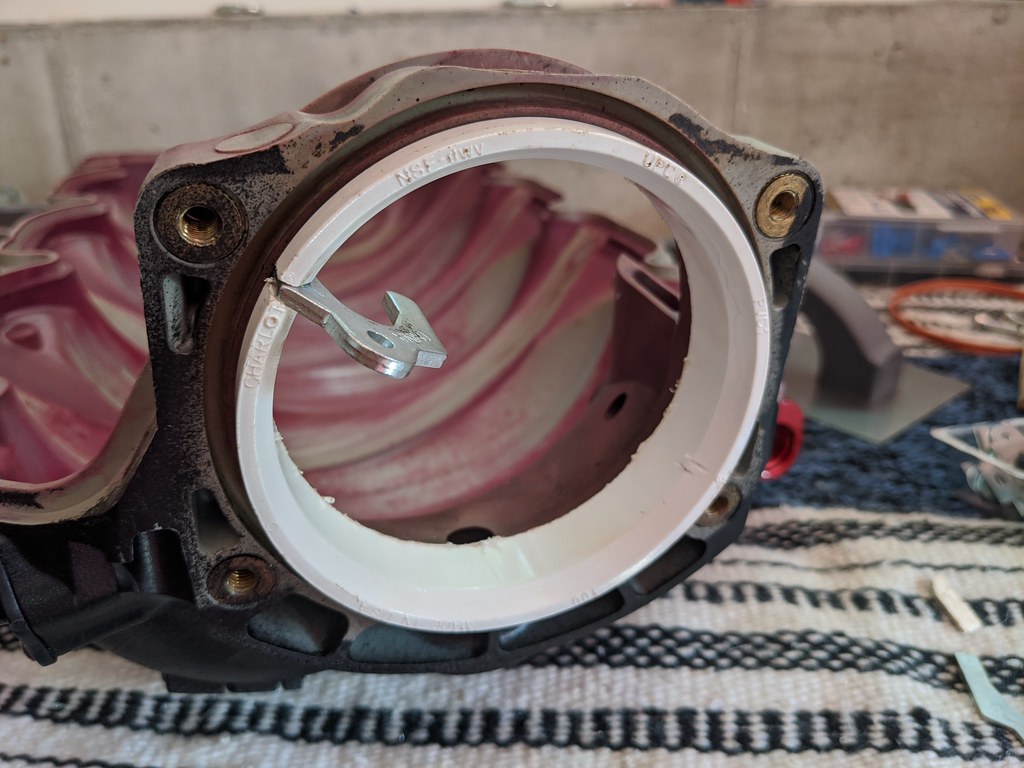
Getting better
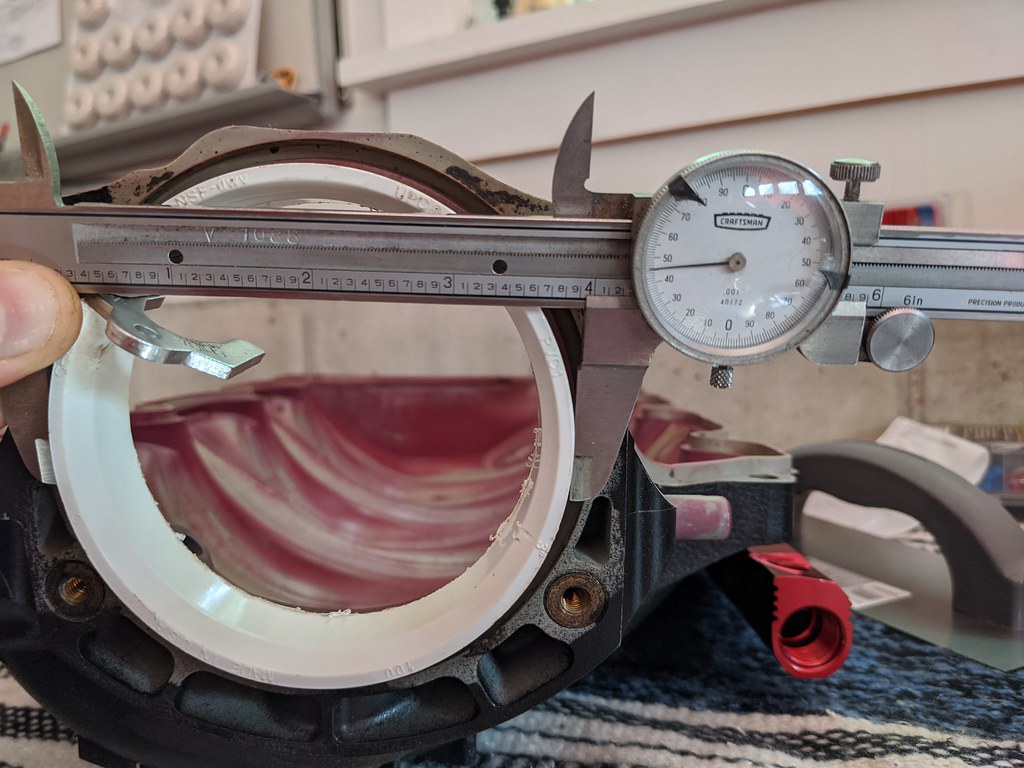
Eventually I was able to get the whole PVC pipe in there which measured out at 4.020, so it was a little larger than the TB. But what happened is the intake would stretch back to it's natural position and wouldn't get any larger than 3.965". At this point it's close enough for me to catch it with a cartridge roll and have a flush opening with the TB.
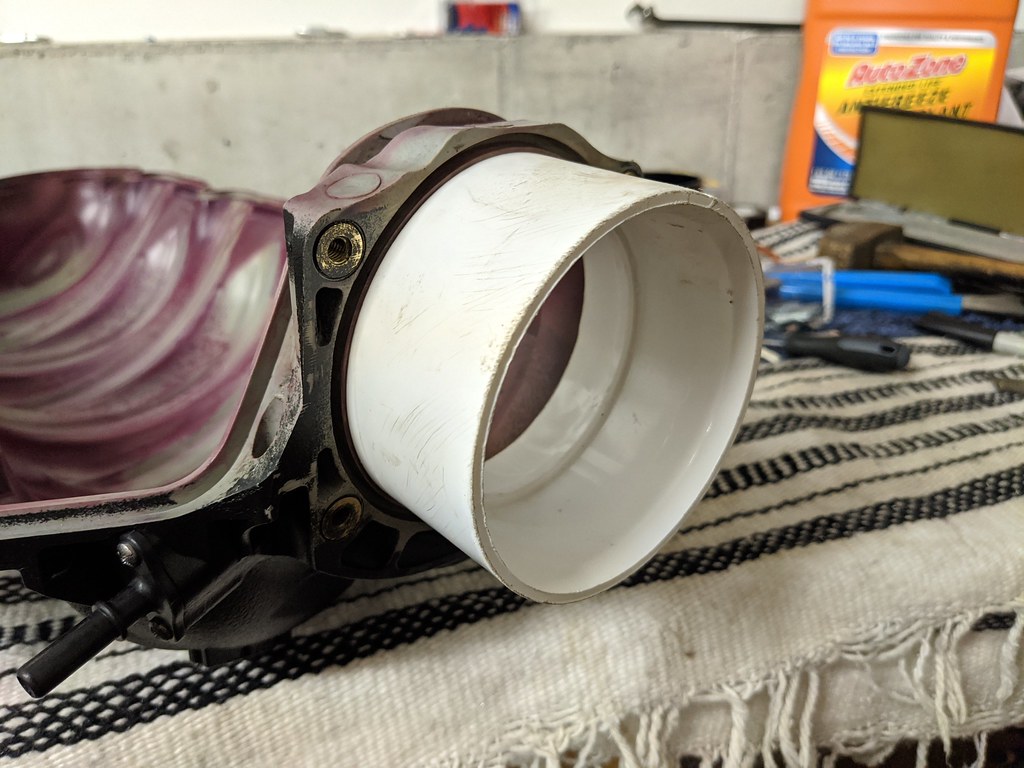
I'm much happier with this now. Should have gotten a picture before I started. I could actually see the seal for the TB...
While I had the intake out, I decided to throw on a set of Holley EFI fuel rails I've had for a while and they actually fit much better than the Aeromotive rails. I think that with the stainless steel heads on the bolts, it will break up all the black and look really good. I may brush some Torch Red paint I have on the logos on the intake.
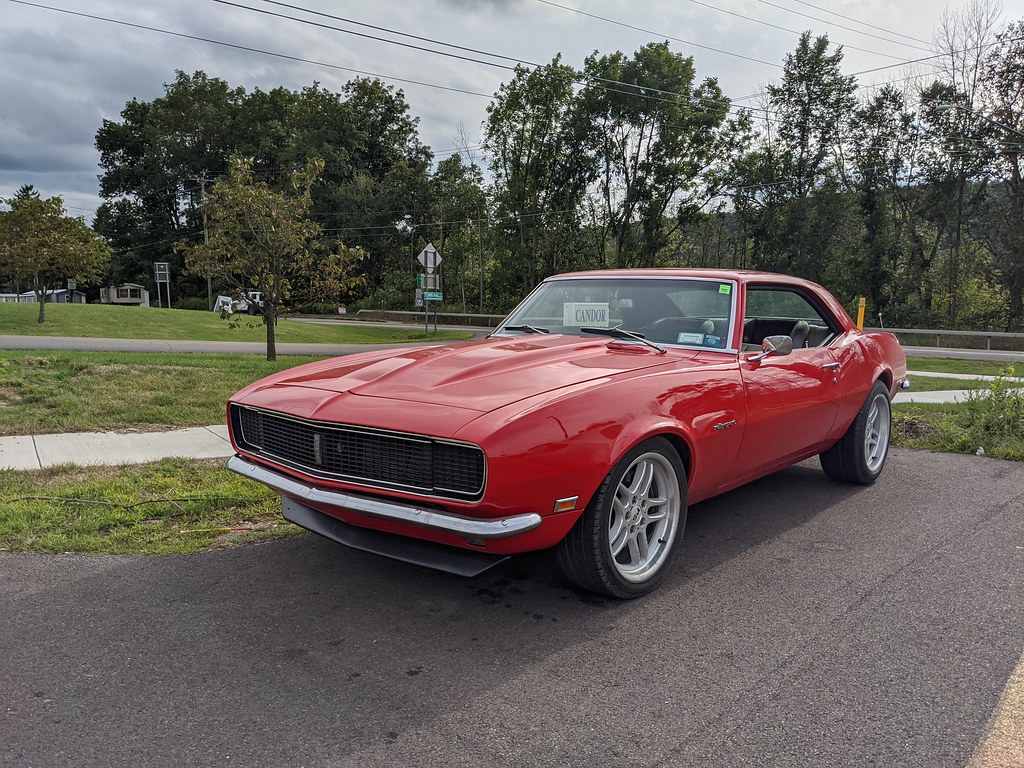
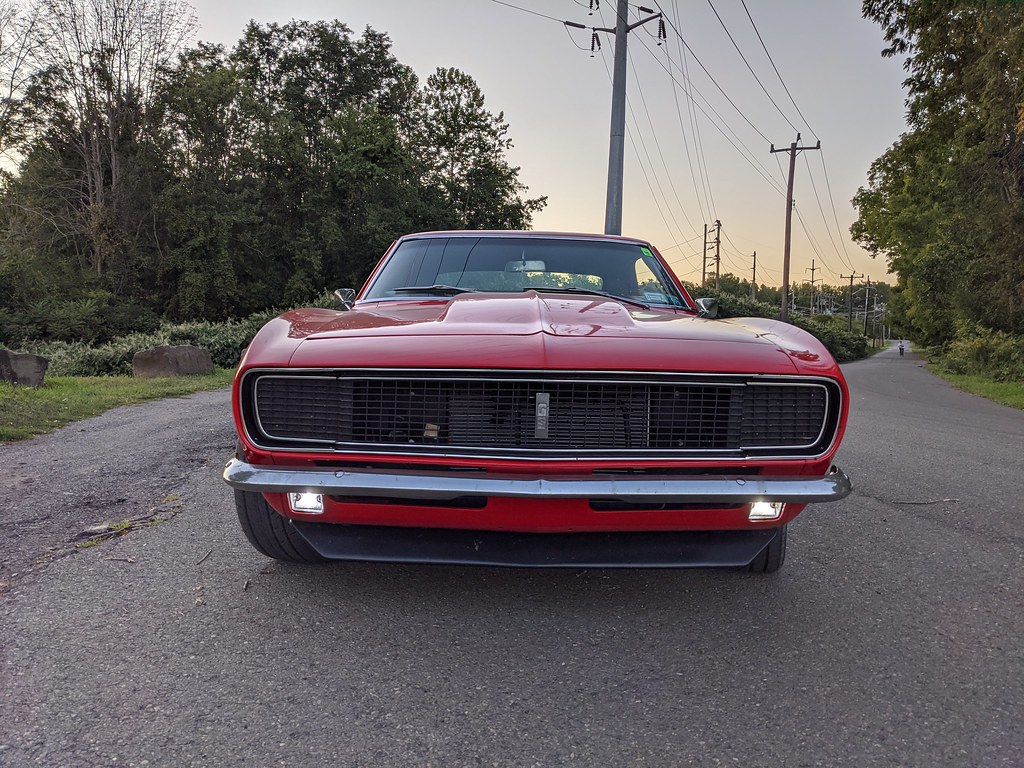
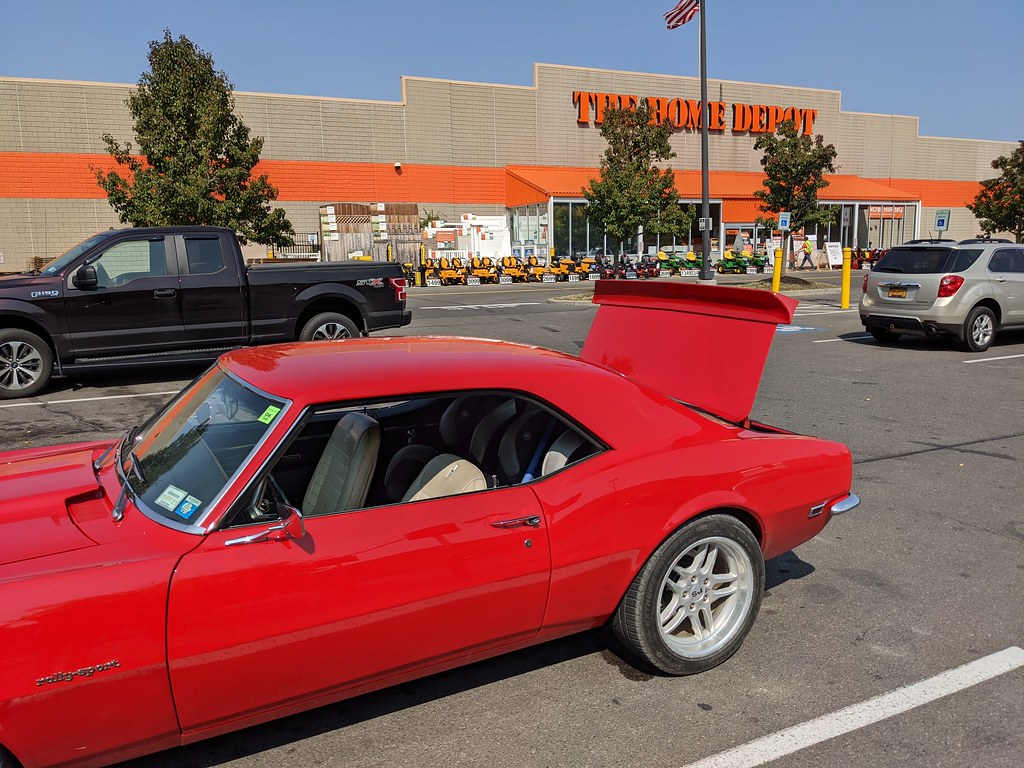
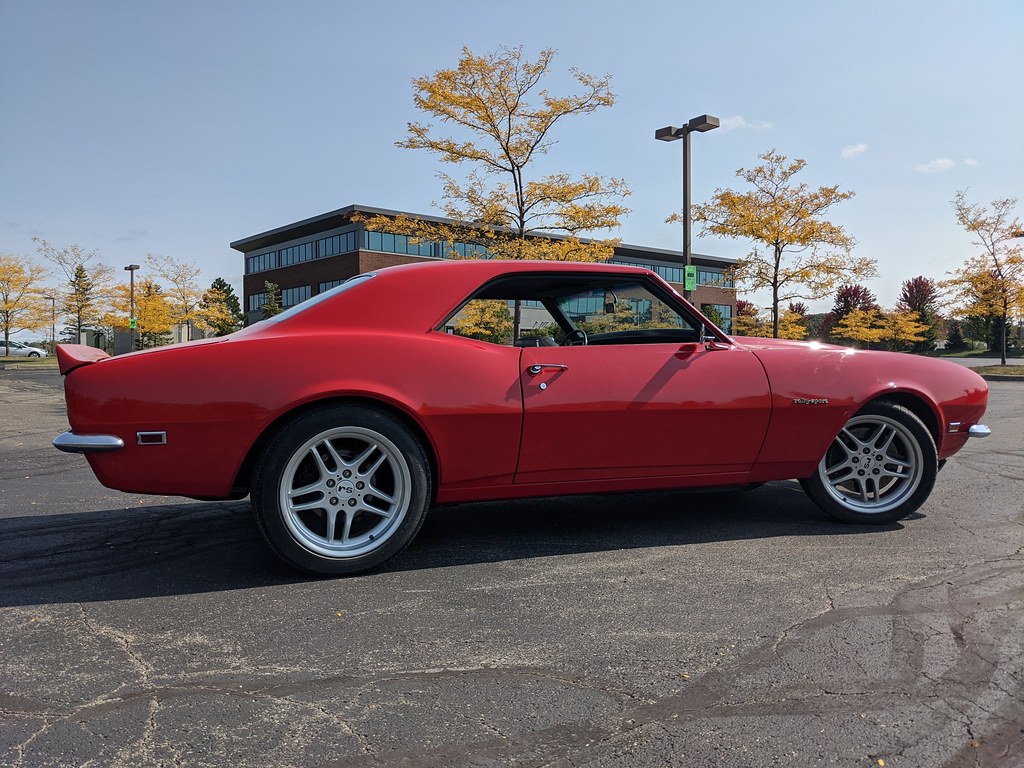
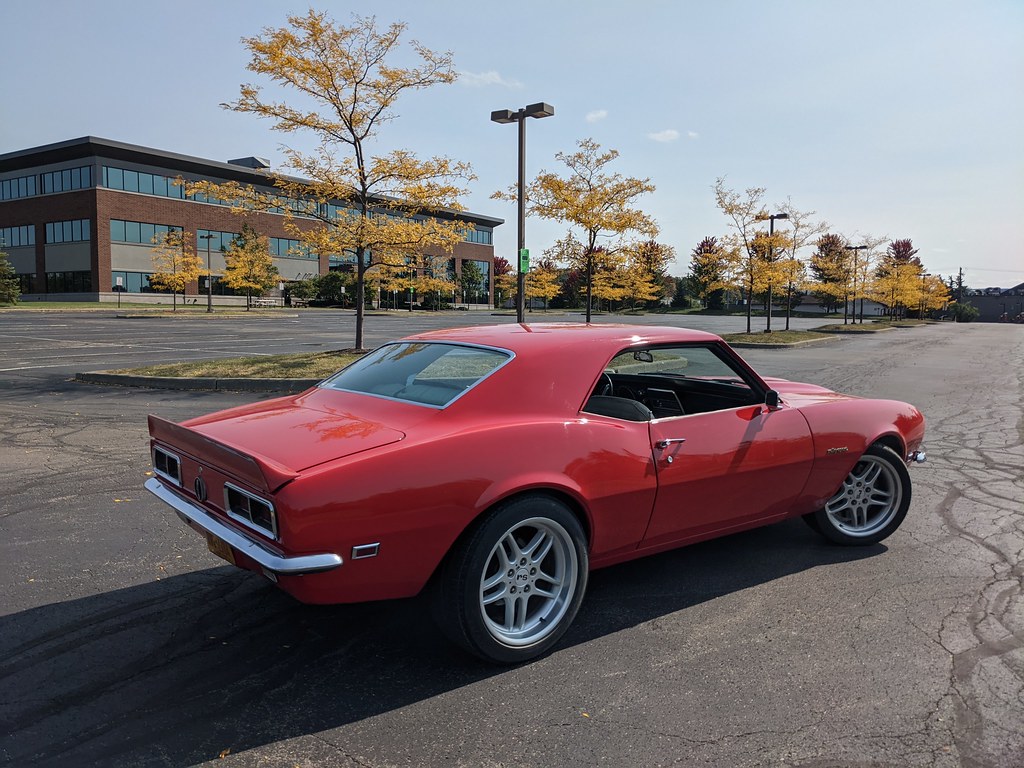
On Saturday I got my car out for a short drive and wanted to grab some pictures. Thought I'd share. I'm no photographer, but I think they turned out pretty good for cell phone pictures.
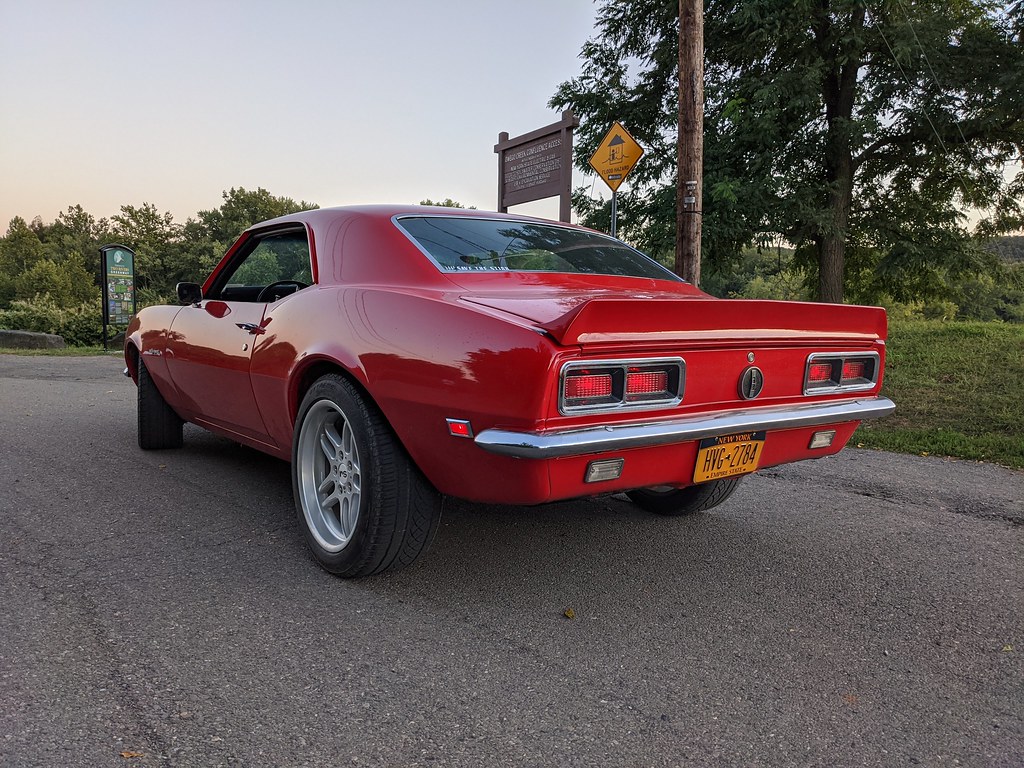
This is a cool picture because in 2012 we had a historic flood in this town and that blue label on the sign behind the car was the highest level that the water rose to!
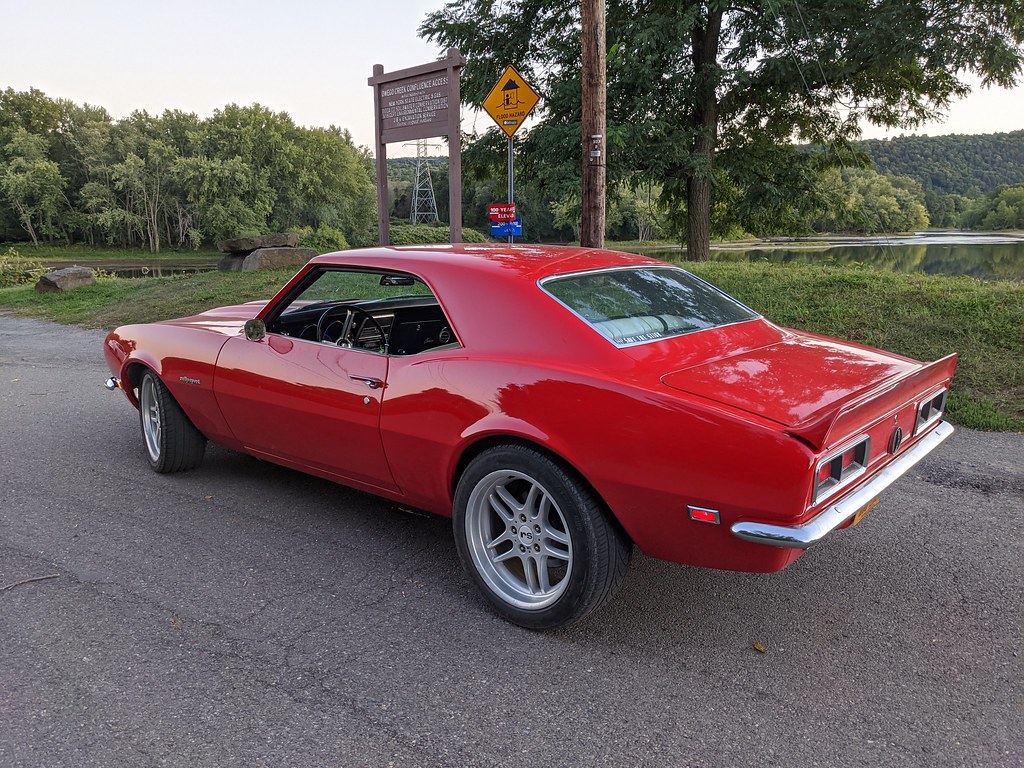
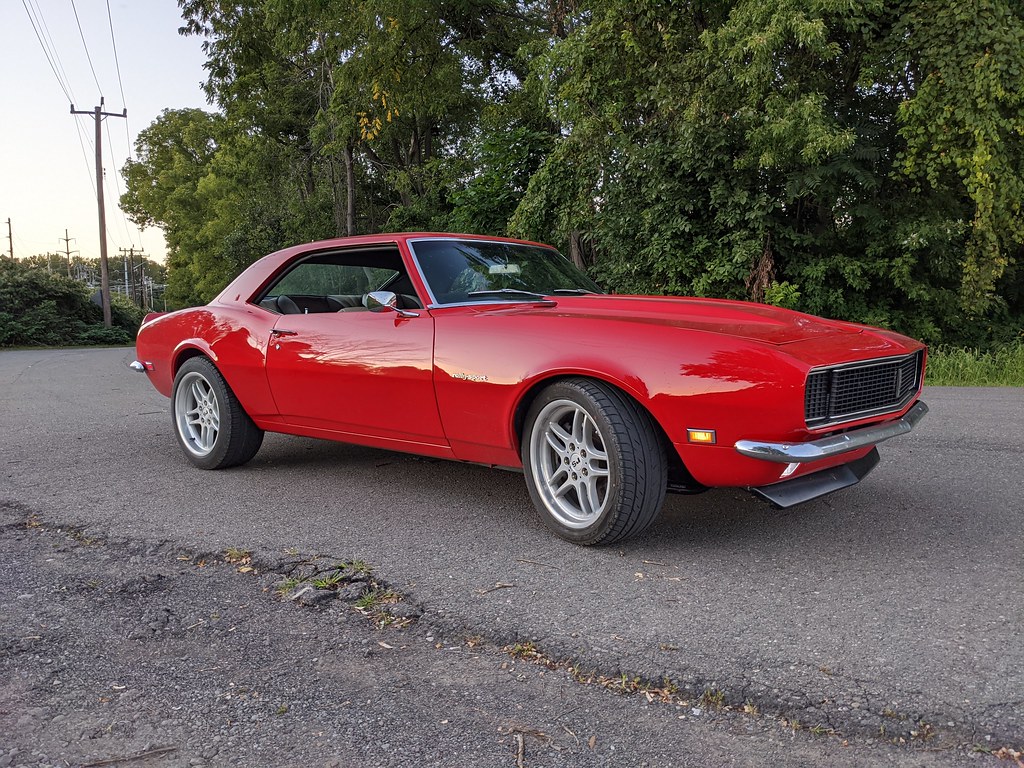
This was my favorite picture from the day.

Cheers,
Ryan
I found out that a 3" PVC pipe has almost exactly a 4" outer diameter, so I used that as a starting point to get it back to where it should be. I didn't get a picture of the measurements before I started but it was around 3.870", which is much smaller than 4.016"(converted from 102mm). I cut about 1" off of the end of the PVC pipe and then cut a section out of it. I heated it up and slowly added some body shims I had to help this stretch back into place.
Getting better
Eventually I was able to get the whole PVC pipe in there which measured out at 4.020, so it was a little larger than the TB. But what happened is the intake would stretch back to it's natural position and wouldn't get any larger than 3.965". At this point it's close enough for me to catch it with a cartridge roll and have a flush opening with the TB.
I'm much happier with this now. Should have gotten a picture before I started. I could actually see the seal for the TB...
While I had the intake out, I decided to throw on a set of Holley EFI fuel rails I've had for a while and they actually fit much better than the Aeromotive rails. I think that with the stainless steel heads on the bolts, it will break up all the black and look really good. I may brush some Torch Red paint I have on the logos on the intake.
On Saturday I got my car out for a short drive and wanted to grab some pictures. Thought I'd share. I'm no photographer, but I think they turned out pretty good for cell phone pictures.
This is a cool picture because in 2012 we had a historic flood in this town and that blue label on the sign behind the car was the highest level that the water rose to!
This was my favorite picture from the day.
Cheers,
Ryan
The following users liked this post:
Speed Freek (03-28-2022)
01-07-2021, 02:26 PM
#4
TECH Fanatic
Thread Starter
iTrader: (27)
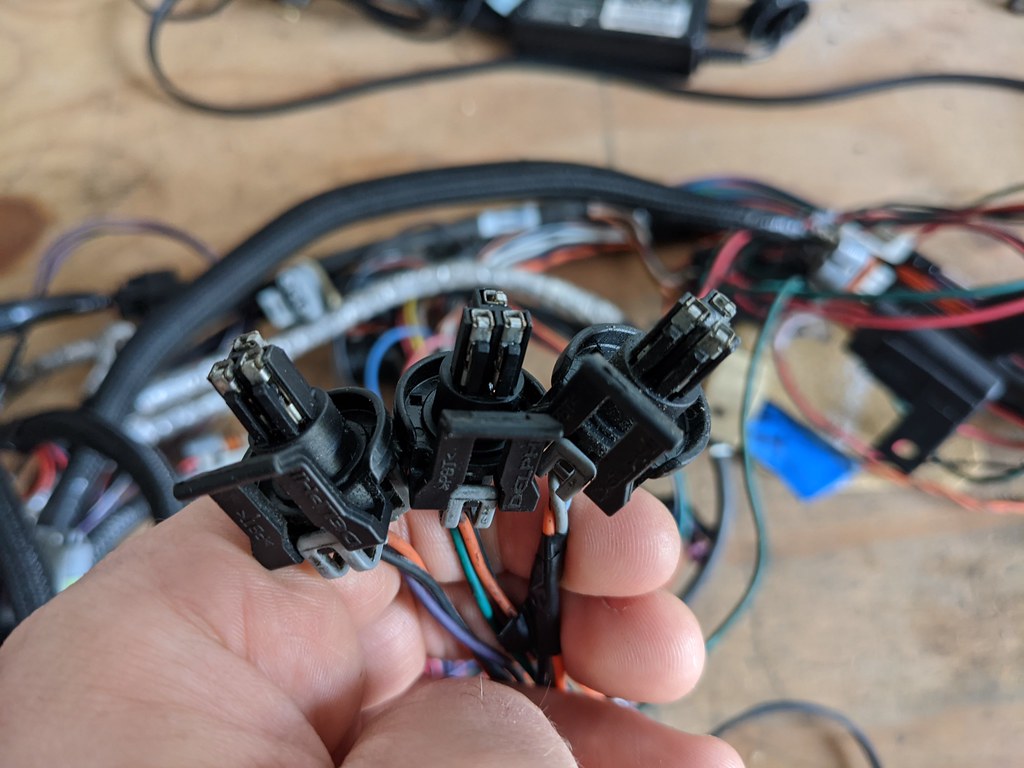
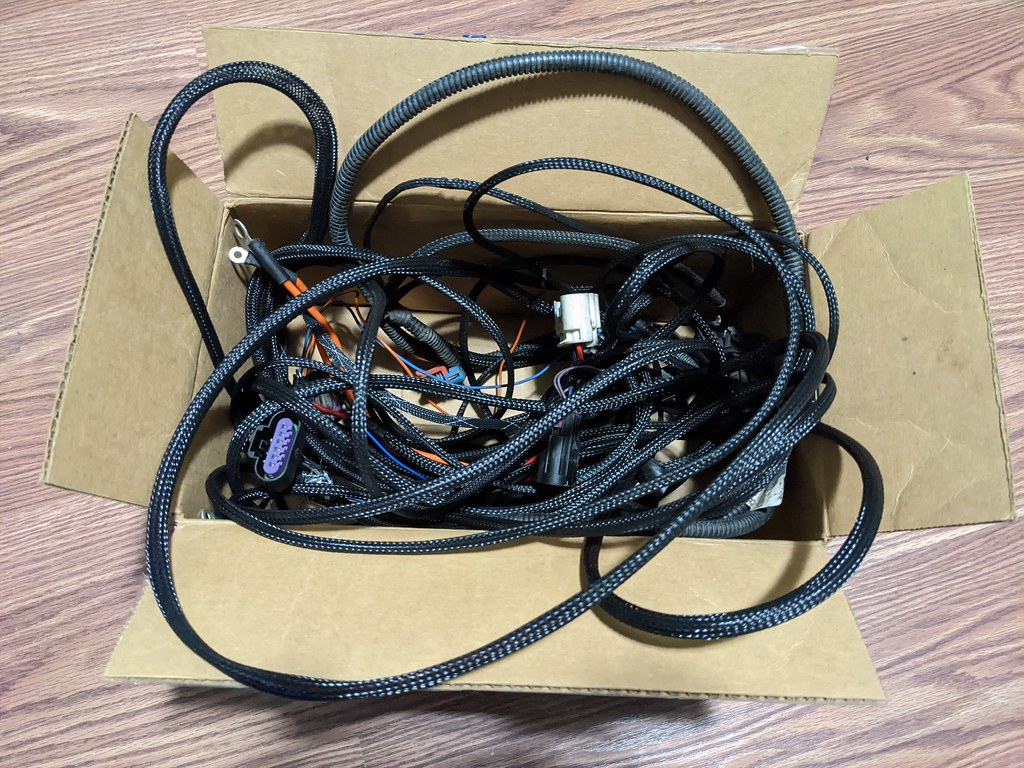
Not a huge update, just collecting parts and tinkering on the motor and intake. Mostly just driving the car as the driving season is coming to an end. I was planning on modifying my stock 24x harness that came with my Terminator X so that it will run properly with the 58x engine, but came across a great deal on a 58x harness. There were enough differences, that it made sense to just buy this harness since it was about 1/3 the price of new. The guy also included an I/O harness add on and swapped the LS1 style MAP pigtail for the LS3 style.
Only thing missing or modified was the seal and terminal retainer for these three pigtails. Cheap fix to get more.
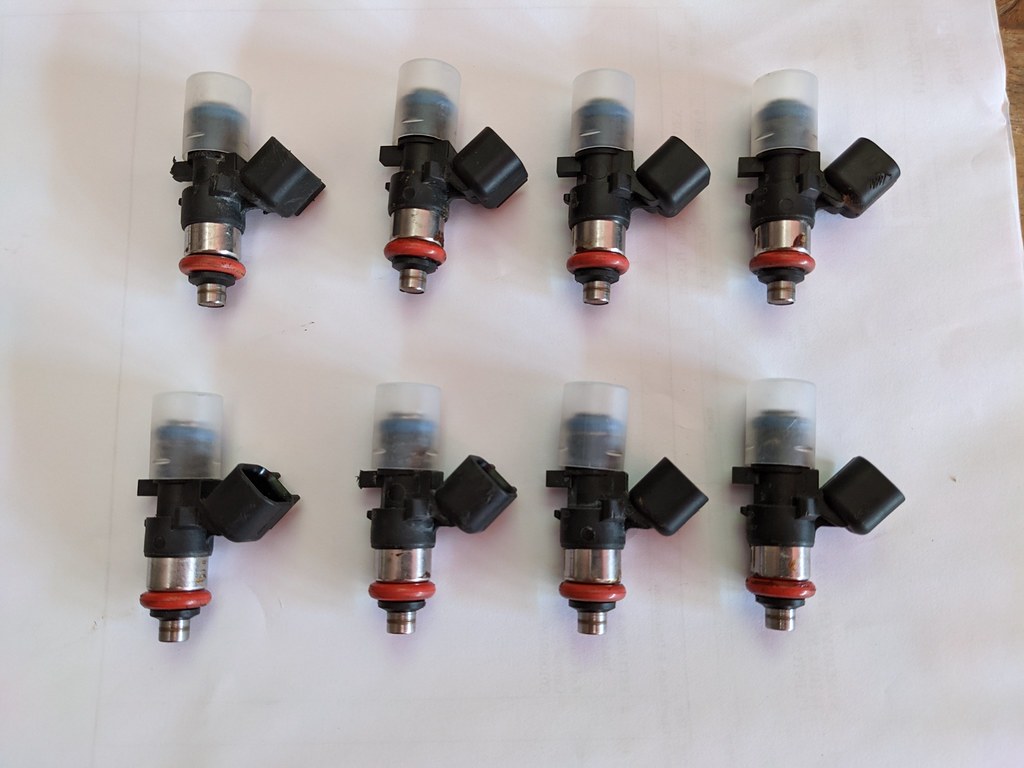
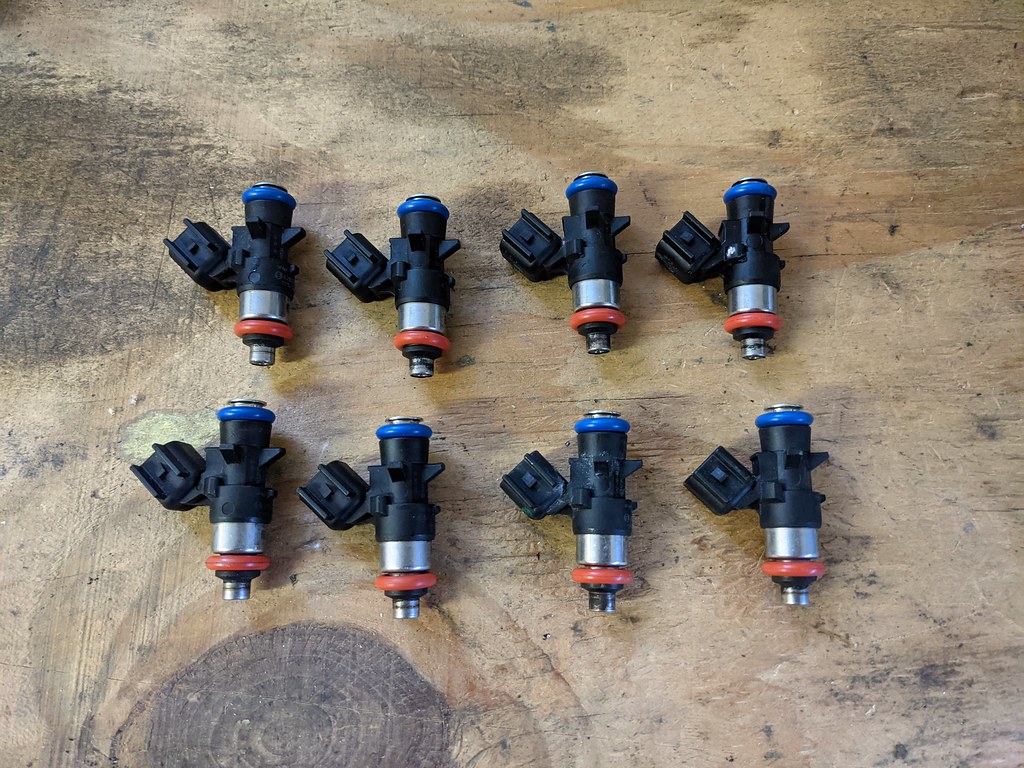
Bobby (Uglybird) hooked me up with a set of 52lb. LSA injectors that he wasn't using. Thanks again man.
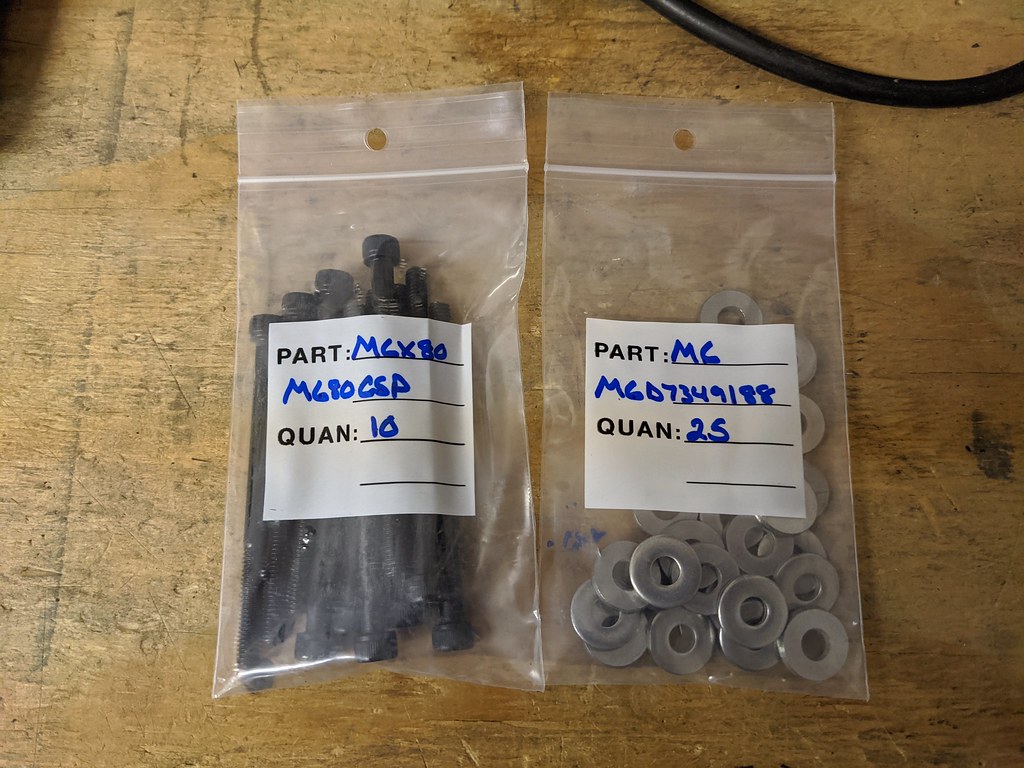
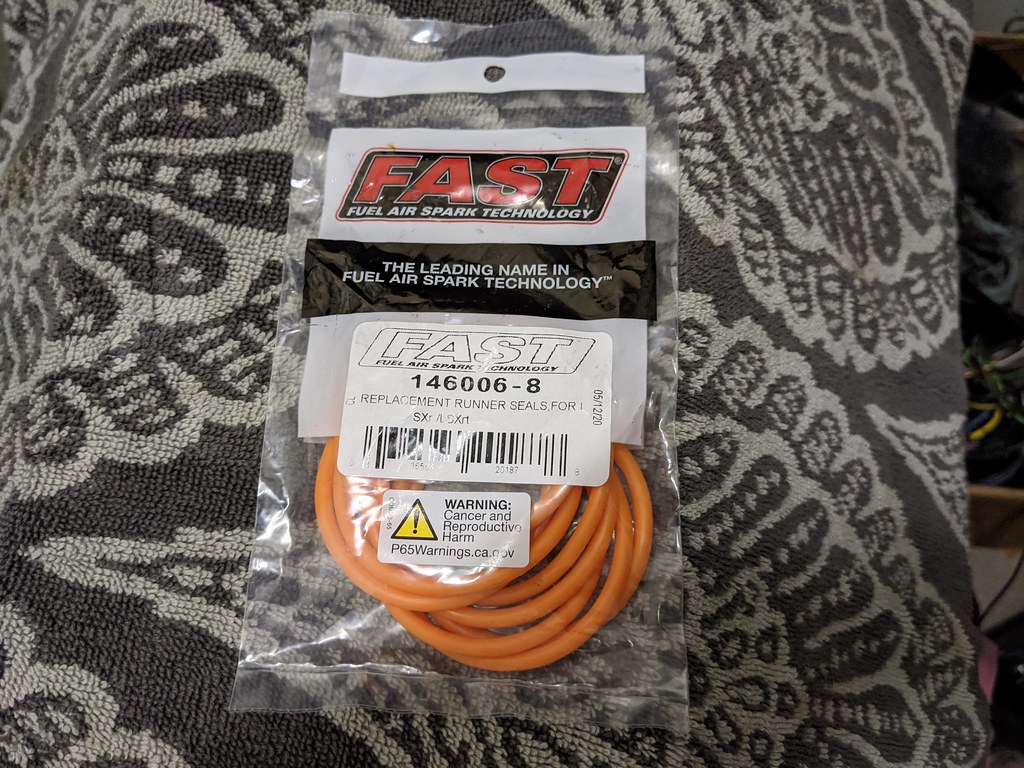
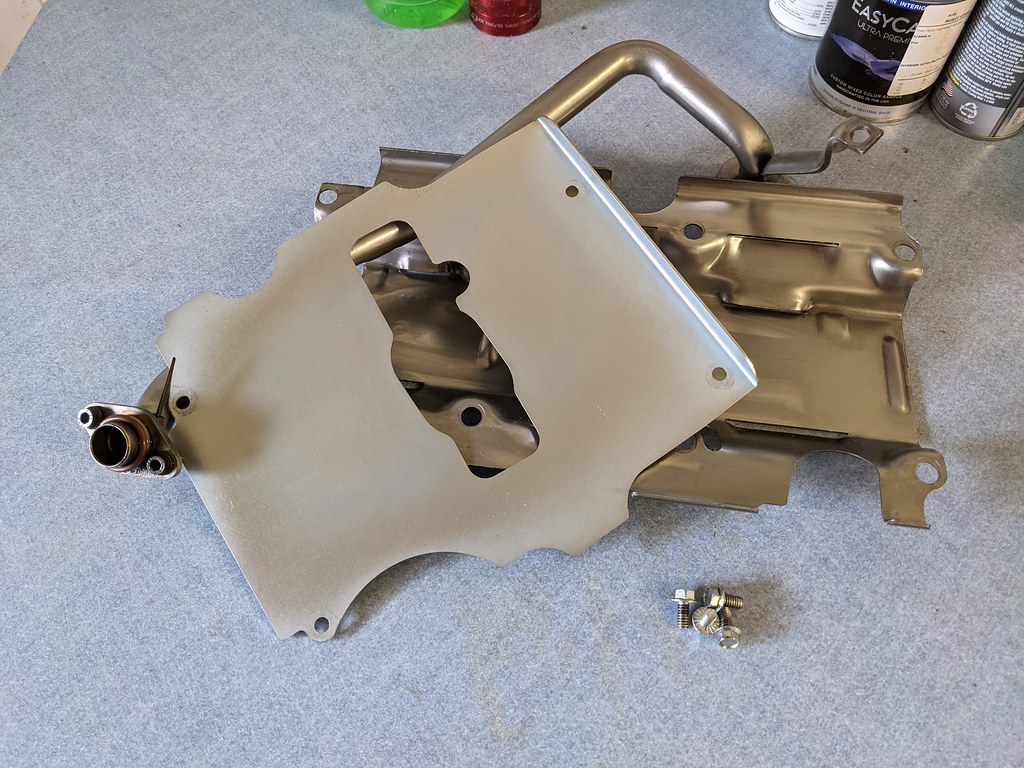
I also picked up all brand new stainless hardware for the FAST intake. All of the external hardware had seen better days, so I swapped it all out. There are 8 internal flange bolts that hold each of the runners in place, which are not stainless. I searched high and low and finally found a set in stainless for a great price. I also bought some brand new runner seals since 5 of the 8 were torn. Should be good as new once I put it all back together.
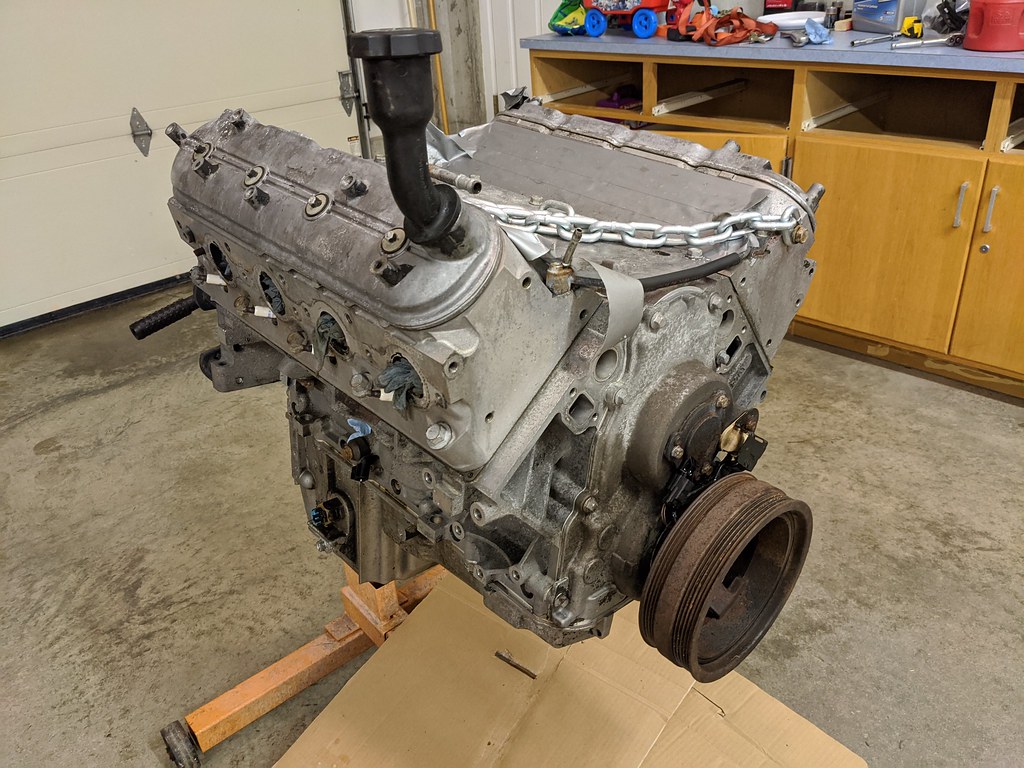
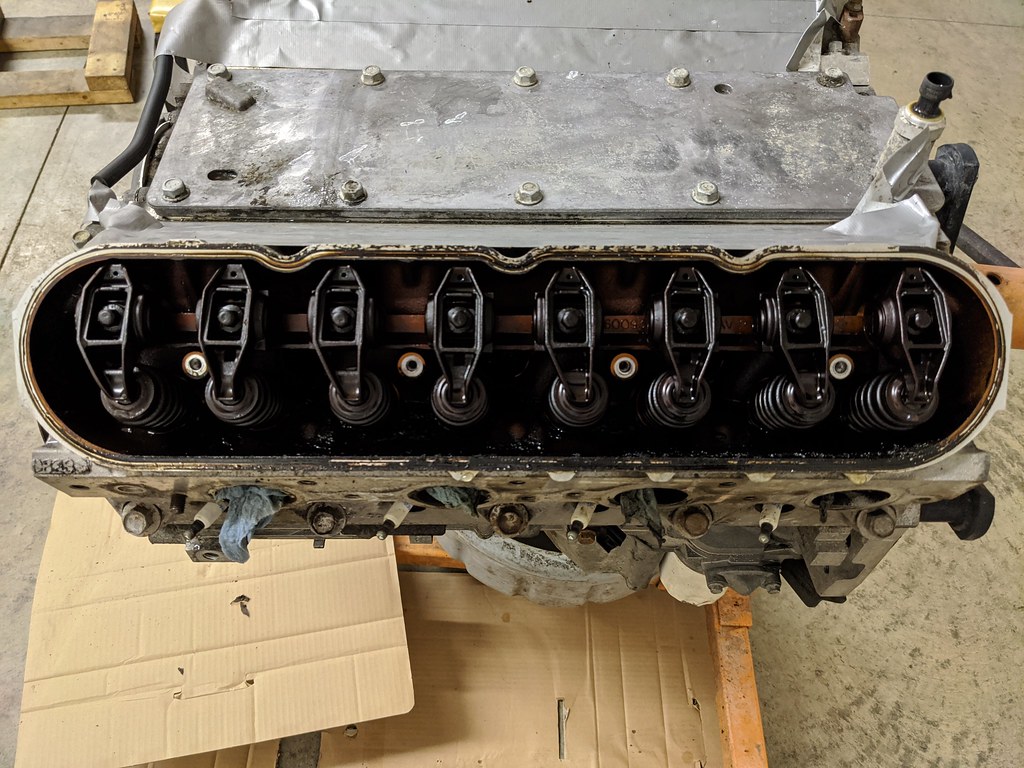
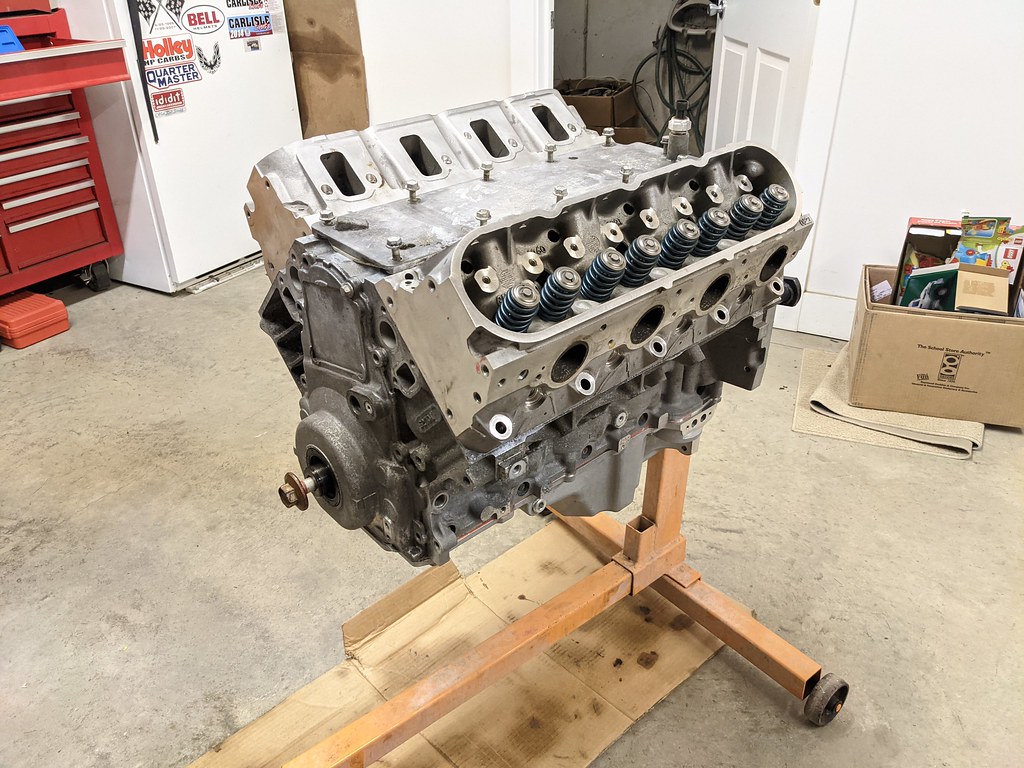
I set the low mileage 0821 heads on the motor just to see what it all looks like. I can't wait to tear into it. I'm waiting for my buddy to get me a flexplate so that I can get the balancer bolt off and see what the cam bearings look like.
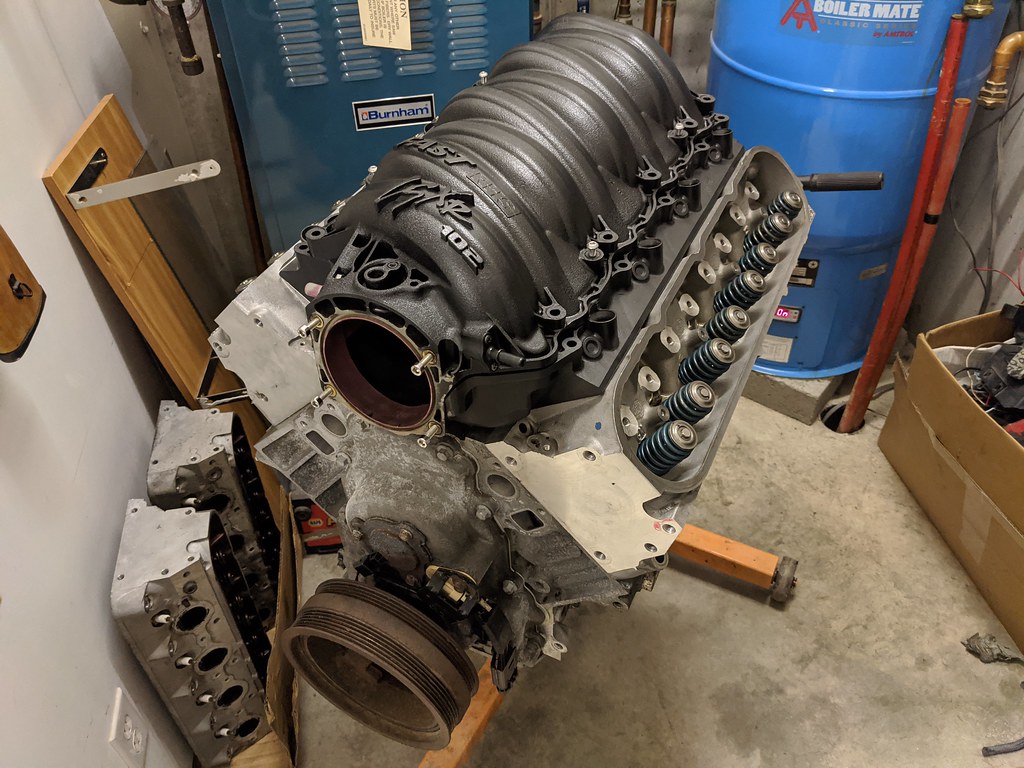
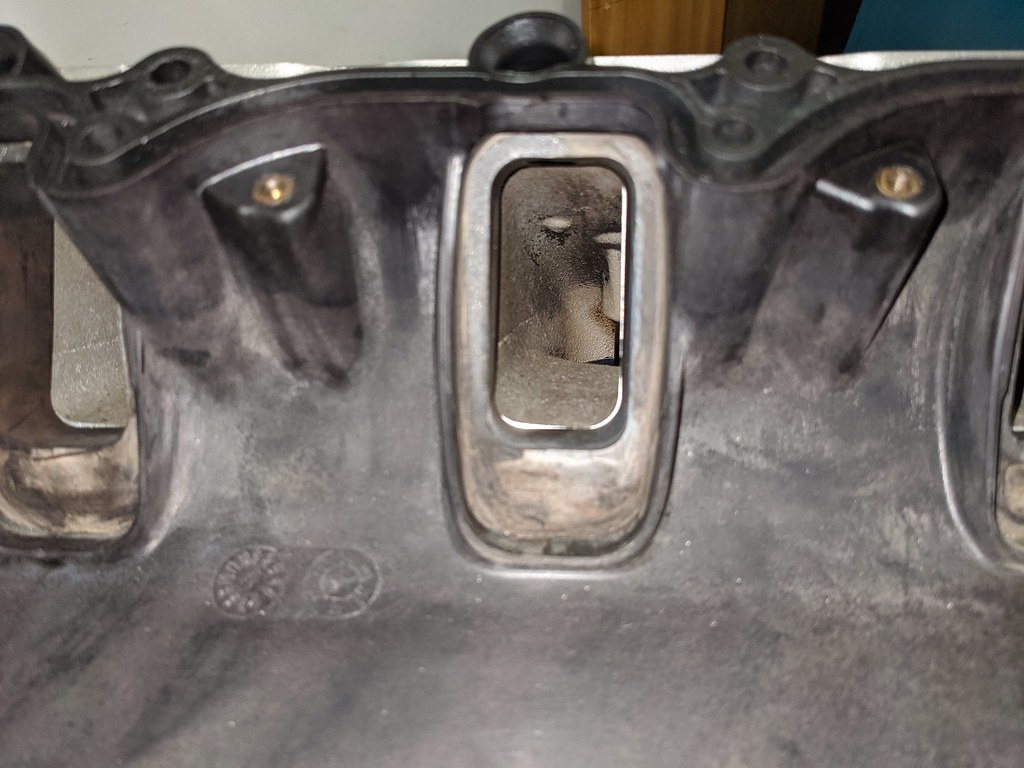
I also pulled the upper intake off to see how the ports matched up with the heads. Really not bad at all, but I'll touch up where the runners don't quite match up. Also now that I have the runner seals, I can re-install the runners and lightly port where the runners meet up to the intake flange. I've read that is where any gains would be made on these intakes, so I'll lightly hit them. Again, not going crazy, but while I'm there I might as well.

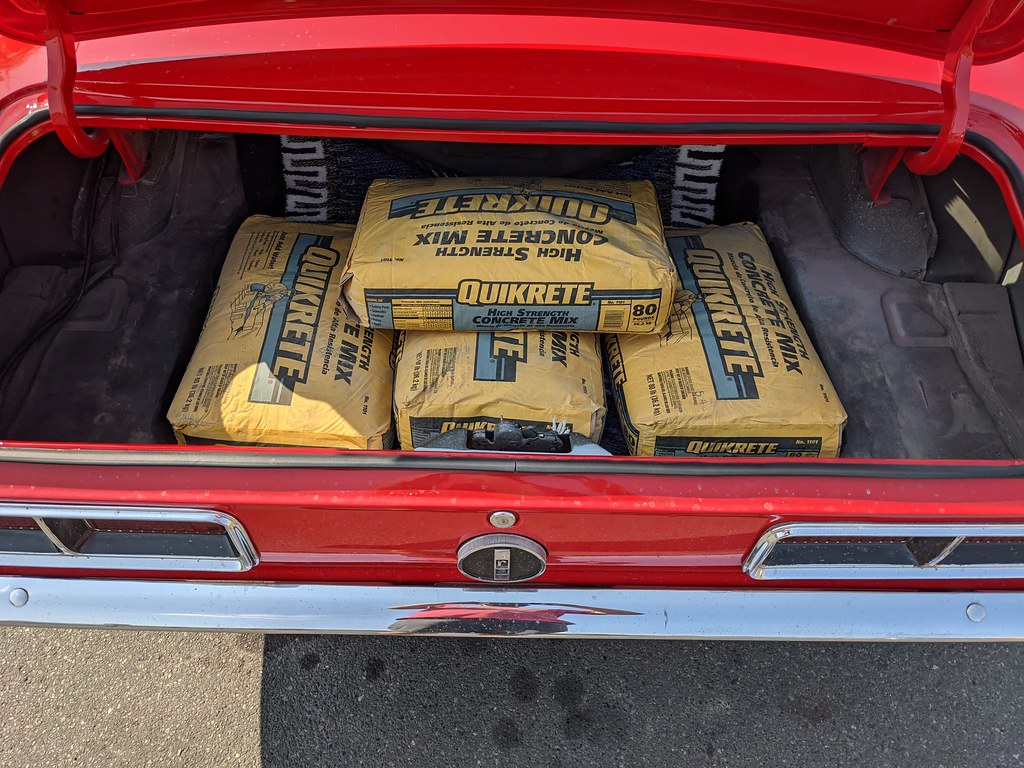
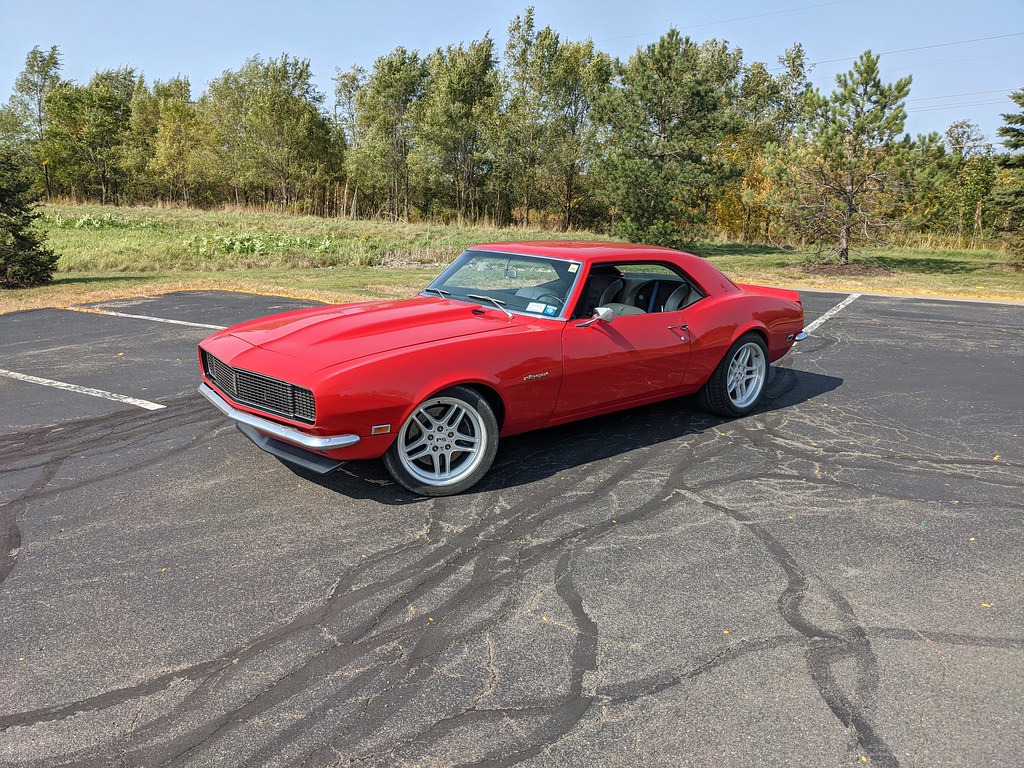
Over the past weekend I needed to run to Home Depot to grab a few bags of concrete. She handled it like a champ!! Just truck stuff, no big deal.
I stopped at my old office building on Cornell's campus and grabbed some cool fall pictures.

Cheers,
Ryan
Only thing missing or modified was the seal and terminal retainer for these three pigtails. Cheap fix to get more.
Bobby (Uglybird) hooked me up with a set of 52lb. LSA injectors that he wasn't using. Thanks again man.
I also picked up all brand new stainless hardware for the FAST intake. All of the external hardware had seen better days, so I swapped it all out. There are 8 internal flange bolts that hold each of the runners in place, which are not stainless. I searched high and low and finally found a set in stainless for a great price. I also bought some brand new runner seals since 5 of the 8 were torn. Should be good as new once I put it all back together.
I set the low mileage 0821 heads on the motor just to see what it all looks like. I can't wait to tear into it. I'm waiting for my buddy to get me a flexplate so that I can get the balancer bolt off and see what the cam bearings look like.
I also pulled the upper intake off to see how the ports matched up with the heads. Really not bad at all, but I'll touch up where the runners don't quite match up. Also now that I have the runner seals, I can re-install the runners and lightly port where the runners meet up to the intake flange. I've read that is where any gains would be made on these intakes, so I'll lightly hit them. Again, not going crazy, but while I'm there I might as well.
Over the past weekend I needed to run to Home Depot to grab a few bags of concrete. She handled it like a champ!! Just truck stuff, no big deal.
I stopped at my old office building on Cornell's campus and grabbed some cool fall pictures.
Cheers,
Ryan
 01-07-2021, 02:28 PM
#6
TECH Fanatic
Thread Starter
iTrader: (27)
After a busy week of carefully removing all of the engine components it was time to get that LS1 out of there. I pulled the motor and trans together, but not after a little drama. I was going to meet the potential buyer Sunday morning, so I had prepped the car all week here and there to be able to pull the motor Friday night after my boys went to sleep. That way I'd have plenty of time and wouldn't need to rush since I do not want to repaint anything! Well my engine hoist had other plans...
I started trying to jack up the motor and it was leaking internally. Then I noticed this and by that time all the stores that had a new jack were all closed.
I ran to the trusty Harbor Freight Saturday morning and was able to get the new ram swapped in just a few minutes. Then take two for Saturday afternoon and the motor came out pretty uneventful. My older son even "helped" me. I liked having him out there as we was taking tools out of my toolbox and stacking/organizing them on the floor in his own way.
It's so oily because I had to swap oil pans. I kept the Holley 302-3.
Now I have this strange empty feeling inside...
And looking toward the future, I've decided to change directions slightly and sold the FAST 102. I'm not in the process of collecting parts to add some boost in the way of an LSA supercharger. I'm currently hunting for parts, so if you happen to have a supercharger and lid on the shelf and want it to go to a good home, shoot me a PM.
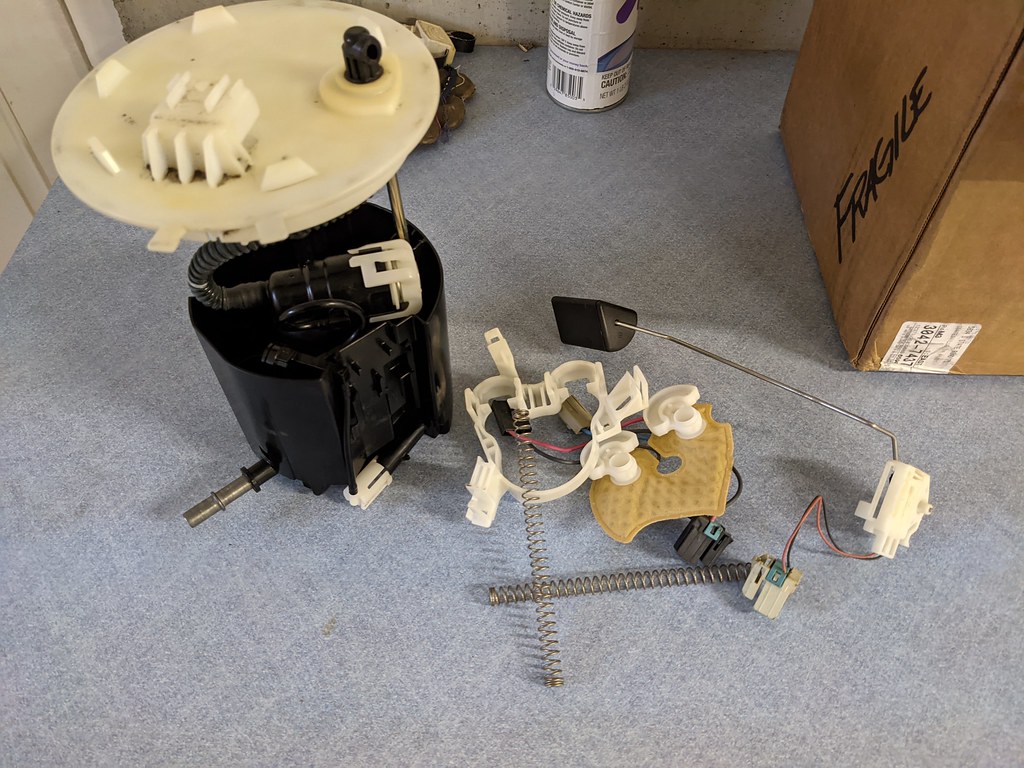
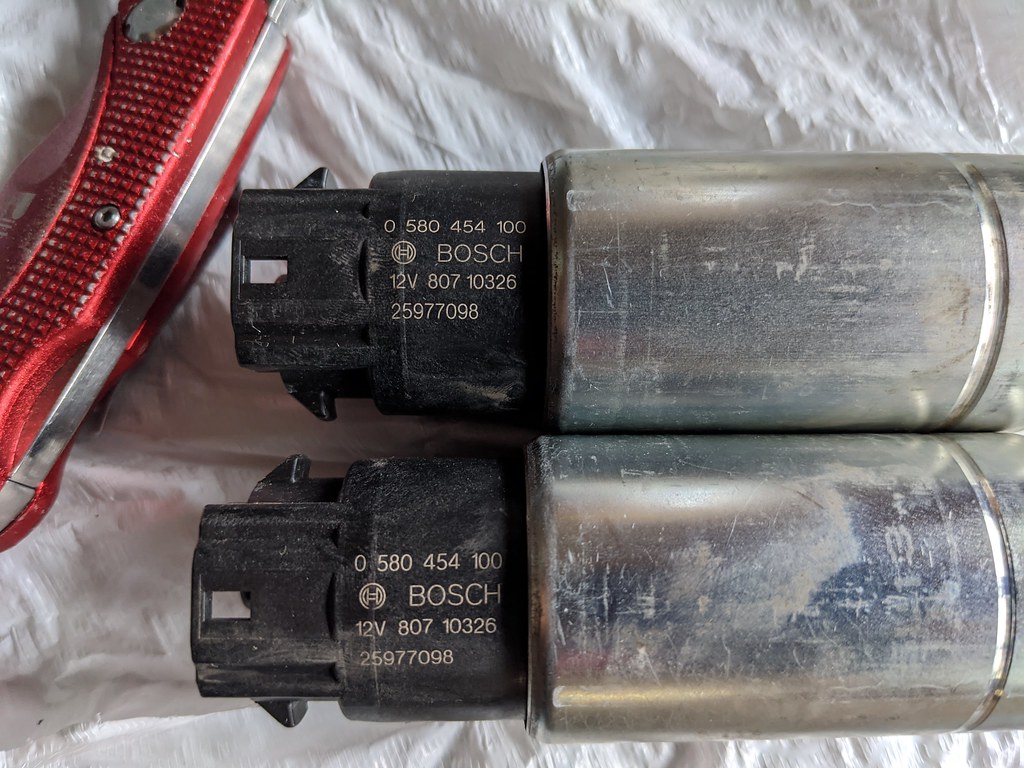
I picked up this Livernoise Firestorm fuel pump assembly for a killer price, but will need to fix the fuel hat. I think I have a clever solution for that, I'll check in soon. Livernoise says it will support 800HP, so it will support way more than I'll need.

Dual 255 LPH pumps
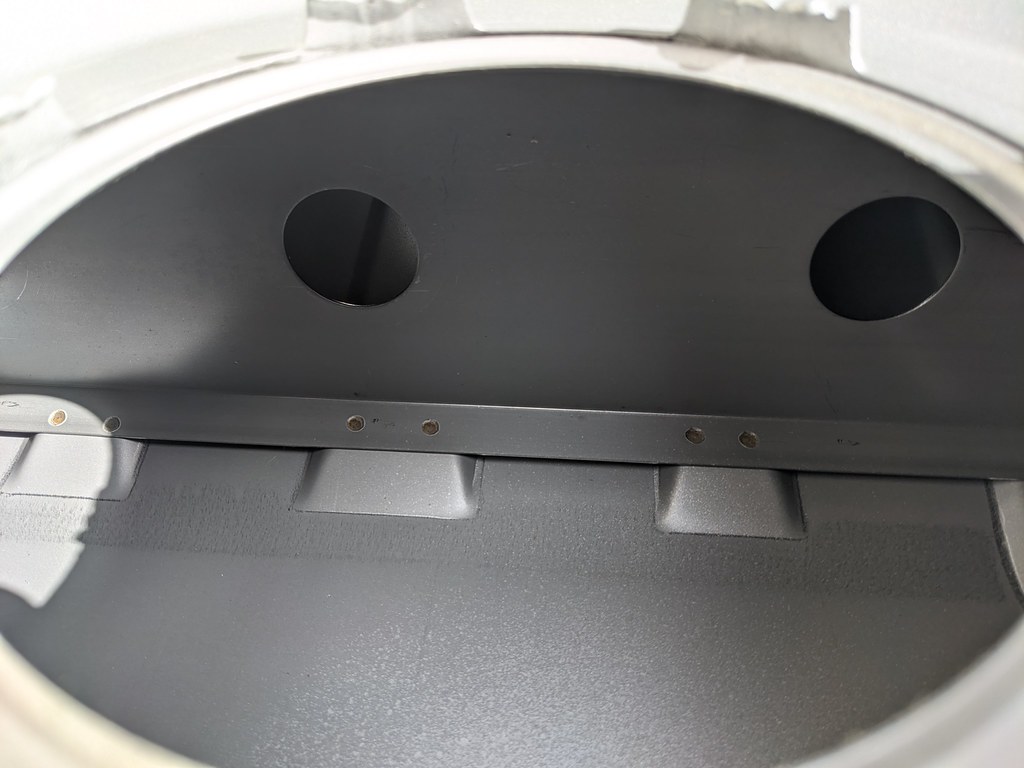
I kept having my fuel tank leaking and ended up pulling the trigger on the Rick's Resto-Mod tank. It will give me room to grow if/when I do a mini-tub, corner pickups, and larger fuel capacity. That's what happens when you have too much to drink working out in the garage I guess haha. I have to say that I'm super impressed with the quality and the construction. Even though the 5th gen pumps don't need it they added some internal baffling, which will help with hard accel or decel.
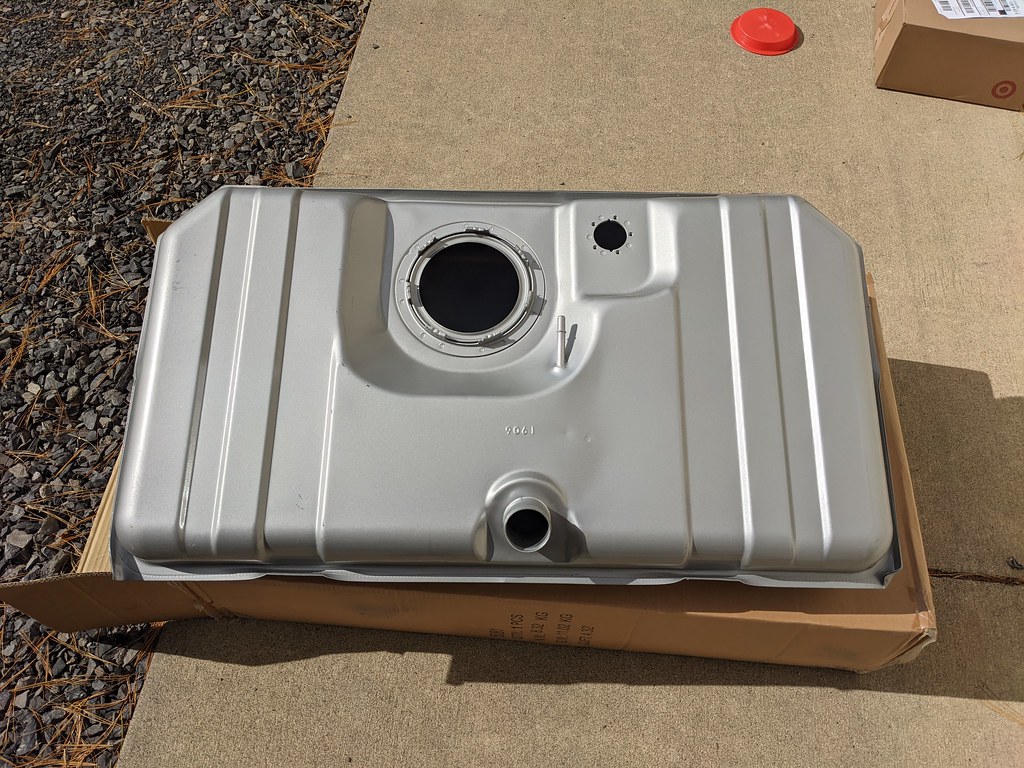
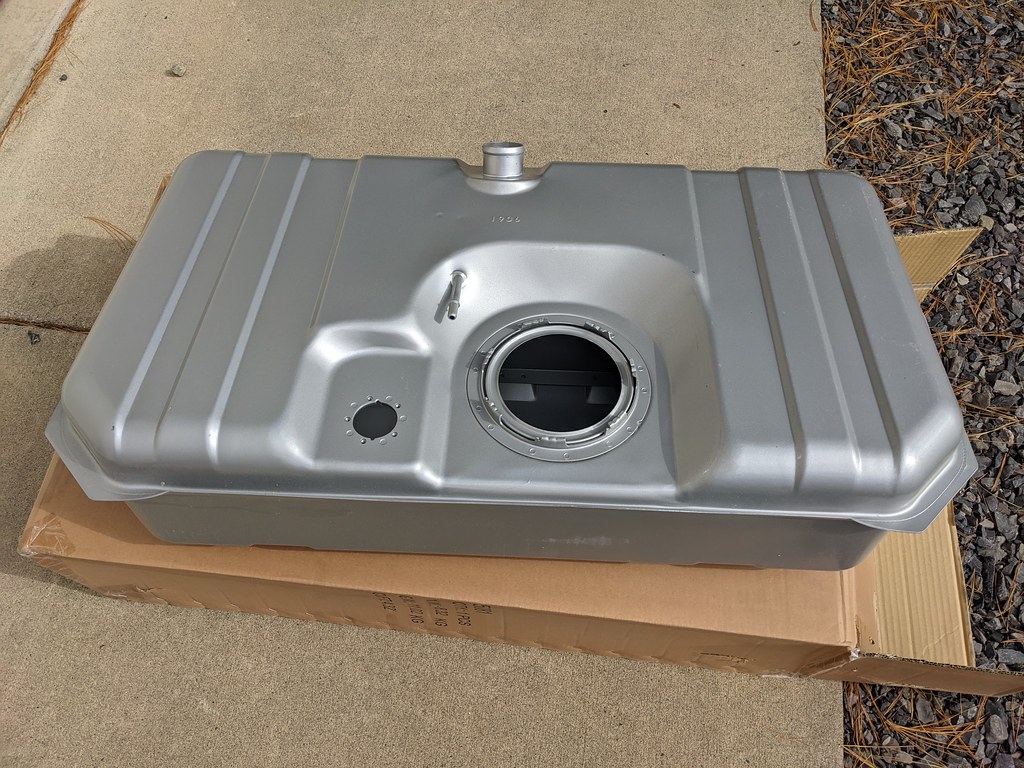
Corner pickups
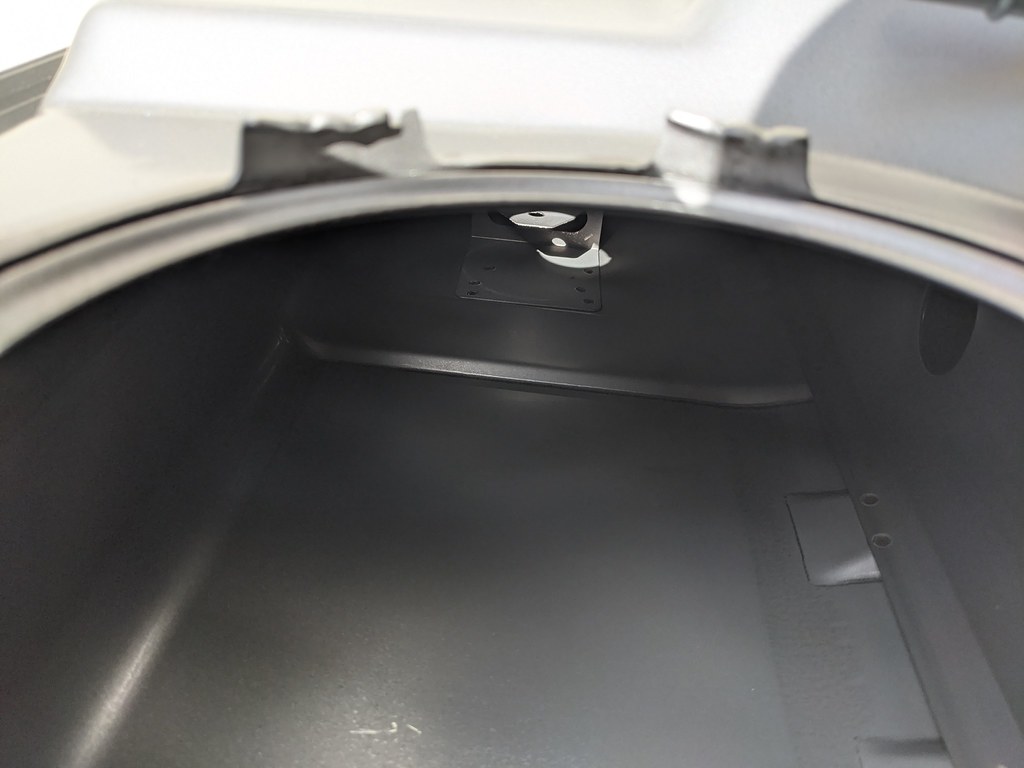
Internal baffling.
All for now, but I'll be adding parts as I now need a transmission, intake and everything else to get this back together.
Cheers,
Ryan
I started trying to jack up the motor and it was leaking internally. Then I noticed this and by that time all the stores that had a new jack were all closed.
I ran to the trusty Harbor Freight Saturday morning and was able to get the new ram swapped in just a few minutes. Then take two for Saturday afternoon and the motor came out pretty uneventful. My older son even "helped" me. I liked having him out there as we was taking tools out of my toolbox and stacking/organizing them on the floor in his own way.
It's so oily because I had to swap oil pans. I kept the Holley 302-3.
Now I have this strange empty feeling inside...
And looking toward the future, I've decided to change directions slightly and sold the FAST 102. I'm not in the process of collecting parts to add some boost in the way of an LSA supercharger. I'm currently hunting for parts, so if you happen to have a supercharger and lid on the shelf and want it to go to a good home, shoot me a PM.
I picked up this Livernoise Firestorm fuel pump assembly for a killer price, but will need to fix the fuel hat. I think I have a clever solution for that, I'll check in soon. Livernoise says it will support 800HP, so it will support way more than I'll need.
Dual 255 LPH pumps
I kept having my fuel tank leaking and ended up pulling the trigger on the Rick's Resto-Mod tank. It will give me room to grow if/when I do a mini-tub, corner pickups, and larger fuel capacity. That's what happens when you have too much to drink working out in the garage I guess haha. I have to say that I'm super impressed with the quality and the construction. Even though the 5th gen pumps don't need it they added some internal baffling, which will help with hard accel or decel.
Corner pickups
Internal baffling.
All for now, but I'll be adding parts as I now need a transmission, intake and everything else to get this back together.
Cheers,
Ryan
01-07-2021, 02:29 PM
#7
TECH Fanatic
Thread Starter
iTrader: (27)
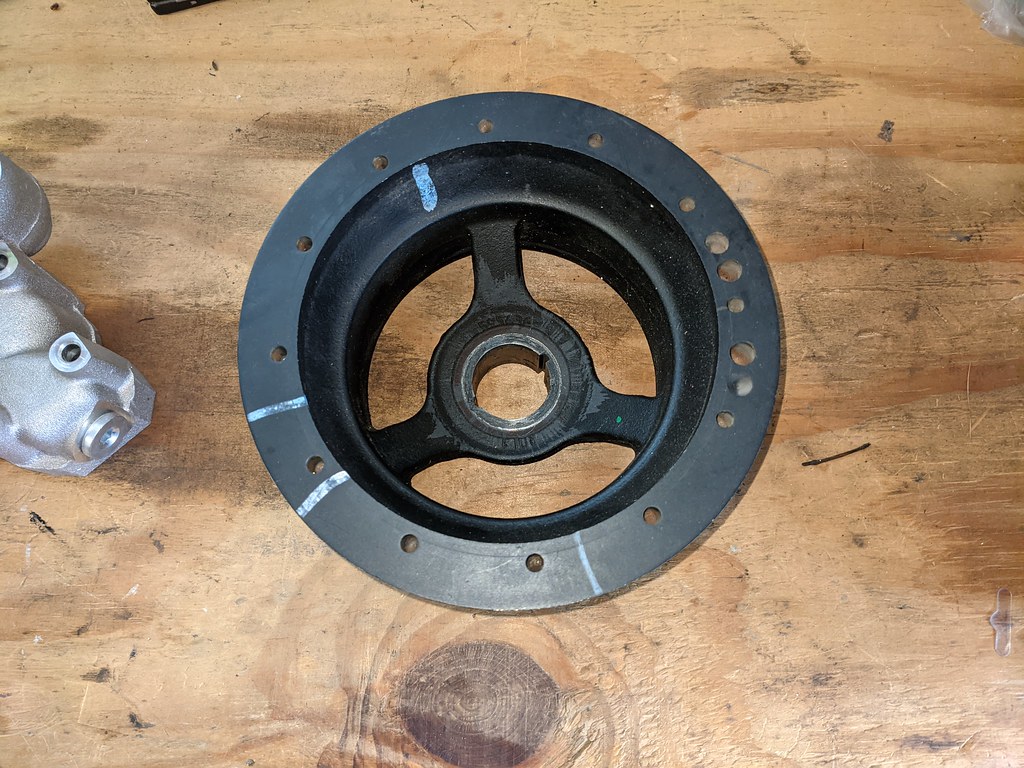
I made some progress on the disassembly of the 6.2 this weekend. I needed to get the timing cover off to keep digging deeper to inspect the motor. After a little persuasion I was able to break the balancer bolt free so that I could remove the timing cover.
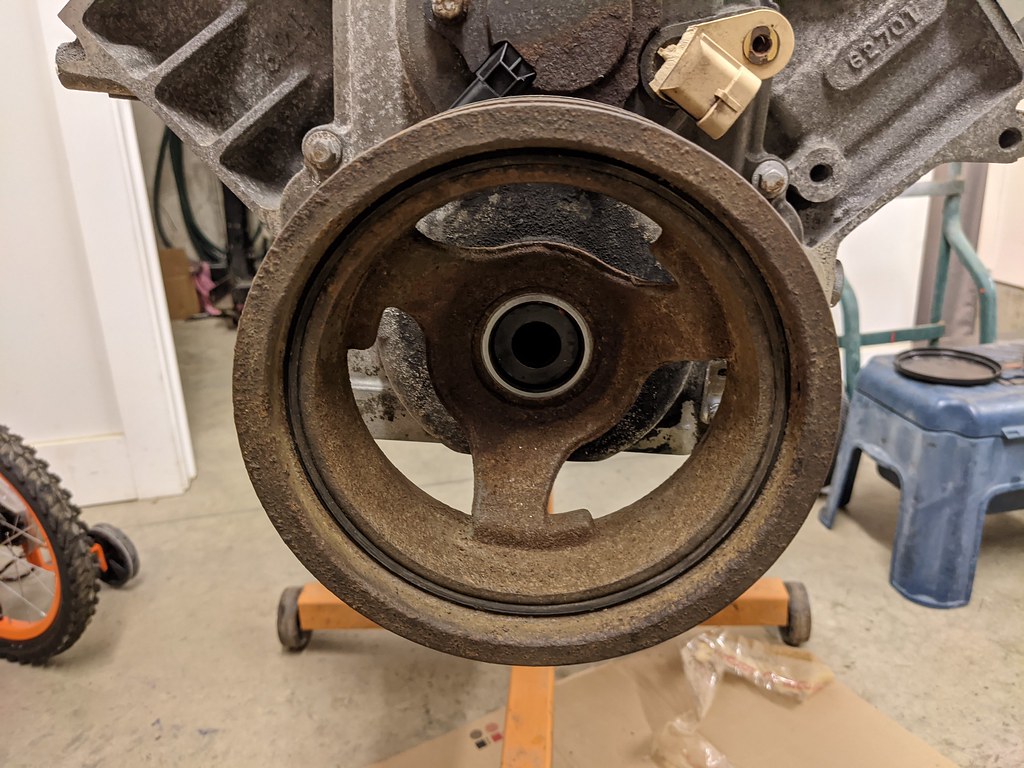
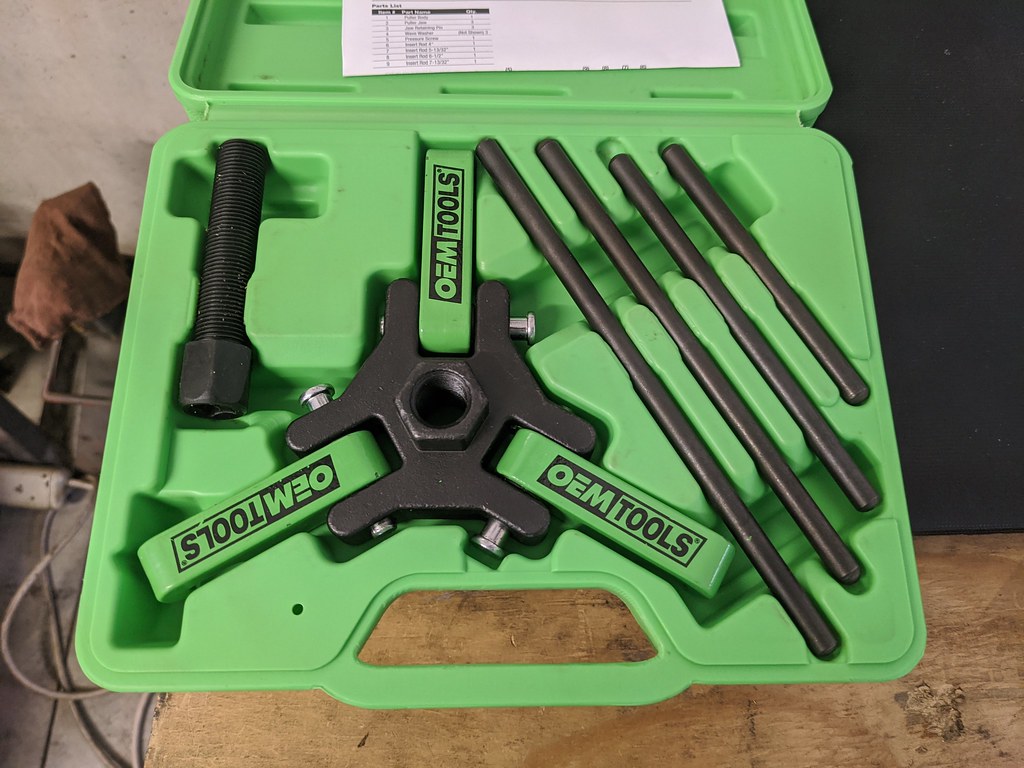
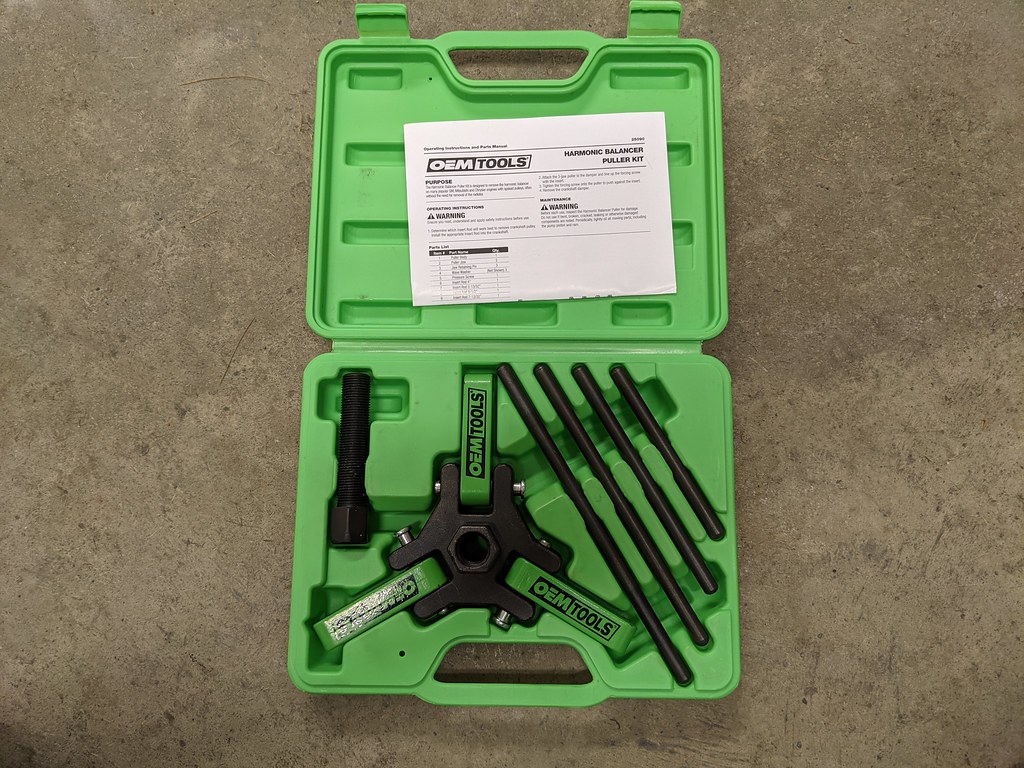
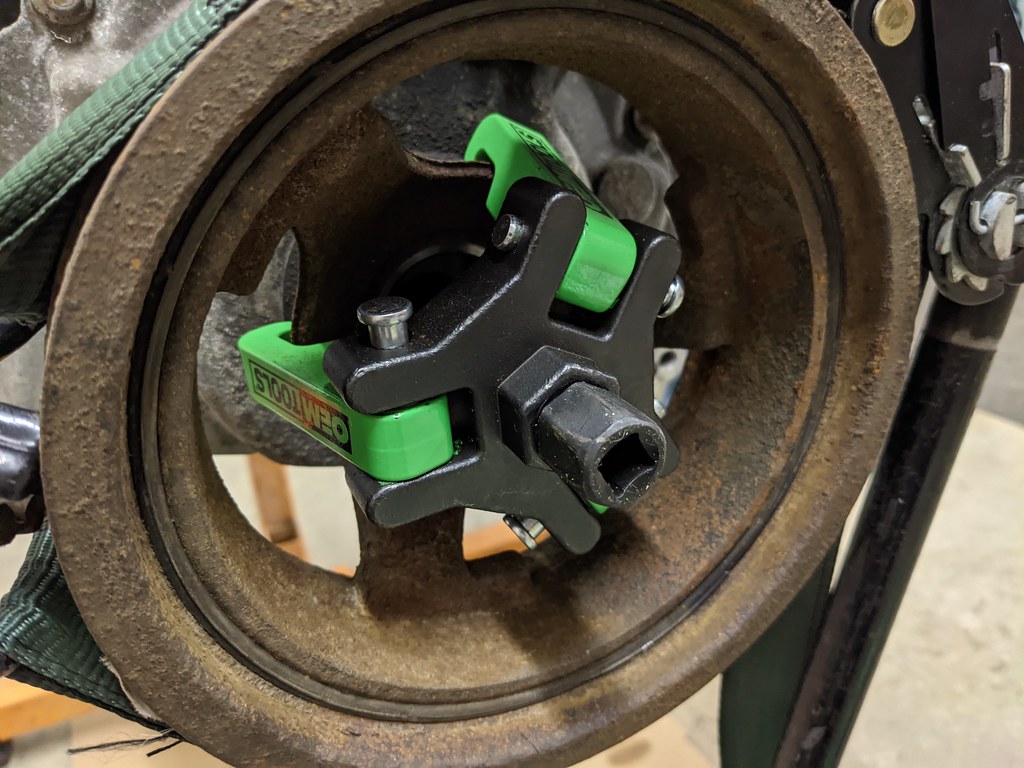
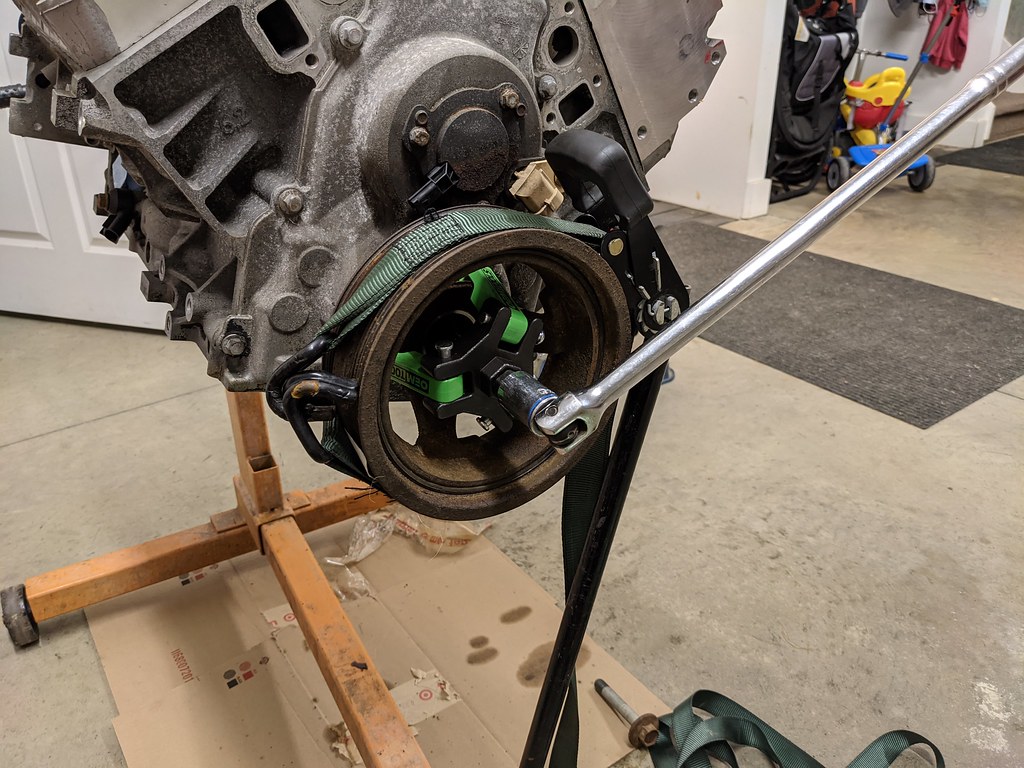
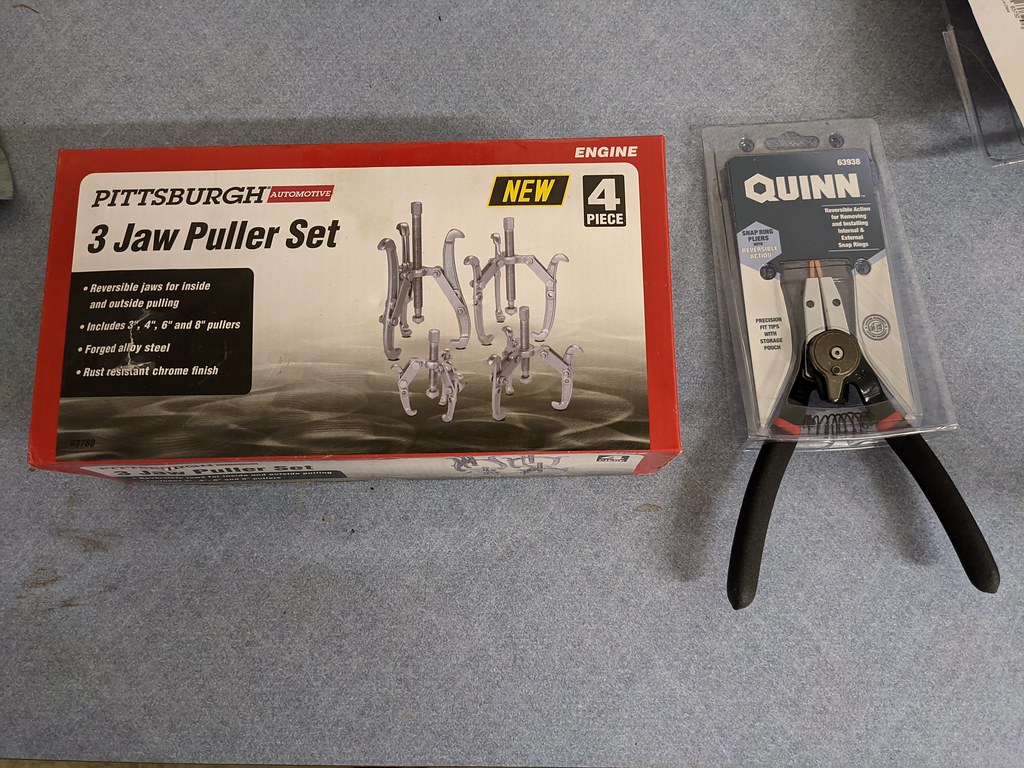
I picked up this puller from OEM tools and it made pulling the balancer super easy. I've wanted one for a while, so I figured I would spring for the purchase this time. I'm certain this won't be the last LS balancer I'll pull haha
Then it was time to get rid of the VVT parts. I'll hang onto them in case I ever want to try out a VVT cam.
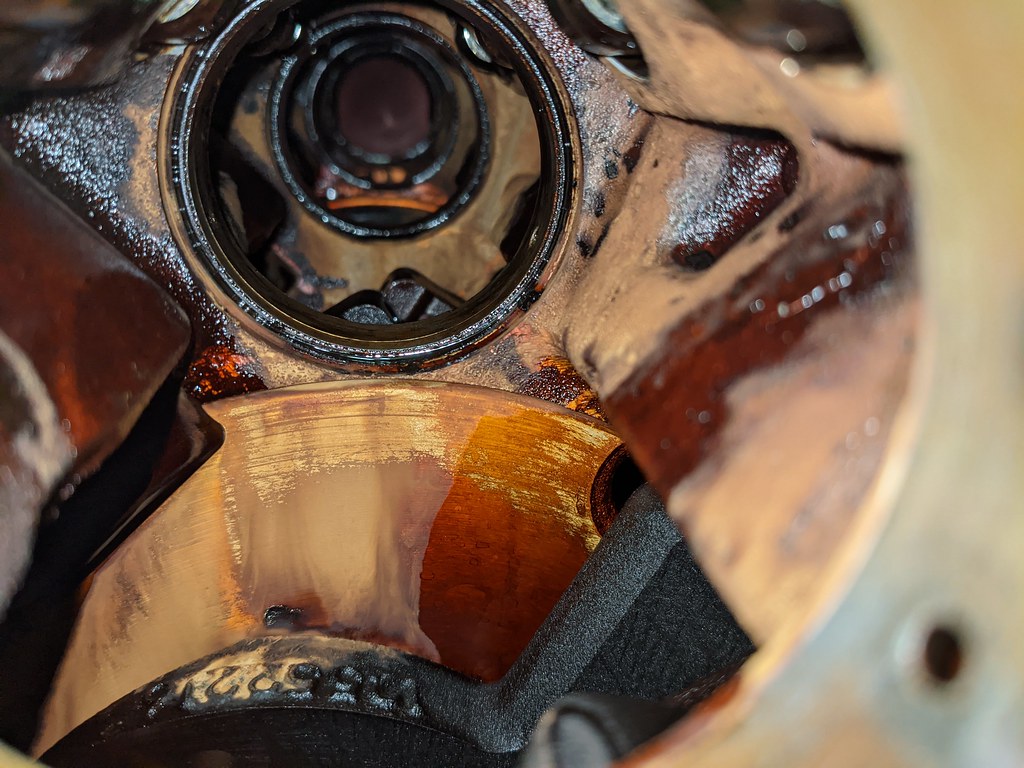
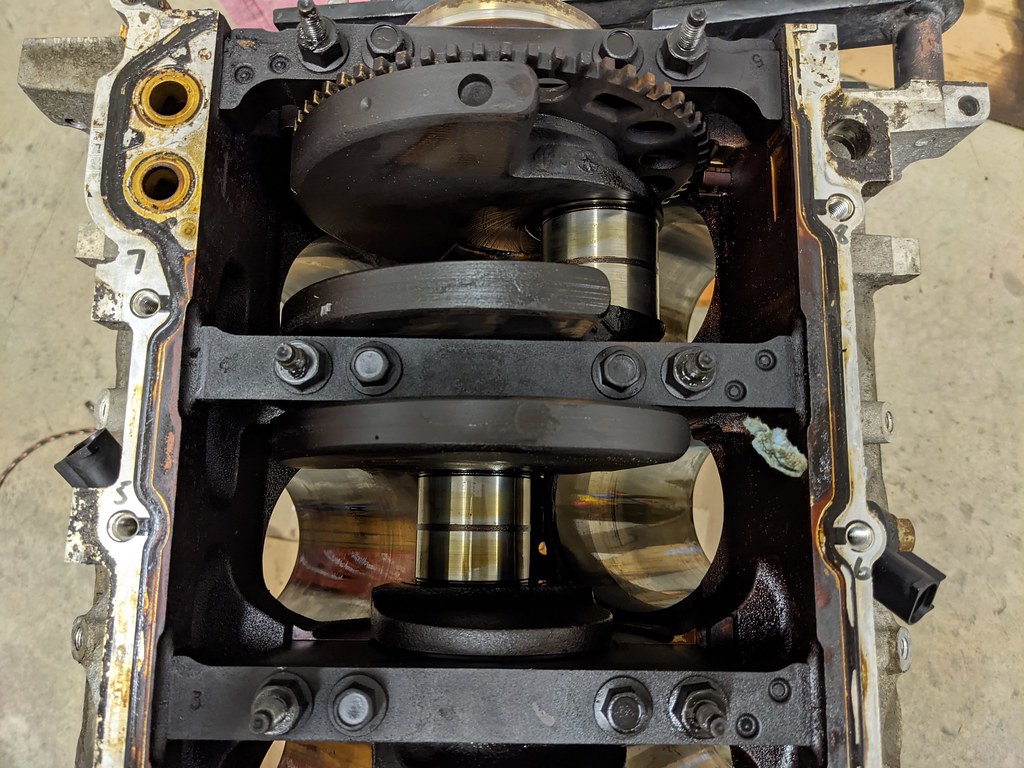
Then it came to pulling the cam and it gave me a little resistance. I thought that was strange as any cam I've done slides back and forth quite easily. Well, the cam bearings are toast...
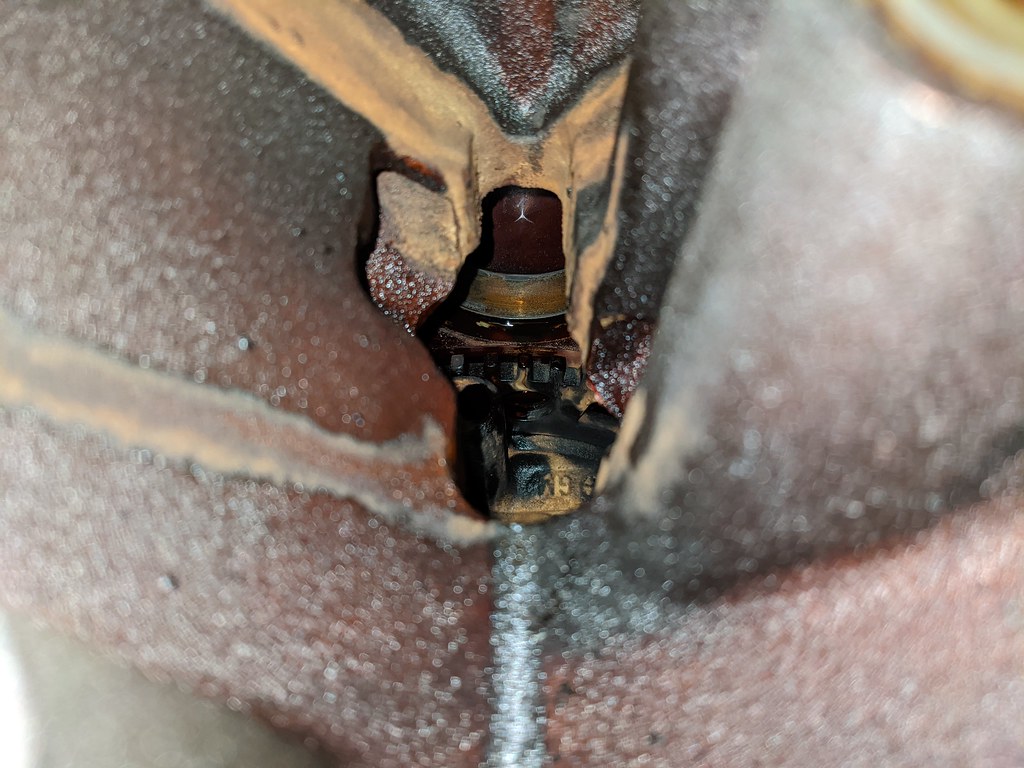
Check out the groove that the VVT cam left in the center bearing!
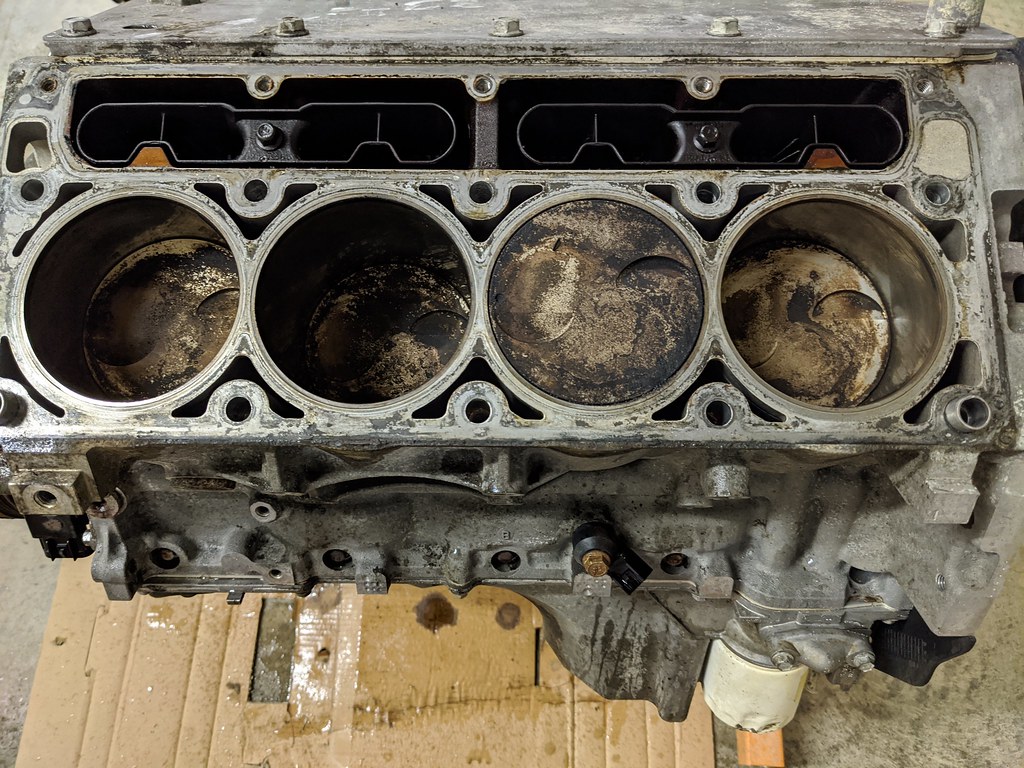
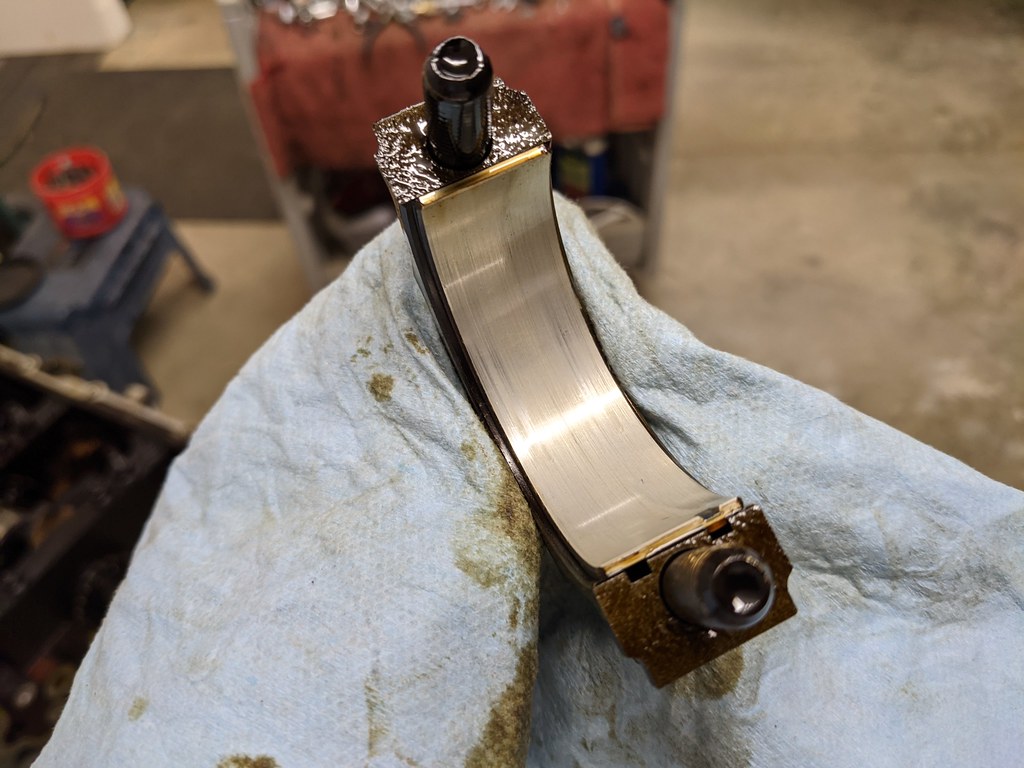
Then I decided to pull a rod bearing to see how those looked. Wow, what a difference. It's almost hard to believe the motor has almost 200k miles.
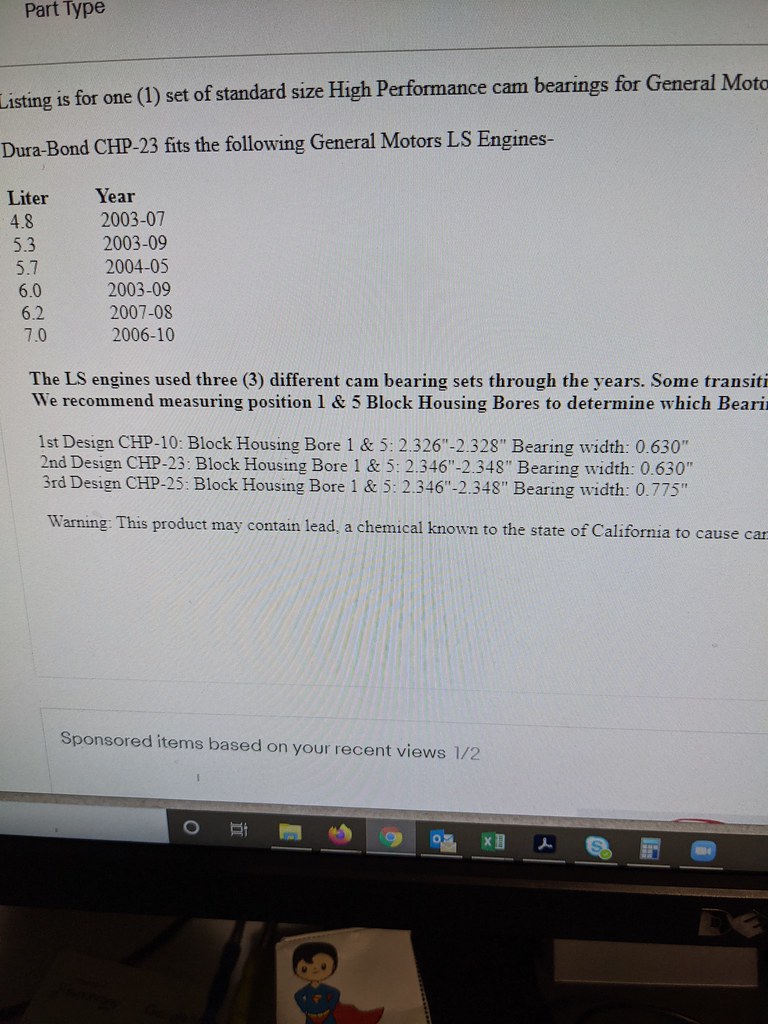
After a bunch of research and going out to measure the bearings a few times on my engine. I figured out that I needed the Durabond CHP-23 bearings which is the second design for LS motors. I picked up a bearing installation/removal tool from Car Shop Inc. and it all should be here by the weekend. I'm going to install them myself after watching a few videos of others installing them. Wish me luck!
I do plan to pull the rotating assembly before I install the cam bearings to ensure that I don't get any debris falling down into the rotating assembly. It will also be a good time to thoroughly degrease the entire block while I have it apart. If the rest of the bearings look as good as that one rod bearing I pulled, I'm just going to reuse them.
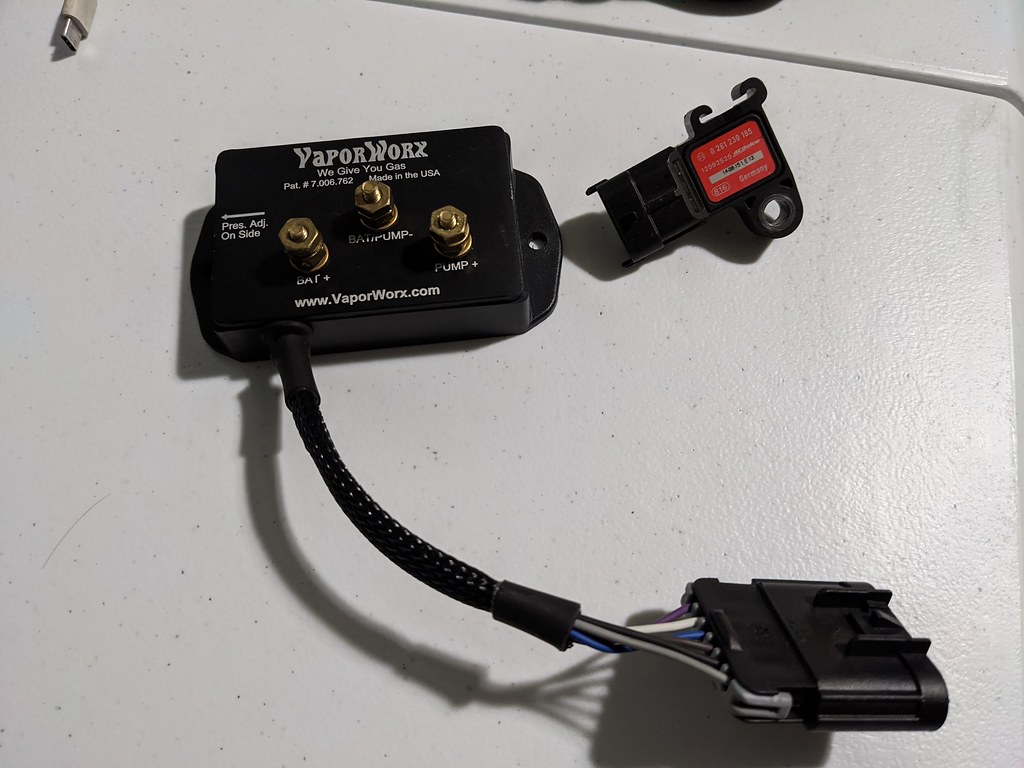
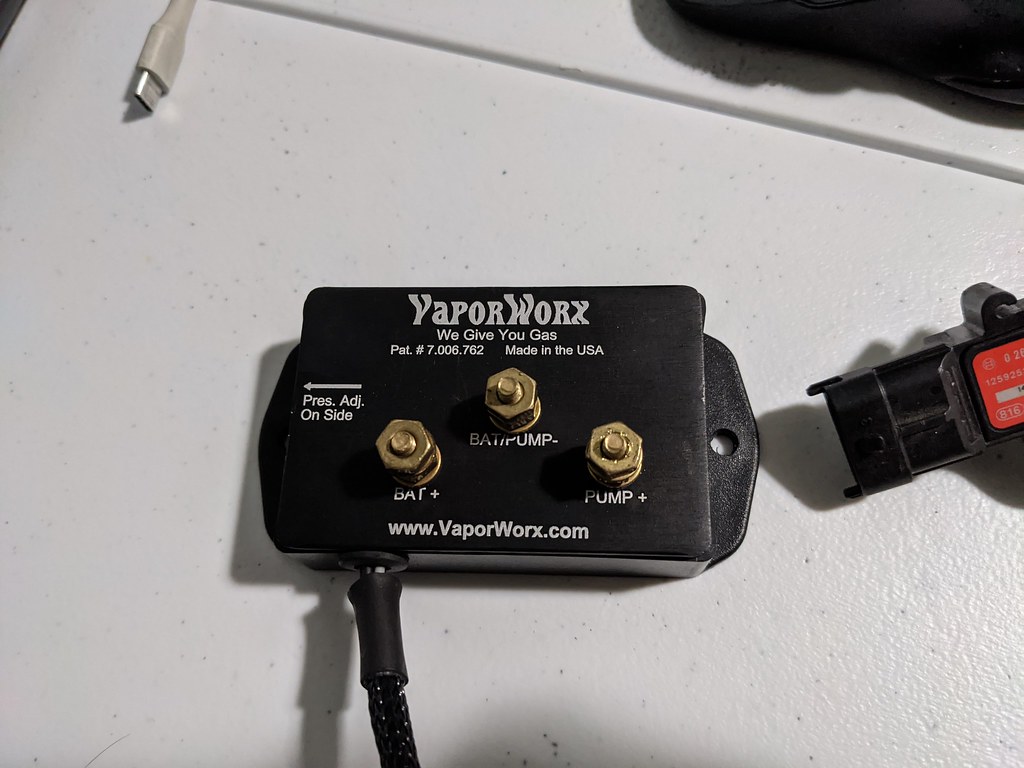
I've been finding some great deals on used parts too. I picked up a lightly used Vaporworx module from a guy who was going from LSA to a huge turbo and running a fuel cell in the back. He even threw in a bunch of extra wiring and a 3 bar MAP sensor.
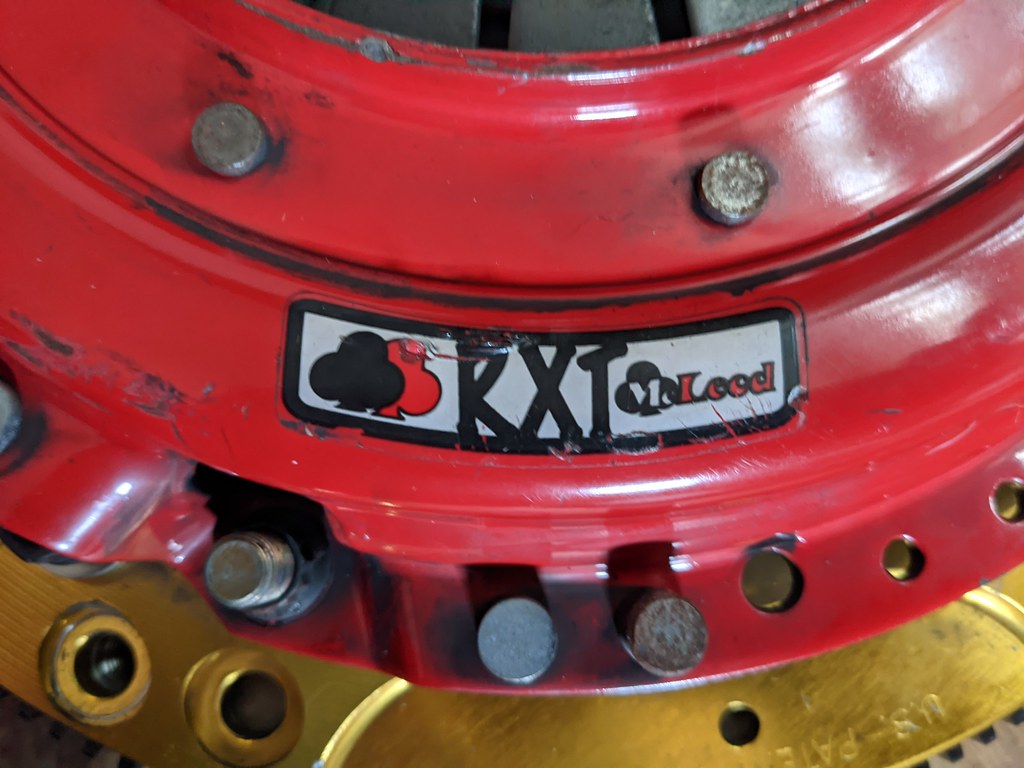
Then I found a guy selling a McLeod RXT twin disk clutch with less than 500 miles on it. He included a steel splined install tool too for way less than half the price of new. He blew his motor and decided to go auto.

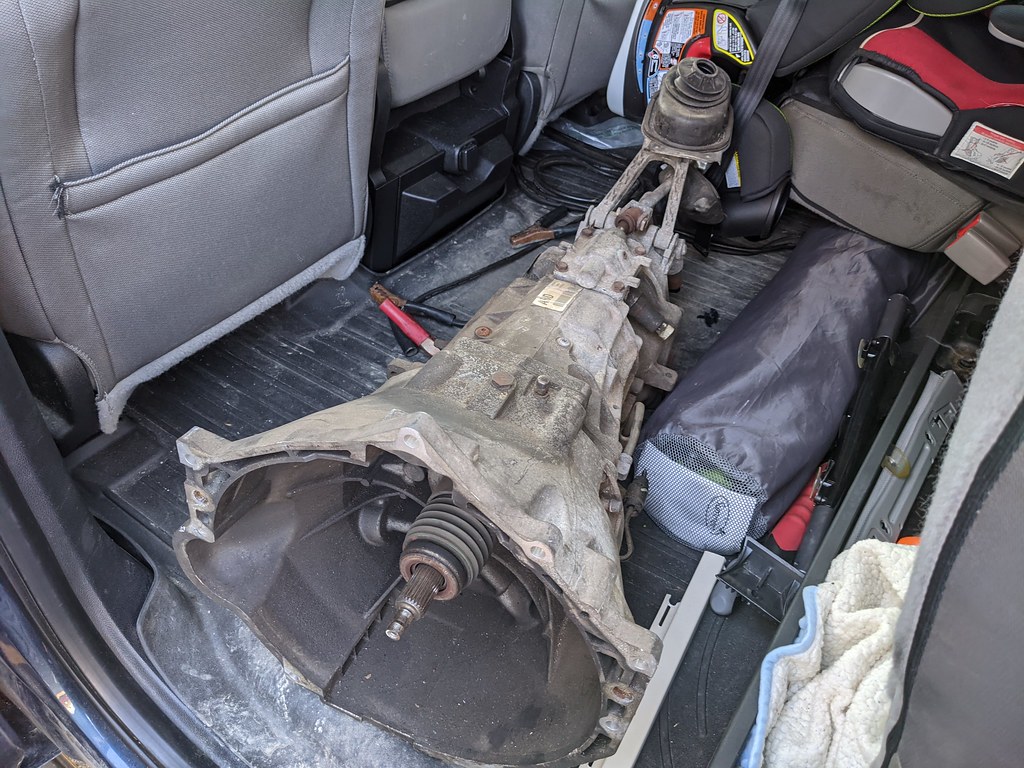
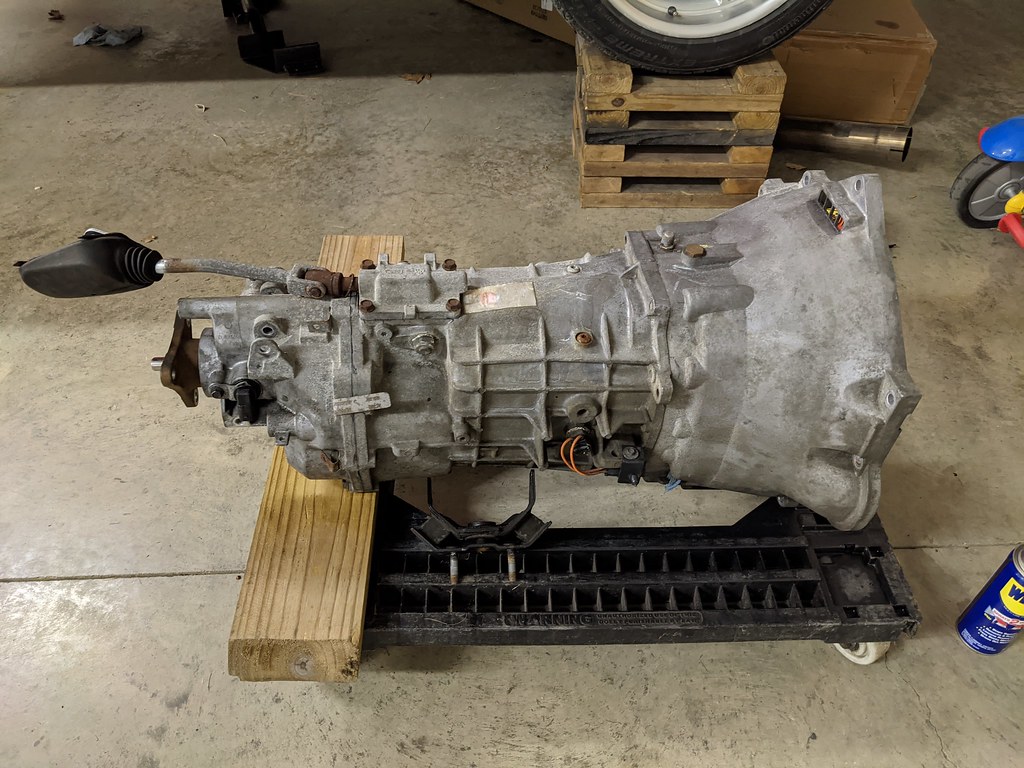
I sent my buddy a message that I was looking for a TR6060 so that I could swap tail housings and build my own Magnum trans. Sure enough he had one with about 60k miles on it. Same story, the guy was going auto. Good news for me haha.
Last but not least, I found a really nice condition LSA supercharger! So pumped about this. I already bought a bunch of parts to get everything to play nicely.

I'm trying to find a company out there that has a Magnum tail housing conversion that has a magnum mainshaft in stock. It's apparently on national backorder, so I'm going to keep calling around.
Cheers,
Ryan
I picked up this puller from OEM tools and it made pulling the balancer super easy. I've wanted one for a while, so I figured I would spring for the purchase this time. I'm certain this won't be the last LS balancer I'll pull haha
Then it was time to get rid of the VVT parts. I'll hang onto them in case I ever want to try out a VVT cam.
Then it came to pulling the cam and it gave me a little resistance. I thought that was strange as any cam I've done slides back and forth quite easily. Well, the cam bearings are toast...
Check out the groove that the VVT cam left in the center bearing!
Then I decided to pull a rod bearing to see how those looked. Wow, what a difference. It's almost hard to believe the motor has almost 200k miles.
After a bunch of research and going out to measure the bearings a few times on my engine. I figured out that I needed the Durabond CHP-23 bearings which is the second design for LS motors. I picked up a bearing installation/removal tool from Car Shop Inc. and it all should be here by the weekend. I'm going to install them myself after watching a few videos of others installing them. Wish me luck!
I do plan to pull the rotating assembly before I install the cam bearings to ensure that I don't get any debris falling down into the rotating assembly. It will also be a good time to thoroughly degrease the entire block while I have it apart. If the rest of the bearings look as good as that one rod bearing I pulled, I'm just going to reuse them.
I've been finding some great deals on used parts too. I picked up a lightly used Vaporworx module from a guy who was going from LSA to a huge turbo and running a fuel cell in the back. He even threw in a bunch of extra wiring and a 3 bar MAP sensor.
Then I found a guy selling a McLeod RXT twin disk clutch with less than 500 miles on it. He included a steel splined install tool too for way less than half the price of new. He blew his motor and decided to go auto.
I sent my buddy a message that I was looking for a TR6060 so that I could swap tail housings and build my own Magnum trans. Sure enough he had one with about 60k miles on it. Same story, the guy was going auto. Good news for me haha.
Last but not least, I found a really nice condition LSA supercharger! So pumped about this. I already bought a bunch of parts to get everything to play nicely.
I'm trying to find a company out there that has a Magnum tail housing conversion that has a magnum mainshaft in stock. It's apparently on national backorder, so I'm going to keep calling around.
Cheers,
Ryan
Trending Topics
01-07-2021, 02:33 PM
#8
TECH Fanatic
Thread Starter
iTrader: (27)
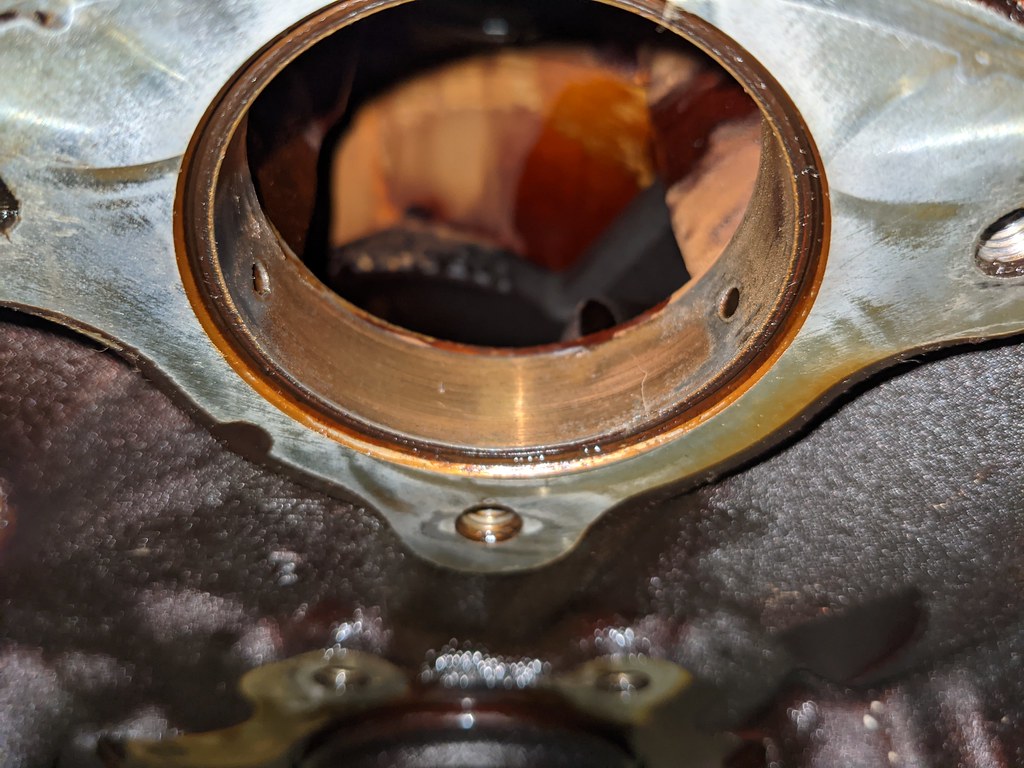
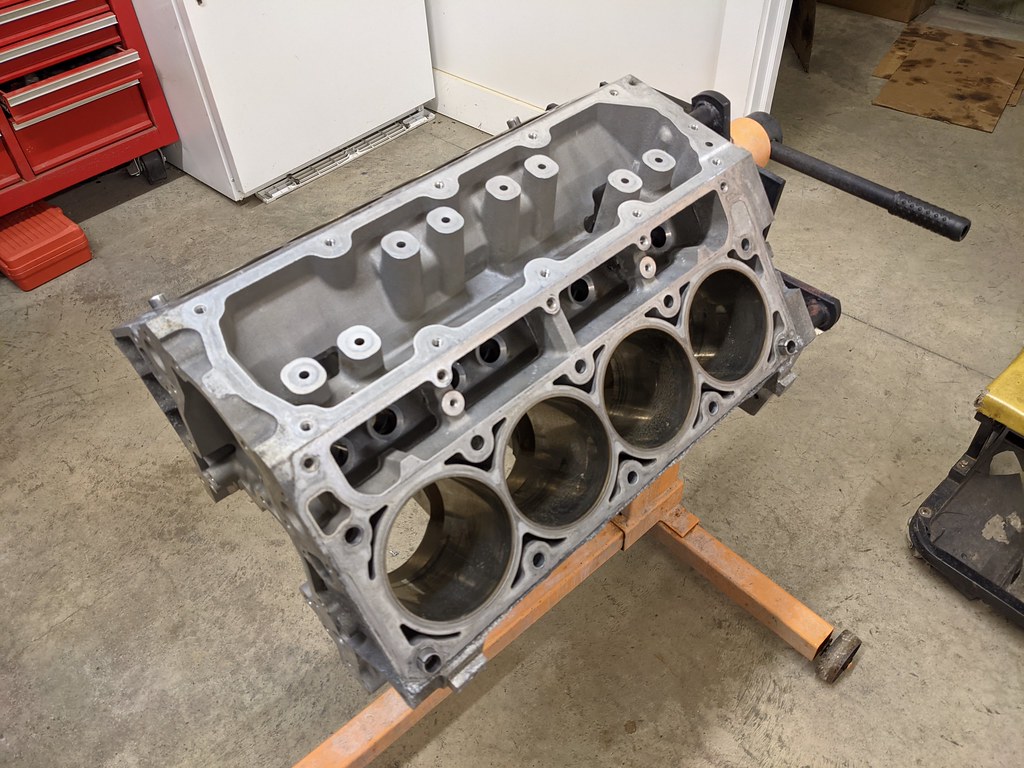
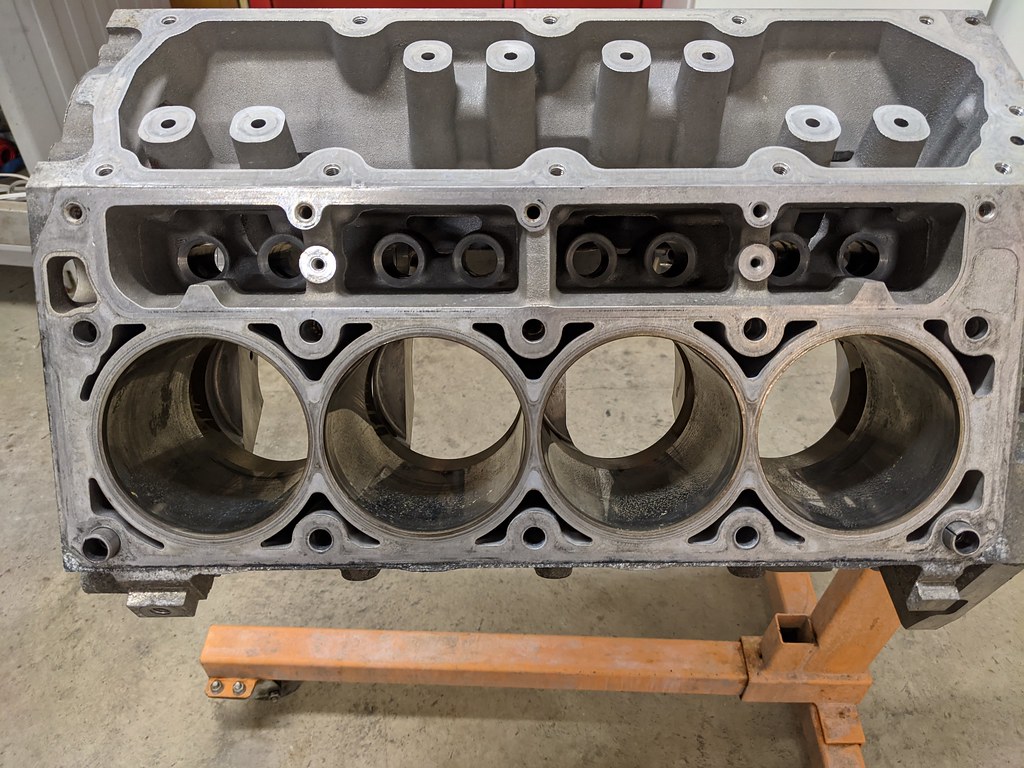
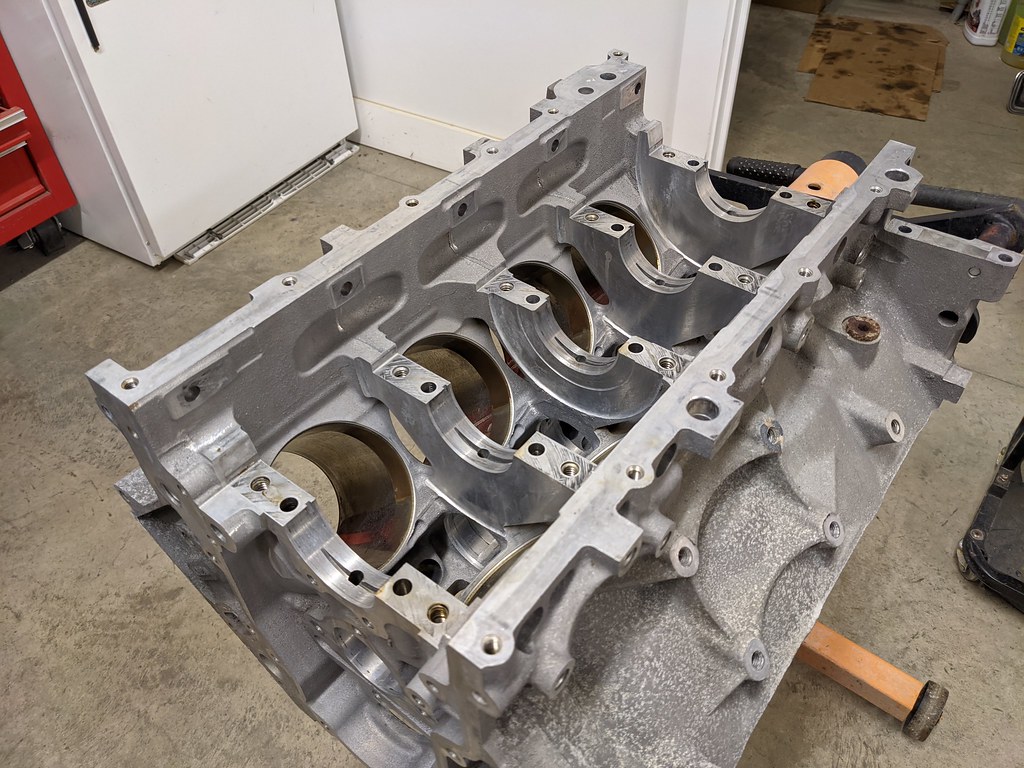
Well I tore a little deeper into the motor, and it definitely needs main bearings. Although the rod bearings all look great, I'm just going to replace them all while I'm in there. The crank looks fantastic, so I'm not going to touch that. I'll degrease it when the time comes, but otherwise it's going to go right back in.

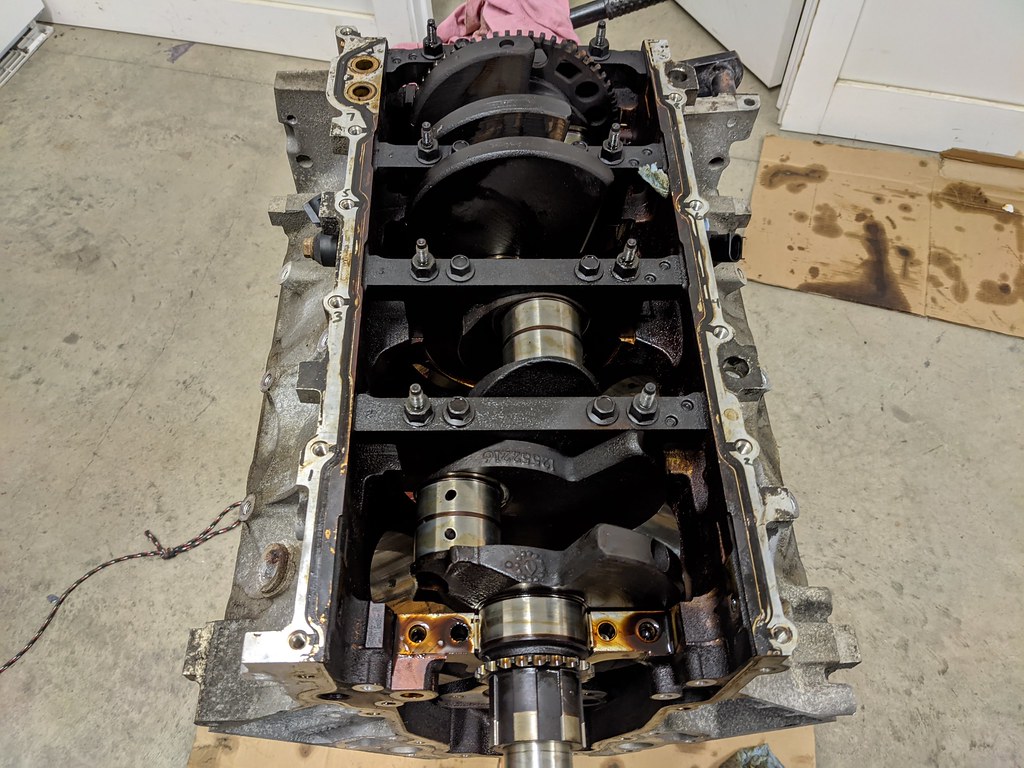
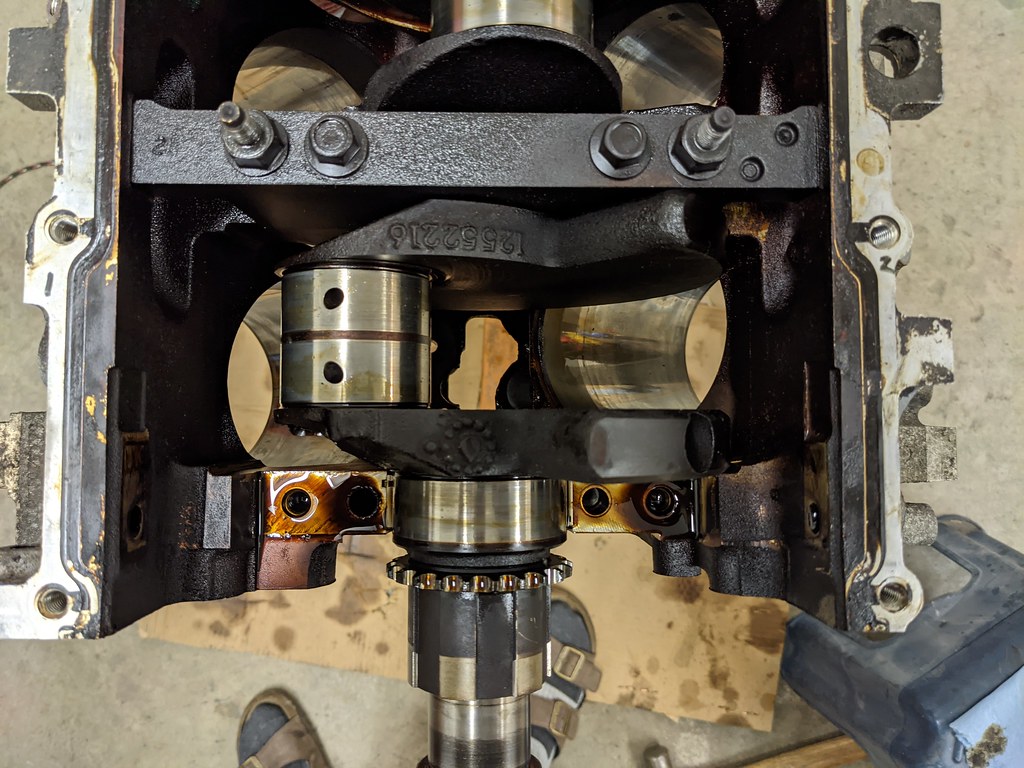
Then out comes the crank. It's very grimy in there from all the oil. I'll be taking care of that soon.
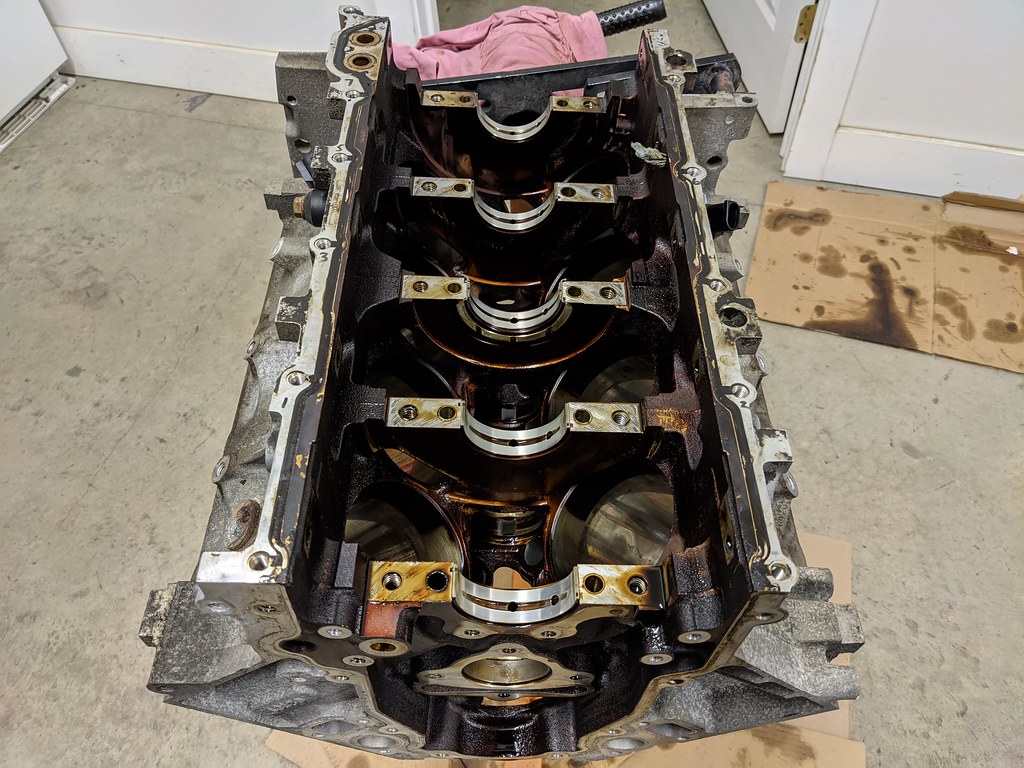
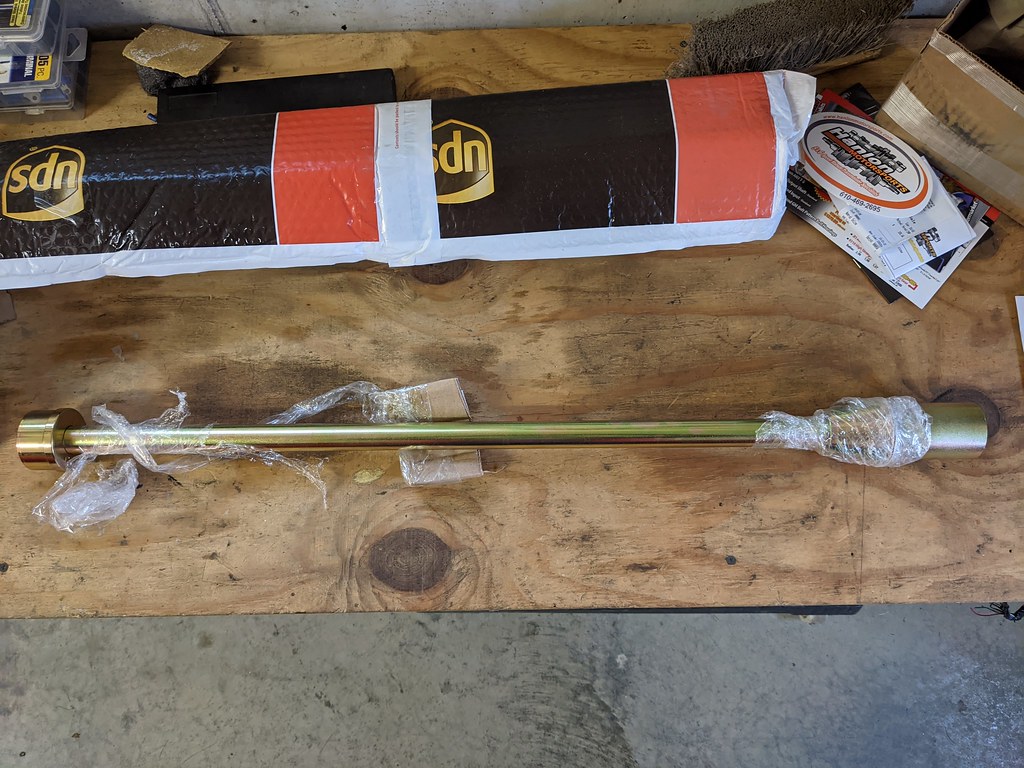
While the bearings really didn't look bad for how many miles are on them, I might as well replace them while I'm down this far. Not sure how much it would cost to have a machine shop remove and install a set of cam bearings, but I decided to just buy the tool and do it myself. I figured for $100 I will likely do this again at some point in my life. Tools are a great investment. I got this from Car Shop Inc. and I can simply buy a different mandrel for other engines. This one is specific to Gen 3/4 LS.
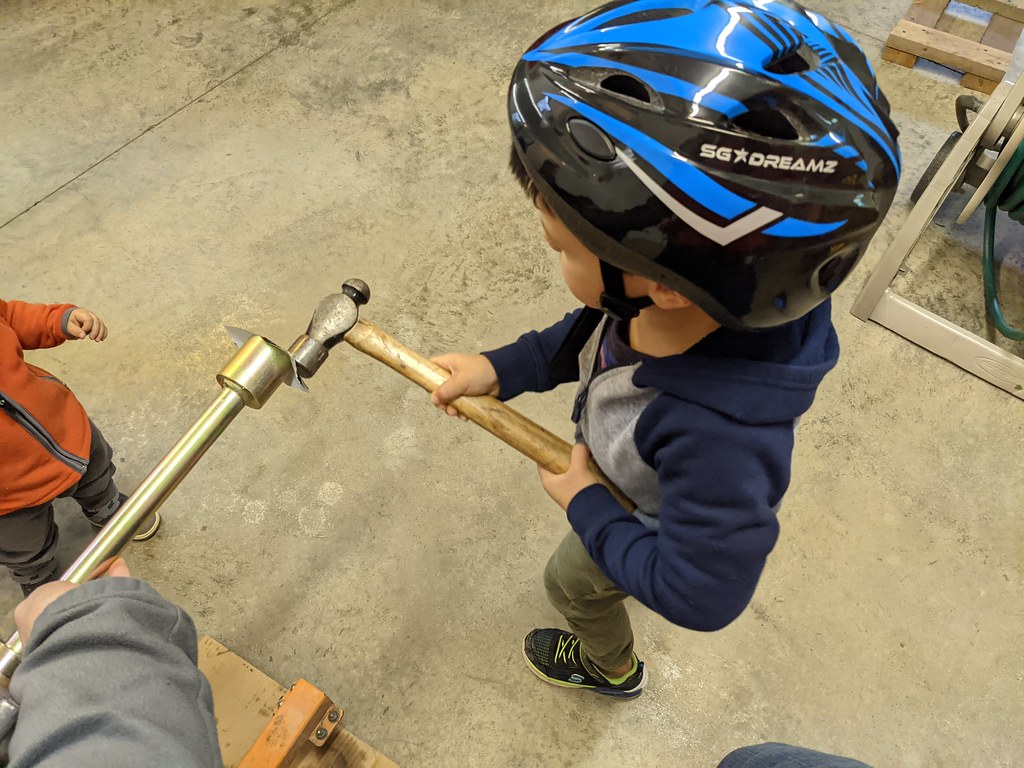
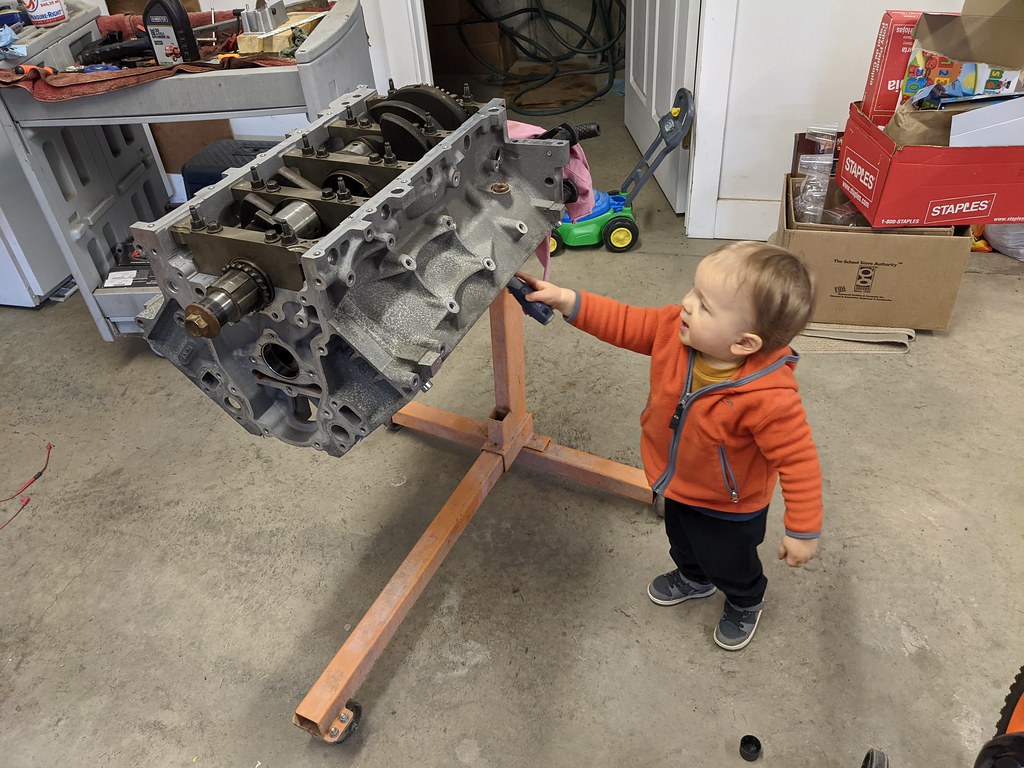
I got my sons involved and my oldest helped drive out the first one while I held it. Pretty cool moment for me. He was riding a bike, and I figured he could keep the helmet on since it couldn't hurt haha.
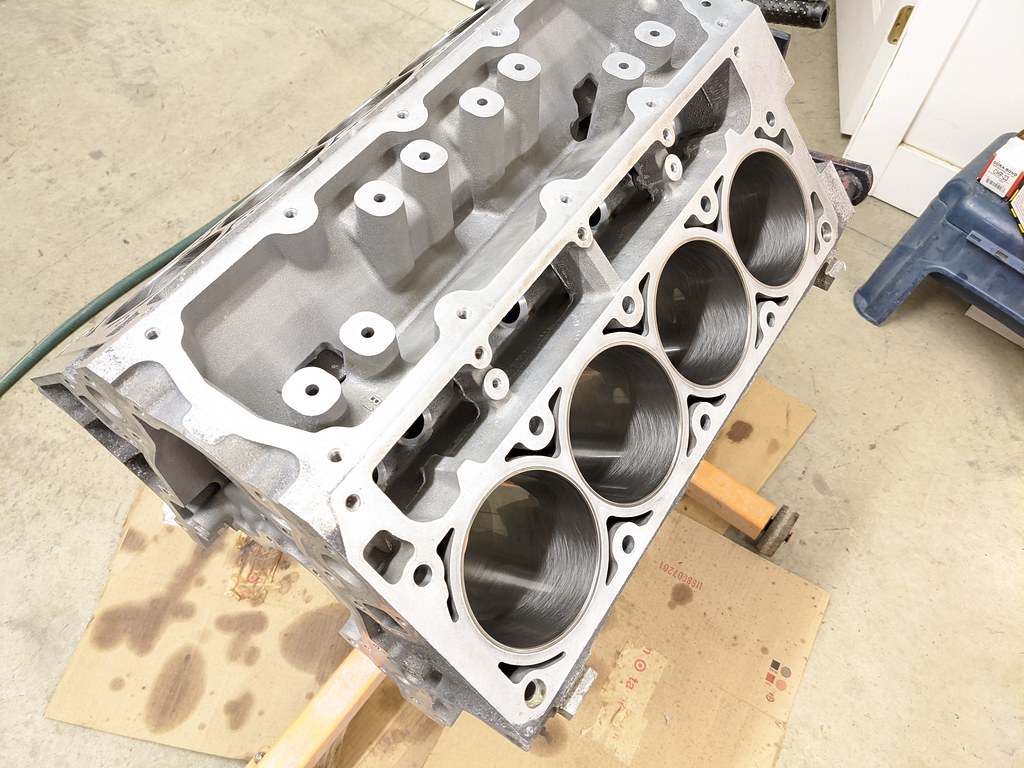
After cleaning the block about 12 different times with purple power, the block really cleaned up nicely. I may hit it a few more times when I get the wire brushes into the oil passages, but I'm happy with how it cleaned up on the inside. Once I clean the passages it's all ready for some new cam bearings.
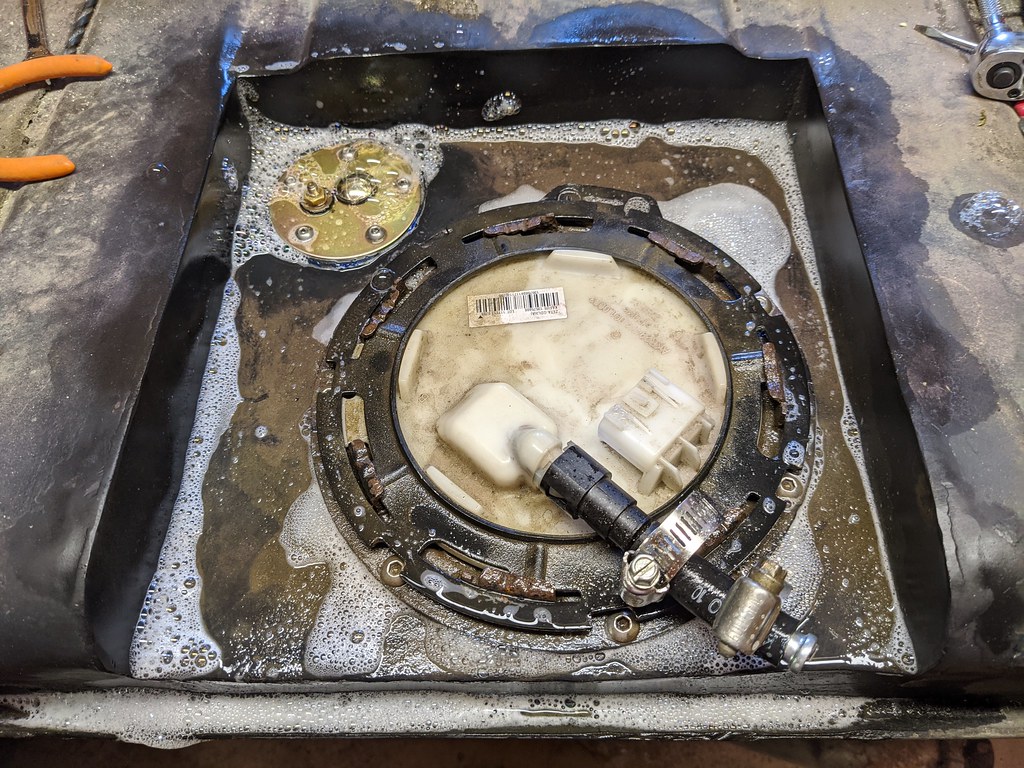
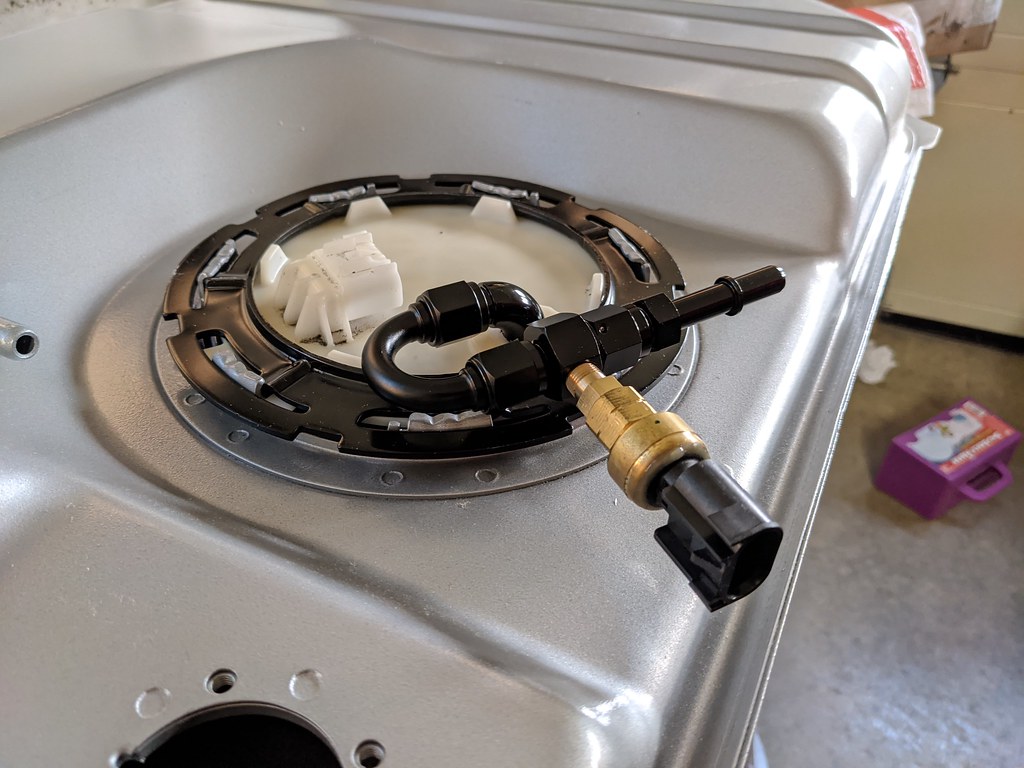
So all the parts came in to repair my Livernoise Firestorm dual pump assembly. The reason that I got it so cheap was because the fuel fitting had broken off where the GM quick connect was. After searching around online, this is actually a very common thing for the CTS-V guys. Since this is essentially a CTS-V pump, it is a very similar fix. I found a guy online who posted up a great write-up on how to fix.
This is how it came on arrival.
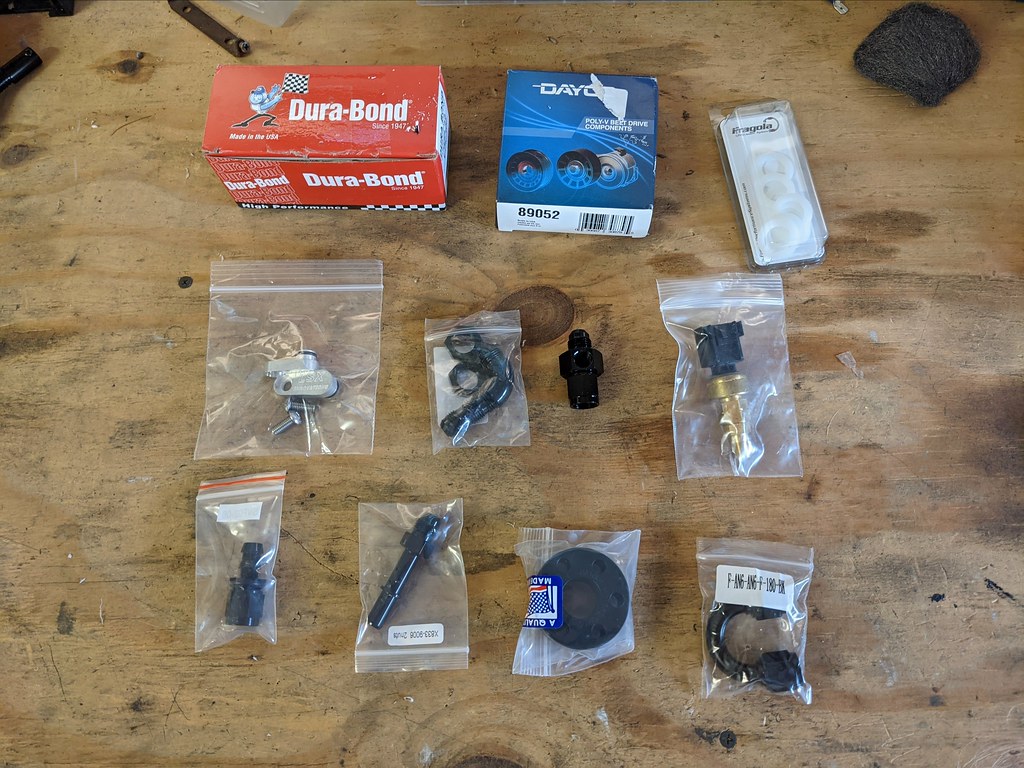
Here are all the various parts that I picked up to fix it. There are also my cam bearings, idler pulley and solid isolator for the supercharger.
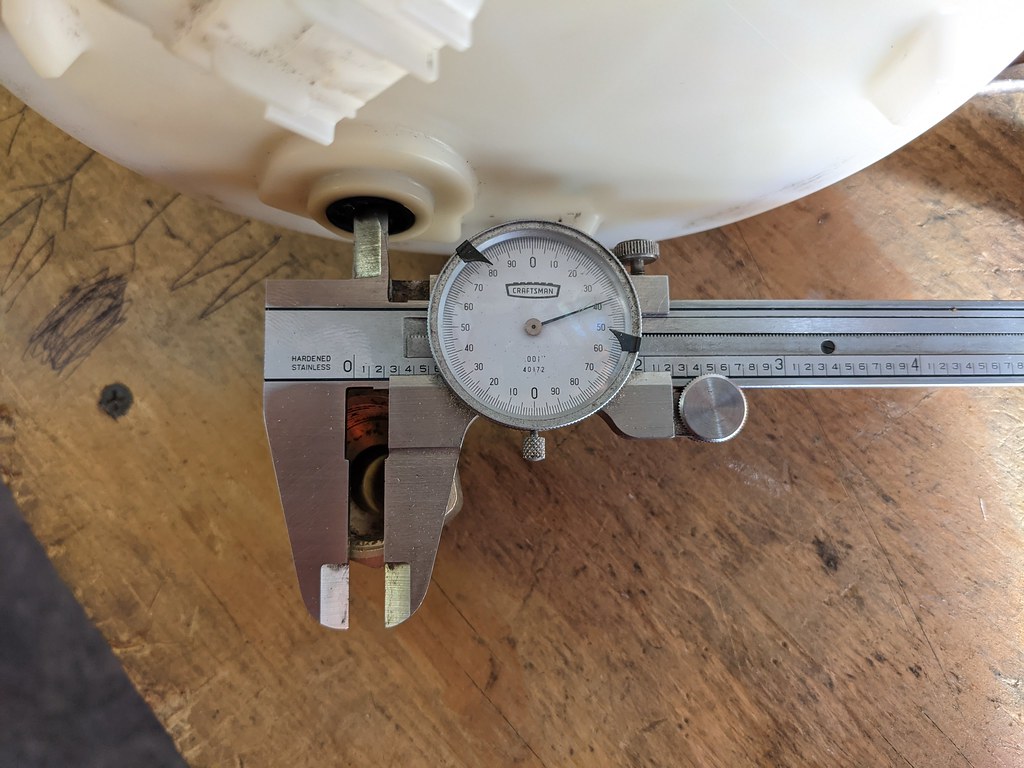
So the idea is to remove and replace the existing fuel fitting with a 90* AN6 line. What I love about this is the reduced restriction that this will create. Rather than a hard 90* turn for the fuel, this AN6 line has a nice gradual curve to it. Similar to a mandrel bent exhaust pipe vs. a hard kink. Also when I measured it with my caliper, there was a noticeably larger inner diameter for the new fitting. Less restriction on the fuel flow has to help the fuel pumps to work less, which I hope would mean longer life.
I didn't take pictures in process, but you need to "mill" this internal fitting flat in order for the AN fitting nuts to sit flush inside. If not the barbed fitting wouldn't be long enough to reach. If that makes any sense to anyone. What I used was a flat blade wood drill bit that was 7/8", but it would have worked better with a 1". I trimmed the internal ribs down with a sharp razor blade and made sure that the nut sat flush with the inside.
Now where my mod differs from the one done on the CTS-V site, is I decided to thread my fitting directly into the hat. I'm hoping that when I disassemble to add some sealant to the threads for a permanent fix upon reassembly.
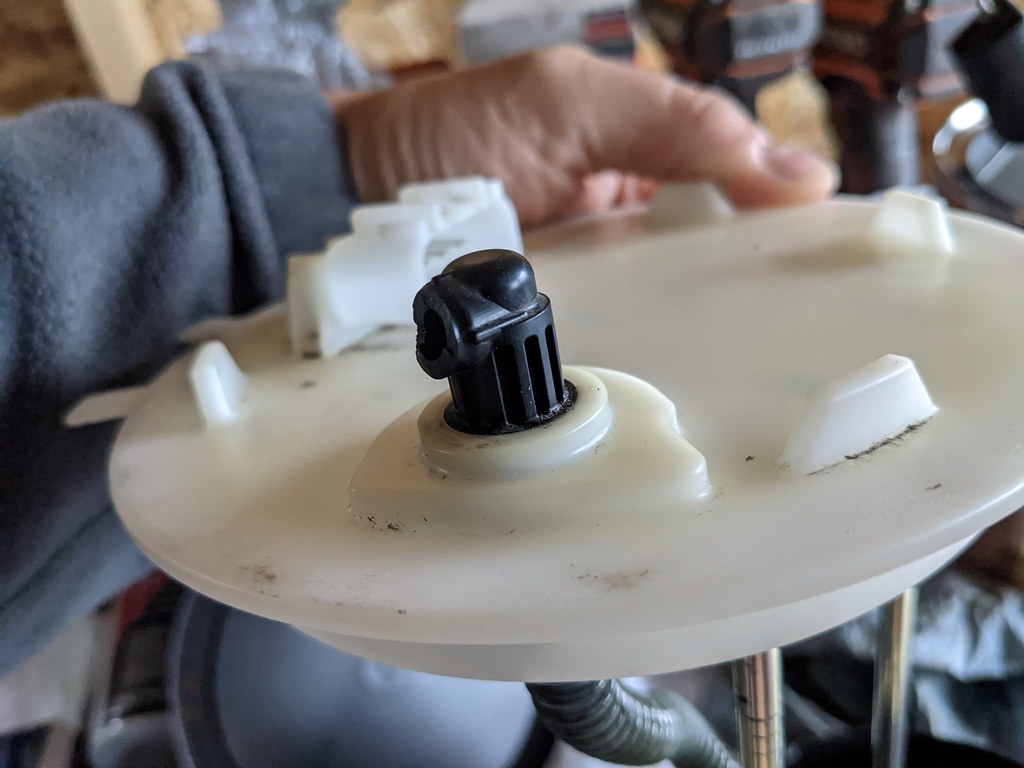
While I needed to fix the fuel fitting, I also needed to add a fuel pressure sensor somewhere for the Vaporworx module to read properly so really this solved two problems for me. Here is the had mocked up in my fuel tank. Very pleased with how that turned out.
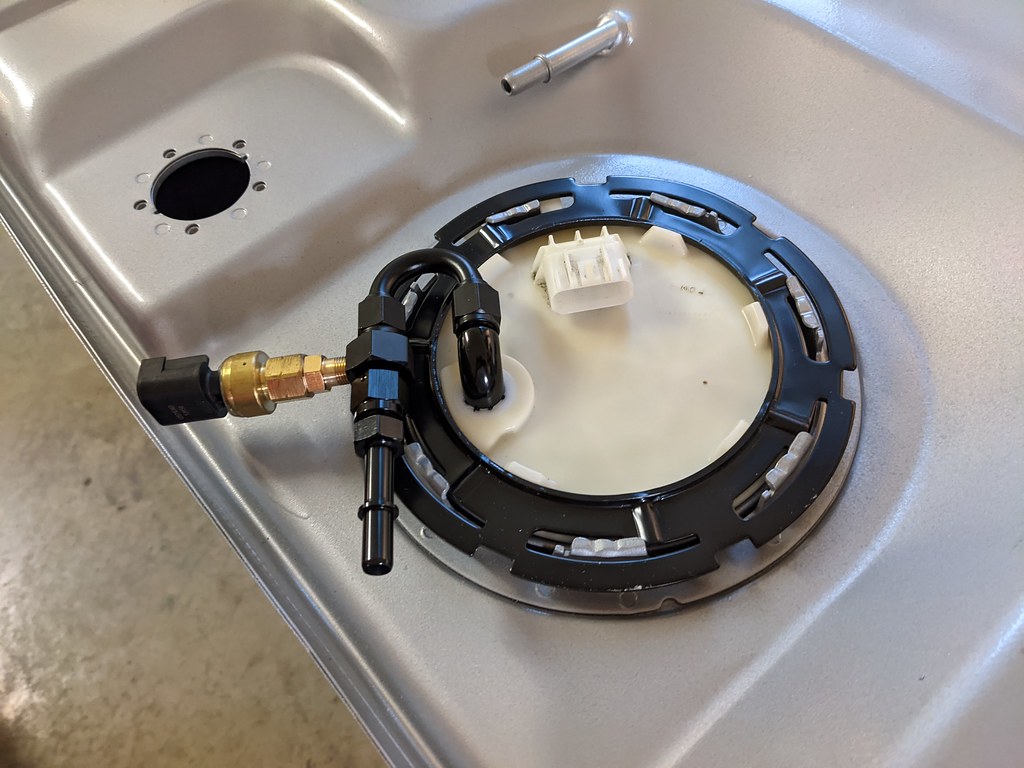
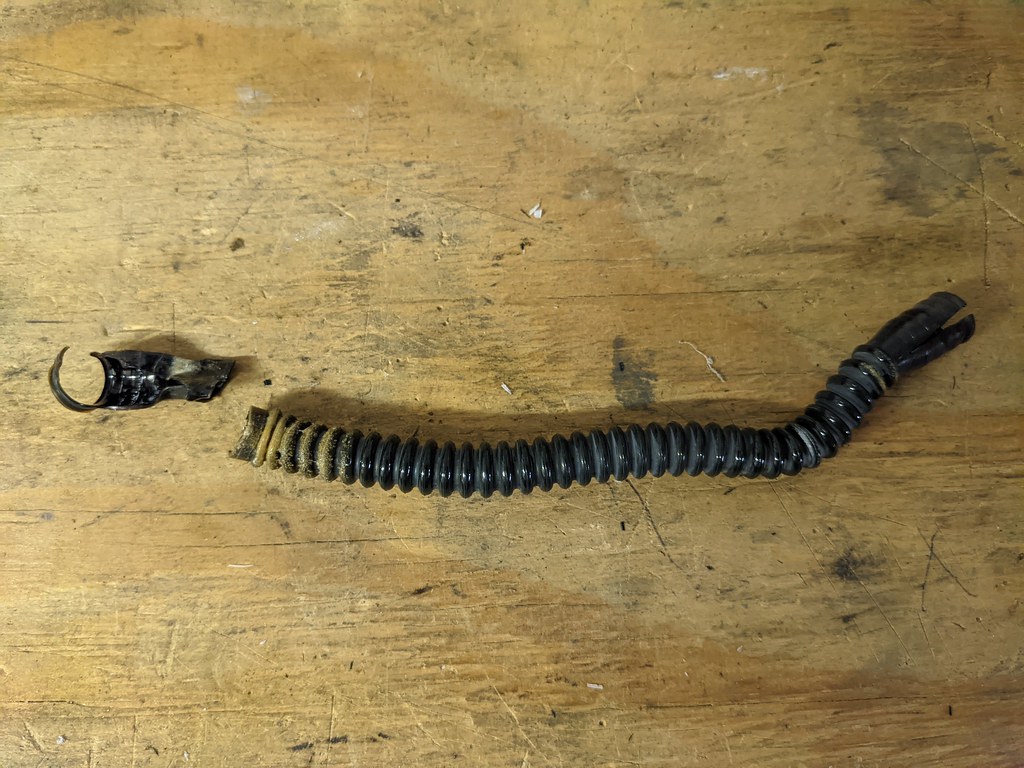
Here is the pile of plastic that I "milled" out of the fuel hat for this modification.

The only thing left to finish this modification is a new corrugated fuel tube and some clamps.
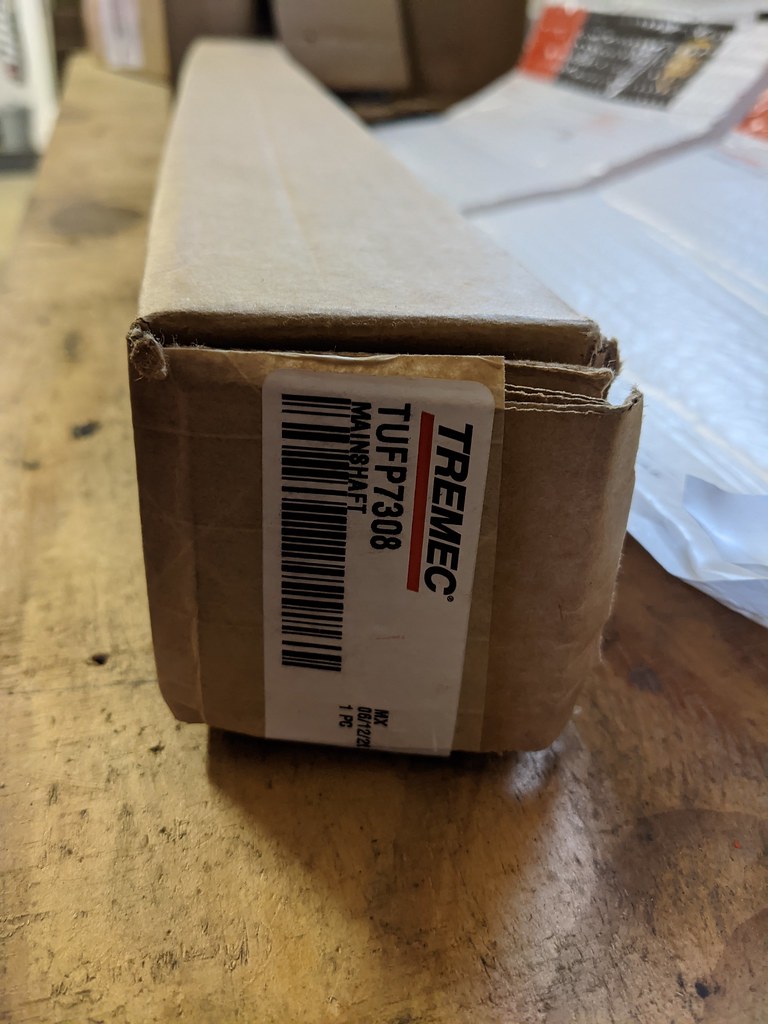
I also picked up a few more parts for my trans conversion. Here is the little unicorn that nobody seemed to have in stock. I searched around and found a shop in PA called Hanlon Motorsports who ended up having two T56 Magnum mainshafts in stock! I bought one on the spot. Part number TUFP-7308 for anyone that wants the number.

Then I called around to a few other places and found a company in AZ called Amp Performance who hooked me up with a new take off tailshaft housing, reluctors, and clips to finish off my conversion. I would have preferred to buy everything through Tick Performance and be done with it, but they weren't sure if they were even going to get a mainshaft in stock before the spring. It was a lot of calling around, but glad I found it all.
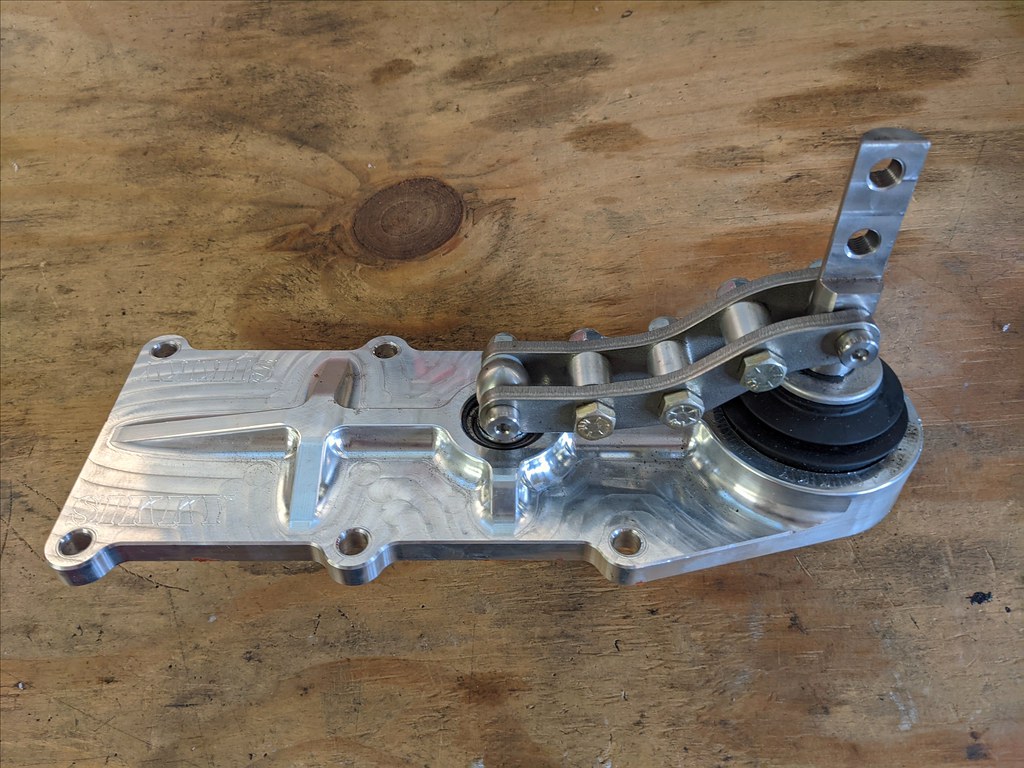
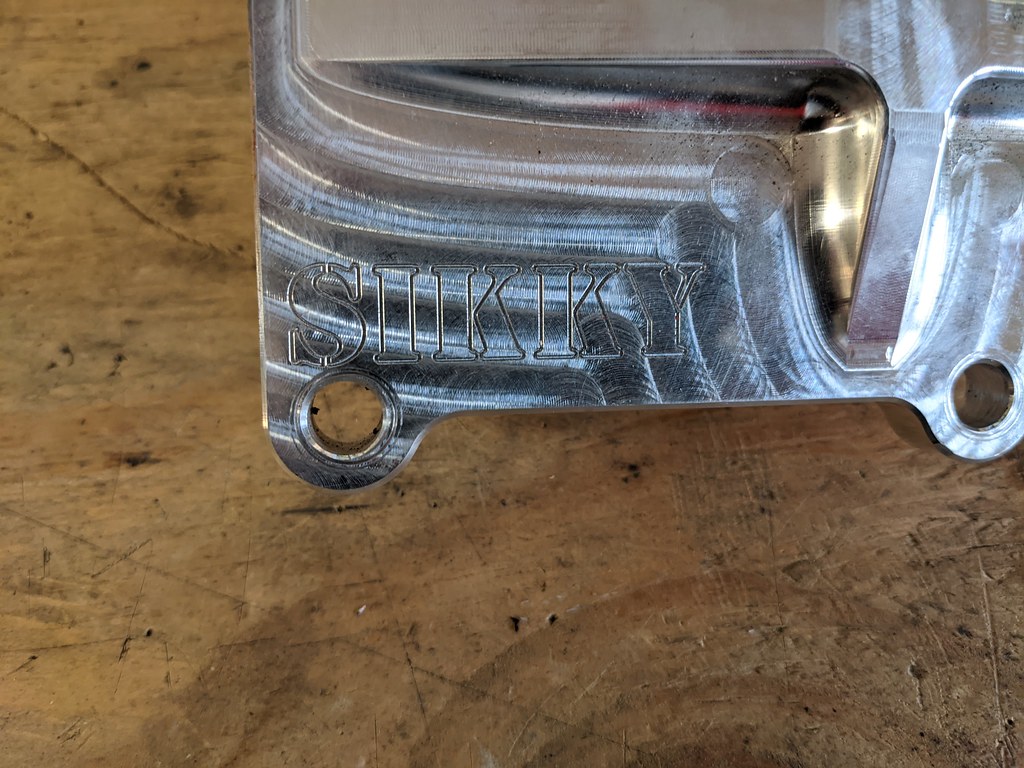
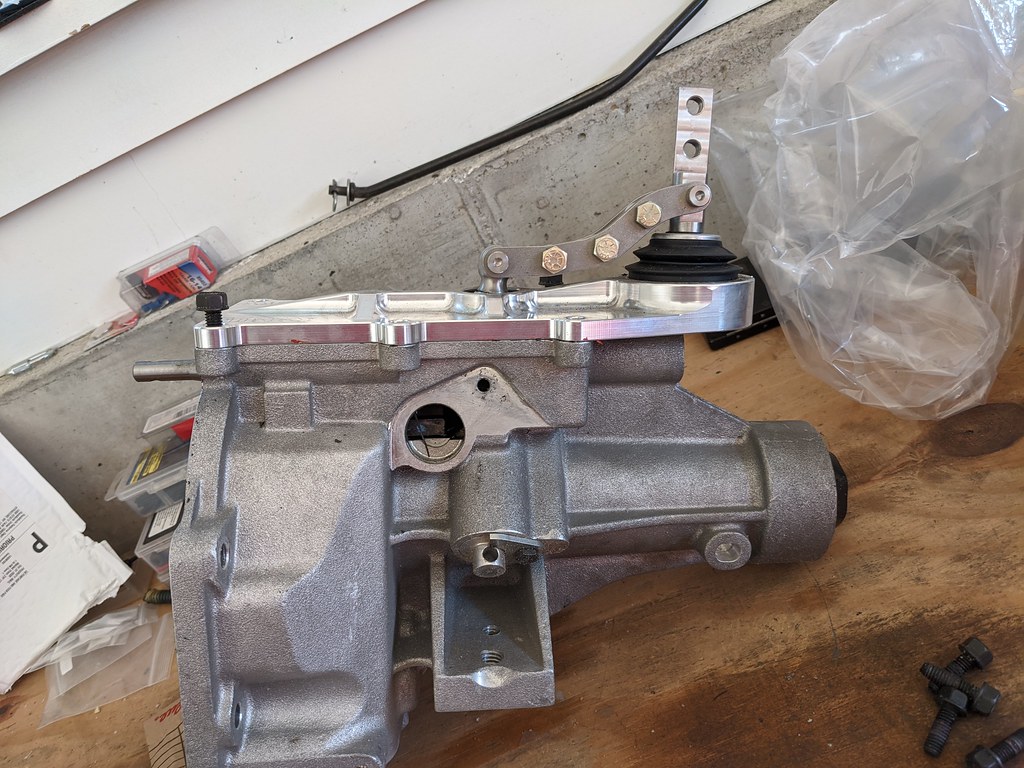
Now another issue that came up is that my current car is set up for a 4th gen Camaro T56 and the T56 Magnum has a shifter that is forward 3-4". I was contemplating just buying a Magnum-F which would have been a direct replacement for my old trans, but what fun would that be haha. I found a company called Sikky who sells a cantilever style shifter that move the position 4" to the rear. After searching quick online I found a guy who had one bolted to his trans and then took it off for whatever reason. Literally like new for about half price, now that's what I call Penny Pinching! And I have to say the machine work on this shifter is outstanding. It is a shame that it will be hid under my shift boot.
I placed my order through Summit Racing today for what will be a complete rebuild on my motor. That will officially exhaust the proceeds from the sale of my LS1/6 speed, but I feel really good about all of the deals I was able to score. There shouldn't be too many more big purchases left to get me back up and running. Once all of these parts finish coming in I have a lot of work to do. I've never rebuilt a motor or transmission so this will be a great winter education for me.
Cheers,
Ryan
Then out comes the crank. It's very grimy in there from all the oil. I'll be taking care of that soon.
While the bearings really didn't look bad for how many miles are on them, I might as well replace them while I'm down this far. Not sure how much it would cost to have a machine shop remove and install a set of cam bearings, but I decided to just buy the tool and do it myself. I figured for $100 I will likely do this again at some point in my life. Tools are a great investment. I got this from Car Shop Inc. and I can simply buy a different mandrel for other engines. This one is specific to Gen 3/4 LS.
I got my sons involved and my oldest helped drive out the first one while I held it. Pretty cool moment for me. He was riding a bike, and I figured he could keep the helmet on since it couldn't hurt haha.
After cleaning the block about 12 different times with purple power, the block really cleaned up nicely. I may hit it a few more times when I get the wire brushes into the oil passages, but I'm happy with how it cleaned up on the inside. Once I clean the passages it's all ready for some new cam bearings.
So all the parts came in to repair my Livernoise Firestorm dual pump assembly. The reason that I got it so cheap was because the fuel fitting had broken off where the GM quick connect was. After searching around online, this is actually a very common thing for the CTS-V guys. Since this is essentially a CTS-V pump, it is a very similar fix. I found a guy online who posted up a great write-up on how to fix.
This is how it came on arrival.
Here are all the various parts that I picked up to fix it. There are also my cam bearings, idler pulley and solid isolator for the supercharger.
So the idea is to remove and replace the existing fuel fitting with a 90* AN6 line. What I love about this is the reduced restriction that this will create. Rather than a hard 90* turn for the fuel, this AN6 line has a nice gradual curve to it. Similar to a mandrel bent exhaust pipe vs. a hard kink. Also when I measured it with my caliper, there was a noticeably larger inner diameter for the new fitting. Less restriction on the fuel flow has to help the fuel pumps to work less, which I hope would mean longer life.
I didn't take pictures in process, but you need to "mill" this internal fitting flat in order for the AN fitting nuts to sit flush inside. If not the barbed fitting wouldn't be long enough to reach. If that makes any sense to anyone. What I used was a flat blade wood drill bit that was 7/8", but it would have worked better with a 1". I trimmed the internal ribs down with a sharp razor blade and made sure that the nut sat flush with the inside.
Now where my mod differs from the one done on the CTS-V site, is I decided to thread my fitting directly into the hat. I'm hoping that when I disassemble to add some sealant to the threads for a permanent fix upon reassembly.
While I needed to fix the fuel fitting, I also needed to add a fuel pressure sensor somewhere for the Vaporworx module to read properly so really this solved two problems for me. Here is the had mocked up in my fuel tank. Very pleased with how that turned out.
Here is the pile of plastic that I "milled" out of the fuel hat for this modification.
The only thing left to finish this modification is a new corrugated fuel tube and some clamps.
I also picked up a few more parts for my trans conversion. Here is the little unicorn that nobody seemed to have in stock. I searched around and found a shop in PA called Hanlon Motorsports who ended up having two T56 Magnum mainshafts in stock! I bought one on the spot. Part number TUFP-7308 for anyone that wants the number.
Then I called around to a few other places and found a company in AZ called Amp Performance who hooked me up with a new take off tailshaft housing, reluctors, and clips to finish off my conversion. I would have preferred to buy everything through Tick Performance and be done with it, but they weren't sure if they were even going to get a mainshaft in stock before the spring. It was a lot of calling around, but glad I found it all.
Now another issue that came up is that my current car is set up for a 4th gen Camaro T56 and the T56 Magnum has a shifter that is forward 3-4". I was contemplating just buying a Magnum-F which would have been a direct replacement for my old trans, but what fun would that be haha. I found a company called Sikky who sells a cantilever style shifter that move the position 4" to the rear. After searching quick online I found a guy who had one bolted to his trans and then took it off for whatever reason. Literally like new for about half price, now that's what I call Penny Pinching! And I have to say the machine work on this shifter is outstanding. It is a shame that it will be hid under my shift boot.
I placed my order through Summit Racing today for what will be a complete rebuild on my motor. That will officially exhaust the proceeds from the sale of my LS1/6 speed, but I feel really good about all of the deals I was able to score. There shouldn't be too many more big purchases left to get me back up and running. Once all of these parts finish coming in I have a lot of work to do. I've never rebuilt a motor or transmission so this will be a great winter education for me.
Cheers,
Ryan
01-07-2021, 02:35 PM
#9
TECH Fanatic
Thread Starter
iTrader: (27)
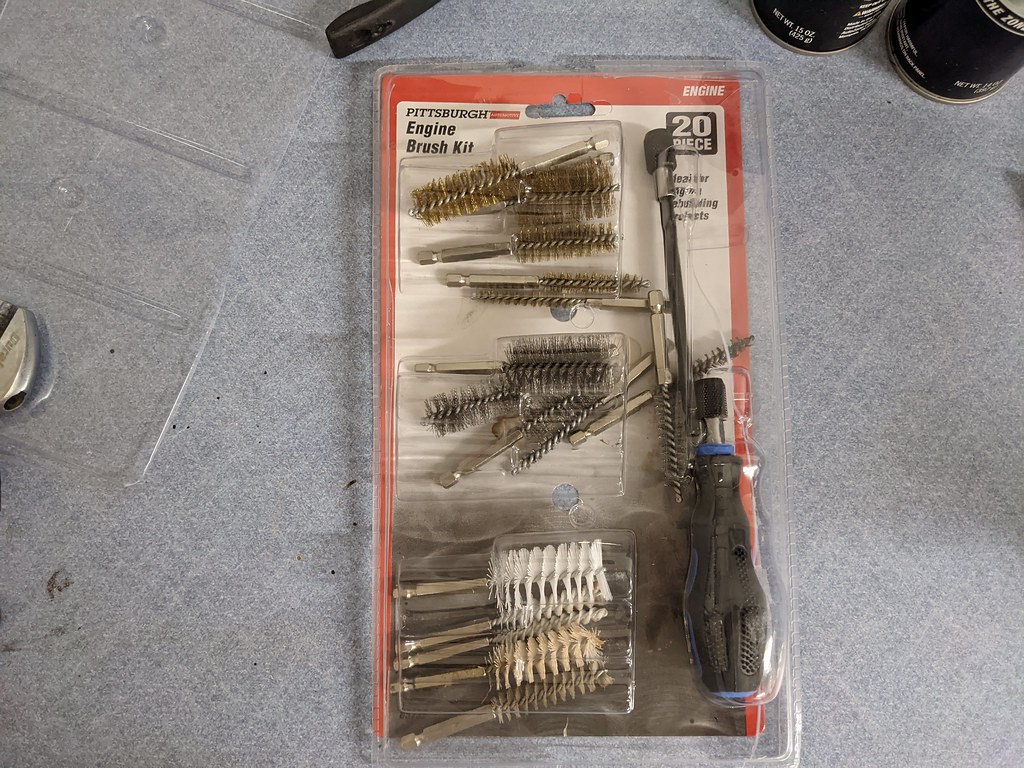
Made some solid progress this weekend on the engine build, and all of the parts I ordered came in. I took off the day Friday with my wife and after we spent most of the day together, she got terribly motion sick from the walk that we went on so she laid down early afternoon. I took used that opportunity along with the fantastic weather to get out the power washer and get some parts cleaned up. I only intended on using a brush kit I bought earlier in the day to clean out the oil passages in the block, but that turned into a deep clean of the whole motor. I was actually stunned by how clean the block turned out. All I used was the nylon brush from Harbor Freight engine brush kit on my drill and Purple Power. I didn't even use much pressure. Pictures speak for themselves.

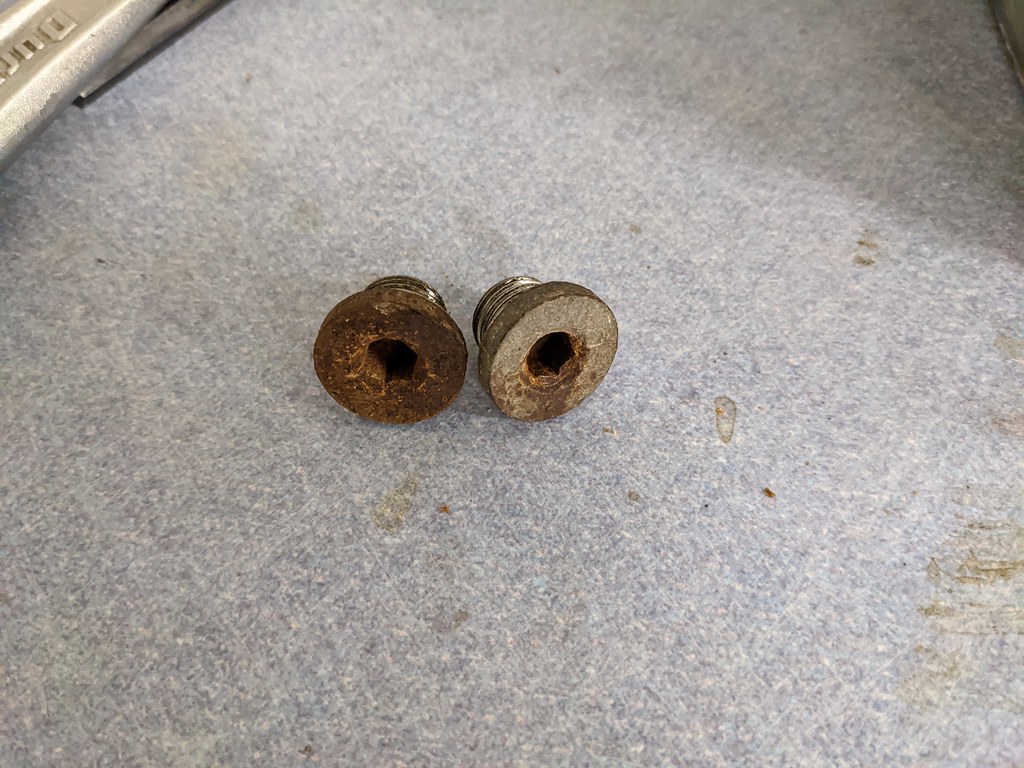
I pulled the oil passage plugs to get all the grime out. Not sure if I'm going to reuse these or not. I think new ones are cheap enough that I may just do that.
I also blasted my TR6060 to get the clutch dust and grime off of it.
Here's the brush kit along with the jaw pullers and snap ring plyers I bought for the Magnum conversion.
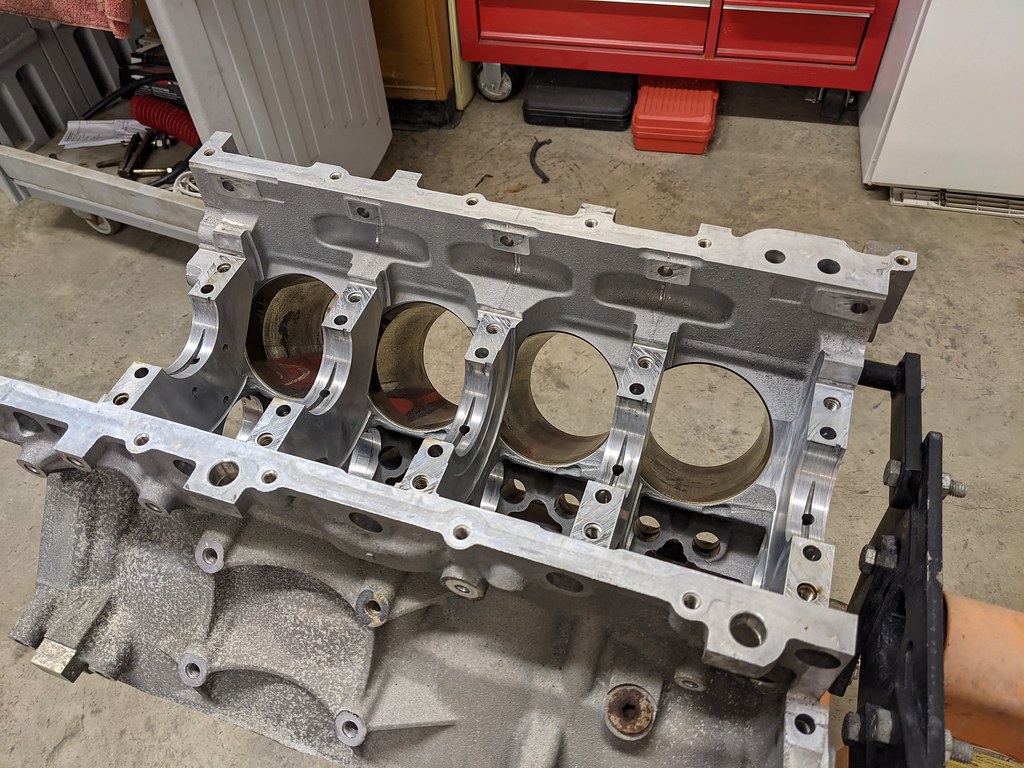
Then right as I was finishing that up, the FedEx truck dropped off my ball hone. Wife was still on the couch, so I got right to work. None of them were bad at all, but I chose the "worst" cylinder and got right to work. I sprayed the ball hone with WD40 and ATF and started counting the strokes. The walls cleaned up really nicely at 15 strokes, so I repeated that for the other 7 cylinders. I was thinking it would take much more time than it did. Start to finish was about 45 mins. Very pleased with the results.
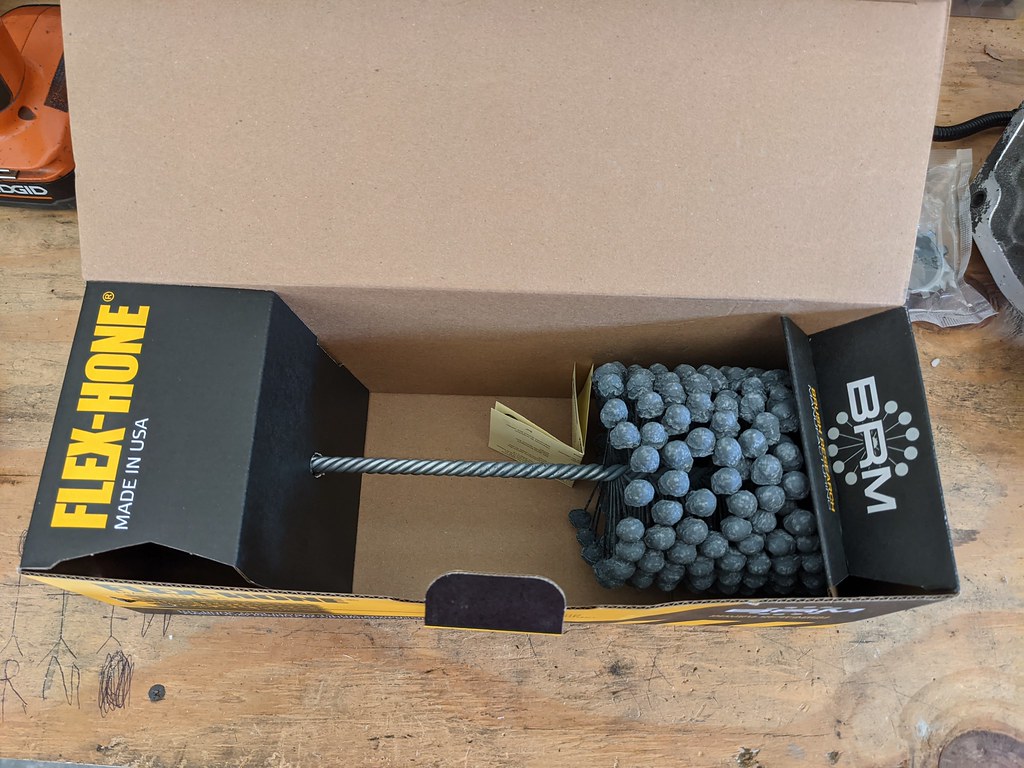

I still need to do a final wipe of the cylinder walls with some lint free cloths, but I did about 2-3 initial wipes and got 95% of the grit.
Now that the hone was done, I got out my bearing installer and pounded in the new bearings Saturday night. I was a little nervous as this is something that I've never done before. I'm not sure if this is the right way to do it, but this helped me and thought I'd pass it along. What I did was used a sharpie and drew on the mandrel to give me a guide. I first marked where the oil passages were on the block, and marked where the oil passage was on the bearing. Then centered the oil passages on the bearing and block but I found that it was hard to see my lines when the mandrel was in the block. So I lined up those marks, but then made a mark at the 6 o'clock position (remember the motor is upside down), so that it was pointing straight up. I could easily see it before I started to pound it in. Hopefully these pictures help explain better what I did.
Another thing that is super important to remember is that for this particular bearing set there are specific locations for each bearing. They are all different and special care needs to be taken to ensure that they are in the right locations. One thing that I noticed too right out of the box was that there were burrs on all of the bearing surface edges. I wasn't comfortable with that so I took some 600 grit sandpaper and carefully deburred each of the bearings by hand. Again, not sure if this was the "proper" thing to do, but I didn't want to scuff up my new cam during the install. I took special care not to sand the actual bearing surface, just the edge so that when the cam was installed it would be a nice smooth transition.
I should also mention the order of the bearings matters too. For example, the mandrel will not fit out the bottom in the center galley's, so if you installed say position 2 and 3 with the mandrel, you could potentially get it stuck and have to press it out again to get the mandrel out.
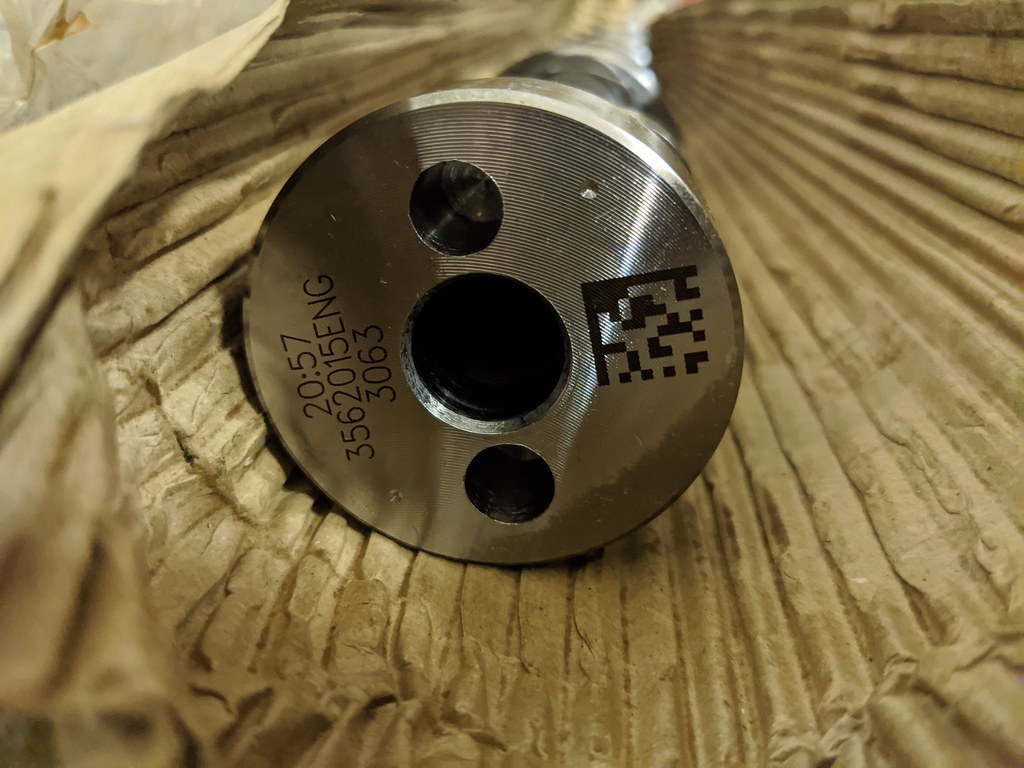
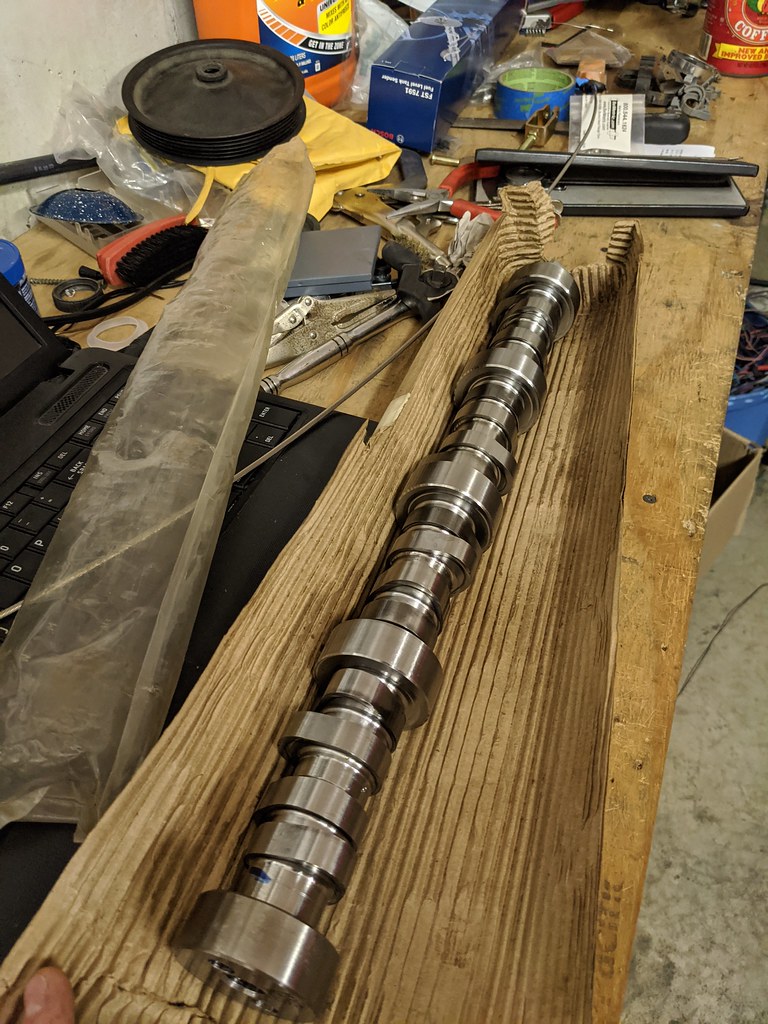
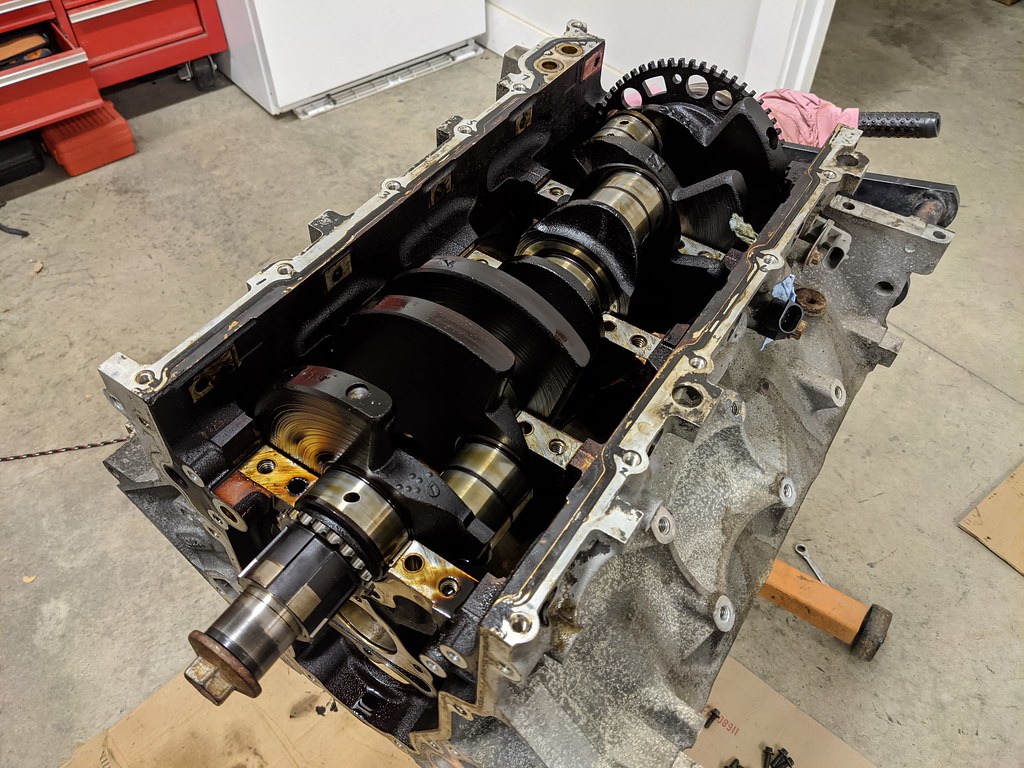
I wiped everything down multiple times and then the moment of truth, I had to see if the cam would fit. It was a tease, but I installed my new Ghost cam to see what I had done. I was thrilled that the cam spun very freely with little effort by hand.
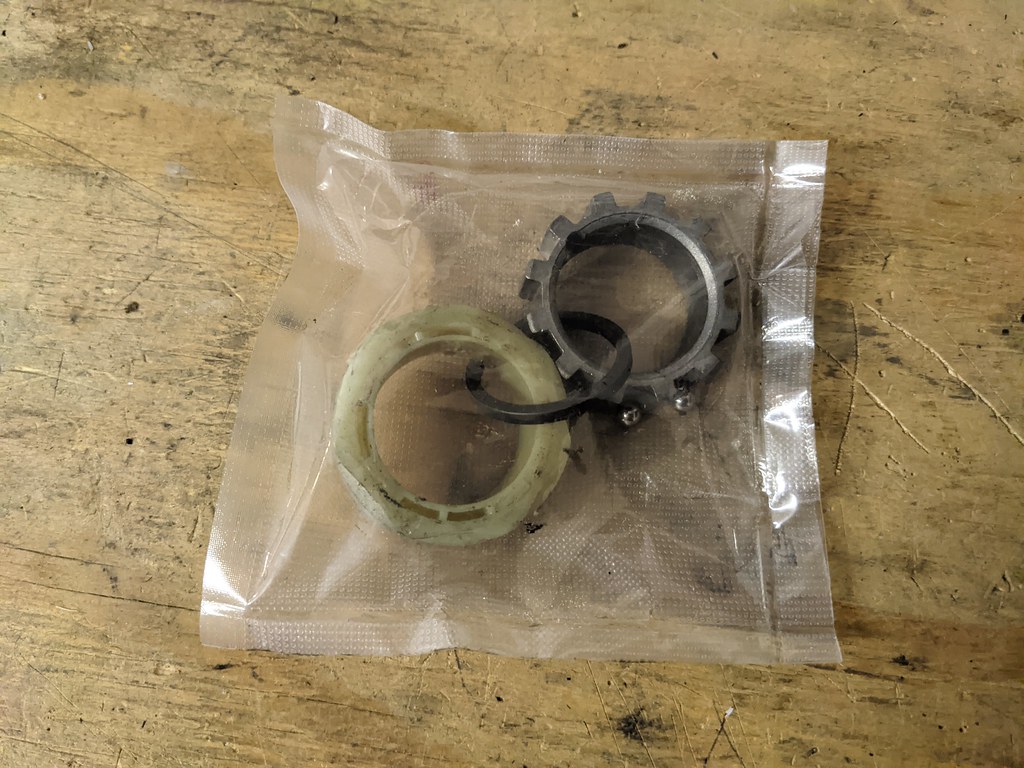
Then the last of the parts I ordered came in. First up is the magnum tailshaft, shifter, shift rail and VSS reluctor parts. All the parts are new Magnum take off parts from when Amp was doing 4th gen tailshaft swaps. Since the Magnum-f came out, I'd imagine that finding the used Magnum tailshafts will be harder and harder to come by. I'm glad I got mine when I did.
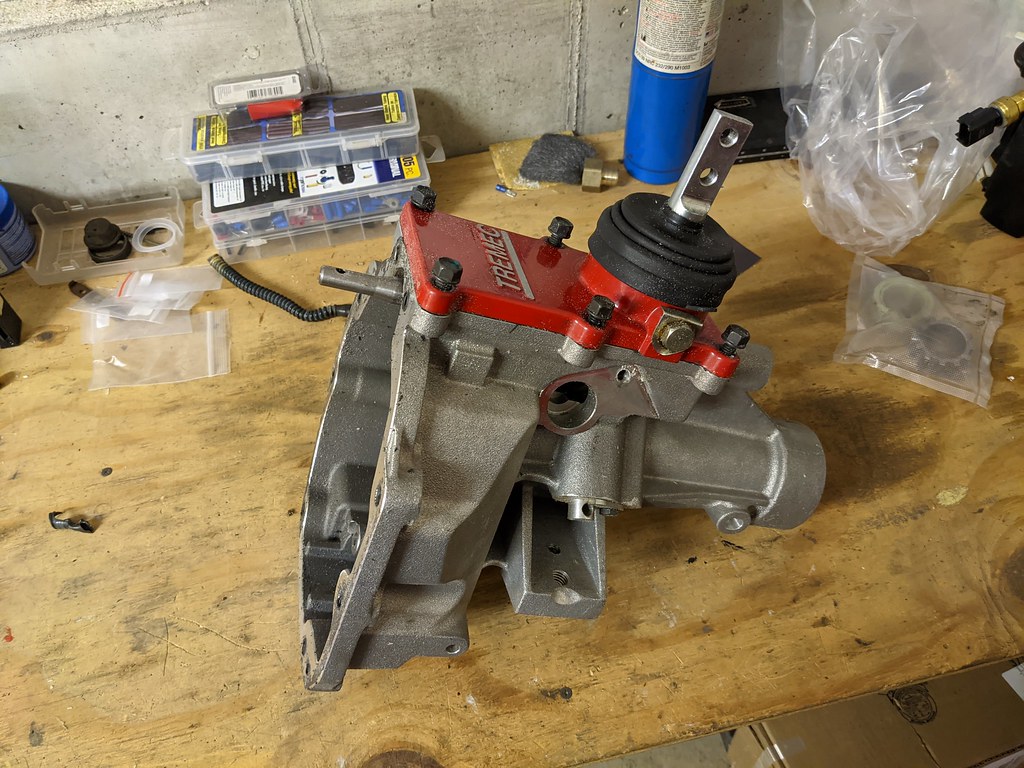
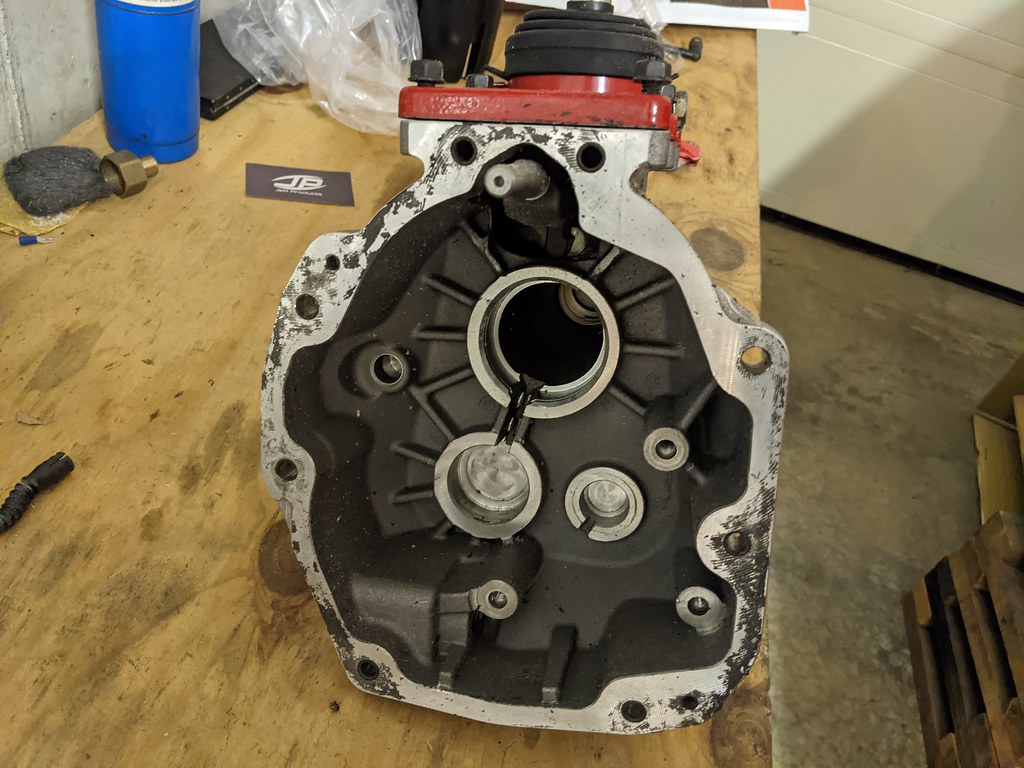
I had to test fit the Sikky shifter. It is just a very well built piece. From my research it should give me about a 1" setback from the original 4th gen shifter that was in my car. Time will tell though when I get it test fit.
Last but not least is the LSA lid. This thing looks like it is almost new. I got a great buy on it and the guy couldn't find the sensors that he said came with it, so he bought some brand AC Delco sensor from Rock Auto and had them shipped to me.
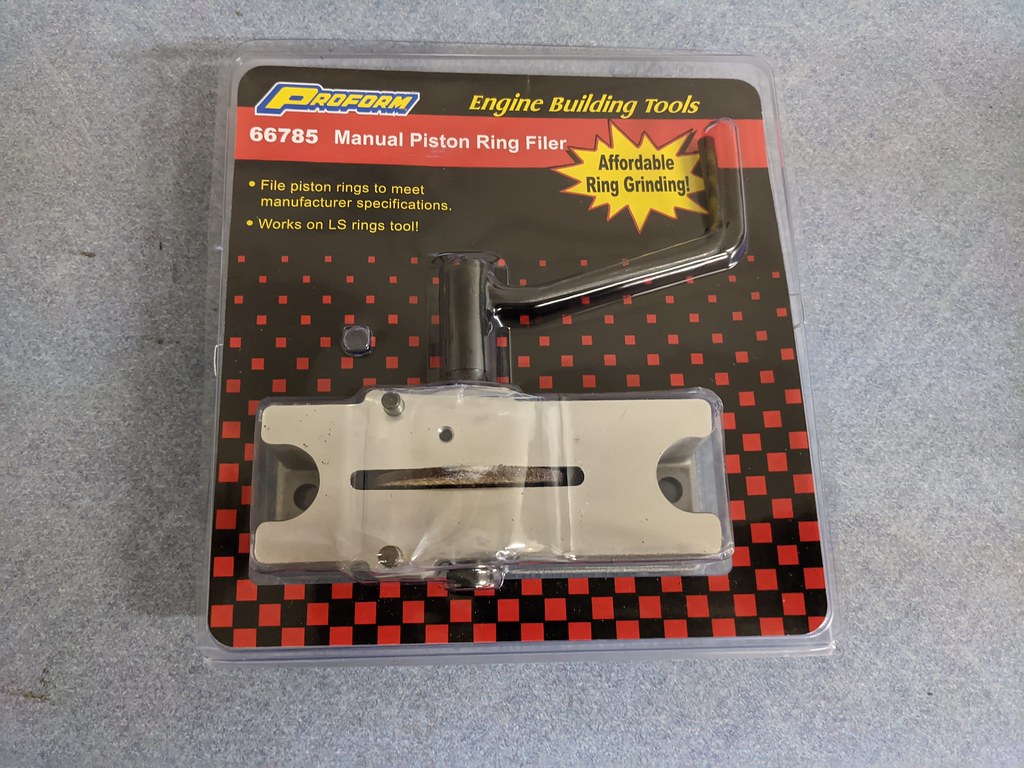
I've got a friend in town who has a ring filer he's going to let me borrow, so hopefully he finds it by next weekend and I'll start fitting up the new piston rings. All for now.
Cheers,
Ryan
I pulled the oil passage plugs to get all the grime out. Not sure if I'm going to reuse these or not. I think new ones are cheap enough that I may just do that.
I also blasted my TR6060 to get the clutch dust and grime off of it.
Here's the brush kit along with the jaw pullers and snap ring plyers I bought for the Magnum conversion.
Then right as I was finishing that up, the FedEx truck dropped off my ball hone. Wife was still on the couch, so I got right to work. None of them were bad at all, but I chose the "worst" cylinder and got right to work. I sprayed the ball hone with WD40 and ATF and started counting the strokes. The walls cleaned up really nicely at 15 strokes, so I repeated that for the other 7 cylinders. I was thinking it would take much more time than it did. Start to finish was about 45 mins. Very pleased with the results.
I still need to do a final wipe of the cylinder walls with some lint free cloths, but I did about 2-3 initial wipes and got 95% of the grit.
Now that the hone was done, I got out my bearing installer and pounded in the new bearings Saturday night. I was a little nervous as this is something that I've never done before. I'm not sure if this is the right way to do it, but this helped me and thought I'd pass it along. What I did was used a sharpie and drew on the mandrel to give me a guide. I first marked where the oil passages were on the block, and marked where the oil passage was on the bearing. Then centered the oil passages on the bearing and block but I found that it was hard to see my lines when the mandrel was in the block. So I lined up those marks, but then made a mark at the 6 o'clock position (remember the motor is upside down), so that it was pointing straight up. I could easily see it before I started to pound it in. Hopefully these pictures help explain better what I did.
Another thing that is super important to remember is that for this particular bearing set there are specific locations for each bearing. They are all different and special care needs to be taken to ensure that they are in the right locations. One thing that I noticed too right out of the box was that there were burrs on all of the bearing surface edges. I wasn't comfortable with that so I took some 600 grit sandpaper and carefully deburred each of the bearings by hand. Again, not sure if this was the "proper" thing to do, but I didn't want to scuff up my new cam during the install. I took special care not to sand the actual bearing surface, just the edge so that when the cam was installed it would be a nice smooth transition.
I should also mention the order of the bearings matters too. For example, the mandrel will not fit out the bottom in the center galley's, so if you installed say position 2 and 3 with the mandrel, you could potentially get it stuck and have to press it out again to get the mandrel out.
I wiped everything down multiple times and then the moment of truth, I had to see if the cam would fit. It was a tease, but I installed my new Ghost cam to see what I had done. I was thrilled that the cam spun very freely with little effort by hand.
Then the last of the parts I ordered came in. First up is the magnum tailshaft, shifter, shift rail and VSS reluctor parts. All the parts are new Magnum take off parts from when Amp was doing 4th gen tailshaft swaps. Since the Magnum-f came out, I'd imagine that finding the used Magnum tailshafts will be harder and harder to come by. I'm glad I got mine when I did.
I had to test fit the Sikky shifter. It is just a very well built piece. From my research it should give me about a 1" setback from the original 4th gen shifter that was in my car. Time will tell though when I get it test fit.
Last but not least is the LSA lid. This thing looks like it is almost new. I got a great buy on it and the guy couldn't find the sensors that he said came with it, so he bought some brand AC Delco sensor from Rock Auto and had them shipped to me.
I've got a friend in town who has a ring filer he's going to let me borrow, so hopefully he finds it by next weekend and I'll start fitting up the new piston rings. All for now.
Cheers,
Ryan
01-07-2021, 02:36 PM
#10
TECH Fanatic
Thread Starter
iTrader: (27)
Public Service Announcement. If you or anyone that you love and care about are suffering from project scope creep, please seek treatment immediately. Symptoms include; lightened wallet, loss of sleep, lengthened project timelines, and the dreaded jack stand syndrome...
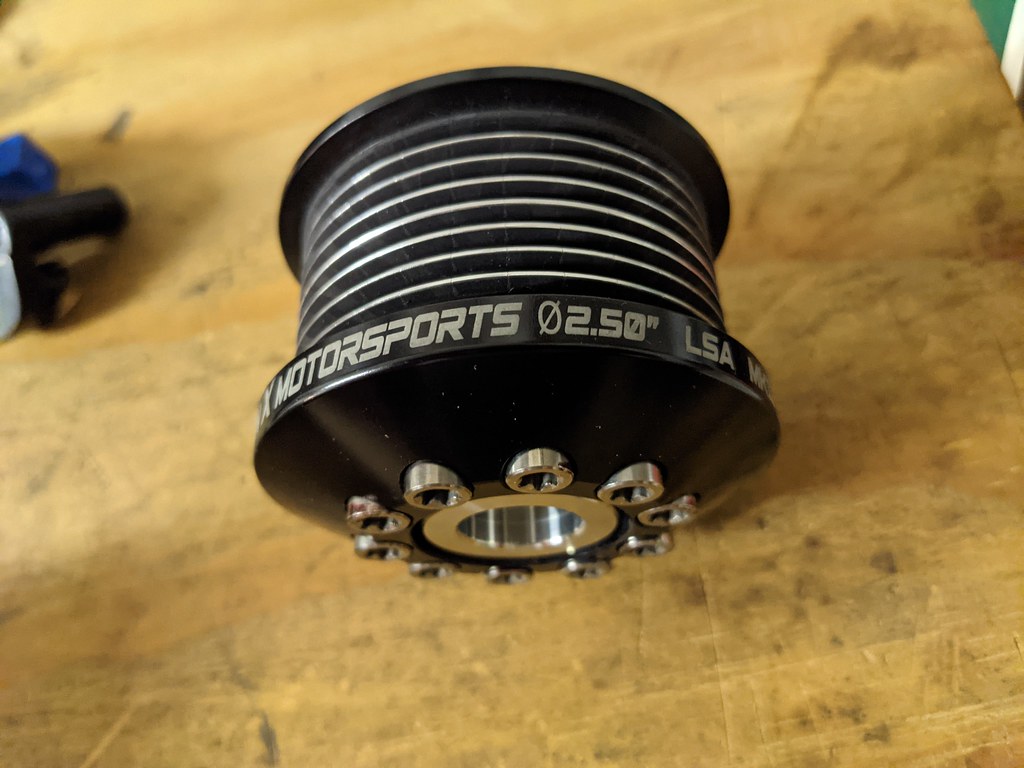
All joking aside, I don't have any new progress to report, but do have some new parts due to scope creep. I kept telling myself to just keep the supercharger stock, and see how it drives. Then I check out the classified ads, and find a great deal on a 2.5" smaller upper pulley for the supercharger that includes a new 8 rib belt. With all of my engine mods with the stock upper pulley I would be right on the edge of maxing out the stock 56 lb LSA injectors. Then the deal strikes again, and I found a set of 95lb injectors for a great deal...
This is the pretty amazing thing about the internet too. I put a message out that I wanted a jig to drill my cylinder head for the LSA dowel pin rather than just breaking off the dowel like most do. It seems like more of a correct solution to me. Some guy online I've never met offered to buy an LSA gasket, build a jig, sent the jig (along with a test cylinder head and milling bits) for me to drill my head. All of this and he wouldn't accept a penny. Amazing.
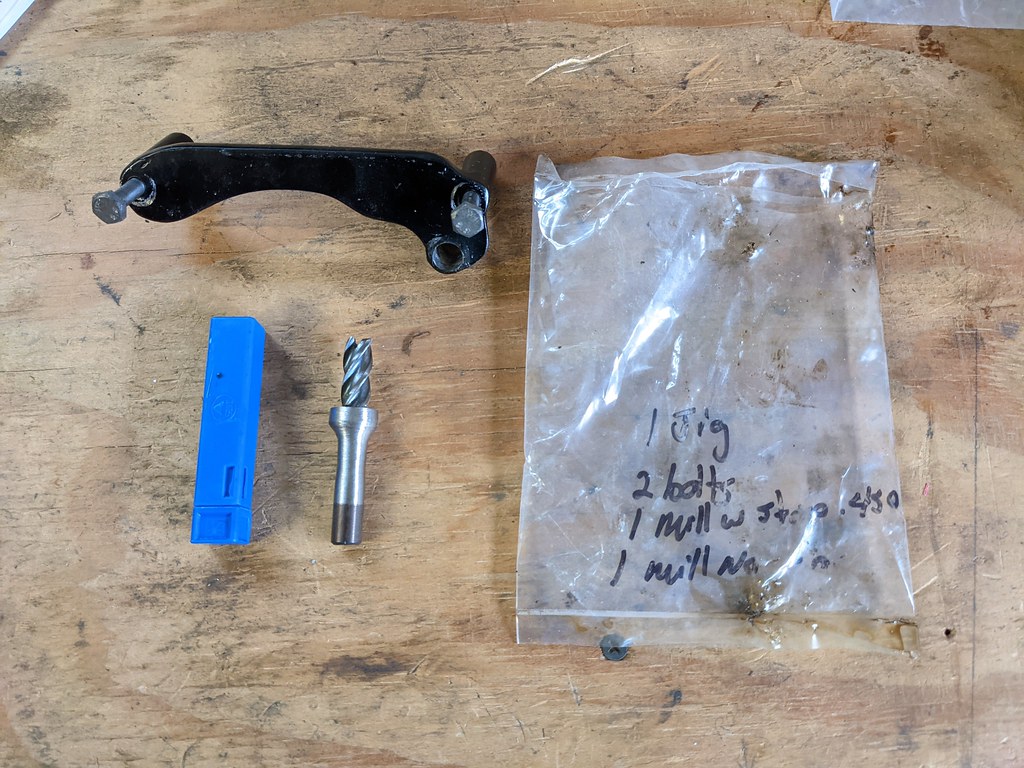
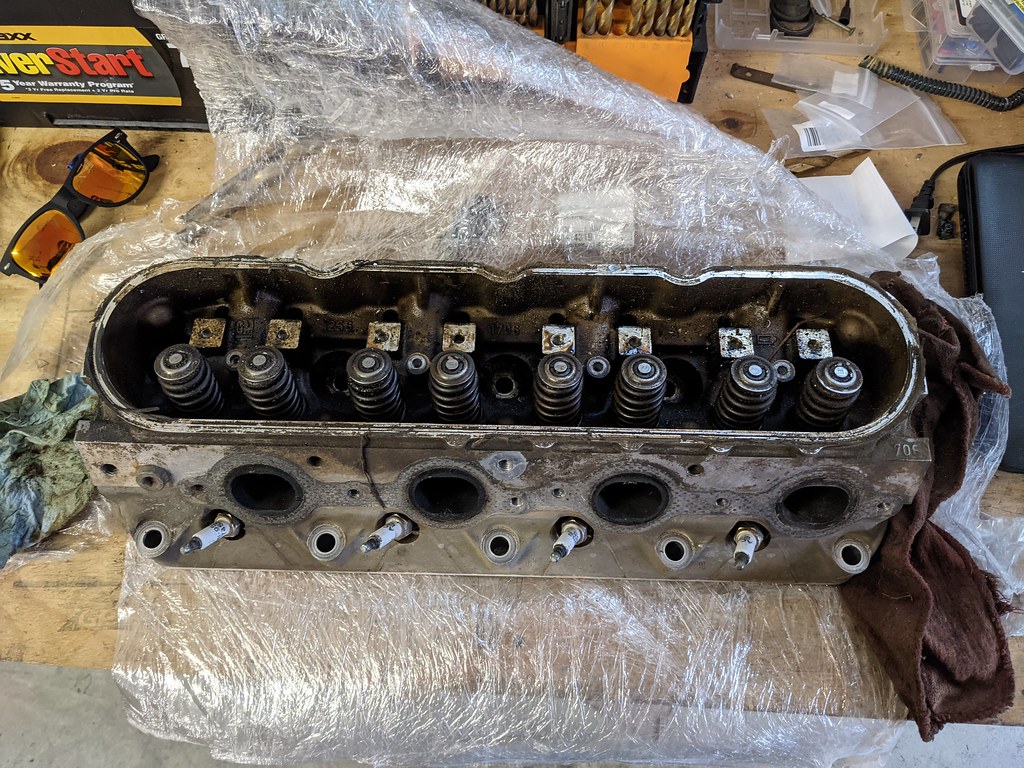
I did a quick test fit of the head on my block and the jig will need to be modified slightly. It is prefect front to rear, but needs to be up a little higher on the head for the intake to seat properly. Talking maybe 1/16" He said that the head is junk and he didn't want it back, which works out perfectly for me since I was looking for a few junk heads to practice some port cleanup on.
My buddy had a junk Civic head that he was going to scrap, so I got that from him too.
Since I couldn't find anyone local to me with a piston ring filer, I just bought one. I'm sure this won't be the last engine I build. I'm planning on gapping the rings to .024 upper and .026 lower, which is according to Mahle's instructions for a supercharged application. Plenty of stock LS3 guys are running factory ring gaps around .016, so I'm comfortable with the margins that I'll have when I open mine up slightly.
Cheers,
Ryan
All joking aside, I don't have any new progress to report, but do have some new parts due to scope creep. I kept telling myself to just keep the supercharger stock, and see how it drives. Then I check out the classified ads, and find a great deal on a 2.5" smaller upper pulley for the supercharger that includes a new 8 rib belt. With all of my engine mods with the stock upper pulley I would be right on the edge of maxing out the stock 56 lb LSA injectors. Then the deal strikes again, and I found a set of 95lb injectors for a great deal...
This is the pretty amazing thing about the internet too. I put a message out that I wanted a jig to drill my cylinder head for the LSA dowel pin rather than just breaking off the dowel like most do. It seems like more of a correct solution to me. Some guy online I've never met offered to buy an LSA gasket, build a jig, sent the jig (along with a test cylinder head and milling bits) for me to drill my head. All of this and he wouldn't accept a penny. Amazing.
I did a quick test fit of the head on my block and the jig will need to be modified slightly. It is prefect front to rear, but needs to be up a little higher on the head for the intake to seat properly. Talking maybe 1/16" He said that the head is junk and he didn't want it back, which works out perfectly for me since I was looking for a few junk heads to practice some port cleanup on.
My buddy had a junk Civic head that he was going to scrap, so I got that from him too.
Since I couldn't find anyone local to me with a piston ring filer, I just bought one. I'm sure this won't be the last engine I build. I'm planning on gapping the rings to .024 upper and .026 lower, which is according to Mahle's instructions for a supercharged application. Plenty of stock LS3 guys are running factory ring gaps around .016, so I'm comfortable with the margins that I'll have when I open mine up slightly.
Cheers,
Ryan
01-07-2021, 02:37 PM
#11
TECH Fanatic
Thread Starter
iTrader: (27)
Srode, I'm pretty sure it's 18 or 19 gallon.
I made a little progress over the long weekend. I got out on Friday night to get some work done. I decided to clean up and test fit the new main bearings that I have to see if I need either need tighter bearings or possibly sending the crank out for machine work. I started by cleaning up the main caps. There was a layer of gunk on the caps that took a long time to clean up. Purple power really helped, but it was pretty nasty work. There was also sludge on the bolts that I had to get cleaned off.
They cleaned up nicely though.

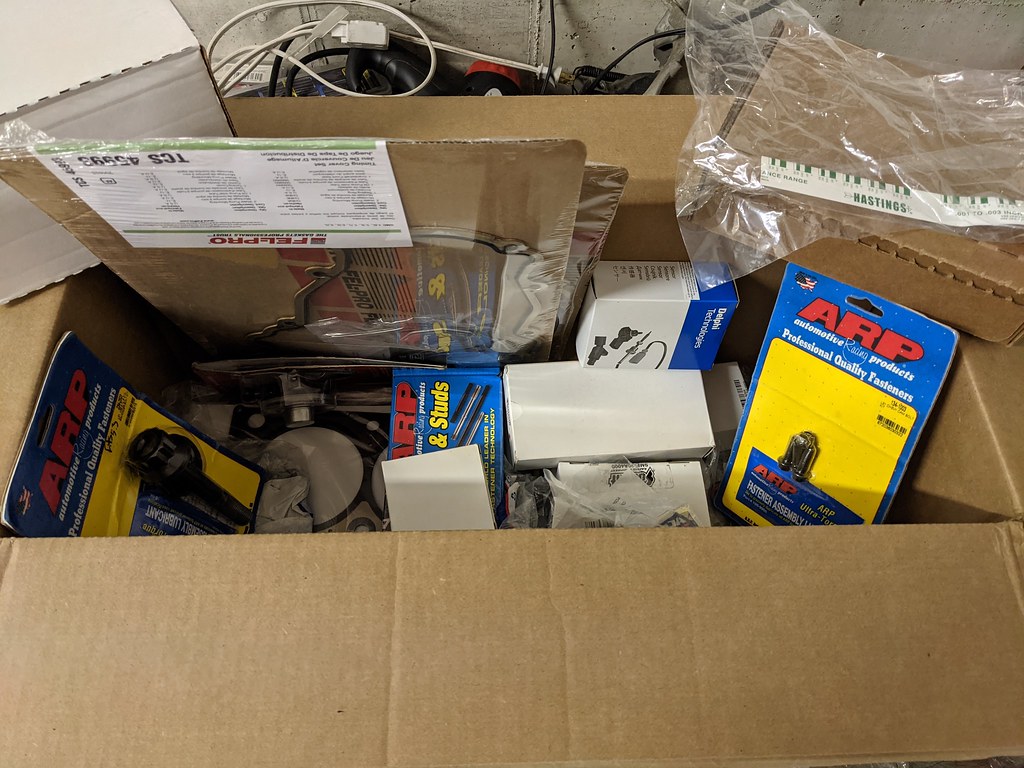
Here is my big box from Summit racing with everything to get this motor back together including tools, sensors, bolts gaskets.
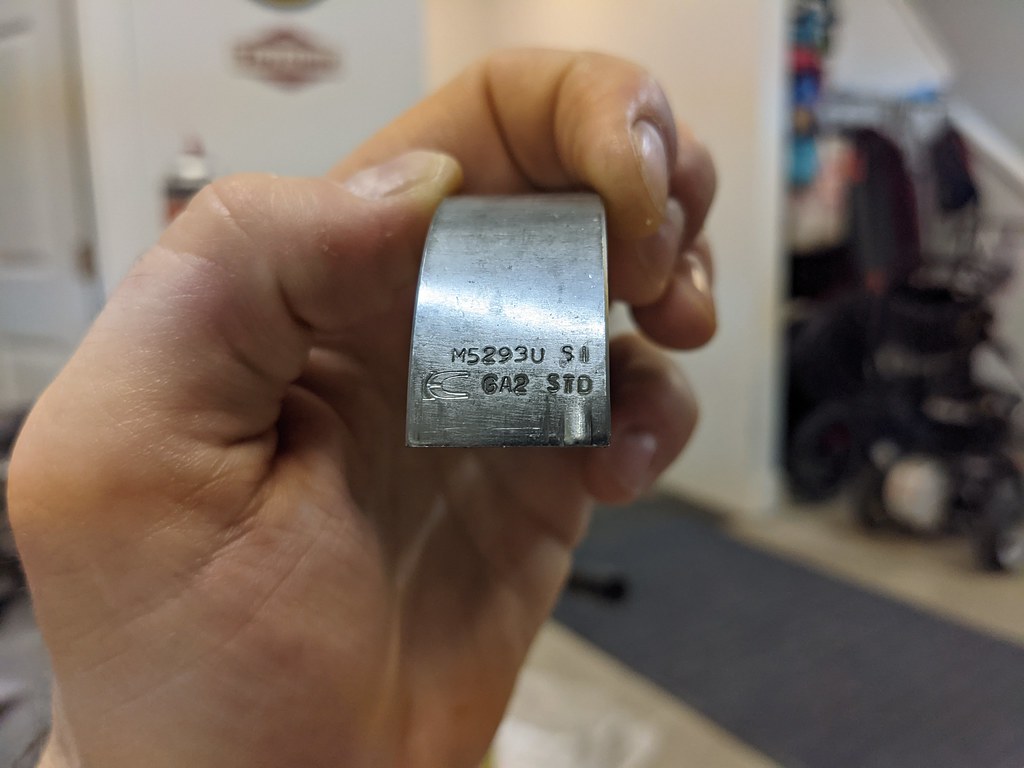
While reading some reviews on the Summit brand main/rod bearings I noticed that people were claiming that they were made by King. After unboxing the mains, here is the stamp on the bearing I pulled out. Has the King bearing stamp.
Went through and installed the top bearings on all the journals being sure to clean everything as I went.
One of the tools that I bought that is needed for the job is a torque angle gauge. Since the mains and rods both require an initial torque value followed by an angle, this gauge is necessary. Took a few tries to figure it out, but it worked great after I got the hang of it.
I put a short piece of plastigauge on all the crank journals and proceeded to torque all 5 main caps.
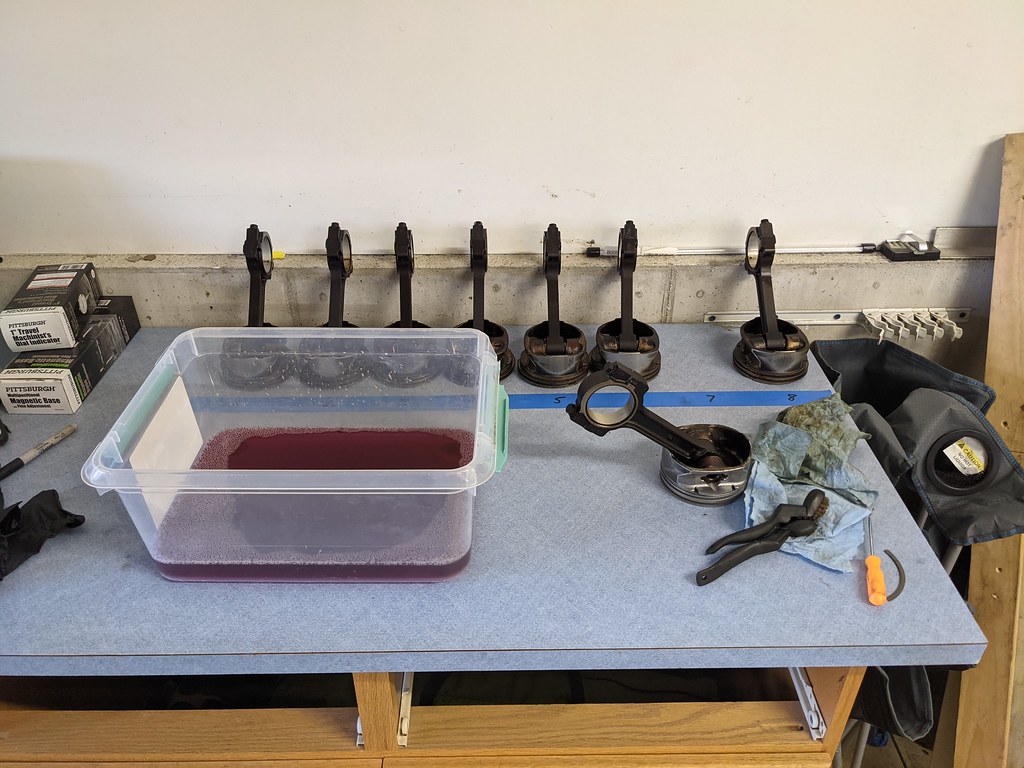
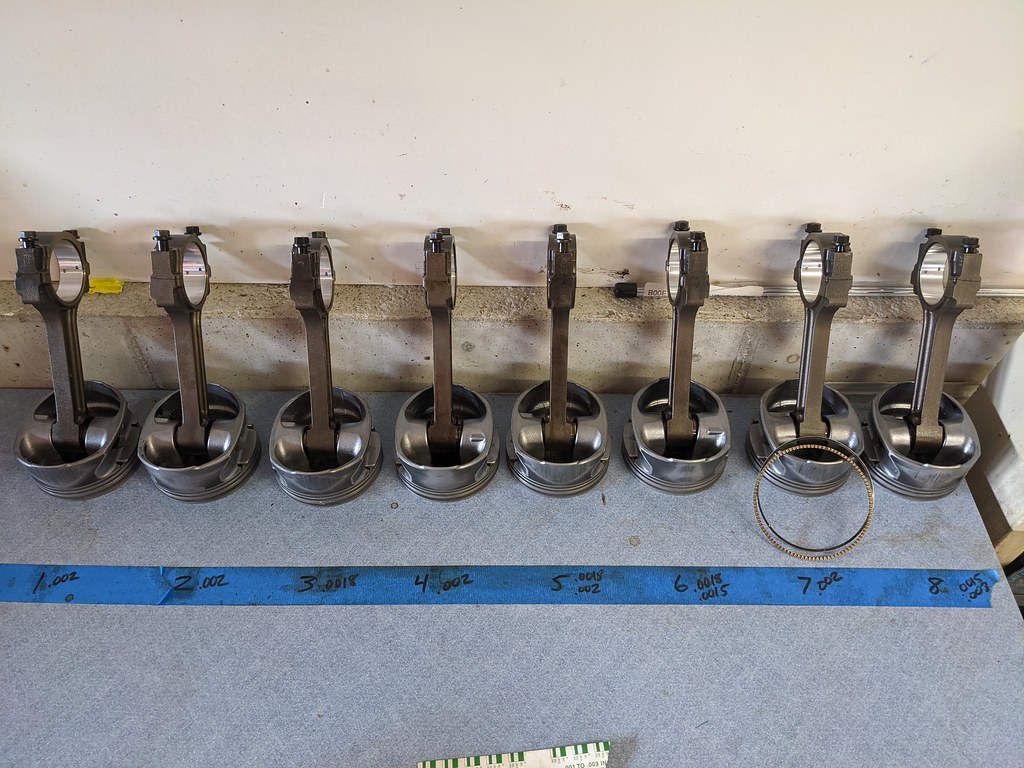
Then removed them one by one and checked bearing clearances. I am happy to report that they are all right within specs. The rule of thumb for stock motors is .00075-.001 per 1" of journal. All LS motors gen3/4 have a 2.100", which would mean the range is .001575 - 0.0021. Mine all measured according to the plastigauge between .0015-.002. I'm a happy camper. I took the picture next to the wrong size, but 1-4 caps measured right at .0015 and the 5th measured at .002. I'm not going to overthink it since they are all within specs. keep in mind that plastigauge has a +/-.0005 margin, but even with that I'm in the right zone.
I called it a night after the bearings all checked out. I want to get the rods all checked next, then once they all check out I can file fit the top and second rings. I'm going to follow with the instructions I found online from Mahle and file them to .024 top and .028 second ring.
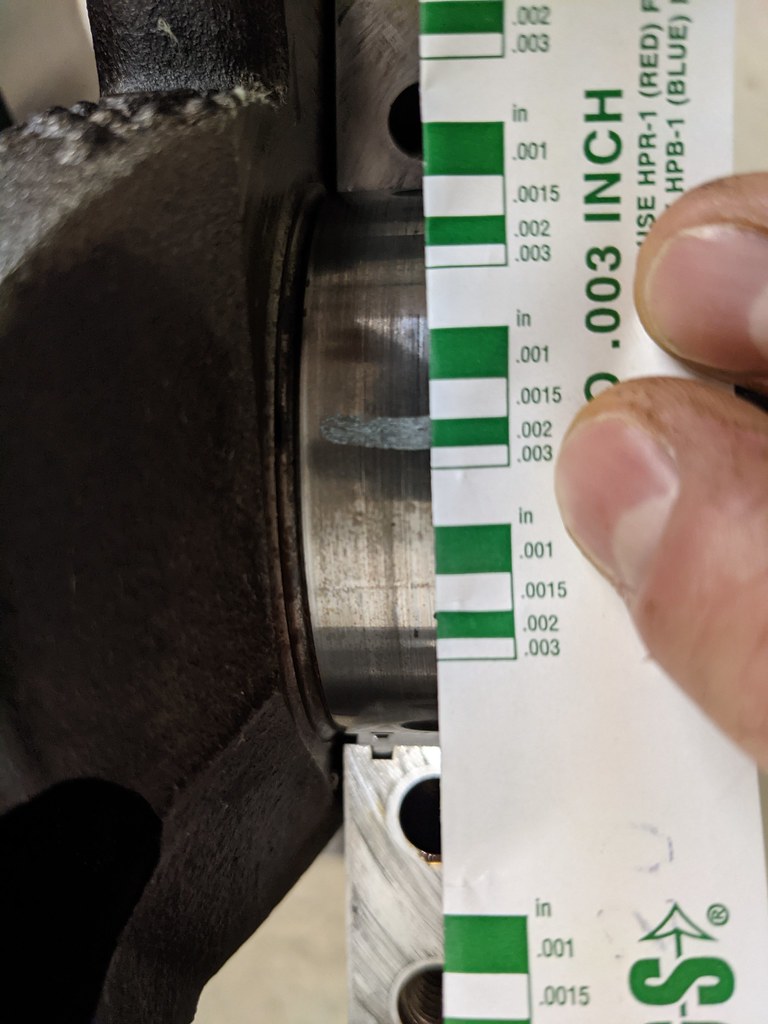
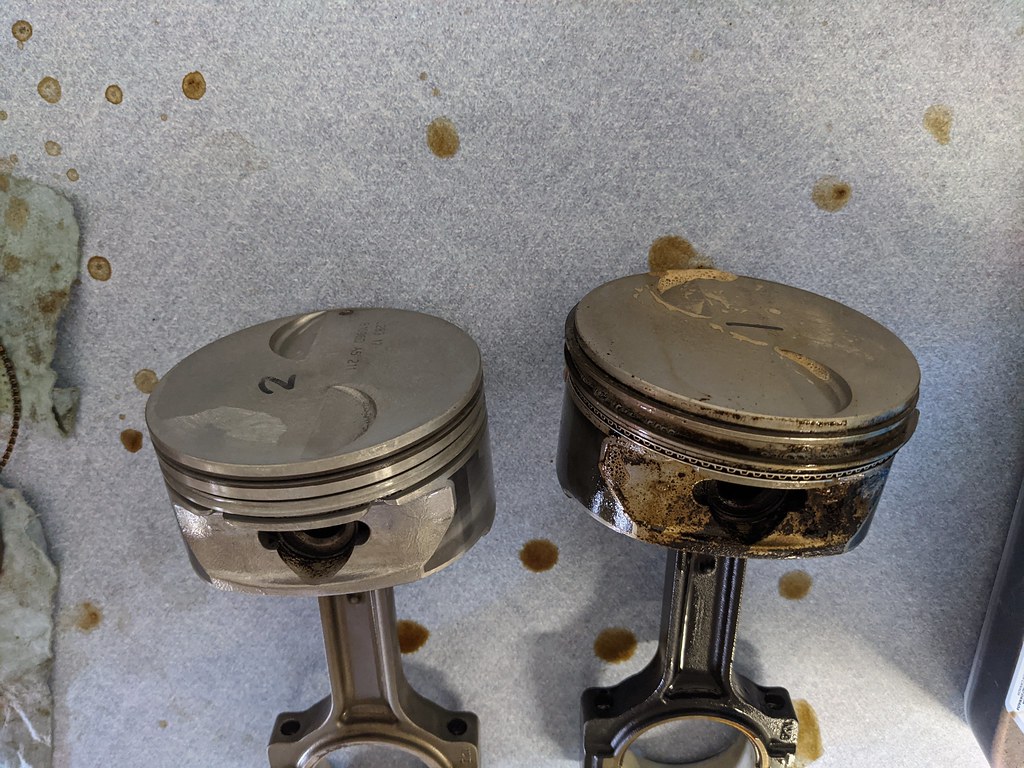
I've also heard people mention that higher mileage motors are "pre-gapped" for boost. While that may be true they are enlarged, I thought I would measure mine just to get an understanding of how true this is. My motor had just shy of 200k miles before I disassembled it. I pulled the top ring off of my motor and it measured at .020 and from everything I gather the stock rings were gapped at .016. So take that for what it is, but there is a little truth to that notion. I want to check the second ring and a few of the other pistons to see if they are consistent.
Thanks,
Ryan
I made a little progress over the long weekend. I got out on Friday night to get some work done. I decided to clean up and test fit the new main bearings that I have to see if I need either need tighter bearings or possibly sending the crank out for machine work. I started by cleaning up the main caps. There was a layer of gunk on the caps that took a long time to clean up. Purple power really helped, but it was pretty nasty work. There was also sludge on the bolts that I had to get cleaned off.
They cleaned up nicely though.
Here is my big box from Summit racing with everything to get this motor back together including tools, sensors, bolts gaskets.
While reading some reviews on the Summit brand main/rod bearings I noticed that people were claiming that they were made by King. After unboxing the mains, here is the stamp on the bearing I pulled out. Has the King bearing stamp.
Went through and installed the top bearings on all the journals being sure to clean everything as I went.
One of the tools that I bought that is needed for the job is a torque angle gauge. Since the mains and rods both require an initial torque value followed by an angle, this gauge is necessary. Took a few tries to figure it out, but it worked great after I got the hang of it.
I put a short piece of plastigauge on all the crank journals and proceeded to torque all 5 main caps.
Then removed them one by one and checked bearing clearances. I am happy to report that they are all right within specs. The rule of thumb for stock motors is .00075-.001 per 1" of journal. All LS motors gen3/4 have a 2.100", which would mean the range is .001575 - 0.0021. Mine all measured according to the plastigauge between .0015-.002. I'm a happy camper. I took the picture next to the wrong size, but 1-4 caps measured right at .0015 and the 5th measured at .002. I'm not going to overthink it since they are all within specs. keep in mind that plastigauge has a +/-.0005 margin, but even with that I'm in the right zone.
I called it a night after the bearings all checked out. I want to get the rods all checked next, then once they all check out I can file fit the top and second rings. I'm going to follow with the instructions I found online from Mahle and file them to .024 top and .028 second ring.
I've also heard people mention that higher mileage motors are "pre-gapped" for boost. While that may be true they are enlarged, I thought I would measure mine just to get an understanding of how true this is. My motor had just shy of 200k miles before I disassembled it. I pulled the top ring off of my motor and it measured at .020 and from everything I gather the stock rings were gapped at .016. So take that for what it is, but there is a little truth to that notion. I want to check the second ring and a few of the other pistons to see if they are consistent.
Thanks,
Ryan
01-07-2021, 02:38 PM
#12
TECH Fanatic
Thread Starter
iTrader: (27)
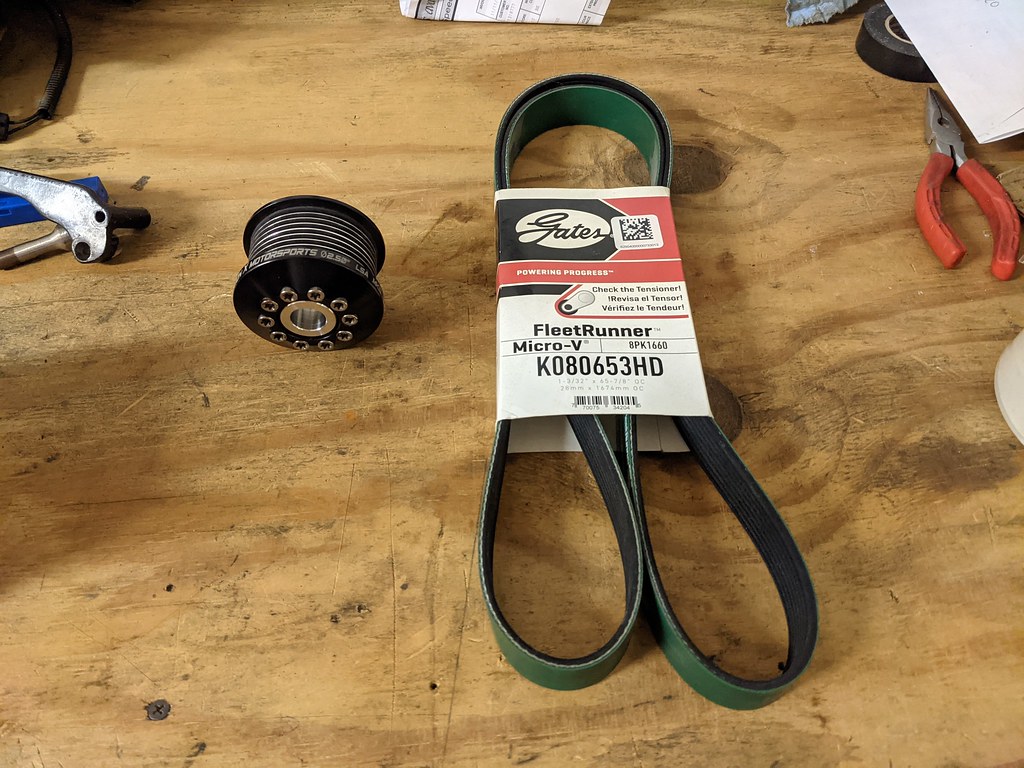
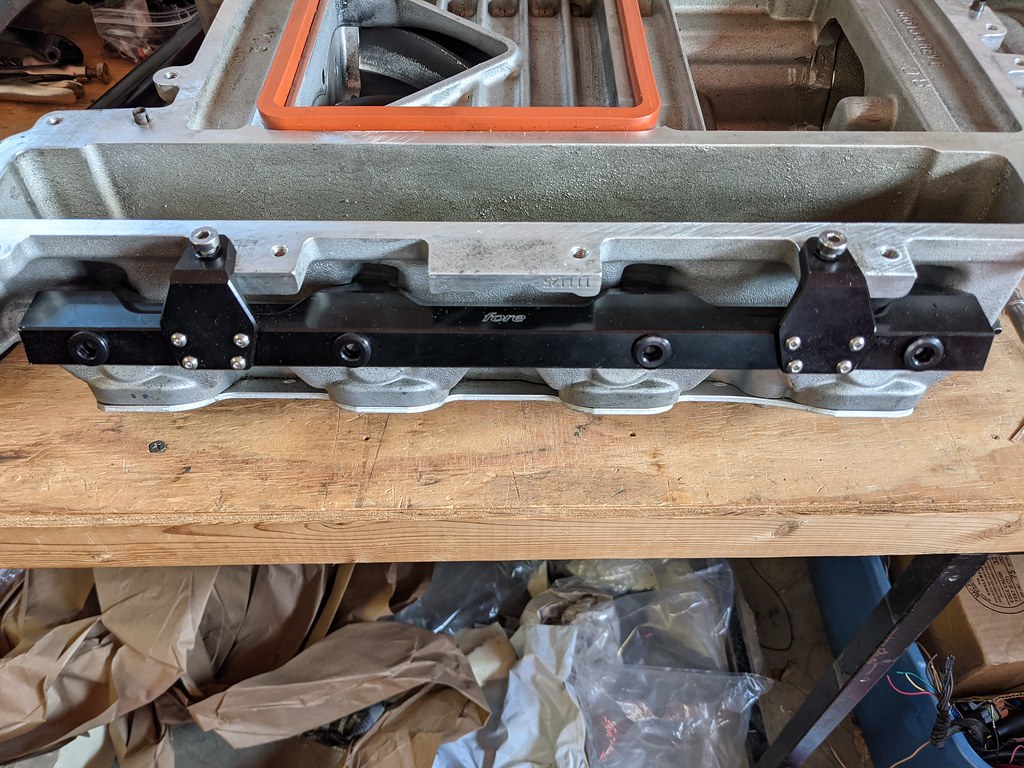
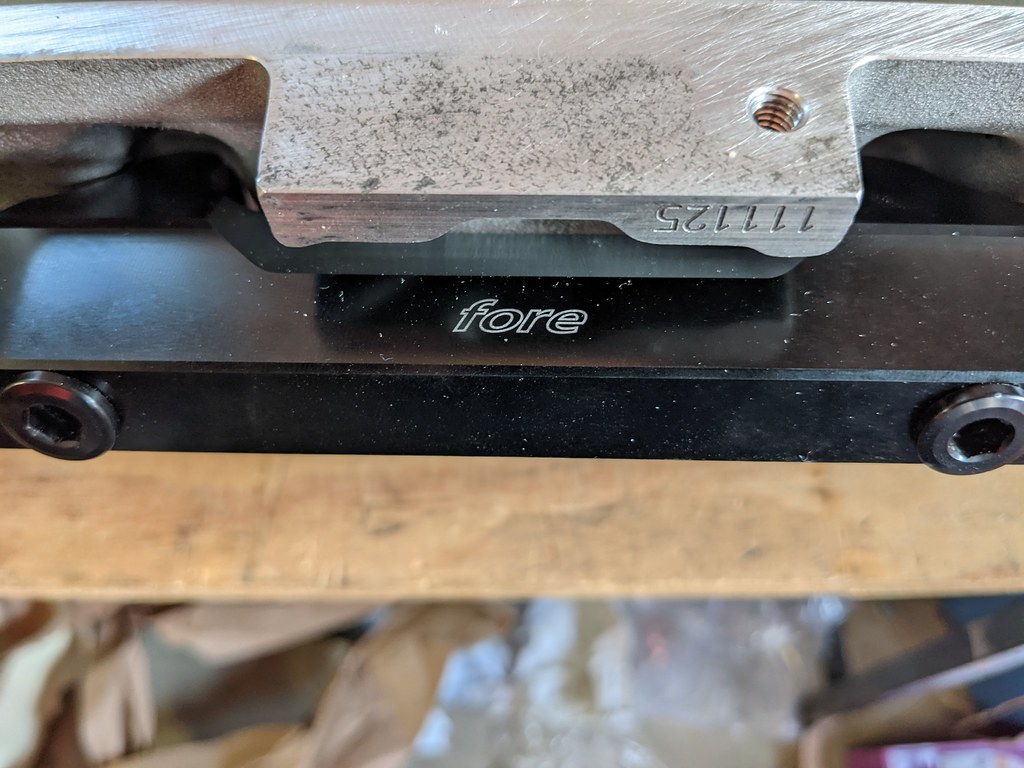
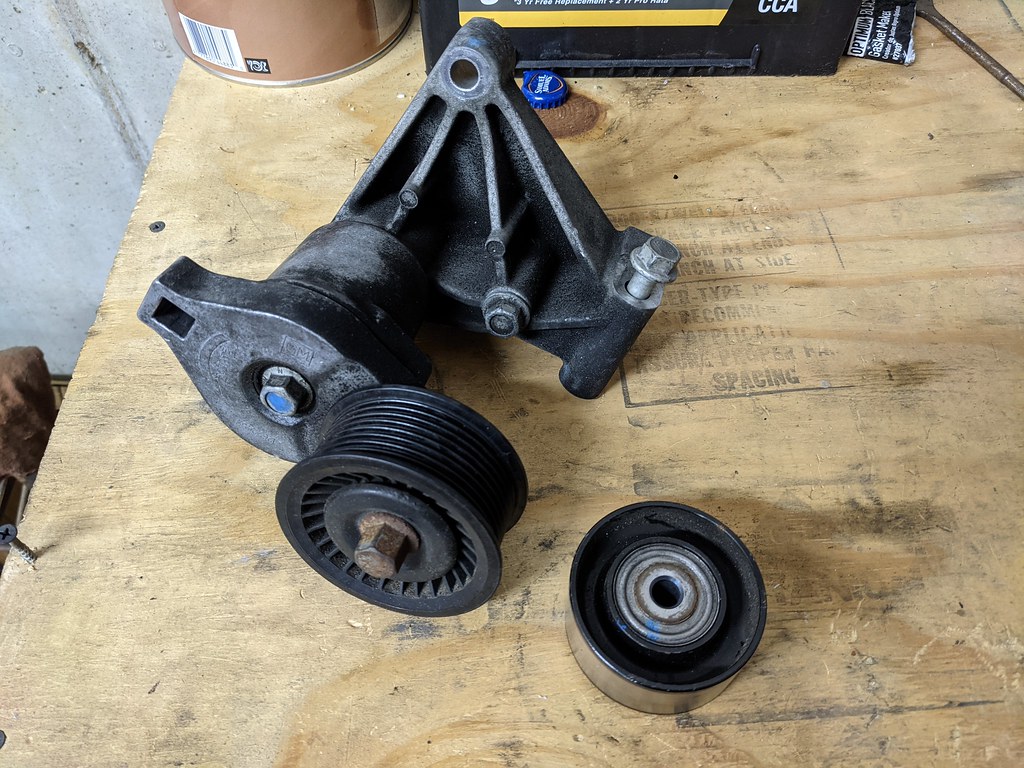
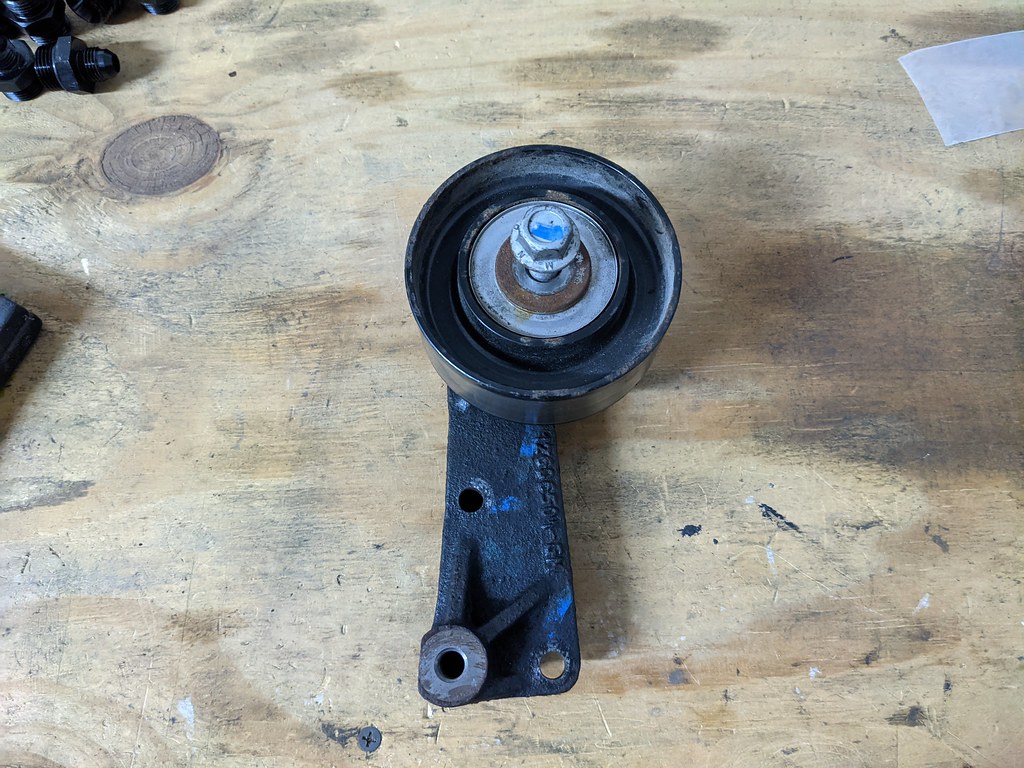
It's not a major update, but I finally tracked down a great price on a set of fuel rails. Pretty stoked about this deal, the retail on the Fore LSA fuel rails is ~$600, plus $160 worth of AN fittings and the guy sold them all to me for $200 bucks! If I play my cards right, maybe I can sell the fittings I won't use and get close to getting them for free! The same guy gave me an incredible deal on an 8 rib tensioner, brackets, idlers and idler bracket. So good that I'm going to just upgrade to the 3 belt setup.
Tensioner bracket
The last piece that I needed to finish my fuel pump was a new corrugated fuel line and these Oetiker clamps. I grabbed a kit with SS clamps on Amazon.
Hoping to make some good progress between now and the New Year!
Thanks,
Ryan
Tensioner bracket
The last piece that I needed to finish my fuel pump was a new corrugated fuel line and these Oetiker clamps. I grabbed a kit with SS clamps on Amazon.
Hoping to make some good progress between now and the New Year!
Thanks,
Ryan
01-07-2021, 02:39 PM
#13
TECH Fanatic
Thread Starter
iTrader: (27)
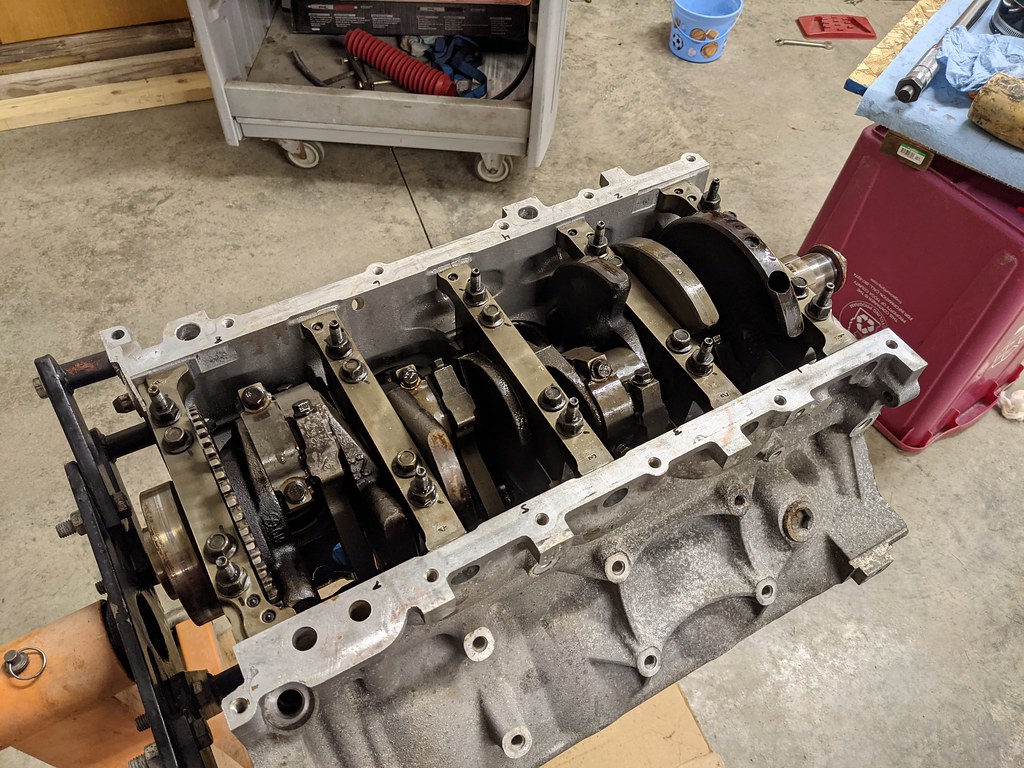
Happy new year to all! I'm stoked to finally have an update that isn't just about buying parts or home repairs. My goal over the holiday break from work was to get the short block fully assembled, so I'll start from the beginning.
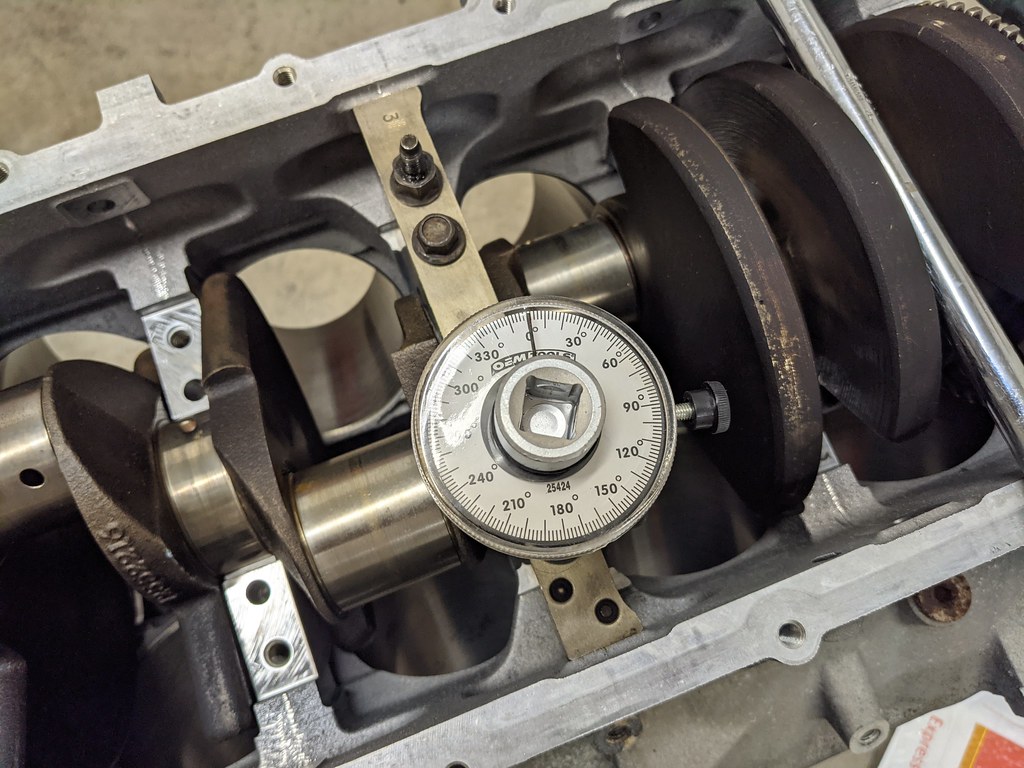
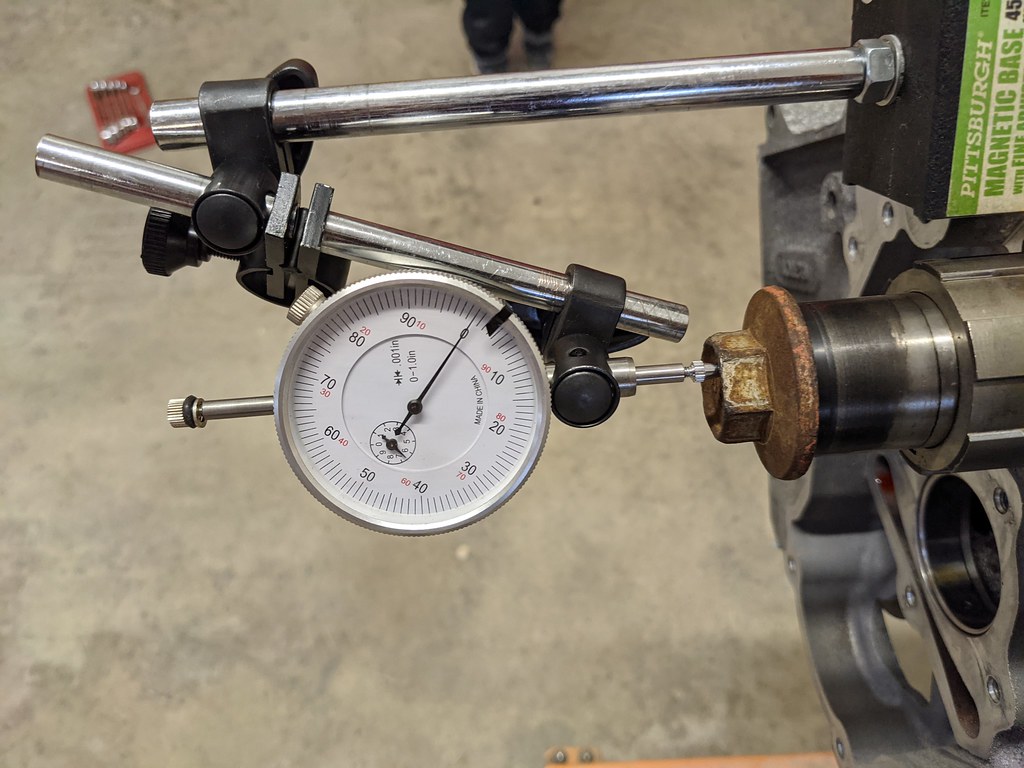
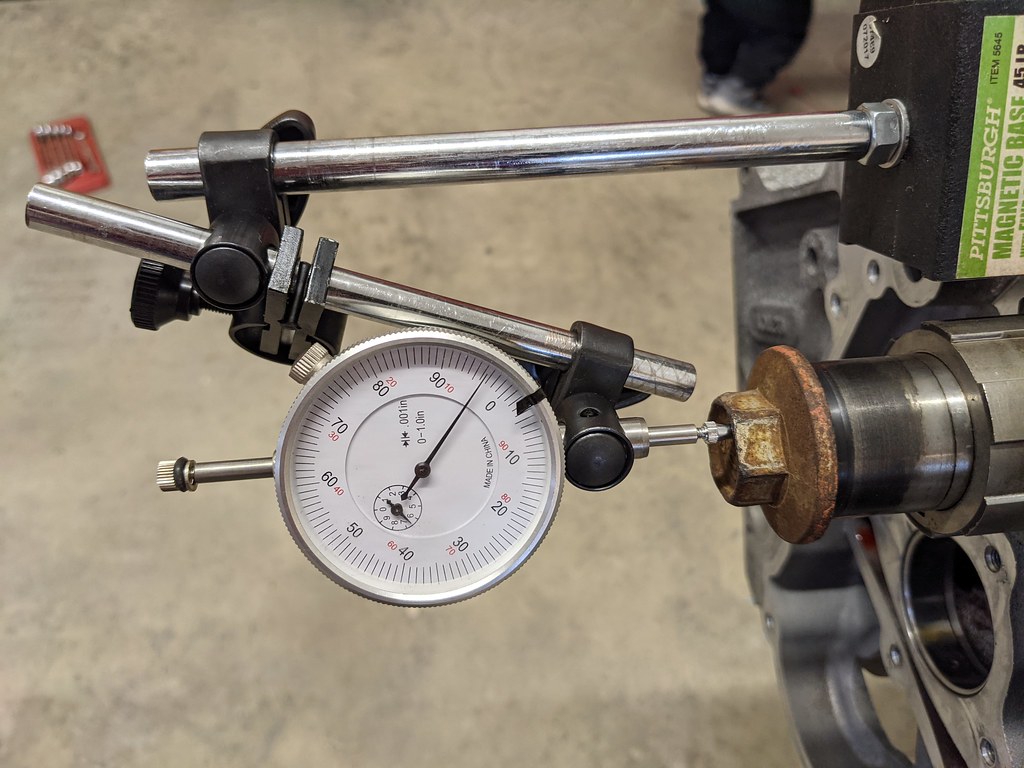
I left off last month by confirming with the Plastigauge that my bearing clearances were within specs for the motor. Next up was to confirm that after the crankshaft main caps were torqued, that thrust checked out. That required a dial indicator and measuring the forward to rear movement of the crank. I had my inspector there to make sure I was doing it correctly.

LS motors require a .004 - .008 clearance to be within specs. Thankfully mine came out around .005, so I'm on the tighter side but within the specs. Must be the angle I took the picture, but it was .005. The picture makes it look more like .0035, but for those concerned, it was measured correctly.
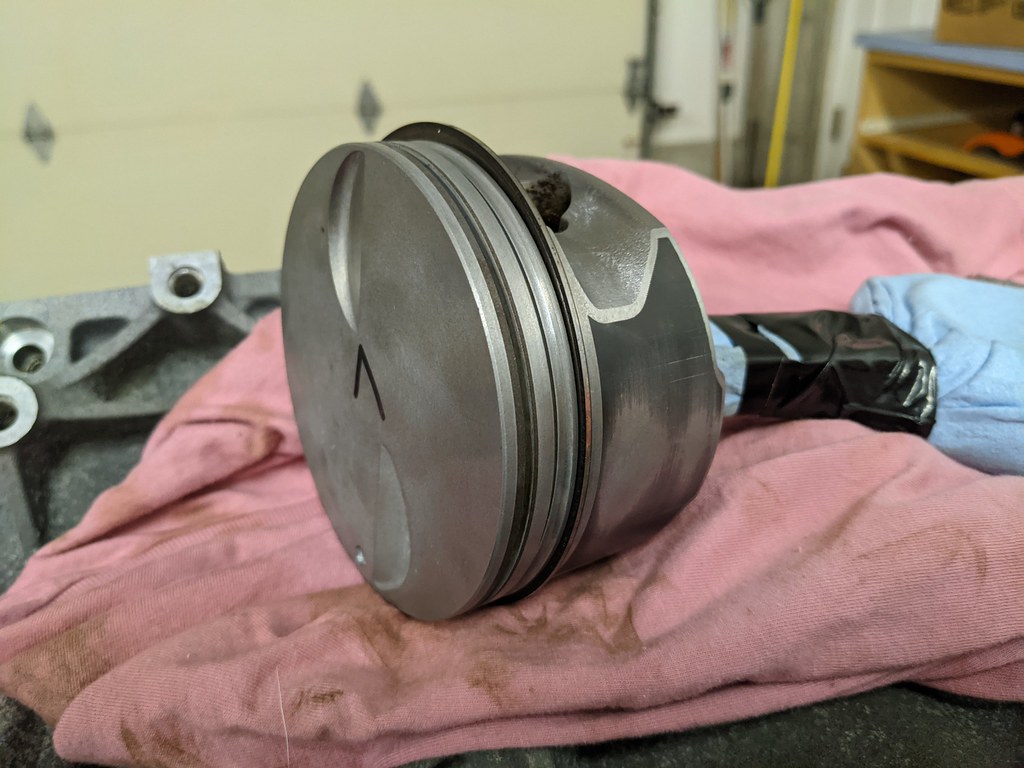
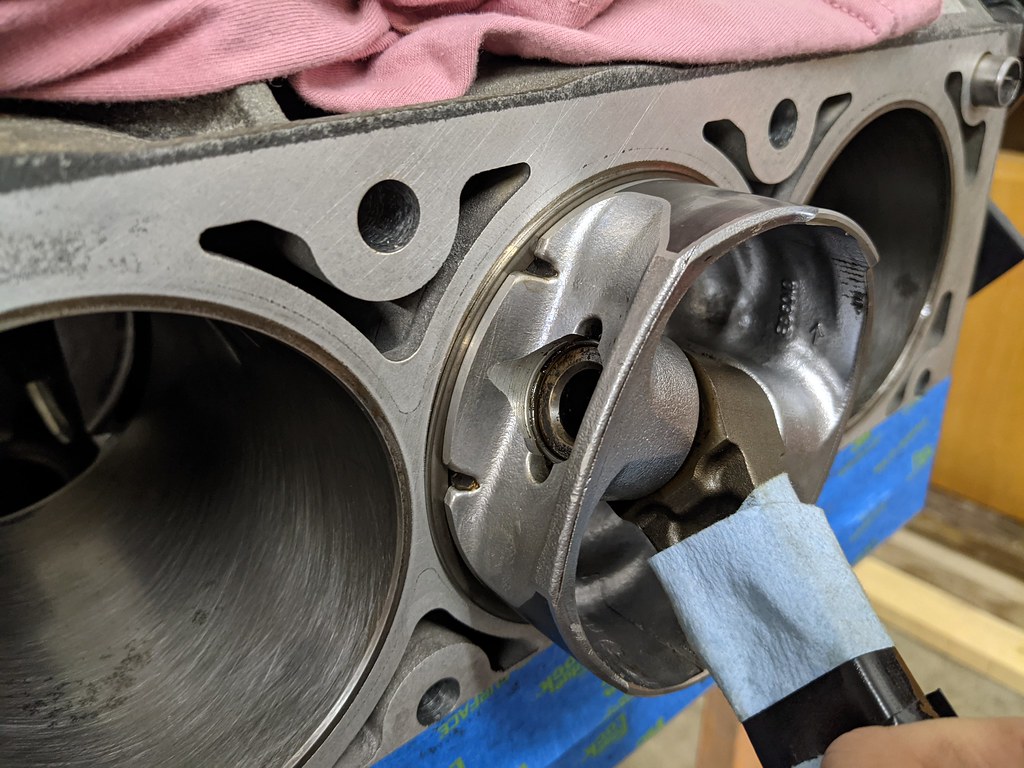
Moving on was getting the pistons/rods ready to assemble. Step one was to get them cleaned up. There was a ton of carbon built up that needed to go. Especially in the ring grooves. Spent several hours cleaning them all up.
After they were cleaned up, I installed them all without rings to check the new bearing clearances. Thankfully they all checked out to be right within the specs using plastigauge, and I could move on. I noted all the measurements on the tape line. I should also mention that the Summit rod bearings I bought were also King brand just like the main bearings.
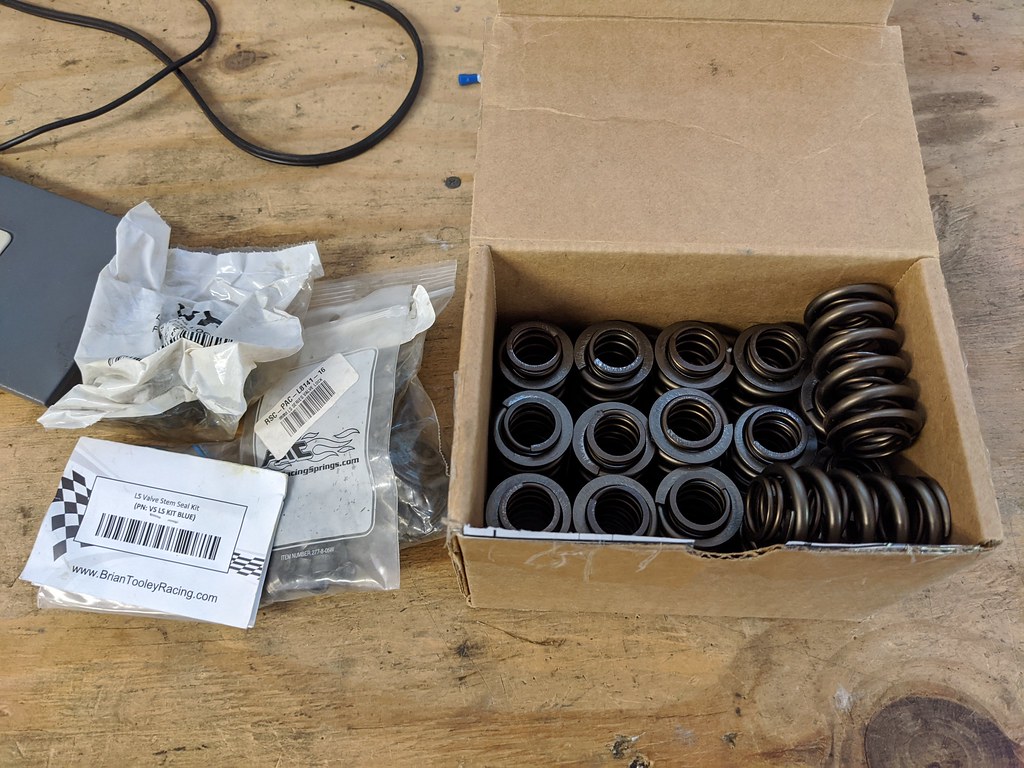
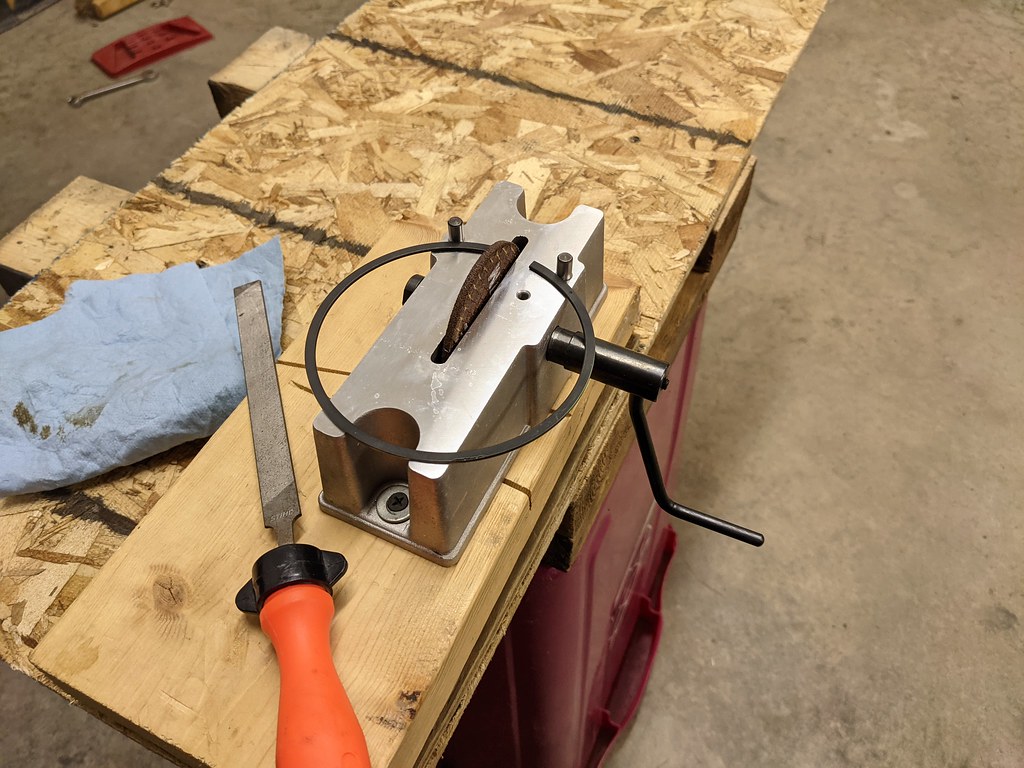
Since I'm going to be running boost, I decided to open up the ring gaps on the top and second rings. After a ton of research seeing what others have done, I decided to just stick with what Mahle recommended for their rings. Using their calculation for supercharged applications, I came up with .024 top and .026 second rings. I bought a ring filer and decided to do it myself. Here's a tip that I used for measuring the ring gaps. I put an old ring on a piston so that when you install the ring in the bore it puts it at a consistent spot each time.
I ordered a ProForm ring filer and it worked perfectly. I liked that method doing it the first time because it allows you to take a very small amount off at a time. The initial measurements were .019 gaps, and it took around 40-50 rotations to increase the gap to .024 for the top rings.
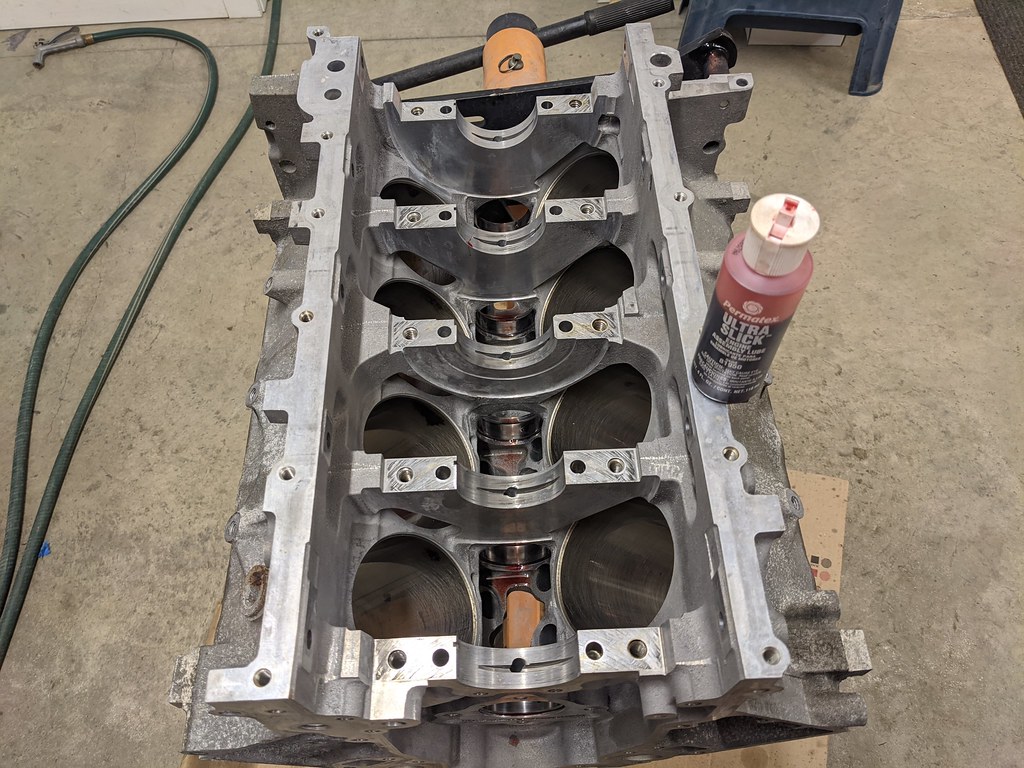
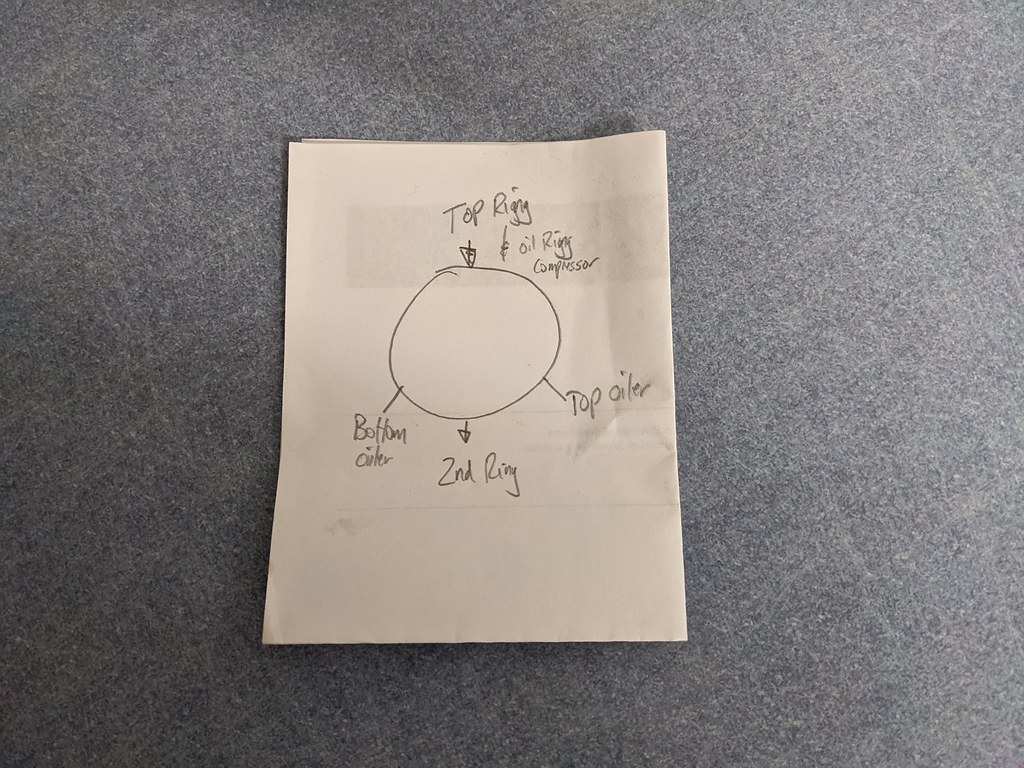
Once the rings were all gapped and organized, I hung them on the pistons and installed them in the motor. I found this nice diagram from Mahle on their instruction page to set up the piston rings. I set it up just like this on all of the pistons.
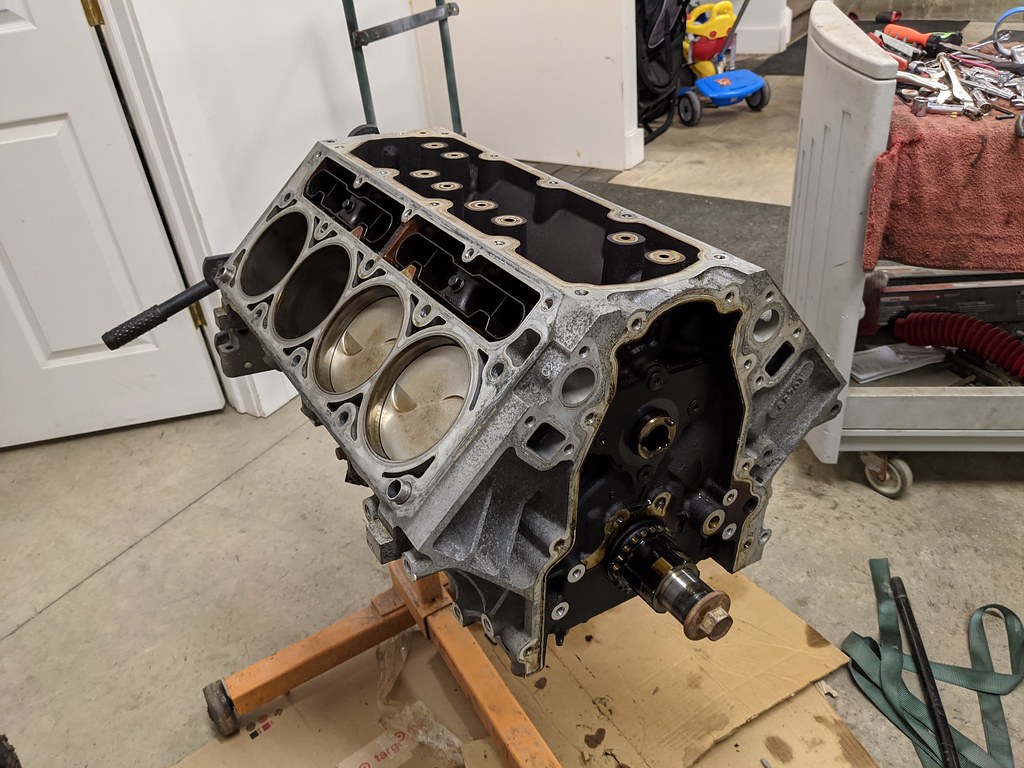
Halfway there
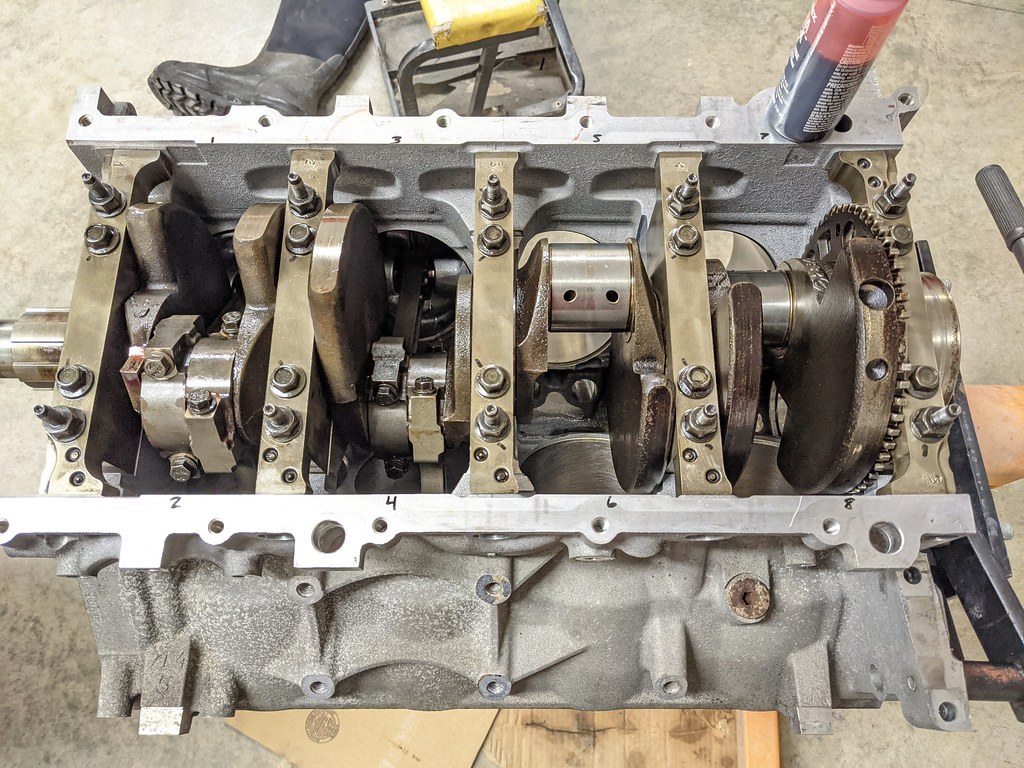
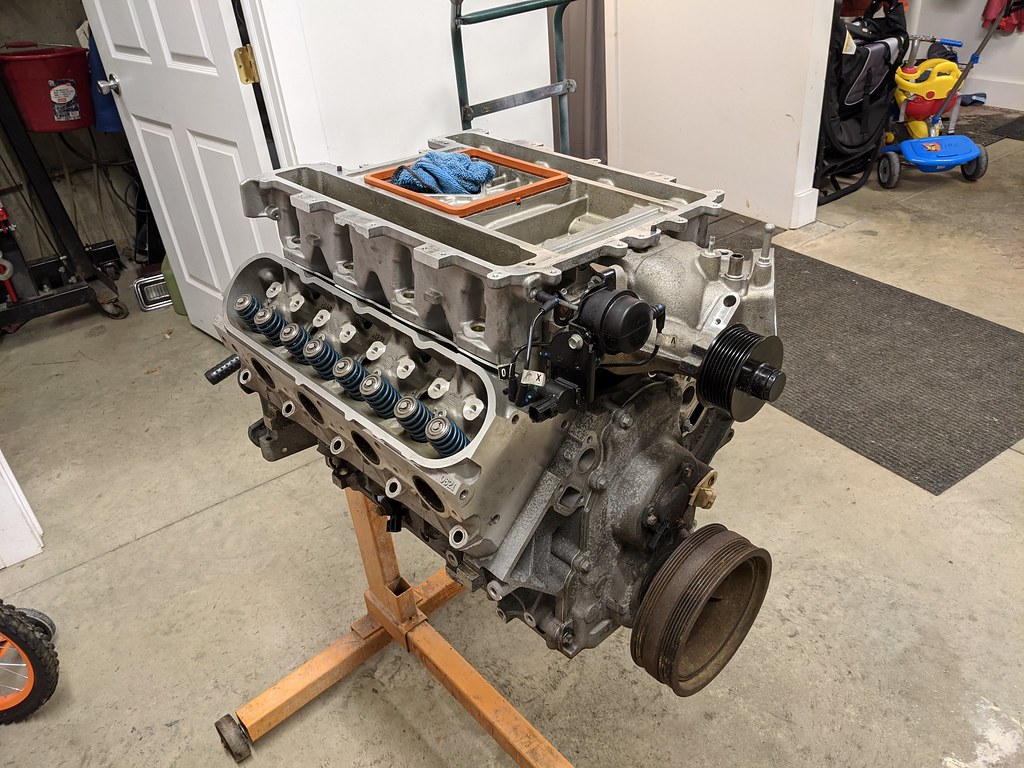
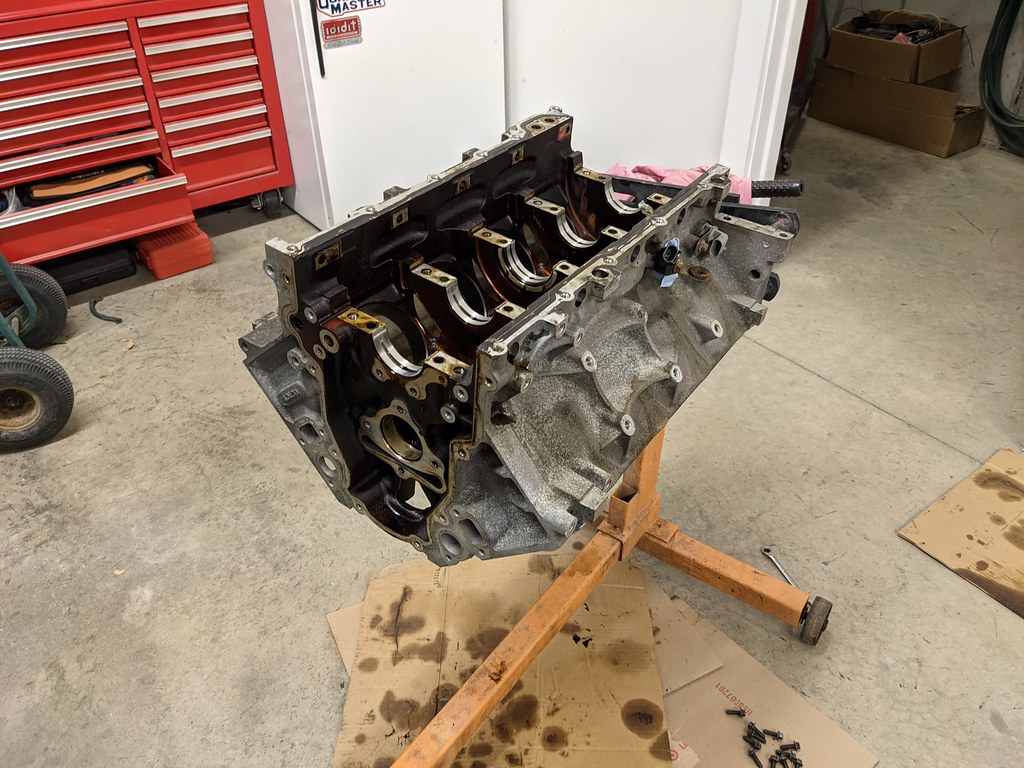
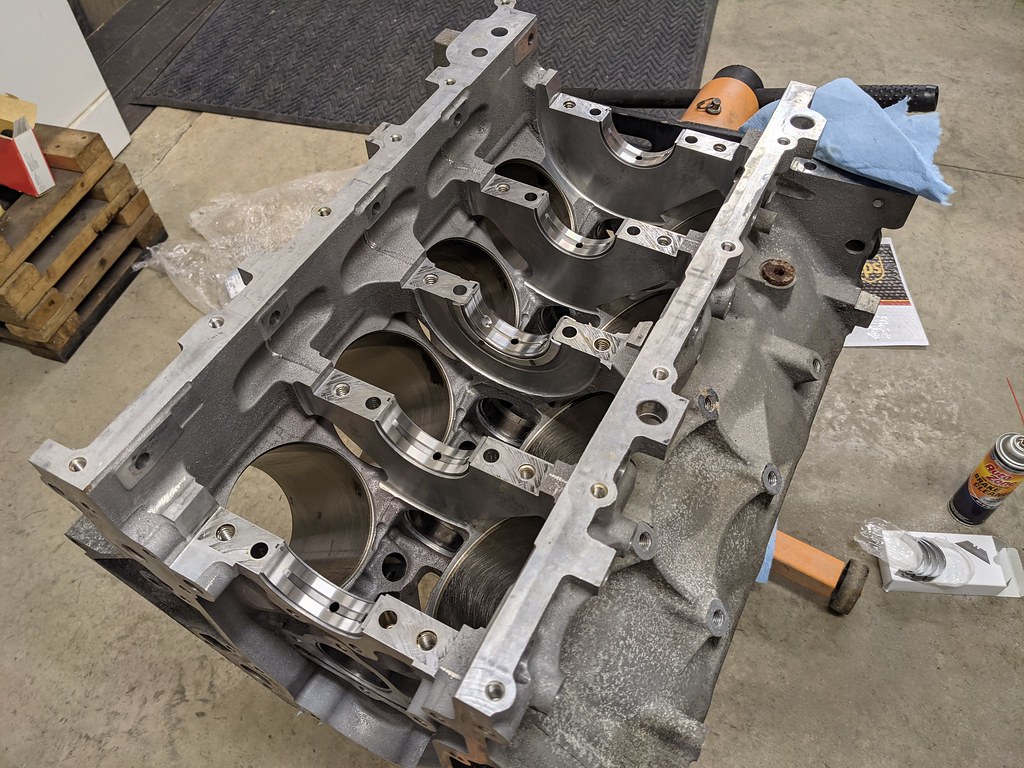
And we have a short block.
To be continued...
I left off last month by confirming with the Plastigauge that my bearing clearances were within specs for the motor. Next up was to confirm that after the crankshaft main caps were torqued, that thrust checked out. That required a dial indicator and measuring the forward to rear movement of the crank. I had my inspector there to make sure I was doing it correctly.
LS motors require a .004 - .008 clearance to be within specs. Thankfully mine came out around .005, so I'm on the tighter side but within the specs. Must be the angle I took the picture, but it was .005. The picture makes it look more like .0035, but for those concerned, it was measured correctly.
Moving on was getting the pistons/rods ready to assemble. Step one was to get them cleaned up. There was a ton of carbon built up that needed to go. Especially in the ring grooves. Spent several hours cleaning them all up.
After they were cleaned up, I installed them all without rings to check the new bearing clearances. Thankfully they all checked out to be right within the specs using plastigauge, and I could move on. I noted all the measurements on the tape line. I should also mention that the Summit rod bearings I bought were also King brand just like the main bearings.
Since I'm going to be running boost, I decided to open up the ring gaps on the top and second rings. After a ton of research seeing what others have done, I decided to just stick with what Mahle recommended for their rings. Using their calculation for supercharged applications, I came up with .024 top and .026 second rings. I bought a ring filer and decided to do it myself. Here's a tip that I used for measuring the ring gaps. I put an old ring on a piston so that when you install the ring in the bore it puts it at a consistent spot each time.
I ordered a ProForm ring filer and it worked perfectly. I liked that method doing it the first time because it allows you to take a very small amount off at a time. The initial measurements were .019 gaps, and it took around 40-50 rotations to increase the gap to .024 for the top rings.
Once the rings were all gapped and organized, I hung them on the pistons and installed them in the motor. I found this nice diagram from Mahle on their instruction page to set up the piston rings. I set it up just like this on all of the pistons.
Halfway there
And we have a short block.
To be continued...
01-07-2021, 02:41 PM
#14
TECH Fanatic
Thread Starter
iTrader: (27)
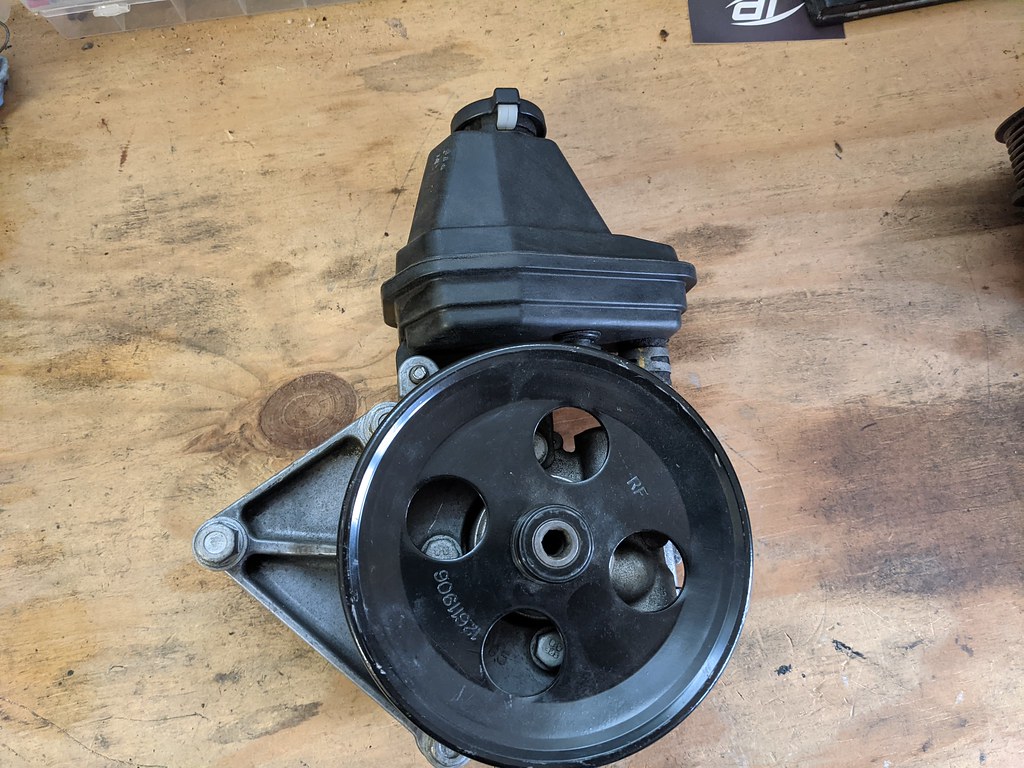
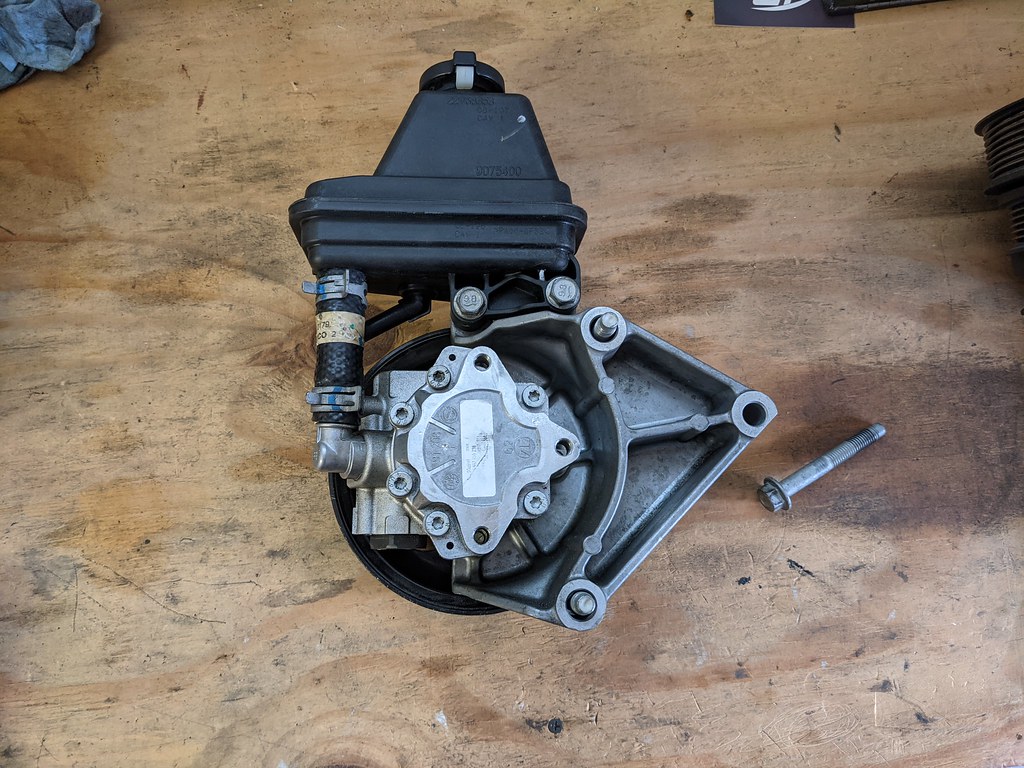
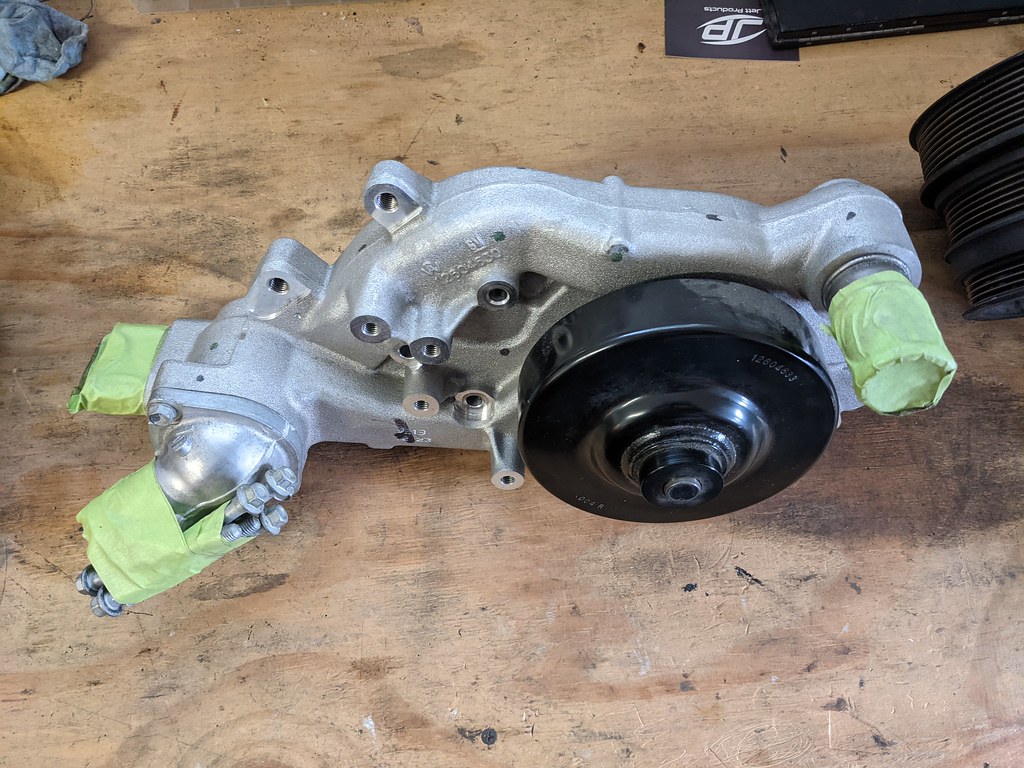
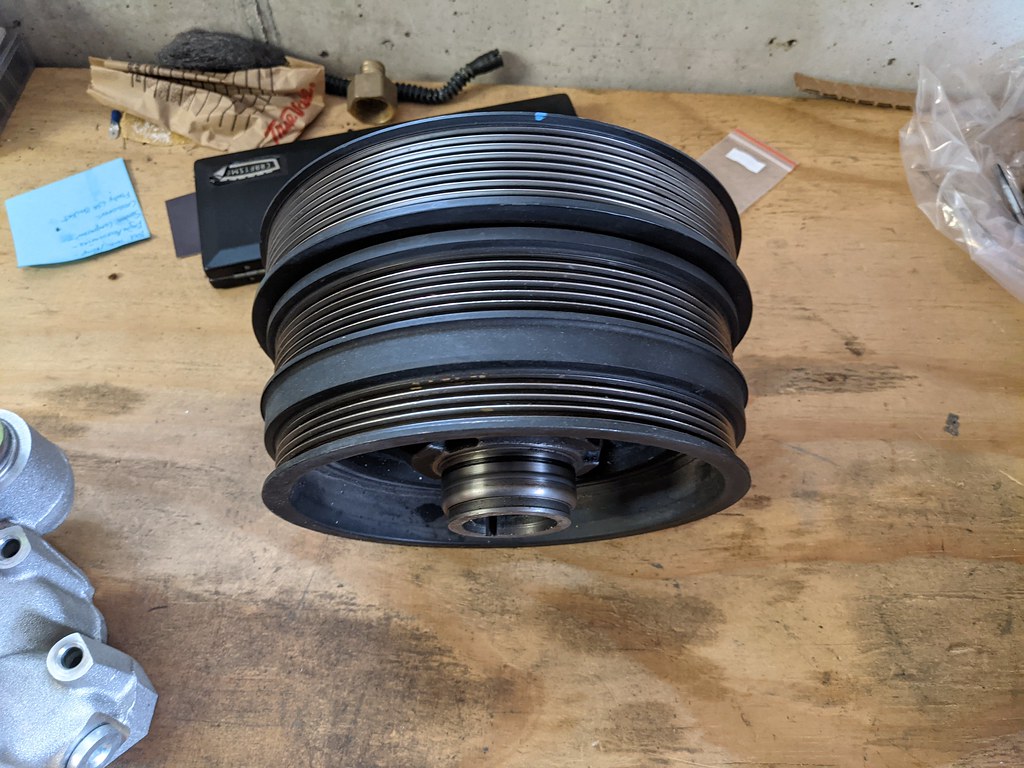
With this last batch of parts, I'm hopefully very close to being at the end of my purchasing... I have sold a bunch of parts to offset these purchases as well as gotten some fantastic deals from people all over the internet. After mulling over what engine accessories to get, I opted to start searching for the stock LSA accessories. I found a guy who sold me the balancer, brand new water pump and a power steering pump for a smoking deal. Then the same guy who I bought the fuel rails from, also sold me the idler bracket. So with the exception of an alternator bracket, I have the complete engine accessories that will give me a true 3 belt setup for the supercharger to run on it's own belt. Much less of a chance for the belt to slip with this setup.
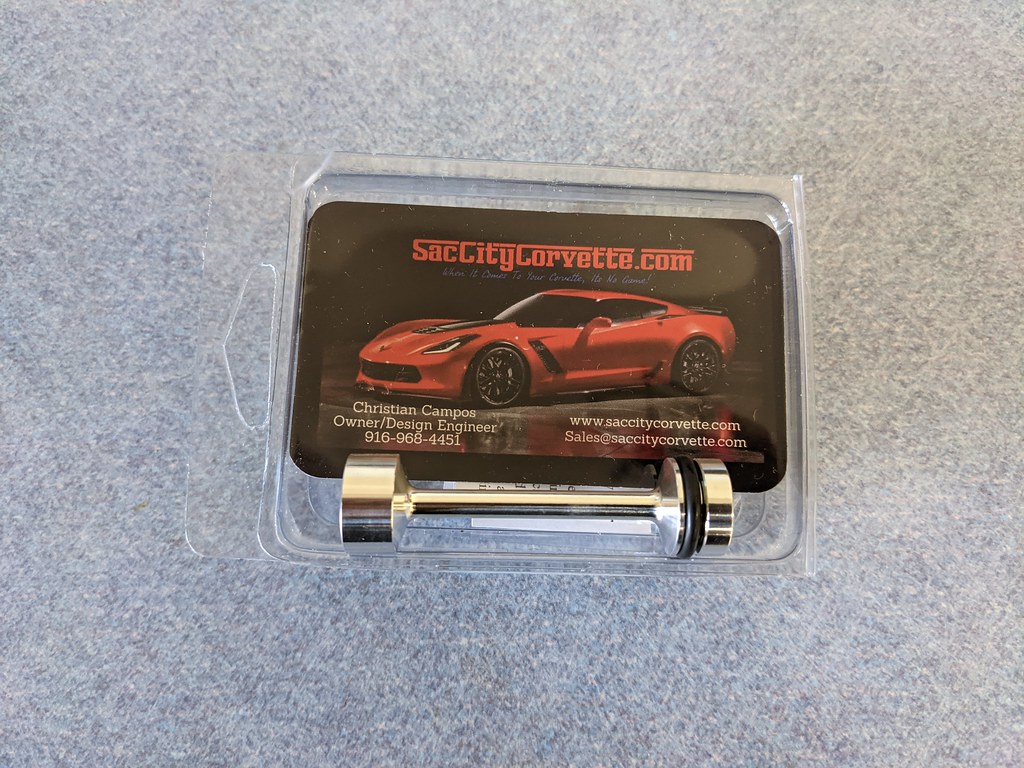
Now, back to the shortblock build. Not sure if it will help or not, but many people say that the Sacc City barbell upgrade is worth it and while I had it this far apart, I figured why not. Supposed to help with oil pressure and filtration.
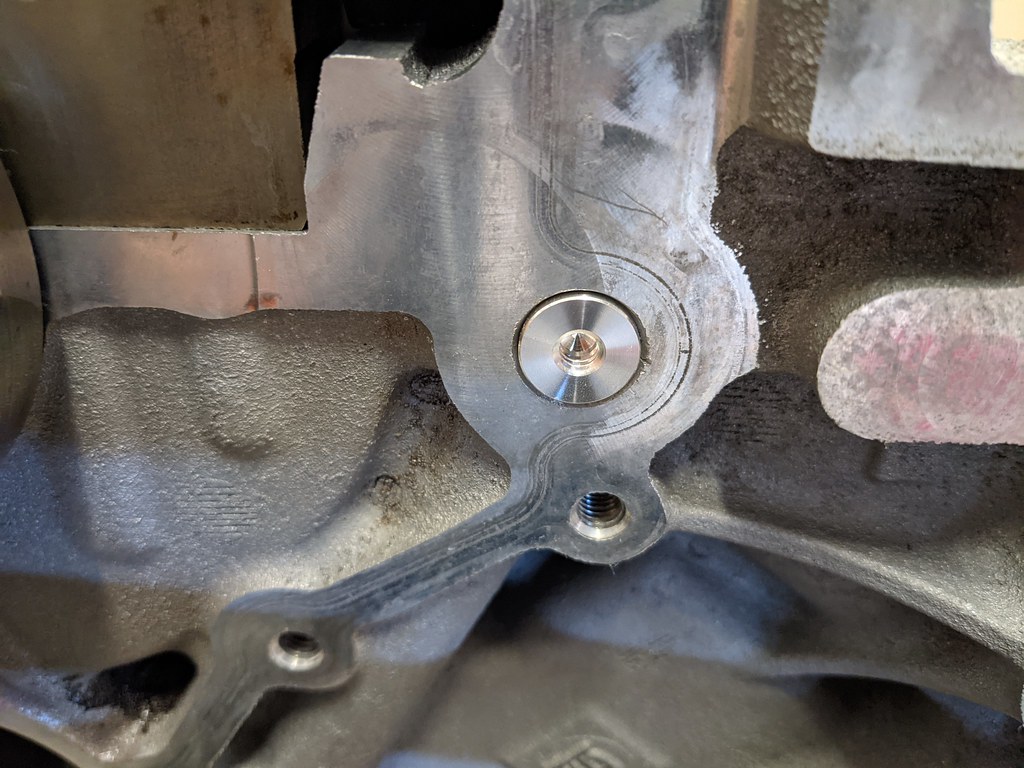
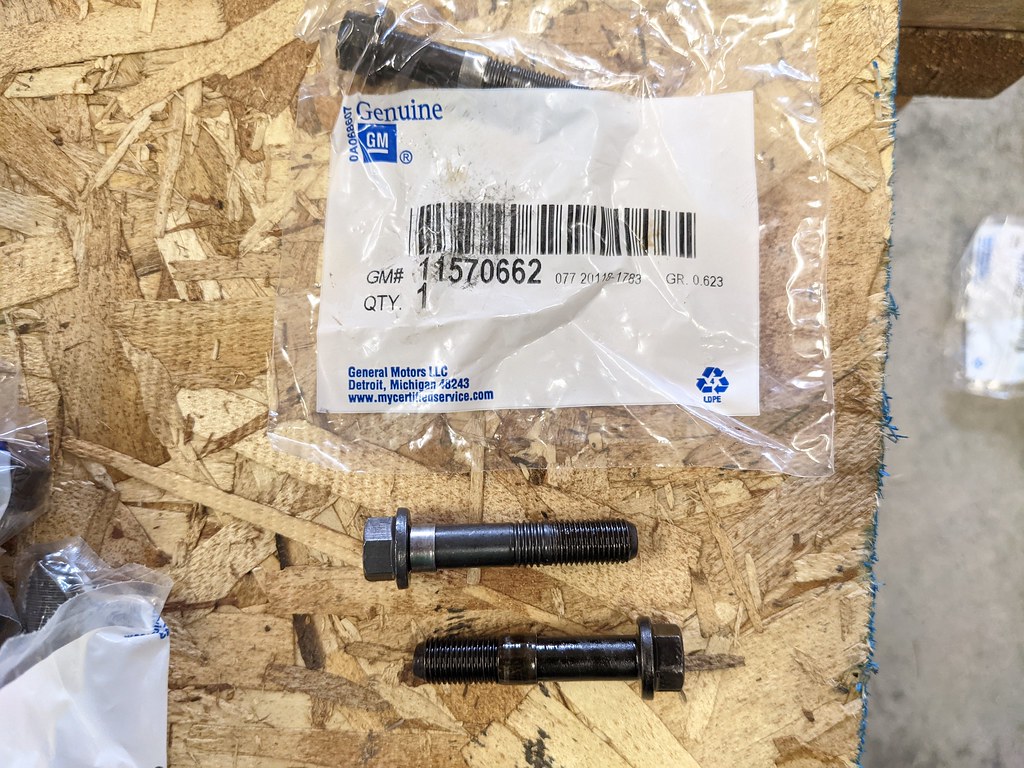
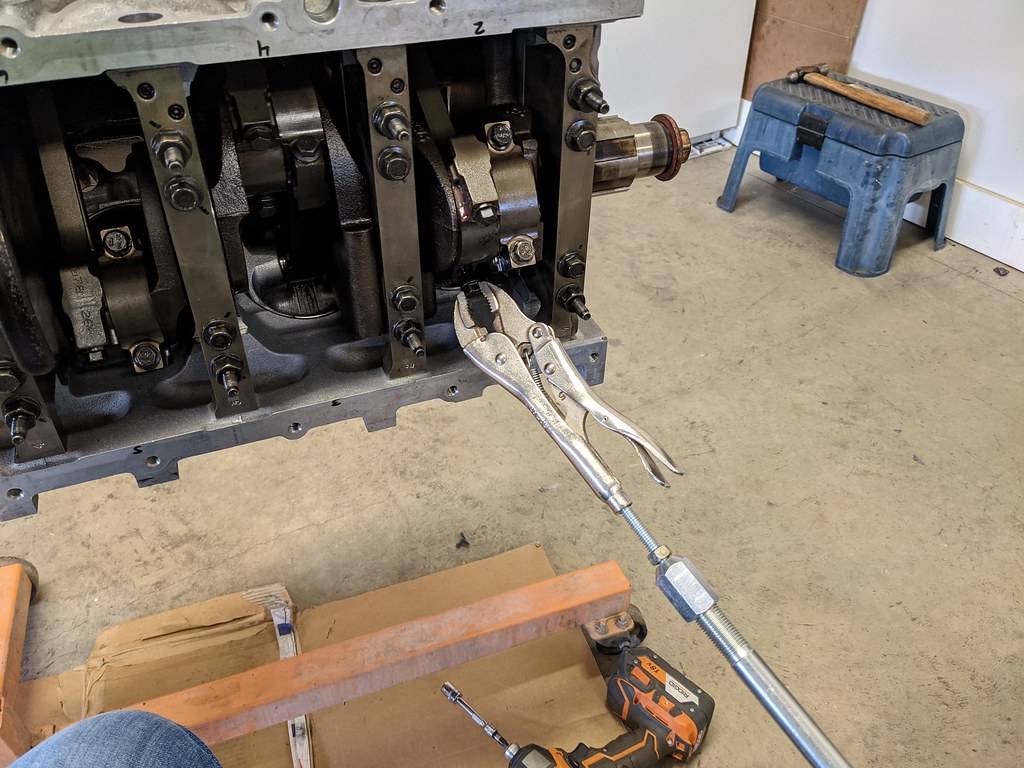
Now before the final torque, I got a bunch of mixed feedback online about whether or not the factory rod bolts are re-usable. I opted to just replace them rather than chance it. I would have opted for ARP bolts, but they change the clamping load and would require that I machine them, and I didn't want to open another can of worms. People have made crazy 1000+ HP numbers on the factory rod bolts, so I'm sure I'll be fine. The factory rod bolts have a bushing that keeps them installed into the cap so they won't come out easily. I opted to finish a project I have been putting off. Adding a pair of vice grips to my slid hammer.
5/16-18 Tap for those who are interested.
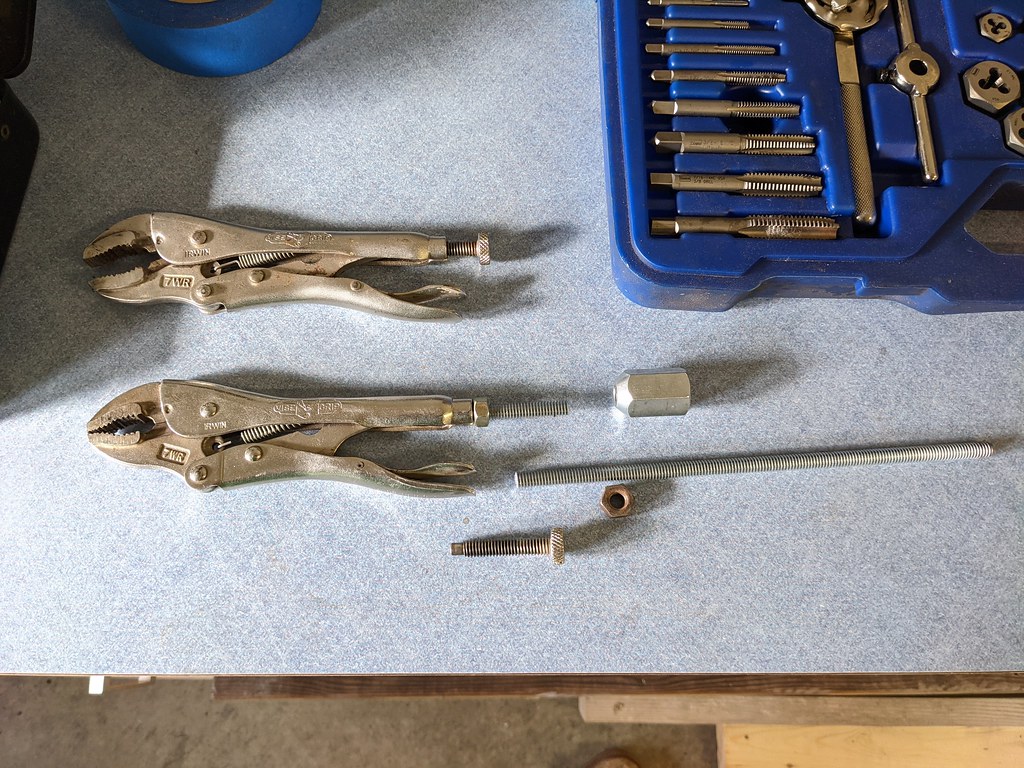
I kept one side of the rod cap tight and then clamped on the other side. A quick little tap with the slide hammer and they popped right out.
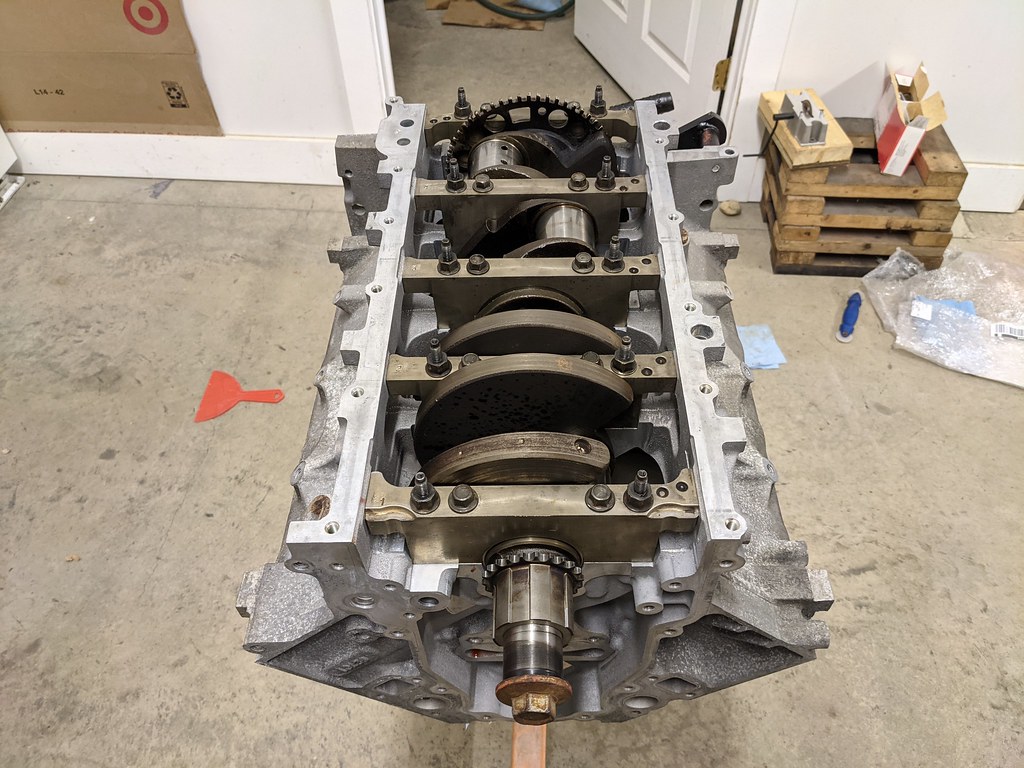
Once I got the final approval from the boss, the shortblock was final assembled and torque'd to spec. A torque angle dial is required for that, which I have earlier in the build.

To be continued...
Now, back to the shortblock build. Not sure if it will help or not, but many people say that the Sacc City barbell upgrade is worth it and while I had it this far apart, I figured why not. Supposed to help with oil pressure and filtration.
Now before the final torque, I got a bunch of mixed feedback online about whether or not the factory rod bolts are re-usable. I opted to just replace them rather than chance it. I would have opted for ARP bolts, but they change the clamping load and would require that I machine them, and I didn't want to open another can of worms. People have made crazy 1000+ HP numbers on the factory rod bolts, so I'm sure I'll be fine. The factory rod bolts have a bushing that keeps them installed into the cap so they won't come out easily. I opted to finish a project I have been putting off. Adding a pair of vice grips to my slid hammer.
5/16-18 Tap for those who are interested.
I kept one side of the rod cap tight and then clamped on the other side. A quick little tap with the slide hammer and they popped right out.
Once I got the final approval from the boss, the shortblock was final assembled and torque'd to spec. A torque angle dial is required for that, which I have earlier in the build.
To be continued...
01-07-2021, 02:44 PM
#15
TECH Fanatic
Thread Starter
iTrader: (27)
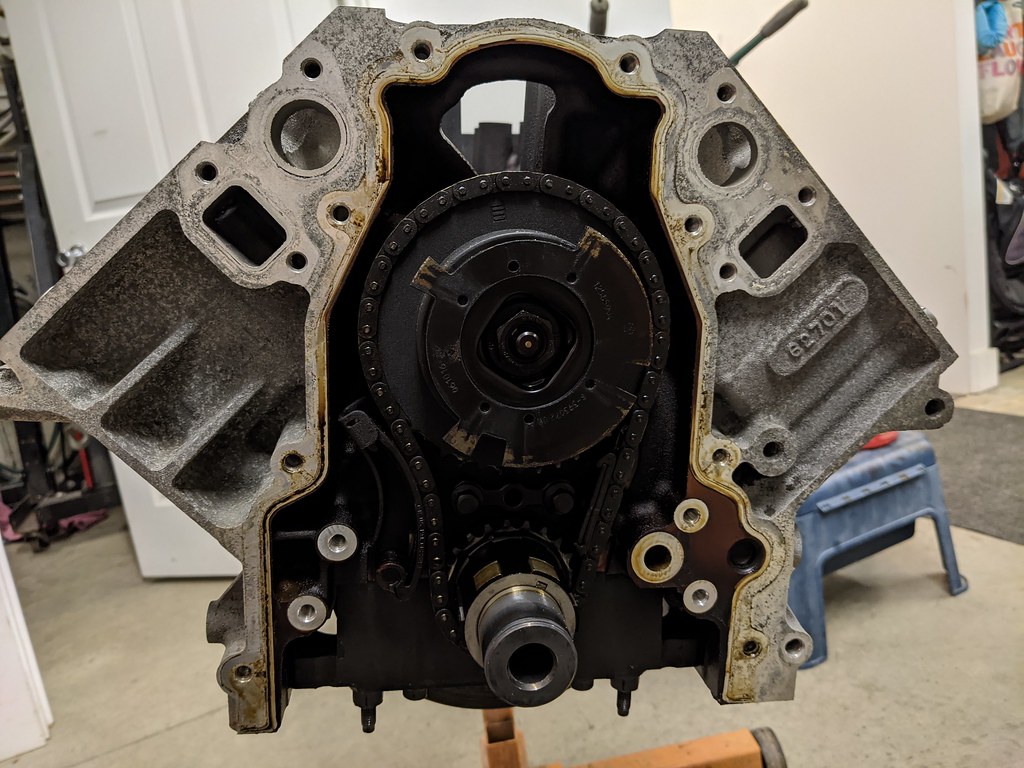
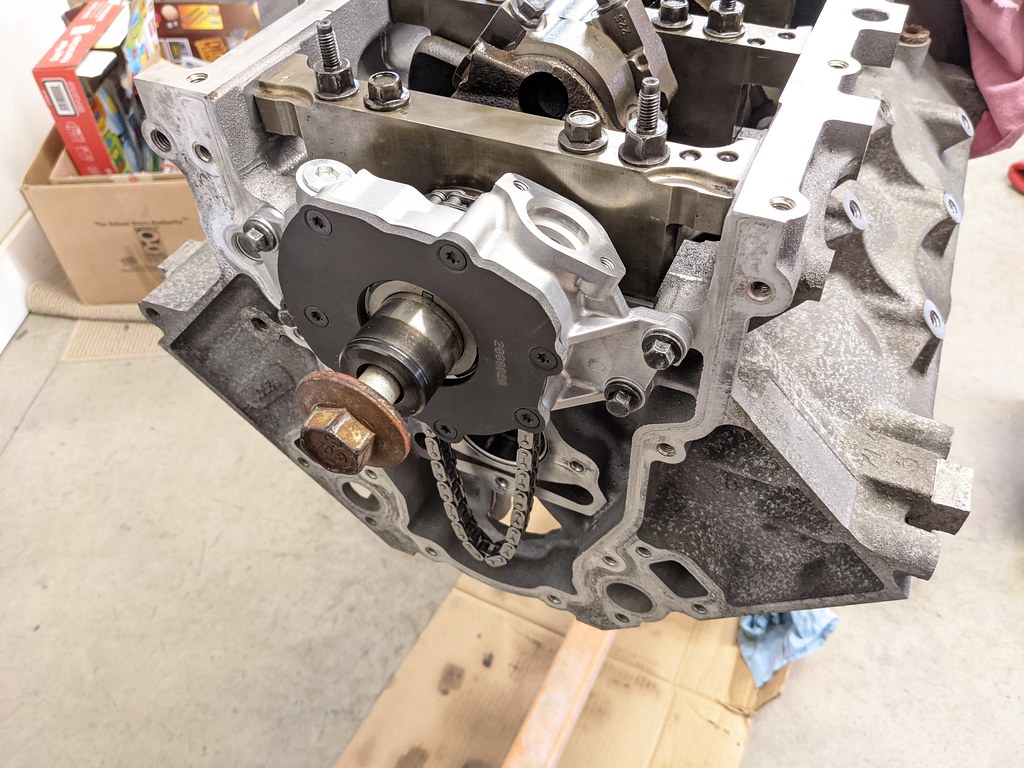
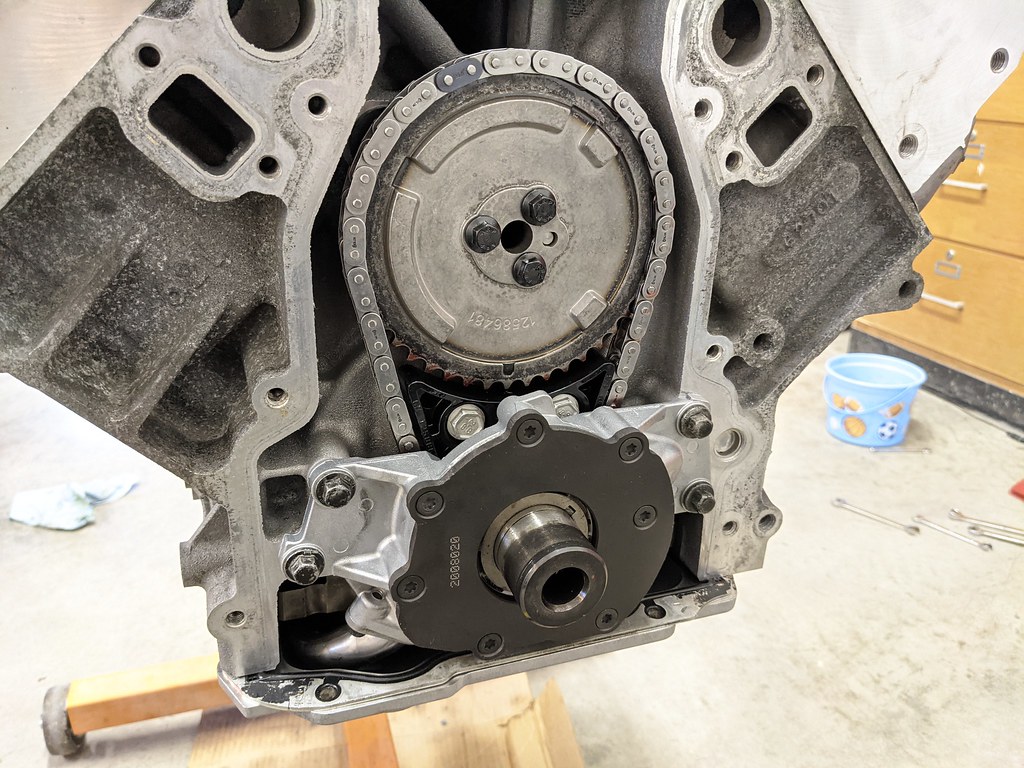
The shortblock is now together and ready for the rest of the bolt ons. Please note that I assembled things out of order, so I had to pull the oil pump back off to get the chain damper installed. I'm going to post the pictures in the order that I took them, but wanted to make note for anyone assembling a motor that the chain, timing gear and damper need to go on before the oil pump.
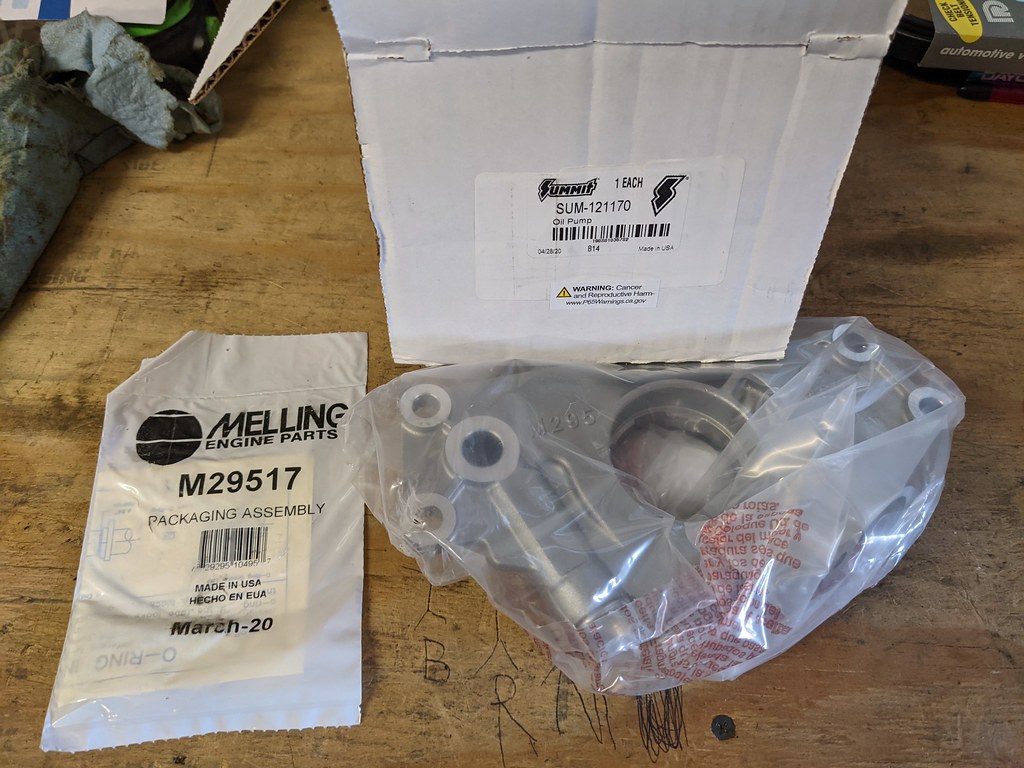
This is the more fun part of the engine building process for me. Bolting on the parts as I unbox them. Much better than cleaning up used parts before they are installed. I thought I would share that I bought the Summit Racing oil pump and it turns out that they are re-boxing Melling pumps. M295
Next up was cleaning up the Holley 302-3 oil pan, windage tray, internal baffle and oil pickup. Now that the shortblock is assembled, I wanted to get it buttoned up to keep any debris out of it. Too much time spent cleaning to mess it up now.
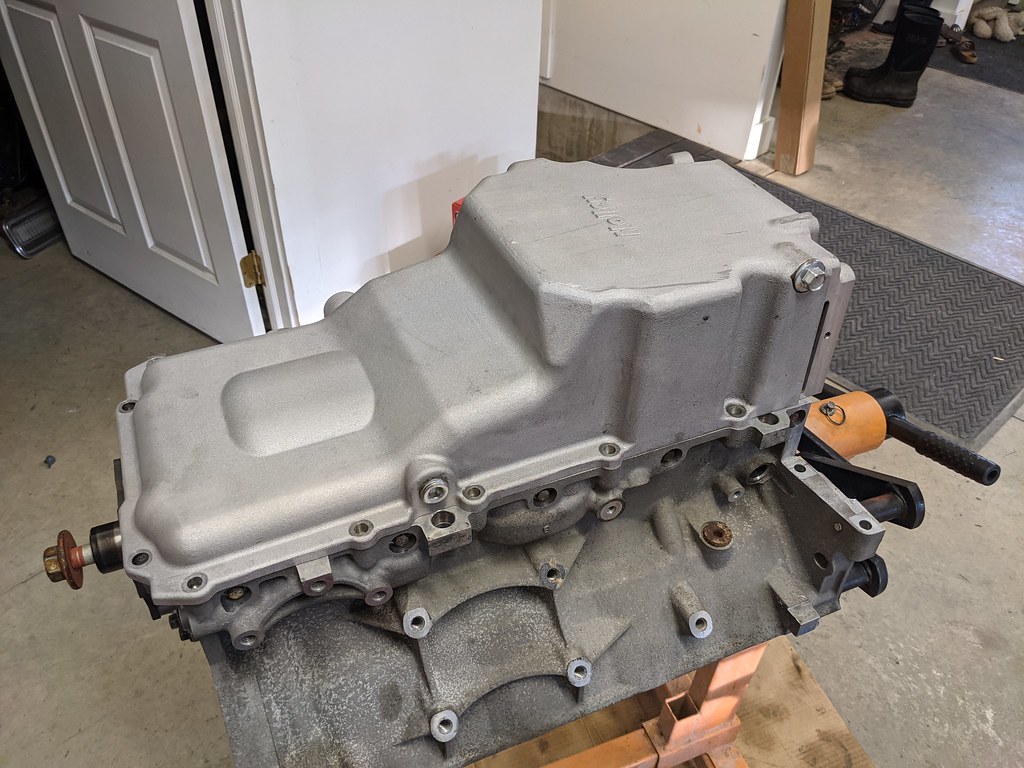
Most of this had to be taken back off to get the damper on.
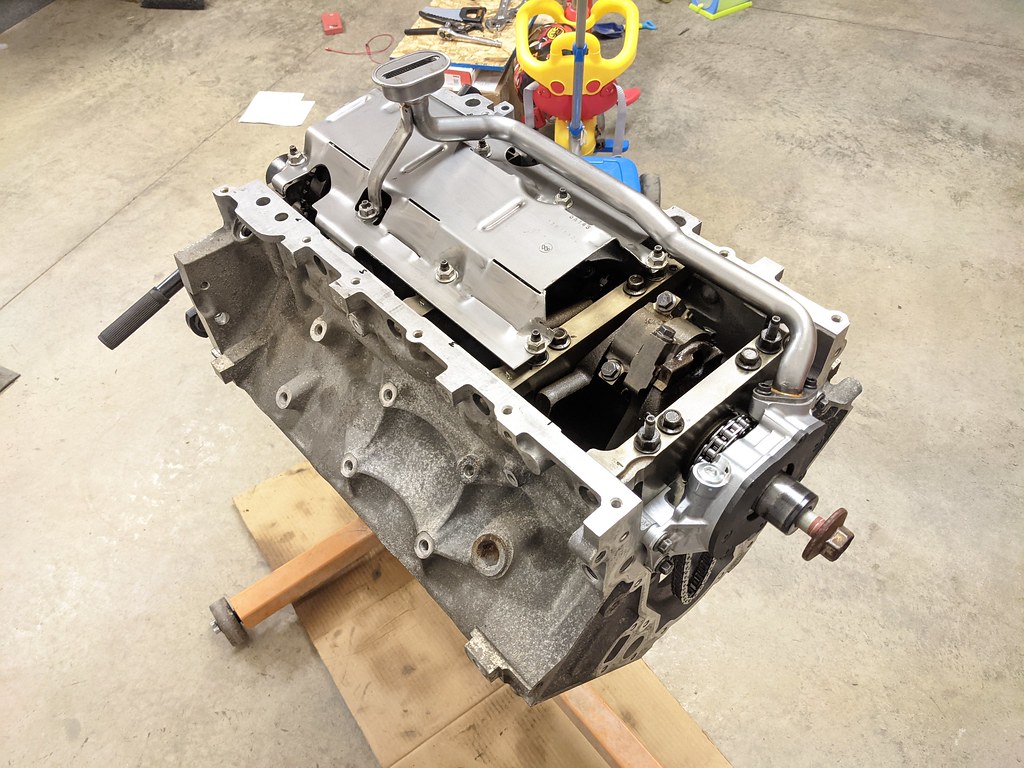
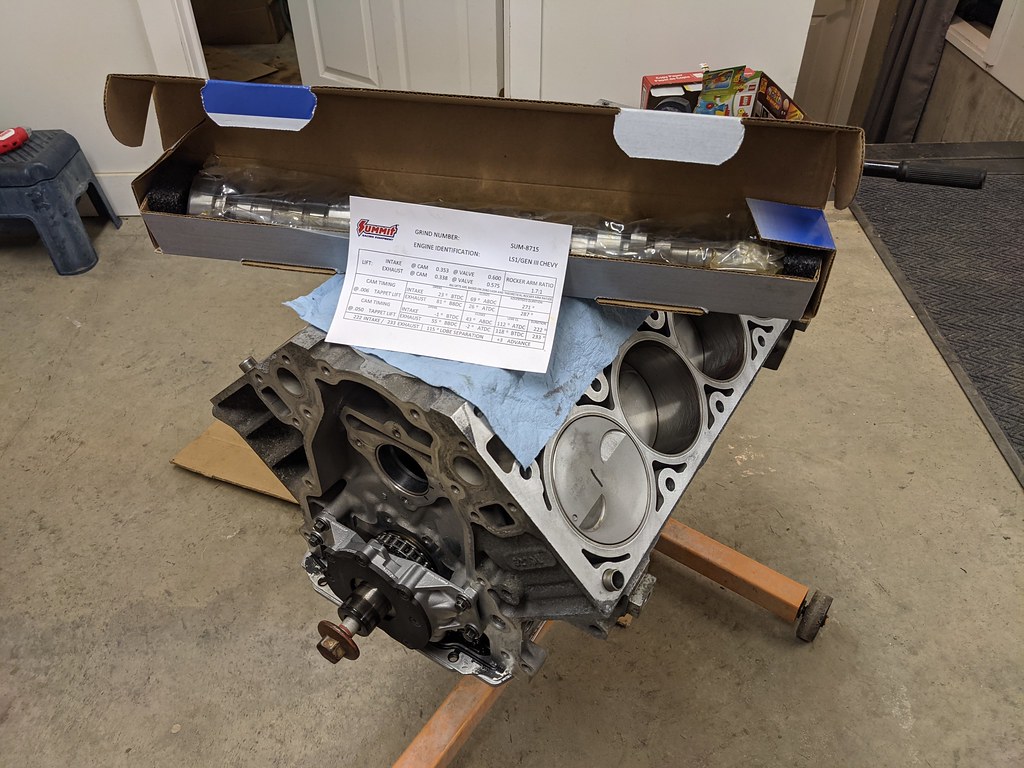
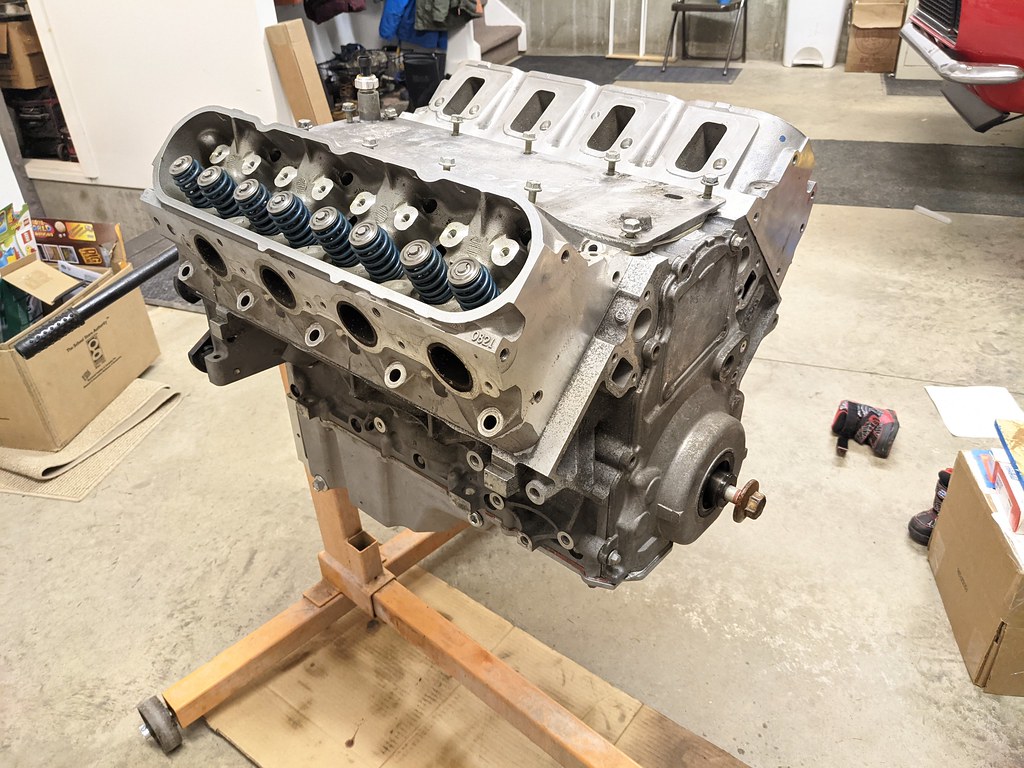
I was probably distracted since I was really looking forward to installing the cam! I went with the Summit Racing 8715 which is the stage 1 boost cam that is nicknamed the Ghost Cam. The specs are 222/233 115+3, .600/.575. I've heard really good things about this cam, and one of the things that sold me is that it has a negative overlap which will keep the boost inside the cylinders rather than bleeding off. I also didn't want to go crazy with a huge cam since this will be on a supercharged motor. Should have a nice idle too.
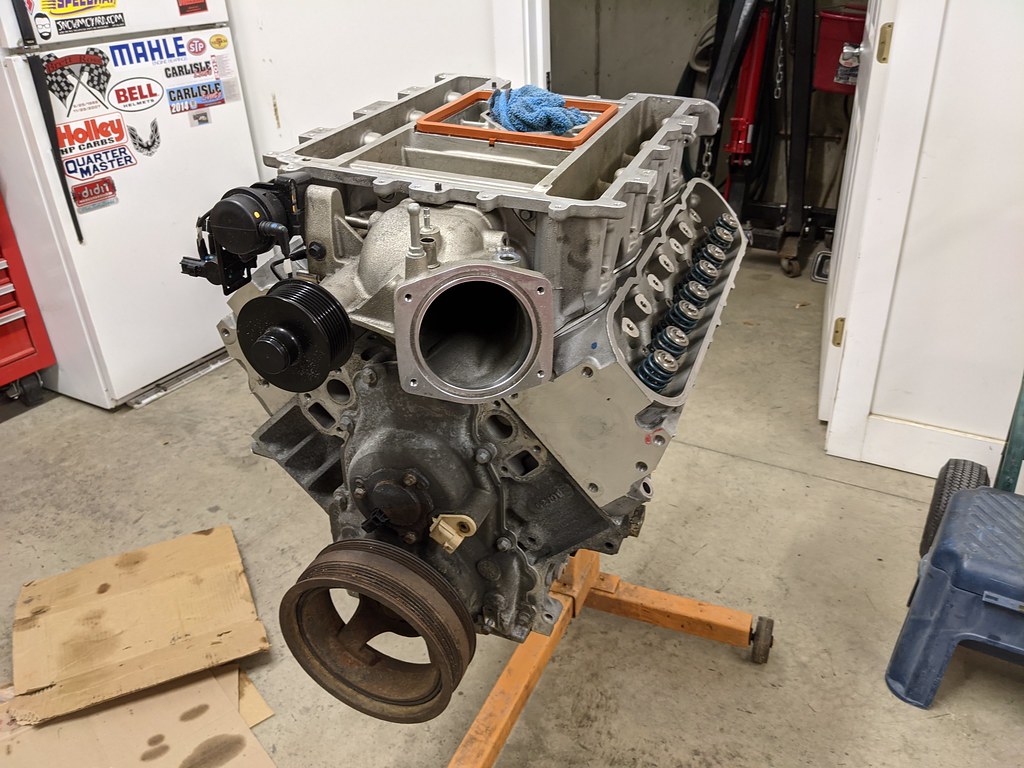
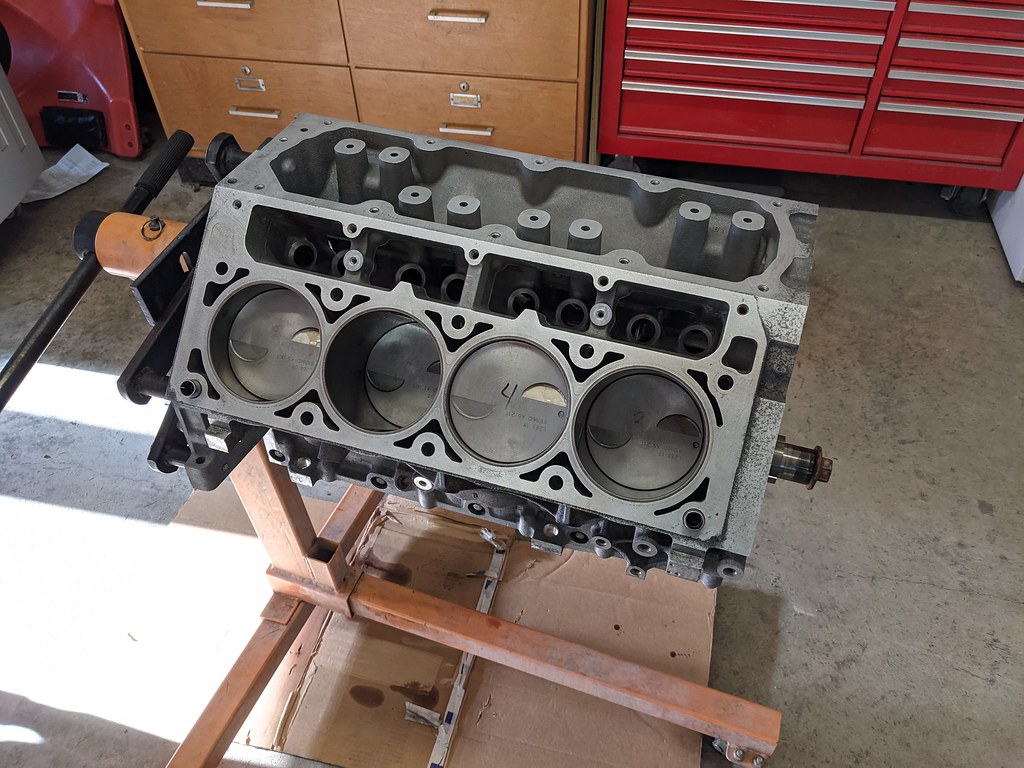
This is where I noticed that the damper wouldn't fit. I didn't care though, I had to toss my heads on to see what the long block looked like. Very happy I'm at this point, but the appearance of the block leaves a lot to be desired.
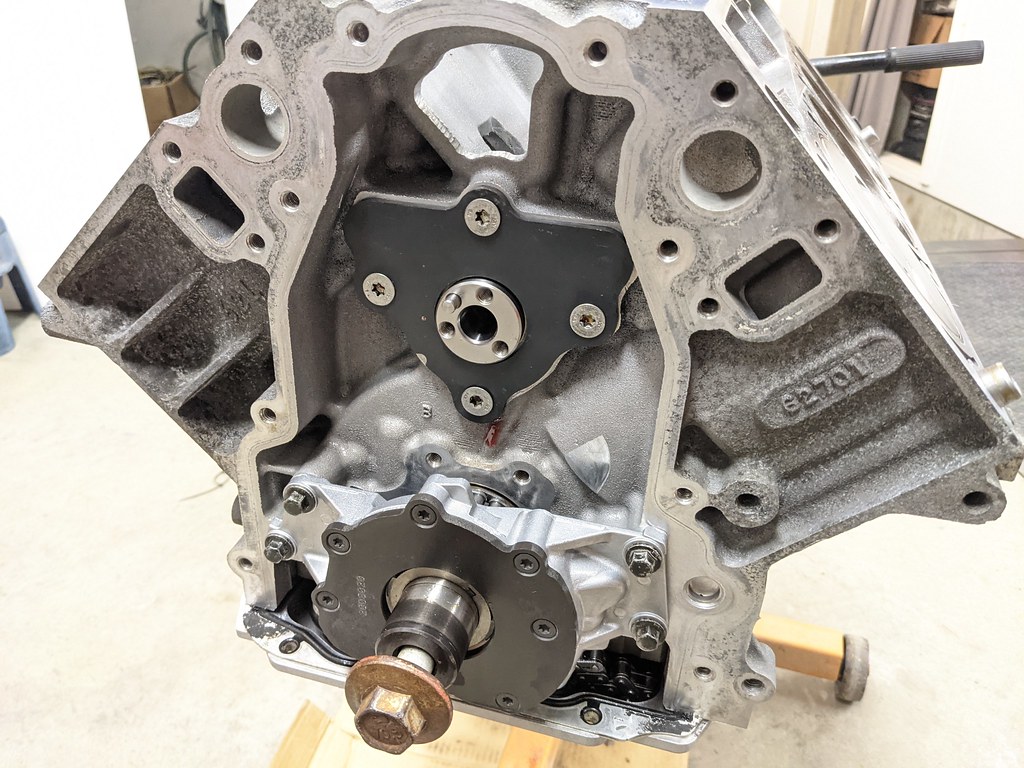
Next morning I pulled the pump and pickup back off and installed the chain damper with some blue Loctite. Repeated the process with the cam plate and cam sprocket. All back together now.
But that block was really bugging me. I had power washed it several times and hit it with Purple Power a bunch and it wasn't cleaning up like I hoped. So it was time to get out the soap and water and scrub it down for paint. I had my little helper buddy out there scrubbing on the block too which was really cool. Didn't get a picture though...
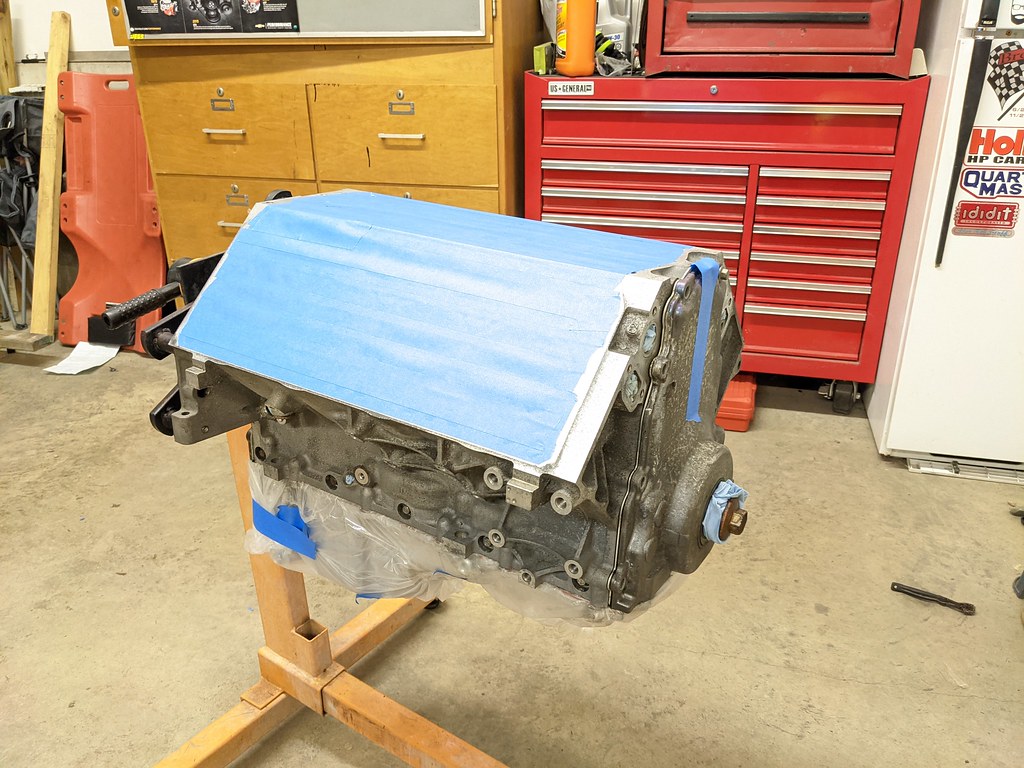
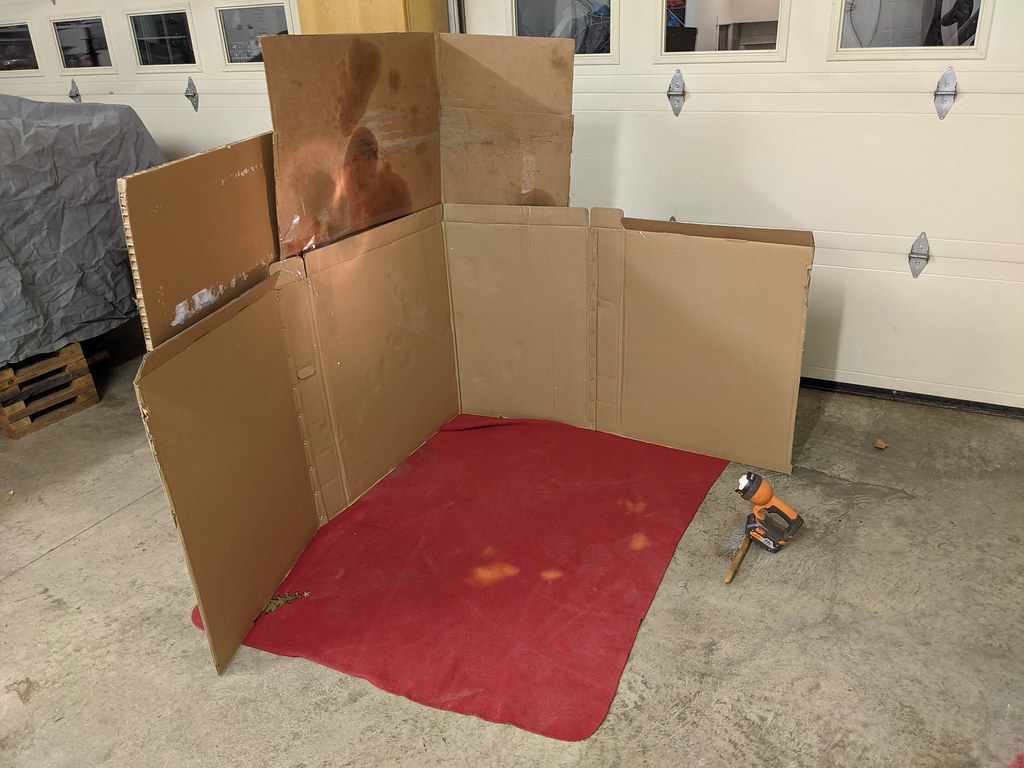
Since it was so cold out, I had to make a little spray booth in the garage to minimize the overspray. It worked really well in conjunction with cracking the garage door and opening a window. It sorta worked like a downdraft booth since the cold air came in through the window and out the garage door.
I read up on this a bunch and decided to try some Self Etching primer as a base rather than the VHT primer. Aluminum is different than steel and needs a better base to really stick. So I figured I'd give this a try.
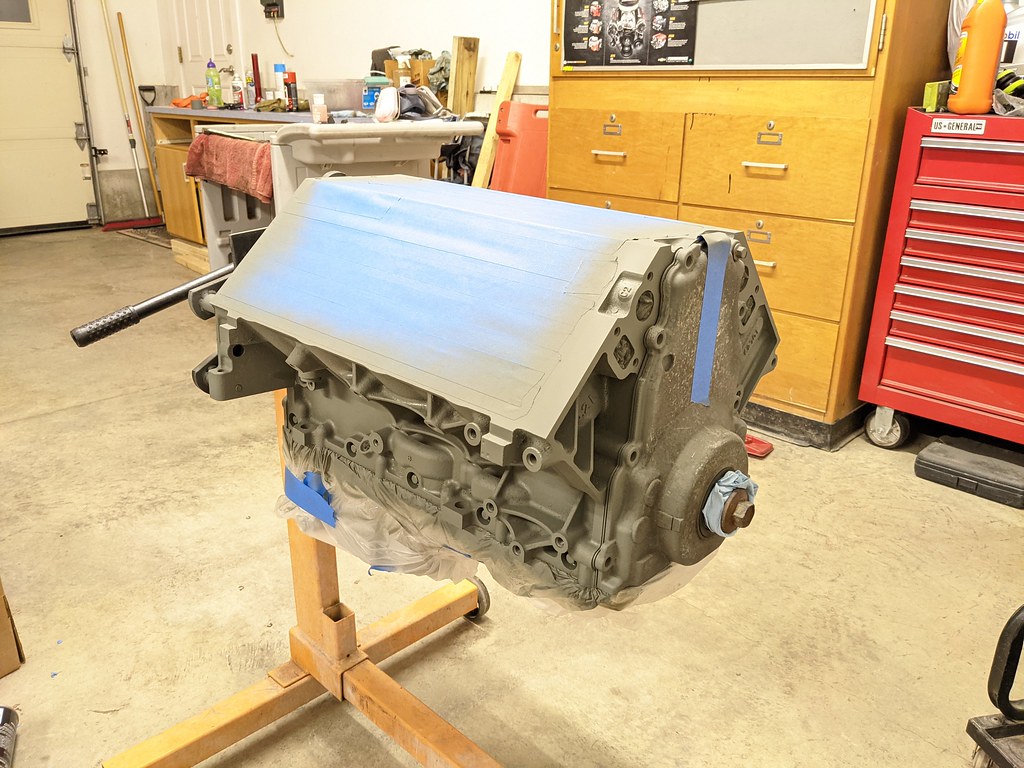
Finally the color coats. I went with the tried and true Chevy Orange. I really liked it when I put my first motor in the car with the 5.3, and wanted to do it again. Very happy with the results and hopefully with the etching primer it has a really durable finish. I also have my boiler room attached to my garage which is a very tiny room that I use for storing car parts, but when the door is closed will get very hot, probably in the 130-140 range and thought this would be perfect to let the motor dry in overnight. Hopefully it helps with the curing process.
So much better than the corroded aluminum look!!
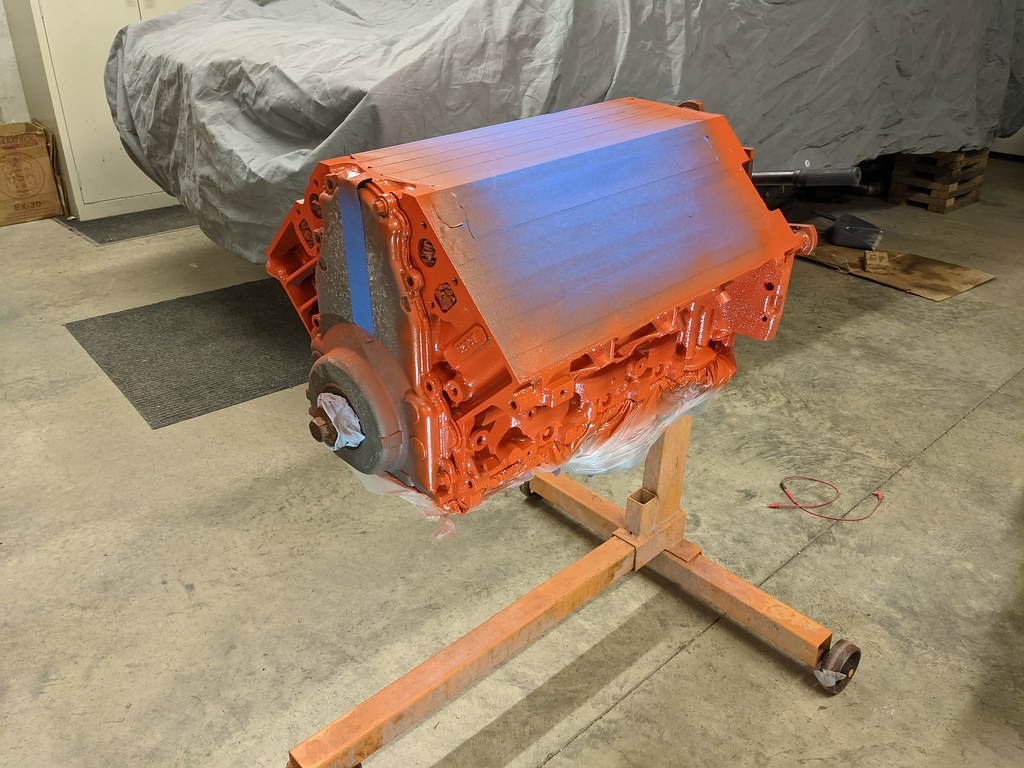
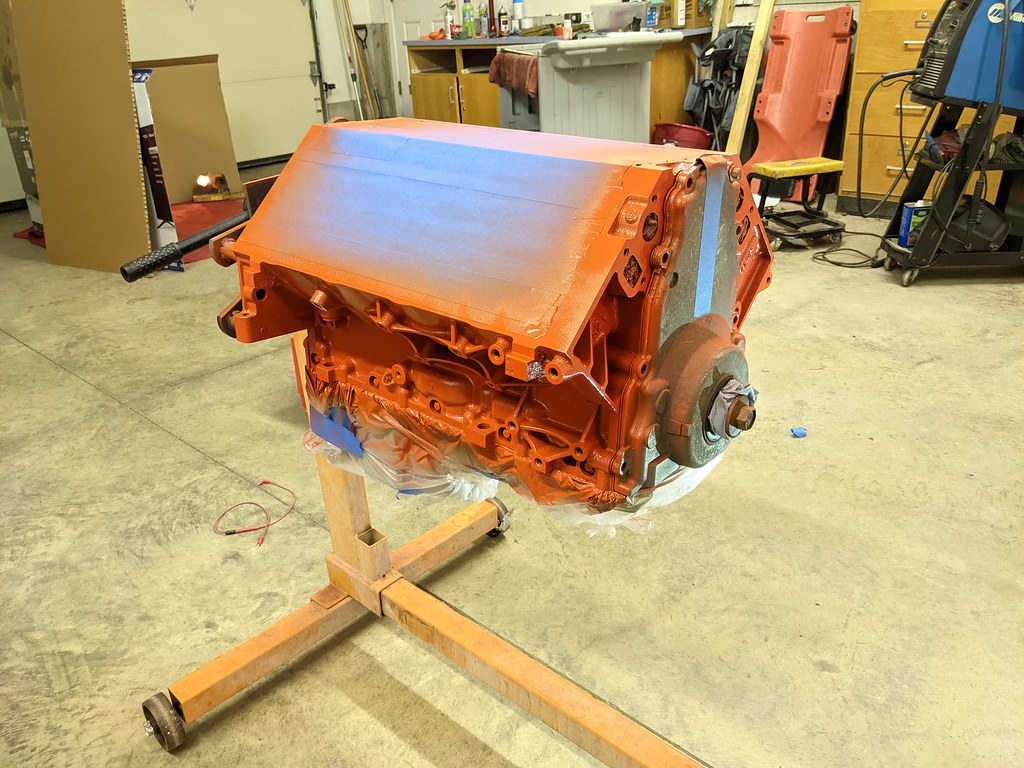
Timing cover wasn't ready for paint and sorta takes away from it, but it looks really good with the aluminum heads. I'm keeping this look, but all of my accessories will be painted satin black. I think it will give a nice throwback look.
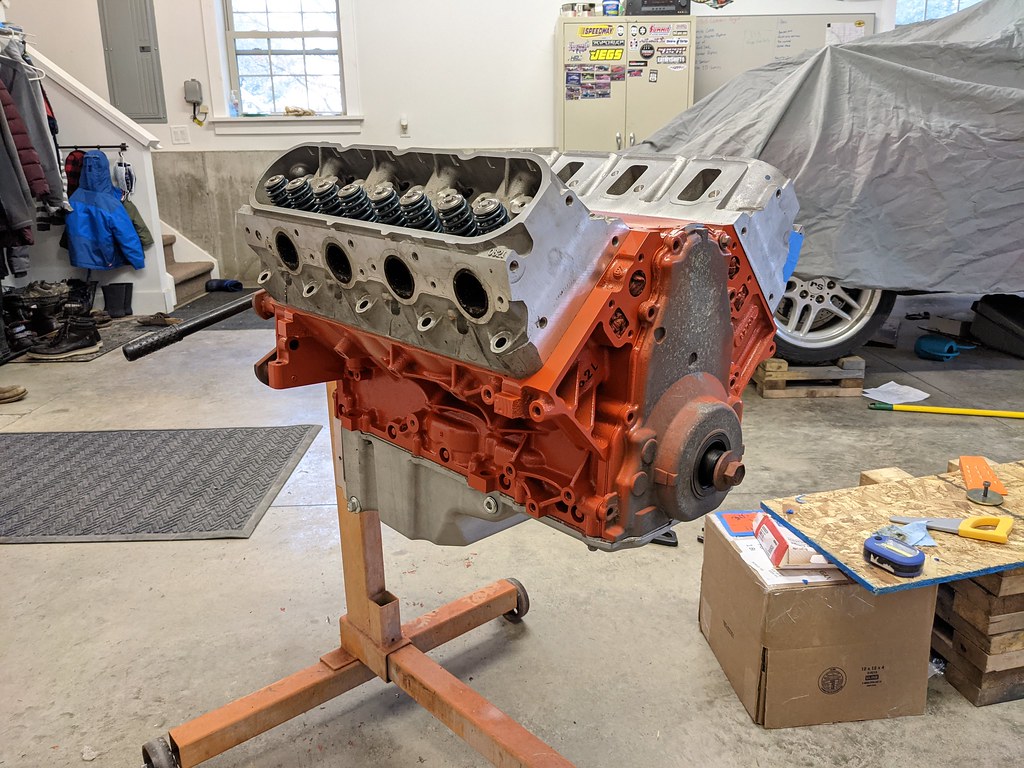
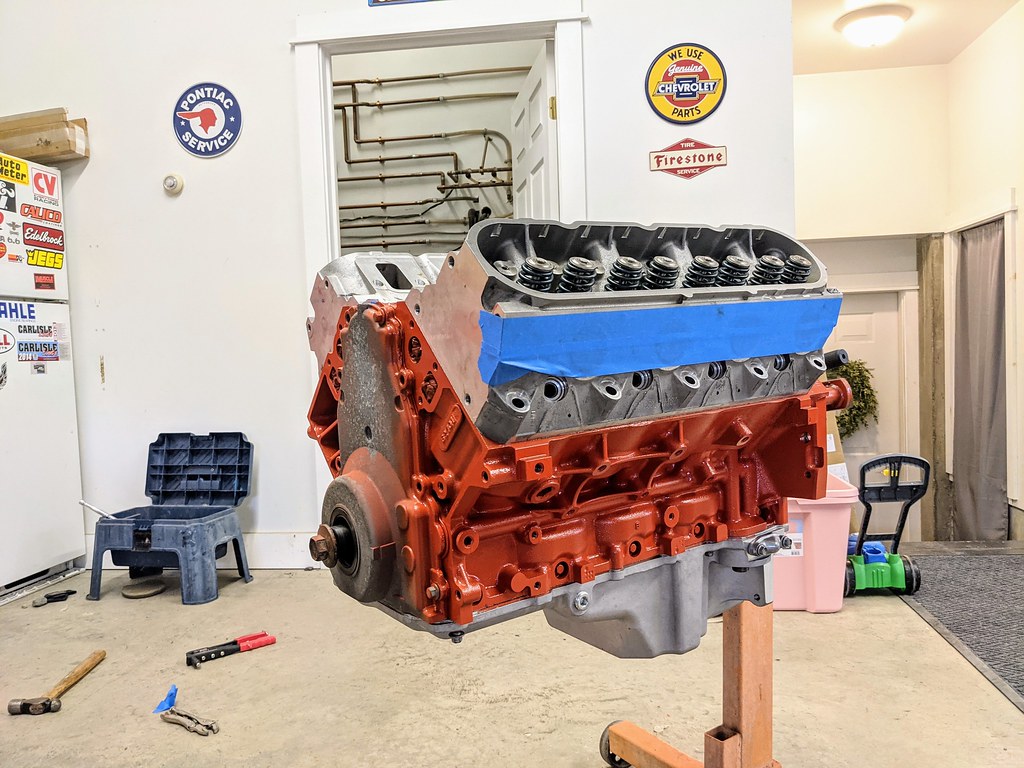
That's where I'm at now, and very happy to have gotten the block assembled during the winter break from work. Now I can slowly clean up parts and hopefully get the motor installed back in the car soon.
Cheers,
Ryan
This is the more fun part of the engine building process for me. Bolting on the parts as I unbox them. Much better than cleaning up used parts before they are installed. I thought I would share that I bought the Summit Racing oil pump and it turns out that they are re-boxing Melling pumps. M295
Next up was cleaning up the Holley 302-3 oil pan, windage tray, internal baffle and oil pickup. Now that the shortblock is assembled, I wanted to get it buttoned up to keep any debris out of it. Too much time spent cleaning to mess it up now.
Most of this had to be taken back off to get the damper on.
I was probably distracted since I was really looking forward to installing the cam! I went with the Summit Racing 8715 which is the stage 1 boost cam that is nicknamed the Ghost Cam. The specs are 222/233 115+3, .600/.575. I've heard really good things about this cam, and one of the things that sold me is that it has a negative overlap which will keep the boost inside the cylinders rather than bleeding off. I also didn't want to go crazy with a huge cam since this will be on a supercharged motor. Should have a nice idle too.
This is where I noticed that the damper wouldn't fit. I didn't care though, I had to toss my heads on to see what the long block looked like. Very happy I'm at this point, but the appearance of the block leaves a lot to be desired.
Next morning I pulled the pump and pickup back off and installed the chain damper with some blue Loctite. Repeated the process with the cam plate and cam sprocket. All back together now.
But that block was really bugging me. I had power washed it several times and hit it with Purple Power a bunch and it wasn't cleaning up like I hoped. So it was time to get out the soap and water and scrub it down for paint. I had my little helper buddy out there scrubbing on the block too which was really cool. Didn't get a picture though...
Since it was so cold out, I had to make a little spray booth in the garage to minimize the overspray. It worked really well in conjunction with cracking the garage door and opening a window. It sorta worked like a downdraft booth since the cold air came in through the window and out the garage door.
I read up on this a bunch and decided to try some Self Etching primer as a base rather than the VHT primer. Aluminum is different than steel and needs a better base to really stick. So I figured I'd give this a try.
Finally the color coats. I went with the tried and true Chevy Orange. I really liked it when I put my first motor in the car with the 5.3, and wanted to do it again. Very happy with the results and hopefully with the etching primer it has a really durable finish. I also have my boiler room attached to my garage which is a very tiny room that I use for storing car parts, but when the door is closed will get very hot, probably in the 130-140 range and thought this would be perfect to let the motor dry in overnight. Hopefully it helps with the curing process.
So much better than the corroded aluminum look!!
Timing cover wasn't ready for paint and sorta takes away from it, but it looks really good with the aluminum heads. I'm keeping this look, but all of my accessories will be painted satin black. I think it will give a nice throwback look.
That's where I'm at now, and very happy to have gotten the block assembled during the winter break from work. Now I can slowly clean up parts and hopefully get the motor installed back in the car soon.
Cheers,
Ryan
01-11-2021, 03:03 PM
#16
TECH Fanatic
Thread Starter
iTrader: (27)
I'm continuing the engine build by getting my heads ready for install. I had originally planned on doing a light port work and bowl cleanup on the heads, but realized that with boost, I think it's really less important than before when I was planning an N/A build. Plus I kinda chickened out haha. The heads are low mileage LS3 0821 heads, and the plan is to clean them up and reinstall. First up is to clean up all of the carbon build up off of the intake valves. It was pretty caked on there. I was actually surprised based on the overall condition of the heads. I didn't think there would be as much build up as there was.


Here's a few before and after. Pretty gummed up. Really glad that I pulled the valves and didn't just swap over the springs.


By no means is it perfect, but did a few rounds of Purple Power and it cleaned about 90% of the gunk out of the runners. I know that it will not stay clean inside so I didn't spend too much time there. Really mostly concerned with the outside cleanup. Overall they heads are in excellent condition.


Once the accessories are installed no one will see this, but I like the detail work.

I was doing some research and settled on the heat exchanger circulation pump. Being the budget conscious person I am, I was trying to find an alternative to the the Varimax pump that seems to be the go to pump for most LSA swaps. What I found is a comparison of a bunch of pumps and found that the Pierburg CWA50 pump that is found on several OEM cars (mine came from an X5 BMW 4.4 Turbo) and performs as good as the Varimax pump, but I picked mine up for $60 rather than $450. Plus mine came with a mounting bracket and a harness. I was also shocked by the size of it. It's roughly the height of a beer can, and maybe twice the diameter. It's also supposed to be nearly silent, which is a win.


Next up is disassembling the rockers and getting them cleaned up for install. I bit the bullet and bought the CHE bronze Trunnion upgrade. They are supposed to be the best upgrade for the stock rockers other than going to a full on shaft rocker. What really sold me is that they don't require the bronze to be pressed in, but rather a free floating design that allows for the bushing to float and have oiling grooves for a smoother movement. Hope to have my rockers all disassembled and clean for when the show up. Then I can measure for my pushrods and button up the motor.
I'm really looking forward to tearing into the TR6060 to swap to the Magnum tailshaft. Should be interesting as it's something I've never done before.
Cheers,
Ryan
Here's a few before and after. Pretty gummed up. Really glad that I pulled the valves and didn't just swap over the springs.
By no means is it perfect, but did a few rounds of Purple Power and it cleaned about 90% of the gunk out of the runners. I know that it will not stay clean inside so I didn't spend too much time there. Really mostly concerned with the outside cleanup. Overall they heads are in excellent condition.
Once the accessories are installed no one will see this, but I like the detail work.
I was doing some research and settled on the heat exchanger circulation pump. Being the budget conscious person I am, I was trying to find an alternative to the the Varimax pump that seems to be the go to pump for most LSA swaps. What I found is a comparison of a bunch of pumps and found that the Pierburg CWA50 pump that is found on several OEM cars (mine came from an X5 BMW 4.4 Turbo) and performs as good as the Varimax pump, but I picked mine up for $60 rather than $450. Plus mine came with a mounting bracket and a harness. I was also shocked by the size of it. It's roughly the height of a beer can, and maybe twice the diameter. It's also supposed to be nearly silent, which is a win.
Next up is disassembling the rockers and getting them cleaned up for install. I bit the bullet and bought the CHE bronze Trunnion upgrade. They are supposed to be the best upgrade for the stock rockers other than going to a full on shaft rocker. What really sold me is that they don't require the bronze to be pressed in, but rather a free floating design that allows for the bushing to float and have oiling grooves for a smoother movement. Hope to have my rockers all disassembled and clean for when the show up. Then I can measure for my pushrods and button up the motor.
I'm really looking forward to tearing into the TR6060 to swap to the Magnum tailshaft. Should be interesting as it's something I've never done before.
Cheers,
Ryan
01-21-2021, 12:48 PM
#18
TECH Fanatic
Thread Starter
iTrader: (27)
Well at the moment, I'm waiting on a valve spring compressor to continue on with my engine build so I've decided to take another step forward, but in a different direction. I've been doing a lot of reading and finally feel that it's time to attempt the transmission. I'm starting with a low mileage LS3 TR6060 out of a 2010 Camaro. After searching online, reading other write-ups, calling sponsors and talking to friends who have build transmissions, I'm ready to attempt the T56 Magnum Tailshaft conversion. At a high level this involves disassembling the transmission down enough to remove the mainshaft, remove everything from the 5th gen mainshaft, swap it all back onto the T56 Magnum mainshaft, then reinstall using the new T56 Magnum extension housing. I took about 100 different photos on just the disassembly, but I'll just post a few to give you an idea what all is involved.
Here's what I started with:

Removed the tailshaft housing first. Then I test fit the new housing to get a ballpark of where the shifter will land.


Every bit of information I could find online about the T56 Magnum shows that the rear shifter location is 26.6" from the bellhousing and the Magnum-F is 29.4". My car was set up for a 4th Gen T56 which is set up to be a drop in for the Magnum-F, so I had originally assumed that I would need to use one of the Sikky setback shifters. Now what is very interesting to me is that the TR6060 with magnum Tail shaft housing measures out to 28" on the dot, with an overall length of roughly 35.25". That means that with the stock Magnum shifter that I should be only about 1.4" forward of my old shifter location. Maybe someone who builds these transmissions can chime in, but I'm assuming that this has something to do with the larger bellhousing for dual friction clutches and the built in cooler pump.

Now the real disassembly starts. I made sure to clean off my bench really well and took the advice of those that have done this before and laid everything out in a line as I remove it.


Now, I didn't have the special long jaw puller tool that is necessary for this job, but I got creative and build some extensions to my 8" jaw puller. Worked like a champ.


More to come...
Here's what I started with:
Removed the tailshaft housing first. Then I test fit the new housing to get a ballpark of where the shifter will land.
Every bit of information I could find online about the T56 Magnum shows that the rear shifter location is 26.6" from the bellhousing and the Magnum-F is 29.4". My car was set up for a 4th Gen T56 which is set up to be a drop in for the Magnum-F, so I had originally assumed that I would need to use one of the Sikky setback shifters. Now what is very interesting to me is that the TR6060 with magnum Tail shaft housing measures out to 28" on the dot, with an overall length of roughly 35.25". That means that with the stock Magnum shifter that I should be only about 1.4" forward of my old shifter location. Maybe someone who builds these transmissions can chime in, but I'm assuming that this has something to do with the larger bellhousing for dual friction clutches and the built in cooler pump.
Now the real disassembly starts. I made sure to clean off my bench really well and took the advice of those that have done this before and laid everything out in a line as I remove it.
Now, I didn't have the special long jaw puller tool that is necessary for this job, but I got creative and build some extensions to my 8" jaw puller. Worked like a champ.
More to come...
The following users liked this post:
Project GatTagO (01-22-2021)
The following users liked this post:
Project GatTagO (01-22-2021)
01-22-2021, 07:23 AM
#20
TECH Fanatic
Thread Starter
iTrader: (27)
Thanks John! I've been following along with your build very closely as well. We are both boosted, but have taken different paths to get there.
Once I pulled a blocker ring and a gear off the countershaft, the rest of the gears slid right off. I made sure to keep track of everything and take a bunch of pictures with every piece I removed. Here is right before the maincase was removed.

After all the detents and guide pins were removed I could pull off the main case.


Now I had access to the mainshaft to further disassemble.


I ended up buying a bearing puller kit from Harbor Freight and while it did the job, wasn't overly impressed with the quality. The chromed bearing separators themselves were nice quality, but the rest of the kit left a lot to be desired. The three jaw puller probably would have worked, but there wasn't much to grab onto with this smaller gear. I didn't want to risk chipping one of the teeth.

I took my time and slowly removed and documented everything. Then It came down to removing the front main bearing. I tried the smaller bearing separator, and ended up bending the cage. That lead to the rollers falling out. This was the only thing that was damaged during the disassembly process and I'm thrilled because that little bearing is only $20.


Here is the table with everything disassembled and in the order it was removed.

The Camaro TR6060 mainshaft is on top, and the new T56 Magnum shaft is on the bottom. You can see on the end of the Camaro shaft where the splines are and how it tapers down quite a bit. That is where guys break the transmissions when they put down more power than stock.


The trans at this point is completely disassembled and I wanted to take assessment of what parts I may need to order. All of the syncros look great with minimal wear as to be expected with a low mileage transmission. All the gears have nicely pointed teeth with no damage as well as the blocker rings and syncro assemblies. I then started looking at the tailshaft and realized there is one bearing and one bearing race installed. I was able to remove the top bearing race pretty easily, but the lower rear counter shaft bearing didn't budge. So I decided to replace it since it was also pretty inexpensive.
Out with the old:

In with the new:


It felt good to start reinstalling some parts, but that is as far as I want to go at this point until I get the new front mainshaft bearing. I want to have that installed so that I can test fit each gear as I go to ensure that I have the proper alignment. I ended up ordering the front main shaft bearing, rear countershaft bearing and a Tick speed bleeder. I'm hoping that it shows up sometime Saturday so that I can get the transmission back together soon.
I received what will hopefully be the one of the last engine parts before I can get it all back together. I splurged a little since it was my birthday a few weeks ago and went with the CHE Trunnion kit. Very impressed with the full floating design as well as the overall presentation. I can't think of any other part that I've opened where I was this impressed.

I'm not sure if I really "needed" the trunnion upgrade, but the motor had almost 200k on it, so I figured it was a good insurance policy. I also received a cheapy valve spring compressor that I bought from Amazon so now I have everything I need to measure for pushrods.
Cheers,
Ryan
Once I pulled a blocker ring and a gear off the countershaft, the rest of the gears slid right off. I made sure to keep track of everything and take a bunch of pictures with every piece I removed. Here is right before the maincase was removed.
After all the detents and guide pins were removed I could pull off the main case.
Now I had access to the mainshaft to further disassemble.
I ended up buying a bearing puller kit from Harbor Freight and while it did the job, wasn't overly impressed with the quality. The chromed bearing separators themselves were nice quality, but the rest of the kit left a lot to be desired. The three jaw puller probably would have worked, but there wasn't much to grab onto with this smaller gear. I didn't want to risk chipping one of the teeth.
I took my time and slowly removed and documented everything. Then It came down to removing the front main bearing. I tried the smaller bearing separator, and ended up bending the cage. That lead to the rollers falling out. This was the only thing that was damaged during the disassembly process and I'm thrilled because that little bearing is only $20.
Here is the table with everything disassembled and in the order it was removed.
The Camaro TR6060 mainshaft is on top, and the new T56 Magnum shaft is on the bottom. You can see on the end of the Camaro shaft where the splines are and how it tapers down quite a bit. That is where guys break the transmissions when they put down more power than stock.
The trans at this point is completely disassembled and I wanted to take assessment of what parts I may need to order. All of the syncros look great with minimal wear as to be expected with a low mileage transmission. All the gears have nicely pointed teeth with no damage as well as the blocker rings and syncro assemblies. I then started looking at the tailshaft and realized there is one bearing and one bearing race installed. I was able to remove the top bearing race pretty easily, but the lower rear counter shaft bearing didn't budge. So I decided to replace it since it was also pretty inexpensive.
Out with the old:
In with the new:
It felt good to start reinstalling some parts, but that is as far as I want to go at this point until I get the new front mainshaft bearing. I want to have that installed so that I can test fit each gear as I go to ensure that I have the proper alignment. I ended up ordering the front main shaft bearing, rear countershaft bearing and a Tick speed bleeder. I'm hoping that it shows up sometime Saturday so that I can get the transmission back together soon.
I received what will hopefully be the one of the last engine parts before I can get it all back together. I splurged a little since it was my birthday a few weeks ago and went with the CHE Trunnion kit. Very impressed with the full floating design as well as the overall presentation. I can't think of any other part that I've opened where I was this impressed.
I'm not sure if I really "needed" the trunnion upgrade, but the motor had almost 200k on it, so I figured it was a good insurance policy. I also received a cheapy valve spring compressor that I bought from Amazon so now I have everything I need to measure for pushrods.
Cheers,
Ryan
The following users liked this post:
G Atsma (01-22-2021)