Madaguy 1955 Nomad Build
#61
TECH Addict
iTrader: (19)
Join Date: Aug 2007
Location: Where the Navy tells me to go
Posts: 2,403
Received 106 Likes
on
88 Posts

Well after I was left with this large hole, I needed to find a way to fill it. I had started to make my own replacement panel, but I didn't have a proper metal brake so the panels turned out so so. Got to looking online and a guy actually makes a piece and sells them on trifive.com and eBay. So I grabbed two and they were just what I needed and they fit perfectly. Plus it came with the curved piece for the door jamb that would have been very difficult for me to create from scratch.


Looking at that 2nd picture... Do you do any sort of rust-prevention treatment inside there (I guess it's the back side of the actual outer body panel) before welding all of that closed?
#62
TECH Fanatic
Thread Starter
iTrader: (27)
Nice find on those panels! Looks like they're quality pieces, and as you said, creating that curved bit around the door jamb would've been quite a challenge. I'm curious how the guy that makes those panels does it.
Looking at that 2nd picture... Do you do any sort of rust-prevention treatment inside there (I guess it's the back side of the actual outer body panel) before welding all of that closed?
Looking at that 2nd picture... Do you do any sort of rust-prevention treatment inside there (I guess it's the back side of the actual outer body panel) before welding all of that closed?
The following users liked this post:
AAIIIC (05-02-2023)
#63
TECH Fanatic
Thread Starter
iTrader: (27)
I was able to get the inner panel patched up and a final weld done. I still need to knock down the welds then coat the entire inside of the panel. Now that this panel is welded in, I can get the rear floor pan patch panel made and welded in. I had my wire feed up a little to high on the spot welds, but they are all solid with penetration.


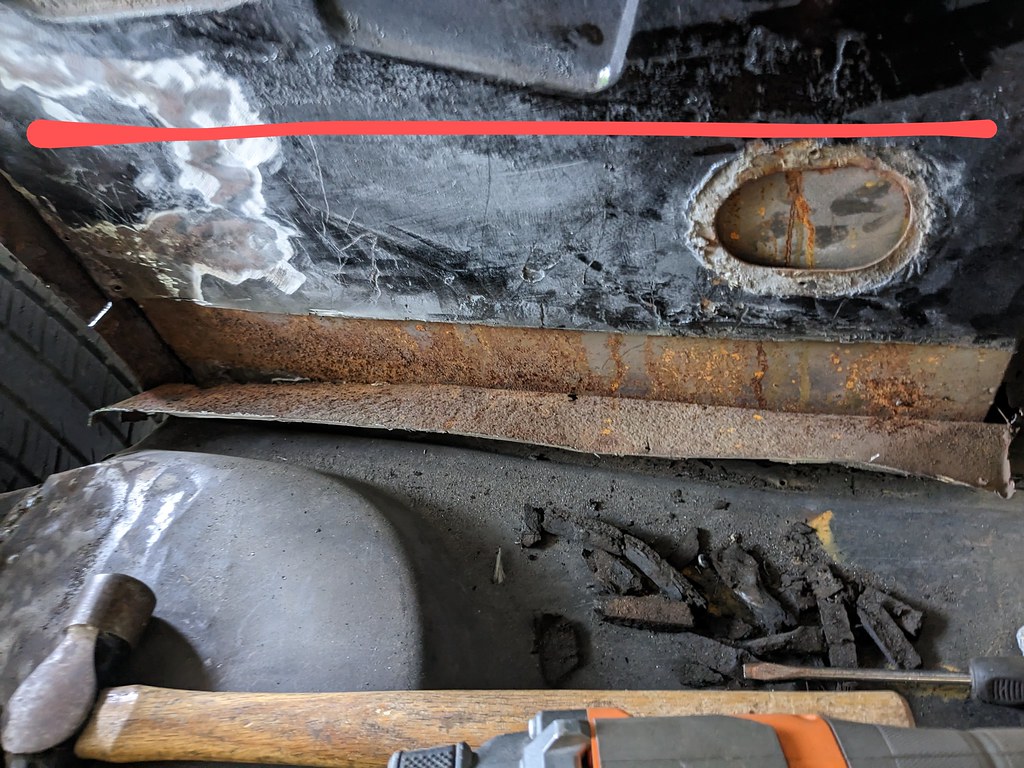
Then I turned my attention to the driver's side, with a very similar bad repair. It was the same style where they crudely threw a panel over the existing rust. You can see through that access hole where the panel was put over the original metal. No prep or seam sealer was used so the rust was left to thrive. Glad I caught it when I did. That inside panel went up to the red line...


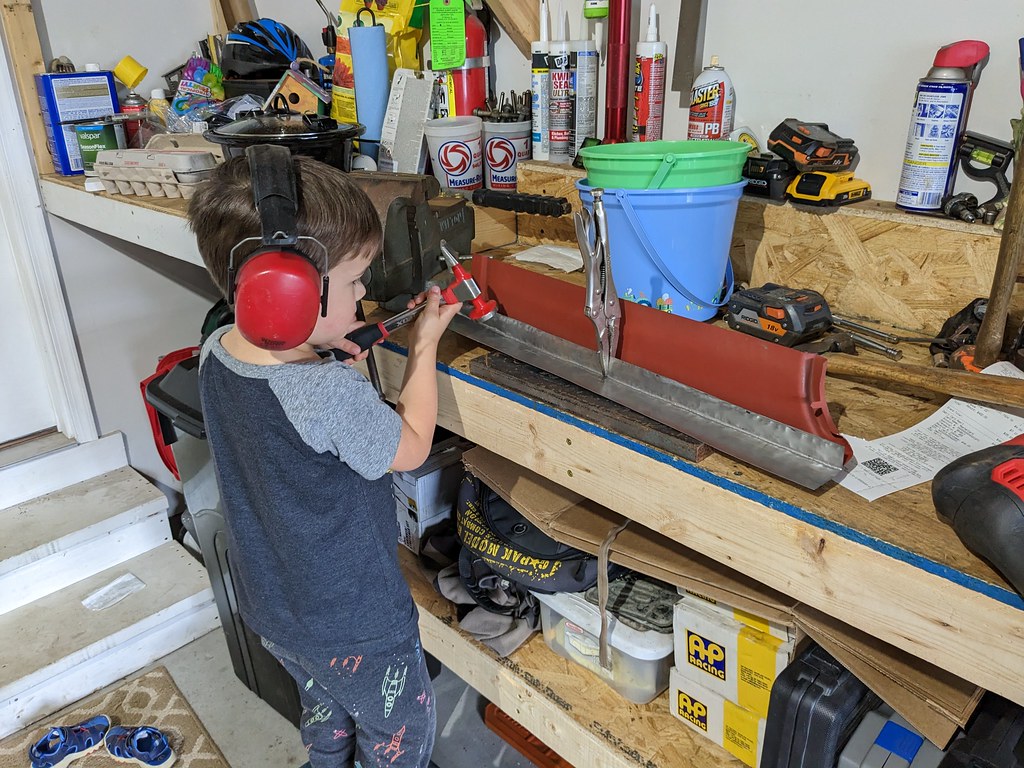
For some reason when the floor was installed, they cut the rear flange off where it meets the lower pillar section. So I'm re-creating this panel so I have something to spot weld to. Needed to seek the help from a professional for this one though.
Once I get these panels welded I'll resume my work on the wheel wells and rear floor sections. I can't wait for the metal work to be over...
Seems to be a common theme here, but I have a really exciting parts update! I had been searching all around with vendors and even used, but came across a few Terminator X Max kits for sale at Summit. I wasn't sure if it was true or not, but they showed 4 550-933 in stock, so I bought one. Was very surprised when this showed up a few days later!! It was everything I needed other than the wrong injectors for me, but I had a buddy who had an EV6 set and we were able to swap, so it was a win win for both of us.


Then I was on FB marketplace and found a guy locally who was parting out a wrecked 2011 CTS-V. He still had the fuel pump assembly and got that for a really good price! Only had 66k miles on it.


I also was able to find a good used set of C5 Brake calipers with mounting brackets. They aren't in the best shape, but are good enough for what I need. I know the calipers are the same, but they are off of a real Z06, so they are factory powder coated red. I got a rebuild kit for them, Kore3 brackets, EBC Red pads, and will be ordering a new pair of rotors soon. I also picked up a pair of 66 Impala brake hubs which will give me a tapered roller bearing upgrade for my factory spindle. I'll need to turn the diameter down to work with the C5 rotors, but otherwise it's a very budget friendly big brake upgrade. Should work nicely with my Tesla Model S brake booster assembly too.

Hopefully I'll knock out some more metal work in the next few days. Only way to eat an elephant is one bite at a time...
Cheers,
Ryan


Then I turned my attention to the driver's side, with a very similar bad repair. It was the same style where they crudely threw a panel over the existing rust. You can see through that access hole where the panel was put over the original metal. No prep or seam sealer was used so the rust was left to thrive. Glad I caught it when I did. That inside panel went up to the red line...


For some reason when the floor was installed, they cut the rear flange off where it meets the lower pillar section. So I'm re-creating this panel so I have something to spot weld to. Needed to seek the help from a professional for this one though.

Once I get these panels welded I'll resume my work on the wheel wells and rear floor sections. I can't wait for the metal work to be over...
Seems to be a common theme here, but I have a really exciting parts update! I had been searching all around with vendors and even used, but came across a few Terminator X Max kits for sale at Summit. I wasn't sure if it was true or not, but they showed 4 550-933 in stock, so I bought one. Was very surprised when this showed up a few days later!! It was everything I needed other than the wrong injectors for me, but I had a buddy who had an EV6 set and we were able to swap, so it was a win win for both of us.


Then I was on FB marketplace and found a guy locally who was parting out a wrecked 2011 CTS-V. He still had the fuel pump assembly and got that for a really good price! Only had 66k miles on it.


I also was able to find a good used set of C5 Brake calipers with mounting brackets. They aren't in the best shape, but are good enough for what I need. I know the calipers are the same, but they are off of a real Z06, so they are factory powder coated red. I got a rebuild kit for them, Kore3 brackets, EBC Red pads, and will be ordering a new pair of rotors soon. I also picked up a pair of 66 Impala brake hubs which will give me a tapered roller bearing upgrade for my factory spindle. I'll need to turn the diameter down to work with the C5 rotors, but otherwise it's a very budget friendly big brake upgrade. Should work nicely with my Tesla Model S brake booster assembly too.

Hopefully I'll knock out some more metal work in the next few days. Only way to eat an elephant is one bite at a time...
Cheers,
Ryan
The following 2 users liked this post by ryeguy2006a:
AAIIIC (05-02-2023), Project GatTagO (05-02-2023)
#64
On The Tree
Dang, you are picking up on all the tri-five tricks! Pretty smart thinking on the hubs. Back around 2000 I converted my 56 to front disc, but I didn't want the 68-72 Chevelle rotor hub assembles, because they kicked the wheel out 3/4 inch! I used the same 65- 69 drum brake impala hubs as you and the REAR discs rotors off a 79-81 trans am. I had to turn the hubs also. Keep up the excellent work!!
#65
TECH Fanatic
Thread Starter
iTrader: (27)
Here's another tedious and boring metal working update. I continued on adding a flange to the rear floor plan section for whatever strange reason the previous person working on the car cut off. I got it trimmed down and fit up so that I could spot weld the new lower panel to it.


As I was test fitting the panel, I noticed something off about the rocker panel and as I hit it with the wire wheel I found another bad repair covered with body filler. That rusty piece was tack welded into place with no prep (weld through primer) and then smoothed over with body filler. Prime spot for rust to thrive...
[url=https://www.flickr.com/gp/98271343@N03/5B5X3782iQ]
Whipped up this cardboard template pretty quickly and then transferred it to steel. Lots of bending, trimming and tweaking before it fit really nice.

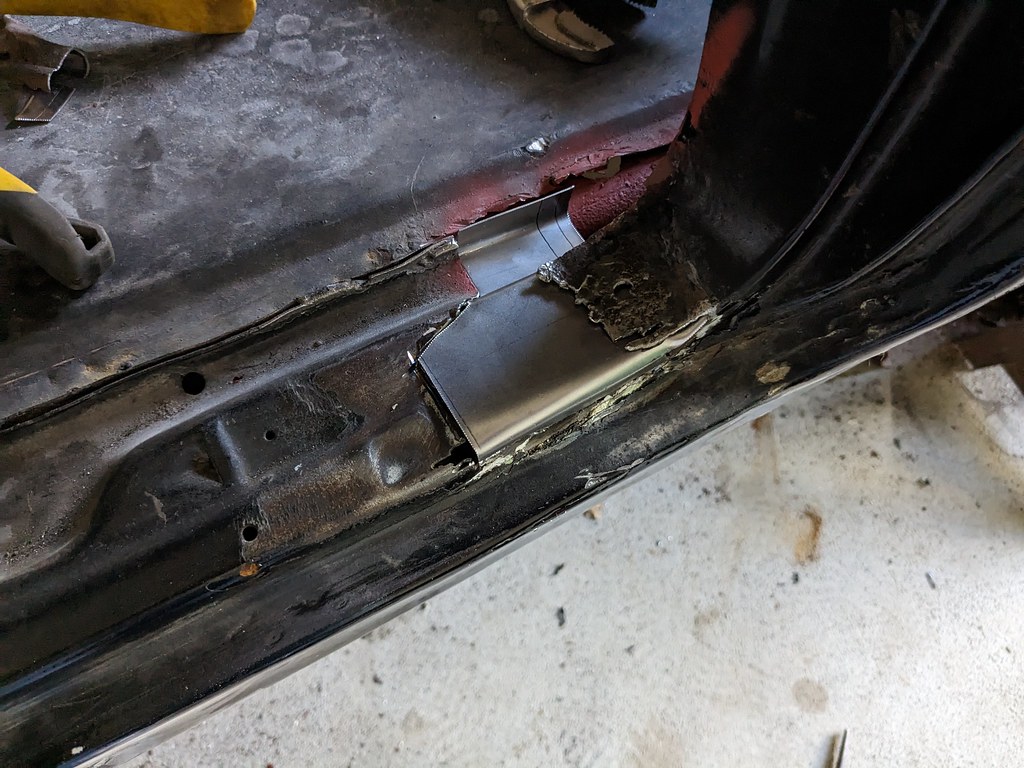
Before I welded it in, the back of the panel was coated in weld through primer. Carefully tacked it all in and tapped it back into place as I was going.

Then I decided it would be a good idea to get the flange and lower panel mocked up before I final welded the panel in place. It's always a good idea to do that so that you aren't surprised later on with bad news if it doesn't fit. It only took about 5 extra minutes, but could have saved me hours later down the road. I also coated both sides of the flange piece with the weld through primer.

Once it all fit together really nicely, I burned it all in and hit it with a flap disk. Once I'm done welding I'm going to go back through and coat the back sides of where I welded the panels with some oil based brush on paint. Where the rocker panel meets the panel I repaired will be addressed at another time. It's not perfect, but way better than before.


Now, I can get back to the repair on the lower interior panel. I used my wire wheel to clean off all of the body filler that was left over so that I could make good clean welds on the new panels. I got busy welding and working along and didn't get any pictures of the progress. I discovered that there weren't as many spot welds as I would like on the braces under the floor pans as well as some undesirable gaps so I worked on locating them from the underside with self tapping screws, then drilling some holes in the sheet metal from the top.


Now that the lower interior panel is repaired, I could get a good and true mock up of the panels. Everything is fitting together really well. Now I need to make some patches on the inner wheel wells and a small patch on the rear floor pan section that is missing.
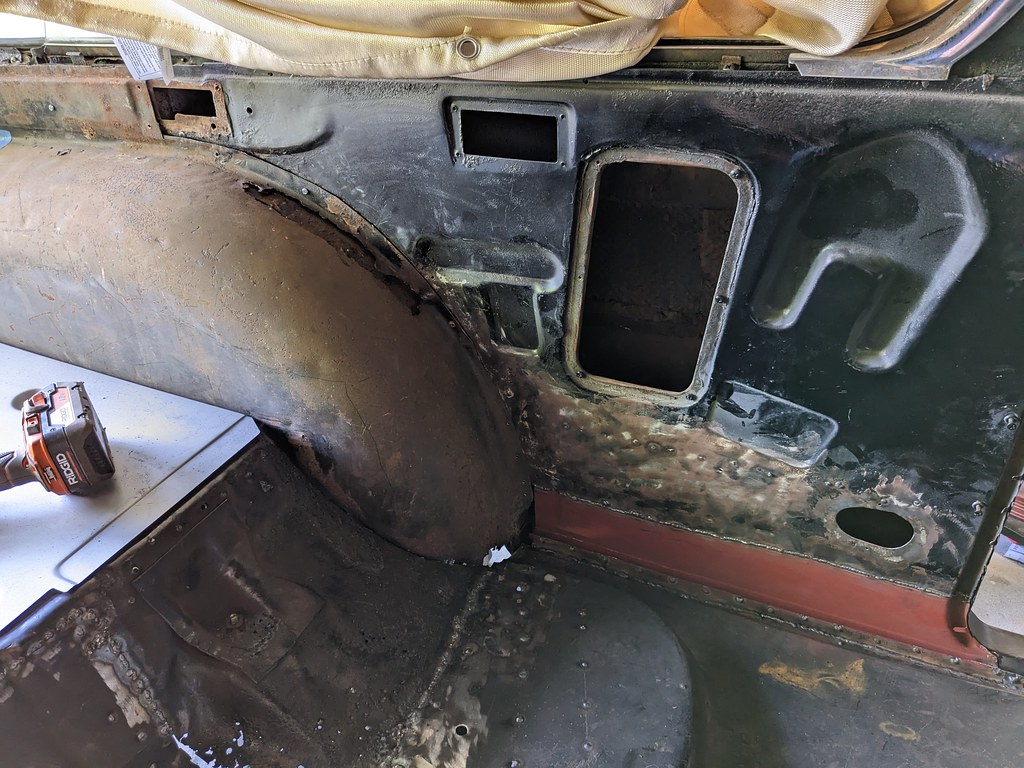
Then I needed to remove the section all the way up to the window channel. The flange is pretty solid, but unfortunately I did find some rust that was through on the outer section of the window channel. I'll have to remove the rear windows to fix that panel.

Next task at hand was figuring out what to do about this little pass through panel that also acts as a brace for the outer front wheel house. That is what attaches the upper window channel to the outer wheel house. Mine were in pretty bad shape, and with some brand new front outer wheel houses, I wasn't going to re-use those crusty pieces. They are not reproduced, so I'm left to fabricate them.


Not too bad for some hand tools and cardboard.

Next up was getting the outer wheel houses prepped for installation. I got the ends sprayed with weld through primer, and the middle section sprayed with an etching primer.

That was as far as I got on Saturday. Some more parts came in and then I'll be able to start actually installing some of these panels!
First up was getting the outer wheel well seals. They need to be glued onto the outer wheel houses, and then can be installed once dried.

I also received my 61-68 full sized drum hubs which is an upgrade for earlier cars to a tapered roller bearing. These will be used for when I upgrade to my big front brakes. They need to be turned down to accept the C5 rotors, and install new bearings/longer wheel studs.


Also my buddy Ian helped me out big time and had an EV6 injector harness that he traded me for the EV1 harness that came with my Terminator X Max kit. After talking with him, he also had a Vaporworx fuel pump ring! Thanks again man.


Lastly, I found a guy selling a brand new Holley Transmission harness a big discount since he wasn't able to use it. That is the last piece that I needed for my wiring, so I should be all good to go when it comes to that point.

I need to keep my head down now and get some work done on cargo area of my car and let my wallet cool down. I should have all of the sheet metal I need now, so I just need to keep plugging away whenever I have a few minutes to do something. Really motivated to get this car back together.
Cheers,
Ryan


As I was test fitting the panel, I noticed something off about the rocker panel and as I hit it with the wire wheel I found another bad repair covered with body filler. That rusty piece was tack welded into place with no prep (weld through primer) and then smoothed over with body filler. Prime spot for rust to thrive...
[url=https://www.flickr.com/gp/98271343@N03/5B5X3782iQ]

Whipped up this cardboard template pretty quickly and then transferred it to steel. Lots of bending, trimming and tweaking before it fit really nice.


Before I welded it in, the back of the panel was coated in weld through primer. Carefully tacked it all in and tapped it back into place as I was going.

Then I decided it would be a good idea to get the flange and lower panel mocked up before I final welded the panel in place. It's always a good idea to do that so that you aren't surprised later on with bad news if it doesn't fit. It only took about 5 extra minutes, but could have saved me hours later down the road. I also coated both sides of the flange piece with the weld through primer.

Once it all fit together really nicely, I burned it all in and hit it with a flap disk. Once I'm done welding I'm going to go back through and coat the back sides of where I welded the panels with some oil based brush on paint. Where the rocker panel meets the panel I repaired will be addressed at another time. It's not perfect, but way better than before.


Now, I can get back to the repair on the lower interior panel. I used my wire wheel to clean off all of the body filler that was left over so that I could make good clean welds on the new panels. I got busy welding and working along and didn't get any pictures of the progress. I discovered that there weren't as many spot welds as I would like on the braces under the floor pans as well as some undesirable gaps so I worked on locating them from the underside with self tapping screws, then drilling some holes in the sheet metal from the top.


Now that the lower interior panel is repaired, I could get a good and true mock up of the panels. Everything is fitting together really well. Now I need to make some patches on the inner wheel wells and a small patch on the rear floor pan section that is missing.

Then I needed to remove the section all the way up to the window channel. The flange is pretty solid, but unfortunately I did find some rust that was through on the outer section of the window channel. I'll have to remove the rear windows to fix that panel.

Next task at hand was figuring out what to do about this little pass through panel that also acts as a brace for the outer front wheel house. That is what attaches the upper window channel to the outer wheel house. Mine were in pretty bad shape, and with some brand new front outer wheel houses, I wasn't going to re-use those crusty pieces. They are not reproduced, so I'm left to fabricate them.


Not too bad for some hand tools and cardboard.

Next up was getting the outer wheel houses prepped for installation. I got the ends sprayed with weld through primer, and the middle section sprayed with an etching primer.

That was as far as I got on Saturday. Some more parts came in and then I'll be able to start actually installing some of these panels!
First up was getting the outer wheel well seals. They need to be glued onto the outer wheel houses, and then can be installed once dried.

I also received my 61-68 full sized drum hubs which is an upgrade for earlier cars to a tapered roller bearing. These will be used for when I upgrade to my big front brakes. They need to be turned down to accept the C5 rotors, and install new bearings/longer wheel studs.


Also my buddy Ian helped me out big time and had an EV6 injector harness that he traded me for the EV1 harness that came with my Terminator X Max kit. After talking with him, he also had a Vaporworx fuel pump ring! Thanks again man.


Lastly, I found a guy selling a brand new Holley Transmission harness a big discount since he wasn't able to use it. That is the last piece that I needed for my wiring, so I should be all good to go when it comes to that point.

I need to keep my head down now and get some work done on cargo area of my car and let my wallet cool down. I should have all of the sheet metal I need now, so I just need to keep plugging away whenever I have a few minutes to do something. Really motivated to get this car back together.
Cheers,
Ryan
The following users liked this post:
AAIIIC (05-08-2023)
#66
Looks great Ryan. I love seeing young kids working on hotrods. Start Ďem young
#67
TECH Senior Member
#68
TECH Addict
iTrader: (19)
Join Date: Aug 2007
Location: Where the Navy tells me to go
Posts: 2,403
Received 106 Likes
on
88 Posts

 ) is quite admirable.
 The following 2 users liked this post by AAIIIC:
G Atsma (05-08-2023), ryeguy2006a (05-22-2023)
#69
TECH Fanatic
Thread Starter
iTrader: (27)
Thanks man! I'm certainly not a professional fabricator, but I'm happy with the way things are turning out. That's all I can do really is just accept that I bought this car as is and do the best that I can to make it right. Doesn't do any good to get mad, and I guess this stage of the build is sort of what makes them fun and interesting.
I wanted to see how the pass through panels that I made fit with the outer wheel houses, and I'm happy that they were 95% great. The hole that I used was a tad higher than it should have been so I need to open up the bottom of the hole and it will not contact the cable at all. It held the front outer wheel house exactly where it needed to be so that is fantastic. I need to scrape off that under coating from the inner wheel house...
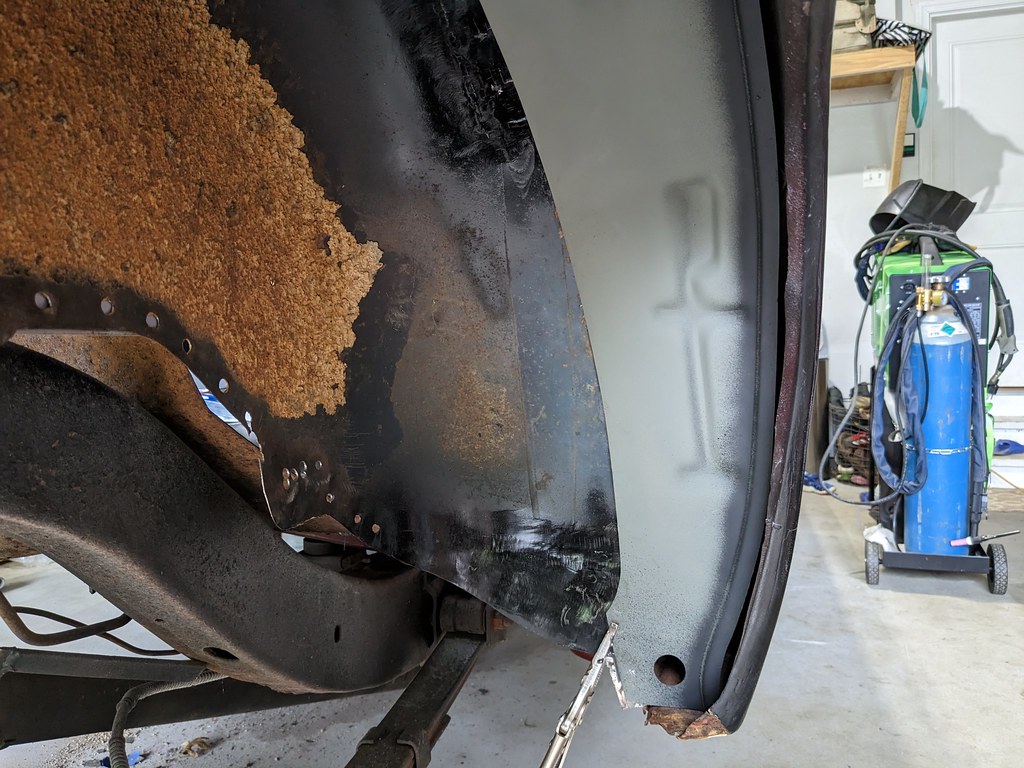

Glad those parts are fitting right. I need to replace the old seals with the new ones, and then I can do a final mock up before welding.
Next up was something I had been dreading... removing the driver's side window's to repair the rusty window channel. The good news is that most of the screws came right out and only fought with two stubborn screws.


I could have just forgot that I saw these large rust holes, but I couldn't let it go.

The outer window trim requires that you remove the windows before you can remove the trim. Most of the screws came out easy with some PB Blaster and my impact drill, but the last two were too rusty. I was trying to drill the head of the one screw to just remove the trim then worry about the screw later, then my bit broke...
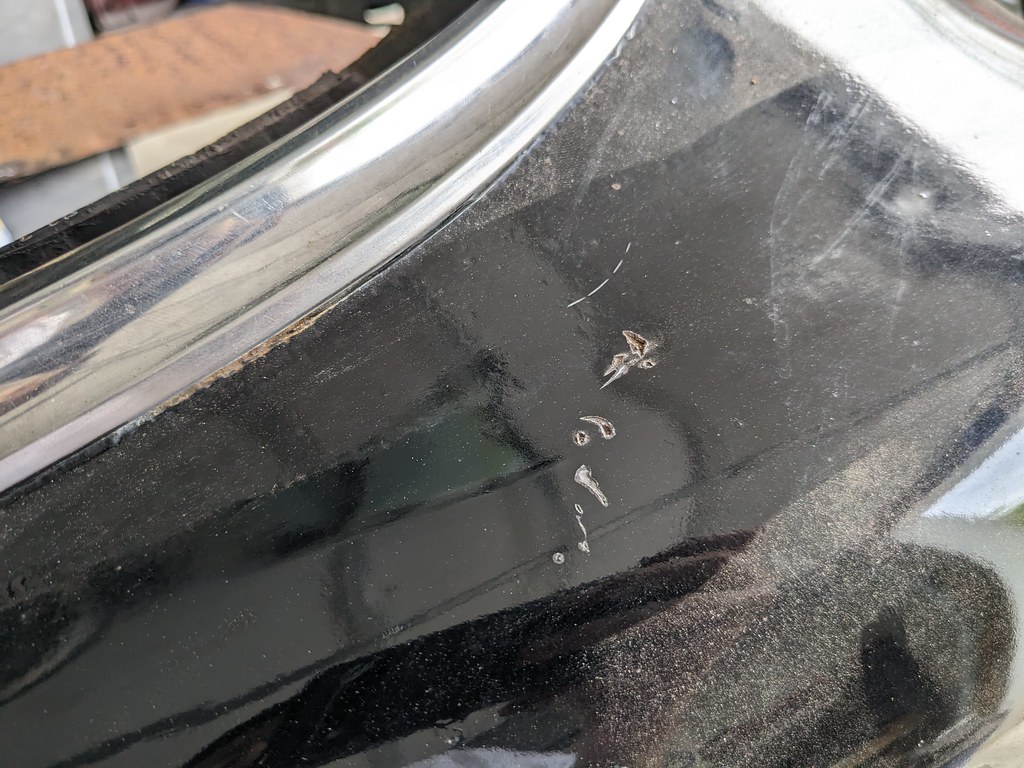
I was mad at first, but then realized that 1) it builds character/patina, and 2) the paint job is a solid 15 footer so it's not that big of a deal. I walked away and then came back and decided to try the old weld a nut to the top trick and I won with no damage to the trim.

Once the trim was off I realized that the trim has never been off of the car since it was new! It was a little more crusty than I would have liked, but I'll treat the rust with something before the trim goes back on. It was also really cool to see the original paint for the car. My trim tag is missing so I didn't know for sure what the color was, but now I'm confident it was Ivory top, but not sure what shade of green that is. I think there were three that year.


Here's the bad spot.

I cut it out right at the corner so that I could retain as much of the original metal as I could and keep some of the intricate shapes in the metal.


A metal brake would come in really handy during this stage, but instead I'm working with what I have. A 1/2" plate of steel, vice grips, and a hammer. Turned out pretty good and I got the width of the channel spot on. Mocked it up several times to get the angles right and the fitment spot on.


I bought this really cool tool for filling in spot weld holes that worked great for a few of those large pits. Highly recommend this tool, it worked great.

I installed the inner wheel well for the first bit of welding so that I knew that it was in the right position and no surprises later. Ground with a flap disk and I was very pleased with that repair.
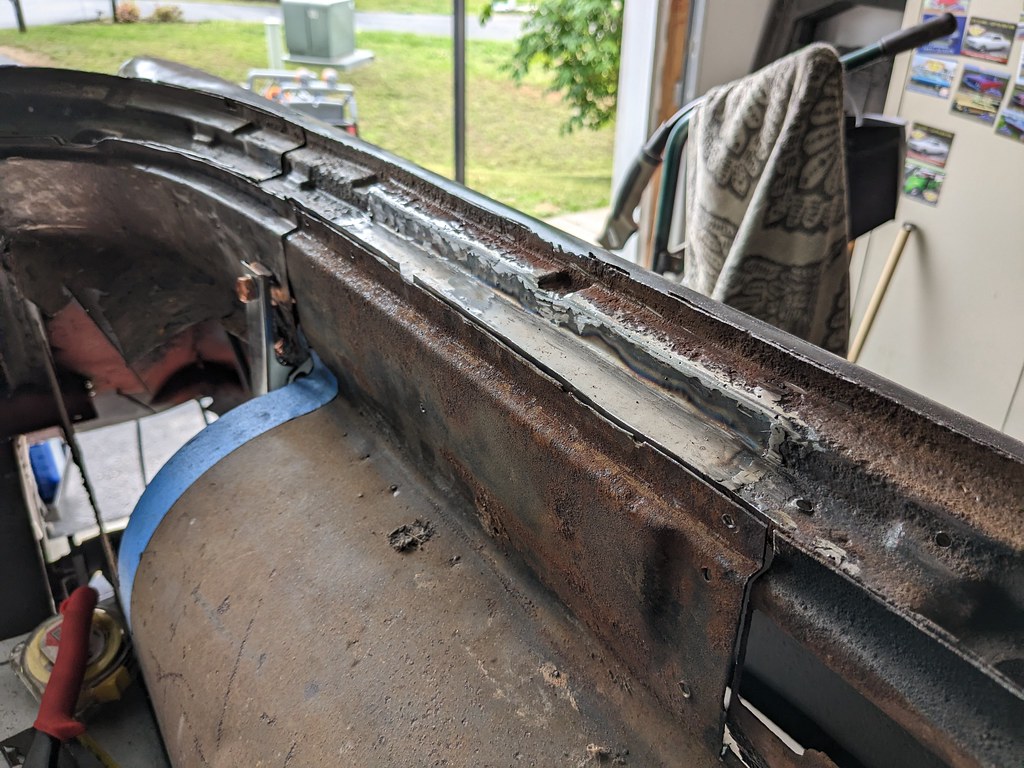

Next up was a repairing this flange. There was a small triangular section missing from the flange. Quick little patch and it was good as new and hit it with some weld through primer.
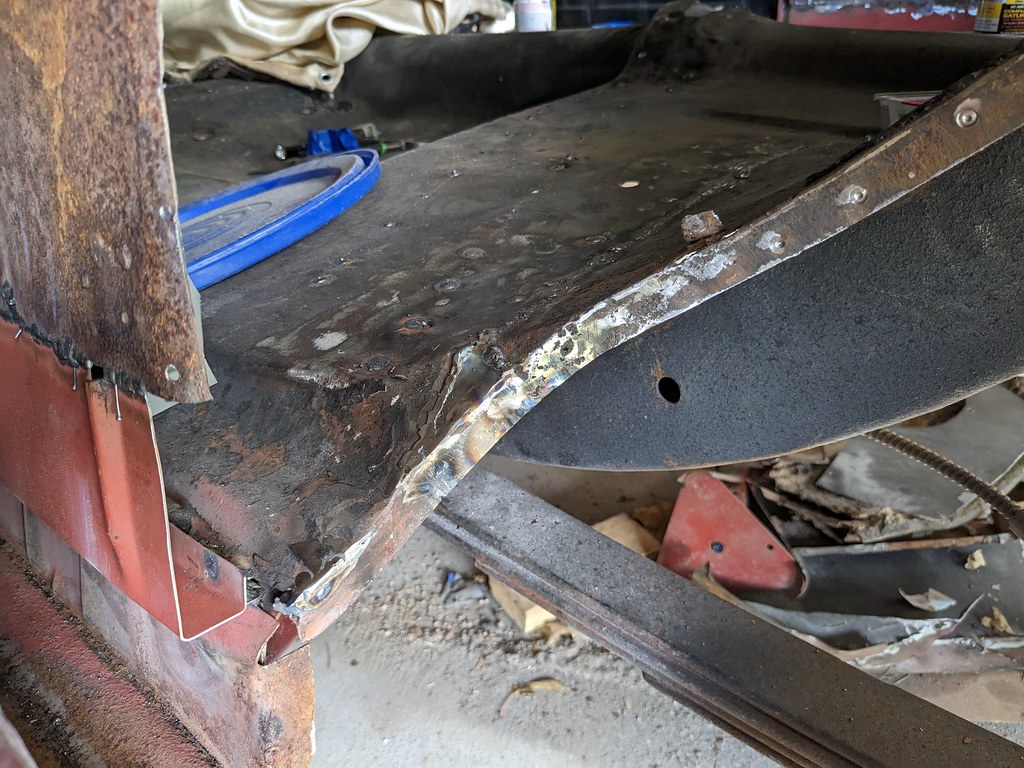

Next was making an upper and lower patch for the wheel inner well. I used the new floor pan flange as a template for where the lower inner wheel well patch needed to be. Got busy working and didn't take pictures, but here's the final product.


I didn't get a picture of it, but I found the last piece of new metal that I needed to buy which was the gas tank brace. I found someone selling on eBay for almost $80 off, which was perfect timing for me. I also found a guy selling a Gen 6 cooling fan off of a 2017 SS Camaro for really cheap on a FB group. These fans are bad to the bone, 19" SPAL fan with an 850 Watt motor that is controlled by PWM. I think I saw somewhere that they are rated around 4k cfm. Best part is they are nearly a direct fit on a stock tri-five radiator support!


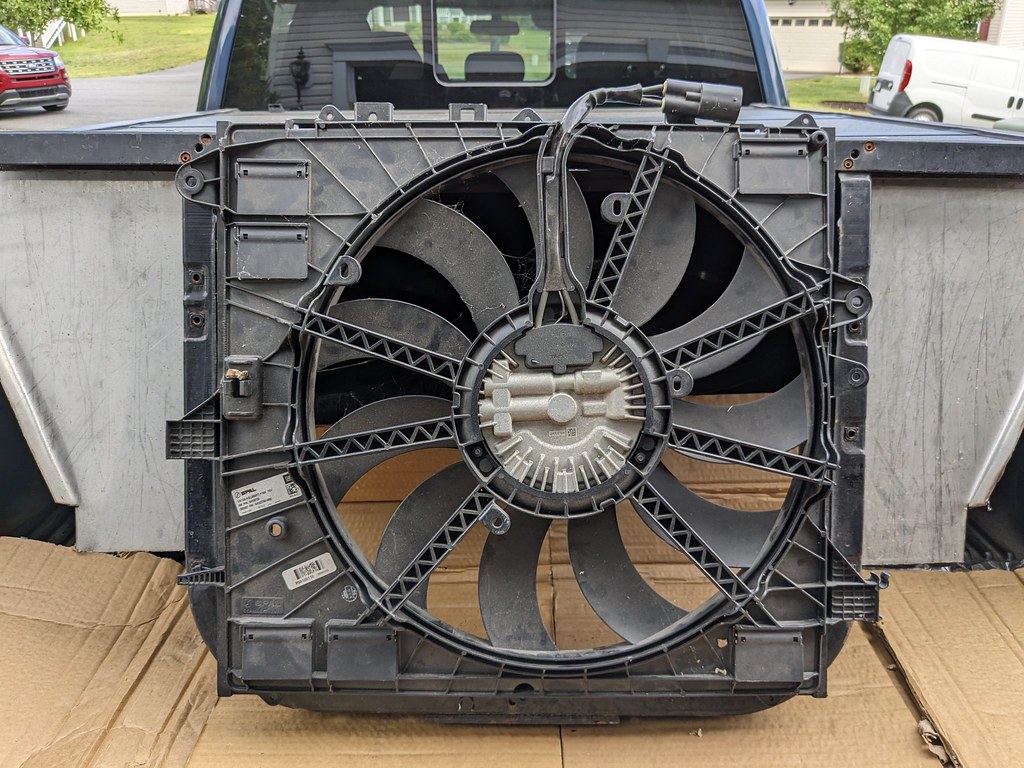
Now that my window channel, floor pan flange and inner wheel house are both repaired, they are ready to install for good. I just need to drill some holes for spot welds, spray weld through primer and final weld the panels. Very exciting to get to this stage. I think once I get the driver's side wheel well all welded and back together, I may pull off the passenger's side windows and trim to treat that side as well. I'm this far I might as well. Plus I won't have to worry about hurting the windows with weld spatter.
Cheers,
Ryan
I wanted to see how the pass through panels that I made fit with the outer wheel houses, and I'm happy that they were 95% great. The hole that I used was a tad higher than it should have been so I need to open up the bottom of the hole and it will not contact the cable at all. It held the front outer wheel house exactly where it needed to be so that is fantastic. I need to scrape off that under coating from the inner wheel house...


Glad those parts are fitting right. I need to replace the old seals with the new ones, and then I can do a final mock up before welding.
Next up was something I had been dreading... removing the driver's side window's to repair the rusty window channel. The good news is that most of the screws came right out and only fought with two stubborn screws.


I could have just forgot that I saw these large rust holes, but I couldn't let it go.

The outer window trim requires that you remove the windows before you can remove the trim. Most of the screws came out easy with some PB Blaster and my impact drill, but the last two were too rusty. I was trying to drill the head of the one screw to just remove the trim then worry about the screw later, then my bit broke...

I was mad at first, but then realized that 1) it builds character/patina, and 2) the paint job is a solid 15 footer so it's not that big of a deal. I walked away and then came back and decided to try the old weld a nut to the top trick and I won with no damage to the trim.

Once the trim was off I realized that the trim has never been off of the car since it was new! It was a little more crusty than I would have liked, but I'll treat the rust with something before the trim goes back on. It was also really cool to see the original paint for the car. My trim tag is missing so I didn't know for sure what the color was, but now I'm confident it was Ivory top, but not sure what shade of green that is. I think there were three that year.


Here's the bad spot.

I cut it out right at the corner so that I could retain as much of the original metal as I could and keep some of the intricate shapes in the metal.


A metal brake would come in really handy during this stage, but instead I'm working with what I have. A 1/2" plate of steel, vice grips, and a hammer. Turned out pretty good and I got the width of the channel spot on. Mocked it up several times to get the angles right and the fitment spot on.


I bought this really cool tool for filling in spot weld holes that worked great for a few of those large pits. Highly recommend this tool, it worked great.

I installed the inner wheel well for the first bit of welding so that I knew that it was in the right position and no surprises later. Ground with a flap disk and I was very pleased with that repair.


Next up was a repairing this flange. There was a small triangular section missing from the flange. Quick little patch and it was good as new and hit it with some weld through primer.


Next was making an upper and lower patch for the wheel inner well. I used the new floor pan flange as a template for where the lower inner wheel well patch needed to be. Got busy working and didn't take pictures, but here's the final product.


I didn't get a picture of it, but I found the last piece of new metal that I needed to buy which was the gas tank brace. I found someone selling on eBay for almost $80 off, which was perfect timing for me. I also found a guy selling a Gen 6 cooling fan off of a 2017 SS Camaro for really cheap on a FB group. These fans are bad to the bone, 19" SPAL fan with an 850 Watt motor that is controlled by PWM. I think I saw somewhere that they are rated around 4k cfm. Best part is they are nearly a direct fit on a stock tri-five radiator support!


Now that my window channel, floor pan flange and inner wheel house are both repaired, they are ready to install for good. I just need to drill some holes for spot welds, spray weld through primer and final weld the panels. Very exciting to get to this stage. I think once I get the driver's side wheel well all welded and back together, I may pull off the passenger's side windows and trim to treat that side as well. I'm this far I might as well. Plus I won't have to worry about hurting the windows with weld spatter.
Cheers,
Ryan
#70
TECH Fanatic
Thread Starter
iTrader: (27)
Here's the last piece that I needed to buy for my sheet metal adventures. It's the rear gas tank brace. I could have re-used the original one, but it would have been a shame to put an old rusty one in place with the new sheet metal.

Coated the inside with weld through primer.

Next job was to get the passenger side floor pan flange repaired so that I can attach it to the wheel well. I decided to make this in two pieces to save myself a bunch of time with the shrinker/stretcher. I started with a cardboard template to get the curvature right for the floor piece, then transferred it to sheet metal for a final fitment. Once I was happy with that fitment, I laid down some painters tape to get the right curvature for the flange piece.


Carefully pealed off the tape and transferred it to sheet metal. I always make my templates as accurate as I can, and cut my metal slightly larger to account for any variations.


Once I had my two pieces I got it all back together to start tacking it together for final welding. I would tack, trim, grind, and fit multiple times. I noticed at the top of the floor pan flange on the driver's side that there was a triangular indentation, so I did my best to replicate that.


I'm very happy with how the final piece turned out, and glad that it fits really nicely as well.


Driver's side wheel well is all ready for welding now. I also took one of the rear pieces that I had left over to see how the fitment was and looks like it will need a small filler panel, but otherwise fits very nice with the curve at the back.
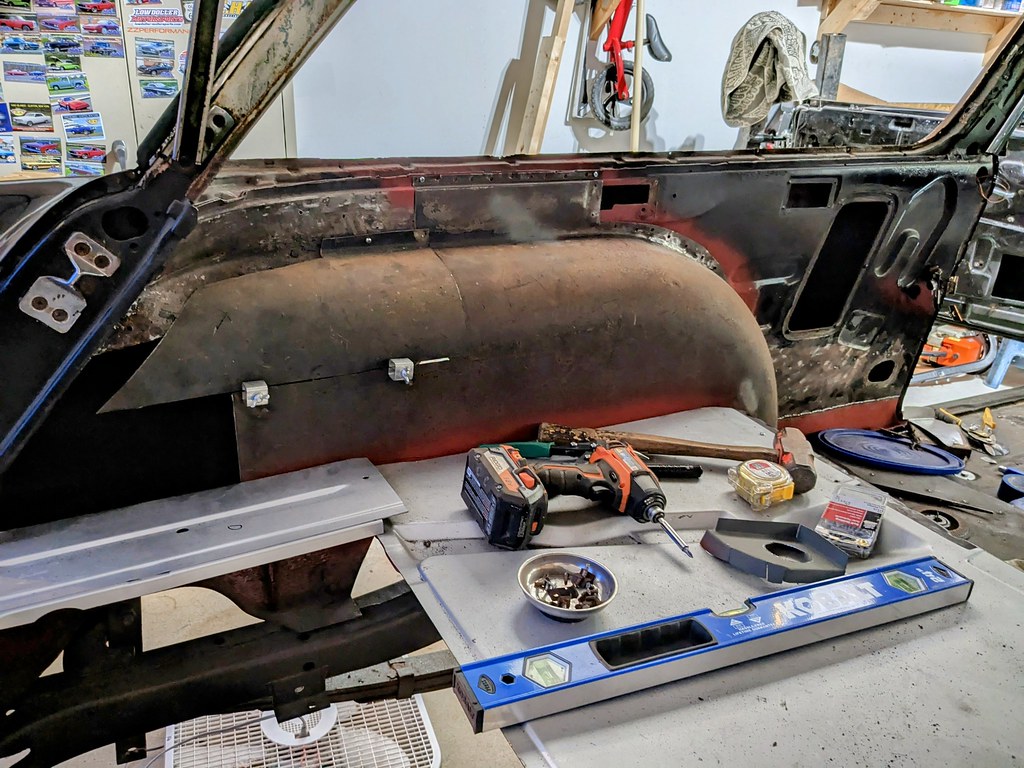
Then my family and I decided to go up to NY to visit family, and brought some parts for my father-in-law to work on since he's been itching to work on my car ever since I got it. Figured it would be a great project to fit up the center cross brace and shock re-enforcement plates. Brought the weld through primer, and we got to work.


We got the whole family involved! My wife, brother in law, sister in law and father in law all got to try out some spot welds on the panels. We dialed in the welder before hand, and gave them all some pieces to practice on and they all did surprisingly well. Cool that we all have a part in it now.
My wife getting some instruction from her Dad. Yes, before the comments come those are OSHA approved Birkenstocks.

The final piece turned out really great with a tight fitment just like I wanted.


I was also able to borrow a tool from my grandpa that I didn't even realize that he had. I've been wanting a metal brake for a long time and this one is perfect as it bolts to the bench top and is 36" wide. I needed to build a zig zag piece for where the inner wheel well meets the tailgate opening. This was just the ticket, and worked great after several test pieces. They were actually much harder to make than they appear.


It worked out great because my FIL got to use his new garage. He's just finalized everything on it and is on the hunt for a new project, so he got to use a lot of his new tools and I got a lot of progress done on my car. Everyone wins!
We were only there from Friday through Sunday, so when we got back yesterday when everyone was napping, I got my TIG welder all set up to try for the first time with all the right gas and equipment. I sharpened up my tungsten and had a full tank of 100% Argon. I tried a few spot welds at first to practice my initiations, then a few straight lines with no filler to get a feel for the torch. After I felt more comfortable, I started doing some straight lines with adding filler rod. Definitely a learning curve, but actually not as bad as I had made it out to be in my mind. Here's the best one that I was able to lay down this go around. It looks good to me other than the small divots? Any feedback would be greatly appreciated!

After I felt pretty confident with the coupons that I had, I attempted to go live action with my outer wheel house. I had a nice tight fit up and this run only took a small amount of filler at the end.

These were my settings. I watched several youtube videos on what people are running for settings and this was just what I came up with based on several that I watched. Again, feel free to critique.

Cheers,
Ryan

Coated the inside with weld through primer.

Next job was to get the passenger side floor pan flange repaired so that I can attach it to the wheel well. I decided to make this in two pieces to save myself a bunch of time with the shrinker/stretcher. I started with a cardboard template to get the curvature right for the floor piece, then transferred it to sheet metal for a final fitment. Once I was happy with that fitment, I laid down some painters tape to get the right curvature for the flange piece.


Carefully pealed off the tape and transferred it to sheet metal. I always make my templates as accurate as I can, and cut my metal slightly larger to account for any variations.


Once I had my two pieces I got it all back together to start tacking it together for final welding. I would tack, trim, grind, and fit multiple times. I noticed at the top of the floor pan flange on the driver's side that there was a triangular indentation, so I did my best to replicate that.


I'm very happy with how the final piece turned out, and glad that it fits really nicely as well.


Driver's side wheel well is all ready for welding now. I also took one of the rear pieces that I had left over to see how the fitment was and looks like it will need a small filler panel, but otherwise fits very nice with the curve at the back.

Then my family and I decided to go up to NY to visit family, and brought some parts for my father-in-law to work on since he's been itching to work on my car ever since I got it. Figured it would be a great project to fit up the center cross brace and shock re-enforcement plates. Brought the weld through primer, and we got to work.


We got the whole family involved! My wife, brother in law, sister in law and father in law all got to try out some spot welds on the panels. We dialed in the welder before hand, and gave them all some pieces to practice on and they all did surprisingly well. Cool that we all have a part in it now.
My wife getting some instruction from her Dad. Yes, before the comments come those are OSHA approved Birkenstocks.

The final piece turned out really great with a tight fitment just like I wanted.


I was also able to borrow a tool from my grandpa that I didn't even realize that he had. I've been wanting a metal brake for a long time and this one is perfect as it bolts to the bench top and is 36" wide. I needed to build a zig zag piece for where the inner wheel well meets the tailgate opening. This was just the ticket, and worked great after several test pieces. They were actually much harder to make than they appear.


It worked out great because my FIL got to use his new garage. He's just finalized everything on it and is on the hunt for a new project, so he got to use a lot of his new tools and I got a lot of progress done on my car. Everyone wins!
We were only there from Friday through Sunday, so when we got back yesterday when everyone was napping, I got my TIG welder all set up to try for the first time with all the right gas and equipment. I sharpened up my tungsten and had a full tank of 100% Argon. I tried a few spot welds at first to practice my initiations, then a few straight lines with no filler to get a feel for the torch. After I felt more comfortable, I started doing some straight lines with adding filler rod. Definitely a learning curve, but actually not as bad as I had made it out to be in my mind. Here's the best one that I was able to lay down this go around. It looks good to me other than the small divots? Any feedback would be greatly appreciated!

After I felt pretty confident with the coupons that I had, I attempted to go live action with my outer wheel house. I had a nice tight fit up and this run only took a small amount of filler at the end.

These were my settings. I watched several youtube videos on what people are running for settings and this was just what I came up with based on several that I watched. Again, feel free to critique.

Cheers,
Ryan
#71
Iíve found some good Tig welding videos on YouTube. I donít do it enough to retain what they give for pointers. You Tube is great for DIY
#72
TECH Fanatic
Thread Starter
iTrader: (27)
I feel like this weekend I made a huge step forward with the metal work. I've been working diligently this week and Sunday I was able to sit back and enjoy my work. Earlier in the week, I had a grinding session to finally knock down the welds on the inside and bottom side of the rear floor pans. I hate grinding on my back under a car... I've tried in the past to grind my butt welds flush with the panels, but for whatever reason I usually end up doing more harm than it's worth. So I just knocked them down because at the end of the day it's going to be covered in carpet. I spent more time on the bottom side since that will be more likely to be seen.


All patched up and ready to move onto the next step. I'm leaving that for now as I want to coat it with POR15.

The wheel well is now mocked up for a final time and all surfaces have been sprayed with weld through primer. It was time to figure out the rear patchwork that is needed to modify a wagon wheel tub to fit a Nomad. Unfortunately the Nomad wheel tubs are not reproduced, so it's necessary to modify a wagon wheel tub to fit. I bought these a while ago, but the rear side panels that fit on either side of the spare tire well needed to be fit up. What I did was put a straight edge on them off of the car and marked where they were straight so that I could have a nice straight wheel tub.

I had to notch the panels on the end so that they sat on top of the rear brace.


Now that those panels are where they need to be, I can build off of that plane. I know that the wheel wells will be covered with something eventually, but it was important to me to get them as good as I could. Now I can test if the panels I made in the metal brake.


Next was getting an initial piece cut and mocked up to fill the hole.

Trimmed everything down closer and tighter to where they need to be.


There wasn't much to take pictures of, but it took a lot of time fitting and playing with the panels so that they were level, straight and fit on the same plane. My spot welds would sometimes shrink the metal too much and I had to cut and repeat the process. I was happy with the fitment and decided to finally spot weld the wheel well into the body. I still need to remove the cargo panel, drill spot weld holes and spray with weld through primer, so I stopped welding at the rear floor pan.


Now it's really starting to look like something. I slowly worked my way around the panels to keep the heat down and make sure that the panels weren't moving when I was welding. If they move off of the same plane from one another it will be very obvious. Once I worked my way around, I ground the welds down a little so that I could see the panel better and get a feel for the shape.


Again, I skipped around didn't get any picture of the in between process, but I worked my way around and filled the gaps in. Kept my heat spaced out and kept feeling the panel with my bare hands. Even doing this, the panel moved around, but I kept experimenting as I was going. I would get a little tin canning, and would try to add more heat to the side that looked like it needed to be shrunk. I was surprised that it worked to significantly reduced the tin canning it had at one point. Also kept my grinding wheel moving. I used a 36 grit flap disk for the first pass and stayed moving. I read an article that sometimes it's actually the grinding after the welding that can cause the panels to warp. Then I swapped to a 120 grit flap disk and tried to smooth off the panel without taking off too much of the original panels and thinning them out. I coated all the bare metal in an etch primer followed by a few coats of satin black. I'm very pleased with how it all turned out, although the satin is more glossy than I was hoping for. May hit it with a flat black.

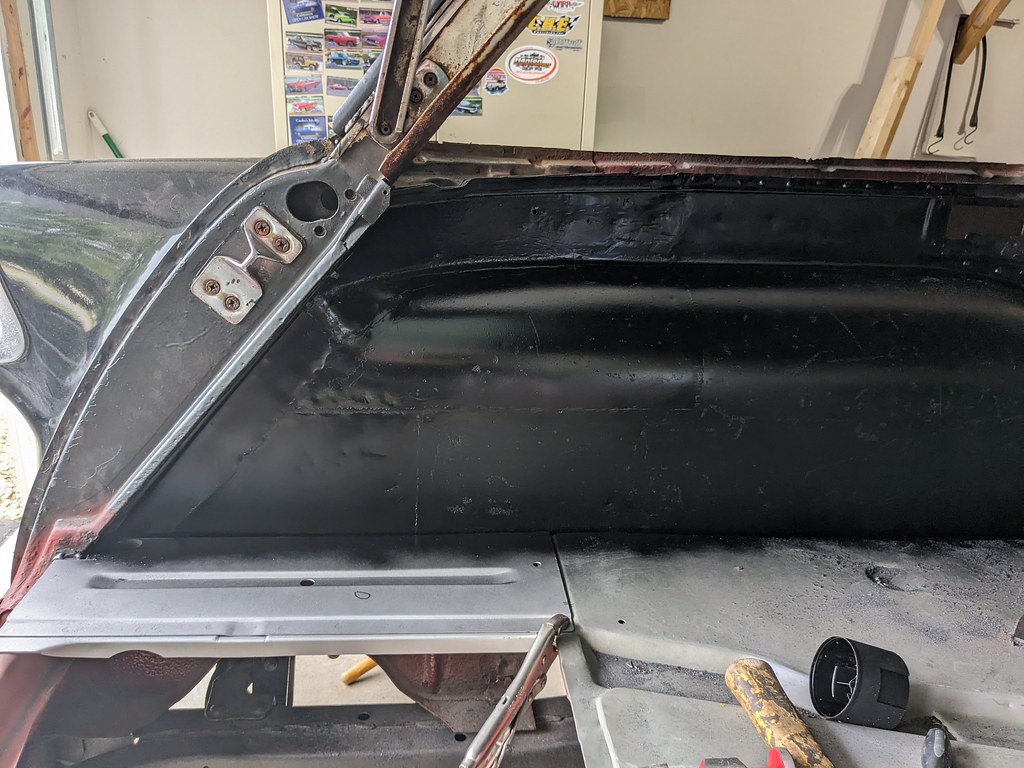
This took way longer than I had initially thought, due to some surprise previous repairs that needed to be redone, but I'm happy with the results. I'm hoping that the second side is going to go much faster since it is in better shape than the driver's side. Once I'm done with the inner wheel wells, I'm moving towards installing the outer wheel wells.
Cheers,
Ryan


All patched up and ready to move onto the next step. I'm leaving that for now as I want to coat it with POR15.

The wheel well is now mocked up for a final time and all surfaces have been sprayed with weld through primer. It was time to figure out the rear patchwork that is needed to modify a wagon wheel tub to fit a Nomad. Unfortunately the Nomad wheel tubs are not reproduced, so it's necessary to modify a wagon wheel tub to fit. I bought these a while ago, but the rear side panels that fit on either side of the spare tire well needed to be fit up. What I did was put a straight edge on them off of the car and marked where they were straight so that I could have a nice straight wheel tub.

I had to notch the panels on the end so that they sat on top of the rear brace.


Now that those panels are where they need to be, I can build off of that plane. I know that the wheel wells will be covered with something eventually, but it was important to me to get them as good as I could. Now I can test if the panels I made in the metal brake.


Next was getting an initial piece cut and mocked up to fill the hole.

Trimmed everything down closer and tighter to where they need to be.


There wasn't much to take pictures of, but it took a lot of time fitting and playing with the panels so that they were level, straight and fit on the same plane. My spot welds would sometimes shrink the metal too much and I had to cut and repeat the process. I was happy with the fitment and decided to finally spot weld the wheel well into the body. I still need to remove the cargo panel, drill spot weld holes and spray with weld through primer, so I stopped welding at the rear floor pan.


Now it's really starting to look like something. I slowly worked my way around the panels to keep the heat down and make sure that the panels weren't moving when I was welding. If they move off of the same plane from one another it will be very obvious. Once I worked my way around, I ground the welds down a little so that I could see the panel better and get a feel for the shape.


Again, I skipped around didn't get any picture of the in between process, but I worked my way around and filled the gaps in. Kept my heat spaced out and kept feeling the panel with my bare hands. Even doing this, the panel moved around, but I kept experimenting as I was going. I would get a little tin canning, and would try to add more heat to the side that looked like it needed to be shrunk. I was surprised that it worked to significantly reduced the tin canning it had at one point. Also kept my grinding wheel moving. I used a 36 grit flap disk for the first pass and stayed moving. I read an article that sometimes it's actually the grinding after the welding that can cause the panels to warp. Then I swapped to a 120 grit flap disk and tried to smooth off the panel without taking off too much of the original panels and thinning them out. I coated all the bare metal in an etch primer followed by a few coats of satin black. I'm very pleased with how it all turned out, although the satin is more glossy than I was hoping for. May hit it with a flat black.


This took way longer than I had initially thought, due to some surprise previous repairs that needed to be redone, but I'm happy with the results. I'm hoping that the second side is going to go much faster since it is in better shape than the driver's side. Once I'm done with the inner wheel wells, I'm moving towards installing the outer wheel wells.
Cheers,
Ryan
#73
TECH Enthusiast
Incredible amount of work in repairs but its very cool to see the progress!
The following 3 users liked this post by Mr. Black:
#74
Ryan gets **** done. No dicking around, thatís for sure. Lol
The following 2 users liked this post by Jimbo1367:
G Atsma (06-13-2023), ryeguy2006a (06-13-2023)
#75
TECH Fanatic
Thread Starter
iTrader: (27)
Haha, I love that. I told myself I can't mess around with the mechanicals, plumbing, suspension/brakes, etc. until the metal work is done. So I'm highly motivated because I really want to start building my engine and getting the wiring and brakes installed.
The following users liked this post:
Zanie (06-14-2023)
#77
Ryan- I followed you over here from the Camaro site after someone there mentioned you had the Nomad project going here. When I first found this thread, you had 4 pages of updates and hundreds of pictures, and was mightily impressed. Now, several days later, frankly, I'm disappointed. I expected to see another 4 pages of updates and several hundred more pictures since your last update 4 days ago, but...nothing. I need to see huge progress posted here every single day. At least two junkyard parts runs and a major rust repair...every single day. And pictures. Lots of pictures. I'm not a patient man, so get on with it already.
-Pat
(Seriously...awesome project, enjoying your build!)
-Pat
(Seriously...awesome project, enjoying your build!)
The following users liked this post:
ryeguy2006a (06-20-2023)
#78
TECH Fanatic
Thread Starter
iTrader: (27)
Haha, thanks Pat. I'll do better next week. 
After a huge push to get that driver's side wheel well in place. I've been slowly just planning my next step to make sure that I'm not missing anything I'll regret after welding up the panels. Before I welded in the outer wheel house panels, I wanted to make sure that I prepped all the inner structure panels while I had access to them. I also wanted to get the metal under the trim treated to hopefully prevent the panels from getting any worse. I used an oil based paint that is similar to POR-15, but I think was made by Rustoleum.

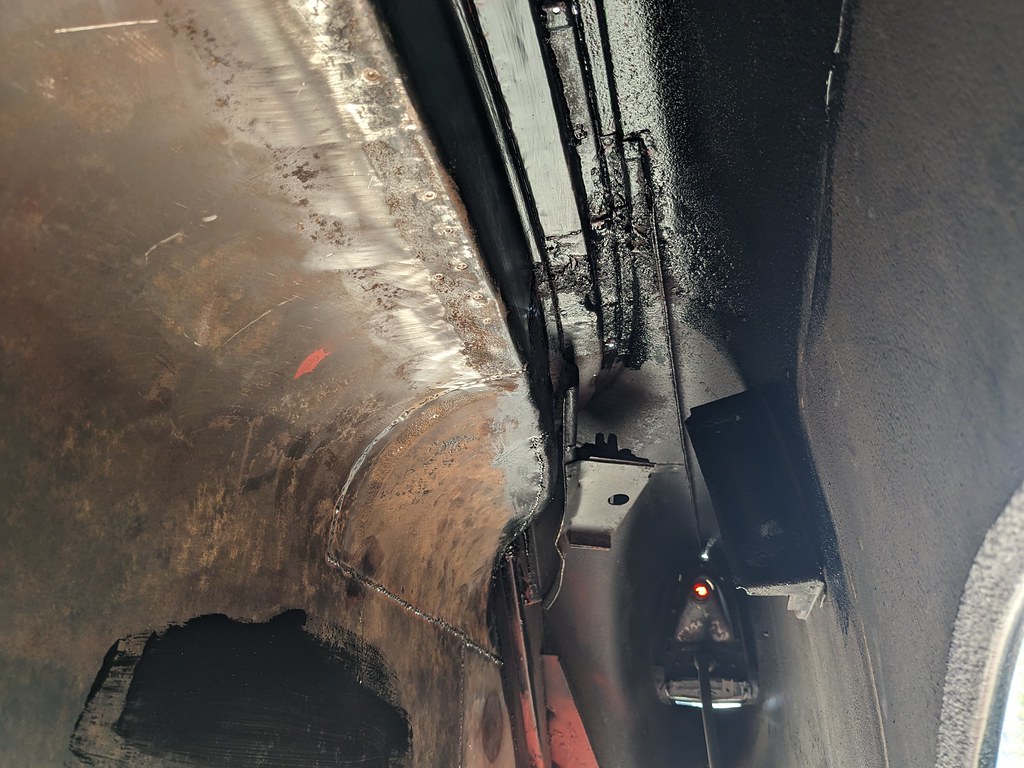
Now that this channel is repaired and prepped, I can work on reinstalling the glass and trim. I left that piece turquoise to remember the original color since the trim tag is missing on this car.


Next was prepping the original outer wheel houses. They required a few patches and adding on the Nomad lower panels. They were ready for me to install new seals which I chose to both glue and rivet. While not original, they worked really well and should seal very nicely to the quarter panels. The rear outer wheel house is shown, but I added a seal for the front outer as well.


One last test fit before I do a final weld up. Very happy with the fitment, and it will sit nice and flush with the front outer as well. Now I can pull them both, paint the top sides and final weld them in.

I'm not sure what this piece is called, but it's got a rubber bumper that stops the rear sliding glass. I re-created this little bracket and will get this installed after I get the window felts back in place. Original was in terrible condition, but I was able to get a good trace of it before it broke in half.


I started preparing the passenger side wheel house for installation. I got it all of the old under coating off of it, but still need to drill all my spot weld holes and grind down the flange where I'll need to weld on the body smooth. Hopefully I'll make a bunch more progress on that this week. Once I get both wheel wells installed, I can test fit my rear folding seat. I can't wait for that because I think that is one of the coolest parts of these old wagons.
Cheers,
Ryan

After a huge push to get that driver's side wheel well in place. I've been slowly just planning my next step to make sure that I'm not missing anything I'll regret after welding up the panels. Before I welded in the outer wheel house panels, I wanted to make sure that I prepped all the inner structure panels while I had access to them. I also wanted to get the metal under the trim treated to hopefully prevent the panels from getting any worse. I used an oil based paint that is similar to POR-15, but I think was made by Rustoleum.


Now that this channel is repaired and prepped, I can work on reinstalling the glass and trim. I left that piece turquoise to remember the original color since the trim tag is missing on this car.


Next was prepping the original outer wheel houses. They required a few patches and adding on the Nomad lower panels. They were ready for me to install new seals which I chose to both glue and rivet. While not original, they worked really well and should seal very nicely to the quarter panels. The rear outer wheel house is shown, but I added a seal for the front outer as well.


One last test fit before I do a final weld up. Very happy with the fitment, and it will sit nice and flush with the front outer as well. Now I can pull them both, paint the top sides and final weld them in.

I'm not sure what this piece is called, but it's got a rubber bumper that stops the rear sliding glass. I re-created this little bracket and will get this installed after I get the window felts back in place. Original was in terrible condition, but I was able to get a good trace of it before it broke in half.


I started preparing the passenger side wheel house for installation. I got it all of the old under coating off of it, but still need to drill all my spot weld holes and grind down the flange where I'll need to weld on the body smooth. Hopefully I'll make a bunch more progress on that this week. Once I get both wheel wells installed, I can test fit my rear folding seat. I can't wait for that because I think that is one of the coolest parts of these old wagons.
Cheers,
Ryan
#79
TECH Fanatic
Thread Starter
iTrader: (27)
Really happy with the progress that I've made over the last few weeks. My big push really paid off. I left off with doing a last final test fit of the inner wheel house. I've had it on and off quite a few times, so I knew it was ready to go, but this time it was all prepped with weld through primer.
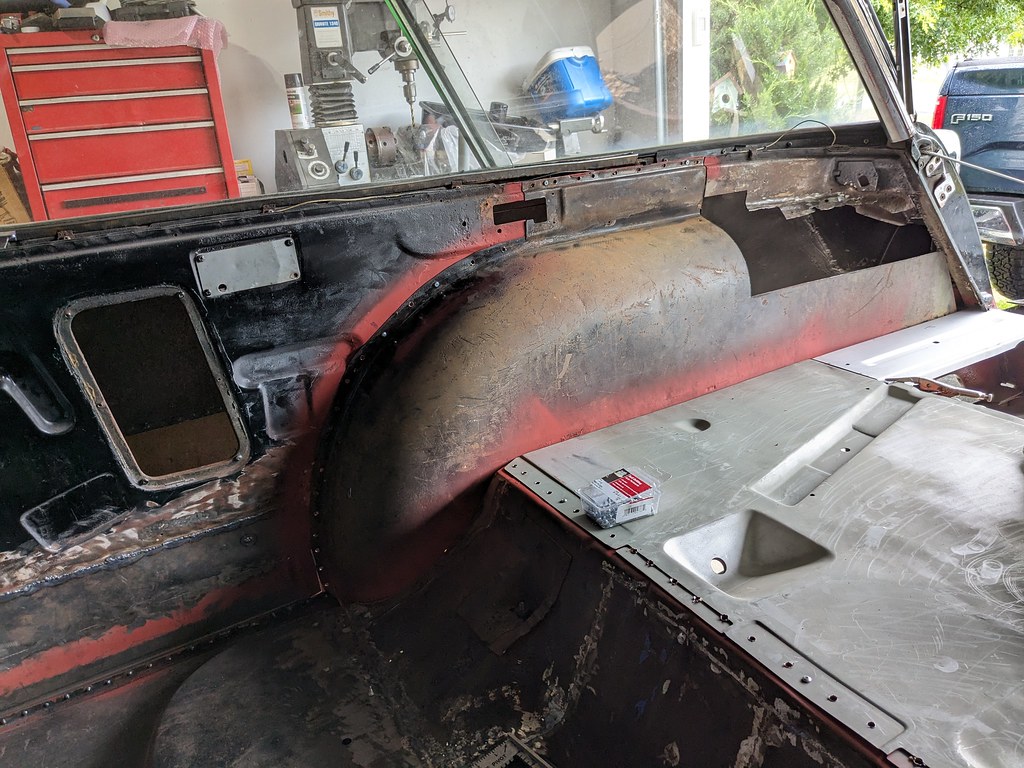
Then I started to mock up the other pieces that needed to be trimmed and fit up to complete the patches. The first picture shows the difference between the angles of the Nomad vs all other wagons. The wheel wells are unique and need to be modified since no one makes reproduction pieces.

Once I was happy with the initial trial fitment, I just started trimming the pieces to get them to come together the way I wanted. I kept a close eye on the driver's side to be sure they matched. Since I was splicing pieces the top piece wanted to dip down, so I kept my straight edge and made sure it was straight and level across the top.
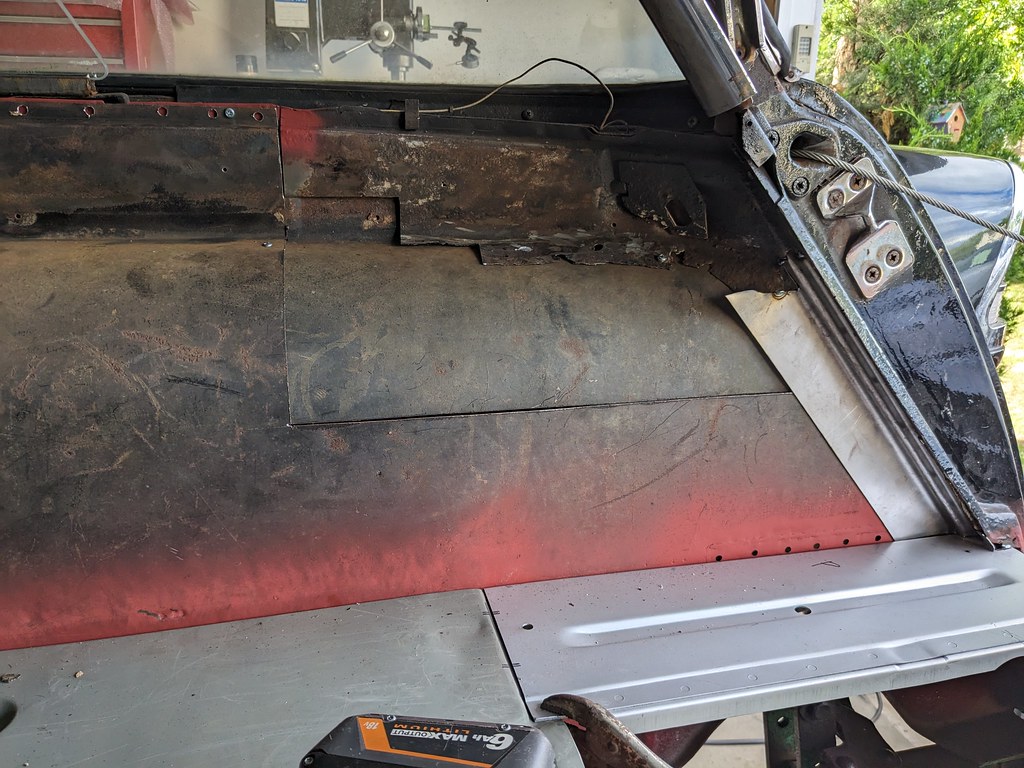

The fitment is really good at this point with all of the panels. I have been holding off on welding in the center cargo panel until I got the passenger side all mocked up. It was time now to work my way down and start filling in the spot welds.

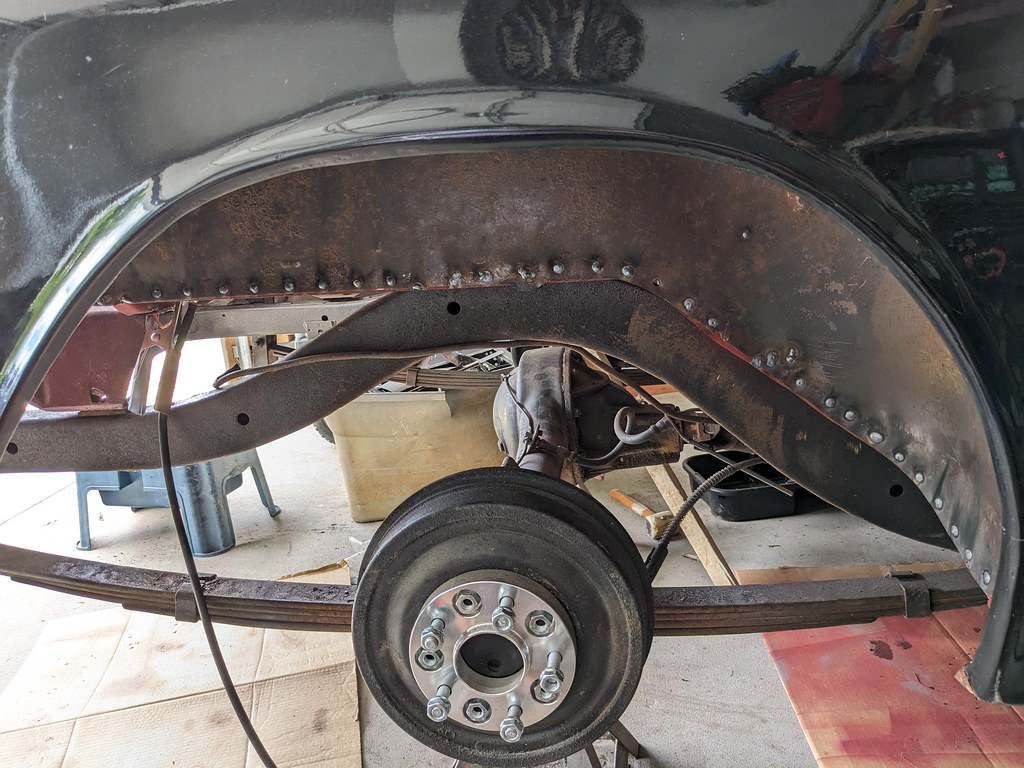
Once the cargo panel was done, I moved onto the wheel well.

I skipped a lot of steps here, but over 3-4 days I worked my way around and welded in the upper patch panel. It was a little more tricky than the driver's side, but nothing too crazy. But I forgot to take any pictures during that time, so here's the finished wheel well. The repairs are very visible, but that was done on purpose because they are going to be covered, so I didn't take the time to make it perfectly smooth.


So stoked to be to this point now. Lots more work than I had originally anticipated, but I'm very pleased with the results.


After I finished up that wheel well I decided to pull out my engine and start looking at that. I've been telling myself that I had to wait to do anything other than sheet metal work until I was done. Well I'm pretty much done now with the rear of the car now, so I'm going to get things ready. I got the boys out early and they helped me power wash the 6.0 block after I got it stripped down to the bare block.

It cleaned up really nicely and all the bearings looked great.


Then yesterday I got curious what the spare tire well would look like. It needs a little repair where the spot welds were drilled out, but I sprayed it black and set it in place. I've been going back and forth on what to do with that area. Delete the spare tire and run a larger fuel tank, or run a wagon tank and keep the spare. Now that I see it in place, I'm confident that I want to keep the spare tire and modify the wagon tank for an in-tank pump.


I'm hoping that things will start to move a little quicker now that all of the heavy fabrication work is done. I still need to install the outer wheel houses on both sides, but they will move quickly since they are just spot welded in place. I'm also going to start plugging away at things like brakes and components to mock up the engine/transmission.
Cheers,
Ryan

Then I started to mock up the other pieces that needed to be trimmed and fit up to complete the patches. The first picture shows the difference between the angles of the Nomad vs all other wagons. The wheel wells are unique and need to be modified since no one makes reproduction pieces.

Once I was happy with the initial trial fitment, I just started trimming the pieces to get them to come together the way I wanted. I kept a close eye on the driver's side to be sure they matched. Since I was splicing pieces the top piece wanted to dip down, so I kept my straight edge and made sure it was straight and level across the top.


The fitment is really good at this point with all of the panels. I have been holding off on welding in the center cargo panel until I got the passenger side all mocked up. It was time now to work my way down and start filling in the spot welds.


Once the cargo panel was done, I moved onto the wheel well.

I skipped a lot of steps here, but over 3-4 days I worked my way around and welded in the upper patch panel. It was a little more tricky than the driver's side, but nothing too crazy. But I forgot to take any pictures during that time, so here's the finished wheel well. The repairs are very visible, but that was done on purpose because they are going to be covered, so I didn't take the time to make it perfectly smooth.


So stoked to be to this point now. Lots more work than I had originally anticipated, but I'm very pleased with the results.


After I finished up that wheel well I decided to pull out my engine and start looking at that. I've been telling myself that I had to wait to do anything other than sheet metal work until I was done. Well I'm pretty much done now with the rear of the car now, so I'm going to get things ready. I got the boys out early and they helped me power wash the 6.0 block after I got it stripped down to the bare block.

It cleaned up really nicely and all the bearings looked great.


Then yesterday I got curious what the spare tire well would look like. It needs a little repair where the spot welds were drilled out, but I sprayed it black and set it in place. I've been going back and forth on what to do with that area. Delete the spare tire and run a larger fuel tank, or run a wagon tank and keep the spare. Now that I see it in place, I'm confident that I want to keep the spare tire and modify the wagon tank for an in-tank pump.


I'm hoping that things will start to move a little quicker now that all of the heavy fabrication work is done. I still need to install the outer wheel houses on both sides, but they will move quickly since they are just spot welded in place. I'm also going to start plugging away at things like brakes and components to mock up the engine/transmission.
Cheers,
Ryan
The following 5 users liked this post by ryeguy2006a:
AAIIIC (07-09-2023), jetfixrguy (07-05-2023), nleming (07-11-2023), patman2 (07-05-2023), Project GatTagO (07-05-2023)
#80
TECH Fanatic
Thread Starter
iTrader: (27)
Thanks man!
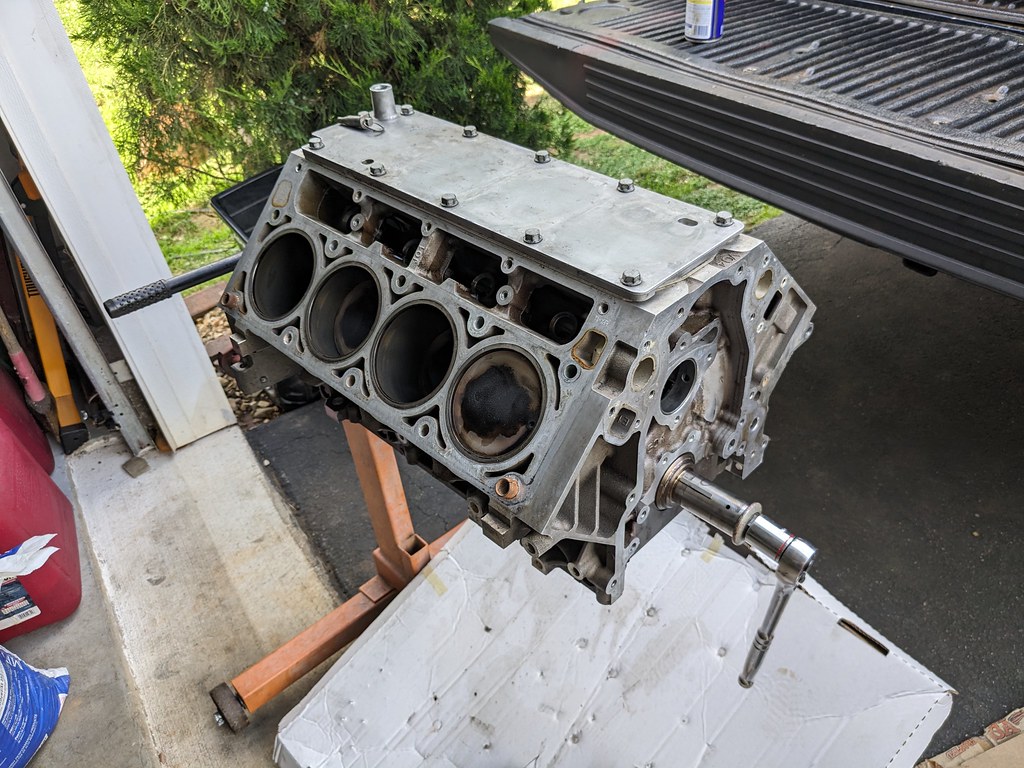
Didn't make a whole lot of progress this weekend, but moving forward none the less. I'd been on the fence about building the LS2 block, but at the end of the day I really wanted an aluminum gen4 5.3 engine. So I posted it for a few days on FB marketplace that I wanted to trade the bare block for a LC9 or similar. Some guy messaged me and said that he had a good shortblock that he pulled out of his car to go with a forged 5.7 and kept this as a spare. He sent me a video of it running and he wanted to go with something larger than the 5.7, so we swapped. Very happy with the trade. I am planning to add a turbo at some point so I'll pull the pistons and gap the rings. Probably .024/.026, and then reassemble. I kept the 6.0 rotating assembly, so if I find a good deal on an iron block, I always have the option to put together a forged piston short block. For now I'm just going to push it in the corner and get back to finishing the metal work.

Here's the finished window bracket. I think the only function this serves is a stop for the sliding side window. The original one was completely rusted, so I remade this one.

I installed the new outer seals on the outer wheel houses and now that they are cured, I wanted to get them installed. I wasn't able to finish, but the driver's side is now mocked up and ready to weld. The passenger side rear outer wheel house still needs to have the seal installed, but should be able to get to that this week.


I got a little sidetracked by a treasure I found. I was cruising FB Marketplace and found where a guy was moving and had some stuff out by the curb for free. It was some sort of home brew setup that he had lost interest in and needed to get rid of it. I saw it and immediately thought that would work perfectly for the new welding cart that I have been wanting to build. I went to go check it out and grabbed it. It's made of a heavy square tubing and the dimensions are spot on for what I need. I'm going to modify the bars to shorten it, but I'll have more than enough materials to make exactly what I want. I removed all the brew stuff and I'm hoping to make a buck on it.

I started by adding some casters on the front to get it mobile, since it was never meant to move when brewing.


That's as far as I got, but the plan is to make a holder for two tanks at the rear, middle will have some TIG Filler rod holders, tool box somewhere on the bottom and then a platform on the top for holding the welder. I'll add some hooks and clips for my helmet, hoses and cables. Very excited to get rid of the cheapy Harbor Freight unit that is very top heavy.
Hoping to get all of the welding done soon on the body and then I'll be able to re-install the side windows and trim.
Thanks,
Ryan
Didn't make a whole lot of progress this weekend, but moving forward none the less. I'd been on the fence about building the LS2 block, but at the end of the day I really wanted an aluminum gen4 5.3 engine. So I posted it for a few days on FB marketplace that I wanted to trade the bare block for a LC9 or similar. Some guy messaged me and said that he had a good shortblock that he pulled out of his car to go with a forged 5.7 and kept this as a spare. He sent me a video of it running and he wanted to go with something larger than the 5.7, so we swapped. Very happy with the trade. I am planning to add a turbo at some point so I'll pull the pistons and gap the rings. Probably .024/.026, and then reassemble. I kept the 6.0 rotating assembly, so if I find a good deal on an iron block, I always have the option to put together a forged piston short block. For now I'm just going to push it in the corner and get back to finishing the metal work.


Here's the finished window bracket. I think the only function this serves is a stop for the sliding side window. The original one was completely rusted, so I remade this one.

I installed the new outer seals on the outer wheel houses and now that they are cured, I wanted to get them installed. I wasn't able to finish, but the driver's side is now mocked up and ready to weld. The passenger side rear outer wheel house still needs to have the seal installed, but should be able to get to that this week.


I got a little sidetracked by a treasure I found. I was cruising FB Marketplace and found where a guy was moving and had some stuff out by the curb for free. It was some sort of home brew setup that he had lost interest in and needed to get rid of it. I saw it and immediately thought that would work perfectly for the new welding cart that I have been wanting to build. I went to go check it out and grabbed it. It's made of a heavy square tubing and the dimensions are spot on for what I need. I'm going to modify the bars to shorten it, but I'll have more than enough materials to make exactly what I want. I removed all the brew stuff and I'm hoping to make a buck on it.

I started by adding some casters on the front to get it mobile, since it was never meant to move when brewing.


That's as far as I got, but the plan is to make a holder for two tanks at the rear, middle will have some TIG Filler rod holders, tool box somewhere on the bottom and then a platform on the top for holding the welder. I'll add some hooks and clips for my helmet, hoses and cables. Very excited to get rid of the cheapy Harbor Freight unit that is very top heavy.
Hoping to get all of the welding done soon on the body and then I'll be able to re-install the side windows and trim.
Thanks,
Ryan
The following 5 users liked this post by ryeguy2006a:
JKEY (07-11-2023), Mr. Black (07-11-2023), nleming (07-11-2023), patman2 (07-10-2023), Project GatTagO (07-10-2023)

