

Madaguy 1955 Nomad Build


That sounds like a lot of work and possibility for mistakes when reinstalling the pins, but maybe less work than trying to unplug all connectors and fish through the grommet on the engine side. didn't think about grommets when getting the Jag running and just ran the harness through 2 holes in the firewall. Trying to figure out an easy way to install grommets without having to uninstall or depin everything. I see they have those bolt-together grommets but not sure if it'll work for my application.


That sounds like a lot of work and possibility for mistakes when reinstalling the pins, but maybe less work than trying to unplug all connectors and fish through the grommet on the engine side. didn't think about grommets when getting the Jag running and just ran the harness through 2 holes in the firewall. Trying to figure out an easy way to install grommets without having to uninstall or depin everything. I see they have those bolt-together grommets but not sure if it'll work for my application.
Andrew

Thread Starter
Joined: Apr 2012
Posts: 2,171
Likes: 716
From: Ruckersville, VA
Yes, this is a 1 piece grommet. It was $15 bucks on Summit and is supposed to fit the 2.5" hole that I drilled in my firewall. I too made the mistake of not installing the grommet first, but I'm just going to unplug everything from the engine side and snake it through the grommet. It will be time consuming, but will be a much cleaner look. The biggest PITA will be the head grounds since they are on the back side of the engine.
Thread Starter
Joined: Apr 2012
Posts: 2,171
Likes: 716
From: Ruckersville, VA
I like when I can install clean parts! All the parking brake parts and hardware were in great shape, so I just had to clean them up and paint.

Then I had to figure out how it all went back together. Thankfully there are many diagrams online and I was able to get if figured out pretty quickly. I put in the new front parking brake cable, new cable guide rollers/hardware and lubricated the parking brake handle. I was worried that the transmission crossmember that I installed would rub, but it clears by about 1/4".


I removed the exhaust to gain access to the lower parking brake cable guide and also because I never installed the gaskets. While I had them out, I painted them with some high temp flat black. Probably will still burn off, but since it's mild steel I thought it may give it a little more protection than leaving it bare.

It was a quick update, but pretty excited to have functional parking brakes now. That was a bigger worry for me since that's an item on the inspection list and I'm sure they'll check. Just need to get my horn working, wire up headlights, add an exhaust hanger, and install wiper motor/arms. Once those are done, I can schedule an inspection.
Cheers,
Ryan
Then I had to figure out how it all went back together. Thankfully there are many diagrams online and I was able to get if figured out pretty quickly. I put in the new front parking brake cable, new cable guide rollers/hardware and lubricated the parking brake handle. I was worried that the transmission crossmember that I installed would rub, but it clears by about 1/4".
I removed the exhaust to gain access to the lower parking brake cable guide and also because I never installed the gaskets. While I had them out, I painted them with some high temp flat black. Probably will still burn off, but since it's mild steel I thought it may give it a little more protection than leaving it bare.
It was a quick update, but pretty excited to have functional parking brakes now. That was a bigger worry for me since that's an item on the inspection list and I'm sure they'll check. Just need to get my horn working, wire up headlights, add an exhaust hanger, and install wiper motor/arms. Once those are done, I can schedule an inspection.
Cheers,
Ryan
Thread Starter
Joined: Apr 2012
Posts: 2,171
Likes: 716
From: Ruckersville, VA
I've been busy wrapping up all of the small details needed in order to get the car ready to be 100% road legal. Next up on the list was getting the car converted over to electric wipers. The standard option was a vacuum actuator, with electric being optional. What I find very slick is that the same **** is used for both vacuum or electric. You rotate the **** on the dash and that will pull/push a cable to run the vacuum motor, but it also works to activate the electric switch. Pretty cool that it works for both and was a very easy swap.

Since I was rewiring the whole car, I wanted to make the dash easier to remove if I needed to. I added a metripack connector so I could just disconnect in the future.

The horn was pretty straight forward. I picked up a universal horn from Advanced Auto and everything was wired up correctly. I did have a little trouble getting the horn mechanism to ground properly at first, but that just needed some sanding an dielectrical grease. This 210 steering wheel I got from the JY didn't come with a center cap, but I found one on eBay in the right condition and color. It matches the wheel perfectly!


As I was testing the lights and other operations, I noticed that the headlight switch I had wasn't operating the gauge illumination. I had two switches, and since the other one worked better, I opted to use that one. However the switch was very stiff. I decided to pull it apart and inspect. The mechanism that operates the headlights is very basic, but does have lots of springs that need to be in the right spots. There was a slight bit of corrosion on the contacts, so I scuffed those up and added some dielectrical grease. It's now smooth as butter, but was a PITA to get back together correctly.

This wasn't necessary for the inspection, but I wanted to get the firewall sealed up and this was a good sized hole. This is a Haltech grommet that's made for a 2.5" hole. Fits great and makes for a much cleaner operation. I'd highly recommend buying one BEFORE you wire up the car. Makes for much less work down the road.

Lastly, I ordered a new body bushing rubber kit. Most of the body bushings were newer, but there were a handful that look to be reused originals and were very cracked and hard. Figured I'd just start with a brand new kit. It was a huge PITA to get the body squared up without a lift, but was able to get it where I was happy.

I'm also starting to think about getting the interior finalized and buttoned up. I picked up some Kilamat 80 Mil sound deadener and once that is installed I'll need to get the wheel wells covered. I bought a pair of vinyl covers from CARS, Inc. that I'll wrap the rear inner wheel wells with. I'm hoping that the sound deadener will make a big difference with how loud the interior is. Between that and running a proper tail pipe I'm hoping that it will be much quieter.

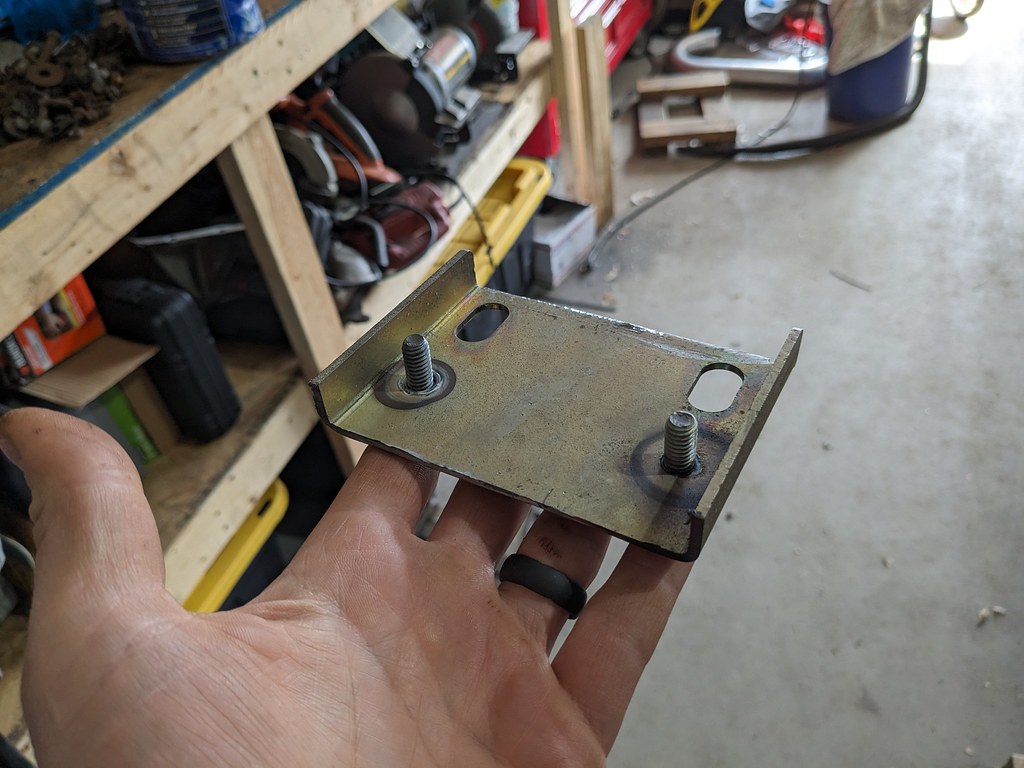
I'm not sure when, but at some point I'll want to install A/C and found this bracket used for a fantastic price. Should make building a custom bracket significantly easier.

I bought a new union to replace the one that I bought a few weeks ago and while I was inspecting it, I noticed that there was a large burr inside. Just a reminder to always check your new parts.

I picked up a second regulator for my welder specifically for Argon. I had been swapping back and forth, but my welder has two ports for MIG and TIG so you can run two different gasses. So I wanted to take advantage of the one specific for TIG and bought this regulator with two separate outputs. Now I'll be able to back purge when I'm welding stainless so there won't be any sugaring on the backside when I build an exhaust next go around.

My punch list is now down to just a few items and I'm getting really anxious to get this car out on the highway. Right now I need to figure out the leaking transmission cooler fittings. I really just want to find a bandaid solution so that it will stop leaking on the garage floor. The radiator that's currently installed works find and doesn't leak, but I want to figure out something different so that I can use the Gen6 Camaro fan which would mean a new radiator. I don't want to fab up cooler brackets and route the lines knowing that I'll change it soon. So for now, I'll just keep an eye on the trans temps.
Cheers,
Ryan
Since I was rewiring the whole car, I wanted to make the dash easier to remove if I needed to. I added a metripack connector so I could just disconnect in the future.
The horn was pretty straight forward. I picked up a universal horn from Advanced Auto and everything was wired up correctly. I did have a little trouble getting the horn mechanism to ground properly at first, but that just needed some sanding an dielectrical grease. This 210 steering wheel I got from the JY didn't come with a center cap, but I found one on eBay in the right condition and color. It matches the wheel perfectly!
As I was testing the lights and other operations, I noticed that the headlight switch I had wasn't operating the gauge illumination. I had two switches, and since the other one worked better, I opted to use that one. However the switch was very stiff. I decided to pull it apart and inspect. The mechanism that operates the headlights is very basic, but does have lots of springs that need to be in the right spots. There was a slight bit of corrosion on the contacts, so I scuffed those up and added some dielectrical grease. It's now smooth as butter, but was a PITA to get back together correctly.
This wasn't necessary for the inspection, but I wanted to get the firewall sealed up and this was a good sized hole. This is a Haltech grommet that's made for a 2.5" hole. Fits great and makes for a much cleaner operation. I'd highly recommend buying one BEFORE you wire up the car. Makes for much less work down the road.
Lastly, I ordered a new body bushing rubber kit. Most of the body bushings were newer, but there were a handful that look to be reused originals and were very cracked and hard. Figured I'd just start with a brand new kit. It was a huge PITA to get the body squared up without a lift, but was able to get it where I was happy.
I'm also starting to think about getting the interior finalized and buttoned up. I picked up some Kilamat 80 Mil sound deadener and once that is installed I'll need to get the wheel wells covered. I bought a pair of vinyl covers from CARS, Inc. that I'll wrap the rear inner wheel wells with. I'm hoping that the sound deadener will make a big difference with how loud the interior is. Between that and running a proper tail pipe I'm hoping that it will be much quieter.
I'm not sure when, but at some point I'll want to install A/C and found this bracket used for a fantastic price. Should make building a custom bracket significantly easier.
I bought a new union to replace the one that I bought a few weeks ago and while I was inspecting it, I noticed that there was a large burr inside. Just a reminder to always check your new parts.
I picked up a second regulator for my welder specifically for Argon. I had been swapping back and forth, but my welder has two ports for MIG and TIG so you can run two different gasses. So I wanted to take advantage of the one specific for TIG and bought this regulator with two separate outputs. Now I'll be able to back purge when I'm welding stainless so there won't be any sugaring on the backside when I build an exhaust next go around.
My punch list is now down to just a few items and I'm getting really anxious to get this car out on the highway. Right now I need to figure out the leaking transmission cooler fittings. I really just want to find a bandaid solution so that it will stop leaking on the garage floor. The radiator that's currently installed works find and doesn't leak, but I want to figure out something different so that I can use the Gen6 Camaro fan which would mean a new radiator. I don't want to fab up cooler brackets and route the lines knowing that I'll change it soon. So for now, I'll just keep an eye on the trans temps.
Cheers,
Ryan
Thread Starter
Joined: Apr 2012
Posts: 2,171
Likes: 716
From: Ruckersville, VA
Thanks man, I appreciate it!! My hope is that a few years down the road that this car will be receiving an aftermarket chassis from Nerd Rods. 
HUGE update for me. I've been consistently plugging away at getting this car ready for the open road. It's one thing going around the neighborhood, but another thing entirely to get the car up to 55+ on a highway. After reviewing the options at Virginia DMV, I came to realize that I should have registered my car using Antique plates rather than a regular registration when I originally bought the car. Antique plates have no annual inspection requirements and a one time registration fee, so I'm much better off with that option. There are some restrictions about where you can drive, but from what I understand they are very hard to enforce. So once I re-registered with the new plates, I was free to get the car out on the open road and do some testing! My parents came down to VA to visit for the weekend, and I really wanted to take my Dad with me on the maiden voyage out on the open road. They came into town and I got him right to work. We buttoned up a few things that I hadn't gotten to and we were able to drive about a mile up the road and back to get gas!

My dad took some unflattering photos of me haha. While I look irritated, inside I was stoked to be out and driving.


The EFI really benefitted from getting up to temperature and out on the road. It was stalling quite a bit on gear change and hard hot starts, but afterwards it cleaned up and was much happier. While there were tons of good that came out of the drive, my attention seems to be focused on the things I want to fix. Pulls hard to the right, terrible body roll (no sway bars or rear shocks), tons of rattles, louder inside than outside of the car (no door panels or sound deadener), and the worst part is I think it sounds like a truck... I've got a lot of theories as to why that could be, but I'd be open to suggestions that could help. Stock manifolds, 2.5" pipes Y into single 3" and a Walker QuietFlow SS muffler. Sounds great at idle.
Overall the first drive was a huge success and I can't wait to get the interior back together and work out all the bugs.
Sunday afternoon I got out and started tucking wires and getting the dash back together. Looks so much better. Anyone know what vehicle that "Nomad" emblem came from? While it's not original, I really like how it looks and am keeping it!


I bought some seam sealer a few days ago and will be going through the floors to seal up any spots that I had leftover from all the panel replacement. Hopefully between that and the sound deadener I'll be able to seal up and quiet down the interior.
Cheers,
Ryan
HUGE update for me. I've been consistently plugging away at getting this car ready for the open road. It's one thing going around the neighborhood, but another thing entirely to get the car up to 55+ on a highway. After reviewing the options at Virginia DMV, I came to realize that I should have registered my car using Antique plates rather than a regular registration when I originally bought the car. Antique plates have no annual inspection requirements and a one time registration fee, so I'm much better off with that option. There are some restrictions about where you can drive, but from what I understand they are very hard to enforce. So once I re-registered with the new plates, I was free to get the car out on the open road and do some testing! My parents came down to VA to visit for the weekend, and I really wanted to take my Dad with me on the maiden voyage out on the open road. They came into town and I got him right to work. We buttoned up a few things that I hadn't gotten to and we were able to drive about a mile up the road and back to get gas!
My dad took some unflattering photos of me haha. While I look irritated, inside I was stoked to be out and driving.
The EFI really benefitted from getting up to temperature and out on the road. It was stalling quite a bit on gear change and hard hot starts, but afterwards it cleaned up and was much happier. While there were tons of good that came out of the drive, my attention seems to be focused on the things I want to fix. Pulls hard to the right, terrible body roll (no sway bars or rear shocks), tons of rattles, louder inside than outside of the car (no door panels or sound deadener), and the worst part is I think it sounds like a truck... I've got a lot of theories as to why that could be, but I'd be open to suggestions that could help. Stock manifolds, 2.5" pipes Y into single 3" and a Walker QuietFlow SS muffler. Sounds great at idle.
Overall the first drive was a huge success and I can't wait to get the interior back together and work out all the bugs.
Sunday afternoon I got out and started tucking wires and getting the dash back together. Looks so much better. Anyone know what vehicle that "Nomad" emblem came from? While it's not original, I really like how it looks and am keeping it!
I bought some seam sealer a few days ago and will be going through the floors to seal up any spots that I had leftover from all the panel replacement. Hopefully between that and the sound deadener I'll be able to seal up and quiet down the interior.
Cheers,
Ryan

Thread Starter
Joined: Apr 2012
Posts: 2,171
Likes: 716
From: Ruckersville, VA
Thread Starter
Joined: Apr 2012
Posts: 2,171
Likes: 716
From: Ruckersville, VA
That could very well be the case and in that event, I'll have to just live with it. That exhaust is my short term exhaust because in the not too distant future, I'll be modifying it to swap on a turbo log manifold. 
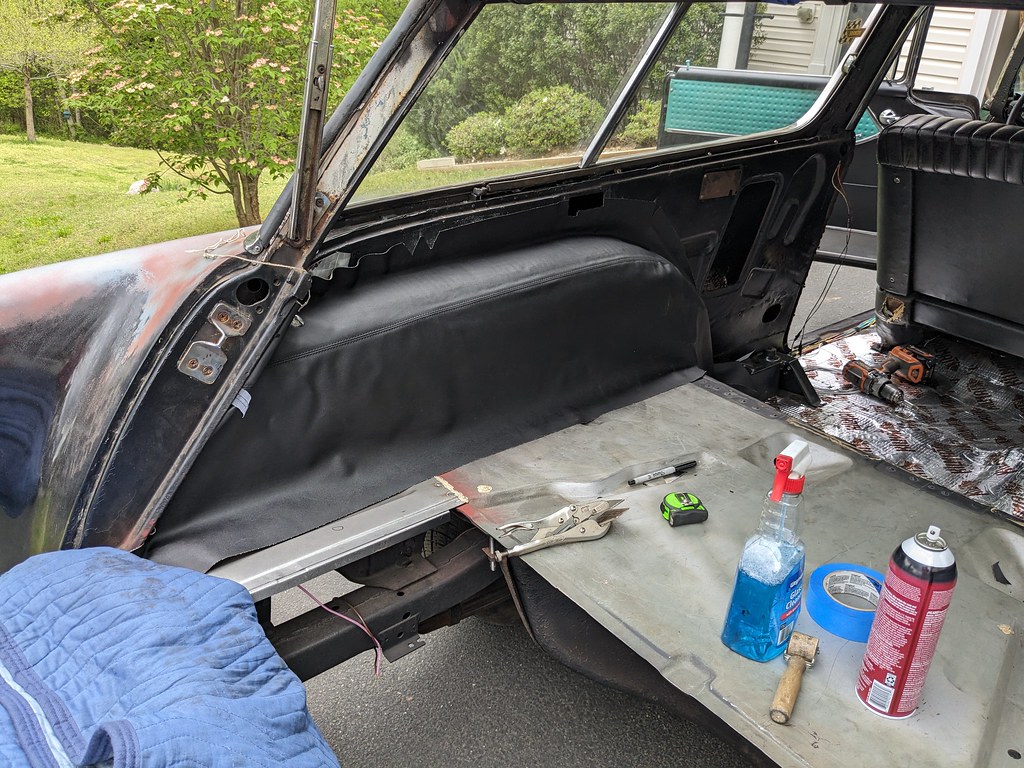
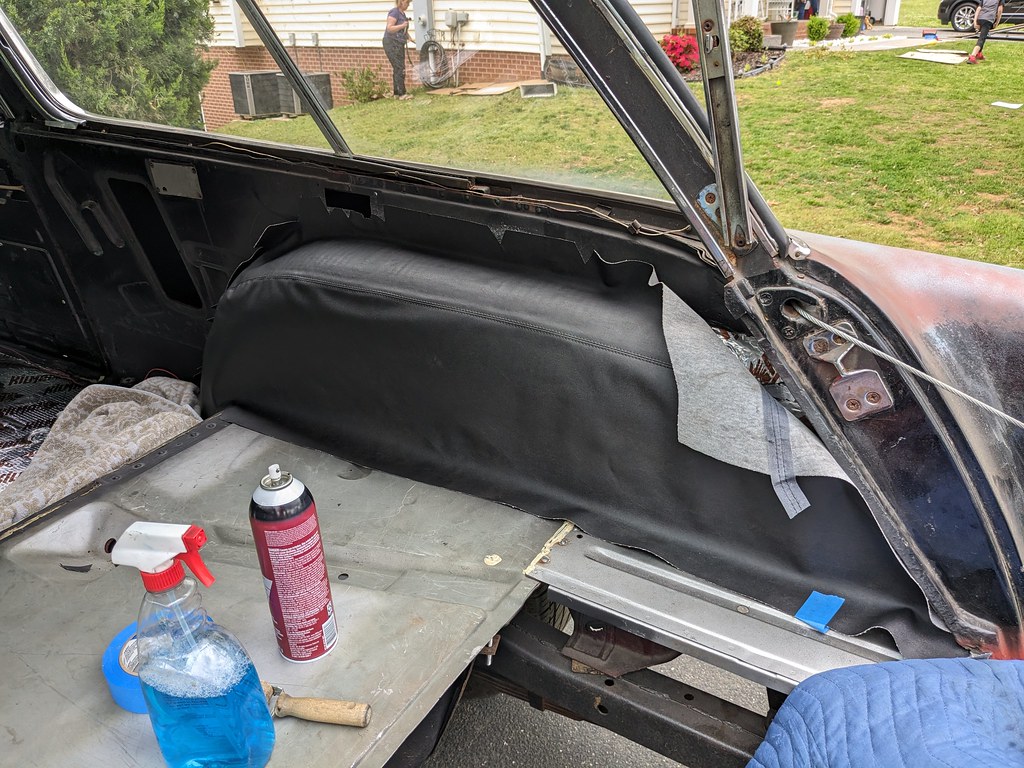
My sound deadener came in a few weeks ago, but am just now to the point where I am ready to install. Before I laid down the deadener, I bought a tube of seam sealer to seal up all of the spots where I had to replace metal. That should help keep the fumes and occasional rain out of the car. I also sanded down the floors and cleaned up any oil/grease spots.

I got the first few pieces started and my youngest son wanted to help with the roller, so he got right in there! He was bored after a few minutes, but glad he was able to help me again. I always show my boys what I'm doing and see if they want to help.


It's such a simple and relatively quick task, but is very satisfying when you step back to check your work.

I'm in the process of modifying the front seat so I can lower it and move it backwards. Wrapping that up shortly so that will be nice sitting in a more comfortable position.
Cheers,
Ryan
My sound deadener came in a few weeks ago, but am just now to the point where I am ready to install. Before I laid down the deadener, I bought a tube of seam sealer to seal up all of the spots where I had to replace metal. That should help keep the fumes and occasional rain out of the car. I also sanded down the floors and cleaned up any oil/grease spots.
I got the first few pieces started and my youngest son wanted to help with the roller, so he got right in there! He was bored after a few minutes, but glad he was able to help me again. I always show my boys what I'm doing and see if they want to help.
It's such a simple and relatively quick task, but is very satisfying when you step back to check your work.
I'm in the process of modifying the front seat so I can lower it and move it backwards. Wrapping that up shortly so that will be nice sitting in a more comfortable position.
Cheers,
Ryan
Thread Starter
Joined: Apr 2012
Posts: 2,171
Likes: 716
From: Ruckersville, VA
I hope so too and I'm also looking forward to a great driving summer!
I finished my seat modification project last night. I learned recently that the front bench seat that I picked up was unfortunately not a 55-56 split bench seat, but rather a 53-54 Bel-Air seat. While I was a little disappointed, it all made sense why it never quite fit right in the car. It looks very similar so I decided that I'm just going to run with it. The seat sits too high and forward in the car as it is, so my plan is to drill a few new holes to relocate the rear mounts, build extensions for the front to bolt down and the biggest... notch the front and rear bracing to sit down lower.
I took some basic measurements and just went for it. Here's basically what I wanted to create, and just improvised.


I had some leftover 5/8" rod from my shifter project and bent it into an arch roughly the size of what I needed and confirmed it was the same radius as the trans hump. I welded the rod in first, then cut out the brace to keep the original shape.

Then I got busy and forgot to take pictures. I added a second rod parallel to the first rod with a cross brace in between. I drilled out the spot welds on the chunk of the seat frame I cut out and used the top piece for re-attaching the seat upholstery to. I had to notch the center support and re-bend it so that it would also be raised a bit. (I'll later discover that I have to notch it further and relocate the back higher as it was still hitting the trans hump.)


I used this as an opportunity to practice with my TIG welder. One reason is that I need the practice, and two is that as old as the seat I needed to reduce the amount of sparks thrown. Nice thing with the TIG welder is that when done correctly there are few if any sparks. I've found that if you don't clean the pieces 100%, that it will spatter a small amount. I still have a ways to go, but I'm happy with my improvements.

I again got busy and didn't take pictures, but here's the final piece. You can see that the center piece is quite a bit higher than the other pictures, and I also notched the center of the back frame. It was enough to get the seat to fit without contacting the transmission hump and should given enough room for carpet too.


With the seat modifications out of the way, it was on to the seat mounts. I dug through my metal pile and found a really cool bracket that had holes that lined up perfectly with the original seat mounts. I just had to figure out how I wanted to bolt the original style seat mounts to the plates. I came up with the idea of welding some studs that would allow me to bolt them down.

Little more TIG practice.

Here it is test fit. This was prior to me painting the sliders.

The overall setback is about 2" back and 3" down. Now the gas/brake pedal and steering wheel are at a very comfortable position. I have tons of head room now and I'm really excited to take the car out for a drive to compare.
Before:

After:

Next up is laying down the Kilamat on the wheel wells so that I can wrap them with the Vinyl covers. Really excited to see those installed!
Cheers,
Ryan
Thread Starter
Joined: Apr 2012
Posts: 2,171
Likes: 716
From: Ruckersville, VA
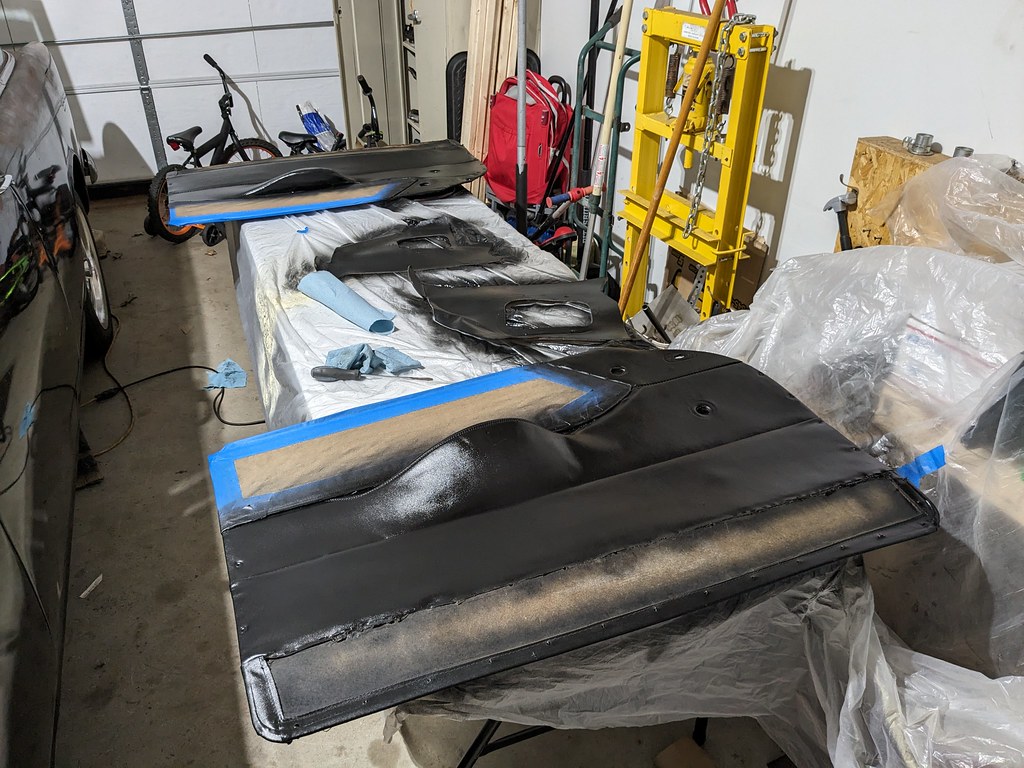
I've been plugging away getting the car prepped to start installing the interior panels. At the recommendation of many tri-five wagon folks, I've wrapped the rear wheel wells in sound deadener. I'm also hoping that this will fill in any small dents/imperfections that they had. I'm going to run over them a few more times with a larger roller before I glue down the vinyl covers.

It's very rough test fit, but I couldn't help but throw one up just to see how it fit. I think with a lot of heat and some help I'll be able to stretch the cover for a nice fitment. My main concern is to make sure that the seam is nice and straight.

My father-in-law dropped off some parts that he wasn't using a few months ago that he removed from his 1956 Belair which included a chrome glove box door. I knew that I didn't want a chrome glove box door, but I saw a car at a local Cars & Coffee with a dash board with a ton of stickers on it. It got me thinking about the tons of stickers that I have and I could throw them on the chrome glove box so I could easily swap back and forth if I wanted/needed to. There was quite a bit of rust/pitting in the inside of the door, so I sanded that all down primed and painted it flat black.


After that dried for a few days, I pulled out my envelope full of stickers and got to work. It was fun because I brought it inside the house and the kids were coloring so we all did an arts/crafts time. I'm really happy with the way that it turned out. It definitely goes with the theme of the car.


Next up is getting my exhaust tailpipe welded up and installed. I also want to install some seatbelts and dye/clean up my interior panels before I reinstall.
Question, has anyone used vinyl dye on seats before? I'd like to dye the rear seats black on my car, but I don't want to if it can come off or start flaking. I was impressed with the dye I used on my Camaro. I accidently scratched something against it, but it held up with no peeling or damage. I had heard some people had issues with the dyed seats reactivating in the heat and it coming off on your clothes.
Cheers,
Ryan
It's very rough test fit, but I couldn't help but throw one up just to see how it fit. I think with a lot of heat and some help I'll be able to stretch the cover for a nice fitment. My main concern is to make sure that the seam is nice and straight.
My father-in-law dropped off some parts that he wasn't using a few months ago that he removed from his 1956 Belair which included a chrome glove box door. I knew that I didn't want a chrome glove box door, but I saw a car at a local Cars & Coffee with a dash board with a ton of stickers on it. It got me thinking about the tons of stickers that I have and I could throw them on the chrome glove box so I could easily swap back and forth if I wanted/needed to. There was quite a bit of rust/pitting in the inside of the door, so I sanded that all down primed and painted it flat black.
After that dried for a few days, I pulled out my envelope full of stickers and got to work. It was fun because I brought it inside the house and the kids were coloring so we all did an arts/crafts time. I'm really happy with the way that it turned out. It definitely goes with the theme of the car.
Next up is getting my exhaust tailpipe welded up and installed. I also want to install some seatbelts and dye/clean up my interior panels before I reinstall.
Question, has anyone used vinyl dye on seats before? I'd like to dye the rear seats black on my car, but I don't want to if it can come off or start flaking. I was impressed with the dye I used on my Camaro. I accidently scratched something against it, but it held up with no peeling or damage. I had heard some people had issues with the dyed seats reactivating in the heat and it coming off on your clothes.
Cheers,
Ryan
Thread Starter
Joined: Apr 2012
Posts: 2,171
Likes: 716
From: Ruckersville, VA
This last update has been sort of a messy, clean-up and painting update. I'm gearing up for my interior install and need to prepare all of my parts and panels for the installation. My car came to me with very little interior in the car, so most of what I have is a mix and match from other cars. While keeping on a budget, my goal is to get the interior to be complete and look pretty decent. Generally those two are mutually exclusive, but I'm going to do my best.
First up was to clean up the rusty roof. There was a ton of surface rust that I wanted to clean up for future installation of heat/sound deadener. I'm not sure when I'll attempt the head liner, but for now it looks pretty cool with just the black roof.

Not much to see, but I did order an 8 piece carpet kit from ACC. I ordered it from Rock Auto and will say that they had the best prices and shipping wasn't bad at all. I'm leaving it boxed up for now since it takes up much less space. I'll pull it out and let it sit in the sun before I go to install.

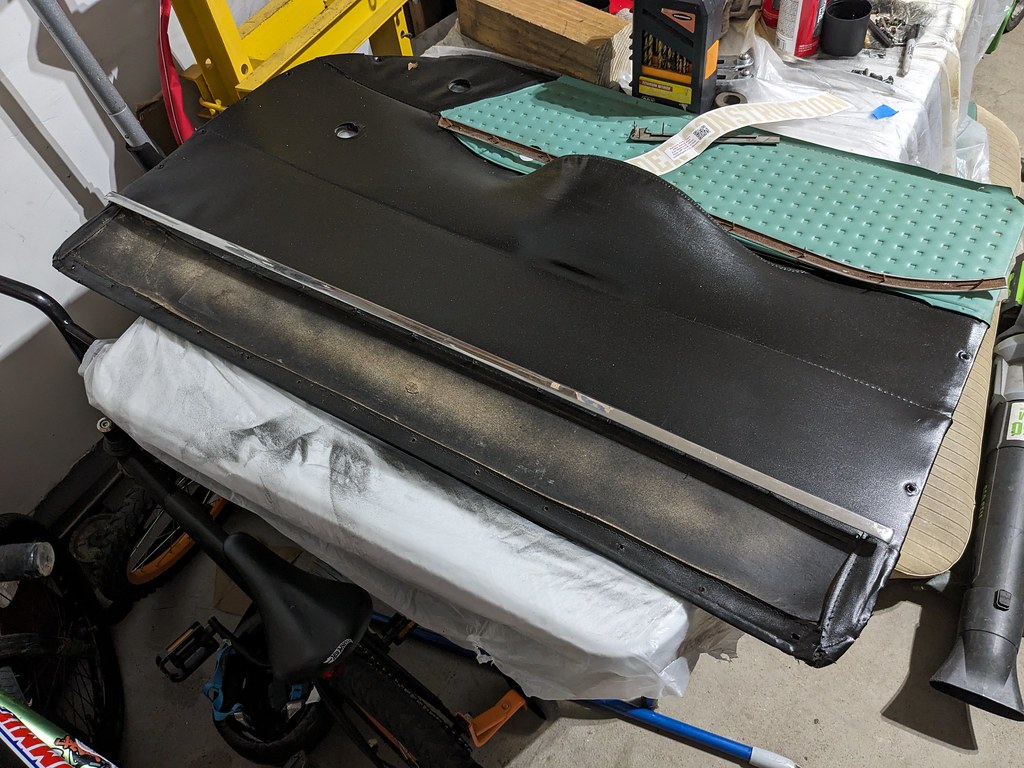
Next part is really exciting for me. I have been itching to get the interior panels that I bought from Spring Carlisle last year out and installed on the car. It's been in the box and moved around the garage for almost a year, but is finally ready to get some attention. Crazy how good of condition they are for being almost 70 years old!

I didn't notice when I bought these originally, but in the upper right side of the door panel there is a 4th hole. After some research I found out that this is for a rare factory optional remote mirror. Pretty cool, and looks like I'll need to track one down at some point, but for now I'll just make a little block off plate or something.

Got all the rest of the panels and trim set out and started to organize.

The white interior panels really isn't the style of what I'm going after, so I decided to change it. Black was never an interior or exterior option for 1955, and I've never seen another two tone black and turquoise Nomad interior. I decided to use the same SEM Vinyl dye that I used on my Camaro on these panels. I carefully masked off the turquoise and prepped the white for paint. First step was Windex and a scrub brush, followed by soap and water with a scrub brush. Then once I felt the panels were clean enough, I wiped down the white with a liberal amount of lacquer thinner soaked in a rag, then it was ready to spray! My father-in-law gave these kick panels to me too from his 1956 Bel-Air, so I used the same method and dyed these too.

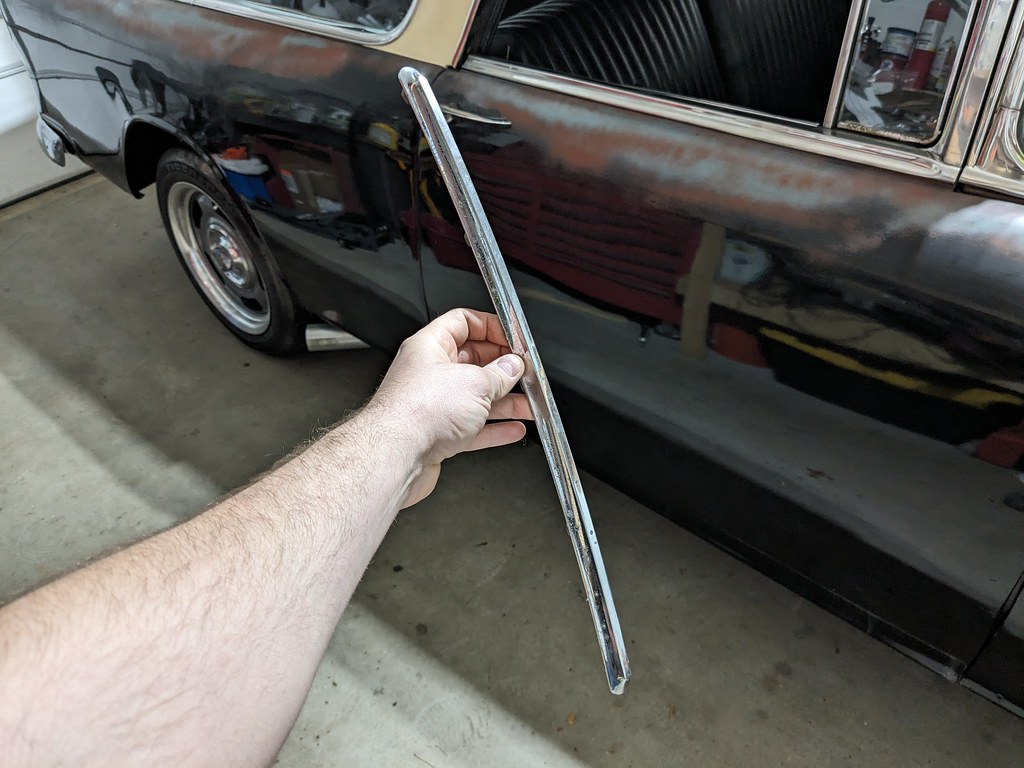
I couldn't wait to get the masking off so that I could see what it's going to look like with all the trim installed. I'm very pleased with how it's going to look. It's actually better than I had hoped. I quickly polished the trim, but the lower waffle panel needs some attention. For those that don't know, all of the stainless trim and "waffle" panel is unique to only 1955 Nomad's. Unfortunately, when I was taking inventory of the trim, I am missing the longest piece of stainless trim for the one side. Thankfully Spring Carlisle is right around the corner, and I know a few people will have them at the show.

Right now, I'm working on getting the door garnish moldings cleaned, painted and fit to the doors. I'm going to order more vinyl dye so that I can spray the rear seat bottom and back. I'll have more time removing all of the trim and brackets, but it will look so good and be worth it.
Cheers,
Ryan
First up was to clean up the rusty roof. There was a ton of surface rust that I wanted to clean up for future installation of heat/sound deadener. I'm not sure when I'll attempt the head liner, but for now it looks pretty cool with just the black roof.
Not much to see, but I did order an 8 piece carpet kit from ACC. I ordered it from Rock Auto and will say that they had the best prices and shipping wasn't bad at all. I'm leaving it boxed up for now since it takes up much less space. I'll pull it out and let it sit in the sun before I go to install.
Next part is really exciting for me. I have been itching to get the interior panels that I bought from Spring Carlisle last year out and installed on the car. It's been in the box and moved around the garage for almost a year, but is finally ready to get some attention. Crazy how good of condition they are for being almost 70 years old!
I didn't notice when I bought these originally, but in the upper right side of the door panel there is a 4th hole. After some research I found out that this is for a rare factory optional remote mirror. Pretty cool, and looks like I'll need to track one down at some point, but for now I'll just make a little block off plate or something.
Got all the rest of the panels and trim set out and started to organize.
The white interior panels really isn't the style of what I'm going after, so I decided to change it. Black was never an interior or exterior option for 1955, and I've never seen another two tone black and turquoise Nomad interior. I decided to use the same SEM Vinyl dye that I used on my Camaro on these panels. I carefully masked off the turquoise and prepped the white for paint. First step was Windex and a scrub brush, followed by soap and water with a scrub brush. Then once I felt the panels were clean enough, I wiped down the white with a liberal amount of lacquer thinner soaked in a rag, then it was ready to spray! My father-in-law gave these kick panels to me too from his 1956 Bel-Air, so I used the same method and dyed these too.
I couldn't wait to get the masking off so that I could see what it's going to look like with all the trim installed. I'm very pleased with how it's going to look. It's actually better than I had hoped. I quickly polished the trim, but the lower waffle panel needs some attention. For those that don't know, all of the stainless trim and "waffle" panel is unique to only 1955 Nomad's. Unfortunately, when I was taking inventory of the trim, I am missing the longest piece of stainless trim for the one side. Thankfully Spring Carlisle is right around the corner, and I know a few people will have them at the show.
Right now, I'm working on getting the door garnish moldings cleaned, painted and fit to the doors. I'm going to order more vinyl dye so that I can spray the rear seat bottom and back. I'll have more time removing all of the trim and brackets, but it will look so good and be worth it.
Cheers,
Ryan
Thread Starter
Joined: Apr 2012
Posts: 2,171
Likes: 716
From: Ruckersville, VA
Moving along, I was really anxious to get the door panel installed to see what it was going to look like. I was able to get the trim all polished up and installed a few nights ago. I was able to get the majority of the dents on the waffle panel popped out, but looks way better than when I started. I all the trim was polished up using Mother's Polish. That worked so well vs. the generic polish I had bought years ago from a parts store.

I realized that before I can install the door panel for good that I'd need to get the door garnish moldings installed first. They weren't in the best shape when I bought them, but I could fix that. I used a flap disk to take down all of the rusty flakes, primed with etch primer, then followed up by a few coats of high build.


I waited a few days for it to dry down completely before I tried sanding it. When I was ready I started with some 600 dry on a block to knock it down smooth, then followed that up with 600 wet sanding. I was able to get about 75% of the bumps out but when I started getting into the etch primer I stopped. Sprayed on another two medium-heavy coats of the high build, and repeated my sanding process. Worked great and got all of the spots out. Very pleased with the spray can high build. You can see the specks in the one spot that were all filled in with the second coat of high build.


Then I did a test fit with the garnish moulding and the door panel. Really cool to see it together, but also very glad that I did a test fit because the door needed tweaking as well as the garnish was twisted. Always test fit things BEFORE a final install.

I had also realized at this time that I was missing a door pull bracket. Found a nice set of used pieces on eBay and had them pretty quickly. Now that the test fit was over, I was confident that I'd be able to spray the door mouldings. I turned to my old trusty SEM Trim Black paint. I love the way this paint lays out and I think the sheen is perfect.


Then it was time for a final fitment of the re-finished door panel. So happy with the results! In 1955, you weren't able to order a black interior, so taking an original interior and re-dying it black with Turquoise accents is a cool touch. While the panels aren't in the best condition, given they are nearly 70 years old they look pretty good IMO. Plus, I'm not going for a perfect restoration just a cool reliable driver.


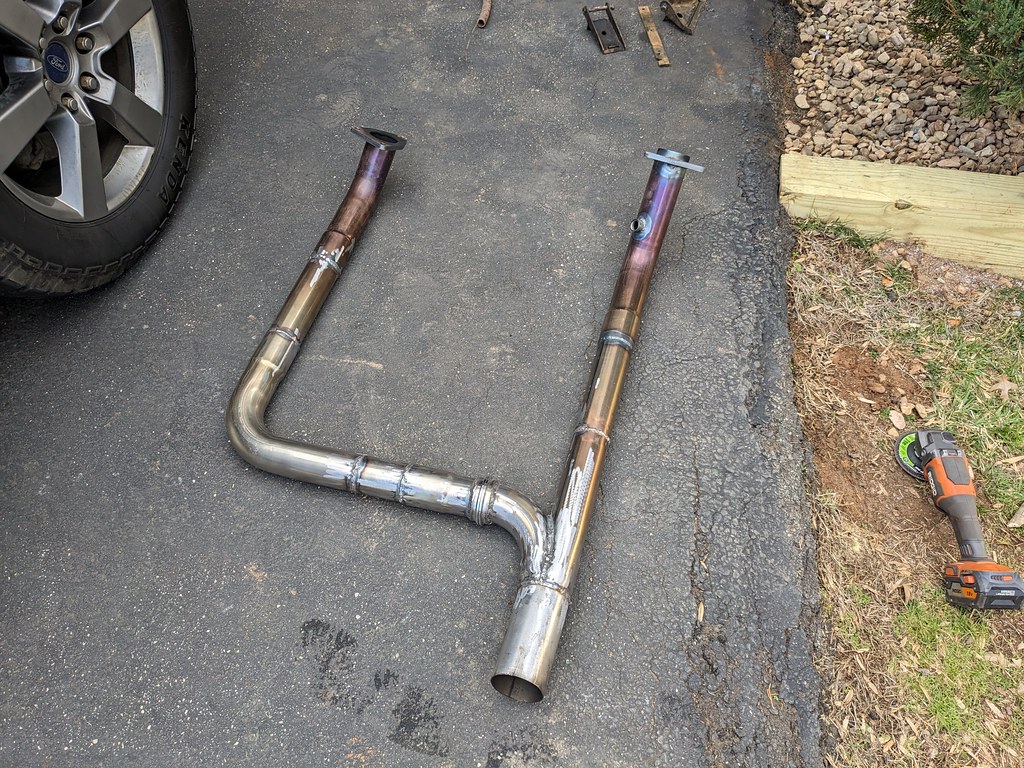
I also needed to install a tail pipe to get the exhaust out from under the car. I put together a quick side exit that will be a temporary exhaust until the time comes to add some boost.

All of this was building up to this weekend where there was a cruise-in at the local restoration shop here in Charlottesville called C'Ville Classics. I hadn't been more than a few miles up the road and back, so this was a test of how it would do a little farther from home. It was about 20 miles round trip and the car performed perfectly. Engine temps were perfect, trans shifted great, no whining from rear end, brakes performed amazing, and was significantly quieter with the added sound deadener/tailpipe combination. Now, there are a bunch of things I need to address first of which is a front end alignment, but was a great test drive.


We had a great time and the car got a ton of attention. We walked away to see the other cars and looked back and there were several people checking it out.

My son wanted a picture next to the car. They were just about as happy as I was that we were able to drive it to that show today. I can't wait to get the seats dyed and install some seatbelts so we can all go for a ride.
It was great talking to guys at the show and answering lots of questions. Of all the things on the car, the iBooster got the most questions. Lots of people had no idea what it was, or that it was some sort of ABS module. I think the best comment though was as I was leaving when a guy leaned into my window and said, "I love the car man it looks great. Well it doesn't look great, but you know what I mean, haha" That's about what I expected as a reaction from people.
Next on my short list of things to address is a small weep leak from the transmission pan, addressing the cooling fan, and front end alignment. My father-in-law is stopping down this week so that we can go to Spring Carlisle, and while he's down we are going to install the rear wheel well covers. That's really a two man job, so that will be a huge step towards getting the interior back together.
Cheers,
Ryan
I realized that before I can install the door panel for good that I'd need to get the door garnish moldings installed first. They weren't in the best shape when I bought them, but I could fix that. I used a flap disk to take down all of the rusty flakes, primed with etch primer, then followed up by a few coats of high build.
I waited a few days for it to dry down completely before I tried sanding it. When I was ready I started with some 600 dry on a block to knock it down smooth, then followed that up with 600 wet sanding. I was able to get about 75% of the bumps out but when I started getting into the etch primer I stopped. Sprayed on another two medium-heavy coats of the high build, and repeated my sanding process. Worked great and got all of the spots out. Very pleased with the spray can high build. You can see the specks in the one spot that were all filled in with the second coat of high build.
Then I did a test fit with the garnish moulding and the door panel. Really cool to see it together, but also very glad that I did a test fit because the door needed tweaking as well as the garnish was twisted. Always test fit things BEFORE a final install.
I had also realized at this time that I was missing a door pull bracket. Found a nice set of used pieces on eBay and had them pretty quickly. Now that the test fit was over, I was confident that I'd be able to spray the door mouldings. I turned to my old trusty SEM Trim Black paint. I love the way this paint lays out and I think the sheen is perfect.
Then it was time for a final fitment of the re-finished door panel. So happy with the results! In 1955, you weren't able to order a black interior, so taking an original interior and re-dying it black with Turquoise accents is a cool touch. While the panels aren't in the best condition, given they are nearly 70 years old they look pretty good IMO. Plus, I'm not going for a perfect restoration just a cool reliable driver.
I also needed to install a tail pipe to get the exhaust out from under the car. I put together a quick side exit that will be a temporary exhaust until the time comes to add some boost.
All of this was building up to this weekend where there was a cruise-in at the local restoration shop here in Charlottesville called C'Ville Classics. I hadn't been more than a few miles up the road and back, so this was a test of how it would do a little farther from home. It was about 20 miles round trip and the car performed perfectly. Engine temps were perfect, trans shifted great, no whining from rear end, brakes performed amazing, and was significantly quieter with the added sound deadener/tailpipe combination. Now, there are a bunch of things I need to address first of which is a front end alignment, but was a great test drive.
We had a great time and the car got a ton of attention. We walked away to see the other cars and looked back and there were several people checking it out.
My son wanted a picture next to the car. They were just about as happy as I was that we were able to drive it to that show today. I can't wait to get the seats dyed and install some seatbelts so we can all go for a ride.
It was great talking to guys at the show and answering lots of questions. Of all the things on the car, the iBooster got the most questions. Lots of people had no idea what it was, or that it was some sort of ABS module. I think the best comment though was as I was leaving when a guy leaned into my window and said, "I love the car man it looks great. Well it doesn't look great, but you know what I mean, haha" That's about what I expected as a reaction from people.
Next on my short list of things to address is a small weep leak from the transmission pan, addressing the cooling fan, and front end alignment. My father-in-law is stopping down this week so that we can go to Spring Carlisle, and while he's down we are going to install the rear wheel well covers. That's really a two man job, so that will be a huge step towards getting the interior back together.
Cheers,
Ryan

Thread Starter
Joined: Apr 2012
Posts: 2,171
Likes: 716
From: Ruckersville, VA
iBooster with the C5 brakes is a fantastic combination. Thanks again for the BBT bracket!
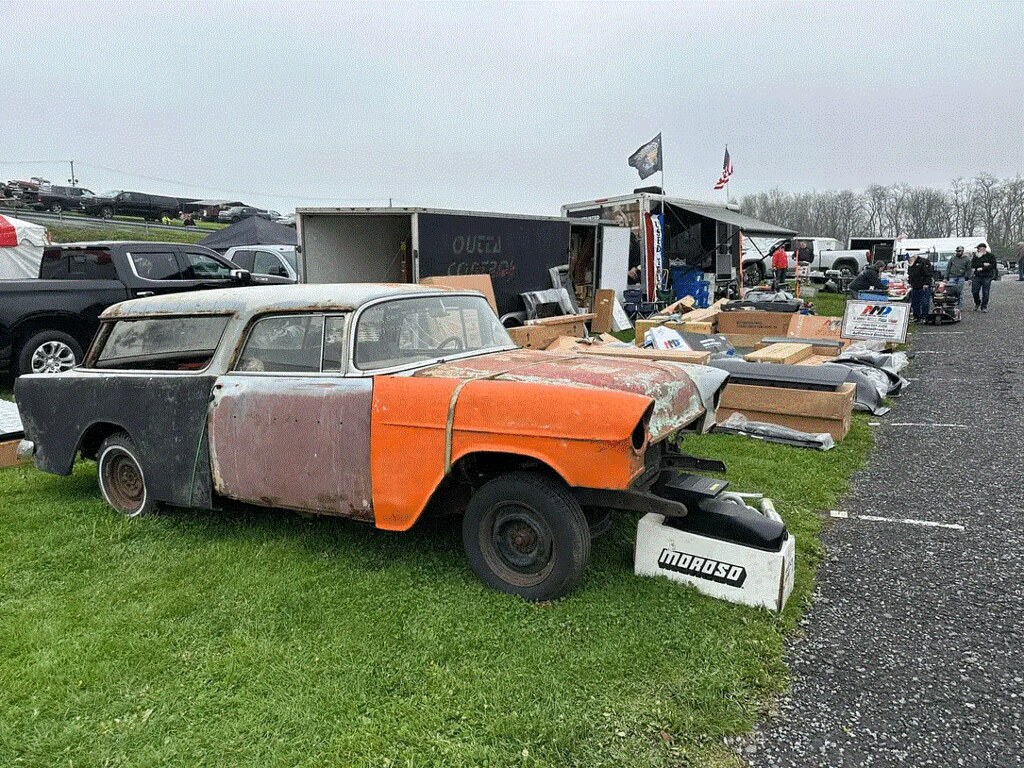
As I do every year as far back as I can remember, I've been going to the Spring Carlisle car show swap meet. It's normally a kick off for the spring, although now being further south it's actually less in bloom when I drive north to Carlisle. Plus we have the Cars and Coffee cruise in's all year round, but none the less I love going to see what all of the vendors have to offer. My father-in-law bought a 56 Belair Hardtop back in November last year so we made a plan that he would come with me this year. I had three major things that I wanted to get when I was down there; Liftgate garnish moulding, 1 remaining door panel stainless trim piece, and a Nomad roof section. I coordinated with 3 separate guys to meet me there with the parts since I didn't want to ship any of those parts. Two of the three vendors I was able to meet and purchase parts, but there was a misunderstanding and the guy with the door trim brought the wrong piece. There are two pieces of long trim that go on the top and bottom of the waffle insert. I needed the upper but he brought the lower... I was super bummed out because that was the only one that I was able to source. Nothing on forums, eBay, FB groups or FB marketplace...
Towards the end of the day we were walking past a vendor for AMD sheetmetal and he was selling a 1955 Nomad. As I'm checking it out, sure enough there's an old door panel in the back with the trim piece that I needed! So I humbly went over to the guy who owned the car, offered him a very generous price and asked multiple times if he would sell me the piece. He apologetically said no and said he would just like to keep it all together. I was super bummed out, but I figured it was worth a shot. Right about that time we went to grab lunch and shortly after it started raining. We agreed that it was time to leave, but we had to walk past that 55 Nomad and I thought what the heck, I'll ask one more time. He was busy with other customers, but once they moved on I approached him with a little smirk on my face and asked as nicely as I could one more time. He started to chuckle a little and said, "You know there's always one guy at these show's that gives me a hard time and today it's you! Let me see what piece of trim you are talking about." So I showed him what piece I needed and to my luck the other piece was missing, so it was already an incomplete set. After a little more back and forth he was able to pry it off and I couldn't take my money out quick enough. So stoked to have that piece!
The car was REALLY rough!

Here are the other parts that I picked up. Really stoked to have found a front bumper that matches my car with a bit of rust. The infamous piece of trim is in the middle, along with a liftgate garnish moulding and other misc. tailgate pieces.

I did a quick polish on it and this is where it will go. Just need to polish the rest of the trim and get it installed on the car!
The last tailgate bar to finish my set.
I bought some Nomad parts from a guy in NY when I was visiting last year, and I've kept in touch with the guy since he has 4 Nomad's! He met me at Carlisle and when I went to pay him GAVE me this roof section. He had two spare sections that came in a bunch of parts he bought and said if I can use it that he was happy. Thanks Tom. As nice as the metal is on this roof, I'd hate to see the condition that the car must have been in to give up these parts.


I didn't get many pictures from the show, but I did snag some pictures of this from a vendor. This is going to be one of the next upgrades that I'd like to do on my car, but I want to integrate the Gen6 Camaro 850 watt SPAL fan rather than the dual fans. I'll pick a radiator and work around that to build my structure.

We were beat by the time we got home, but had to at least see what the bumper looked like on the car. It's just sitting on that stool, but really changes the look of the car. So happy to have a complete front end.

While I had a second set of hands, my father in law helped me glue down the rear wheel well covers. This would have been very difficult to do by myself, especially making sure that the seam was straight. We glued down the middle section of the covers that have the straightest point to reference. That way I can come back later and pull it tight to get rid of wrinkles and that section will stay straight and I'll work off of that.

I'm really pleased with how they turned out.
We took the car out for another drive and it really is so nice that I can just turn the key and it fires right up. I'm very happy with my base tune so far. I need to smooth out my VE table and tweak some shift points, but otherwise I'm extremely happy with the way it performs. I posted after the first drive that I wasn't happy with the exhaust note, but the combination of sound deadener, more interior panels and the tail pipe has my mind changed. I'm very happy with the exhaust notes throughout the power band and it's quiet enough that I can have a comfortable conversation at 60 mph with my passengers. Just what I wanted.
Hoping to have my interior assembled and reinstalled over the next few weeks and then I can just enjoy driving it for the summer.
Cheers,
Ryan
As I do every year as far back as I can remember, I've been going to the Spring Carlisle car show swap meet. It's normally a kick off for the spring, although now being further south it's actually less in bloom when I drive north to Carlisle. Plus we have the Cars and Coffee cruise in's all year round, but none the less I love going to see what all of the vendors have to offer. My father-in-law bought a 56 Belair Hardtop back in November last year so we made a plan that he would come with me this year. I had three major things that I wanted to get when I was down there; Liftgate garnish moulding, 1 remaining door panel stainless trim piece, and a Nomad roof section. I coordinated with 3 separate guys to meet me there with the parts since I didn't want to ship any of those parts. Two of the three vendors I was able to meet and purchase parts, but there was a misunderstanding and the guy with the door trim brought the wrong piece. There are two pieces of long trim that go on the top and bottom of the waffle insert. I needed the upper but he brought the lower... I was super bummed out because that was the only one that I was able to source. Nothing on forums, eBay, FB groups or FB marketplace...
Towards the end of the day we were walking past a vendor for AMD sheetmetal and he was selling a 1955 Nomad. As I'm checking it out, sure enough there's an old door panel in the back with the trim piece that I needed! So I humbly went over to the guy who owned the car, offered him a very generous price and asked multiple times if he would sell me the piece. He apologetically said no and said he would just like to keep it all together. I was super bummed out, but I figured it was worth a shot. Right about that time we went to grab lunch and shortly after it started raining. We agreed that it was time to leave, but we had to walk past that 55 Nomad and I thought what the heck, I'll ask one more time. He was busy with other customers, but once they moved on I approached him with a little smirk on my face and asked as nicely as I could one more time. He started to chuckle a little and said, "You know there's always one guy at these show's that gives me a hard time and today it's you! Let me see what piece of trim you are talking about." So I showed him what piece I needed and to my luck the other piece was missing, so it was already an incomplete set. After a little more back and forth he was able to pry it off and I couldn't take my money out quick enough. So stoked to have that piece!
The car was REALLY rough!
Here are the other parts that I picked up. Really stoked to have found a front bumper that matches my car with a bit of rust. The infamous piece of trim is in the middle, along with a liftgate garnish moulding and other misc. tailgate pieces.
I did a quick polish on it and this is where it will go. Just need to polish the rest of the trim and get it installed on the car!
The last tailgate bar to finish my set.
I bought some Nomad parts from a guy in NY when I was visiting last year, and I've kept in touch with the guy since he has 4 Nomad's! He met me at Carlisle and when I went to pay him GAVE me this roof section. He had two spare sections that came in a bunch of parts he bought and said if I can use it that he was happy. Thanks Tom. As nice as the metal is on this roof, I'd hate to see the condition that the car must have been in to give up these parts.
I didn't get many pictures from the show, but I did snag some pictures of this from a vendor. This is going to be one of the next upgrades that I'd like to do on my car, but I want to integrate the Gen6 Camaro 850 watt SPAL fan rather than the dual fans. I'll pick a radiator and work around that to build my structure.
We were beat by the time we got home, but had to at least see what the bumper looked like on the car. It's just sitting on that stool, but really changes the look of the car. So happy to have a complete front end.
While I had a second set of hands, my father in law helped me glue down the rear wheel well covers. This would have been very difficult to do by myself, especially making sure that the seam was straight. We glued down the middle section of the covers that have the straightest point to reference. That way I can come back later and pull it tight to get rid of wrinkles and that section will stay straight and I'll work off of that.
I'm really pleased with how they turned out.
We took the car out for another drive and it really is so nice that I can just turn the key and it fires right up. I'm very happy with my base tune so far. I need to smooth out my VE table and tweak some shift points, but otherwise I'm extremely happy with the way it performs. I posted after the first drive that I wasn't happy with the exhaust note, but the combination of sound deadener, more interior panels and the tail pipe has my mind changed. I'm very happy with the exhaust notes throughout the power band and it's quiet enough that I can have a comfortable conversation at 60 mph with my passengers. Just what I wanted.
Hoping to have my interior assembled and reinstalled over the next few weeks and then I can just enjoy driving it for the summer.
Cheers,
Ryan
Find a local salvage yard and see if they have a Volt there. The Volt dual fans would work perfectly for that radiator. They are 300watts each and will work great and fit better than the Camaro fan.
Andrew
Andrew