

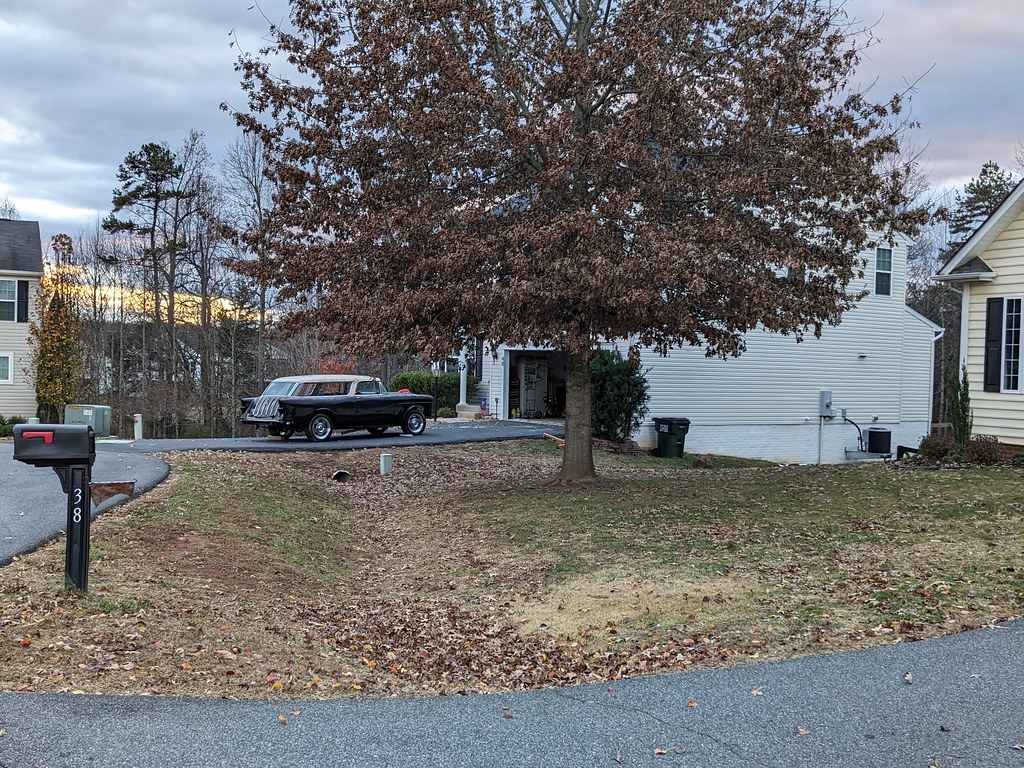
Madaguy 1955 Nomad Build


On The Tree

Joined: Feb 2012
Posts: 108
Likes: 40
From: Lombard, Il
That flare tool does much better than the one I purchased from Eastwood! Their tool is so bad that I called them and the Eastwood tech told me It's not for NiCop lines.
I suggested they should put a disclaimer in their ad. If I would have known I never would have bought it.
I suggested they should put a disclaimer in their ad. If I would have known I never would have bought it.

Thread Starter


Joined: Apr 2012
Posts: 2,170
Likes: 715
From: Ruckersville, VA
Hope everyone had a great Thanksgiving. I had quite a productive week. I wasn't able to get an update in last week, but have some great progress for today. One of my goals was to move the fuel tank off of the ground and get it bolted down under the car. Luckily, I haven't finalized the spare tire well so I didn't have to drop the rear end to get the fuel tank installed.
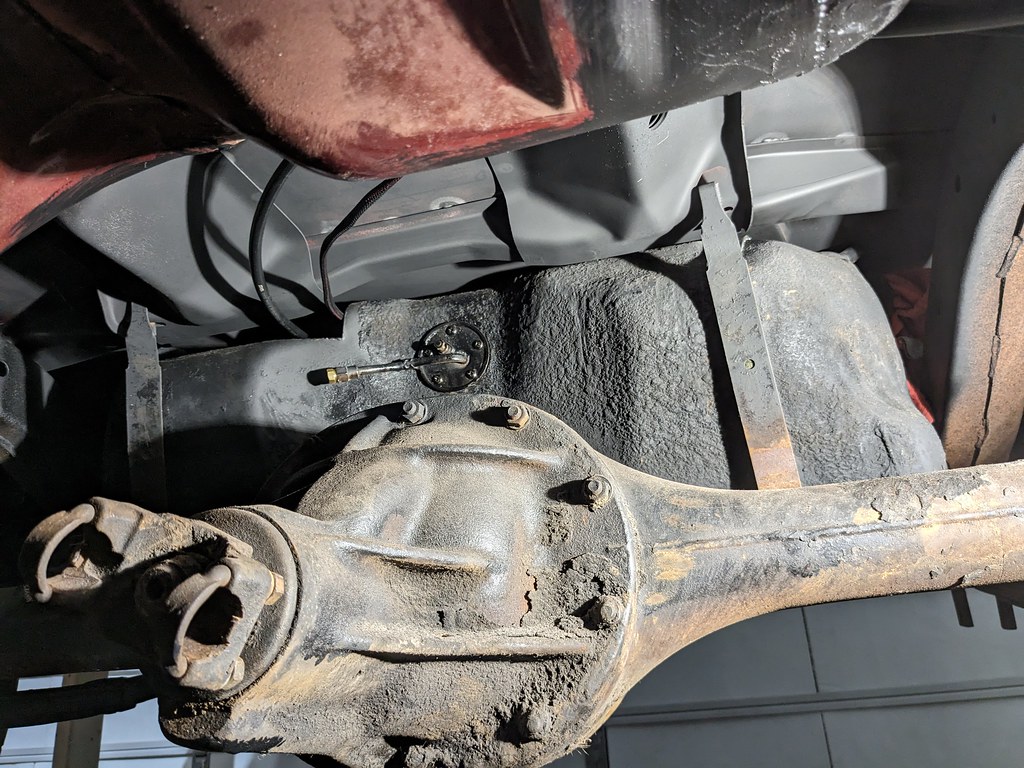
After that was out of my way, I decided it was time to get the brake lines routed and installed. The rear line was sort of a pain because I didn't know how I wanted to have it routed. The factory was routed on the passenger side, but I didn't like the way I was going to have to run the lines. Instead, what I did was ran it down the driver's side along with the fuel lines with a dual clamp I bought. These worked great and tucked up very nicely. I started by using a new rear brake hose. When I removed the stock one, I noticed that the ID of the hose was completely sealed shut! Scary.


I almost forgot, but I had to add in a residual valve for the rear drums. My intention is to upgrade to rear disk brakes at some point, so I created this little loop so that when I upgrade, I can simply remove this line.
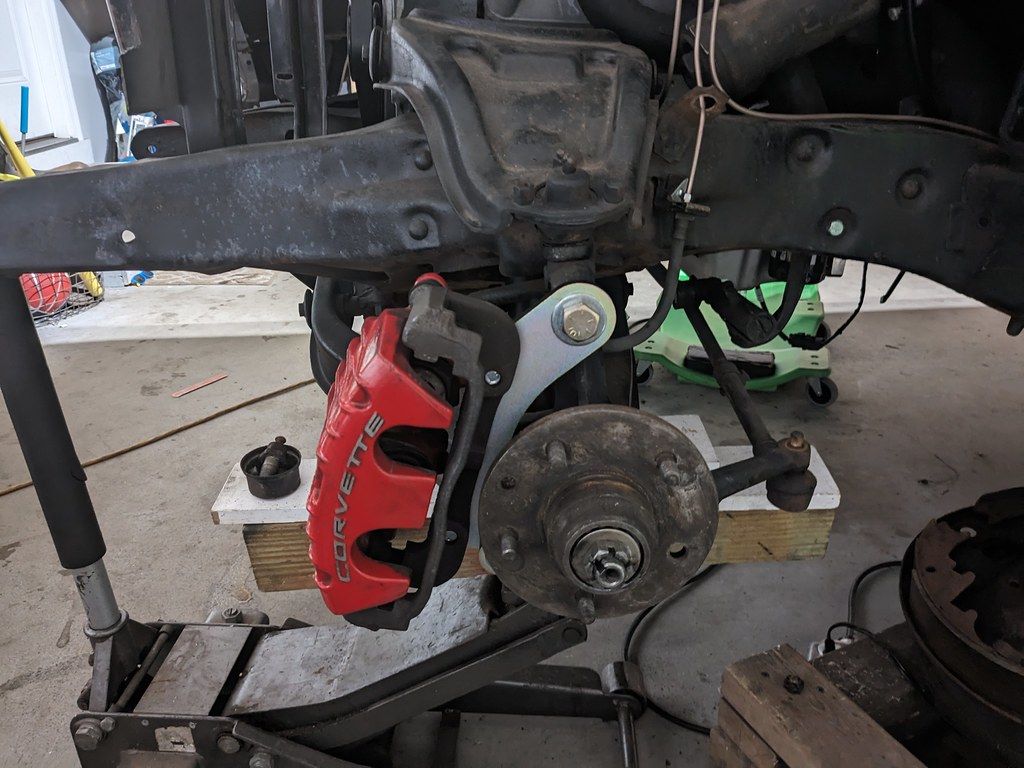
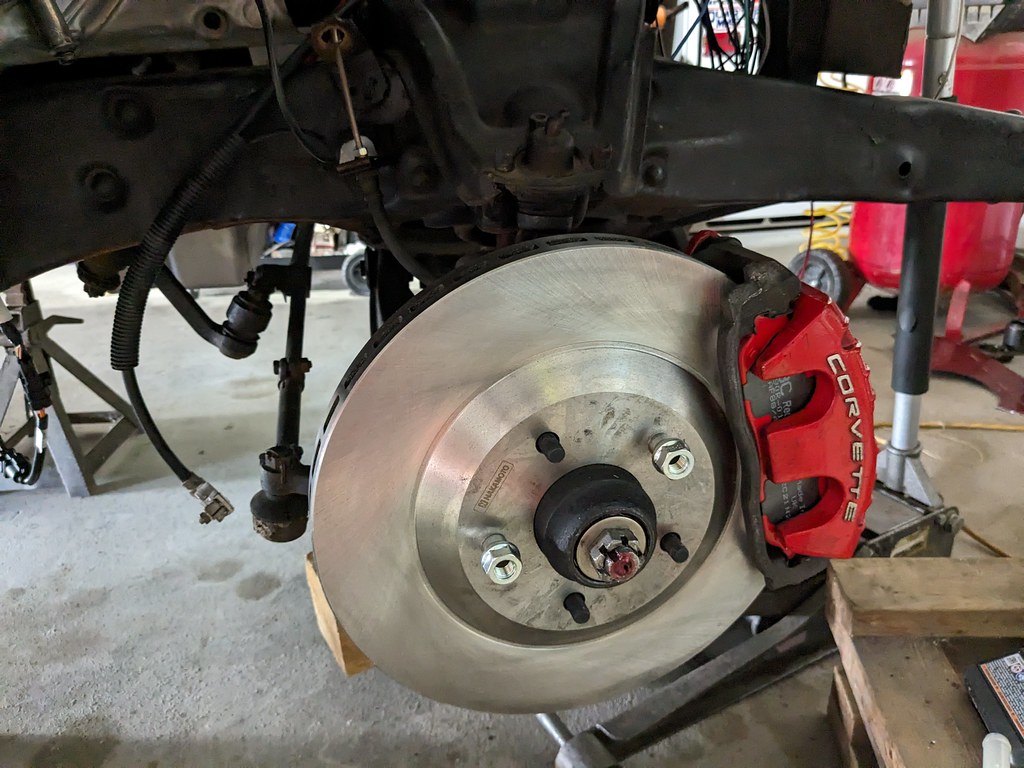
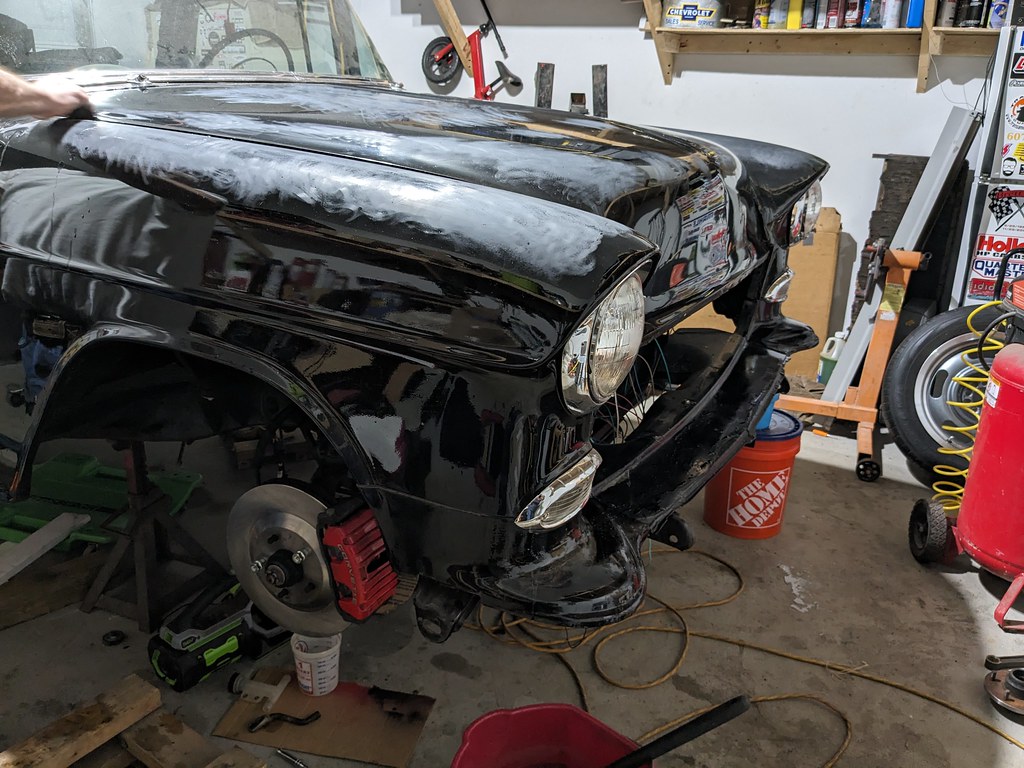
I had turned down the pair of Impala drum brake hubs I bought for the C5 brake swap a few months ago, but came to realized that the one side had a spun outer bearing race. That's not something I wanted to repair, so I found another good core and turned that down on my lathe. Pressed in the new bearing races and installed. Now it's back on all four wheels. I also used a pair of rear 97-04 Corvette brake hoses that came with a pair of calipers I bought for the front hoses. They fit perfectly where I wanted them to be and even came with little brackets to mount to my frame.
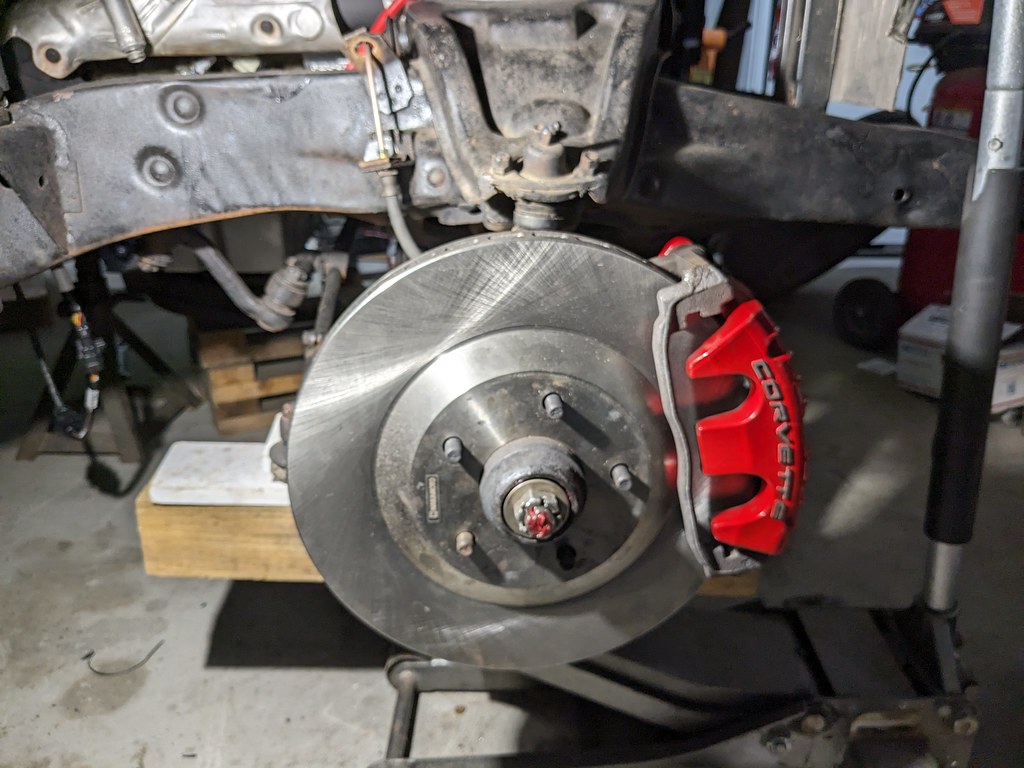
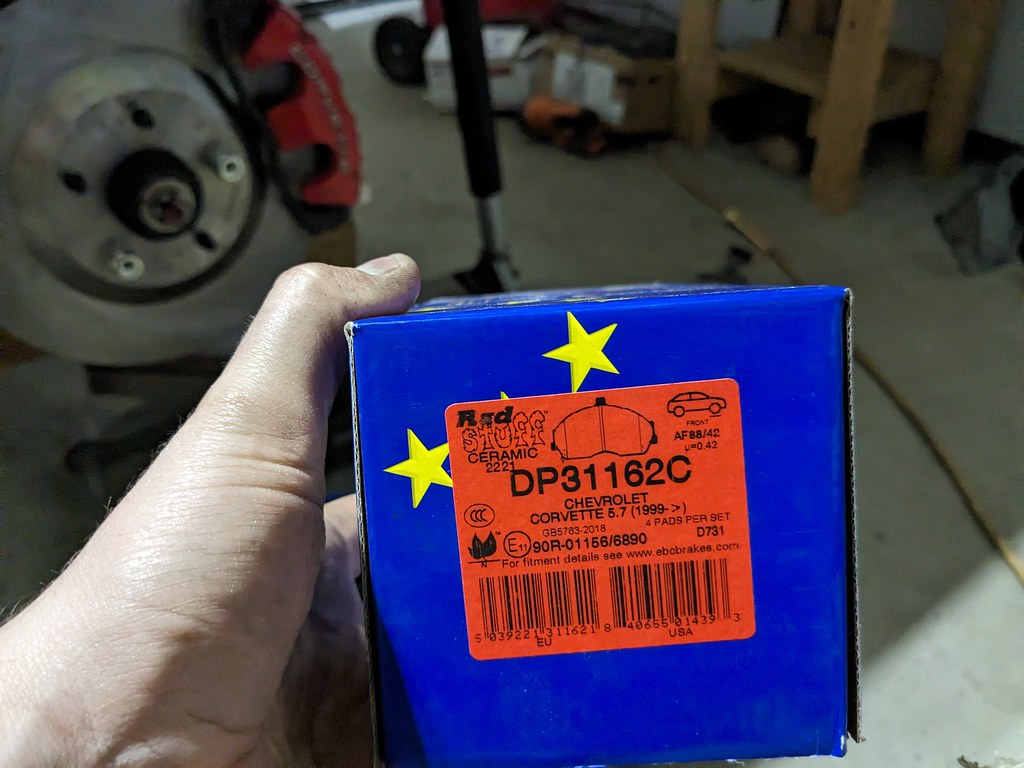
I didn't get any pictures, but I rebuilt the brake calipers with new boots and seals. Then I topped off the calipers with a pair of EBC Red Stuff brake pads that I won for my Camaro a few years ago. Last thing that I need is a pair of dust covers for the hubs and the install will be complete.
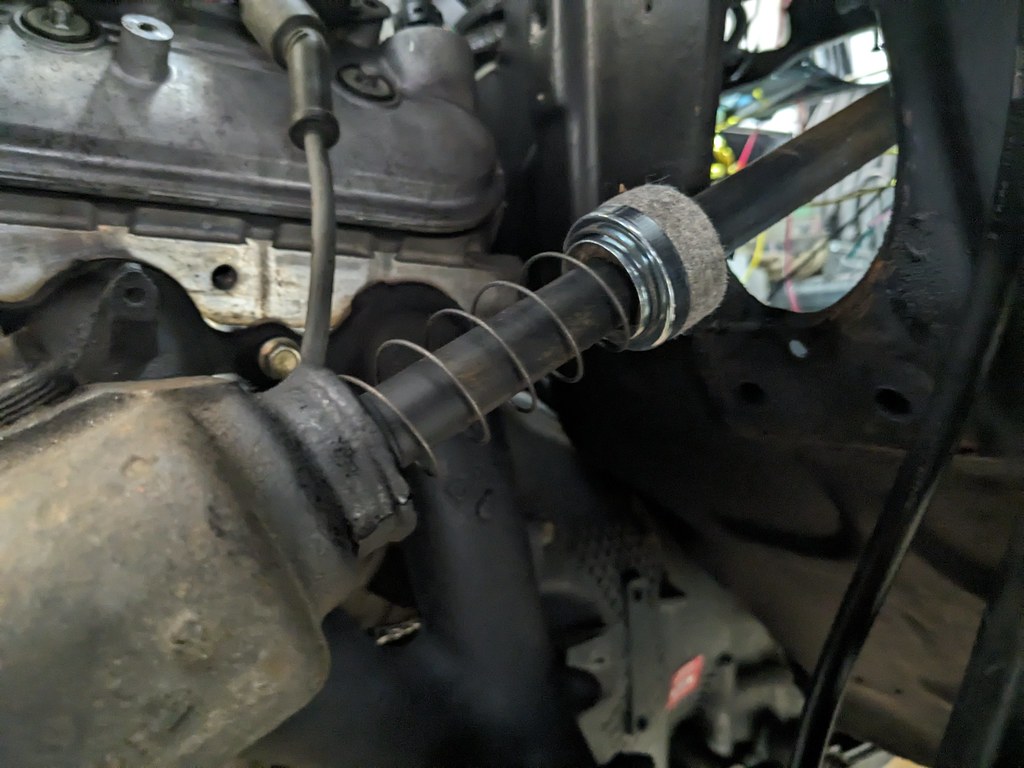
The last component to the brake swap was getting the brake pedal connected to the iBooster. I used the stock brake clevis and the threaded end that came with the booster and TIG welded them together. Turned out great with plenty of adjustability .

Hard to tell from the photo, but the booster rod has a nice flat and straight path.

I topped off the MC with fresh fluid and did have a few leaks, but nothing that required more than tightening some lines a bit. That made for a great feeling. I still need to recruit my wife to help me bleed them, but I'll save that for a later time. For now it's back to a roller again.

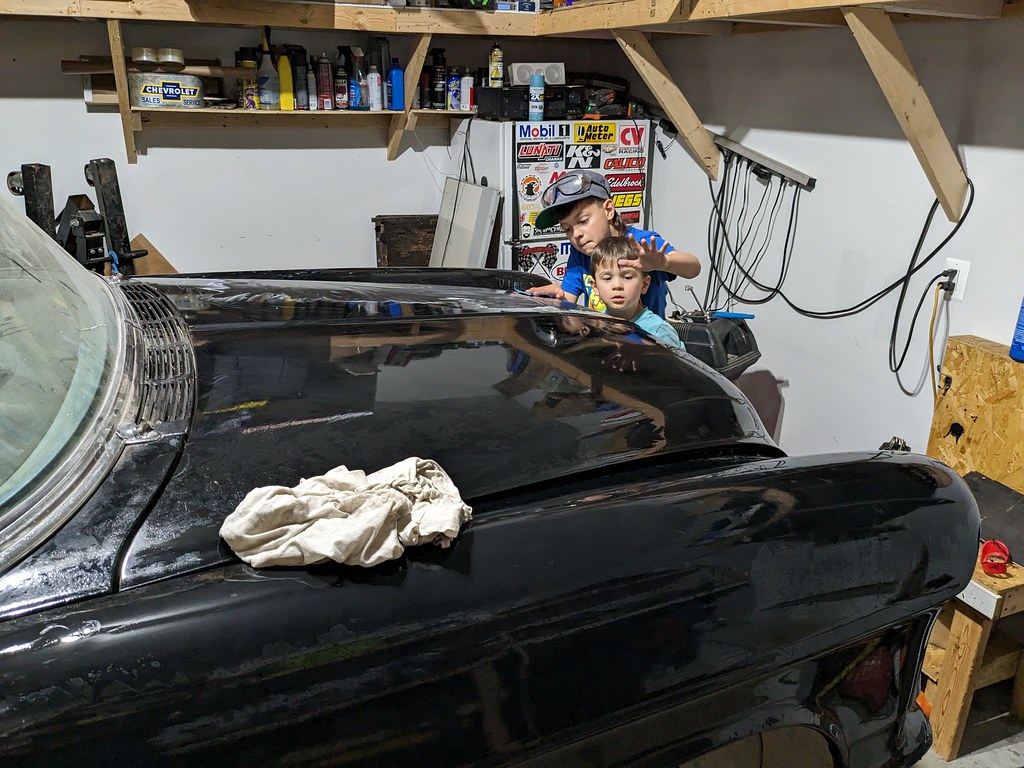
Thought this was just amazing. My 8 YO son came up to me a few nights ago and presented this to me. He had drawn this from a picture of my car and nailed the emblems and colors. It's official now!!

Lastly, I finally pulled the steering column to see what was going on with the shifter linkage, or lack there of. I don't have any conclusion just yet on that project, but thought I'd post a picture of the original steering shaft. This goes directly from the steering box and all the way up to the steering wheel. People must have drove a little differently back then knowing that there was a literal spear pointed at your chest the whole time you were driving!
I have another update coming soon, which is huge. But I'll give it a little more time before I reveal.
Cheers,
Ryan
After that was out of my way, I decided it was time to get the brake lines routed and installed. The rear line was sort of a pain because I didn't know how I wanted to have it routed. The factory was routed on the passenger side, but I didn't like the way I was going to have to run the lines. Instead, what I did was ran it down the driver's side along with the fuel lines with a dual clamp I bought. These worked great and tucked up very nicely. I started by using a new rear brake hose. When I removed the stock one, I noticed that the ID of the hose was completely sealed shut! Scary.
I almost forgot, but I had to add in a residual valve for the rear drums. My intention is to upgrade to rear disk brakes at some point, so I created this little loop so that when I upgrade, I can simply remove this line.
I had turned down the pair of Impala drum brake hubs I bought for the C5 brake swap a few months ago, but came to realized that the one side had a spun outer bearing race. That's not something I wanted to repair, so I found another good core and turned that down on my lathe. Pressed in the new bearing races and installed. Now it's back on all four wheels. I also used a pair of rear 97-04 Corvette brake hoses that came with a pair of calipers I bought for the front hoses. They fit perfectly where I wanted them to be and even came with little brackets to mount to my frame.
I didn't get any pictures, but I rebuilt the brake calipers with new boots and seals. Then I topped off the calipers with a pair of EBC Red Stuff brake pads that I won for my Camaro a few years ago. Last thing that I need is a pair of dust covers for the hubs and the install will be complete.
The last component to the brake swap was getting the brake pedal connected to the iBooster. I used the stock brake clevis and the threaded end that came with the booster and TIG welded them together. Turned out great with plenty of adjustability .
Hard to tell from the photo, but the booster rod has a nice flat and straight path.
I topped off the MC with fresh fluid and did have a few leaks, but nothing that required more than tightening some lines a bit. That made for a great feeling. I still need to recruit my wife to help me bleed them, but I'll save that for a later time. For now it's back to a roller again.
Thought this was just amazing. My 8 YO son came up to me a few nights ago and presented this to me. He had drawn this from a picture of my car and nailed the emblems and colors. It's official now!!
Lastly, I finally pulled the steering column to see what was going on with the shifter linkage, or lack there of. I don't have any conclusion just yet on that project, but thought I'd post a picture of the original steering shaft. This goes directly from the steering box and all the way up to the steering wheel. People must have drove a little differently back then knowing that there was a literal spear pointed at your chest the whole time you were driving!
I have another update coming soon, which is huge. But I'll give it a little more time before I reveal.
Cheers,
Ryan
Thread Starter
Joined: Apr 2012
Posts: 2,170
Likes: 715
From: Ruckersville, VA
Thanks for the encouragement! Very excited to show my latest update although to some it may be a bit controversial. Before I bought my car, I was really hoping to find a Nomad with great patina but those cars are few and far between. I also never liked the solid black that my car was and have always wanted to paint the roof. A buddy of mine came across a car and sent it to me and I fell in love. It was a black car with a tan roof where the patina was showing through the original turquoise paint and I immediately fell in love. My car was originally a turquoise with a cream top, so for me I was sold on that combination as it was a perfect visualization of what my car could be. My father-in-law came down for Thanksgiving and he asked me what I wanted to do to my car and I said that I wanted to patina my car. Now a little background is that he just purchased a 56 Hardtop Bel-Air originally from Texas with some killer patina, but his was true and real. Given he was the resident patina expert, this was the perfect opportunity.
We started by wet sanding the whole hood hood and cleaning off any pine sap that was there when I bought the car. My boys love to help, so they were out there helping us prep for some paint.

Once the area was prepped, we wiped it down and got to shooting the paint. We had to paint the "base" coat first, followed by the primer that would have been sprayed over when it was repainted. Then when you sand it down, it will show through properly. No real rhyme or reason for how you paint it since you really can't screw it up haha.


Once the paint was dry, we attacked it with some more 600 and made sure to change the paper often to avoid scratches. This paint job won't fool anyone who's painted a car before, but if I can avoid scratches that are a dead giveaway that it isn't authentic.
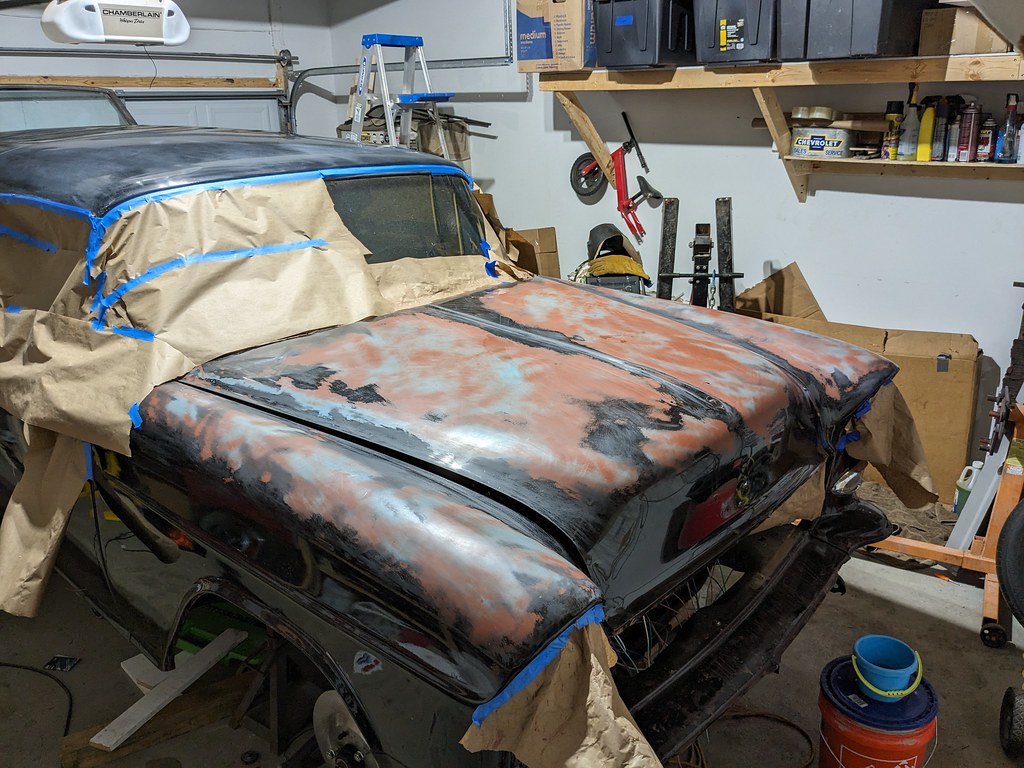
I didn't get many pictures during the last stage, but basically it was about 9pm in the last photo and I turned to my FIL and said that it would be really cool to see the roof painted. He said that he was going inside to be done for the night, but I told him that I was going to move forward with painting the roof. So I started sanding, then he just started taping up the car. Before we knew it, the almond color was being painted followed by some red oxide primer. Here's after we pealed back the tape.

Well after we pealed off the tape, we thought hey, wouldn't it look great if the grill was on and the trim around it polished and installed? Hour or so later and here's what we had.
The next day we woke up and got to taping up the trim again, but to paint the tops of the doors, quarters, emblems and the tailgate. Again, got busy and didn't take any photos, but here's the results.
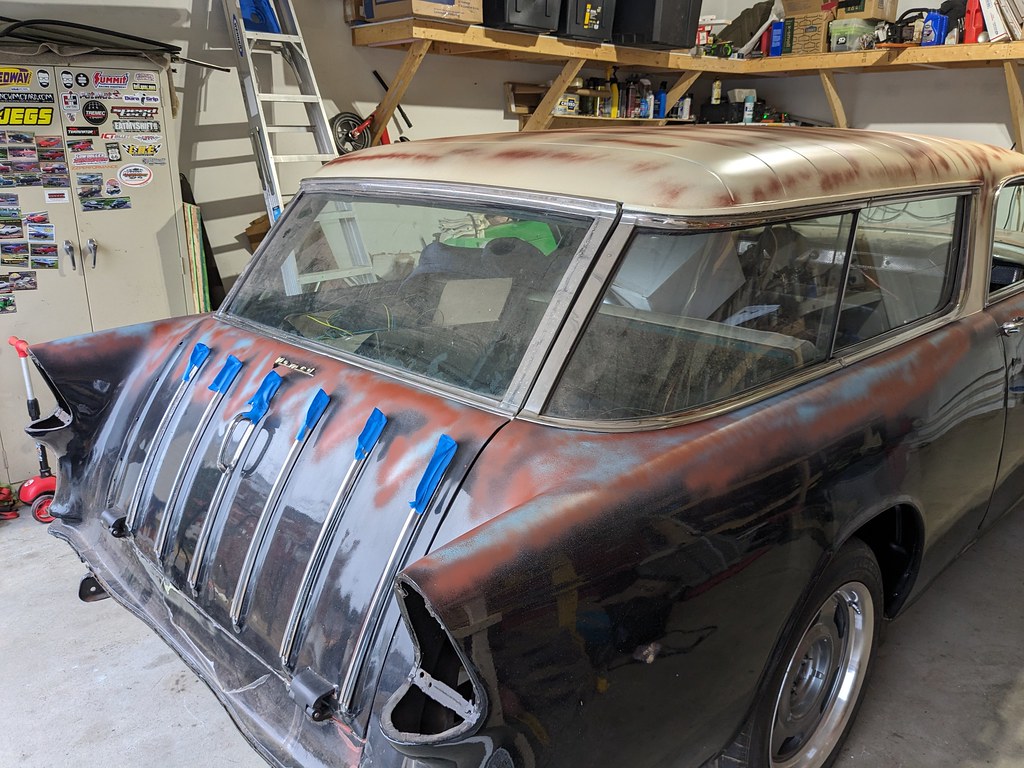
Yes I do have a patch panel for the rust hole and yes I am going to repair it. I'll just blend it in and it will disappear.
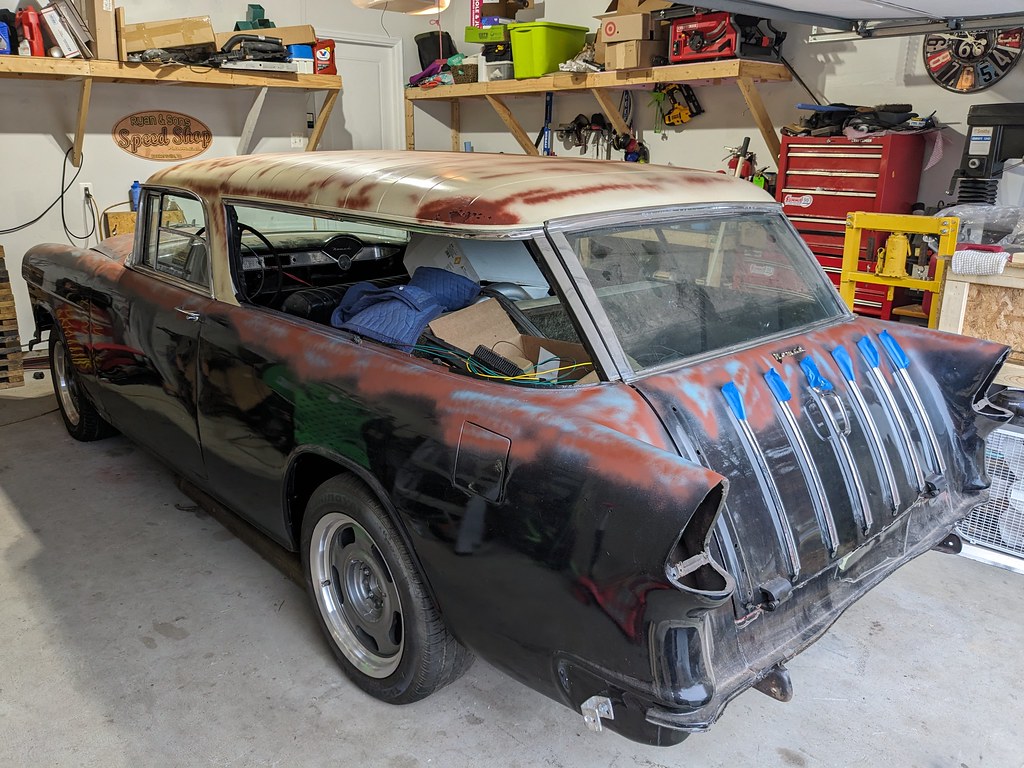
Then we pushed it outside and I couldn't help it, but I reinstalled the rear window on the driver's side.
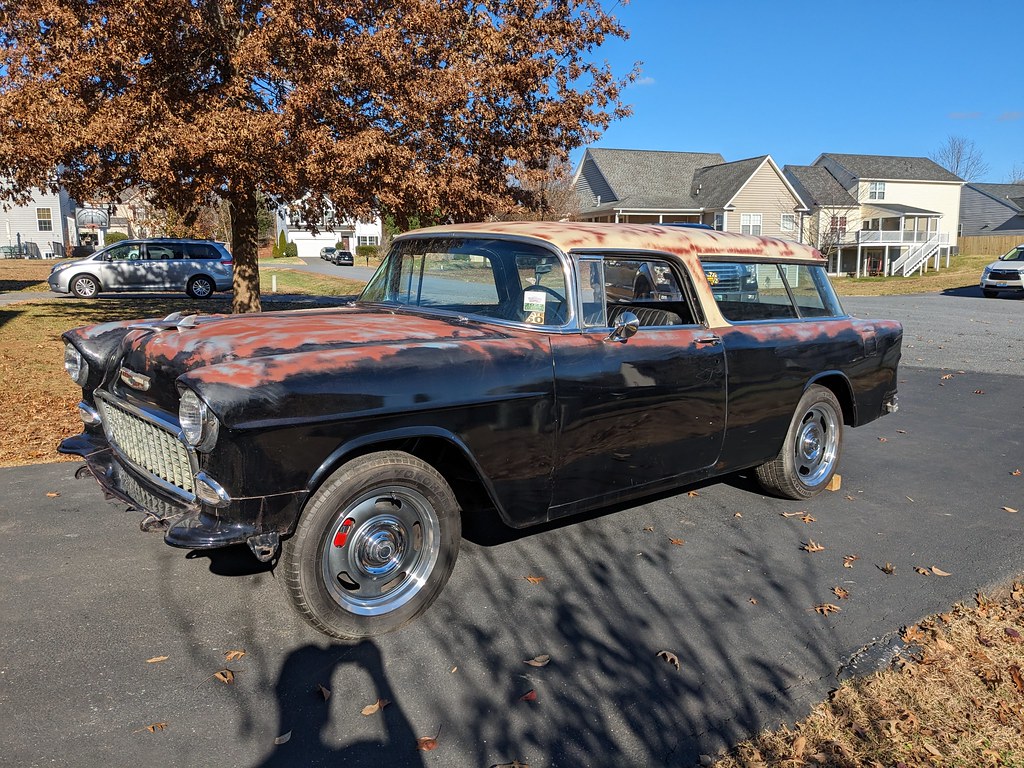
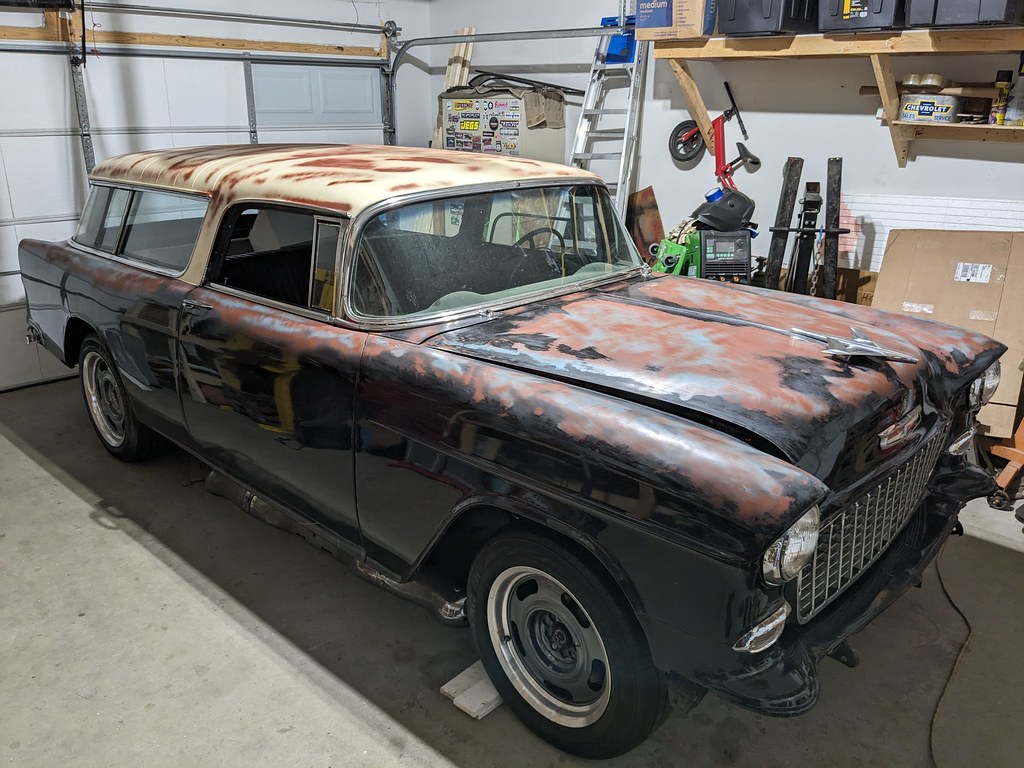
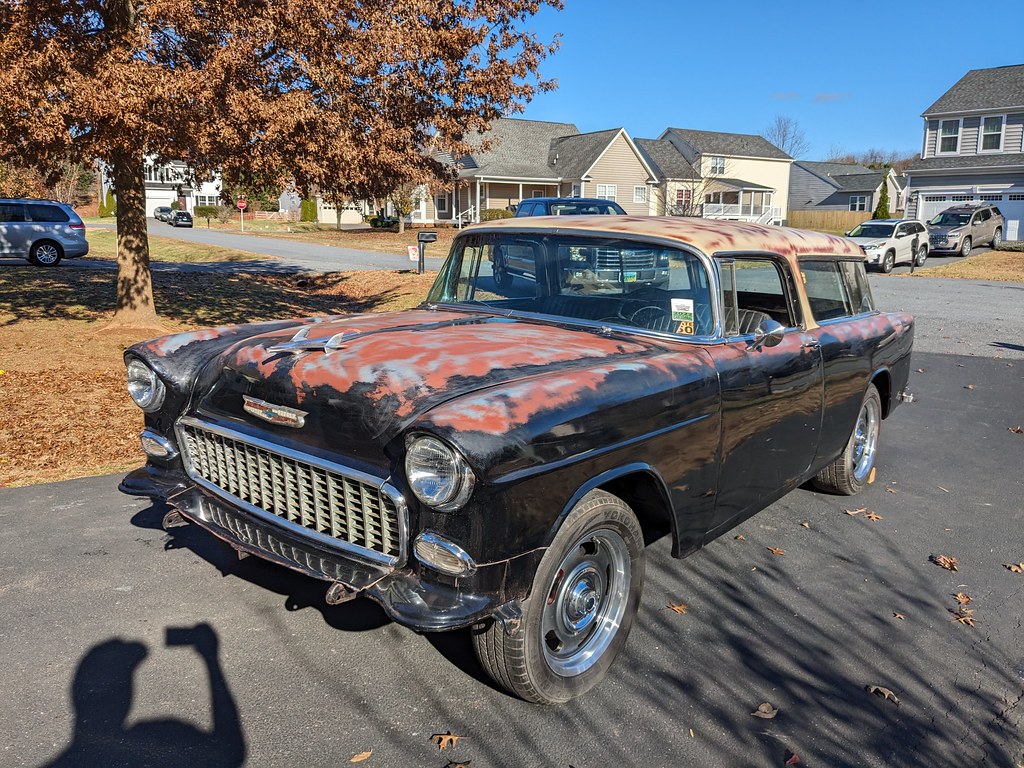
With it outside, you can really get a full idea of what the car looks like. It honestly turned out better than I thought it was going to. It was hard to see the car inside of my small garage, but outside I think it looks fantastic. I just kept walking around it and staring. It was a total transformation and doesn't even look like the same car to me.


And in case anyone was wondering, here are my paint supplies. I understand that my paintjob won't impress everyone, my goal for this car isn't to be perfect, but to drive it.

The paint looks way better now than it did before we started because there were many defects in the clear coat. It was peeling away in places and I don't believe they had the best adhesion or prep. The car needs a full paintjob, but I just don't want to spend that kind of time on it right now. I'd rather get my enjoyment behind the wheel and making memories with my family. Plus a huge bonus is I don't have to worry about parking lot dings! Just builds more character!
Hope you all had a great Thanksgiving!
Cheers,
Ryan
We started by wet sanding the whole hood hood and cleaning off any pine sap that was there when I bought the car. My boys love to help, so they were out there helping us prep for some paint.
Once the area was prepped, we wiped it down and got to shooting the paint. We had to paint the "base" coat first, followed by the primer that would have been sprayed over when it was repainted. Then when you sand it down, it will show through properly. No real rhyme or reason for how you paint it since you really can't screw it up haha.
Once the paint was dry, we attacked it with some more 600 and made sure to change the paper often to avoid scratches. This paint job won't fool anyone who's painted a car before, but if I can avoid scratches that are a dead giveaway that it isn't authentic.
I didn't get many pictures during the last stage, but basically it was about 9pm in the last photo and I turned to my FIL and said that it would be really cool to see the roof painted. He said that he was going inside to be done for the night, but I told him that I was going to move forward with painting the roof. So I started sanding, then he just started taping up the car. Before we knew it, the almond color was being painted followed by some red oxide primer. Here's after we pealed back the tape.
Well after we pealed off the tape, we thought hey, wouldn't it look great if the grill was on and the trim around it polished and installed? Hour or so later and here's what we had.
The next day we woke up and got to taping up the trim again, but to paint the tops of the doors, quarters, emblems and the tailgate. Again, got busy and didn't take any photos, but here's the results.
Yes I do have a patch panel for the rust hole and yes I am going to repair it. I'll just blend it in and it will disappear.
Then we pushed it outside and I couldn't help it, but I reinstalled the rear window on the driver's side.
With it outside, you can really get a full idea of what the car looks like. It honestly turned out better than I thought it was going to. It was hard to see the car inside of my small garage, but outside I think it looks fantastic. I just kept walking around it and staring. It was a total transformation and doesn't even look like the same car to me.
And in case anyone was wondering, here are my paint supplies. I understand that my paintjob won't impress everyone, my goal for this car isn't to be perfect, but to drive it.
The paint looks way better now than it did before we started because there were many defects in the clear coat. It was peeling away in places and I don't believe they had the best adhesion or prep. The car needs a full paintjob, but I just don't want to spend that kind of time on it right now. I'd rather get my enjoyment behind the wheel and making memories with my family. Plus a huge bonus is I don't have to worry about parking lot dings! Just builds more character!
Hope you all had a great Thanksgiving!
Cheers,
Ryan


Thread Starter
Joined: Apr 2012
Posts: 2,170
Likes: 715
From: Ruckersville, VA
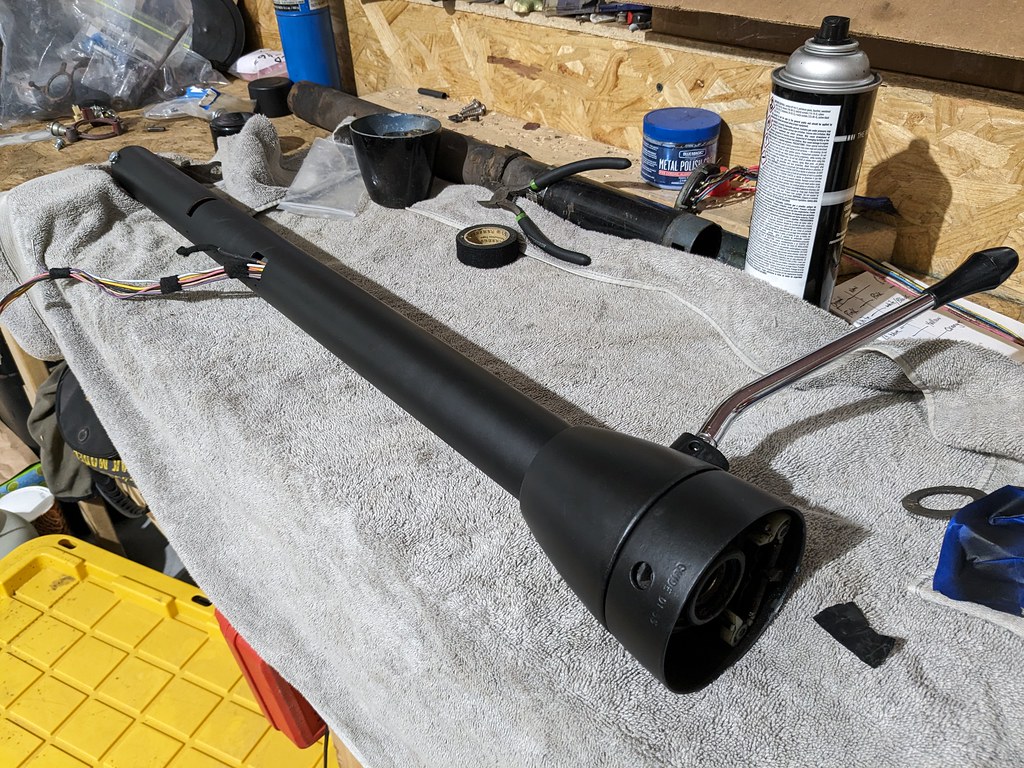
It's been a few weeks since an update, but I'm working on it a little bit here and there. The biggest thing was tracking down all of the parts for my steering column rebuild. I started by sanding down and painting the steering column, collar and turn signal housing. I love SEM Trim Black for dash parts like this column with the the satin black color being spot on for an OEM look.


In the meantime, I was collecting parts for the steering column rebuild. Gotta love the 50s tech which included felt "bearings" for the inner shift column tube to ride in. A forum member hooked me up with the shift tube, outer column, and all the parts here to get my column back together. The shift lever is used, but in great shape.

The shift lever in place with some fresh grease. I still need to install the shift gate, but is very close to being ready to install.
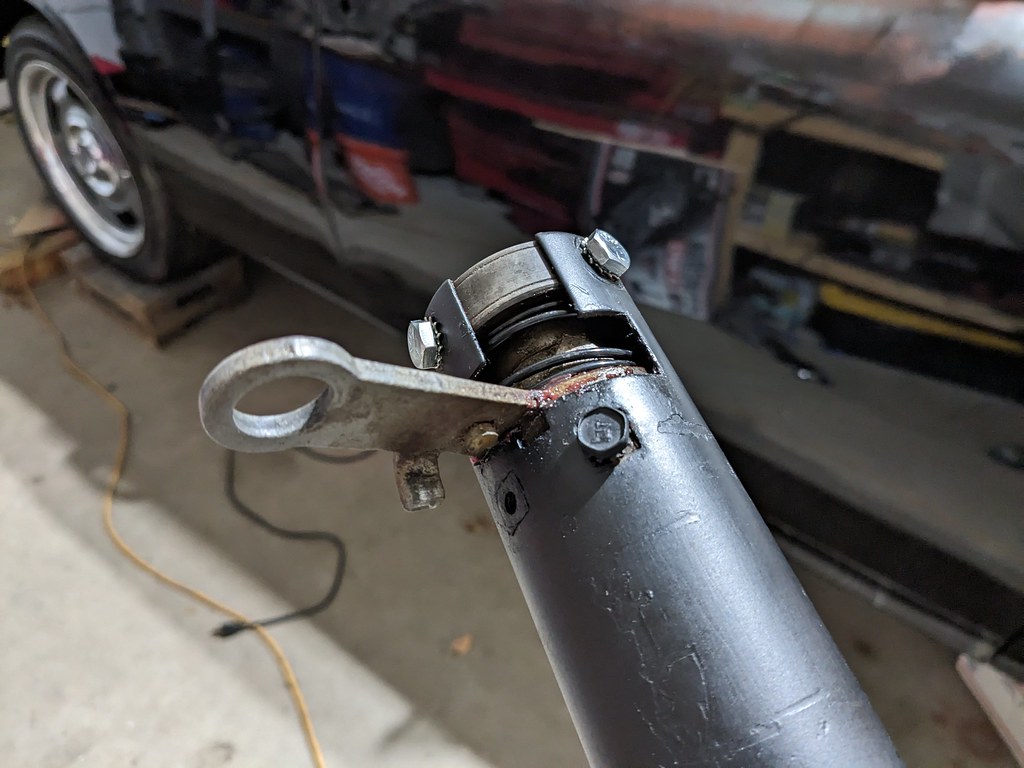
Got excited and put everything back together and realized that there was a little clip that I was missing that hooks up to the gauge bezel for the gear shift indicator. But here's the rebuilt column.
It ended up being a blessing in disguise because when I went to test the turn signals, the switch that I installed wasn't working properly so I installed another one that I had. That one believe it or not was out of the car that was in a junkyard for 40 years and worked perfectly. After ordering a few different places and having to cancel a few orders I was able to track one down. I was at a stand still because I had to install this before I could get the column reinstalled for good.
It fits onto the inner shift tube as shown here. That is connected to the shift indicator on the dash and is pulled down by a little spring clip. It's a very basic but creative method. I'll get more pictures when the gauges go back together.
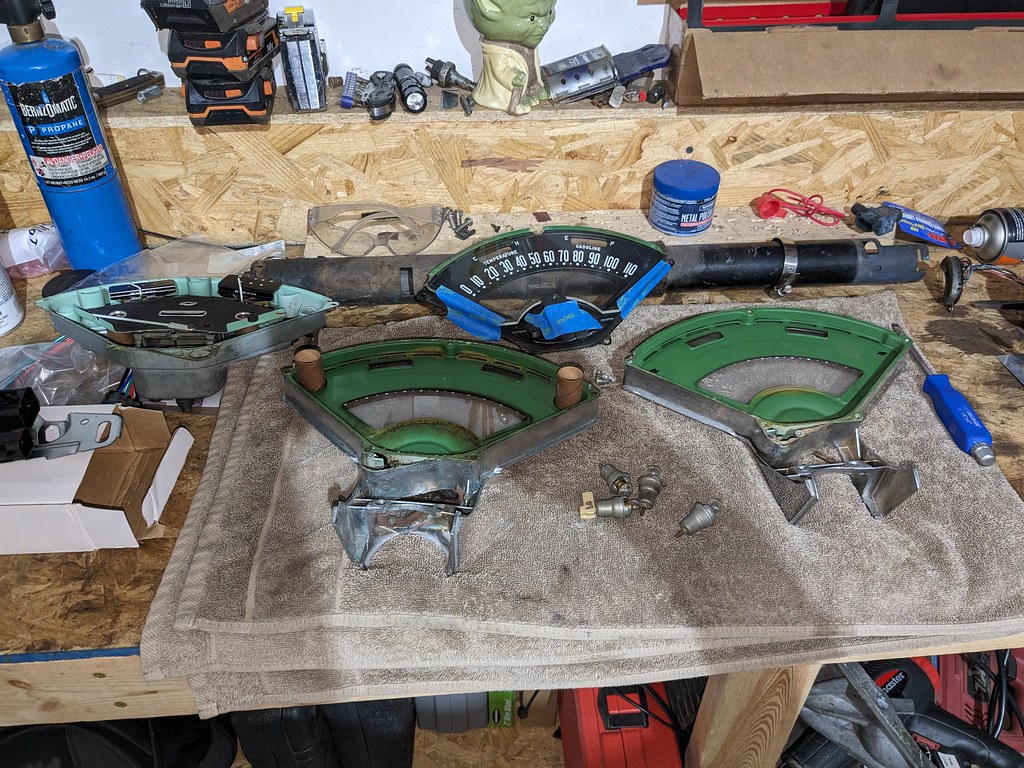
While I was waiting for parts, I decided to pull apart and assemble a gauge cluster with the best components that I had. My father-in-law was getting a new gauge cluster so he gave me his old one. I used my 55 speedometer and his 56 electronic temp sensor and my 55 fuel gauge. 55 was unique that they used some sort of mechanical gauge with a tube that went directly to the engine. Since the 56 was a direct swap and is electronic, it will work really well with the 3 wire LS temp sensor.
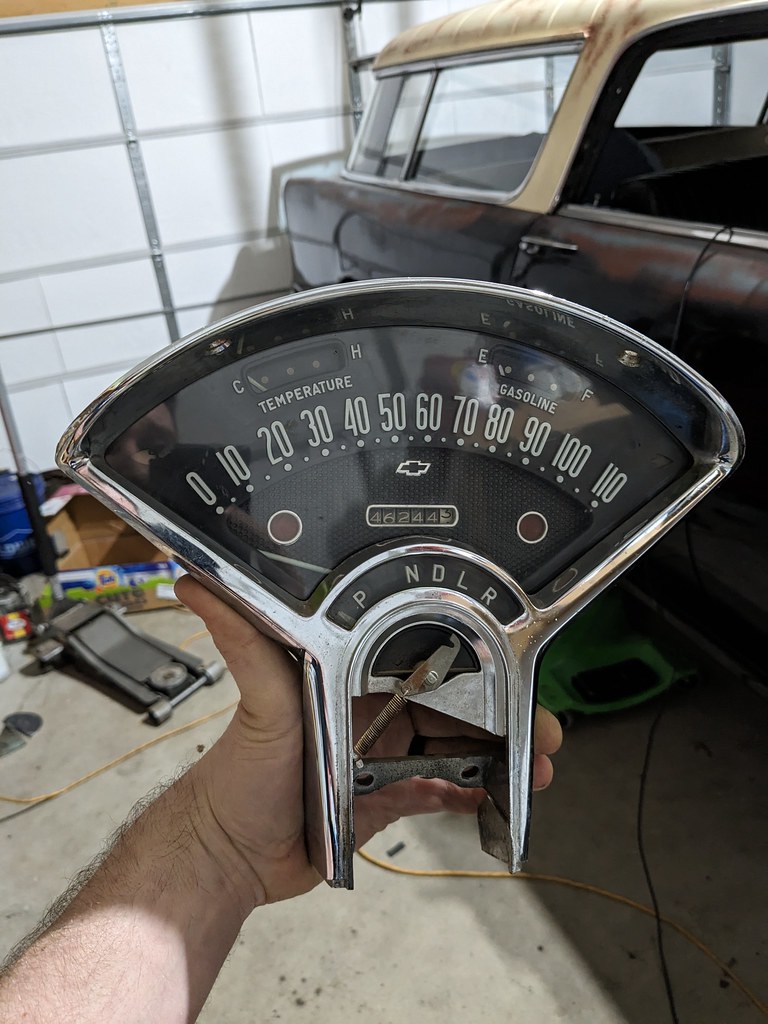
I realized after I took this picture that I had a revised indicator lens for a modern gear selection, PRNDL rather than the outdated Powerglide pattern with PND1R.
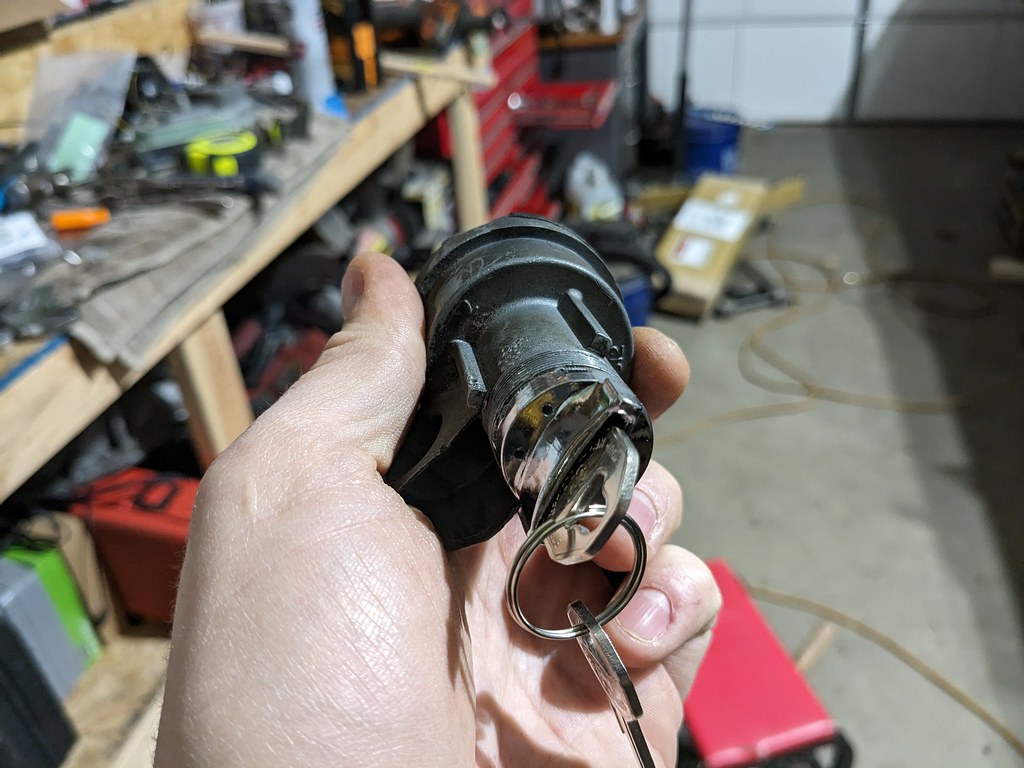
I also had trouble tracking down the original key and decided to take matters into my own hands. The drill method. The only way to get the lock cylinder out is to drill it out enough to release the pin that holds it in. I slowly drilled and checked and it finally popped out and my new lock set could be installed.

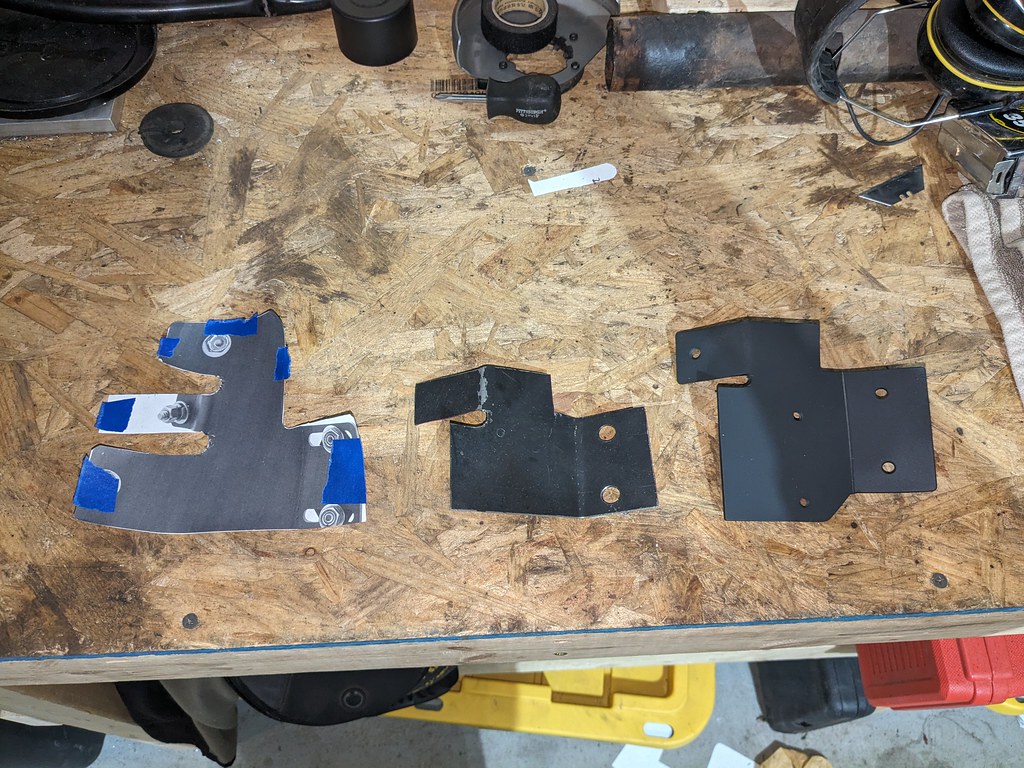
Another project I've been putting off is what to do about my DBW pedal and how I wanted to attach it. I came across a nice bracket made by CPP, but it's only for Corvettes and mounts quite a bit differently than the Impala pedal that I picked up. But what I did like was how the bracket attached to the firewall using the existing hardware where the stock pedal bolts up. After debating on buying the piece and then modifying it, I got an idea. Try to print the picture to scale and then transfer it to steel. Thankfully CPP's image was to scale which made it easy to transfer to a thin gauge piece of steel I had. Once I got the angles right I was able to trim off the pieces I didn't need and figured out where I needed to add. Then transferred that to a 1/4" plate I had which fit up perfectly! Very pleased with the results. Only thing left is to add some longer bolts where it bolts up stock, and add a block off plate and nuts to the other side. Then it's sealed from the elements.

Right now, I'm in the process of converting the column wiring to the 69-90's turn signal wiring so that when I am ready, I can just swap out the stock column for a tilt/collapsible unit. One thing that I noticed is that while the cheap harness had the correct style terminals for that style turn signal connector, they weren't quite right. The terminal on the left has the same width the entire end, while the correct terminal tapers in to properly match where the connector tapers in. As is, they aren't making a good connection and the signals were either making an intermittent connection or none at all. Just something to look out for if you go with that harness. Thankfully I had some from another project.

I'm hoping to narrow down the list of things that are needed so that I can start buttoning up the wiring over the next few weeks.
Cheers,
Ryan
In the meantime, I was collecting parts for the steering column rebuild. Gotta love the 50s tech which included felt "bearings" for the inner shift column tube to ride in. A forum member hooked me up with the shift tube, outer column, and all the parts here to get my column back together. The shift lever is used, but in great shape.
The shift lever in place with some fresh grease. I still need to install the shift gate, but is very close to being ready to install.
Got excited and put everything back together and realized that there was a little clip that I was missing that hooks up to the gauge bezel for the gear shift indicator. But here's the rebuilt column.
It ended up being a blessing in disguise because when I went to test the turn signals, the switch that I installed wasn't working properly so I installed another one that I had. That one believe it or not was out of the car that was in a junkyard for 40 years and worked perfectly. After ordering a few different places and having to cancel a few orders I was able to track one down. I was at a stand still because I had to install this before I could get the column reinstalled for good.
It fits onto the inner shift tube as shown here. That is connected to the shift indicator on the dash and is pulled down by a little spring clip. It's a very basic but creative method. I'll get more pictures when the gauges go back together.
While I was waiting for parts, I decided to pull apart and assemble a gauge cluster with the best components that I had. My father-in-law was getting a new gauge cluster so he gave me his old one. I used my 55 speedometer and his 56 electronic temp sensor and my 55 fuel gauge. 55 was unique that they used some sort of mechanical gauge with a tube that went directly to the engine. Since the 56 was a direct swap and is electronic, it will work really well with the 3 wire LS temp sensor.
I realized after I took this picture that I had a revised indicator lens for a modern gear selection, PRNDL rather than the outdated Powerglide pattern with PND1R.
I also had trouble tracking down the original key and decided to take matters into my own hands. The drill method. The only way to get the lock cylinder out is to drill it out enough to release the pin that holds it in. I slowly drilled and checked and it finally popped out and my new lock set could be installed.
Another project I've been putting off is what to do about my DBW pedal and how I wanted to attach it. I came across a nice bracket made by CPP, but it's only for Corvettes and mounts quite a bit differently than the Impala pedal that I picked up. But what I did like was how the bracket attached to the firewall using the existing hardware where the stock pedal bolts up. After debating on buying the piece and then modifying it, I got an idea. Try to print the picture to scale and then transfer it to steel. Thankfully CPP's image was to scale which made it easy to transfer to a thin gauge piece of steel I had. Once I got the angles right I was able to trim off the pieces I didn't need and figured out where I needed to add. Then transferred that to a 1/4" plate I had which fit up perfectly! Very pleased with the results. Only thing left is to add some longer bolts where it bolts up stock, and add a block off plate and nuts to the other side. Then it's sealed from the elements.
Right now, I'm in the process of converting the column wiring to the 69-90's turn signal wiring so that when I am ready, I can just swap out the stock column for a tilt/collapsible unit. One thing that I noticed is that while the cheap harness had the correct style terminals for that style turn signal connector, they weren't quite right. The terminal on the left has the same width the entire end, while the correct terminal tapers in to properly match where the connector tapers in. As is, they aren't making a good connection and the signals were either making an intermittent connection or none at all. Just something to look out for if you go with that harness. Thankfully I had some from another project.
I'm hoping to narrow down the list of things that are needed so that I can start buttoning up the wiring over the next few weeks.
Cheers,
Ryan
Thread Starter
Joined: Apr 2012
Posts: 2,170
Likes: 715
From: Ruckersville, VA
Happy New Year! I'm starting to get really excited about getting this car back together now and running. I hit quite a snag working on the steering column in this car and when you combine it with waiting on parts that I didn't know that I needed, it feels like that's all I've been working on. I ordered a new turn signal kit from AAW to cut out and replaced all of the terminals from the last update with the tapered ones. That fixed the issues that I was having with inconsistent connections. Then on the column I updated the 1955 turn signal wiring with the 69+ wiring that most newer columns have. Then after all of that, I was still getting inconsistent turn signals and came to the conclusion that it was the turn signal switch. I've held off on buying a new one because the short term plan is to replace the column with a tilt unit. It's a real big PITA to install this switch because of the way that the shift collar installs until I found out the trick. I thought this whole time that you had to install the collar first, then feed the wires through a tiny hole that was at a weird angle, but with the new wiring that's glued together flat you can simply slip the collar over the wiring. That made things soo much easier.

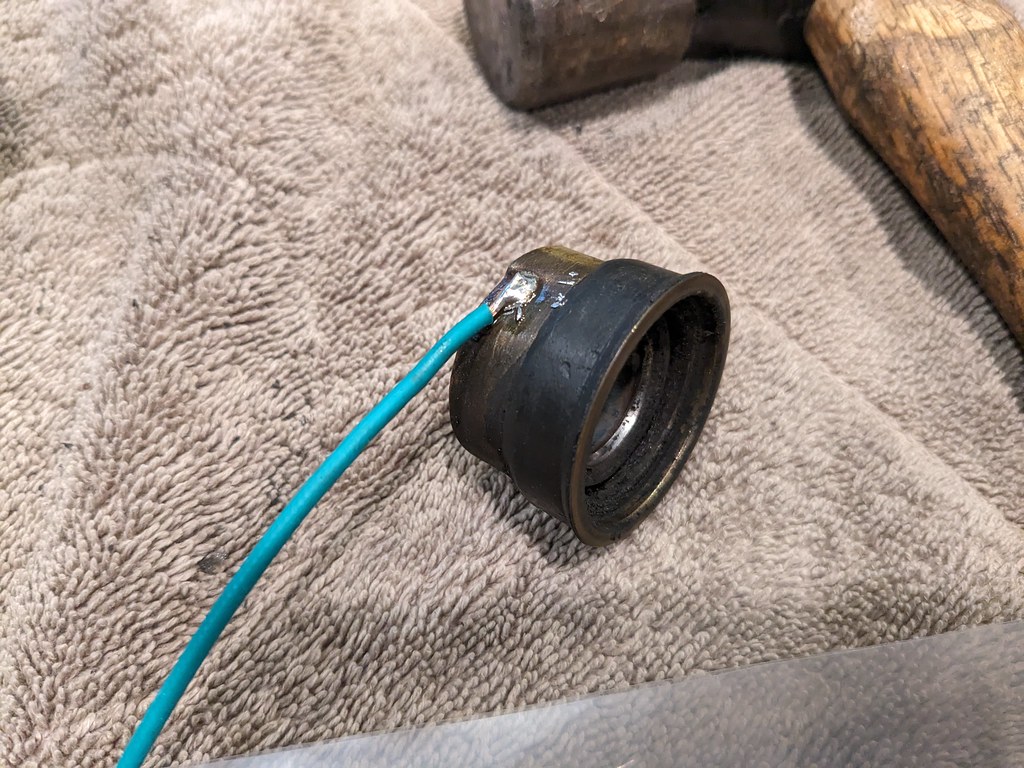
The bearing was in good shape for the upper column, but the horn wire that is soldered to the side was brittle. I re-soldered a new wire in the stock place and it was good as new. I used the updated color combination rather than the tan from the old GM color codes.
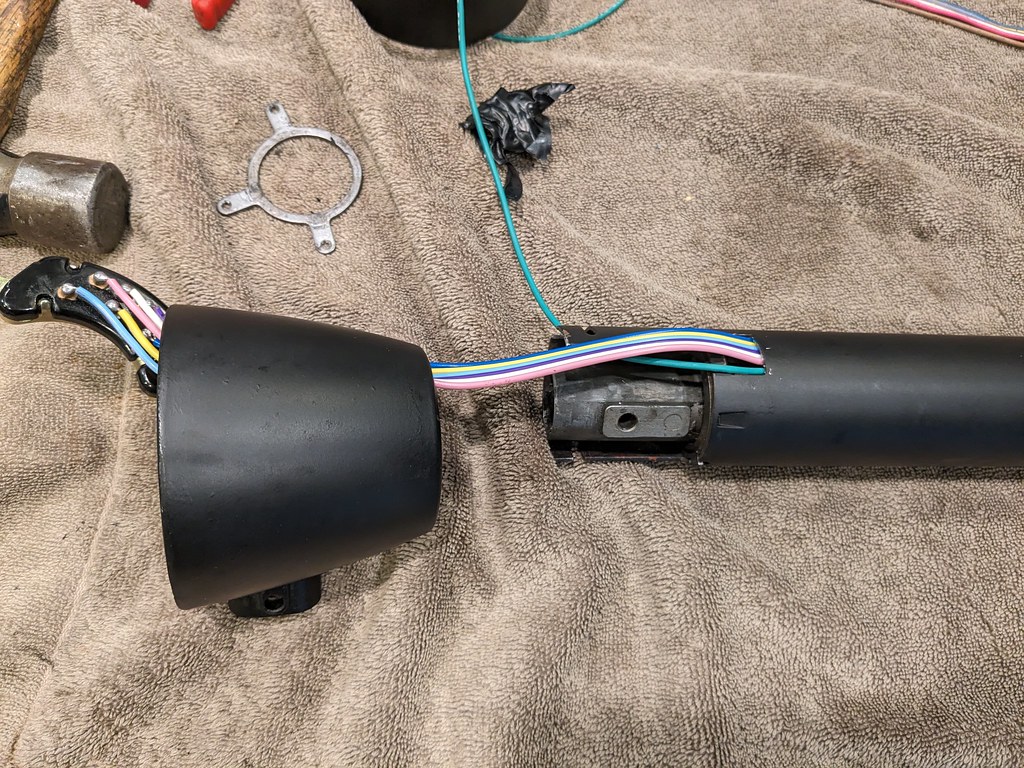
First you need to feed all the wires through the collar, then you can feed them into the column. (Note, I found out shortly after this picture that I needed to do the same thing with the horn wire).
Then carefully install the collar onto the shift tube and slowly slip it over the signal wiring.

Once the collar is slipped over the wires, you can reassemble the signal housing and button it all up. I didn't get a picture, but it looks the same as the first 5 times I assembled it. I also had a heck of a time finding a 12-24 machine screw for the shift detent at the bottom of the column. Ended up going to a hardware store and just cut down a screw. Not pretty, but it worked! Once the new signal switch was installed I put it back in the car and tested the lights. No surprise, but they all functioned 100% with no glitchy wiring.
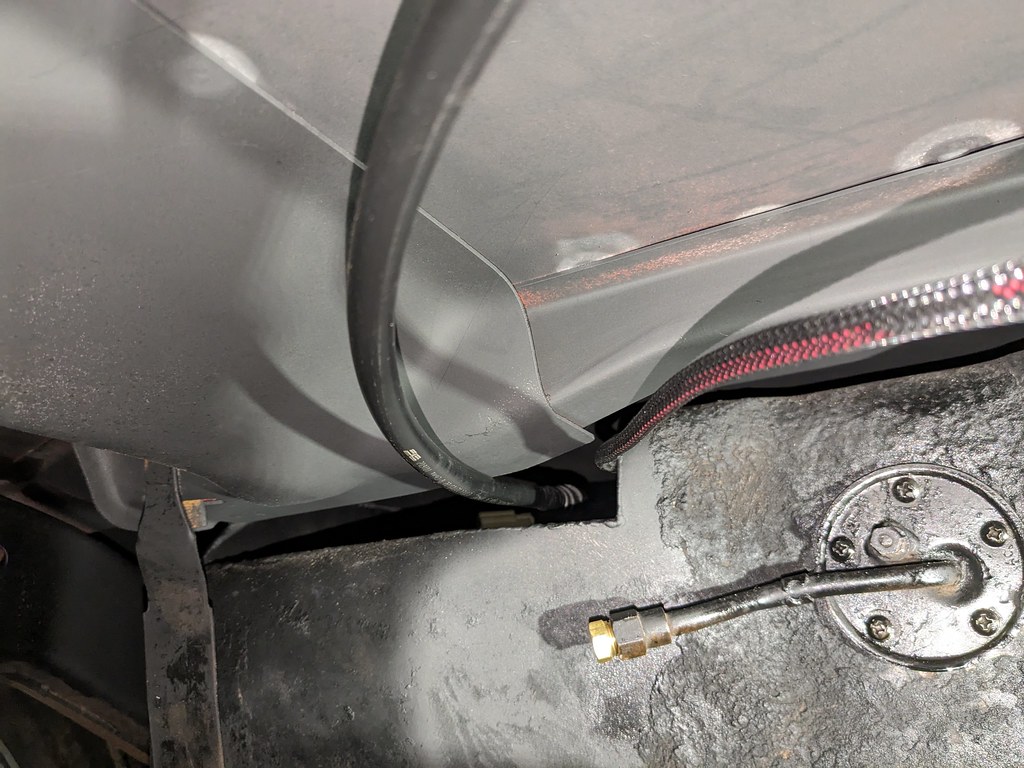
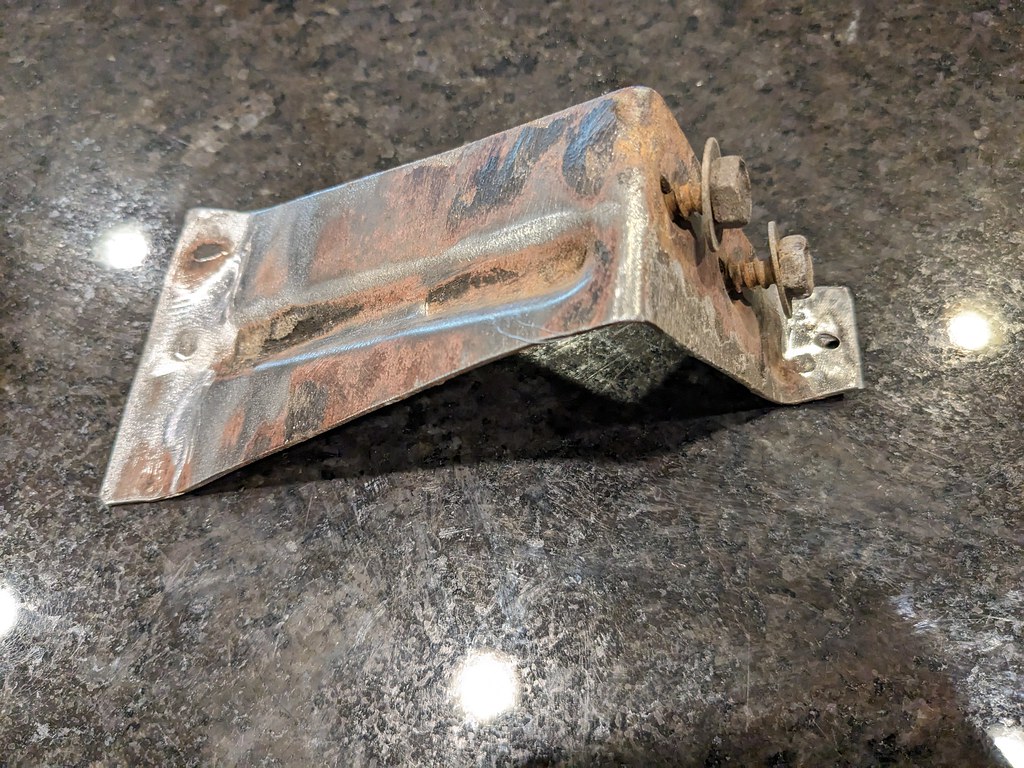
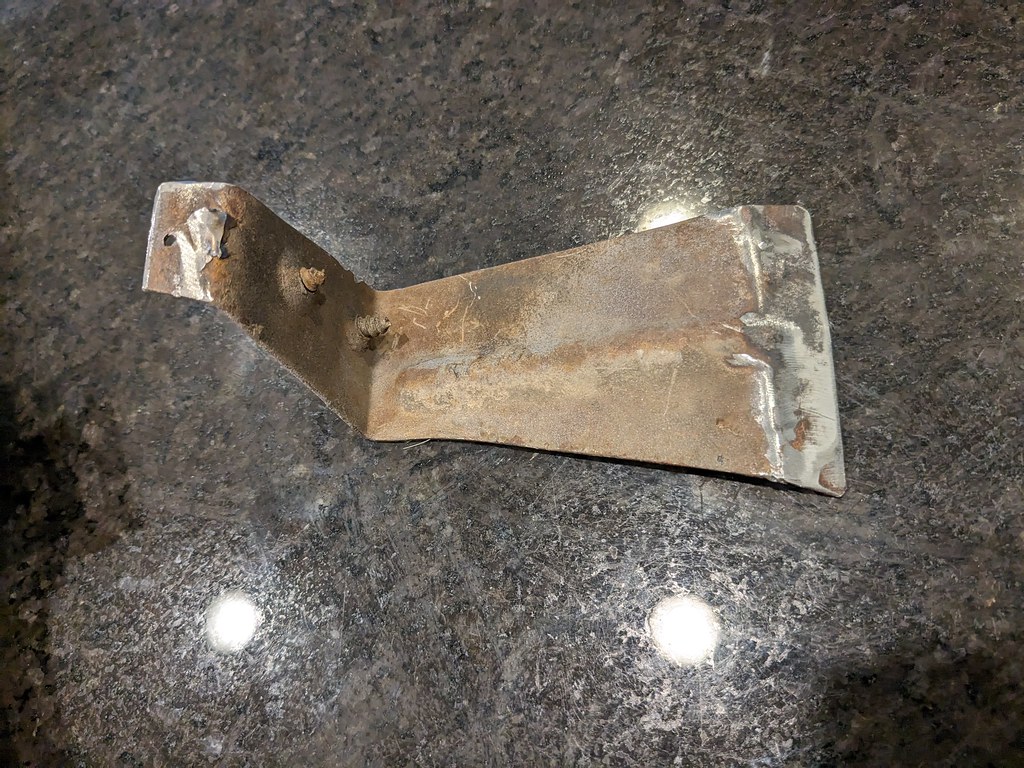
I ordered a new 1955 Chevy Wagon fuel filler a while ago because I wasn't able to find a used one. I didn't think they would be hard to find, but I guess since it was a one year filler tube most people didn't hang onto the wagon stuff when parting out. Anyway, after I installed it, I realized that I'm missing the little bracket that the filler tube bolts to. I put a call out to guys on a FB page and some guy reached out saying that he was mini-tubbing his wagon and would be willing to cut it off for me. Not only that, he wasn't going to use the filler tube either. He ended up selling me everything for a fantastic price considering it was being shipped across the country. He had the tube, gas cap, bracket and even the original screws!

I couldn't believe just how good of condition that bracket was and I love using original metal when I can.
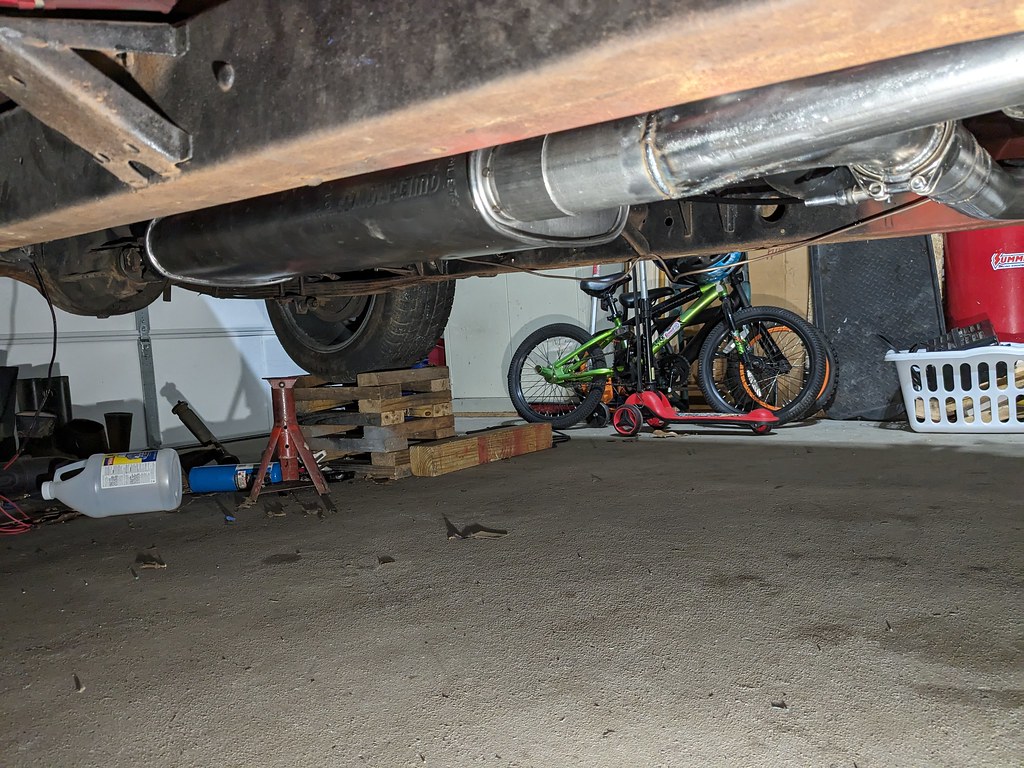
Next up is going to be reinstalling the steering column and getting to work on the shift linkage. Once that's in place, I can work on installing the driver's side exhaust from the manifold back. I forgot that I pulled off the transmission tailshaft housing, so I need to pull that back off and apply some silicone. Once I have a shifter, exhaust, little wiring buttoned up I can bleed the brakes and maybe go on a maiden voyage! Although now that I'm writing this all down I have a lot of work to do haha.
Cheers,
Ryan
The bearing was in good shape for the upper column, but the horn wire that is soldered to the side was brittle. I re-soldered a new wire in the stock place and it was good as new. I used the updated color combination rather than the tan from the old GM color codes.
First you need to feed all the wires through the collar, then you can feed them into the column. (Note, I found out shortly after this picture that I needed to do the same thing with the horn wire).
Then carefully install the collar onto the shift tube and slowly slip it over the signal wiring.
Once the collar is slipped over the wires, you can reassemble the signal housing and button it all up. I didn't get a picture, but it looks the same as the first 5 times I assembled it. I also had a heck of a time finding a 12-24 machine screw for the shift detent at the bottom of the column. Ended up going to a hardware store and just cut down a screw. Not pretty, but it worked! Once the new signal switch was installed I put it back in the car and tested the lights. No surprise, but they all functioned 100% with no glitchy wiring.
I ordered a new 1955 Chevy Wagon fuel filler a while ago because I wasn't able to find a used one. I didn't think they would be hard to find, but I guess since it was a one year filler tube most people didn't hang onto the wagon stuff when parting out. Anyway, after I installed it, I realized that I'm missing the little bracket that the filler tube bolts to. I put a call out to guys on a FB page and some guy reached out saying that he was mini-tubbing his wagon and would be willing to cut it off for me. Not only that, he wasn't going to use the filler tube either. He ended up selling me everything for a fantastic price considering it was being shipped across the country. He had the tube, gas cap, bracket and even the original screws!
I couldn't believe just how good of condition that bracket was and I love using original metal when I can.
Next up is going to be reinstalling the steering column and getting to work on the shift linkage. Once that's in place, I can work on installing the driver's side exhaust from the manifold back. I forgot that I pulled off the transmission tailshaft housing, so I need to pull that back off and apply some silicone. Once I have a shifter, exhaust, little wiring buttoned up I can bleed the brakes and maybe go on a maiden voyage! Although now that I'm writing this all down I have a lot of work to do haha.
Cheers,
Ryan
Thread Starter
Joined: Apr 2012
Posts: 2,170
Likes: 715
From: Ruckersville, VA
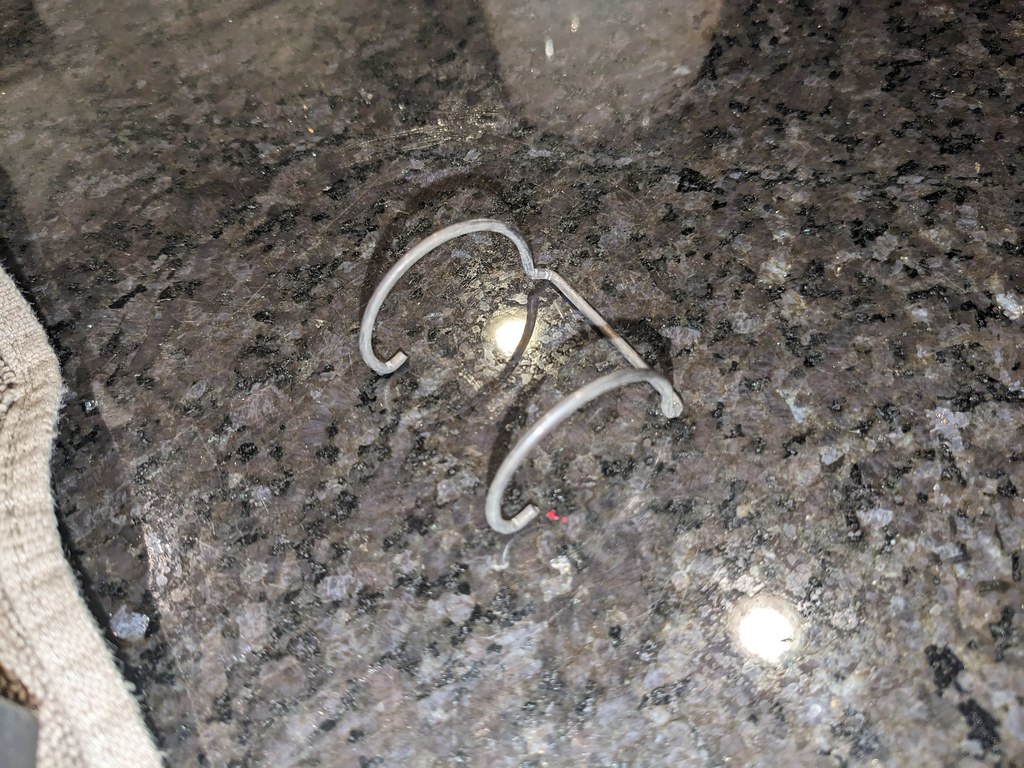
Seems like a very small update, but I overcame a large obstacle for my project. I was finally able to get the steering column installed back in the car! It took forever as I kept coming across parts that either failed or things that needed to be installed prior to the installation of the column itself. First up was this felt seal and spring that no one seemed to have in stock.
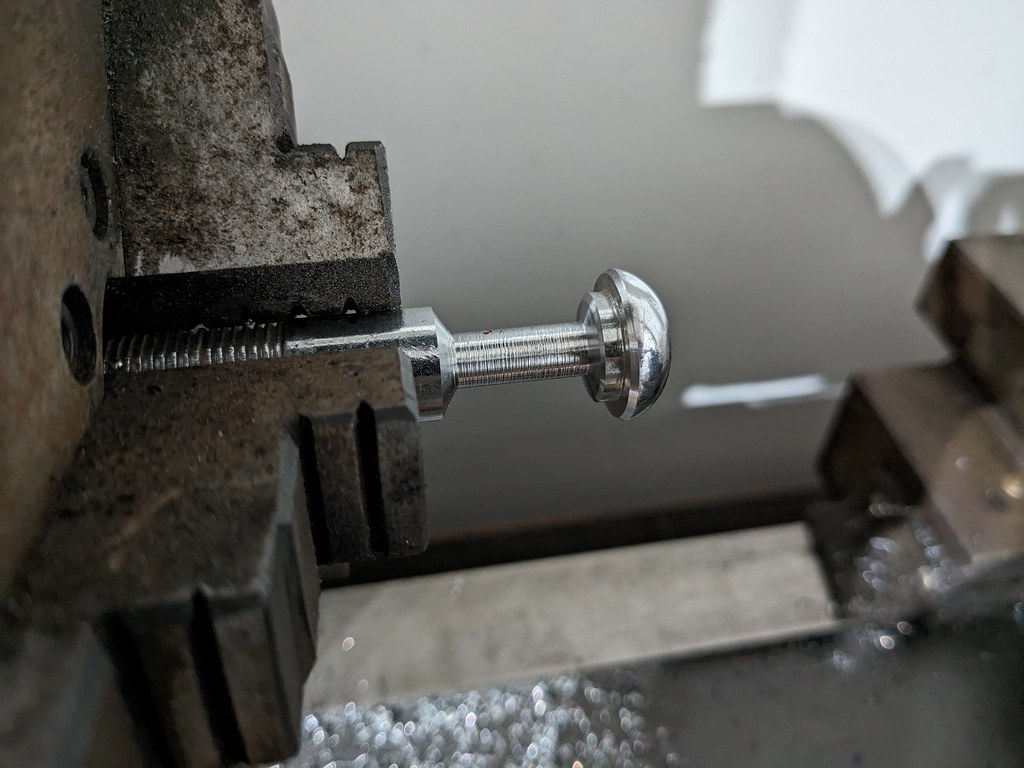
Once I had that on I started thinking about what else I needed to have installed prior to the column going in. I knew the next challenge was to figure out how the column shifter was going to work with the transmission shift linkage. Best plan of action seemed to be using some sort of rod end and a long rod. I started looking at all of the options our there for connecting to the stock shifter, and didn't like what I was finding. What I wanted was to have a bolt with a 1/2" shoulder to fill the stock shifter, but with a 5/16" threaded end for the rod end. Couldn't find what I wanted, so I made it!
Chucked it into my lathe and got to work.
Compared to what I started with.
Here's the bolt with the right length for to give me enough threads. After that was trimmed down, I cut off the end and tapped it with 5/16-24 die.
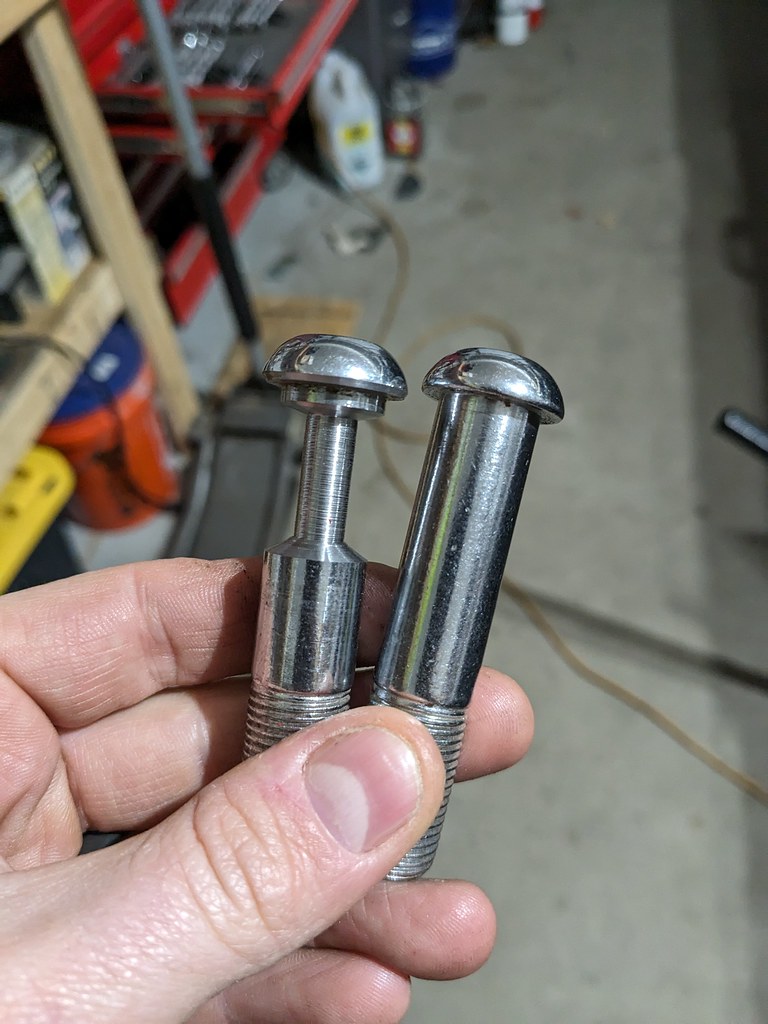
Had a little oops with the die getting a bit off center, but ended up being ok because I cut the shoulder a bit too much. Left is my happy little mistake and right is the finished product. Pretty happy with the outcome.
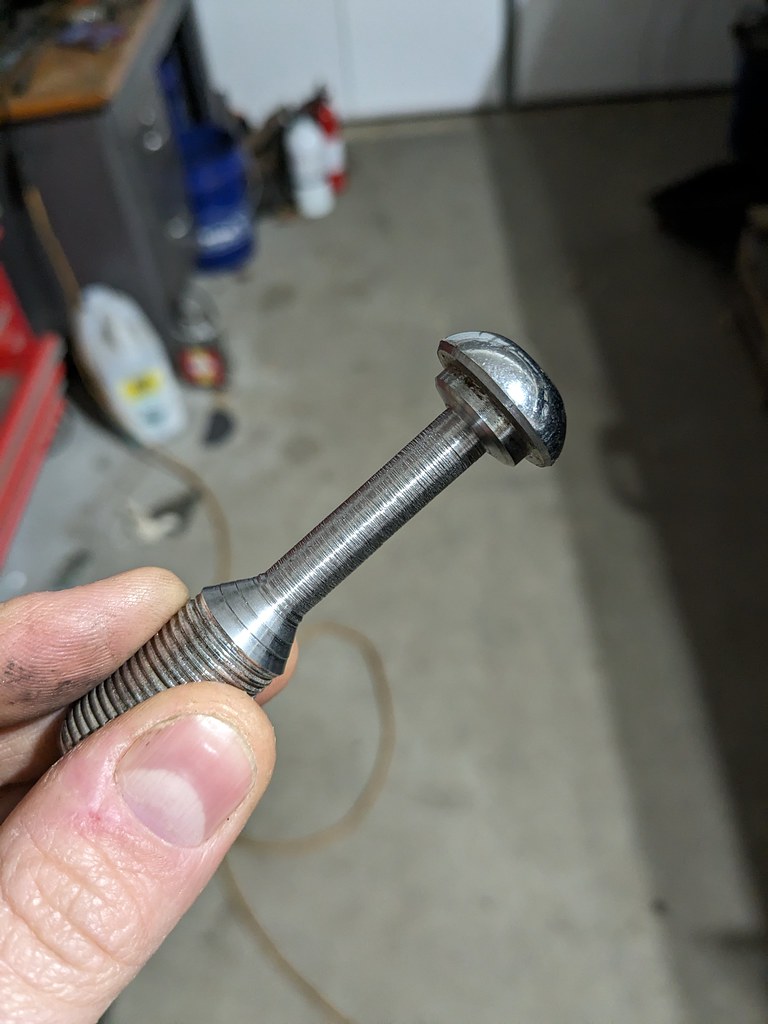
Here's how it will connect to the stock shift linkage. This was just a rod end I had on hand, but I'll be ordering a new one.

Now that I'm happy with how the rod end attaches to the shifter, I felt good enough to install the steering column for good. Used new hardware on the lower clamp and took my time getting the column fit up with the steering wheel. I just popped it off for now though because it's easier to work in the car without that giant wheel in the way.

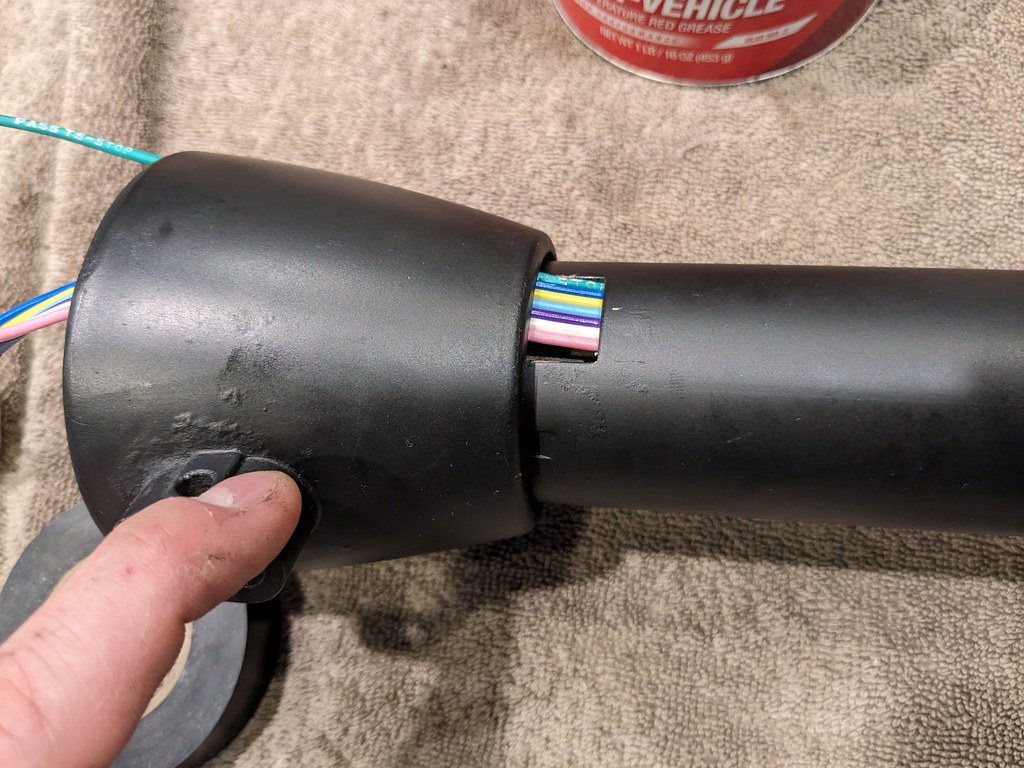
With the column back in the car, I started to turn my attention back to the wiring. The universal harness came pre-wired for oil, water and various other sensors or 12v+ accessories, but I'm taking all of that data from Terminator X so I won't be using them. However, I thought the car may not always have an LS engine so I'd just keep those wires in the harness and seal them off. I used some of the heat shrink with glue to seal off both ends of the wires so they can be easily terminated in the future, but are completely sealed in the meantime. Sorry for the blurry photo, it was late.
It was late last night in the garage and decided that I didn't want to look at the ugly DBW Impala gas pedal and did something about it. I LOVE it and can't wait to drive it with this pedal. I've had this cover for about 12 years now and finally found the right car to install it on!!
I need to get the exhaust routed for the driver's side before I can figure out the shift linkage. I believe the linkage will be much easier to move/change than routing the exhaust piping. Next up is mounting the ECU and finalizing the rest of the wiring on the car.
Cheers,
Ryan
Once I had that on I started thinking about what else I needed to have installed prior to the column going in. I knew the next challenge was to figure out how the column shifter was going to work with the transmission shift linkage. Best plan of action seemed to be using some sort of rod end and a long rod. I started looking at all of the options our there for connecting to the stock shifter, and didn't like what I was finding. What I wanted was to have a bolt with a 1/2" shoulder to fill the stock shifter, but with a 5/16" threaded end for the rod end. Couldn't find what I wanted, so I made it!
Chucked it into my lathe and got to work.
Compared to what I started with.
Here's the bolt with the right length for to give me enough threads. After that was trimmed down, I cut off the end and tapped it with 5/16-24 die.
Had a little oops with the die getting a bit off center, but ended up being ok because I cut the shoulder a bit too much. Left is my happy little mistake and right is the finished product. Pretty happy with the outcome.
Here's how it will connect to the stock shift linkage. This was just a rod end I had on hand, but I'll be ordering a new one.
Now that I'm happy with how the rod end attaches to the shifter, I felt good enough to install the steering column for good. Used new hardware on the lower clamp and took my time getting the column fit up with the steering wheel. I just popped it off for now though because it's easier to work in the car without that giant wheel in the way.
With the column back in the car, I started to turn my attention back to the wiring. The universal harness came pre-wired for oil, water and various other sensors or 12v+ accessories, but I'm taking all of that data from Terminator X so I won't be using them. However, I thought the car may not always have an LS engine so I'd just keep those wires in the harness and seal them off. I used some of the heat shrink with glue to seal off both ends of the wires so they can be easily terminated in the future, but are completely sealed in the meantime. Sorry for the blurry photo, it was late.
It was late last night in the garage and decided that I didn't want to look at the ugly DBW Impala gas pedal and did something about it. I LOVE it and can't wait to drive it with this pedal. I've had this cover for about 12 years now and finally found the right car to install it on!!
I need to get the exhaust routed for the driver's side before I can figure out the shift linkage. I believe the linkage will be much easier to move/change than routing the exhaust piping. Next up is mounting the ECU and finalizing the rest of the wiring on the car.
Cheers,
Ryan

Thread Starter
Joined: Apr 2012
Posts: 2,170
Likes: 715
From: Ruckersville, VA
Thanks Keith, I love how it turned out!
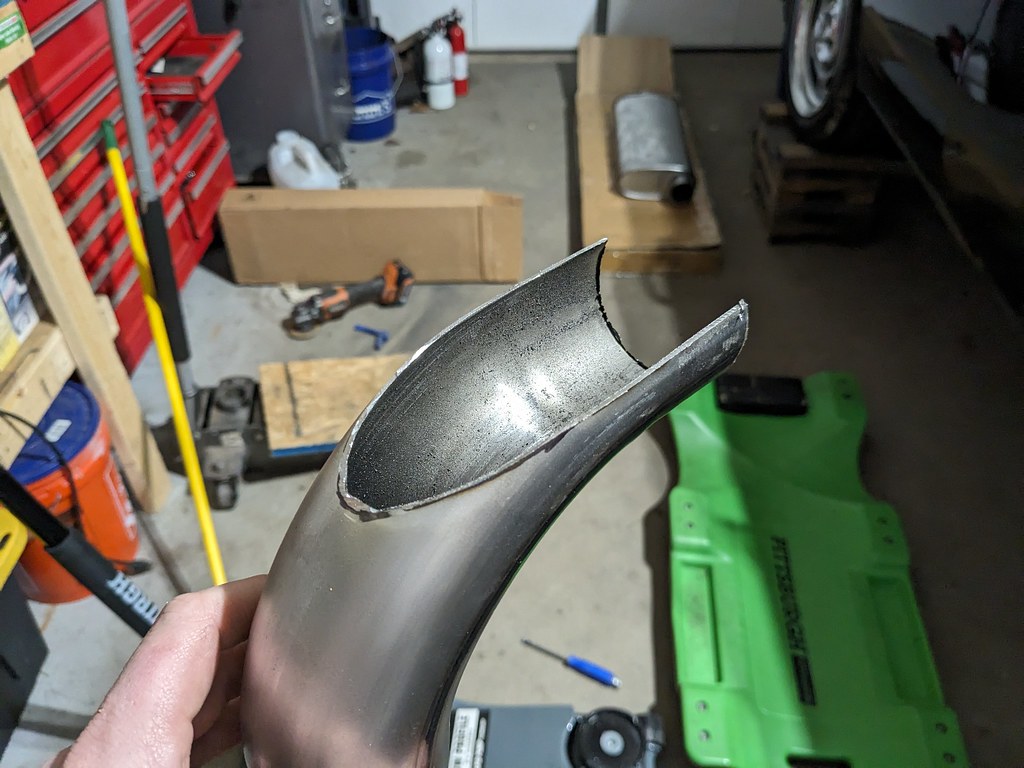
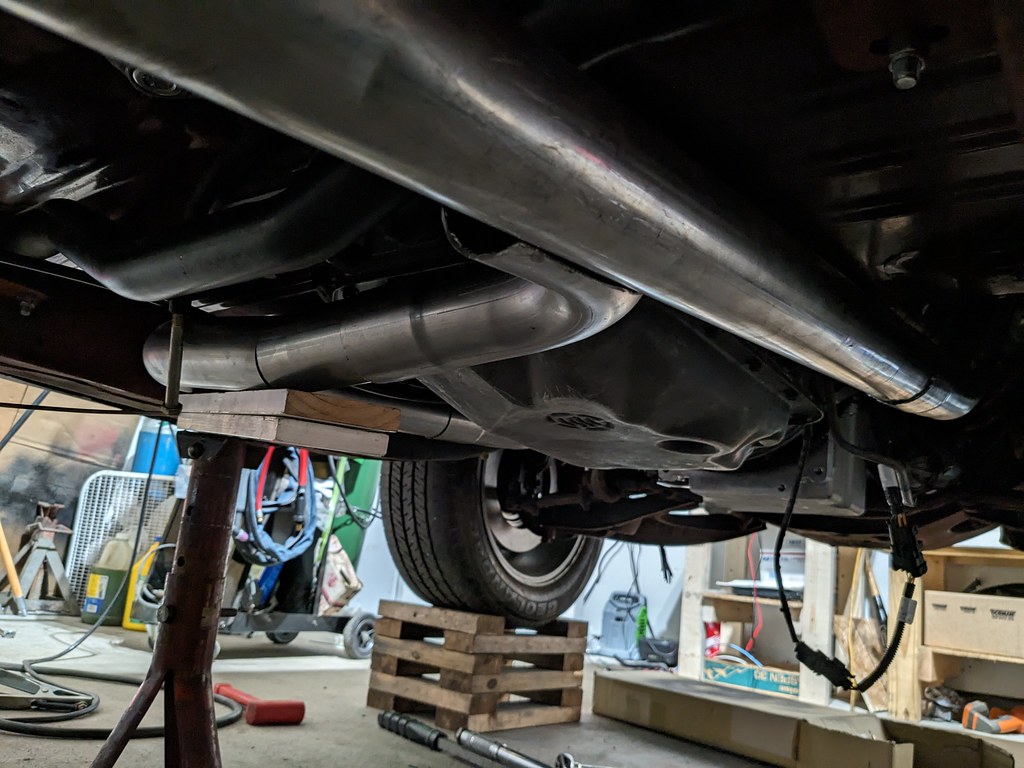
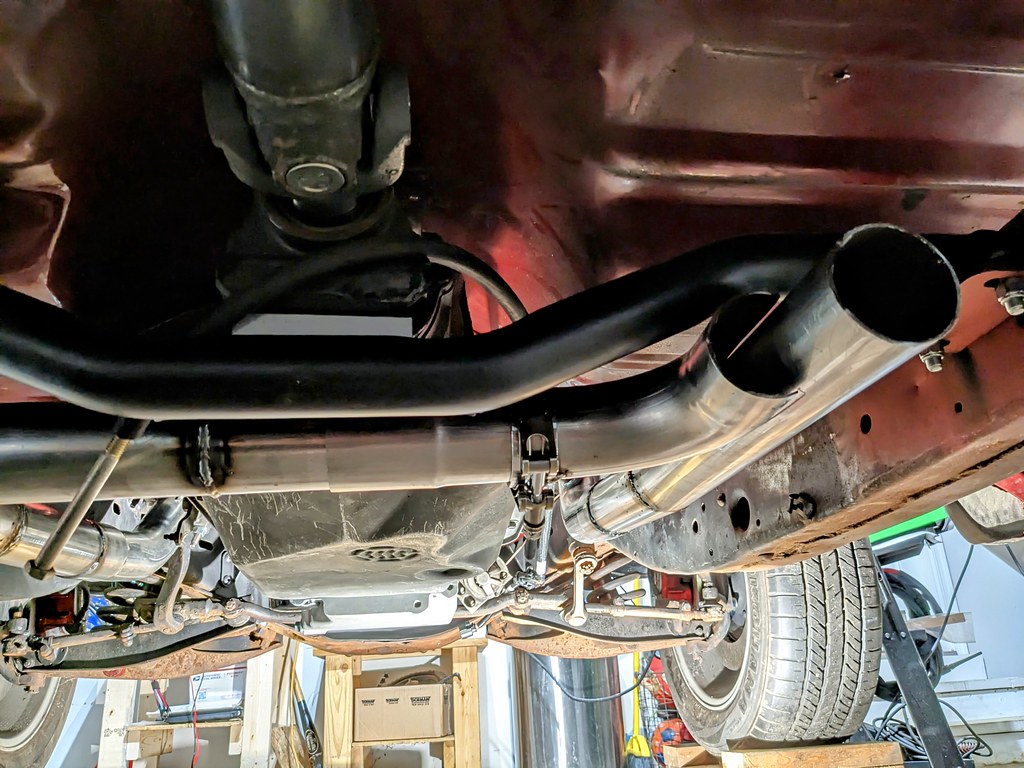
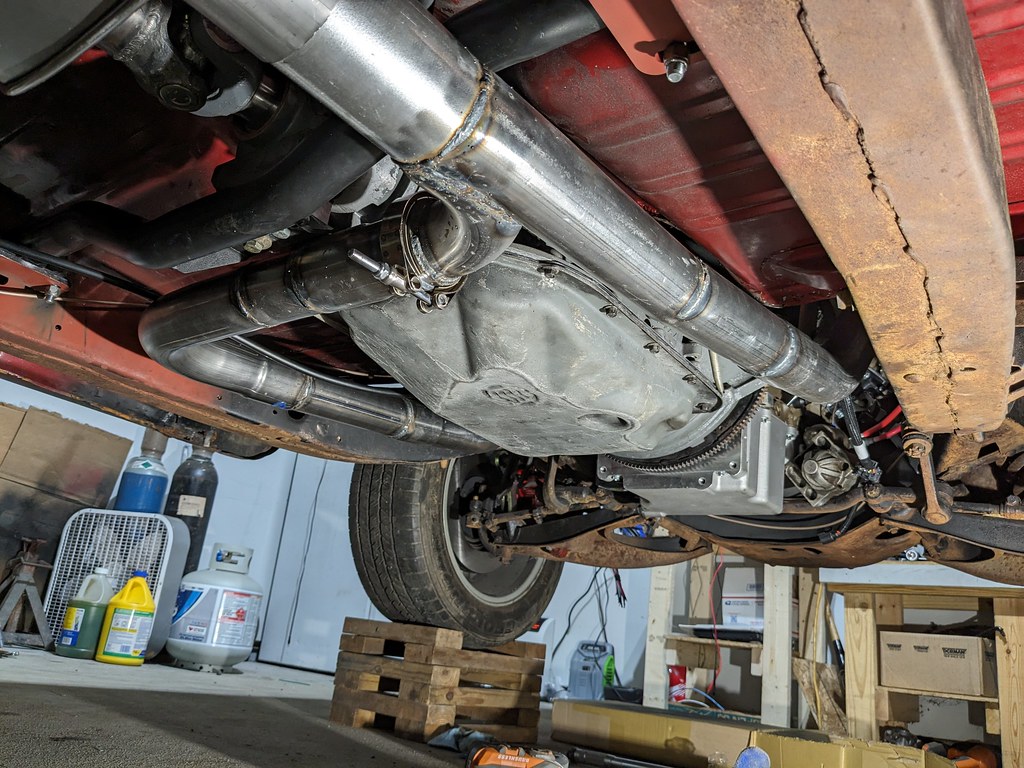
Last week I was tinkering around with the exhaust fitment and how I wanted it to route around everything. I realized that this project needed me to have a 3-4 solid hours to knock it out. I convinced my wife to let me do it Friday night after work so I could just knock it out. Very glad I did, because it's hard to do after the kiddos go to bed when I need to use the grinder. My goal was to make a solid good flowing exhaust, but keeping in mind that it's temporary. I made it from 2.5" mandrel bent mild steel and opted to MIG weld it(mainly because I was out of Argon). I got working along and forgot to take pictures along the way, but I started with some Summit racing Truck flanges then into the two 45* pieces from my universal kit. From there I did my best to get the pipes level with the frame with the straight pieces. Passenger side is where I chose to add the Oxygen sensor, for no other reason than it's less cluttered on that side. I decided to keep things simple with a Y pipe and take a stab at fabricating a 2.5" to 3" merge section. So here's where I remembered to take some pictures. I kept the pipes tucked up above or level with the frame and wrapped the driver's side around between the trans mount and the transmission tailshaft.
Once that was cut, I wanted to mock up the rest of the driver's side to see how it would match up. Once I was happy with how it was turning out I would tack weld a section, and remove the whole pipe to fully weld. That way I the pipe could warp slightly and everything would still line up in the end.
I worked my way back towards the merge, and got a V-band clamp welded together so that either pipe is serviceable if needed. Once that was done, I was able to get the slip section of the pipe welded tight and marked the driver's pipe so that I could trim off that section for a smooth merge.
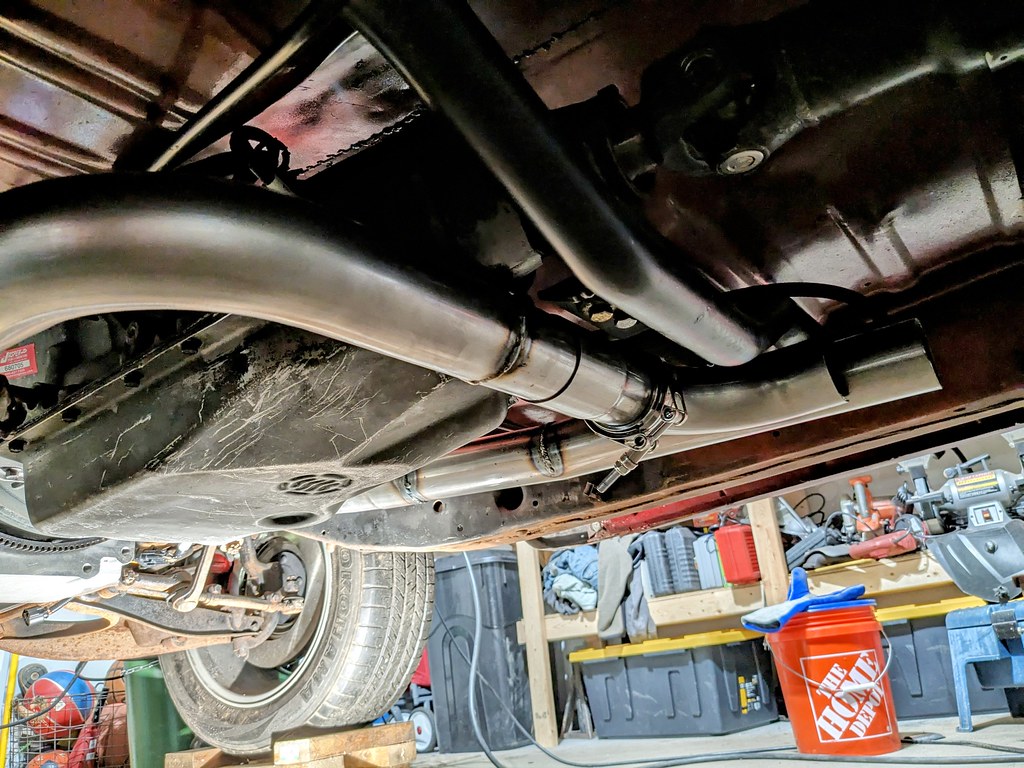
Once that slip section was welded on the driver's side and the section was sliced out of the driver's side, I got the merge fit into place and tacked.


I then removed the pipe and welded all the way around except for the last 2" of the pipe. Then through a combination of hammering and my bench vice I squeezed the pipe into shape using a short section of 3" pipe. It took me a while to slowly shape and get the right fitment for a nice butt weld, but I'm quite happy with the outcome. The only thing I wished I would have done differently is TIG welded, but I was out of Argon and just wanted to get this part done. MIG just left a lot of spatter, which was probably my fault. Should have adjusted the settings, but I like the MIG a bit on the hot side.

Now that the major exhaust fabrication was done, I test fit the muffler I'll be running. It's a Walker Quietflow 21054 stainless muffler with a single in single out 3". It's probably going to rob a bit of HP compared to some of the all out performance mufflers, but all the reviews I read said it was a notch or two above a stock muffler with no highway drone and quiet cabin. Exactly what I'm looking for. I made sure to test fit the muffler with the short 3" exhaust piece before final welding on the merge to make sure it tucked up. It's a beautiful thing when a plan comes together. The exhaust tucks up so nicely.

Also have plenty of room to service the transmission if needed.
I've been putting off the exhaust for a while so it feels good to have the majority of it together. I still need to pull it back apart to knock off the spatter and spray it with some sort of high temp paint to help the mild steel from rusting too quickly. My short term plan is also to run a pipe out the passenger side right before the rear tire. I also want to add a hanger right before and after the muffler. Once those are installed, I'm calling the exhaust done. Next on my list are a combination of shift linkage, radiator install and wiring. I'm working on how to mount the ECU now and hopefully can finish that so I can wrap up the wiring. Not sure if it's possible, but there is a local Cars and Coffee on 2/10 that I'm going to shoot for.
Cheers,
Ryan
Last week I was tinkering around with the exhaust fitment and how I wanted it to route around everything. I realized that this project needed me to have a 3-4 solid hours to knock it out. I convinced my wife to let me do it Friday night after work so I could just knock it out. Very glad I did, because it's hard to do after the kiddos go to bed when I need to use the grinder. My goal was to make a solid good flowing exhaust, but keeping in mind that it's temporary. I made it from 2.5" mandrel bent mild steel and opted to MIG weld it(mainly because I was out of Argon). I got working along and forgot to take pictures along the way, but I started with some Summit racing Truck flanges then into the two 45* pieces from my universal kit. From there I did my best to get the pipes level with the frame with the straight pieces. Passenger side is where I chose to add the Oxygen sensor, for no other reason than it's less cluttered on that side. I decided to keep things simple with a Y pipe and take a stab at fabricating a 2.5" to 3" merge section. So here's where I remembered to take some pictures. I kept the pipes tucked up above or level with the frame and wrapped the driver's side around between the trans mount and the transmission tailshaft.
Once that was cut, I wanted to mock up the rest of the driver's side to see how it would match up. Once I was happy with how it was turning out I would tack weld a section, and remove the whole pipe to fully weld. That way I the pipe could warp slightly and everything would still line up in the end.
I worked my way back towards the merge, and got a V-band clamp welded together so that either pipe is serviceable if needed. Once that was done, I was able to get the slip section of the pipe welded tight and marked the driver's pipe so that I could trim off that section for a smooth merge.
Once that slip section was welded on the driver's side and the section was sliced out of the driver's side, I got the merge fit into place and tacked.
I then removed the pipe and welded all the way around except for the last 2" of the pipe. Then through a combination of hammering and my bench vice I squeezed the pipe into shape using a short section of 3" pipe. It took me a while to slowly shape and get the right fitment for a nice butt weld, but I'm quite happy with the outcome. The only thing I wished I would have done differently is TIG welded, but I was out of Argon and just wanted to get this part done. MIG just left a lot of spatter, which was probably my fault. Should have adjusted the settings, but I like the MIG a bit on the hot side.
Now that the major exhaust fabrication was done, I test fit the muffler I'll be running. It's a Walker Quietflow 21054 stainless muffler with a single in single out 3". It's probably going to rob a bit of HP compared to some of the all out performance mufflers, but all the reviews I read said it was a notch or two above a stock muffler with no highway drone and quiet cabin. Exactly what I'm looking for. I made sure to test fit the muffler with the short 3" exhaust piece before final welding on the merge to make sure it tucked up. It's a beautiful thing when a plan comes together. The exhaust tucks up so nicely.
Also have plenty of room to service the transmission if needed.
I've been putting off the exhaust for a while so it feels good to have the majority of it together. I still need to pull it back apart to knock off the spatter and spray it with some sort of high temp paint to help the mild steel from rusting too quickly. My short term plan is also to run a pipe out the passenger side right before the rear tire. I also want to add a hanger right before and after the muffler. Once those are installed, I'm calling the exhaust done. Next on my list are a combination of shift linkage, radiator install and wiring. I'm working on how to mount the ECU now and hopefully can finish that so I can wrap up the wiring. Not sure if it's possible, but there is a local Cars and Coffee on 2/10 that I'm going to shoot for.
Cheers,
Ryan
Thread Starter
Joined: Apr 2012
Posts: 2,170
Likes: 715
From: Ruckersville, VA
Now that the major exhaust fabrication is nearly wrapped up, I wanted to move my attention to the ECU and where I wanted to mount it. I first played around with the layout of the ECU and the Bussman fuse/relay panel that I wanted to use for various electronics. I wanted to make sure that the mount was easily accessible, yet tucked up and away.

After I played around with the placement, I found a nice spot right behind the dash speaker that is also out of the way of the glove box. I'm hoping that one of those off the shelf dual speaker brackets will work where this is mounted, but if not I'll just fabricate something to fit. I ended up making it out of some 1/8" plate steel I had, which was way overkill but made the bracket very sturdy.
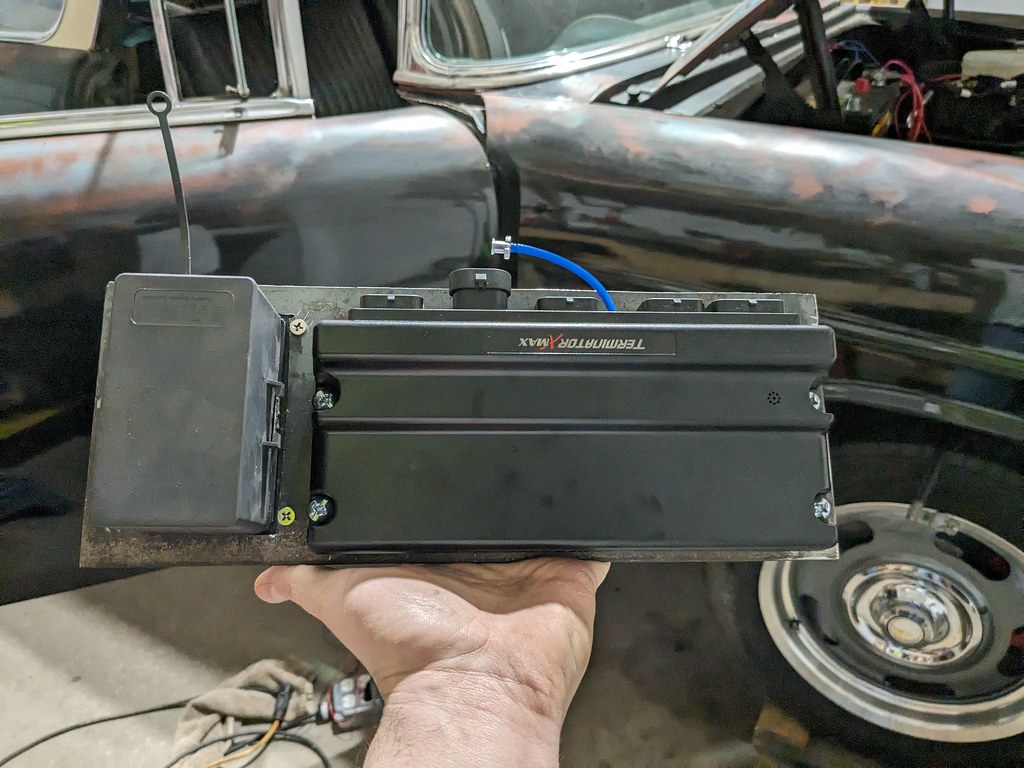
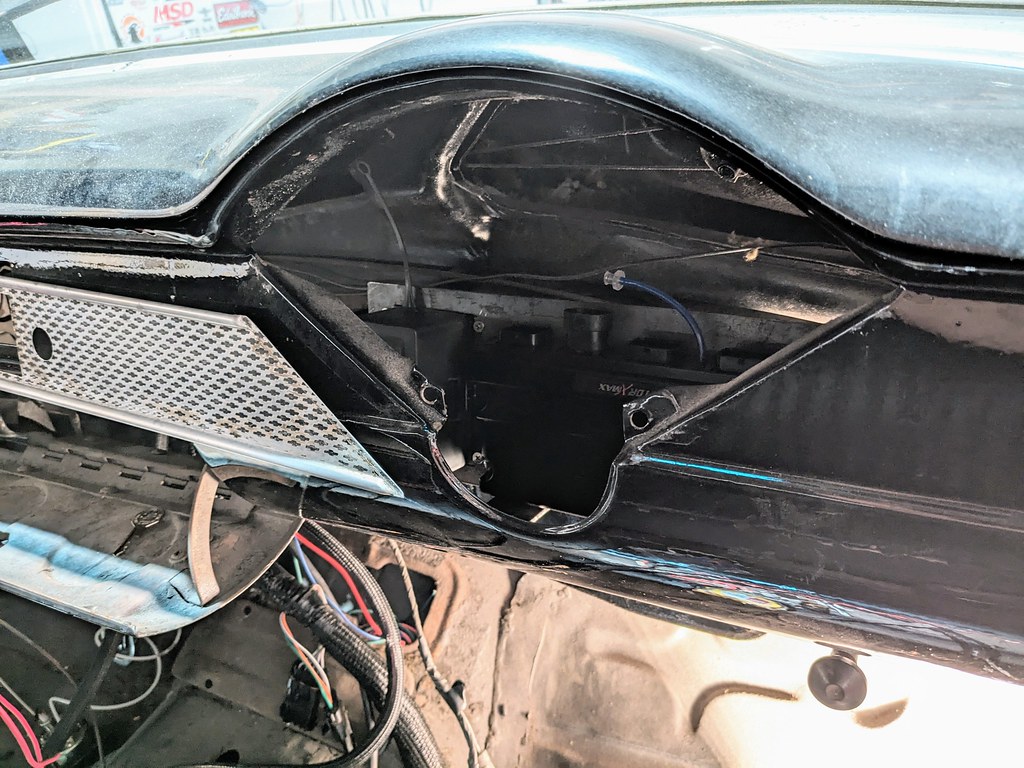

I wanted to make sure that there would be plenty of room behind the Bussman panel for my wiring and also so that if I needed to, I could completely remove it for maintenance.

Once I was happy with the placement I tack welded it in place and removed to weld it completely on my bench.

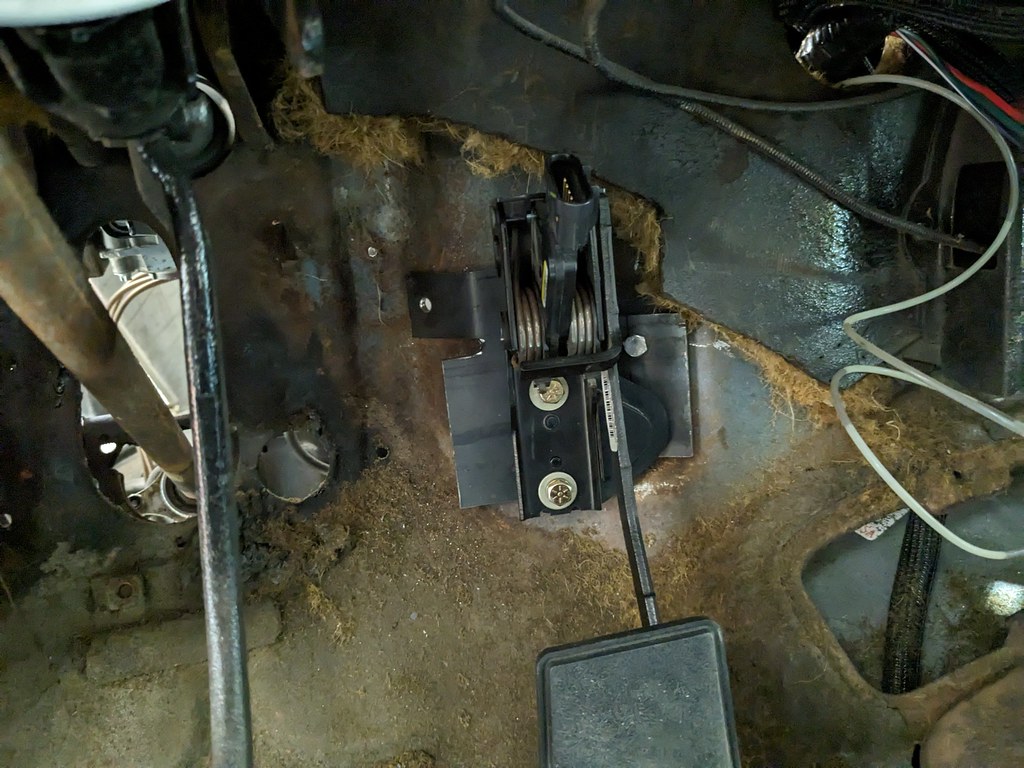
I need to find some rubber isolators before I can mount it permanently, but hoping to get that reinstalled so I can cleanly route all my wiring to the ECU. The exhaust was completed and now I moved on to another project and decided to see what it would take to get the shift lever hooked up so I didn't have any interference wit the exhaust. Keeping with my budget theme, I decided to save some money and make the bracket myself. I repurposed the throttle cable that was on my car when I bought it since it had two rod ends. I can't see where it was actually a TriFive part, but think it was actually a throttle linkage off of a Harley or something. Anyway, I started with the stock lever as a template. I did have to reclock where the lever fits into the slot.

I put the lever in my mill to elongate the hole, but didn't realize until part way through that the head of the mill was moving as it wasn't locked down 100% tight. It looks a little sloppy, but worked great when I installed it so I'm going to stay with it since it has zero play.

I bought a 5/16" rod from Tractor Supply and threaded the ends to match the rod ends, then hooked it all up. The rod needed a slight bend to clear the firewall, but shifts smoothly and freely. Pretty cool that it worked on the first try!
After playing around shifting the gears for a few minutes, I counted the gears and realized that I wasn't quite able to get it to shift into 1st gear. After a bit of thinking and messaging with some TriFive guys I know, they suggested that I re-drill a new hole closer to the pivot. That did the trick and I was able to get all my gears!
[url=https://www.flickr.com/gp/98271343@N03/T470d43D4w]
I was also playing around with the placement of the radiator and the hoses that I wanted to run. After finding several threads on Trifive.com I ordered the Gates 21710 and it fit just like everyone said it would. Once you cut off the section by the mesh, it will fit like it was made to be there.
Now the upper section was a little trickier since there are many variations of engine accessories, but the combination that I came up with works perfectly for a late model Gen4 Truck water pump. I used a combination of Gates 20416 and 20873. I cut and trimmed them to fit the bends that I needed around the CAI, then used an ICT adapter to connect them together. It was leftover from my Camaro, but worked perfectly for this scenario.


While I was modifying the hoses, I wanted to confirm that it wouldn't interfere with the CAI I picked up a while ago. It's a generic 99-06 Silverado/Sierra V8 CAI, but it works great for this application. I'll need to shorten the pipe quite a bit, but overall fits really nicely. It's a nice big filter too so it should provide tons of surface area.
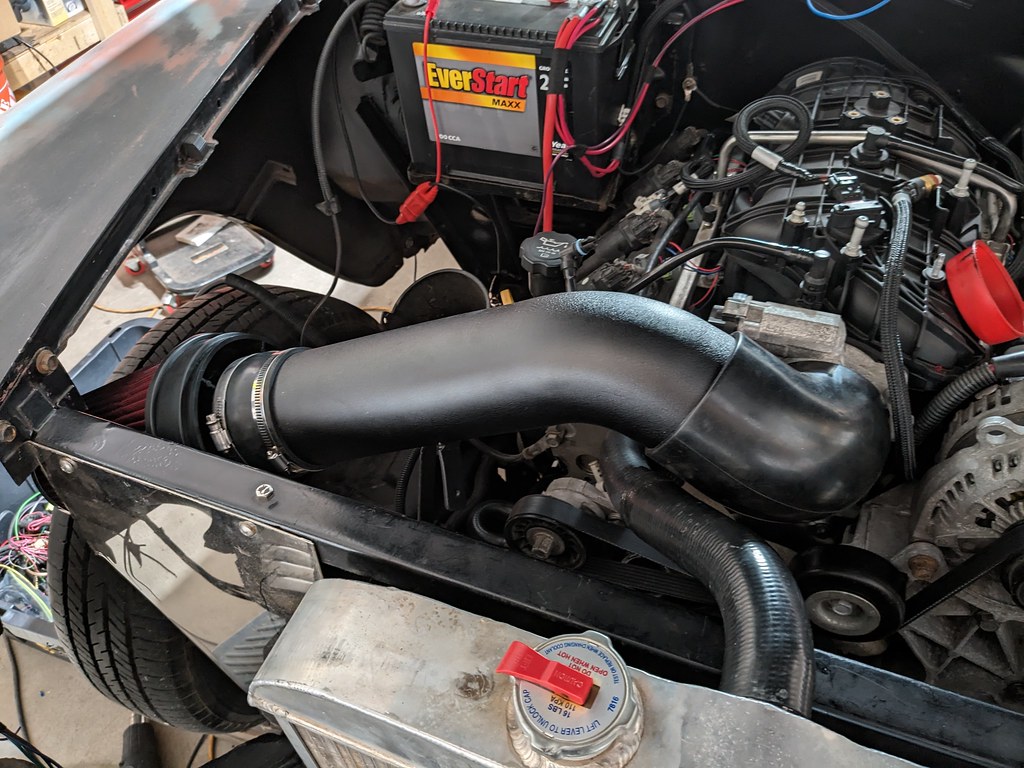
I think that my shorter term goal will be to re-arrange that setup and swap out my engine accessories to C5/C6 to give me more room between the radiator and water pump. That will also give me more room to flip the CAI to the other side for a cleaner look.
Cheers,
Ryan
After I played around with the placement, I found a nice spot right behind the dash speaker that is also out of the way of the glove box. I'm hoping that one of those off the shelf dual speaker brackets will work where this is mounted, but if not I'll just fabricate something to fit. I ended up making it out of some 1/8" plate steel I had, which was way overkill but made the bracket very sturdy.
I wanted to make sure that there would be plenty of room behind the Bussman panel for my wiring and also so that if I needed to, I could completely remove it for maintenance.
Once I was happy with the placement I tack welded it in place and removed to weld it completely on my bench.
I need to find some rubber isolators before I can mount it permanently, but hoping to get that reinstalled so I can cleanly route all my wiring to the ECU. The exhaust was completed and now I moved on to another project and decided to see what it would take to get the shift lever hooked up so I didn't have any interference wit the exhaust. Keeping with my budget theme, I decided to save some money and make the bracket myself. I repurposed the throttle cable that was on my car when I bought it since it had two rod ends. I can't see where it was actually a TriFive part, but think it was actually a throttle linkage off of a Harley or something. Anyway, I started with the stock lever as a template. I did have to reclock where the lever fits into the slot.
I put the lever in my mill to elongate the hole, but didn't realize until part way through that the head of the mill was moving as it wasn't locked down 100% tight. It looks a little sloppy, but worked great when I installed it so I'm going to stay with it since it has zero play.
I bought a 5/16" rod from Tractor Supply and threaded the ends to match the rod ends, then hooked it all up. The rod needed a slight bend to clear the firewall, but shifts smoothly and freely. Pretty cool that it worked on the first try!
After playing around shifting the gears for a few minutes, I counted the gears and realized that I wasn't quite able to get it to shift into 1st gear. After a bit of thinking and messaging with some TriFive guys I know, they suggested that I re-drill a new hole closer to the pivot. That did the trick and I was able to get all my gears!
[url=https://www.flickr.com/gp/98271343@N03/T470d43D4w]
I was also playing around with the placement of the radiator and the hoses that I wanted to run. After finding several threads on Trifive.com I ordered the Gates 21710 and it fit just like everyone said it would. Once you cut off the section by the mesh, it will fit like it was made to be there.
Now the upper section was a little trickier since there are many variations of engine accessories, but the combination that I came up with works perfectly for a late model Gen4 Truck water pump. I used a combination of Gates 20416 and 20873. I cut and trimmed them to fit the bends that I needed around the CAI, then used an ICT adapter to connect them together. It was leftover from my Camaro, but worked perfectly for this scenario.
While I was modifying the hoses, I wanted to confirm that it wouldn't interfere with the CAI I picked up a while ago. It's a generic 99-06 Silverado/Sierra V8 CAI, but it works great for this application. I'll need to shorten the pipe quite a bit, but overall fits really nicely. It's a nice big filter too so it should provide tons of surface area.
I think that my shorter term goal will be to re-arrange that setup and swap out my engine accessories to C5/C6 to give me more room between the radiator and water pump. That will also give me more room to flip the CAI to the other side for a cleaner look.
Cheers,
Ryan
Thread Starter
Joined: Apr 2012
Posts: 2,170
Likes: 715
From: Ruckersville, VA
With the ECU mount sorted out, I was determined to get the wiring buttoned up. While it's great that Holley provides a clean harness with lots of length to route where you need it, for me it was way too much length. I tried looping it around, and started going down that path, then realized that I really disliked how it looked and was in the way of future components. So I pulled it all back out and started over. After a few different options, I found that looping around behind the ECU and looping around the passenger side, it routed much better and used up all of the "extra" length in the Holley harness. Once that was straightened out, I could build off of that routing and start wiring up my Bussmann fuse/relay panel. I pre-wires as much as I could on the bench, then I brought it into the cabin to integrate.

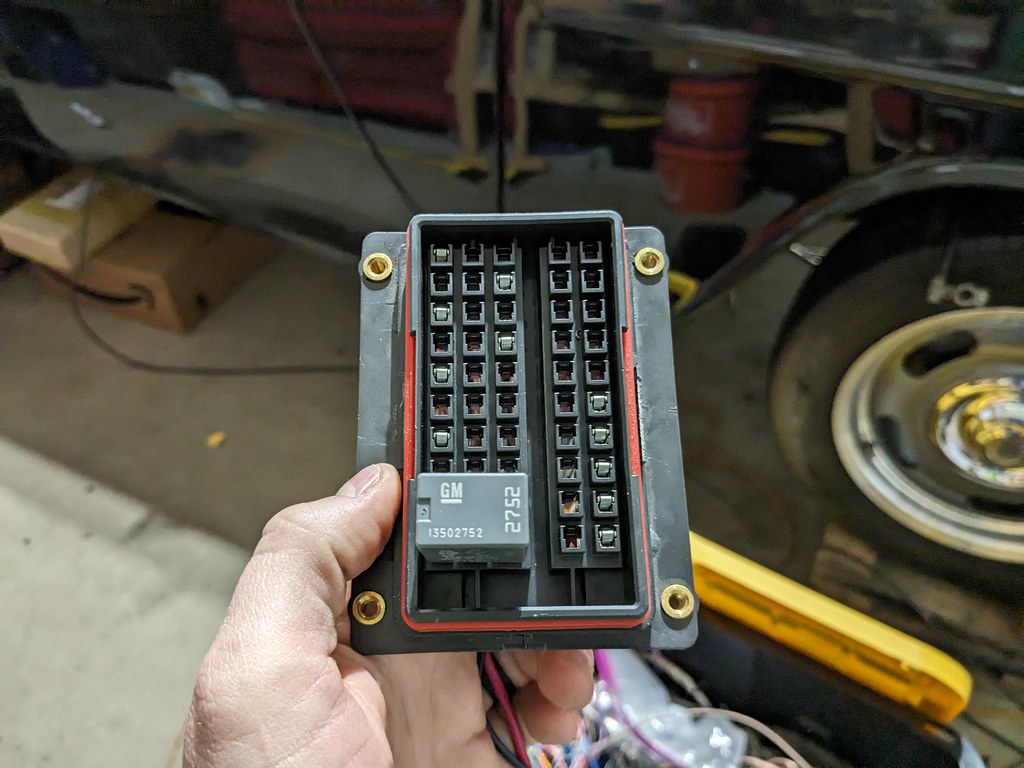
I added wires to relays and spots for future fused accessories that I may need. I added three relays; the bottom one will be a relay dedicated ignition relay to power the panel, middle relay is my neutral safety switch that gets a feed from the factory 4L80e switch. The top relay is a transmission relay to separate it from the engine ECU ignition. It's in the instructions that they need to be separated or the engine may not shut off, but when I opened my transmission harness there was no relay. I found that I must have had an older transmission harness that only had a power feed and that Holley revised the later harnesses to include a relay.
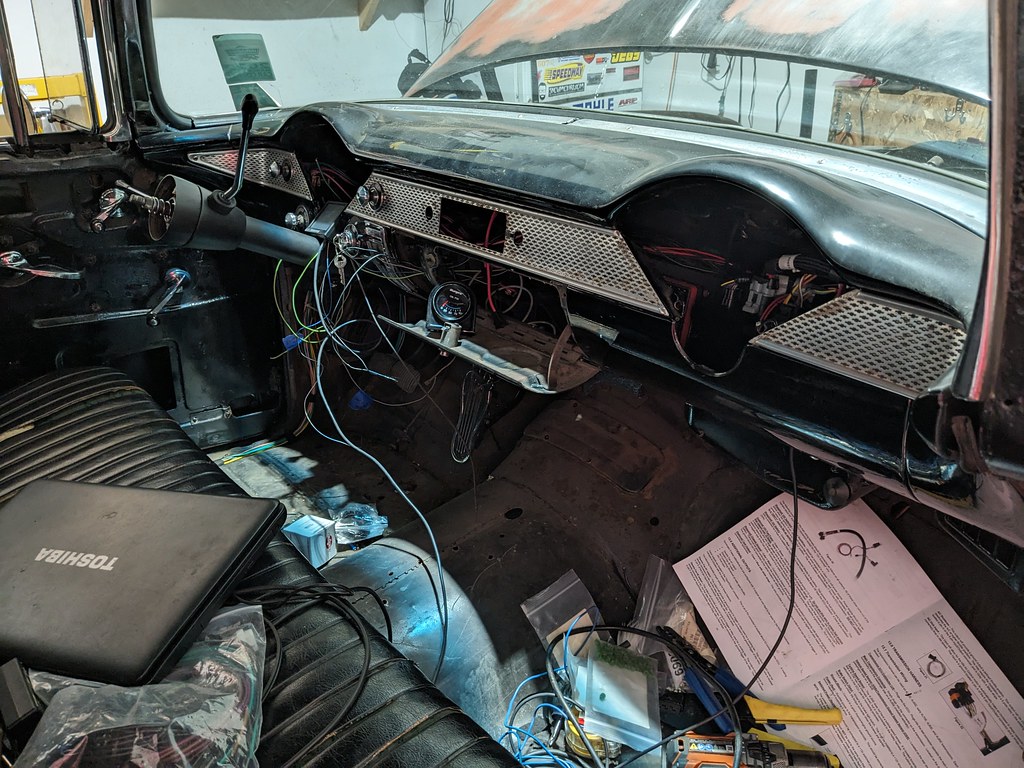
Here is a picture in the middle of my wiring mess. I built the ECU mount and harness in a way that I could pull out the Bussmann panel for servicing, so you can see it on the glove box door. Then I tested everything and it worked perfectly!

Now that it's working I can put it all together and start to tidy up the under dash wiring.


I still have several wires that need to be terminated, but overall I'm happy that the wiring is mostly complete. Most of the remaining wiring is related to my turn signals, gauges or radio. I also wired in a hidden kill switch as a bit of extra protection.
Now that the wiring for the engine/trans is in place and fully functional, I continued down my list to figure out what else I needed to do in order to fire up the car...again I did a bunch of misc. things like, filling the trans fluid, looping cooler lines, re-routing some wiring in the engine bay, final mounting the radiator, installing engine steam ports, tightening bolts, reinstalling O2 sensor, and much more. I got it to the point that I was able to fire up the car as a complete assembly for more than just a few seconds. While the tune needs a lot of work, I was happy to report that it ran with great oil pressure and didn't have any engine leaks that I could find. I did have one transmission cooler line that was dripping quite a bit, but that should be a pretty quick fix. Since this was a completely unknown transmission, I put jack stands under the rear end with 10 quarts in the transmission. My neighbor stopped over when he heard the car fire up and shifted into reverse and he said the wheels were turning! Then in park they stopped.
I'm very pleased that the car is mostly back together now and the motor will run and start with the key as well as move the wheels in gear. I was however disappointed with the way the engine was running. After some more diagnosis, I've got some fueling issues that need to be sorted out. It will only build about 10psi with the fuel pump on, engine off. Then when the pump stops, the pressure drops to zero. I need to so more diagnosis before I can find a solution. Guessing that it's the Frankenstein fuel pump that I built.
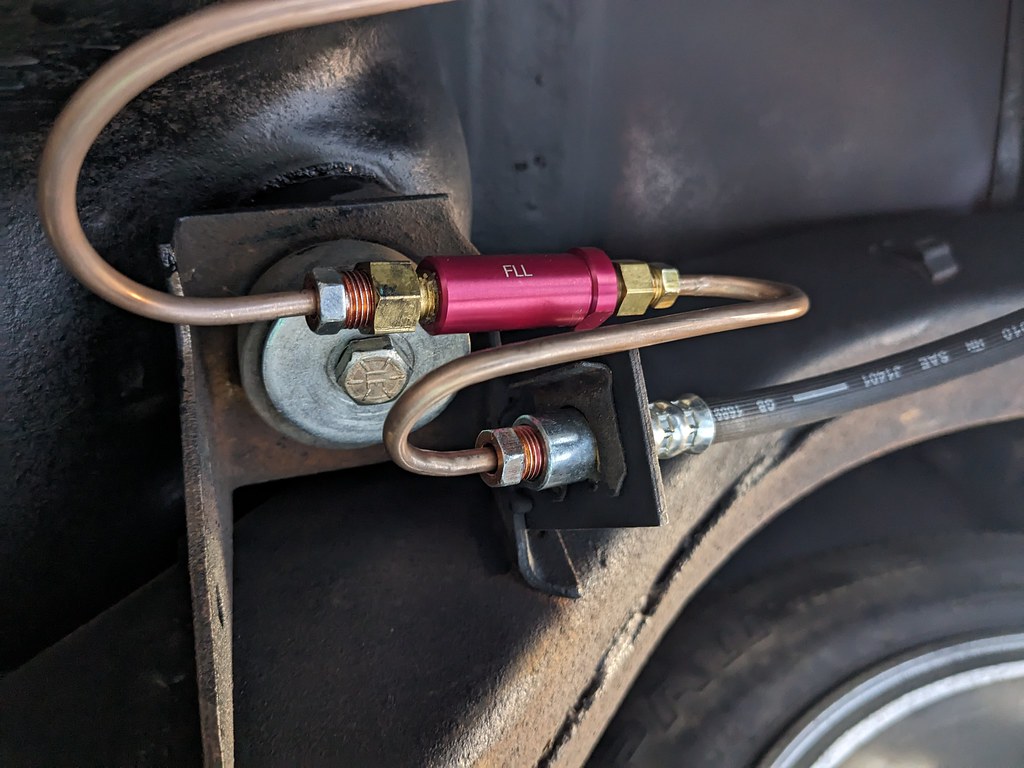
Moving on, I wanted to get the brakes sorted out. I had hoped to just bleed the rear brakes and call it a day, but the driver's side bleeder was froze shut. Ran down to the parts store and ordered a short section of NiCopp and two new wheel cylinders. Pretty cool that they had these on the shelf for an almost 70 year old car!
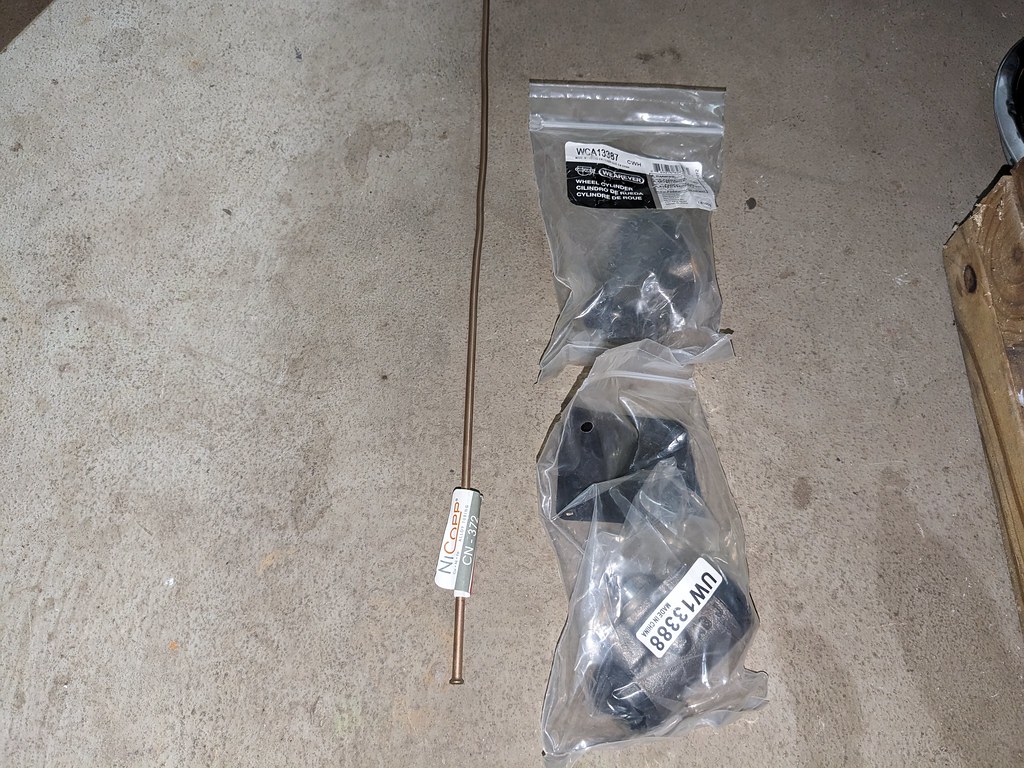
Pulled off the driver's side and everything had surface rust, but was in pretty good shape functionally. Not sure what all of the oil is on the axle? If it was a wheel cylinder, I would have expected to see it on everything?
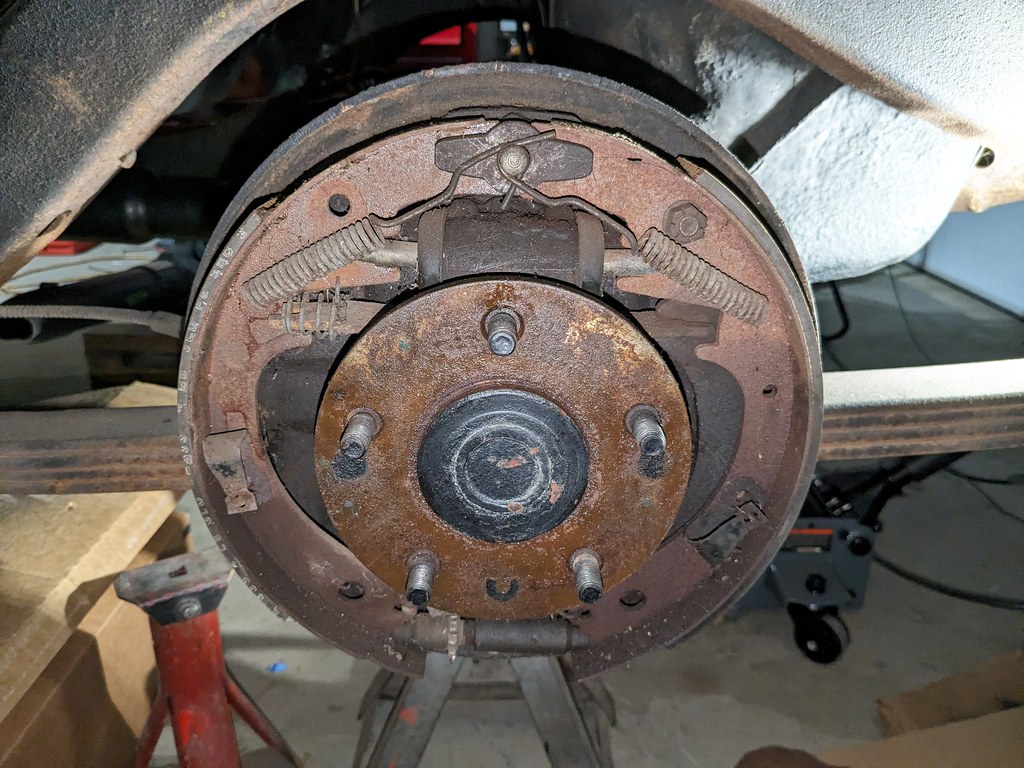
Was able to pop off the top springs and pop the old cylinder right out. Luckily the brake fluid hadn't made it's way down this far yet, so there wasn't any fluid to worry about. Routed the line over the axle housing, then cut and flared to meet up with the hose.
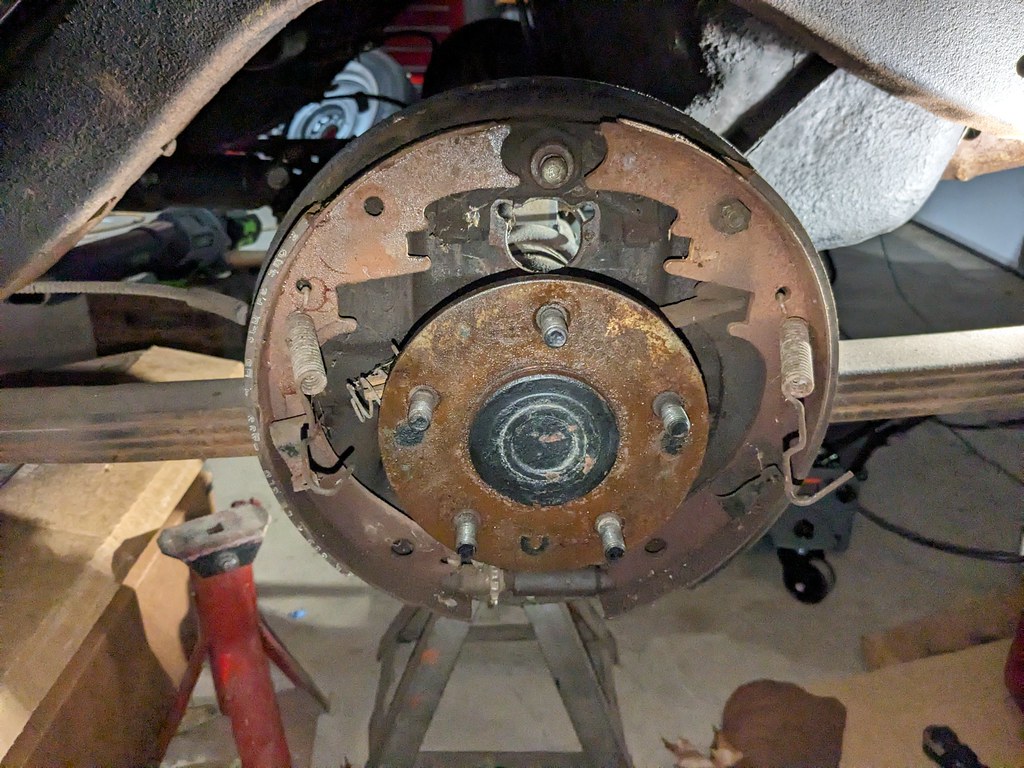
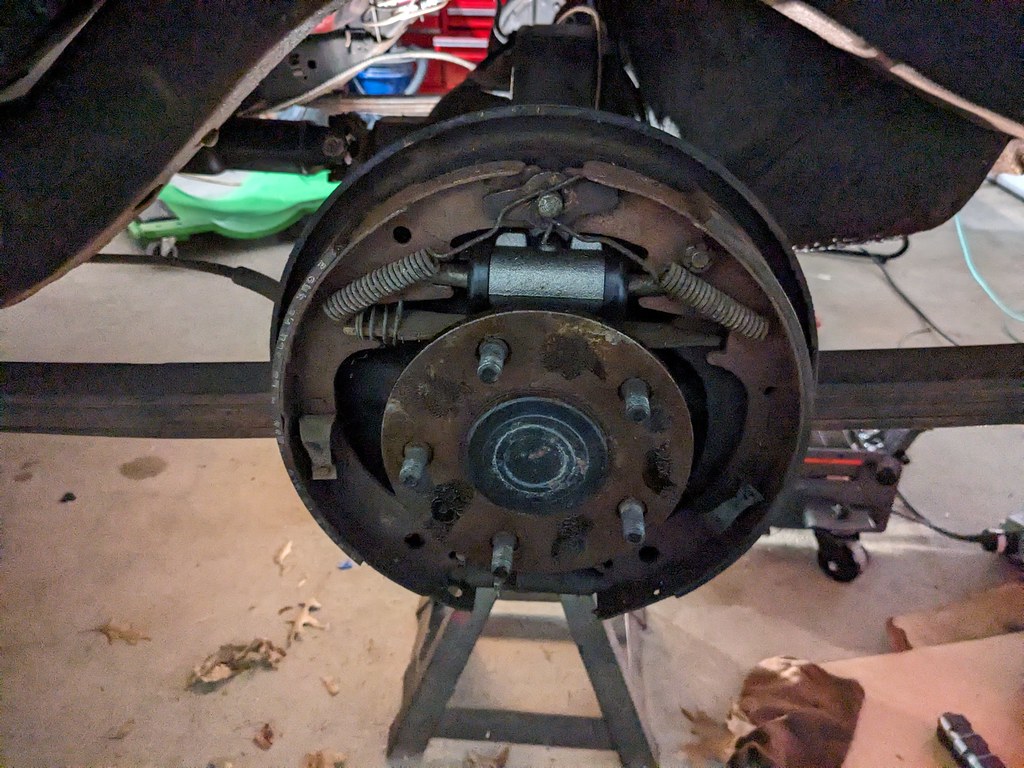
Then it was rinse and repeat for the passenger's side. There was a bit more fluid on this side, but overall no much mess. That project was one of the few times when it took about the same time as I expected which is rare. In a way I'm glad the bleeder was froze because now I have new wheel cylinders and confirmed that everything is in working order.
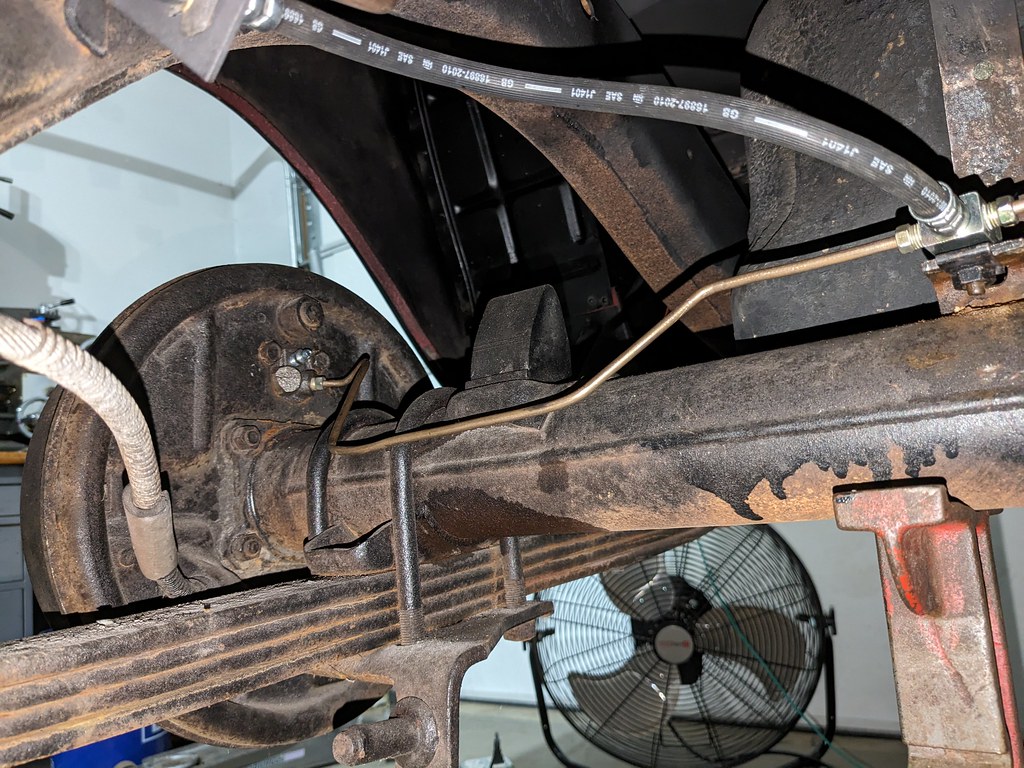
Next thing I had to address was something I discovered after welding in my transmission crossmember a few weeks ago. Two pieces of weld spatter landed on the NiCopp lines and welded themselves in place?!? I didn't think that it was possible since they are mostly Copper, but apparently there's enough Nickle in them to have mild steel weld spatter stick. So rather than replacing the whole thing, I opted to just add a union fitting. I'd love to say that this was also a mostly clean job like the wheel cylinders, but that was not the case at all. I tried to quickly get my flare tool in there, but as fast as I was working the fluid just gushed out.
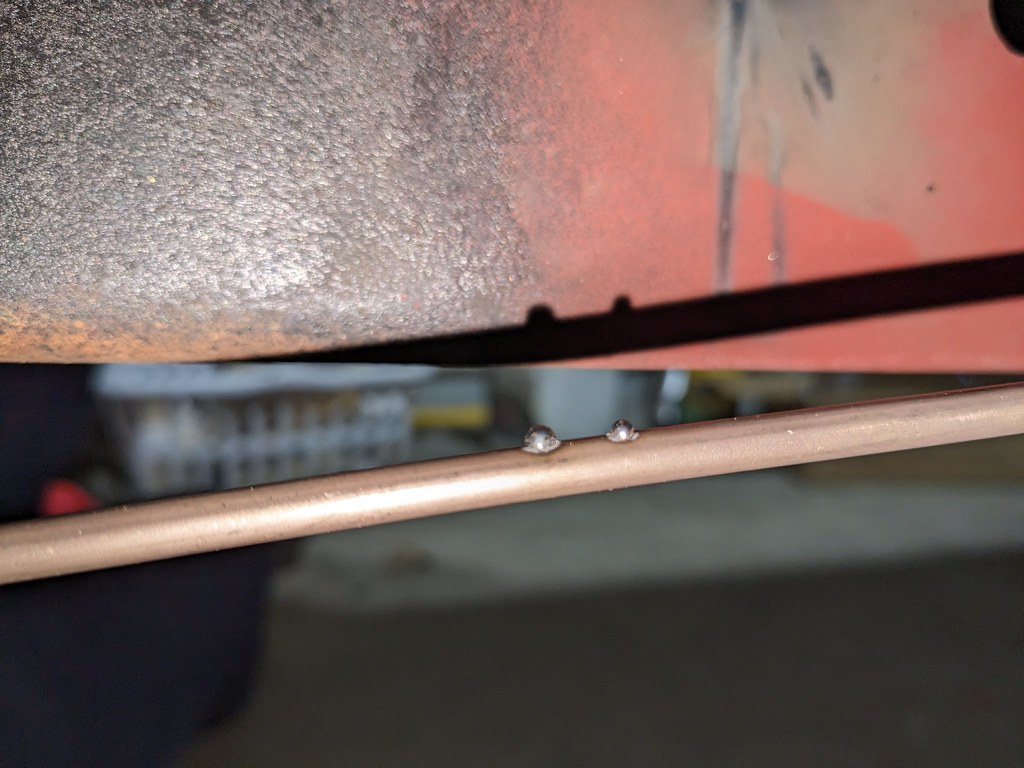
I bought these little clamps a few years ago, and this was just the ticket after I got a good flare. They are made by SUR & R Auto and are called brake fluid stoppers and were perfect for this situation.

I was able to take my time on the other flare since not much fluid came out. Once that was good, I added the union fitting and tried to quickly tighten it all. Got it all tightened down and it didn't drip once overnight, so I call that a win.

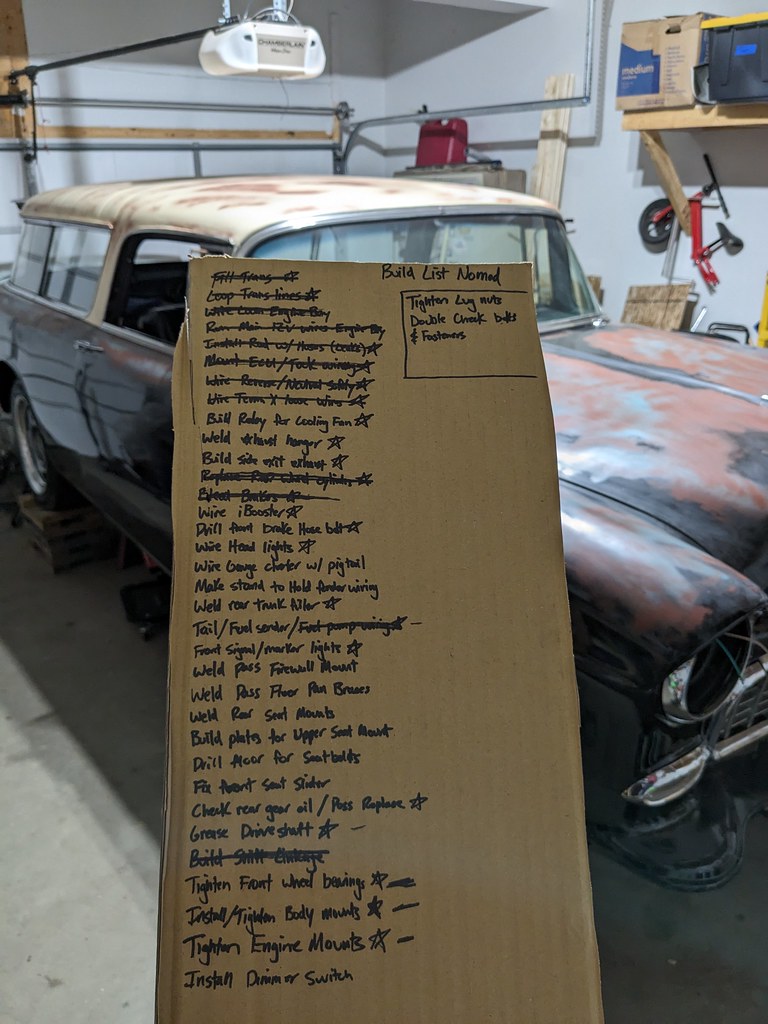
I'm pretty quickly crossing things off of this list! Once I cross a few more off of the list, I think I'll take it up and down the block.
It was a fairly lazy Sunday yesterday so my wife said that she could give me a hand bleeding my brakes. They bled out really nicely after only a few open/shuts on each bleeder. Tested them and the pedal is rock hard. I'm hoping to hook up the iBooster this week and see what the assist feels like. If I can figure out the fueling issue this week, I'm nearly ready to see what she does on the street.
Cheers,
Ryan
I added wires to relays and spots for future fused accessories that I may need. I added three relays; the bottom one will be a relay dedicated ignition relay to power the panel, middle relay is my neutral safety switch that gets a feed from the factory 4L80e switch. The top relay is a transmission relay to separate it from the engine ECU ignition. It's in the instructions that they need to be separated or the engine may not shut off, but when I opened my transmission harness there was no relay. I found that I must have had an older transmission harness that only had a power feed and that Holley revised the later harnesses to include a relay.
Here is a picture in the middle of my wiring mess. I built the ECU mount and harness in a way that I could pull out the Bussmann panel for servicing, so you can see it on the glove box door. Then I tested everything and it worked perfectly!
Now that it's working I can put it all together and start to tidy up the under dash wiring.
I still have several wires that need to be terminated, but overall I'm happy that the wiring is mostly complete. Most of the remaining wiring is related to my turn signals, gauges or radio. I also wired in a hidden kill switch as a bit of extra protection.
Now that the wiring for the engine/trans is in place and fully functional, I continued down my list to figure out what else I needed to do in order to fire up the car...again I did a bunch of misc. things like, filling the trans fluid, looping cooler lines, re-routing some wiring in the engine bay, final mounting the radiator, installing engine steam ports, tightening bolts, reinstalling O2 sensor, and much more. I got it to the point that I was able to fire up the car as a complete assembly for more than just a few seconds. While the tune needs a lot of work, I was happy to report that it ran with great oil pressure and didn't have any engine leaks that I could find. I did have one transmission cooler line that was dripping quite a bit, but that should be a pretty quick fix. Since this was a completely unknown transmission, I put jack stands under the rear end with 10 quarts in the transmission. My neighbor stopped over when he heard the car fire up and shifted into reverse and he said the wheels were turning! Then in park they stopped.
I'm very pleased that the car is mostly back together now and the motor will run and start with the key as well as move the wheels in gear. I was however disappointed with the way the engine was running. After some more diagnosis, I've got some fueling issues that need to be sorted out. It will only build about 10psi with the fuel pump on, engine off. Then when the pump stops, the pressure drops to zero. I need to so more diagnosis before I can find a solution. Guessing that it's the Frankenstein fuel pump that I built.
Moving on, I wanted to get the brakes sorted out. I had hoped to just bleed the rear brakes and call it a day, but the driver's side bleeder was froze shut. Ran down to the parts store and ordered a short section of NiCopp and two new wheel cylinders. Pretty cool that they had these on the shelf for an almost 70 year old car!
Pulled off the driver's side and everything had surface rust, but was in pretty good shape functionally. Not sure what all of the oil is on the axle? If it was a wheel cylinder, I would have expected to see it on everything?
Was able to pop off the top springs and pop the old cylinder right out. Luckily the brake fluid hadn't made it's way down this far yet, so there wasn't any fluid to worry about. Routed the line over the axle housing, then cut and flared to meet up with the hose.
Then it was rinse and repeat for the passenger's side. There was a bit more fluid on this side, but overall no much mess. That project was one of the few times when it took about the same time as I expected which is rare. In a way I'm glad the bleeder was froze because now I have new wheel cylinders and confirmed that everything is in working order.
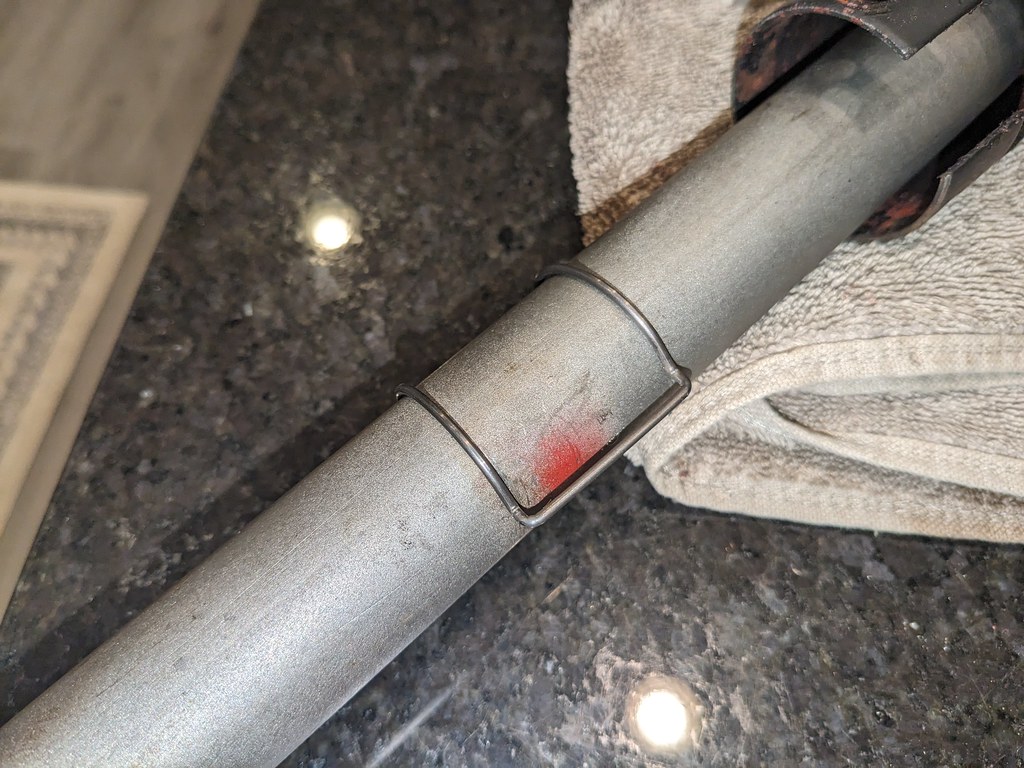
Next thing I had to address was something I discovered after welding in my transmission crossmember a few weeks ago. Two pieces of weld spatter landed on the NiCopp lines and welded themselves in place?!? I didn't think that it was possible since they are mostly Copper, but apparently there's enough Nickle in them to have mild steel weld spatter stick. So rather than replacing the whole thing, I opted to just add a union fitting. I'd love to say that this was also a mostly clean job like the wheel cylinders, but that was not the case at all. I tried to quickly get my flare tool in there, but as fast as I was working the fluid just gushed out.
I bought these little clamps a few years ago, and this was just the ticket after I got a good flare. They are made by SUR & R Auto and are called brake fluid stoppers and were perfect for this situation.
I was able to take my time on the other flare since not much fluid came out. Once that was good, I added the union fitting and tried to quickly tighten it all. Got it all tightened down and it didn't drip once overnight, so I call that a win.
I'm pretty quickly crossing things off of this list! Once I cross a few more off of the list, I think I'll take it up and down the block.
It was a fairly lazy Sunday yesterday so my wife said that she could give me a hand bleeding my brakes. They bled out really nicely after only a few open/shuts on each bleeder. Tested them and the pedal is rock hard. I'm hoping to hook up the iBooster this week and see what the assist feels like. If I can figure out the fueling issue this week, I'm nearly ready to see what she does on the street.
Cheers,
Ryan
Thread Starter
Joined: Apr 2012
Posts: 2,170
Likes: 715
From: Ruckersville, VA
Ok y'all, this last update is super exciting for me, but was quite a roller coaster to get there. With the first startup out of the way, I wasn't that far off from taking the car out for a test drive! First task was to recruit my wife to help me with bleeding the brakes. She's done that before so it was very straight forward and they bled out very quickly. No pictures to show, but now it can officially stop! I'm going to jump around a bit, but stick with me.
Next up was to figure out why the car took so much effort to fire up and run. I would have to crank for a long time to get it to fire and stay running. If you listen to the last video, you can hear that it's labored for fuel. I was hoping to get away without a fuel pressure sensor, but this has forced my hand. I bought a few sensors from Low Dollar Motorsports for both the fuel and oil pressures. Once I got those installed the fuel pressure was only showing 10 psi while running, and would drop to zero immediately after it was off. If that wasn't enough data, I also checked the fuel learn table, and it was trying to add 87% fuel at idle to keep it running. I used a cheapy fuel pressure regulator from eBay and I think it came back to bite me.

So, I dropped the tank and with the fuel pump still connected and turned the pump on and it was spraying like crazy out of that little return hose, so I knew that it was bad... I bit the bullet and ordered the FPR I should have originally from Vaporworx. Ordered on a Sunday afternoon and it arrived by Thursday evening. Huge thanks to Carl!

Almost as soon as that was delivered, I ran out to the mailbox and swapped out the regulator and reinstalled to test. Fantastic news was that after a 2 second prime, it had over 25psi, but the bad news is I found out the fuel lid I used had a cracked fitting and was spraying fuel everywhere under the car!

I was able to pivot fairly quickly and used the gen5 Camaro lid with some small modifications. The lid that I used originally was from a 09-15 CTS-V since the long term plan is to swap in a real CTS-V fuel assembly with twin fuel pumps that's sitting on my bench when I add boost. I'll cross that bridge when the time comes, but for now it's the path of least resistance.

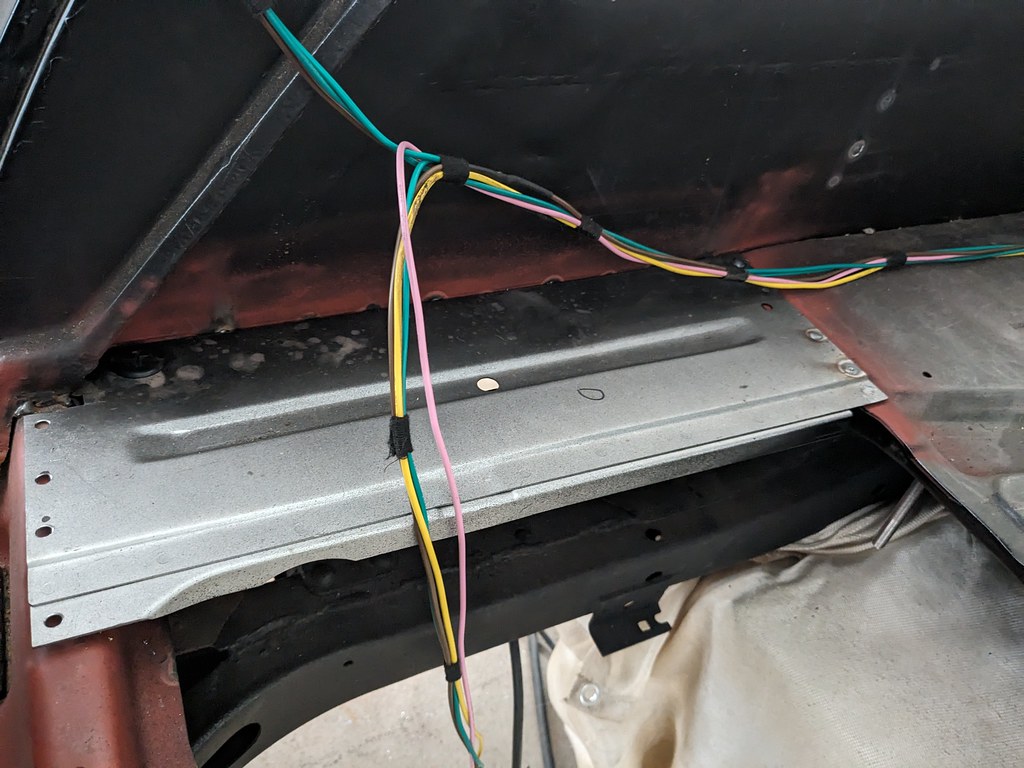
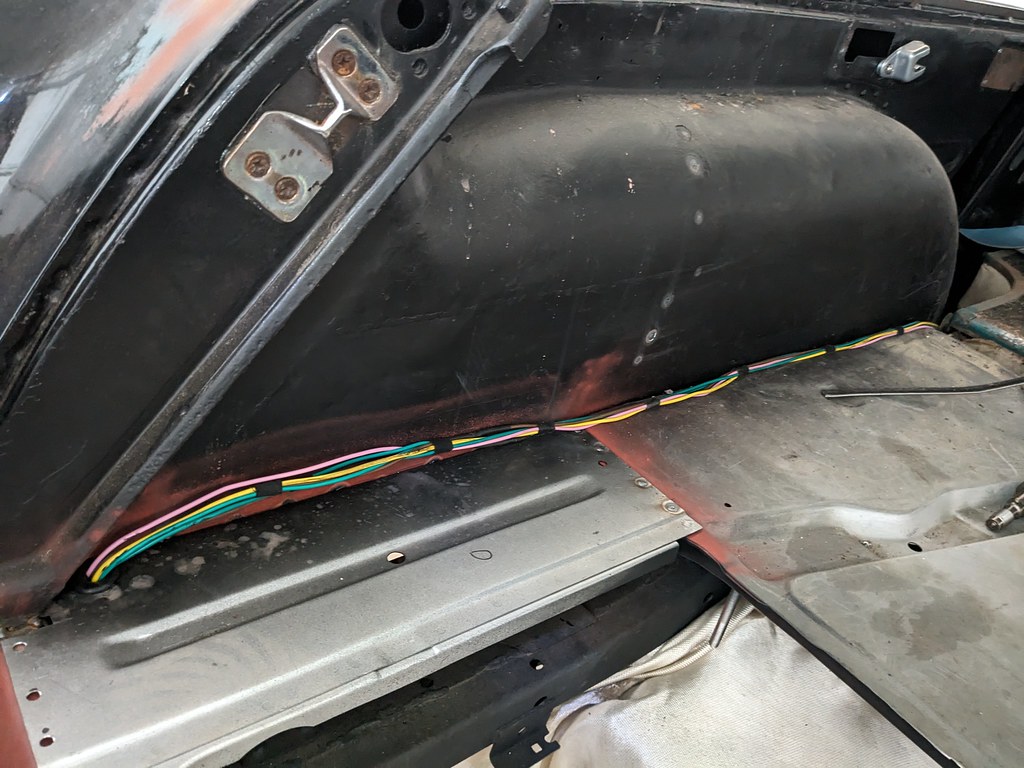
In between waiting for the fuel pump parts and issues, I welded in the cargo extension pieces that fit between the stock spare tire well. I needed to weld those in so that I could route the tail light wiring through the grommet in the driver's side corner.
Again, while waiting for parts I was able to pivot and work on wiring up the iBooster to test it functionality. Again, relied on evcreate.com for the wiring diagrams as there is a ton of information there about the swap. I was lucky enough to get the pigtails with the iBooster I picked up, so it was a matter of striping out the unused wires and labeling them for installation.

With that wired up, I was concerned that it wasn't giving me any assistance. After trial and error of testing all the wiring, I determined that it wasn't the wiring issue. As a last resort, I pulled the pin from the clevis and noticed that there was a bit of preload on the pin. It came out a little hard, but once it was free, I heard some clicking and then I was able to push the rod by hand! Apparently they don't like any preload, so I loosened up the clevis two turns and then reinstalled with full assist! Very happy about that.
Once that was straightened out, I turned back to my fueling issue, and got everything reinstalled in the car. Now the car has a bit over 60psi while running!
With all of that straightened out, it was time to fire up the car and see if it will move. I cranked up the car and it idled significantly better, then gave the car a once over to make sure nothing was leaking and there was fluid pouring out of the transmission! WTH!! Quickly shut it off and found that one of the transmission lines wasn't happy. So I ran to the parts store and someone sold me a significantly discounted line and new fitting to get me quickly fixed up. Swapped those on the car and no leaks!! Well still drips a little on the temporary loop I ran, but it's minimal. All that built up to this:
Then after I got back from the drive, I got a nice walk around in it's current state. Still needs plenty of TLC, but it's a running and driving car now!!
It's been quite a roller coaster the last few days, but I'm so close to having it be street legal. I'm basically down to installing headlights, parking brake, rear view mirror and windshield wipers. Should be able to knock those out in the next few weeks and get an appointment for an inspection!
Cheers,
Ryan
Next up was to figure out why the car took so much effort to fire up and run. I would have to crank for a long time to get it to fire and stay running. If you listen to the last video, you can hear that it's labored for fuel. I was hoping to get away without a fuel pressure sensor, but this has forced my hand. I bought a few sensors from Low Dollar Motorsports for both the fuel and oil pressures. Once I got those installed the fuel pressure was only showing 10 psi while running, and would drop to zero immediately after it was off. If that wasn't enough data, I also checked the fuel learn table, and it was trying to add 87% fuel at idle to keep it running. I used a cheapy fuel pressure regulator from eBay and I think it came back to bite me.
So, I dropped the tank and with the fuel pump still connected and turned the pump on and it was spraying like crazy out of that little return hose, so I knew that it was bad... I bit the bullet and ordered the FPR I should have originally from Vaporworx. Ordered on a Sunday afternoon and it arrived by Thursday evening. Huge thanks to Carl!
Almost as soon as that was delivered, I ran out to the mailbox and swapped out the regulator and reinstalled to test. Fantastic news was that after a 2 second prime, it had over 25psi, but the bad news is I found out the fuel lid I used had a cracked fitting and was spraying fuel everywhere under the car!
I was able to pivot fairly quickly and used the gen5 Camaro lid with some small modifications. The lid that I used originally was from a 09-15 CTS-V since the long term plan is to swap in a real CTS-V fuel assembly with twin fuel pumps that's sitting on my bench when I add boost. I'll cross that bridge when the time comes, but for now it's the path of least resistance.
In between waiting for the fuel pump parts and issues, I welded in the cargo extension pieces that fit between the stock spare tire well. I needed to weld those in so that I could route the tail light wiring through the grommet in the driver's side corner.
Again, while waiting for parts I was able to pivot and work on wiring up the iBooster to test it functionality. Again, relied on evcreate.com for the wiring diagrams as there is a ton of information there about the swap. I was lucky enough to get the pigtails with the iBooster I picked up, so it was a matter of striping out the unused wires and labeling them for installation.
With that wired up, I was concerned that it wasn't giving me any assistance. After trial and error of testing all the wiring, I determined that it wasn't the wiring issue. As a last resort, I pulled the pin from the clevis and noticed that there was a bit of preload on the pin. It came out a little hard, but once it was free, I heard some clicking and then I was able to push the rod by hand! Apparently they don't like any preload, so I loosened up the clevis two turns and then reinstalled with full assist! Very happy about that.
Once that was straightened out, I turned back to my fueling issue, and got everything reinstalled in the car. Now the car has a bit over 60psi while running!
With all of that straightened out, it was time to fire up the car and see if it will move. I cranked up the car and it idled significantly better, then gave the car a once over to make sure nothing was leaking and there was fluid pouring out of the transmission! WTH!! Quickly shut it off and found that one of the transmission lines wasn't happy. So I ran to the parts store and someone sold me a significantly discounted line and new fitting to get me quickly fixed up. Swapped those on the car and no leaks!! Well still drips a little on the temporary loop I ran, but it's minimal. All that built up to this:
Then after I got back from the drive, I got a nice walk around in it's current state. Still needs plenty of TLC, but it's a running and driving car now!!
It's been quite a roller coaster the last few days, but I'm so close to having it be street legal. I'm basically down to installing headlights, parking brake, rear view mirror and windshield wipers. Should be able to knock those out in the next few weeks and get an appointment for an inspection!
Cheers,
Ryan

Congrats on the first drive! I know it sucks to have to buy the fuel pressure sensor (I felt the same way about shelling out the money for it) but ultimately it's a great troubleshooting tool and you'll need it when you go boosted.
The wheels and exhaust note are awesome on this thing. Oh and your boys' **** eating grin riding by is priceless.
The wheels and exhaust note are awesome on this thing. Oh and your boys' **** eating grin riding by is priceless.
Thread Starter
Joined: Apr 2012
Posts: 2,170
Likes: 715
From: Ruckersville, VA
Thanks man! Buy once cry once I suppose. I had always planned on installing one, but like you said I was just hoping to defer the cost down the road. I had a mechanical oil pressure gauge, so while I was buying the fuel pressure I also bought a sensor for oil pressure too.
I'm really happy with the sound too. It's very mellow and yes, the boys were so stoked.
I'm really happy with the sound too. It's very mellow and yes, the boys were so stoked.

Launching!


Joined: Jul 2014
Posts: 292
Likes: 99
From: Duluth, Minnesota
Heck yeah! I have been lurking on this thread for a long while watching the progress and just wanted to jump in and say this thing is so damn cool!
Your work is awesome and to see the progress.
And the paint just fits so well on the car.
Excited to see it all wrap up!
-Cody
Your work is awesome and to see the progress.
And the paint just fits so well on the car.
Excited to see it all wrap up!
-Cody

Thread Starter
Joined: Apr 2012
Posts: 2,170
Likes: 715
From: Ruckersville, VA
Thanks guys!! I'm so stoked to have it to the point that it is now. It's come a long way since I bought it a little over a year ago.
Steve, I don't plan on selling, but if the right offer comes my way I may be tempted to let her go.
Steve, I don't plan on selling, but if the right offer comes my way I may be tempted to let her go.
Thread Starter
Joined: Apr 2012
Posts: 2,170
Likes: 715
From: Ruckersville, VA
With the huge push to get the car running/driving/stopping it wore me down a bit. I had to take a break and just enjoy the fact that I could drive it around the neighborhood. I was still collecting parts, but got back to working on it this weekend. Now that I've hit that large milestone, my next goal is to get the car fully road worthy so that I can schedule an inspection so I can hit the open road! One of the parts I was waiting on was a Y splitter for the Holley CAN bus. This allows me to connect the USB cable and use the 3.5" screen at the same time.

My fuel table needs lots of work.
After looking up the rules for what's required for passing the inspection, the parking brake would be the most challenging item. I had the handle inside the car, but everything else was missing. After looking around online seeing the parts I needed selling for ~$500 bucks, I made a trip to my favorite junkyard up the road. The same car that donated the rear floor section to my car also donated the parking brake parts. The floors were so rotted, that I just cut the hump in between the two floor pans to easily reach the brackets. I was expecting a big fight, but was pleasantly surprised that all 6 bolts came out smooth and easy! couldn't believe how clean the hardware is!
I also picked up some rear seat reinforcement plates and rear view mirror.
The lower cable guide is a bit rough, but nothing that I can't fix. Just needs a new wheel, new hardware and paint.
The mirror back side and mount were pitted, but the face is very smooth. I cleaned up and painted the back side of the mirror, then just used some steel wool on the mount and it cleaned up pretty decent... But matches the rest of the trim in the car.
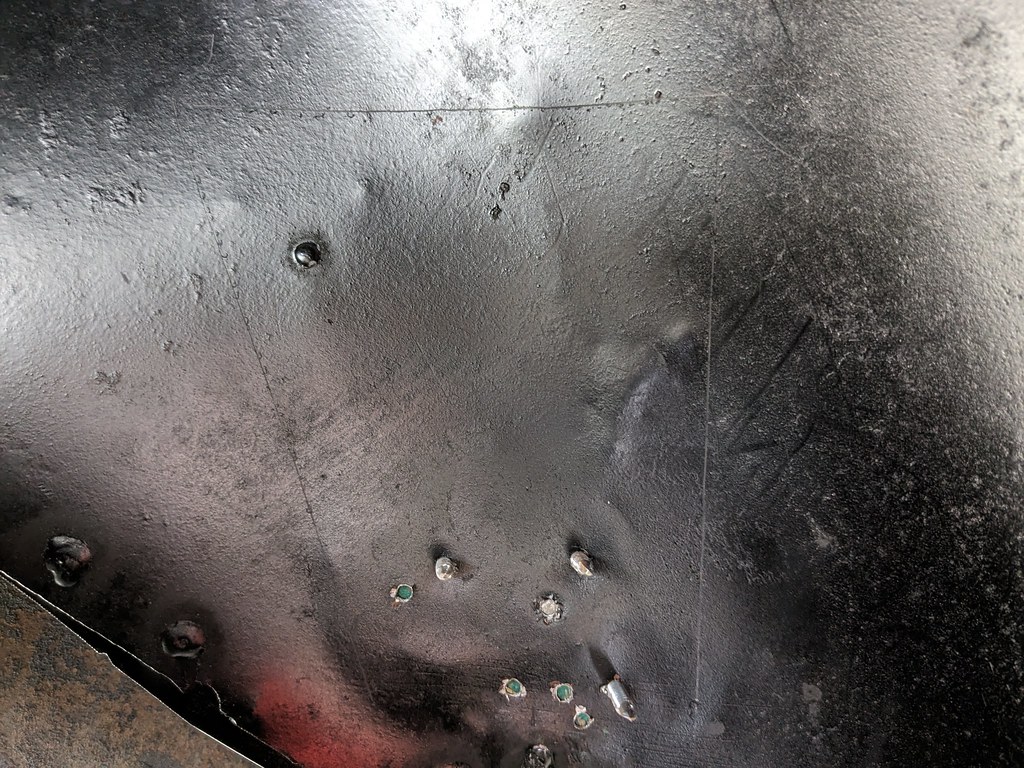
I've been putting off this project for a while, but it was finally time to get the floor braces and rear seat mounts all welded up. Whoever installed the floors before somehow didn't completely weld the floor braces to the pans. So I drilled some holes along the braces and spot welded the floors and braces together.

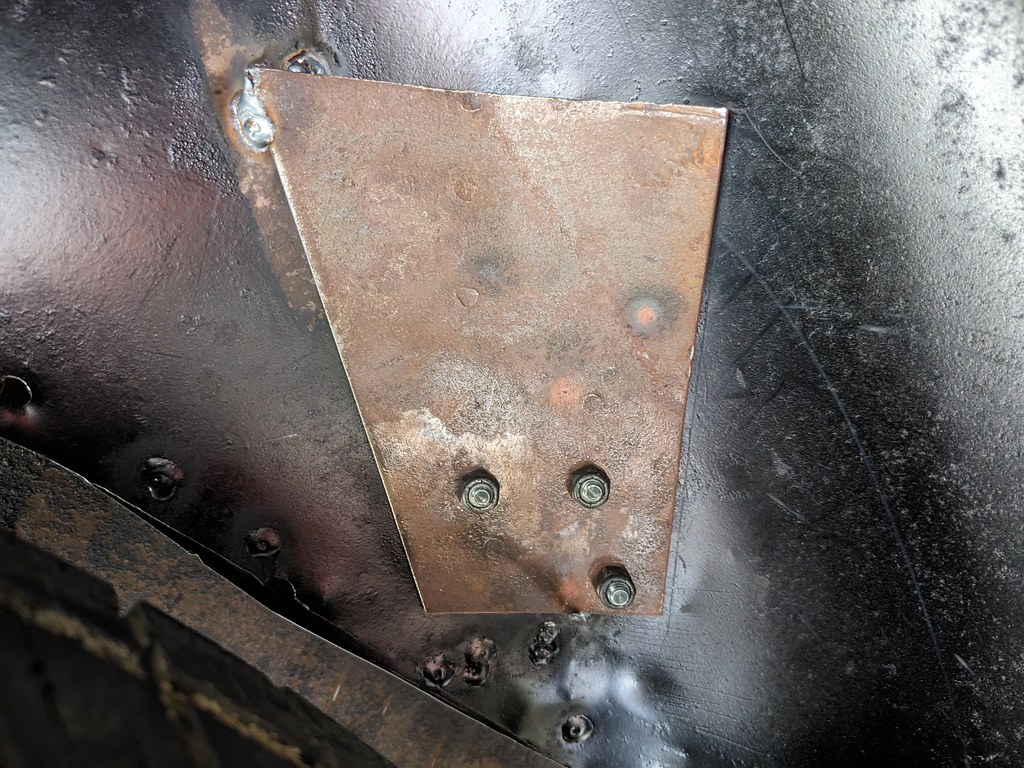
Once that was done, I moved to install the rear seat reinforcement plates. I had the upper seat installed with some self tapping screws so that I could nail down the right mounting spot. So I used those screws to set the plate and scribed a line for the spot welds. I then drilled a bunch of spot weld holes to secure the plate on. I still need to seam seal and paint the plates, but they are now installed.
Since I had the welder out, I pushed to get the rear seat bottom brackets installed. I didn't get any in process, but the seat brackets had to be tweaked slightly once the upper seat was completely bolted down. I buzzed them all together after I drilled a bunch of holes for spot welds. Brackets are very solidly welded, so they aren't going anywhere. Paint was still wet from spraying the spot welds, but it should dry down completely flat.


Once that was final welded, I bolted the rear seat bottom back together too. Looks the same as before, but now when I rotate the seats it's so much smoother.
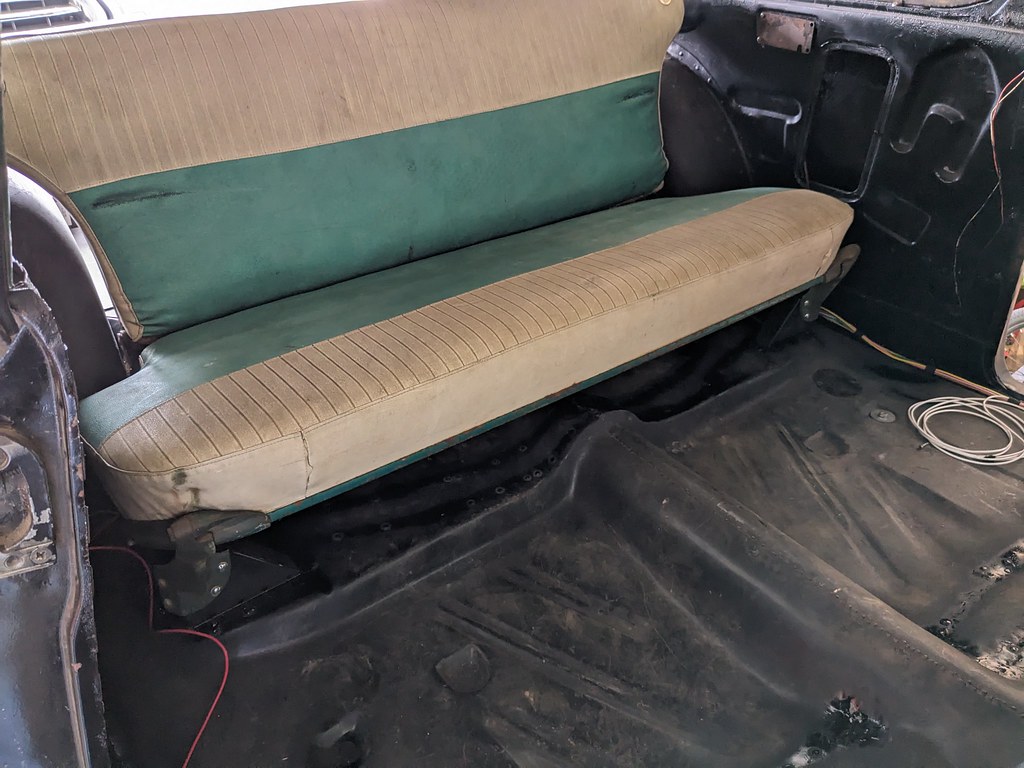
With the seats all back together and bolted down for good, I really wanted to get an interior panel out so see what it looked like. I'm really digging the 55 Nomad panels. My plan is to keep the original Turquoise uppers, but dye the bottom black. I think that it'll look really good and I like that it's still stockish. From all of my research, there wasn't a black interior option for a 1955 Nomad. So using the original panels, but dyed black on the bottom will look pretty cool. Plus the original waffle panels and all of the original chrome trim.

Then the UPS/Fedex/USPS trucks all came and dropped off parts at my house. I got a complete set of body bushings, firewall grommet for Terminator X, ebrake rollers/bolts, shift indicator spring/clip, front parking brake cable, and dust caps for the 61-68 Impala hubs.
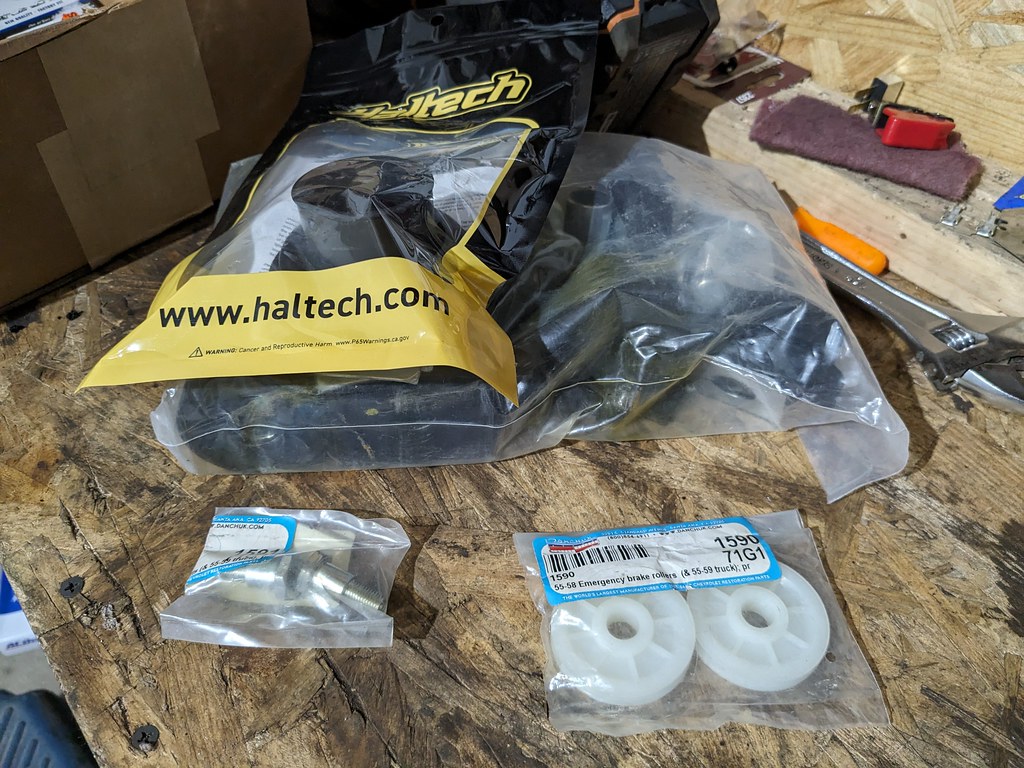
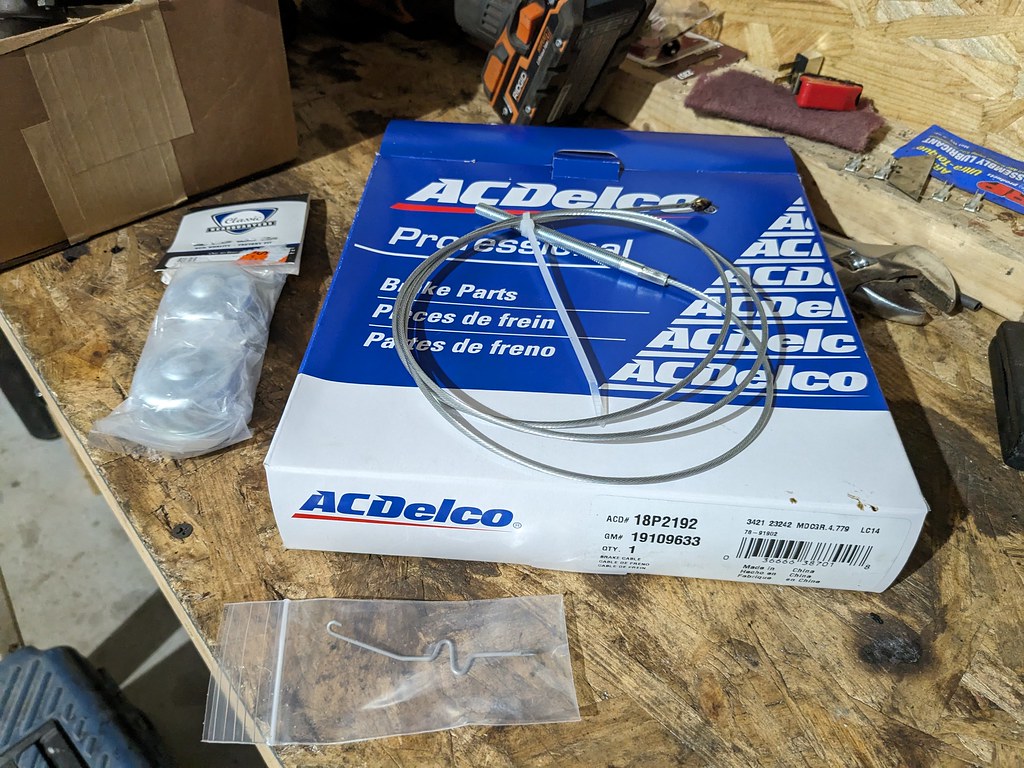
Right now I'm in the process of cleaning up and re-assembling the parking brake setup. First, I had to remove the handle and get rid of those clutch head bolts. I didn't have the right bits for them, but a few minutes with my vice grips took care of them. Will not be reusing them, and replacing with either a button head allen bolt, or a regular hex flange head bolt.
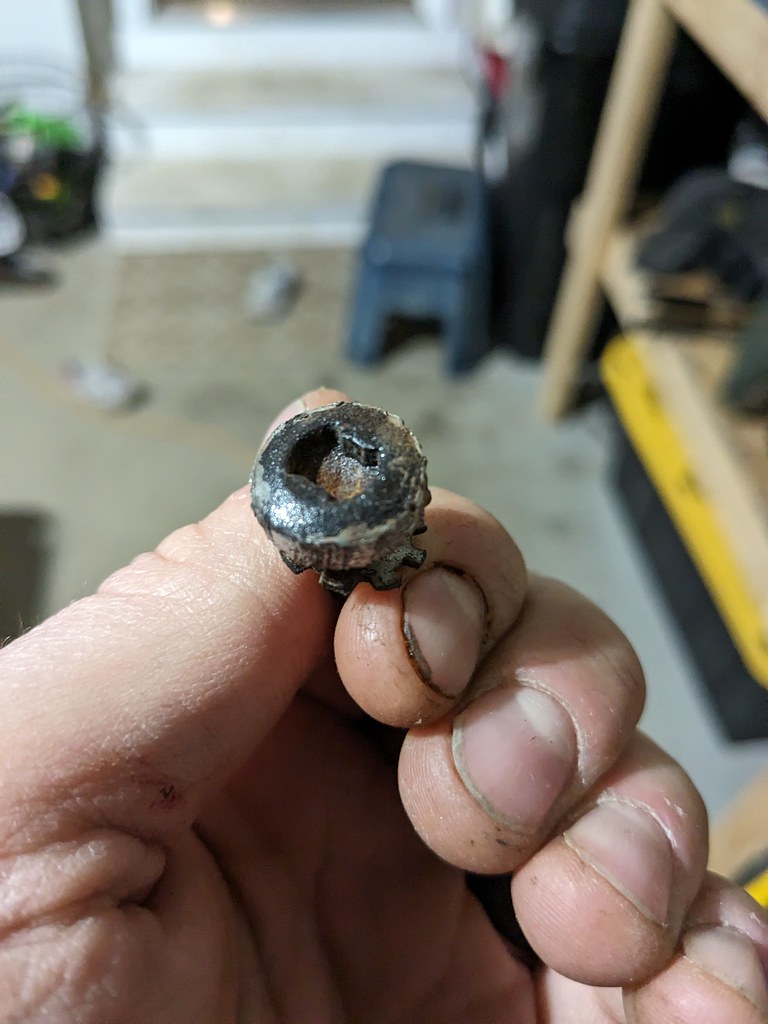

The handle was frozen but after a little bit of TLC I got it free and lubricated. The upper cable guide wheel was also frozen up, so I removed that and will replace with one of the new plastic wheels. Next up is getting the parking brake brackets cleaned up and installed. Should have that done by the end of the week and have functional parking brakes. Next up will be wiper motor and, wiring up headlights/dimmer switch, and buttoning up the last remaining wiring for the dash bezel.
Cheers,
Ryan
My fuel table needs lots of work.
After looking up the rules for what's required for passing the inspection, the parking brake would be the most challenging item. I had the handle inside the car, but everything else was missing. After looking around online seeing the parts I needed selling for ~$500 bucks, I made a trip to my favorite junkyard up the road. The same car that donated the rear floor section to my car also donated the parking brake parts. The floors were so rotted, that I just cut the hump in between the two floor pans to easily reach the brackets. I was expecting a big fight, but was pleasantly surprised that all 6 bolts came out smooth and easy! couldn't believe how clean the hardware is!
I also picked up some rear seat reinforcement plates and rear view mirror.
The lower cable guide is a bit rough, but nothing that I can't fix. Just needs a new wheel, new hardware and paint.
The mirror back side and mount were pitted, but the face is very smooth. I cleaned up and painted the back side of the mirror, then just used some steel wool on the mount and it cleaned up pretty decent... But matches the rest of the trim in the car.
I've been putting off this project for a while, but it was finally time to get the floor braces and rear seat mounts all welded up. Whoever installed the floors before somehow didn't completely weld the floor braces to the pans. So I drilled some holes along the braces and spot welded the floors and braces together.
Once that was done, I moved to install the rear seat reinforcement plates. I had the upper seat installed with some self tapping screws so that I could nail down the right mounting spot. So I used those screws to set the plate and scribed a line for the spot welds. I then drilled a bunch of spot weld holes to secure the plate on. I still need to seam seal and paint the plates, but they are now installed.
Since I had the welder out, I pushed to get the rear seat bottom brackets installed. I didn't get any in process, but the seat brackets had to be tweaked slightly once the upper seat was completely bolted down. I buzzed them all together after I drilled a bunch of holes for spot welds. Brackets are very solidly welded, so they aren't going anywhere. Paint was still wet from spraying the spot welds, but it should dry down completely flat.
Once that was final welded, I bolted the rear seat bottom back together too. Looks the same as before, but now when I rotate the seats it's so much smoother.
With the seats all back together and bolted down for good, I really wanted to get an interior panel out so see what it looked like. I'm really digging the 55 Nomad panels. My plan is to keep the original Turquoise uppers, but dye the bottom black. I think that it'll look really good and I like that it's still stockish. From all of my research, there wasn't a black interior option for a 1955 Nomad. So using the original panels, but dyed black on the bottom will look pretty cool. Plus the original waffle panels and all of the original chrome trim.
Then the UPS/Fedex/USPS trucks all came and dropped off parts at my house. I got a complete set of body bushings, firewall grommet for Terminator X, ebrake rollers/bolts, shift indicator spring/clip, front parking brake cable, and dust caps for the 61-68 Impala hubs.
Right now I'm in the process of cleaning up and re-assembling the parking brake setup. First, I had to remove the handle and get rid of those clutch head bolts. I didn't have the right bits for them, but a few minutes with my vice grips took care of them. Will not be reusing them, and replacing with either a button head allen bolt, or a regular hex flange head bolt.
The handle was frozen but after a little bit of TLC I got it free and lubricated. The upper cable guide wheel was also frozen up, so I removed that and will replace with one of the new plastic wheels. Next up is getting the parking brake brackets cleaned up and installed. Should have that done by the end of the week and have functional parking brakes. Next up will be wiper motor and, wiring up headlights/dimmer switch, and buttoning up the last remaining wiring for the dash bezel.
Cheers,
Ryan