


68 vert conversion help

Thread Starter
Teching In
Joined: Nov 2005
Posts: 3
Likes: 0
From: Port Coquitlam, B.C. Canada
hi there i'm fairly new to this site and in need of some help with a project. i am puting together a proposal for a 68 firebird convertible that i've agreed to build. i am building a stock 69 vert at the moment and when it is done i will be starting the 68, wich hopefully will end up a LS 1/t56. i have discussed suspension with the owner and we agreed on tubular control arms, qa-1's and big brakes, as far as the engine/trans go the owner likes the idea of the 400 that is currently in the car....but it's not original and with the other mods we have discussed it only seems fitting to go with the ls-1. what i'm looking for is any pics, part numbers and lists of relevant pieces that anyone has compiled so i can get this together and present it to him. i have seen a fair amount of camaros that have been done but no birds.....i know the f-bodies share all but a few body pieces but a pic would help greatly. also some performance specs would help, 1/4 mile times, h/p etc of cars that have been converted.....
Thanks
Dave
Thanks
Dave
What most people are doing, one way or another is making their own thing work for them.
I personally am doing the following...
Street and performance style motor mount plates, used in conjunction with standard chevy 3 bolt motor mounts, mine are polyurethane.

I fabbed my own trans X-Member, but www.T56kit.com has a beautiful one that will work with the mounts i'm using.
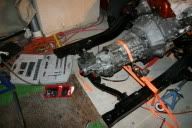
You will need to either notch or have notched, the oil pan to clear the steering box, if that's what's going to be used. From the sound of it, your customer's going all out, so by using a rack and pinion setup, you will need to do no modifications to the (F-Body) oil pan.
here is mine notched.. i still have to finish the pickup tube, but i did this myself...
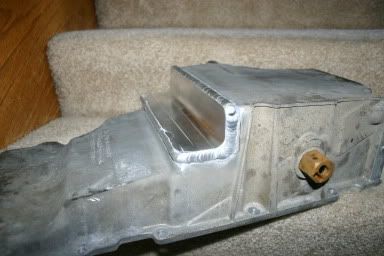
Using that setup, you WON'T have to do any tunnell cutting, and the engine is set back at an optimal location for CG.
You'll also need to remove the stock z-bar seal thingy from the firewall, and either purchase ( s&p) or make (most of us) a bracket to hold the hydraulic clutch master cylinder..

You'll need to find a way to convert the accelerator pedal to a cable type, Lokar sells a cable, and any F-Body LS1 has a cable throttle body..
I havent done it yet, so i have no pics.
Another way to go is by using the BRP kit, i'm not clued in to details on it really, but it makes it easier for you to use A/C, as you don't have to relocate the bracket and/or do any frame mutilation. If it's an aftermarket frame, it's not a concern anyways, i don't think.
Long tubes will work well with the S&P kit, they offer their own, as does Stainless works, and T56Kit offers a very nice set. Stock manifolds will work.
If you don't want to piece together the whole thing, and purchase a kit to do most of it, Street and Performance (www.hotrodlane.cc) as well as T56KIT.com both offer swap kits.
There's 4 or 5 of us doing firstgen camaro swaps, i'm sure people will jump in on this thread, i just wanted to get it started. Oh, yeah. shifter position is moved back 3, maybe 4 inches... No biggie, i actually prefer the new place..
good luck, hope i've helped.
olly
I personally am doing the following...
Street and performance style motor mount plates, used in conjunction with standard chevy 3 bolt motor mounts, mine are polyurethane.
I fabbed my own trans X-Member, but www.T56kit.com has a beautiful one that will work with the mounts i'm using.
You will need to either notch or have notched, the oil pan to clear the steering box, if that's what's going to be used. From the sound of it, your customer's going all out, so by using a rack and pinion setup, you will need to do no modifications to the (F-Body) oil pan.
here is mine notched.. i still have to finish the pickup tube, but i did this myself...
Using that setup, you WON'T have to do any tunnell cutting, and the engine is set back at an optimal location for CG.
You'll also need to remove the stock z-bar seal thingy from the firewall, and either purchase ( s&p) or make (most of us) a bracket to hold the hydraulic clutch master cylinder..
You'll need to find a way to convert the accelerator pedal to a cable type, Lokar sells a cable, and any F-Body LS1 has a cable throttle body..
I havent done it yet, so i have no pics.
Another way to go is by using the BRP kit, i'm not clued in to details on it really, but it makes it easier for you to use A/C, as you don't have to relocate the bracket and/or do any frame mutilation. If it's an aftermarket frame, it's not a concern anyways, i don't think.
Long tubes will work well with the S&P kit, they offer their own, as does Stainless works, and T56Kit offers a very nice set. Stock manifolds will work.
If you don't want to piece together the whole thing, and purchase a kit to do most of it, Street and Performance (www.hotrodlane.cc) as well as T56KIT.com both offer swap kits.
There's 4 or 5 of us doing firstgen camaro swaps, i'm sure people will jump in on this thread, i just wanted to get it started. Oh, yeah. shifter position is moved back 3, maybe 4 inches... No biggie, i actually prefer the new place..
good luck, hope i've helped.
olly
Thread Starter
Teching In
Joined: Nov 2005
Posts: 3
Likes: 0
From: Port Coquitlam, B.C. Canada
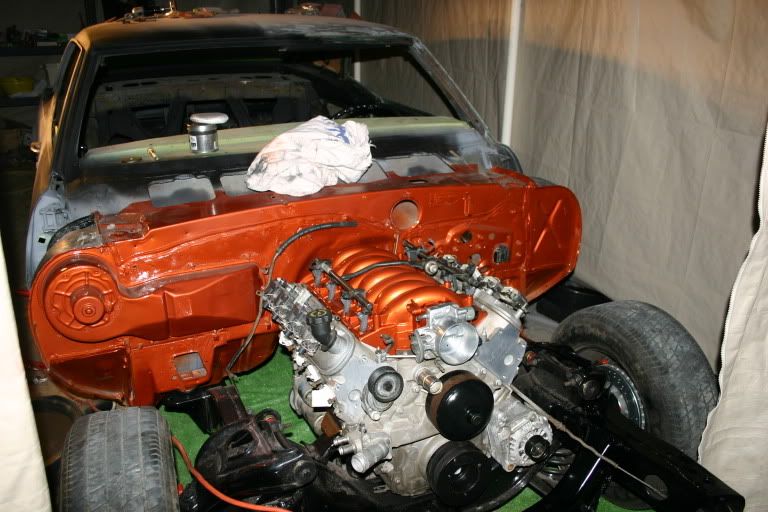
thanks for all that, i may go with an aftermarket frame, seems it may be easier and probably end up with alot less headaches. there is a local shop that does some of this type of work and another that builds arms, brake adapters and such, i will be talking with them soon..... your set-up looks great and i love the color!!! any engine mods? what is the vett engine rated at?
thanks again,
Dave
thanks again,
Dave

Teching In
Joined: Dec 2004
Posts: 42
Likes: 0
From: Canada
I did an LS1, 4L60E swap this spring into my 68 firebird vert. Found it not very difficult. With S&P style mount plate(which you can make yourself in an hour) the motor sits in a great position, and no, you don't need to notch the frame for the alternator. Also, if the car already has a 400 trans, then you should just be able to weld a new tab on it in the right location for the new trans. I used headers, and the notched oil pan from S&P. The thing that took the longest on the project was waiting for parts. If you need a new wiring harness there are a few options in the states, but there is also a company in Saskatoon, Sask. that builds harnesses called Choice Auto. thats where I got my harness. Anyway, its great to see more guys up here in Canada doing the swap.
As for numbers, I took the car to a local shop here in Red Deer, that has a mustang dyno, and it dyno'd at 310 hp , and 320 tq to the wheels. I also took it to the track in Edmonton, and ran a 13.1.
As for numbers, I took the car to a local shop here in Red Deer, that has a mustang dyno, and it dyno'd at 310 hp , and 320 tq to the wheels. I also took it to the track in Edmonton, and ran a 13.1.
Trending Topics
LS1 Tech Stories
The Best V8 Stories One Small Block at Time

Topdon ONE vs. Artidiag 800 BT2: Which is the Diagnostic Tablet For You?
Pouria Savadkouei
Gas Monkey Built a 6-Wheel Ferrari Testarossa With a Corvette LT4 Engine
Verdad Gallardo
7 Most Reliable High-Performance Engines GM Has Ever Built
Verdad Gallardo
Amazing '71 Camaro Restomod Is Modern Muscle Car Under the Skin
Verdad Gallardo
6 Common C5 Corvette Failures and What's Involved In Repairing Them
Pouria Savadkouei
Retro Modern Bandit Pontiac Trans AM Comes With Burt Reynolds' Autograph
Verdad Gallardo
Top 10 Greatest Cadillac V Series Performance Models Ever, Ranked
Pouria Savadkouei
Top 10 Most Powerful Chevy Trucks Ever Made!

Hennessey's New Supercharged Silverado ZR2 Has 700 HP
Verdad Gallardo
Originally Posted by ls1canuck
With S&P style mount plate(which you can make yourself in an hour) the motor sits in a great position, and no, you don't need to notch the frame for the alternator. .

olly
Thread Starter
Teching In
Joined: Nov 2005
Posts: 3
Likes: 0
From: Port Coquitlam, B.C. Canada
Thanks to everyone so far, Rybar i will be bugging you for info, i work in burnaby, and have seen your pics before...beautiful !!!! .... ls1 canuck, i have friends in the red deer area, car guys too. i would love to see some pics of your car if you have any?
thanks to all.
Dave
thanks to all.
Dave