

69 LS1 Camaro - Budget - How too
 04-21-2007, 05:03 AM
#1
We wrapped up our 69 Camaro LS1 project in mid 05 and have enjoyed the heck out of it. She blows ice cold a/c, runs 12.5 in the quarter, and gets mid 20s on the highway. You can't beat it. However, I did things VERY different than the average Joe...so if you like here is a break down.
Specs - 2000 LS1 and 4L60E trans
Brewers motor and trans mount - no drive shaft cut needed.
Stock F body accessories - work great and are very reliable (cheap too)
2000 Z28 Pace Setter non-emission headers (three pipes modified on the driver side)
TCI stall
Bowtie overdrive four speed shifter and console plate
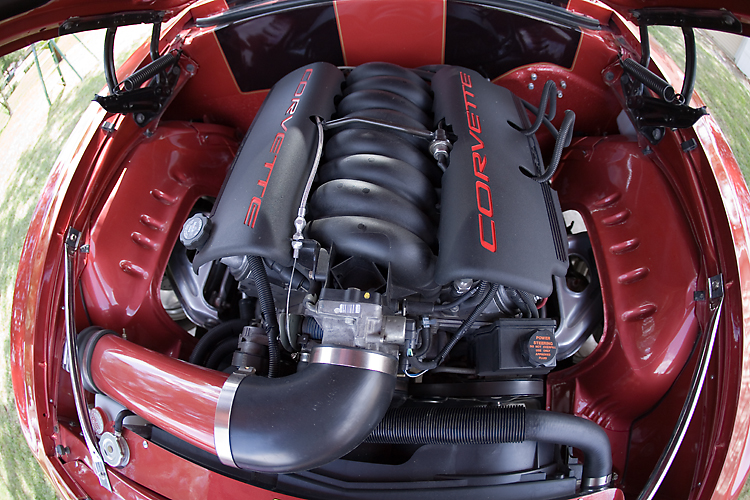
I picked up the block for $400 with a spun main. A $160 crank kit, new rings, gaskets and seals...she was ready to go back together. A roll master chain, then all topped off with a Stage III SLP head/cam package - 36# injectors - LS6 intake - stock throttle body. The head/cam was not a budget item..but I couldnt resist.
Trans was $100 from a trans shop with a blown reverse. I rebuild kit and a few hours later and she was rocking and rolling - with a Transgo Kit added later. Under $400 in the trans.
I had the sub frame out of the car and took measurements of the a/c compressor and performed a simple notch to clear the a/c.
Fuel lines and tank came from a 96 Caprice (22 gal capacity). After a bit of work, it slipped right in and connected on a set of 97-98 Vette rails. This was a direct snap to fit with no cheesy adapters.
Ran a 98 PCM with a mail order tune from a non-site sponsor ($75).
Cooling fans came from a later model Malibu for free, as they were in a collision and the edge of the plastic was broken. Body shop was throwing it out.
Radiator is a Griffin knock off aluminum for $120.
Things I spent big bucks on:
Stall converter
head/cam package
Steeroid rack & Pinion
I am a freak about a clean firewall and engine bay. I spent extra time hiding the windshield wiper by using a VW rabbit unit, and building my own concealed 90 degree hidden brake master cylinder. A/C lines are totally hidden and even run through the frame rail. The wire harness comes out of the trans hump and feeds the engine. I shaved off the output zone of the steering column and reduced that to only the shaft coming out (used a 81 Vette tilt/tele column).
Things I saved big bucks on:
Accessories
cooling fan/radiator
fuel system
deep discount on a spun bearing long block and trans rebuild and modified for the cost of a used LS1 with miles on it.
headers (200 plus a simple mod, then black ceramic coating)
I also did a ton of trading and swapping along the way.
I couldn't have done it without some tips and tricks from guys at LS1tech.
Thanks guys!
Build page:
BTW - I am going to change the brakes soon and install a hydroboost. It will kill the freaky clean look, but will stop like a rockship in reverse mated to the huge 13/12" brakes on the car.
http://www.mcspeed.homestead.com/69_...urrection.html

Specs - 2000 LS1 and 4L60E trans
Brewers motor and trans mount - no drive shaft cut needed.
Stock F body accessories - work great and are very reliable (cheap too)
2000 Z28 Pace Setter non-emission headers (three pipes modified on the driver side)
TCI stall
Bowtie overdrive four speed shifter and console plate
I picked up the block for $400 with a spun main. A $160 crank kit, new rings, gaskets and seals...she was ready to go back together. A roll master chain, then all topped off with a Stage III SLP head/cam package - 36# injectors - LS6 intake - stock throttle body. The head/cam was not a budget item..but I couldnt resist.
Trans was $100 from a trans shop with a blown reverse. I rebuild kit and a few hours later and she was rocking and rolling - with a Transgo Kit added later. Under $400 in the trans.
I had the sub frame out of the car and took measurements of the a/c compressor and performed a simple notch to clear the a/c.
Fuel lines and tank came from a 96 Caprice (22 gal capacity). After a bit of work, it slipped right in and connected on a set of 97-98 Vette rails. This was a direct snap to fit with no cheesy adapters.
Ran a 98 PCM with a mail order tune from a non-site sponsor ($75).
Cooling fans came from a later model Malibu for free, as they were in a collision and the edge of the plastic was broken. Body shop was throwing it out.
Radiator is a Griffin knock off aluminum for $120.
Things I spent big bucks on:
Stall converter
head/cam package
Steeroid rack & Pinion
I am a freak about a clean firewall and engine bay. I spent extra time hiding the windshield wiper by using a VW rabbit unit, and building my own concealed 90 degree hidden brake master cylinder. A/C lines are totally hidden and even run through the frame rail. The wire harness comes out of the trans hump and feeds the engine. I shaved off the output zone of the steering column and reduced that to only the shaft coming out (used a 81 Vette tilt/tele column).
Things I saved big bucks on:
Accessories
cooling fan/radiator
fuel system
deep discount on a spun bearing long block and trans rebuild and modified for the cost of a used LS1 with miles on it.
headers (200 plus a simple mod, then black ceramic coating)
I also did a ton of trading and swapping along the way.
I couldn't have done it without some tips and tricks from guys at LS1tech.
Thanks guys!
Build page:
BTW - I am going to change the brakes soon and install a hydroboost. It will kill the freaky clean look, but will stop like a rockship in reverse mated to the huge 13/12" brakes on the car.
http://www.mcspeed.homestead.com/69_...urrection.html

 04-21-2007, 10:20 AM
#6
Launching!

Just a terrific job. Wish I could point to one of my cars and say "I did all of that" like you can. And a very creative combination of parts and mods to achieve your goal for low bucks.
What is the color? My '69 project car started life as Garnett Red, a color I kind of like, but it's just a bit lacking in brightness and "pop". Your color seems about perfect ...
What is the color? My '69 project car started life as Garnett Red, a color I kind of like, but it's just a bit lacking in brightness and "pop". Your color seems about perfect ...
Trending Topics
 04-21-2007, 11:50 AM
#9
On The Tree

Join Date: Jul 2004
Location: Stockholm, Sweden
Posts: 166
Likes: 0
Received 0 Likes
on
0 Posts

Your car has been one of my sources of inspiration when I did my LS1 swap. I am not completely done yet but soon...
Great looking car and a nice project. Good to see a budget Pro Touring car once in a while.
Jan
Great looking car and a nice project. Good to see a budget Pro Touring car once in a while.
Jan
 04-21-2007, 05:34 PM
#11
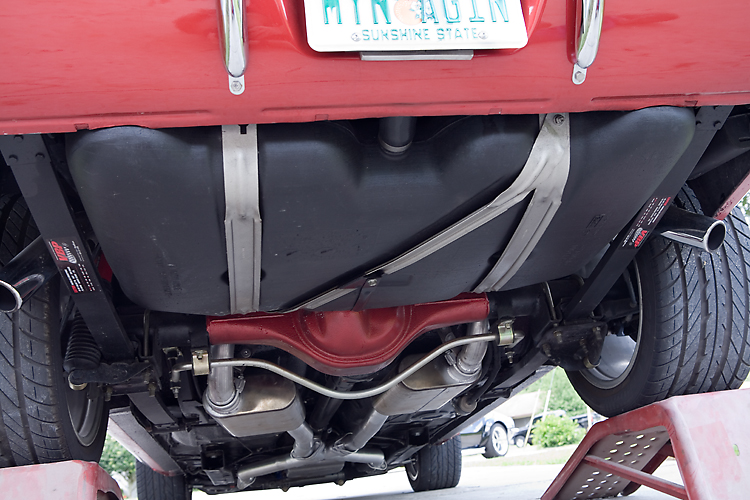
I took a guess on the tank. I had a 96 caprice cop car for parts and realized the fuel filler sticks out the same spot as the Camaro. I cut the floor from the caprice and made a removable door to access the pump so the tank wouldn't have to be dropped. The black additional brace could be removed - but I feel safer with it there making sure the tank is not going to get into the diff. That is actually part of the stock Camaro tank strap I re-used in conjunction with the caprice straps. Oh...I think if they were all painted satin black, you wouldn't notice. You can also put tire-shine on the tank - since it is plastic and make it glow down there. You can't minitub the car with this mod however unless you run coil overs. I was able to drop a Walbro 255 pump straight in the stock Caprice mount.
I've walked a few other guys through it. It is by no means a "bolt in" - but if you like a challenge and the trick results...why spend $1K on a custom tank?
We drove the car to Goodguys in columbus Ohio and could run just over 400 miles between stops - not getting in the throttle.
The color is actually 1986 Renault Alliance (remember those little cars?) Med - mica red. The stripes are Cadillac black cherry with gold accent. It has a pearl accent without the expense or hassle of real pearl.
Total cost to put the LS1 in and get it running (not paint/body -etc) was right around $4K - with a fully rebuild (less the same pistons) motor.
The car also has cruise control which is hidden on the column under the dash and uses a stock GM column switch. That helps on the MPG. I also wired the wipers into the column and used the spot on the dash to mount the fuel pressure sensor.
By the way, I believe a pre plastic Caprice tank would work too, and might be easy to modify...etc. because you can weld -etc. Like a 1987-1990, as you can use the fuel pump assembly and sending unit.
We did a few other things like pull the power windows from the caprice with auto express down, keyless, etc. etc. etc.
My 3 year old loves to ride in the car...and it is already willed to him.
 04-22-2007, 07:34 PM
#13
BTW - I found you you DON'T have to connect the bleeder tube that runs off the heads through the throttle body back into the cooling system. I didn't believe it myself until I talked to a guy with a LS1 in a 68 Camaro that had over 5,000 miles on the install. They had capped his off.
What I did, was run the line up as if it was going into the throttle body - but, I blocked it off. However, when I filled the radiator, I opened the line and filled until coolant was steady running out of the line. This confirmed to me that all the air was out of the motor.
I have had zero coolant issues, have over 5,000 miles on it, and no hassles at all. I see a lot of guys really struggle with trying to weld a nipple in the radiator, or put a fitting in the line...or water pump. Maybe I can save the next conversion guy some time.
04-22-2007, 10:51 PM
#14
TECH Resident
iTrader: (2)
Join Date: Jun 2006
Location: Roswell, GA
Posts: 802
Likes: 0
Received 0 Likes
on
0 Posts
If you're going to plug the front steam line, you'll probably at least want to run a cooler thermostat and also drop the fan temps as well. Steam pockets are bad... Has any done any dyno testing to determine what effect plugging the front steam line has? I couldn't find any on a Google search. My guess would be that it's OK for mild street and drag strip use, but you'd start getting steam pockets with a minute or two of WOT.


