

1dirtyZ's conversion conversion :D
 07-20-2014, 04:25 AM
#141
8 Second Club
Thread Starter
iTrader: (1)
Join Date: Nov 2001
Location: the not so stock tribe
Posts: 3,697
Likes: 0
Received 0 Likes
on
0 Posts

as promised here are a few more pics and some progress 
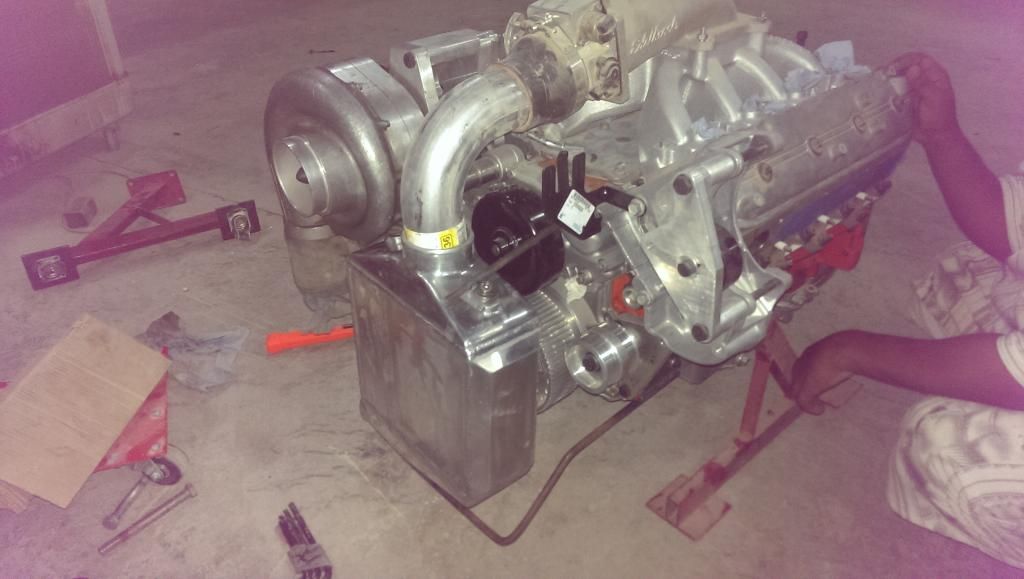
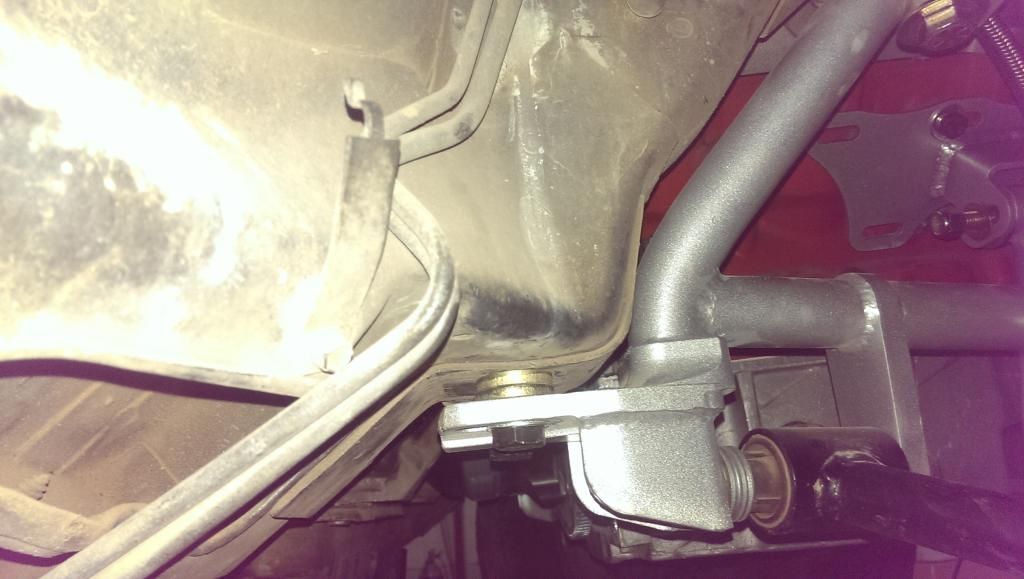
I finally got the balancer on the thing , and you can tell it was on there pretty tight
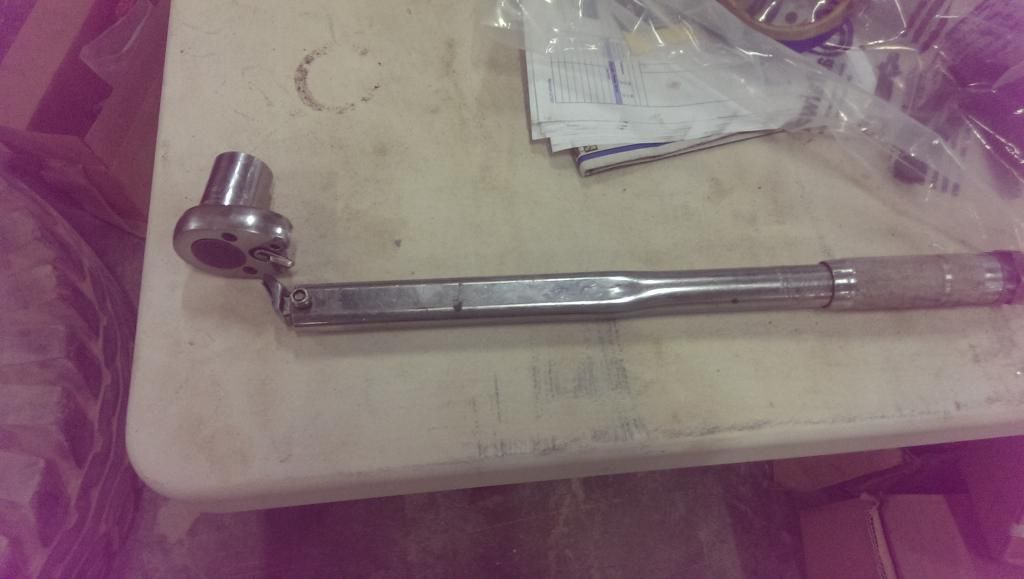
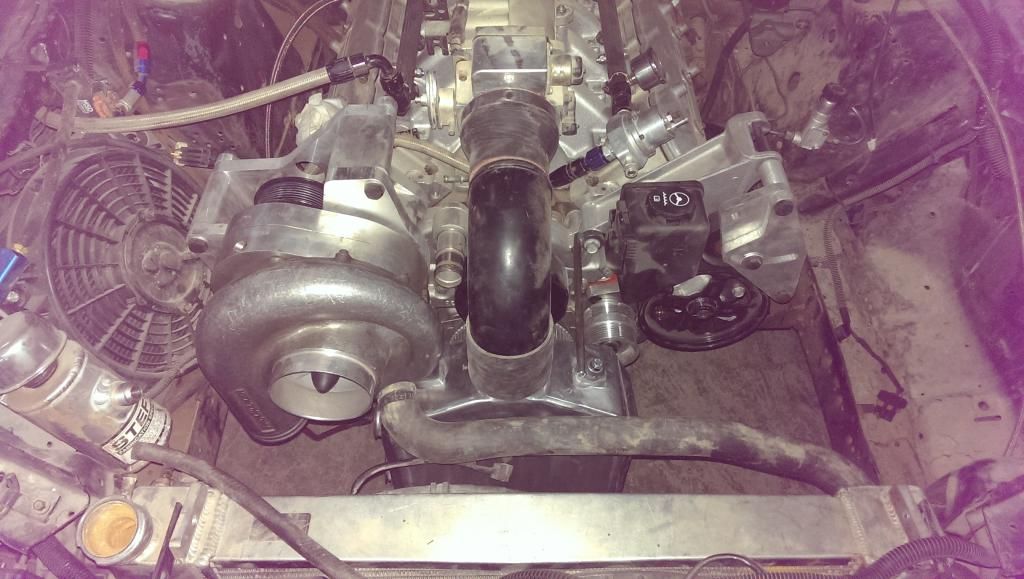
here is how the balancer and brackets look on the front of the engine :
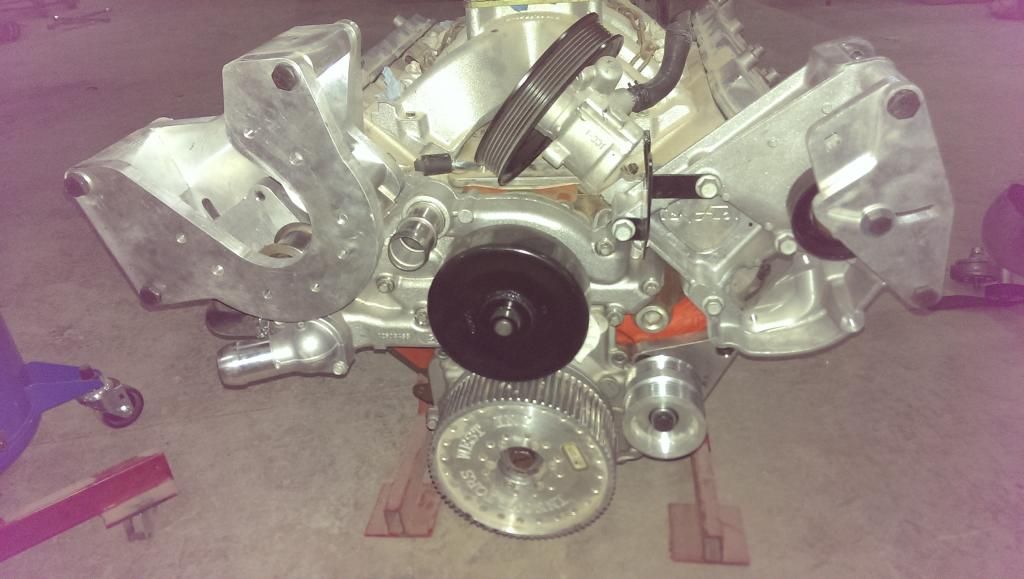
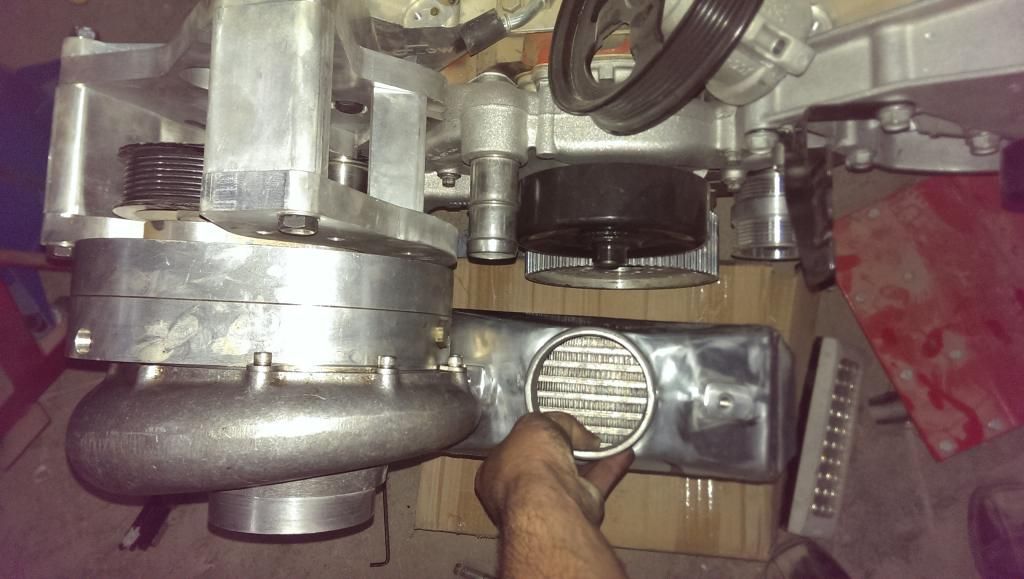
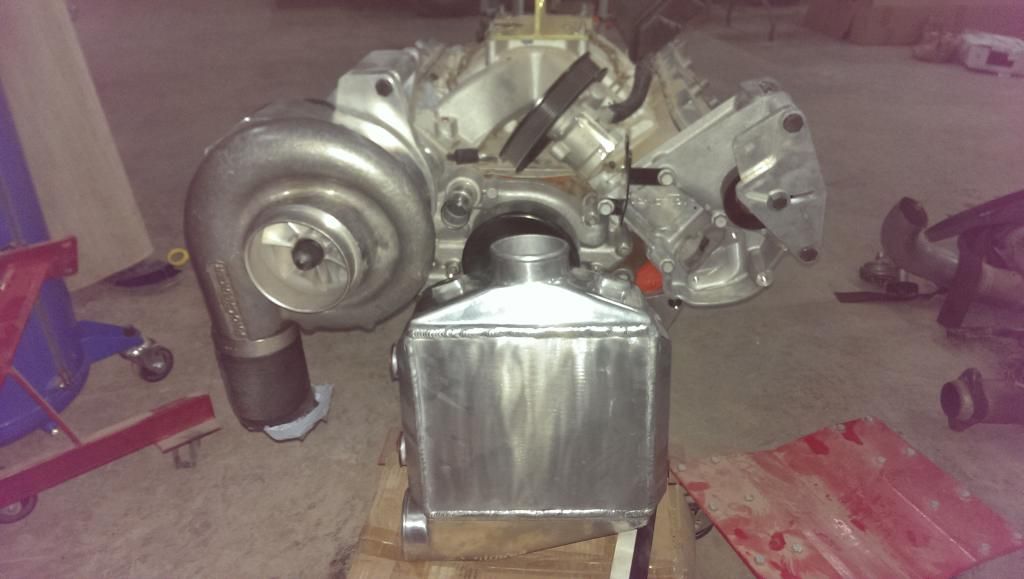
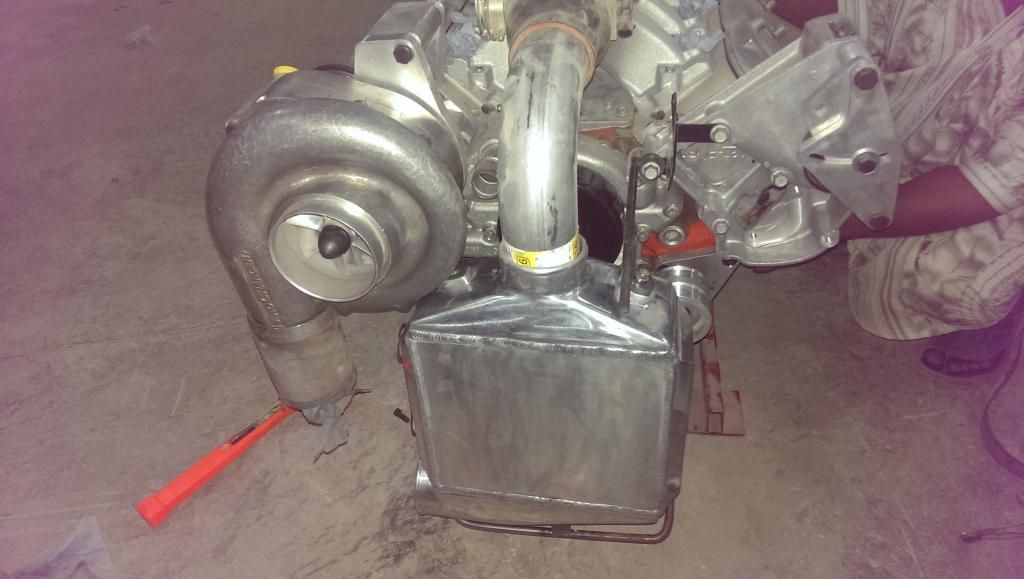
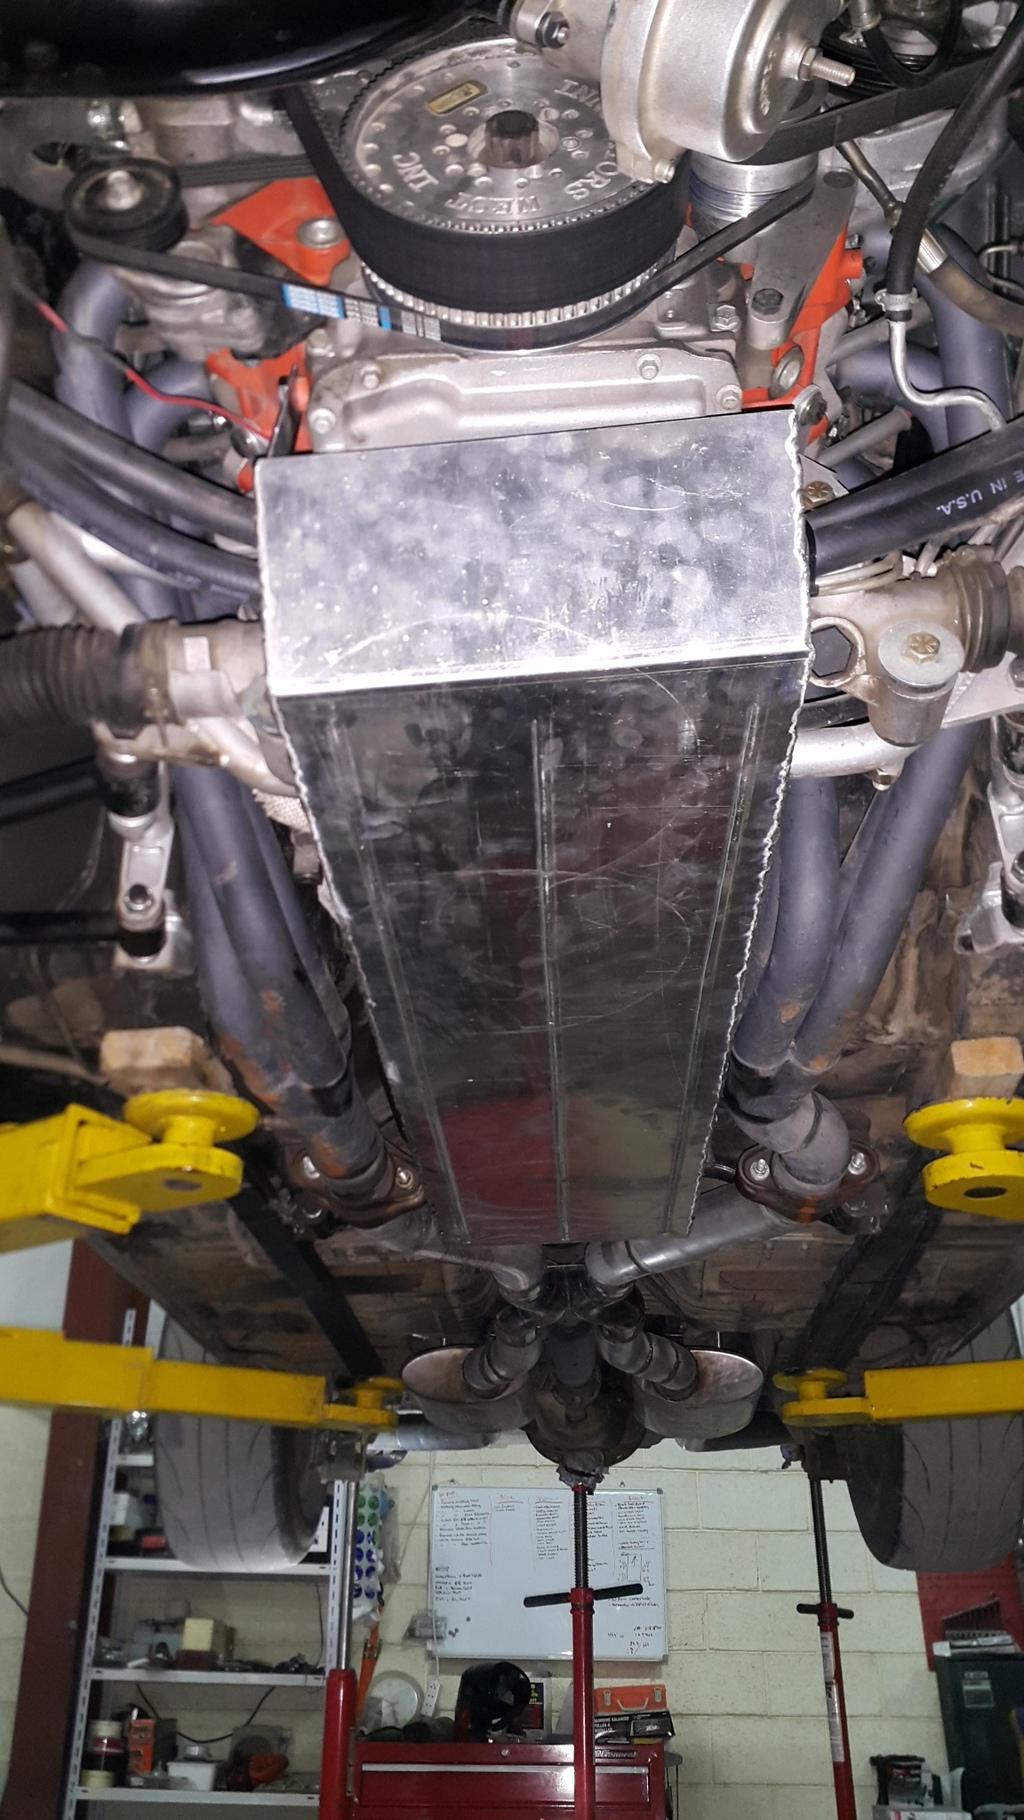
and here is how and where I plan on mounting the air to water intercooler I got for it :
I also found out the blower is leaking from one of the seals , so a seal replacement is due real soon
so the plan now is to fabricate some braces to mount the intercooler in place , then build the piping and BOV stuff, reduce the power steering pump output pressure, and swap the fuel rails, injectors, and sensors from the other engine. by then the engine should be ready to be dropped in place.
so next up on the never ending list :
- fab intercooler brackets and pipes
- swap sensors and injectors
- tighten lower A arm bolts and struts
- install new brake master and plumb brakes
- drop engine in
- shove trans in place
- hope everything works
I finally got the balancer on the thing , and you can tell it was on there pretty tight

here is how the balancer and brackets look on the front of the engine :

and here is how and where I plan on mounting the air to water intercooler I got for it :


I also found out the blower is leaking from one of the seals , so a seal replacement is due real soon
so the plan now is to fabricate some braces to mount the intercooler in place , then build the piping and BOV stuff, reduce the power steering pump output pressure, and swap the fuel rails, injectors, and sensors from the other engine. by then the engine should be ready to be dropped in place.
so next up on the never ending list :
- fab intercooler brackets and pipes
- swap sensors and injectors
- tighten lower A arm bolts and struts
- install new brake master and plumb brakes
- drop engine in
- shove trans in place
- hope everything works
 08-07-2014, 06:49 PM
#142
8 Second Club
Thread Starter
iTrader: (1)
Join Date: Nov 2001
Location: the not so stock tribe
Posts: 3,697
Likes: 0
Received 0 Likes
on
0 Posts
so moving along with the build,,
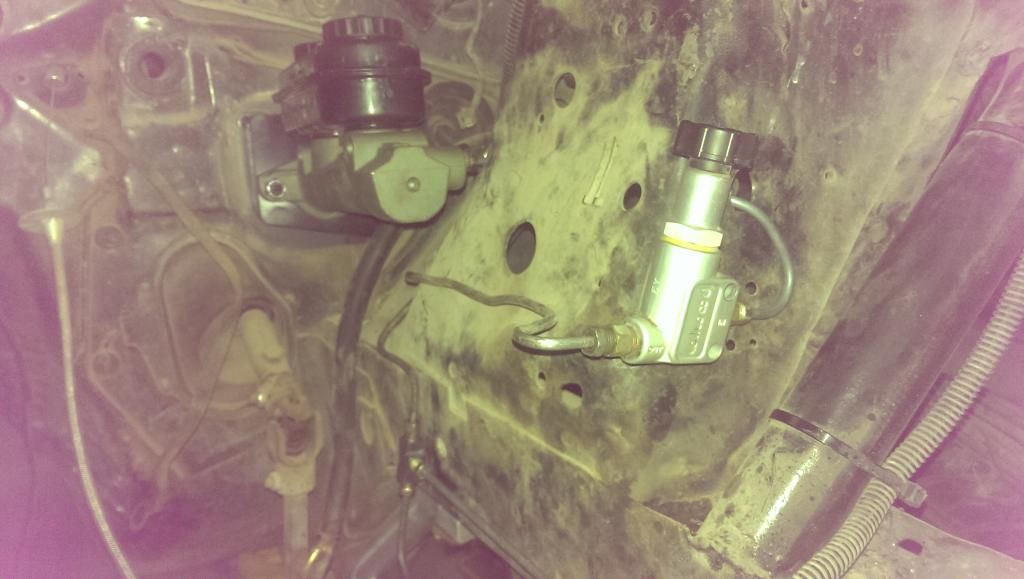
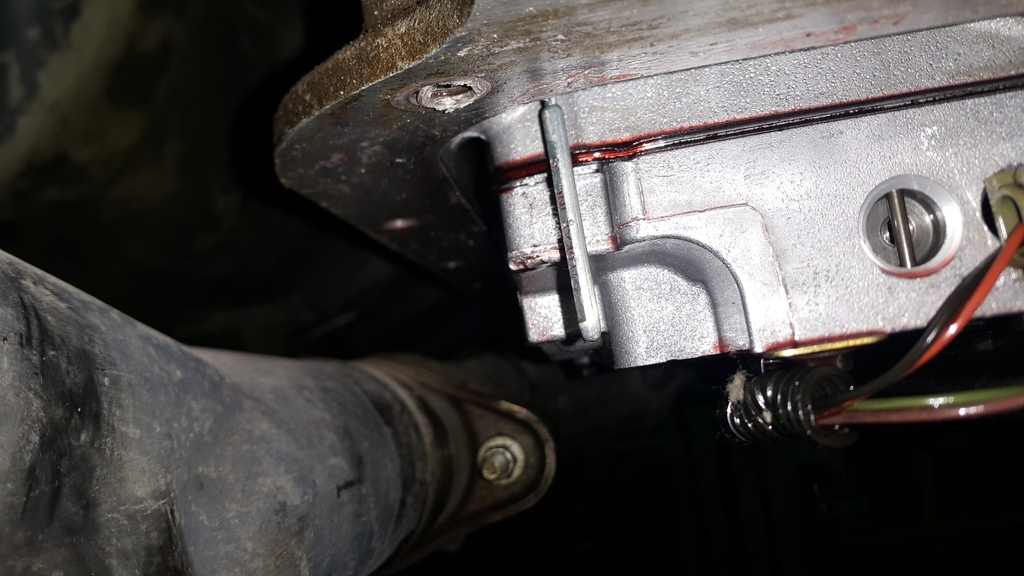
first off , I managed to remove the old brake master cylinder and booster , and I redid the front portion of the brake lines:
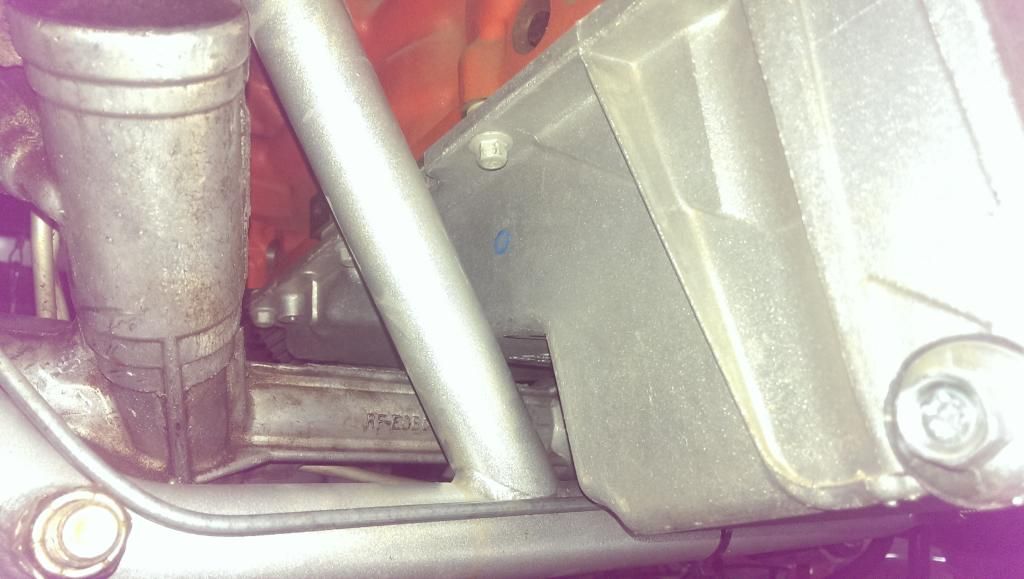
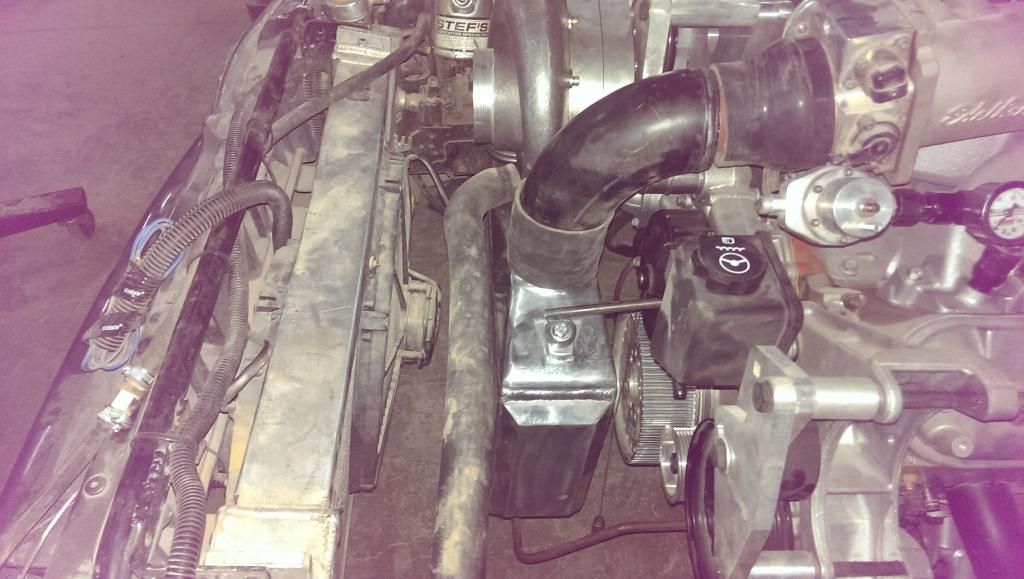
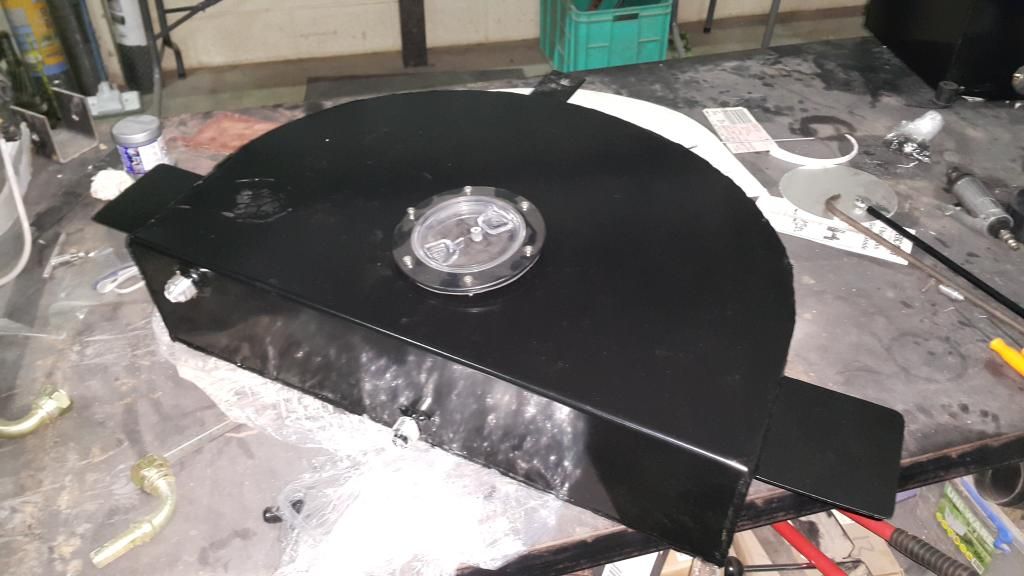
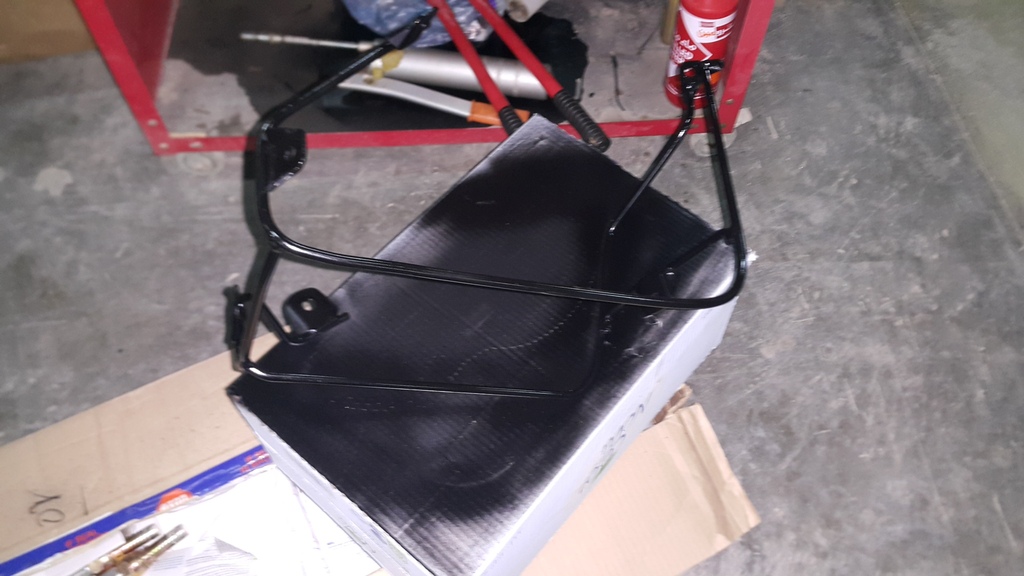
I also managed to finish the intercooler mounting brackets :
and this is how it looks on the car , I have the main one on the bottom , and a smaller one on the top:
all I have to do to finish them is have them powder coated and bolt them in place.
as to what is needed to finish the intercooler system is to fab the charge pipes ( two elbows), weld the BOV valve flange , fab a heat shield for the intercooler itself , and install the fittings and run the water lines.
moving along , I also got the new fuel rails in for the intake manifold and I installed it along with swapping most of the sensors.
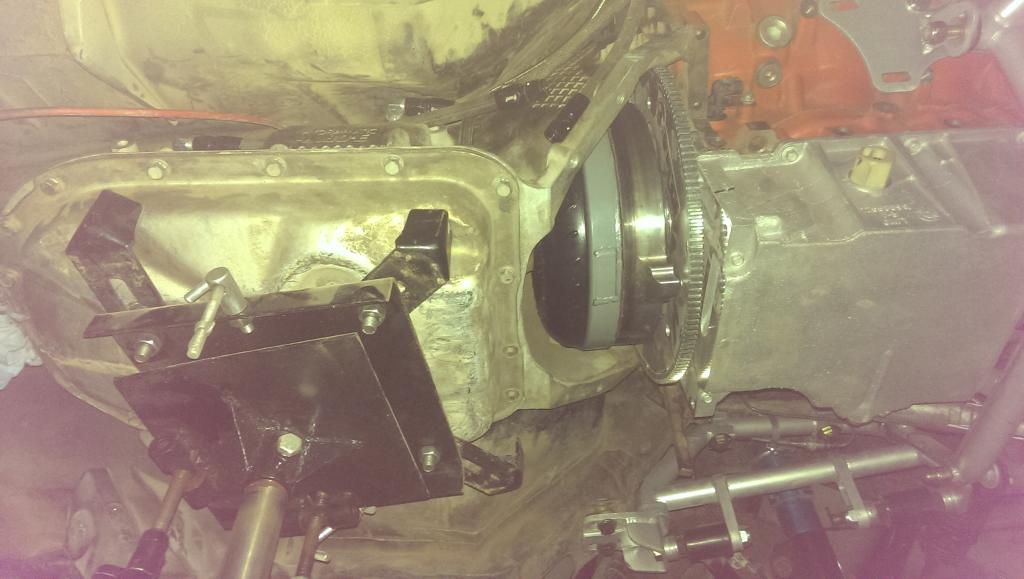
so after I got done with that I decided to drop the engine in , which went smoothly thankfully. the engine with the fbody pan has pretty good clearance with the k member all around. I did notice however that the engine sits about an inch farther forward than when it was sitting on the AJE k member and 4.6 motor mounts ( I'm running an AFCO k member and mounts now).
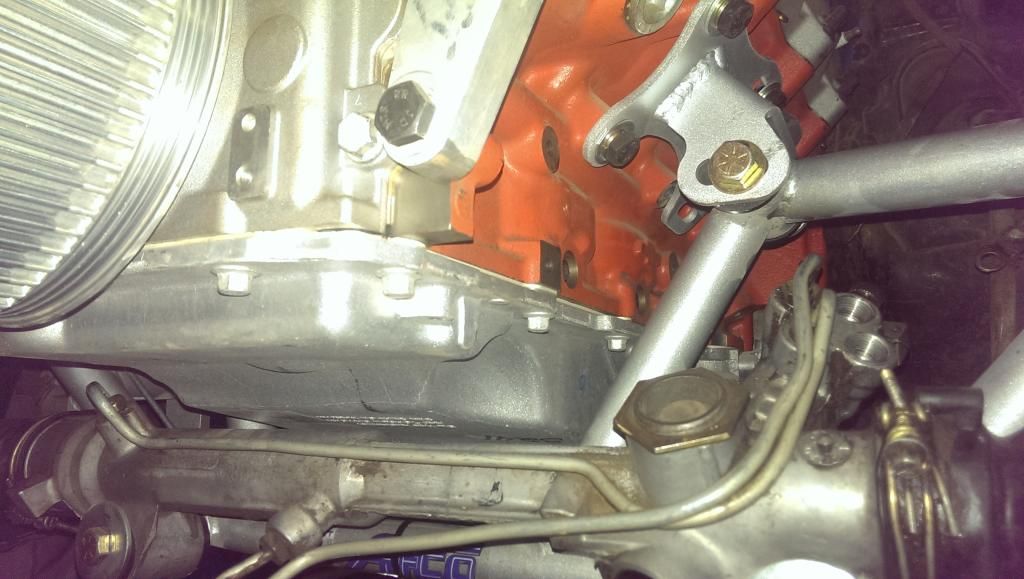

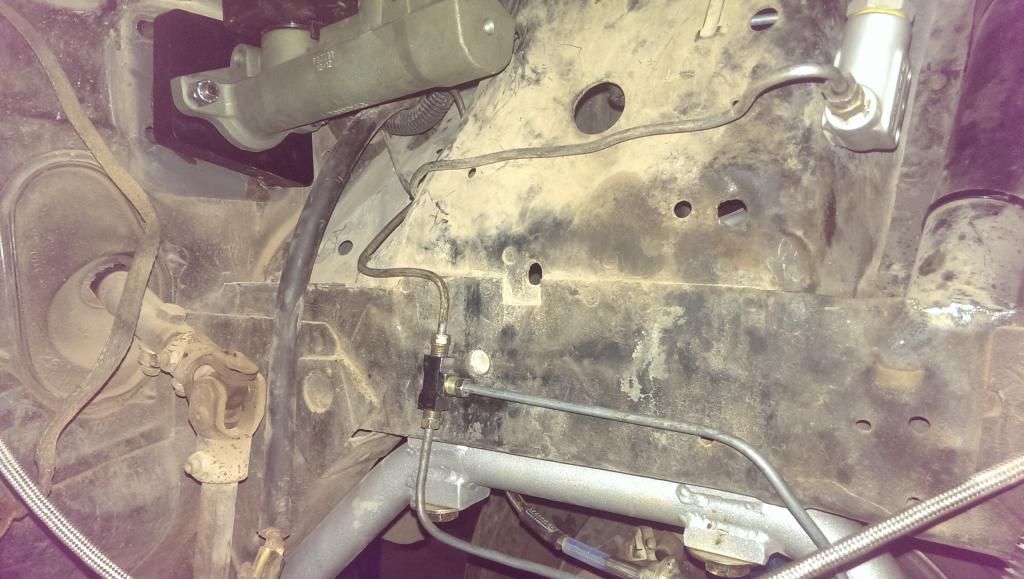
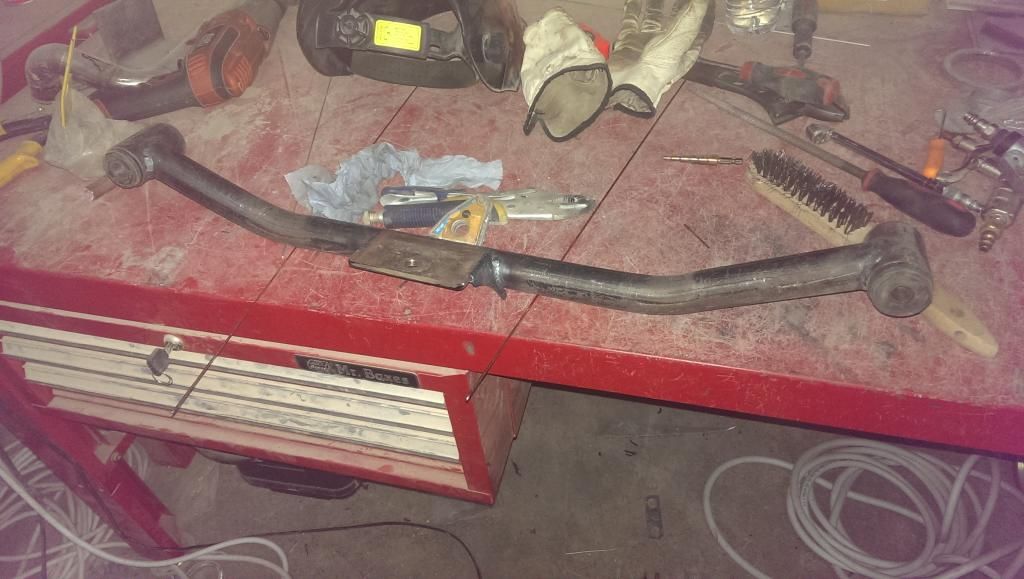
so now that the engine was in , it was time to tackle the tranny, which brought up another issue . the plan is to use a 4L80 trans instead of the th400 I had before , and when I stabbed it in ( along with bolting the headers in ) if found out that the engine does not have enough tilt on it and both the headers and back of the trans were hitting the floorboard . it was so bad that I had to manually push the front of the engine up just to be able to get the tranny to mate to it. so after a few minutes scratching my head I decided to tilt the whole K member back by using shims of varying thicknesses on different mounting holes:
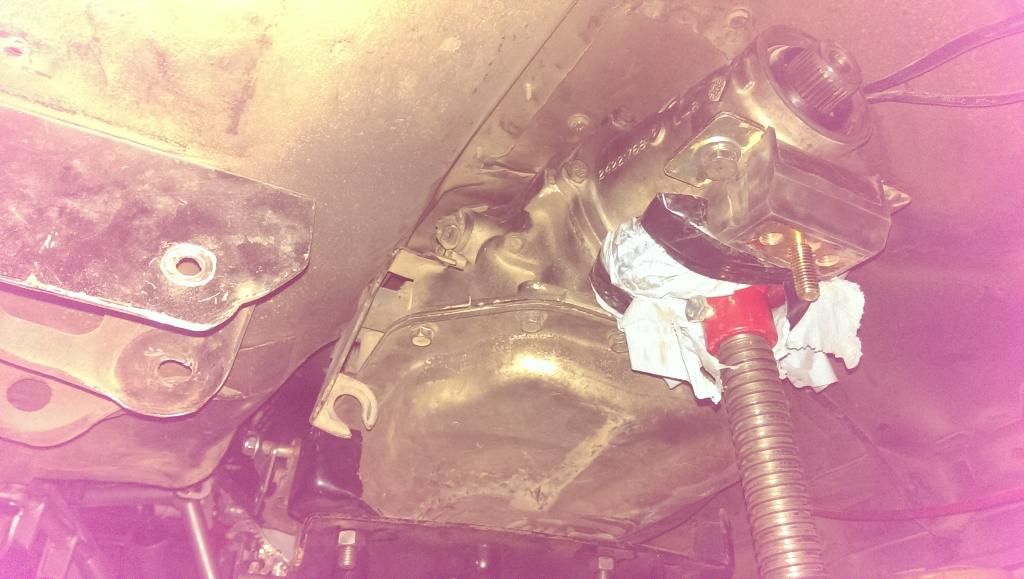
so after that the tranny ( and hooker headers ) fit a lot better , so it was time to slap in the circle D converter in place and shove the tranny in for the last time . I also had to extend one of the tranny cooler lines to make it fit :
all that is left now is to weld the tranny cross member in place and run the wires to the tranny and install a trans blanket and call it done
I also decided to measure how much clearance I'm going to have between the engine and radiator and I got 16" from the face of the balancer tot he bottom of the core support !! which means I can pull the radiator a bit back , as well as run a full size ( most likely an SN95) electric fan instead of the two puller/pusher fans .
so after finishing all that I need to:
- weld trans xmember in place
- adjust the headers to clear the trans and shift linkage, as well as weld ball collectors on them and O2 bungs.
- start fabbing the exhaust
- run the intercooler lines
- fab intercooler heat shield
- weld up charge pipes and BOV flange
- make a new drive shaft
should keep me busy for a few days
first off , I managed to remove the old brake master cylinder and booster , and I redid the front portion of the brake lines:


I also managed to finish the intercooler mounting brackets :

and this is how it looks on the car , I have the main one on the bottom , and a smaller one on the top:


all I have to do to finish them is have them powder coated and bolt them in place.
as to what is needed to finish the intercooler system is to fab the charge pipes ( two elbows), weld the BOV valve flange , fab a heat shield for the intercooler itself , and install the fittings and run the water lines.
moving along , I also got the new fuel rails in for the intake manifold and I installed it along with swapping most of the sensors.
so after I got done with that I decided to drop the engine in , which went smoothly thankfully. the engine with the fbody pan has pretty good clearance with the k member all around. I did notice however that the engine sits about an inch farther forward than when it was sitting on the AJE k member and 4.6 motor mounts ( I'm running an AFCO k member and mounts now).


so now that the engine was in , it was time to tackle the tranny, which brought up another issue . the plan is to use a 4L80 trans instead of the th400 I had before , and when I stabbed it in ( along with bolting the headers in ) if found out that the engine does not have enough tilt on it and both the headers and back of the trans were hitting the floorboard . it was so bad that I had to manually push the front of the engine up just to be able to get the tranny to mate to it. so after a few minutes scratching my head I decided to tilt the whole K member back by using shims of varying thicknesses on different mounting holes:

so after that the tranny ( and hooker headers ) fit a lot better , so it was time to slap in the circle D converter in place and shove the tranny in for the last time . I also had to extend one of the tranny cooler lines to make it fit :


all that is left now is to weld the tranny cross member in place and run the wires to the tranny and install a trans blanket and call it done
I also decided to measure how much clearance I'm going to have between the engine and radiator and I got 16" from the face of the balancer tot he bottom of the core support !! which means I can pull the radiator a bit back , as well as run a full size ( most likely an SN95) electric fan instead of the two puller/pusher fans .
so after finishing all that I need to:
- weld trans xmember in place
- adjust the headers to clear the trans and shift linkage, as well as weld ball collectors on them and O2 bungs.
- start fabbing the exhaust
- run the intercooler lines
- fab intercooler heat shield
- weld up charge pipes and BOV flange
- make a new drive shaft
should keep me busy for a few days
08-10-2014, 03:16 AM
#143
8 Second Club
Thread Starter
iTrader: (1)
Join Date: Nov 2001
Location: the not so stock tribe
Posts: 3,697
Likes: 0
Received 0 Likes
on
0 Posts
made some more progress last night ,
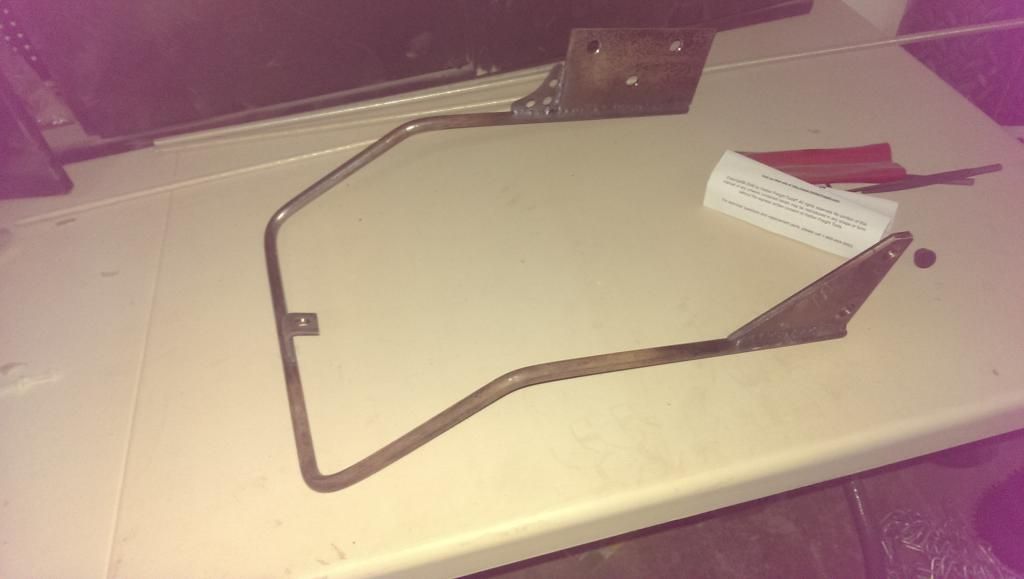
I finished welding the transmission cross member and welded its tabs to the subframes .
cross member with mount pad and bracing :
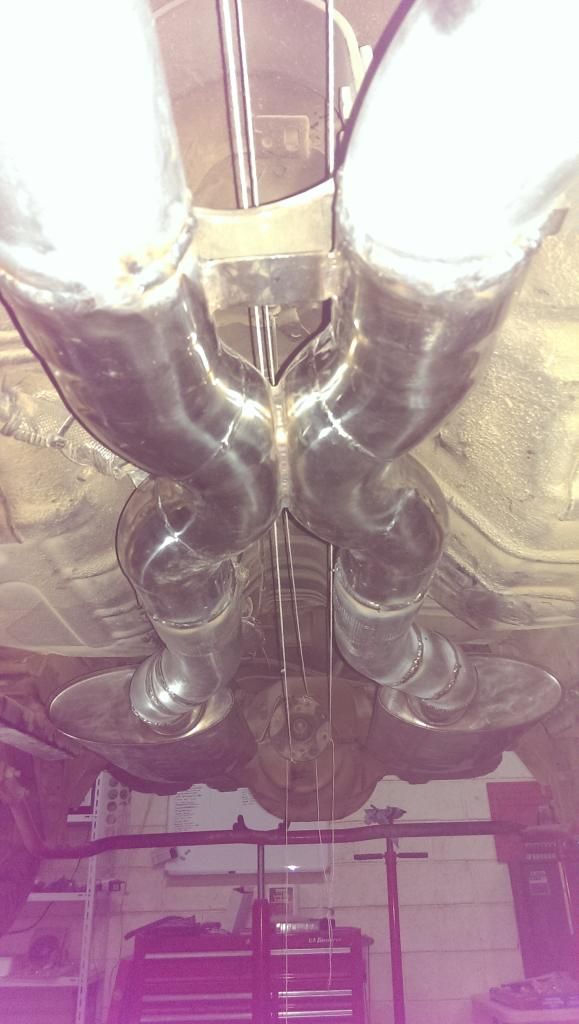
I then moved on to the exhaust side of the build , like I mentioned earlier the exhaust will be a dual 3" setup with an x pipe and two magna flow mufflers. the driver side header comes too close to the trans and shift linkage , so I decided to cut part of the collector off and re route it to fit my needs .
here is a the driver side header tacked into place :
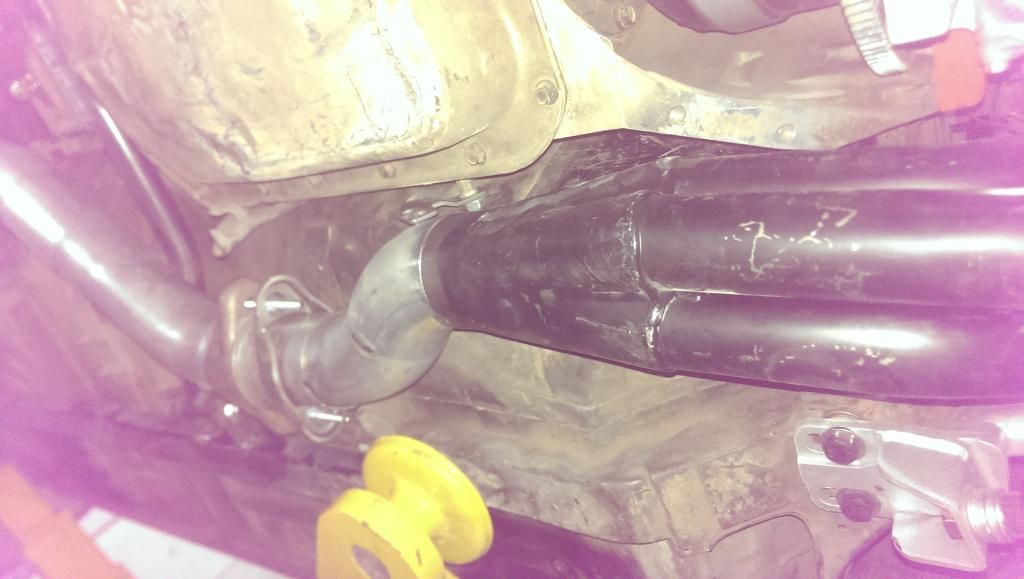
and here is how the whole exhaust up to the x pipe looks like , you can also see how the trans cross member attaches to the frame too:
on a side note , as I was cleaning the mess of old parts , I stumbled on what I believe was the cause on the low boost issue I was having
apparently this has been going on for more than a year now and explains why boost dropped from 17 psi to about 13-14 psi - I just thought the blower was getting old
and finally I remembered that the accessory belt on my setup does not have a tensioner between the balancer and transfer pulley, so I decided to make me one
I just used a stock tensioner and pulley and bolted it to on e of the unused holes on the front pass. side of the block , I then added a small tab with a slight "s" bend in it to mount the upper hole in the tensioner , while the lower one bolts directly to the block:
so now I need to finish welding the exhaust pipes from the headers tot he x pipe and install some O2 bungs , after that I can start mocking the mufflers and pipes from the x pipe to the mufflers. I was thinking of dumping the exhaust right after the mufflers using a pair of turn downs ,,,, but then I thought why not install a flange on the back side of the muffler and have the option of running some turn downs or some pipes that run to the back of the car - reason being there might be a local racing class here that requires full exhaust that exits the rear of the car .
after all that is done I can install the cooler , fab up the heat shield for it , run the coolant lines to the trunk , weld charge pipes and BOV flange , install radiator and plumb it , and finally drop the car on the ground and off the lift and have a shaft made for it
so to summarize the next few steps ( and so I don't forget what to do next ) :
- finish exhaust
- finish intercooler stuff
- radiator , fans , heat exchanger
- driveshaft
- I/C tank in trunk
- bunch of other stuff I can't remember now
I finished welding the transmission cross member and welded its tabs to the subframes .
cross member with mount pad and bracing :

I then moved on to the exhaust side of the build , like I mentioned earlier the exhaust will be a dual 3" setup with an x pipe and two magna flow mufflers. the driver side header comes too close to the trans and shift linkage , so I decided to cut part of the collector off and re route it to fit my needs .
here is a the driver side header tacked into place :

and here is how the whole exhaust up to the x pipe looks like , you can also see how the trans cross member attaches to the frame too:


on a side note , as I was cleaning the mess of old parts , I stumbled on what I believe was the cause on the low boost issue I was having

apparently this has been going on for more than a year now and explains why boost dropped from 17 psi to about 13-14 psi - I just thought the blower was getting old
and finally I remembered that the accessory belt on my setup does not have a tensioner between the balancer and transfer pulley, so I decided to make me one
I just used a stock tensioner and pulley and bolted it to on e of the unused holes on the front pass. side of the block , I then added a small tab with a slight "s" bend in it to mount the upper hole in the tensioner , while the lower one bolts directly to the block:

so now I need to finish welding the exhaust pipes from the headers tot he x pipe and install some O2 bungs , after that I can start mocking the mufflers and pipes from the x pipe to the mufflers. I was thinking of dumping the exhaust right after the mufflers using a pair of turn downs ,,,, but then I thought why not install a flange on the back side of the muffler and have the option of running some turn downs or some pipes that run to the back of the car - reason being there might be a local racing class here that requires full exhaust that exits the rear of the car .
after all that is done I can install the cooler , fab up the heat shield for it , run the coolant lines to the trunk , weld charge pipes and BOV flange , install radiator and plumb it , and finally drop the car on the ground and off the lift and have a shaft made for it
so to summarize the next few steps ( and so I don't forget what to do next
) :- finish exhaust
- finish intercooler stuff
- radiator , fans , heat exchanger
- driveshaft
- I/C tank in trunk
- bunch of other stuff I can't remember now
Last edited by 1dirtyZ; 08-13-2014 at 05:49 AM.
08-13-2014, 06:14 AM
#144
8 Second Club
Thread Starter
iTrader: (1)
Join Date: Nov 2001
Location: the not so stock tribe
Posts: 3,697
Likes: 0
Received 0 Likes
on
0 Posts
exhaust took a bit longer than I thought , but finally done
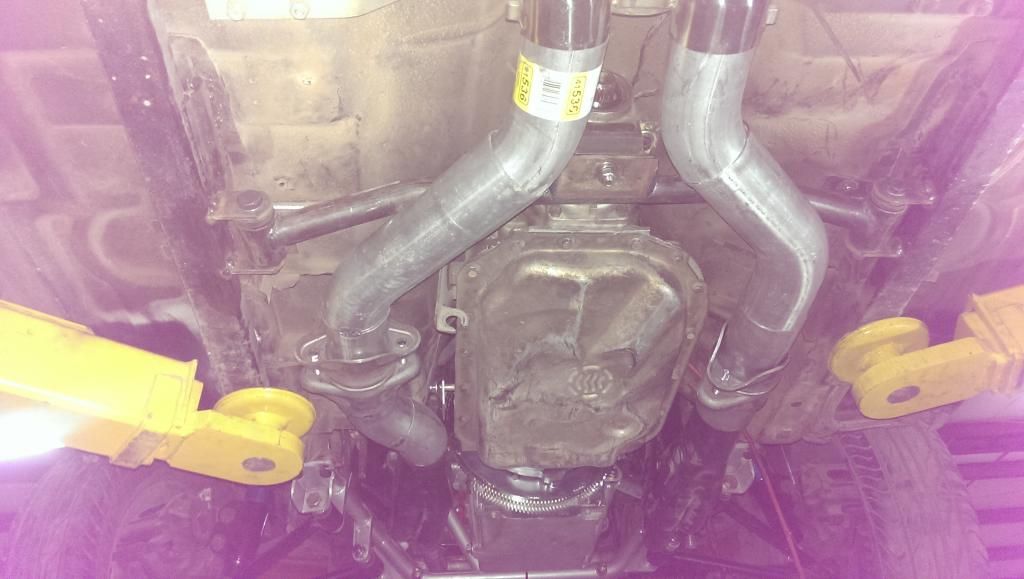
I finished welding up the X pipe and added an O2 bung on the passenger side :
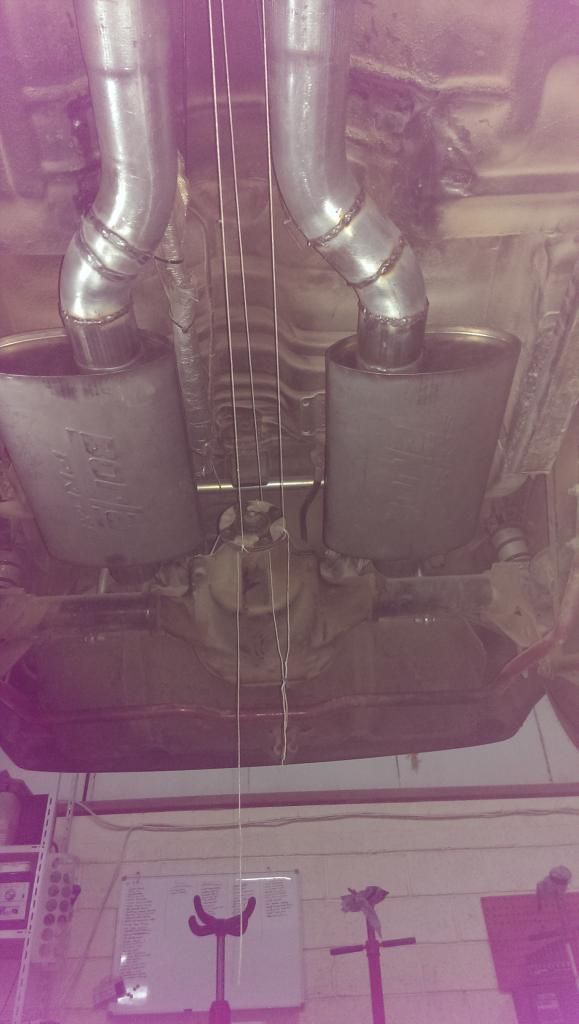
then moved on to the back and installed a pair of borla XS mufflers and hangers.
the plan was to use a pair of magnaflow mufflers ( quitter and flow well) , but when I got them I fount out that the entrance into and out of the muffler has a bottleneck where the pipe shrinks from 3" down to about 2.5" ,,, so I decided to ditch those and went with the borlas.
I also found out that these cars are not symmetrical ; everything seems to be moved over to the side, which meant I had to do some fancy bend routing to have the exhaust clear the floorboard :
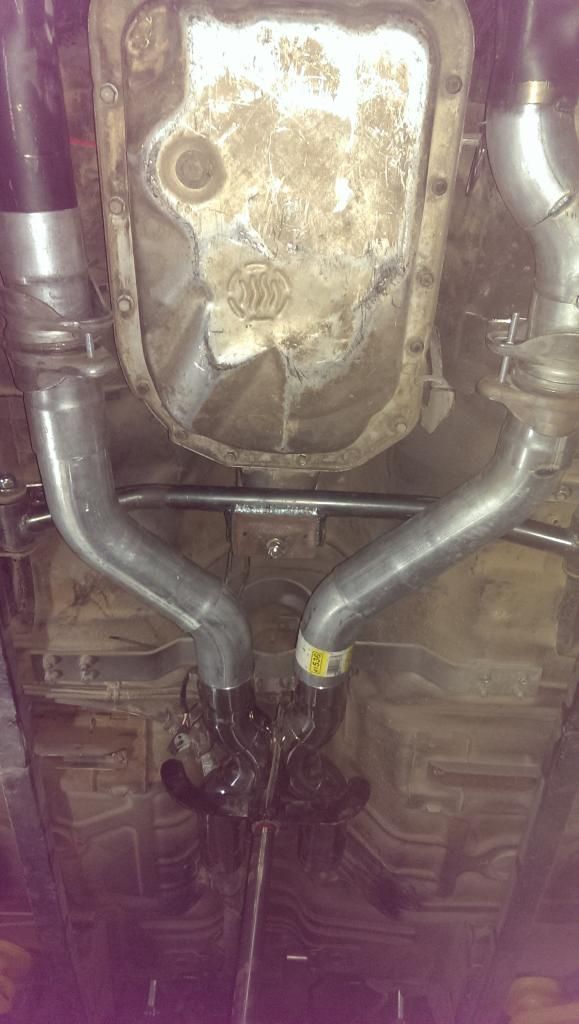
and the finished product ( well the back half of the finished product :
I still have to take it apart and paint it ( don't ask why ,,, just feel it would look better ) and install some turn downs. and I still have to get an "ant's eye " view pic of the complete exhaust .
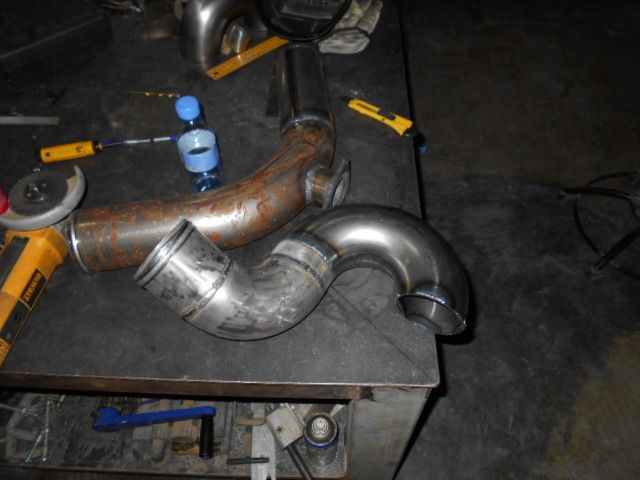
i then moved forward and decided to mess with the intercooler and piping. i mounted the intercooler in place along with the brackets holding it , then proceeded to mock the pipes up. although the piping is just a couple of 90 deg. bends , i wanted to do it nicely and bead roll the edges of the pipes so the couplers have something to grab on to .
so I broke out the 'ol bead roller and started experimenting with a few scrap pipes ,,,, and I then ran out of time
so next up to do is:
- cut, mock , and bead roll intercooler pipes.
- weld BOV flange and IAT bung on pipes.
- fab up some sort of insulation on the front of the intercooler ( maybe wrap the whole thing in thermo insulating sticky stuff.
- install radiator and heat exchanger.
- consider moving the trans cooler from the inside fender to in front of the radiator if i have room .
- weld trans temp sensor bung on trans pan.
- run intercooler lines to trunk
- drop car on ground and measure for driveshaft
I finished welding up the X pipe and added an O2 bung on the passenger side :


then moved on to the back and installed a pair of borla XS mufflers and hangers.
the plan was to use a pair of magnaflow mufflers ( quitter and flow well) , but when I got them I fount out that the entrance into and out of the muffler has a bottleneck where the pipe shrinks from 3" down to about 2.5" ,,, so I decided to ditch those and went with the borlas.
I also found out that these cars are not symmetrical ; everything seems to be moved over to the side, which meant I had to do some fancy bend routing to have the exhaust clear the floorboard :

and the finished product ( well the back half of the finished product
:

I still have to take it apart and paint it ( don't ask why ,,, just feel it would look better
) and install some turn downs. and I still have to get an "ant's eye " view pic of the complete exhaust .i then moved forward and decided to mess with the intercooler and piping. i mounted the intercooler in place along with the brackets holding it , then proceeded to mock the pipes up. although the piping is just a couple of 90 deg. bends , i wanted to do it nicely and bead roll the edges of the pipes so the couplers have something to grab on to .
so I broke out the 'ol bead roller and started experimenting with a few scrap pipes ,,,, and I then ran out of time
so next up to do is:
- cut, mock , and bead roll intercooler pipes.
- weld BOV flange and IAT bung on pipes.
- fab up some sort of insulation on the front of the intercooler ( maybe wrap the whole thing in thermo insulating sticky stuff.
- install radiator and heat exchanger.
- consider moving the trans cooler from the inside fender to in front of the radiator if i have room .
- weld trans temp sensor bung on trans pan.
- run intercooler lines to trunk
- drop car on ground and measure for driveshaft
 08-14-2014, 02:23 AM
#146
8 Second Club
Thread Starter
iTrader: (1)
Join Date: Nov 2001
Location: the not so stock tribe
Posts: 3,697
Likes: 0
Received 0 Likes
on
0 Posts
BSmiff , it is a fun street car
I don't get what you are saying ; do you mean cog driven bracket ?
either way the reason I changed to vette setup is that it mounts the blower higher in the engine compartment and moves it farther back from the radiator.
the old setup was also an 8 rib which was ok , but a cog would let me squeeze the full potential of this setup.
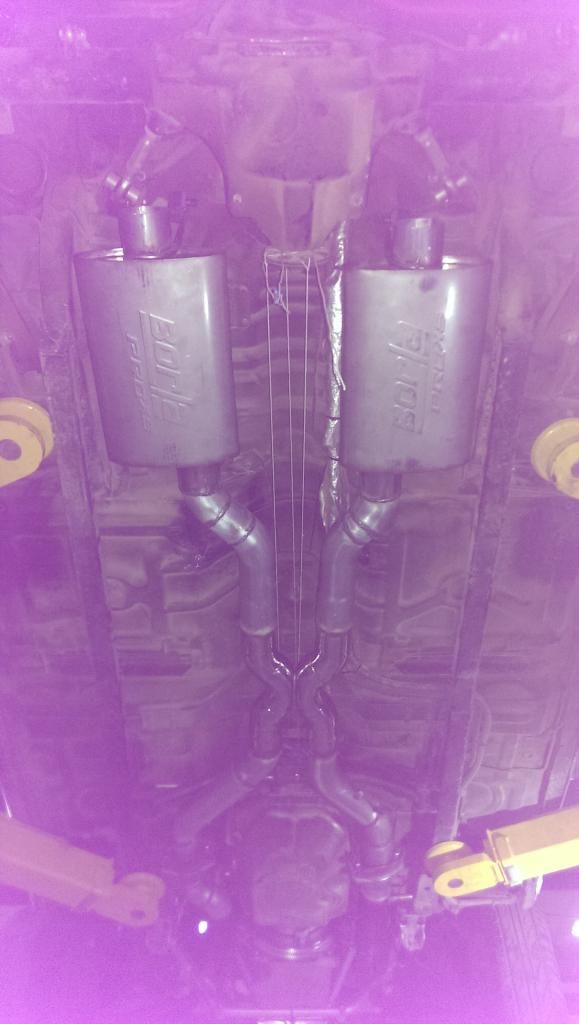
moving on ,,, I didn't get to do much yesterday , but i did get a few pics of the complete exhaust on the car

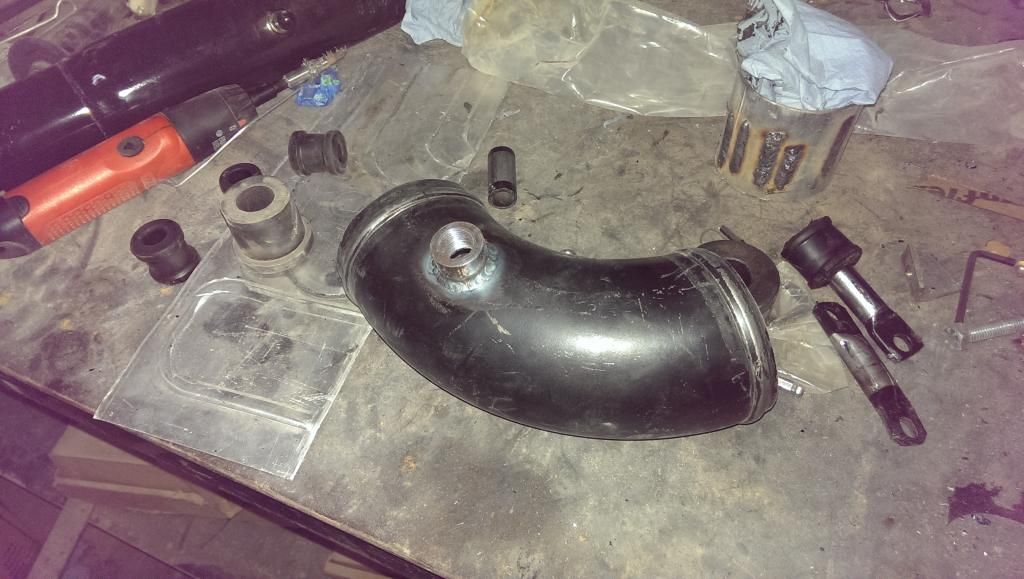
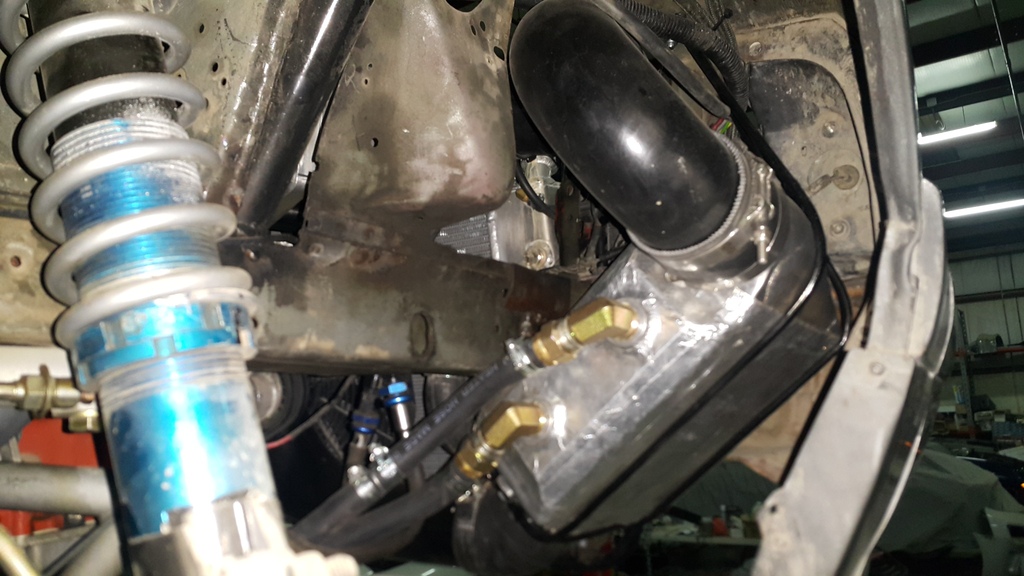
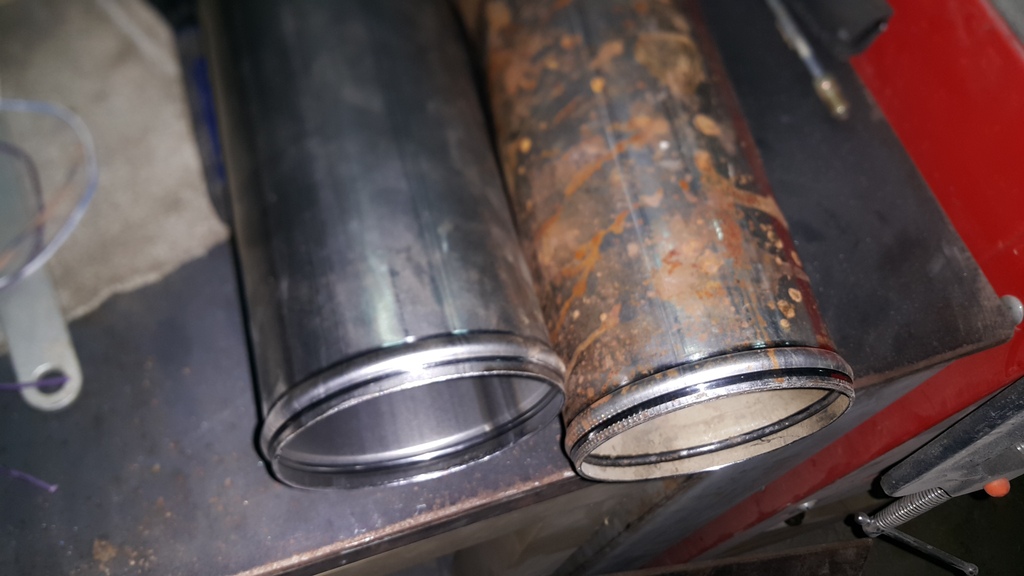
and I did manage to mess around with the charge pipes . I got both pipes cut to size and bead rolled them :
I also dropped the radiator in place to see how everything fit, which was very nicely
i found out i have to make me a new coolant line from the upper water pump outlet to the radiator. i also found out i can use the stock Fbody fans if i needed to .
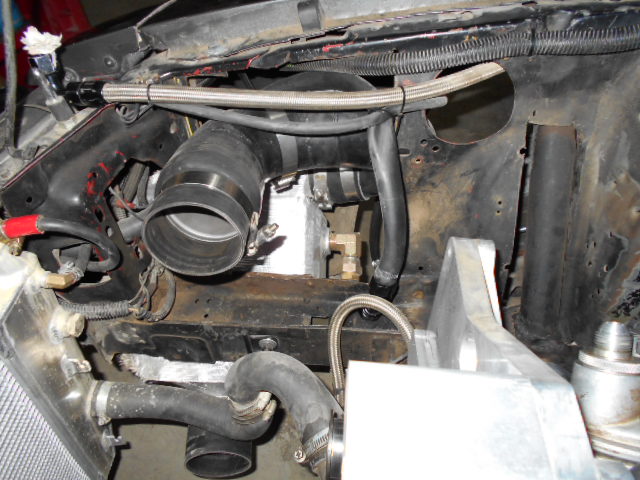
after placing the charge pipes in place i started messing around with where to place the BOV valve . the plan was to mount it on the elbow just before the TB , but doing so will mean i can't run the filter and inlet tube from the driver side to the blower inlet ( the BOV is a vortech mondo unit so it is HUGE) . so i decided to place it between the blower and intercooler.
I'm also looking into relocating the trans cooler from its current location to in front of the radiator. that would give me a bit more room and clean the engine compartment up.
so if i get chance tonight i should be able to weld the IAT bung on the charge pipe , install the engine harness and starter , headers gaskets , figure out where to mount the trans temp sensor ( in pan or in cooler lines) , hook up shifter cable, and anything else i might find amusing to do along the way
I don't get what you are saying ; do you mean cog driven bracket ?
either way the reason I changed to vette setup is that it mounts the blower higher in the engine compartment and moves it farther back from the radiator.
the old setup was also an 8 rib which was ok , but a cog would let me squeeze the full potential of this setup.
moving on ,,, I didn't get to do much yesterday , but i did get a few pics of the complete exhaust on the car


and I did manage to mess around with the charge pipes . I got both pipes cut to size and bead rolled them :

I also dropped the radiator in place to see how everything fit, which was very nicely
i found out i have to make me a new coolant line from the upper water pump outlet to the radiator. i also found out i can use the stock Fbody fans if i needed to .


after placing the charge pipes in place i started messing around with where to place the BOV valve . the plan was to mount it on the elbow just before the TB , but doing so will mean i can't run the filter and inlet tube from the driver side to the blower inlet ( the BOV is a vortech mondo unit so it is HUGE) . so i decided to place it between the blower and intercooler.
I'm also looking into relocating the trans cooler from its current location to in front of the radiator. that would give me a bit more room and clean the engine compartment up.
so if i get chance tonight i should be able to weld the IAT bung on the charge pipe , install the engine harness and starter , headers gaskets , figure out where to mount the trans temp sensor ( in pan or in cooler lines) , hook up shifter cable, and anything else i might find amusing to do along the way
Last edited by 1dirtyZ; 08-14-2014 at 02:29 AM.
09-24-2014, 03:46 AM
#147
8 Second Club
Thread Starter
iTrader: (1)
Join Date: Nov 2001
Location: the not so stock tribe
Posts: 3,697
Likes: 0
Received 0 Likes
on
0 Posts
a bit more to report ,
I managed to finish a few odds and ends here and there ; I welded a trans temp bung on the pan , ran the cooler lines , installed the 4L60 to 4L80 adapter harness ( and dimpled the floor pan in the process) , painted the trans cross member , insulated the intercooler , and ran most of the engine harness .
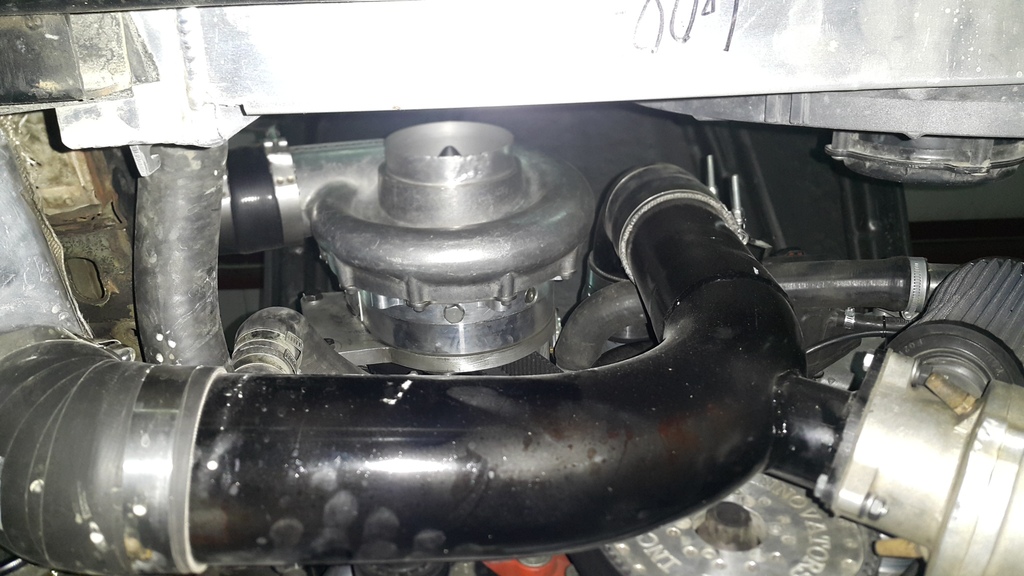
I also got the IAT bung welded in :
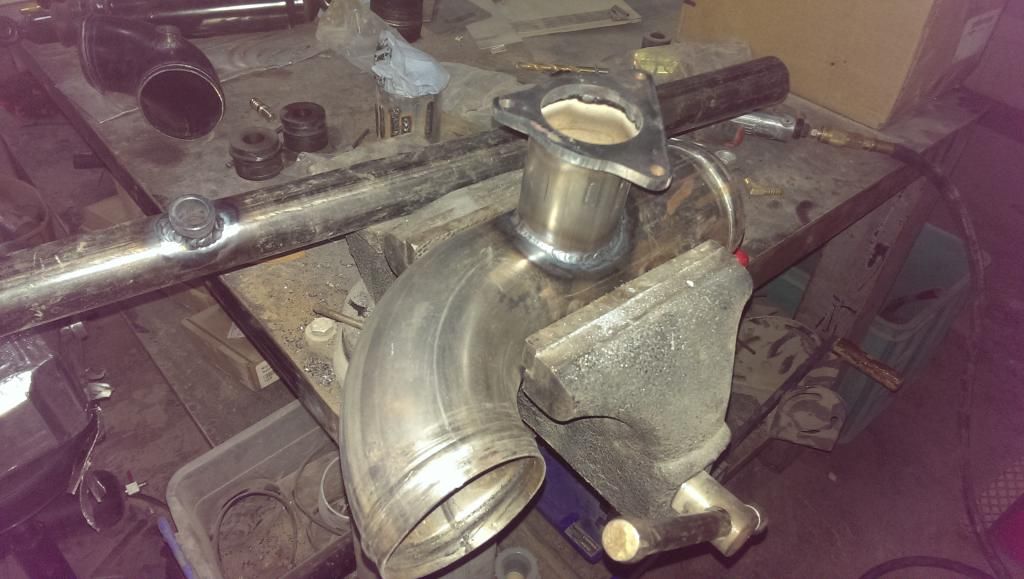
also managed to weld the BOV flange on the charge pipe :
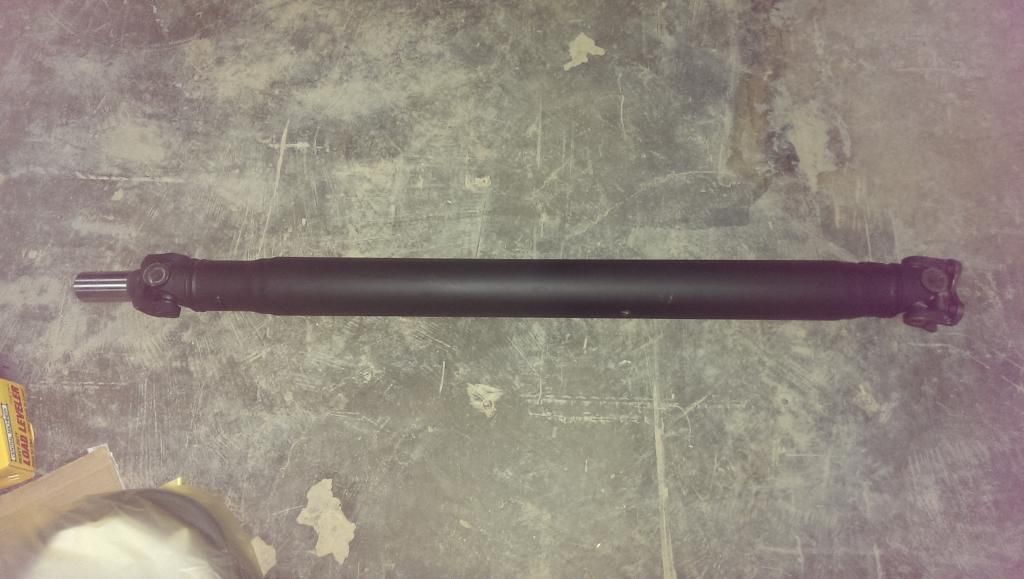
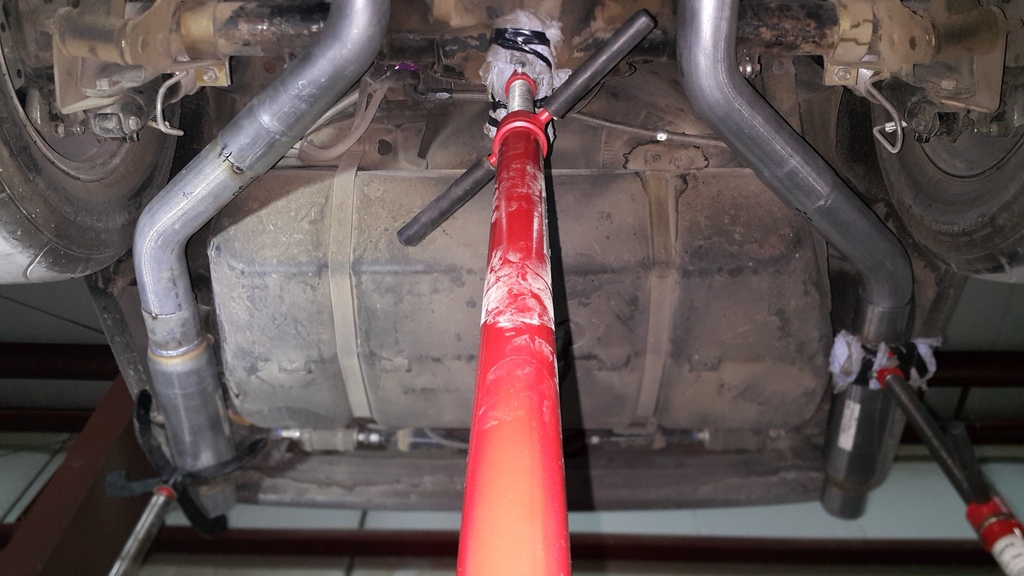
new driveshaft fresh from the shop :
and last but not least I got my turndowns clamped in place :
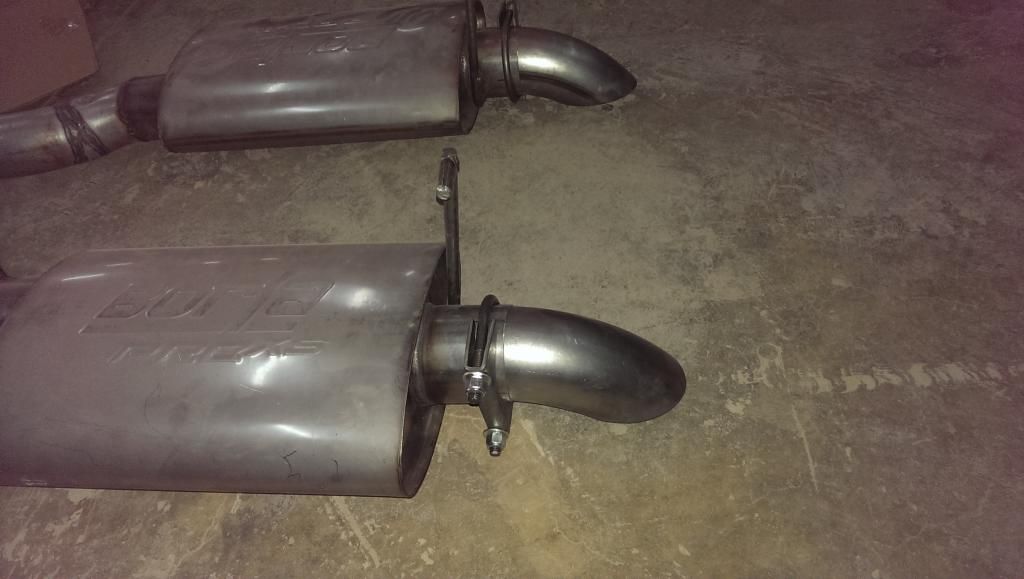
I used clamps for now since I might be racing this heap in a few local races that "might " require full exhaust that exits the rear of the vehicle , so if they do require that I can just unbolt the turndowns and bolt in a set of pipes that go all the way back.
so now that the charge pipes are done , I can take them along with a few other brackets to the powder coaters and after that I can start re-assembly of the blower stuff .
the plan now is to :
- service the blower ( new oring and seals )
- install charge pipes
- Install intercooler and start plumbing it
- install blower
- install driveshaft
- hook up new shifter
- run alternator wire
- figure out engine belt lengths
- start working on fabbing the intercooler ice tank ( torn between an aluminum tank in the spare wheel well or just using a regular ice cooler and plumbing it )
as soon as I'm done with that stuff I can think of starting the engine and checking things over
I managed to finish a few odds and ends here and there ; I welded a trans temp bung on the pan , ran the cooler lines , installed the 4L60 to 4L80 adapter harness ( and dimpled the floor pan in the process) , painted the trans cross member , insulated the intercooler , and ran most of the engine harness .
I also got the IAT bung welded in :

also managed to weld the BOV flange on the charge pipe :

new driveshaft fresh from the shop :

and last but not least I got my turndowns clamped in place :

I used clamps for now since I might be racing this heap in a few local races that "might " require full exhaust that exits the rear of the vehicle , so if they do require that I can just unbolt the turndowns and bolt in a set of pipes that go all the way back.
so now that the charge pipes are done , I can take them along with a few other brackets to the powder coaters and after that I can start re-assembly of the blower stuff .
the plan now is to :
- service the blower ( new oring and seals )
- install charge pipes
- Install intercooler and start plumbing it
- install blower
- install driveshaft
- hook up new shifter
- run alternator wire
- figure out engine belt lengths
- start working on fabbing the intercooler ice tank ( torn between an aluminum tank in the spare wheel well or just using a regular ice cooler and plumbing it )
as soon as I'm done with that stuff I can think of starting the engine and checking things over
02-12-2015, 03:10 AM
#148
8 Second Club
Thread Starter
iTrader: (1)
Join Date: Nov 2001
Location: the not so stock tribe
Posts: 3,697
Likes: 0
Received 0 Likes
on
0 Posts
surprise update!!
been working on and off this thing for a while now ,,, but I guess I had enough stuff done to warrant an update
first off a little update regarding the blower ,,,, if you notice in the pic below ,,,, it grew a bit
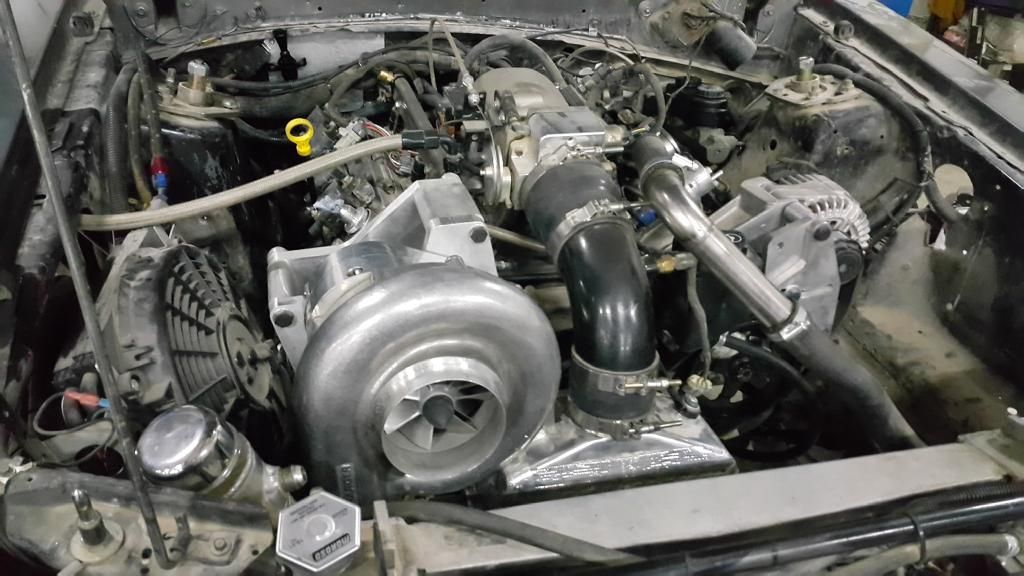
I got a chance to buy back - of all things - my old reverse Rotation F2 blower that I sold off my blue Camaro and like all other blue Camaro parts ,,, they find their way here
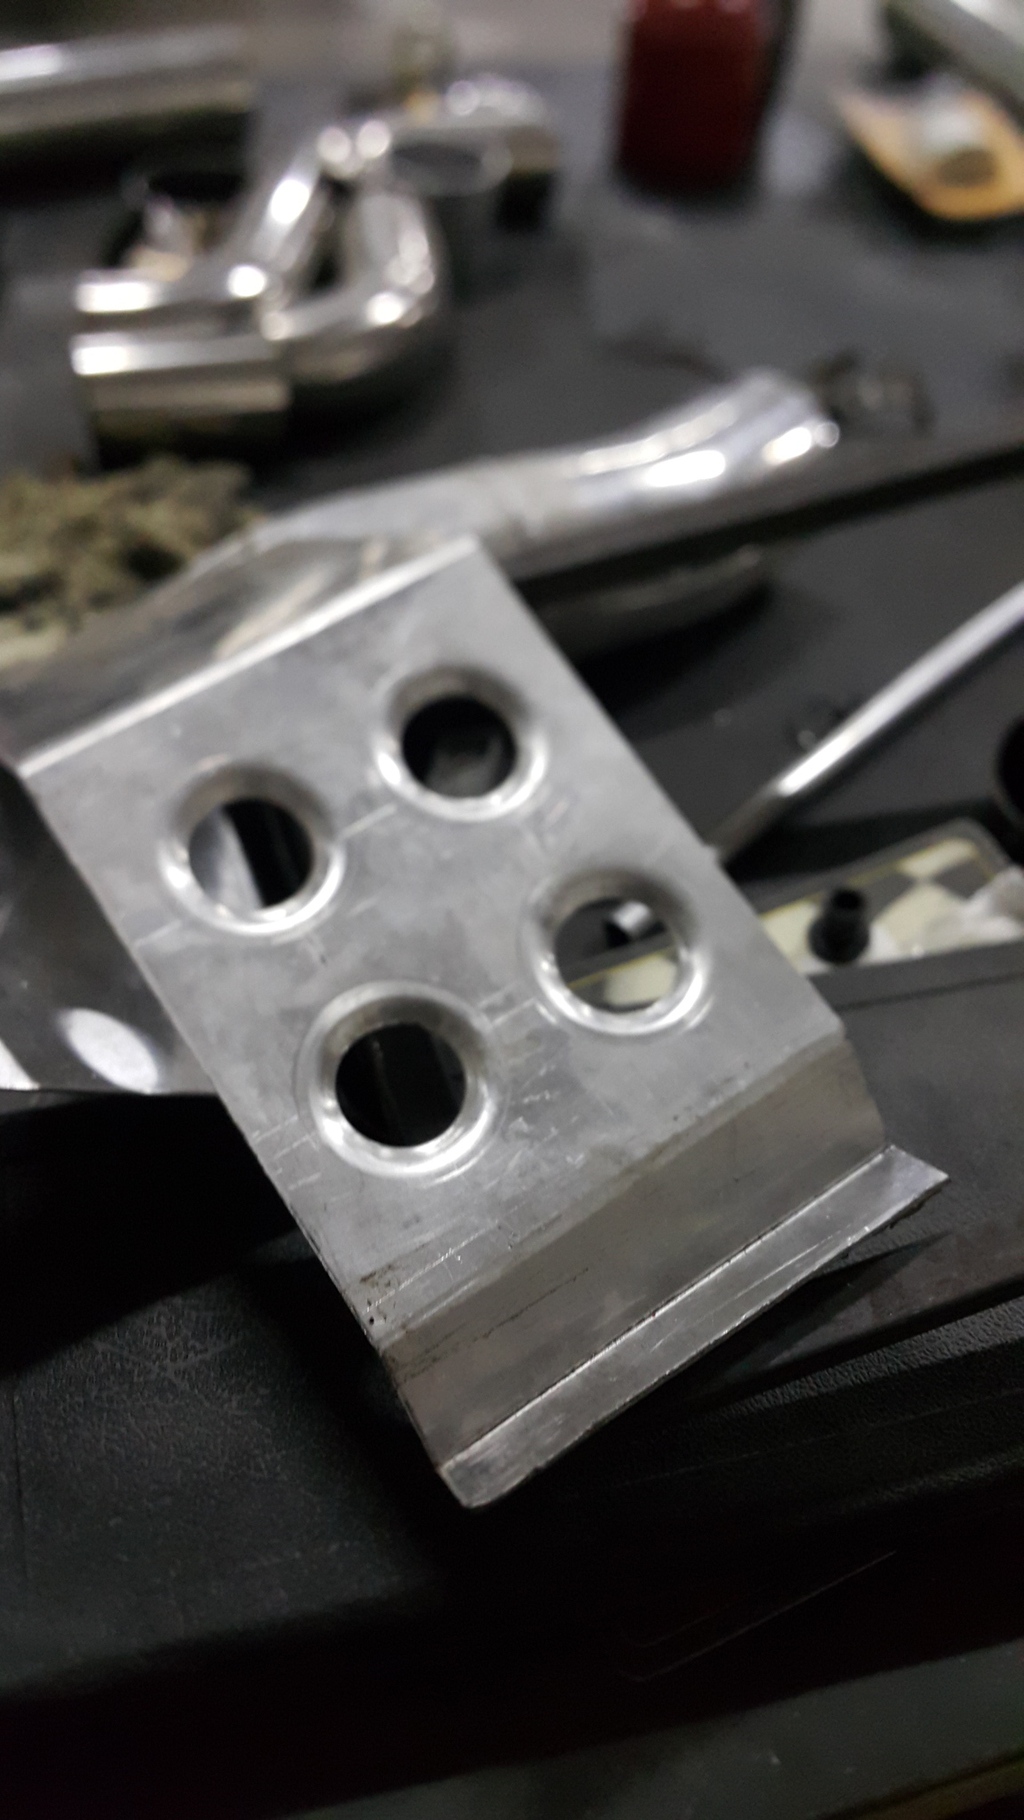
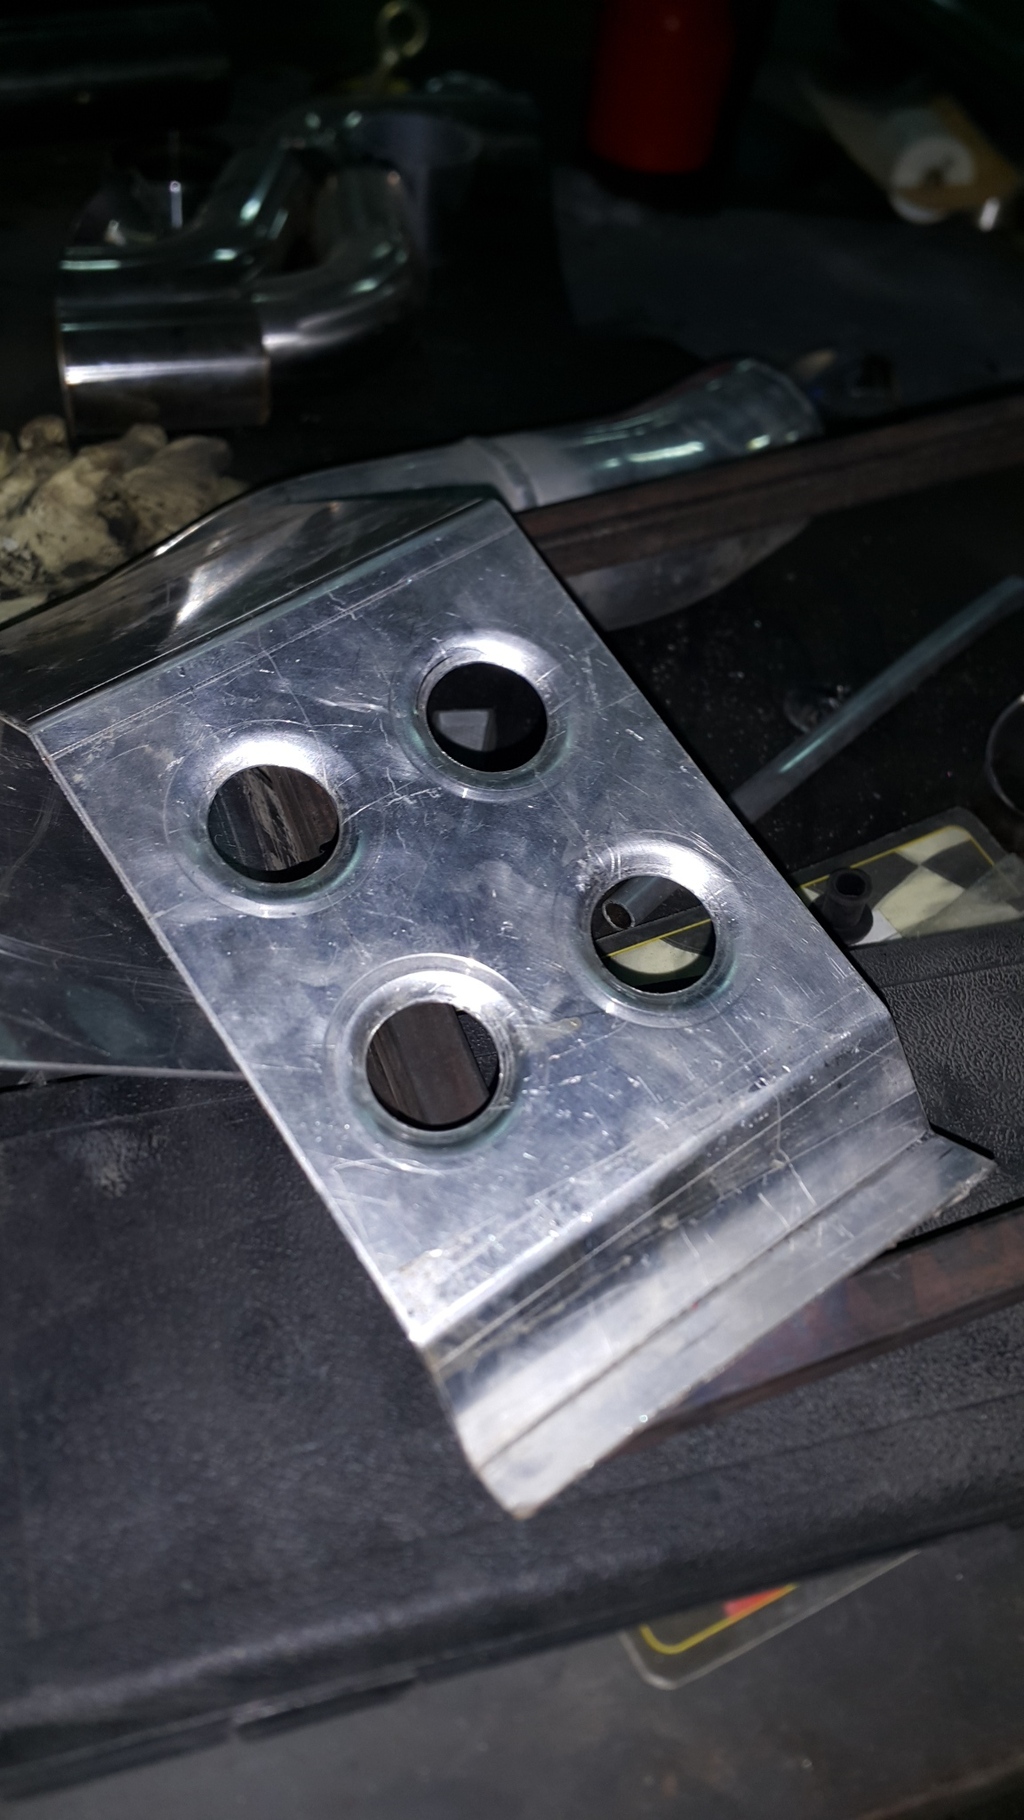
moving on ,, I had to fab up a tensioner for the accessory belts ,,, so the best place I found was where the AC compressor would sit:
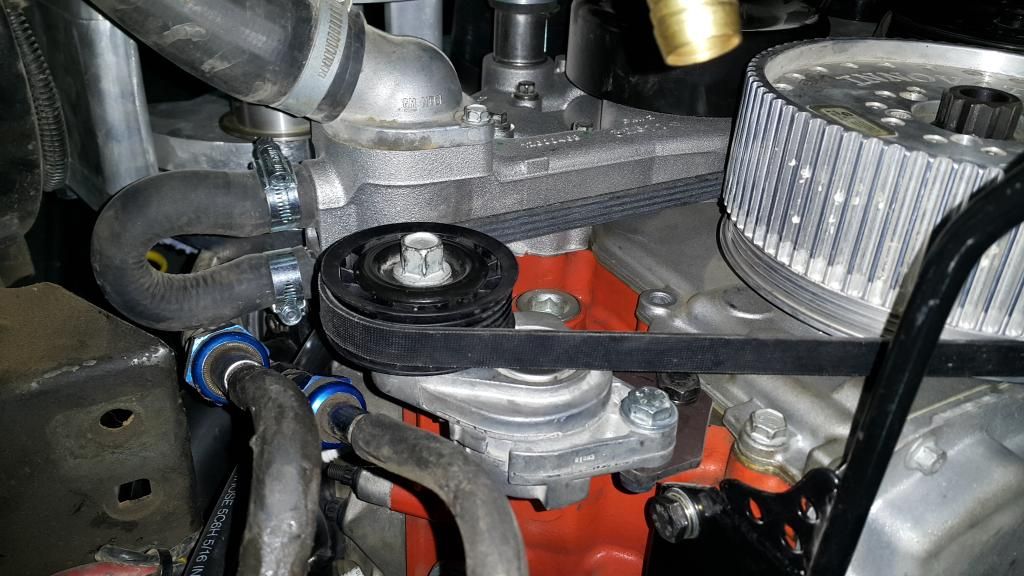
well to get it to fit properly and place proper tension , I had to fab up a plate to hold it in place, incase you are wondering how it looks ,,,, here it is :
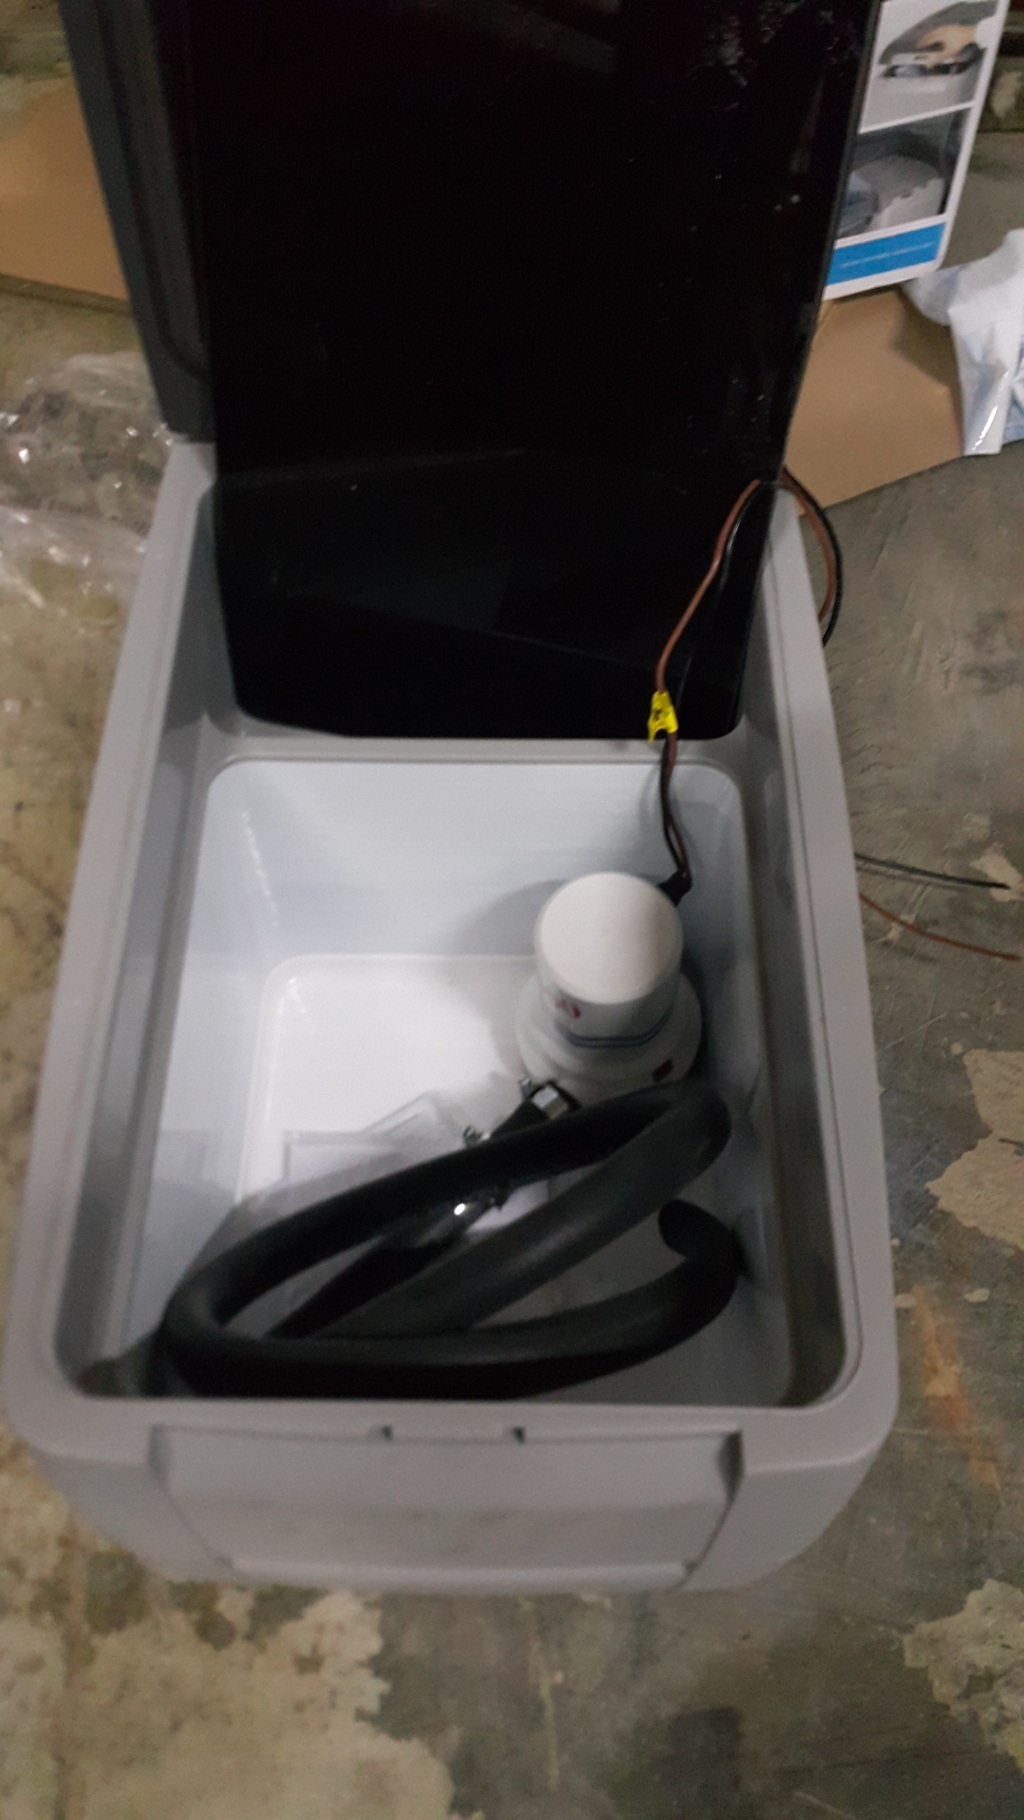
moving on ,, It was time to start on the water tank. I was torn between using a cooler and have it strapped down in the trunk ( keeps things cooler longer) and fabbing up a tank that sits in where the spare tire would ( looks cleaner and saves more space in the trunk).
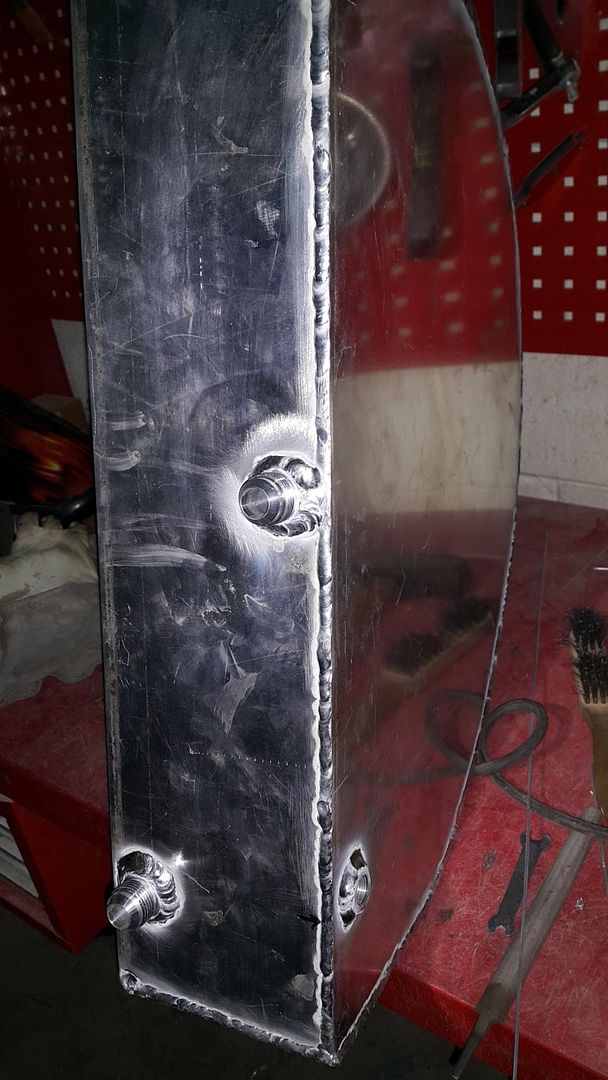
so I finally decided to go with the aluminum tank in the spare tire compartment. the plan was to use a D shaped tank and have the pump and fittings on the flat part of the D .
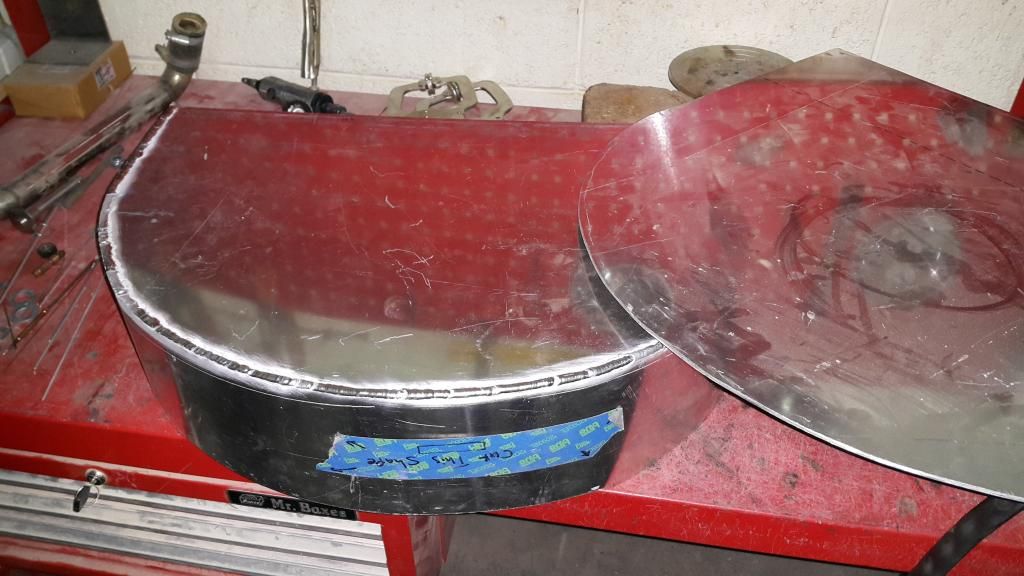
next up was the hole and fittings welded in :
and here is how it looks sitting in the trunk :
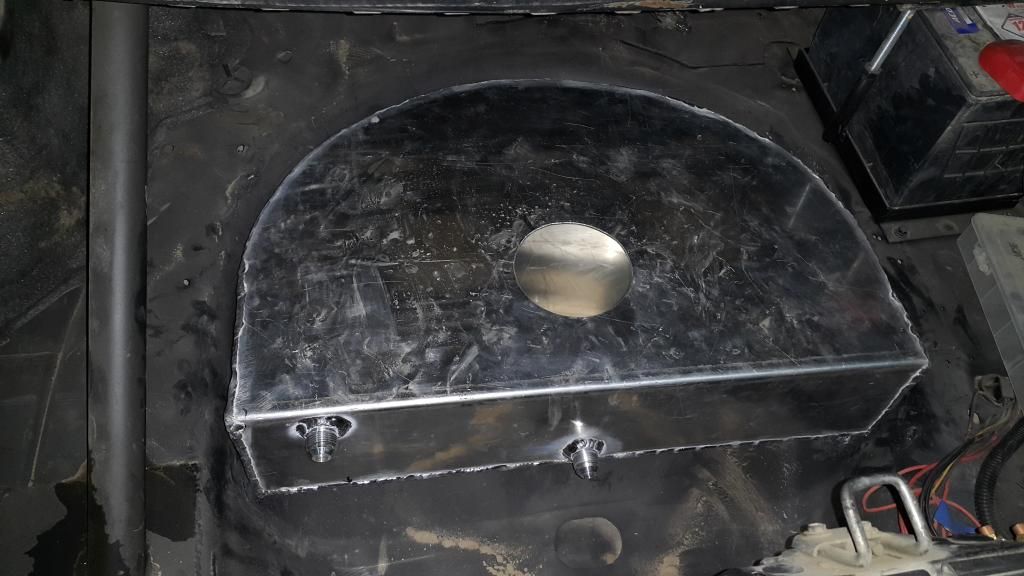
and this is how the finished product looks after powder coating and installing the lid :
I also plumbed the intercooler for now and ran the lines to the trunk ,,, all have to do now is mount the tanks as well as the pump and hook the lines up and intercooler system would be done . the plan was to use a heat exchanger up front but I guess plans have changed , and there is some secret squirrel going on in the near future that I don't want to talk about just yet
so moving on ,,, I am almost ready to fire this thing up. which should be pretty soon
the plan is as follows :
- plumb the intercooler tank and call the intercooler system done
- connect the adapter harness for the trans vss signal to the PCM.
- swap to a 4 speed shifter instead of the 3 speed one now
- tune the bish!
been working on and off this thing for a while now ,,, but I guess I had enough stuff done to warrant an update
first off a little update regarding the blower ,,,, if you notice in the pic below ,,,, it grew a bit

I got a chance to buy back - of all things - my old reverse Rotation F2 blower that I sold off my blue Camaro
and like all other blue Camaro parts ,,, they find their way here moving on ,, I had to fab up a tensioner for the accessory belts ,,, so the best place I found was where the AC compressor would sit:

well to get it to fit properly and place proper tension , I had to fab up a plate to hold it in place, incase you are wondering how it looks ,,,, here it is :

moving on ,, It was time to start on the water tank. I was torn between using a cooler and have it strapped down in the trunk ( keeps things cooler longer) and fabbing up a tank that sits in where the spare tire would ( looks cleaner and saves more space in the trunk).
so I finally decided to go with the aluminum tank in the spare tire compartment. the plan was to use a D shaped tank and have the pump and fittings on the flat part of the D .

next up was the hole and fittings welded in :

and here is how it looks sitting in the trunk :

and this is how the finished product looks after powder coating and installing the lid :

I also plumbed the intercooler for now and ran the lines to the trunk ,,, all have to do now is mount the tanks as well as the pump and hook the lines up and intercooler system would be done . the plan was to use a heat exchanger up front but I guess plans have changed , and there is some secret squirrel going on in the near future that I don't want to talk about just yet
so moving on ,,, I am almost ready to fire this thing up. which should be pretty soon
the plan is as follows :
- plumb the intercooler tank and call the intercooler system done
- connect the adapter harness for the trans vss signal to the PCM.
- swap to a 4 speed shifter instead of the 3 speed one now
- tune the bish!
06-03-2015, 03:27 AM
#149
8 Second Club
Thread Starter
iTrader: (1)
Join Date: Nov 2001
Location: the not so stock tribe
Posts: 3,697
Likes: 0
Received 0 Likes
on
0 Posts
update time!
well there have been quite a few changes that took place
first off I got the intercooler all plumbed and pretty . but I then decided to swap out the rule 500 GPH pump I had in the back to a 1100GPH one for more flow after I saw how inadequate it was on my blue Camaro .
so I ordered the motor alone thinking that its just a simple motor cartridge swap and that the impeller is just a direct swap ,,,, wrong ; after I swapped it I noticed the water was not circulating so I investigated moe and it turned out the pump was binding ,,, long story short : buy the whole pump assembly and don't try to save a few bucks
the other thing that changed from the initial plan is that I ditched the stock pcm and harness and got me a holley dominator ecu and wiring . so that got installed and wired up ,,, and now I have a nicely running mustang
I also got a few other things done , like new front runners , new 4 speed B&M shifter , installed the rear seats , new battery , new starter ( old one was trashed), and some other stuff I can't recall right now
I did get the car baseline tuned , it idles good now and has pretty good throttle response. I did however run into a few issues regarding the transmission .
the first seems to be fluid level related ; the car would be very sluggish in D and requires some RPM to move forward , but it does not do it in reverse ( it rolls back as soon as I lift my foot off the brakes) . I added a quart of fluid to the tranny and it seemed to get better . it now has a small hesitation and then it lurches forward when giving it a bit of gas. I tried removing the lokar flexible dipstick tube to make sure the level is correct and as soon as I pulled the tube fluid came out ,,,, so I know I'm not low on fluid level.
could this be a converter issue , or a pump issue ( the tranny was a used unit built locally and I don't think anything was changed except the clutches and shift kit.
another issue that I am having but seemed to have figured it out is the trans temps that seem to get really hi just idling or driving around. I noticed they reach about 180-190 F on the gauge and that is with the car idling.
first I thought it was a faulty cooler or trans - but if it were a cooler why would the trans preform ok for a bit then start creeping up in temp. well after a few head scratches and looking over the logs it hit me ...... I had a trans heater and not a cooler ,,,, how you ask ??
first off the trans cooler is located in the passenger area inner fender ,,,, right above where the blow off valve is. the blow off valve I'm using is a vortech Mondo valve with a hose discharge ,,,,, and in my infinite wisdom I have it pointing up at the cooler thinking it will provide some air to it while the BOV is open.
what I forgot about is that the intercooler pump is not connected ,,, so there is no circulation in the intercooler ,,,, and looking at me logs I was seeing about 170-180F intake temps at idle after a while . which means the blower is huffing quite a hot charge on to the transmission cooler through the blow off valve .
so to verify this I will try to rotate the BOV around and away from the cooler and see if that helps.
another issue that popped up is transmission shifting ; the car has a $L80 controlled by the holley pcm ,,, the issue I'm having is that when trans temps are under 190f the tranny shifts great just like it was commanded through all 4 gears, the issue I'm getting is that when it gets warm - around 200f ) the thig gets stuck in 2nd gear and will not shift into any other gear but reverse. is this normal for a 4L80? or is there some issue I'm having that needs to be addressed??
so this is where it stands right now ,,, I can't do any long driving or boosted test runs or tuning until I get these things sorted out ,,,, but so far I'm really happy with what this car feels like. the only annoying thing is that the BOV is LOUD when open! the car gets vey quite once you get to 0 vacuum or boost
so next up is fixing the cooler issue , figuring out the trans problem when heating , cleaning up the interior ( shifter boot - center console clean up and panels , etc) then hitting the dyno to see how it does
well there have been quite a few changes that took place
first off I got the intercooler all plumbed and pretty . but I then decided to swap out the rule 500 GPH pump I had in the back to a 1100GPH one for more flow after I saw how inadequate it was on my blue Camaro .
so I ordered the motor alone thinking that its just a simple motor cartridge swap and that the impeller is just a direct swap ,,,, wrong ; after I swapped it I noticed the water was not circulating so I investigated moe and it turned out the pump was binding ,,, long story short : buy the whole pump assembly and don't try to save a few bucks
the other thing that changed from the initial plan is that I ditched the stock pcm and harness and got me a holley dominator ecu and wiring . so that got installed and wired up ,,, and now I have a nicely running mustang
I also got a few other things done , like new front runners , new 4 speed B&M shifter , installed the rear seats , new battery , new starter ( old one was trashed), and some other stuff I can't recall right now
I did get the car baseline tuned , it idles good now and has pretty good throttle response. I did however run into a few issues regarding the transmission .
the first seems to be fluid level related ; the car would be very sluggish in D and requires some RPM to move forward , but it does not do it in reverse ( it rolls back as soon as I lift my foot off the brakes) . I added a quart of fluid to the tranny and it seemed to get better . it now has a small hesitation and then it lurches forward when giving it a bit of gas. I tried removing the lokar flexible dipstick tube to make sure the level is correct and as soon as I pulled the tube fluid came out ,,,, so I know I'm not low on fluid level.
could this be a converter issue , or a pump issue ( the tranny was a used unit built locally and I don't think anything was changed except the clutches and shift kit.
another issue that I am having but seemed to have figured it out is the trans temps that seem to get really hi just idling or driving around. I noticed they reach about 180-190 F on the gauge and that is with the car idling.
first I thought it was a faulty cooler or trans - but if it were a cooler why would the trans preform ok for a bit then start creeping up in temp. well after a few head scratches and looking over the logs it hit me ...... I had a trans heater and not a cooler
,,,, how you ask ??first off the trans cooler is located in the passenger area inner fender ,,,, right above where the blow off valve is. the blow off valve I'm using is a vortech Mondo valve with a hose discharge ,,,,, and in my infinite wisdom I have it pointing up at the cooler thinking it will provide some air to it while the BOV is open.
what I forgot about is that the intercooler pump is not connected ,,, so there is no circulation in the intercooler ,,,, and looking at me logs I was seeing about 170-180F intake temps at idle after a while . which means the blower is huffing quite a hot charge on to the transmission cooler through the blow off valve .
so to verify this I will try to rotate the BOV around and away from the cooler and see if that helps.
another issue that popped up is transmission shifting ; the car has a $L80 controlled by the holley pcm ,,, the issue I'm having is that when trans temps are under 190f the tranny shifts great just like it was commanded through all 4 gears, the issue I'm getting is that when it gets warm - around 200f ) the thig gets stuck in 2nd gear and will not shift into any other gear but reverse. is this normal for a 4L80? or is there some issue I'm having that needs to be addressed??
so this is where it stands right now ,,, I can't do any long driving or boosted test runs or tuning until I get these things sorted out ,,,, but so far I'm really happy with what this car feels like. the only annoying thing is that the BOV is LOUD when open! the car gets vey quite once you get to 0 vacuum or boost
so next up is fixing the cooler issue , figuring out the trans problem when heating , cleaning up the interior ( shifter boot - center console clean up and panels , etc) then hitting the dyno to see how it does
06-04-2015, 01:43 AM
#150
8 Second Club
Thread Starter
iTrader: (1)
Join Date: Nov 2001
Location: the not so stock tribe
Posts: 3,697
Likes: 0
Received 0 Likes
on
0 Posts
I went back to the logs and looked back at the intake temps as well as the trans temps ,,, and what do you know ! the match perfectly
so it seems my theory is true that the BOV is just blowing hot air on to the cooler .
so there are two possible solutions :
first is relocating the transmission cooler to some where else ,,, maybe in front of the radiator,,,, but that would be too much work for me plus the real-estate in front of the radiator is reserved for another project
the second solution is to rotate the outlet of the BOV 90 degrees or so away from the cooler ,,,, which I did
and now I have to address the issue of the lowdness of this BOV ; the thing is freaking loud at idle and part throttle ,,,, but as soon as it shuts at 0 vac. and boost the car gets real quite .
so I was thinking of two options ,,,, the first expensive one and I'm not sure how that would work , is to replace the BOV with an procharger unit that has multiple openings instead oh a hose outlet like the one I have now.
the other option is placing a large filter on the outlet of the BOV to muffle the sound a bit .and I think I will be trying option 2 first .
so it seems my theory is true that the BOV is just blowing hot air on to the cooler .
so there are two possible solutions :
first is relocating the transmission cooler to some where else ,,, maybe in front of the radiator,,,, but that would be too much work for me
plus the real-estate in front of the radiator is reserved for another project the second solution is to rotate the outlet of the BOV 90 degrees or so away from the cooler ,,,, which I did
and now I have to address the issue of the lowdness of this BOV ; the thing is freaking loud at idle and part throttle ,,,, but as soon as it shuts at 0 vac. and boost the car gets real quite .
so I was thinking of two options ,,,, the first expensive one and I'm not sure how that would work , is to replace the BOV with an procharger unit that has multiple openings instead oh a hose outlet like the one I have now.
the other option is placing a large filter on the outlet of the BOV to muffle the sound a bit .and I think I will be trying option 2 first .
06-04-2015, 10:06 AM
#151

I have a buddy with a D1SC and it is SUPER annoying imo. Idk if he actually wants to change it because hes an attention *****..lol
But I would love if he did
07-14-2015, 03:59 AM
#152
8 Second Club
Thread Starter
iTrader: (1)
Join Date: Nov 2001
Location: the not so stock tribe
Posts: 3,697
Likes: 0
Received 0 Likes
on
0 Posts
well a quick update , i started tuning the car's idle and part throttle stuff , the car runs ok and shifts ok , but it still has that annoying lad when you first shift it into gear .
the other major thing to report is i broke another f'$% head unit!!! this time the F2 decided it would snap the input shaft i guess or some thing in there that disconnected the impeller from the input shaft! the thing that pisses me off is that this happened at part throttle , or even maybe at idle since I'm not tuning WOT yet .
this procharger crap is getting really annoying; i broke my F3 about 7 times ( impeller blades flying off, blades touching down , gear box seizing up ) , an F3 -135 touched down also , a friends F1x completely trashing the gear drive and impeller on its first pass and now this stupid thing . makes me rethink the turbo vs supercharger deal a lot now.
07-14-2015, 08:54 AM
#153

Sorry to hear about the trouble. We only use twin screw designs for this very reason.
On a happier note; following your build/mods never gets old. It's always interesting & quality work. Thanks for the updates.
On a happier note; following your build/mods never gets old. It's always interesting & quality work. Thanks for the updates.
11-01-2015, 03:12 AM
#154
8 Second Club
Thread Starter
iTrader: (1)
Join Date: Nov 2001
Location: the not so stock tribe
Posts: 3,697
Likes: 0
Received 0 Likes
on
0 Posts
time for some more updates !
so I shipped the blower out to get fixed by procharger ( to the tune of $1500+ ) and while I was waiting for the F2 to get back I decided it was only appropriate to slap the F1r back on,,, so I did
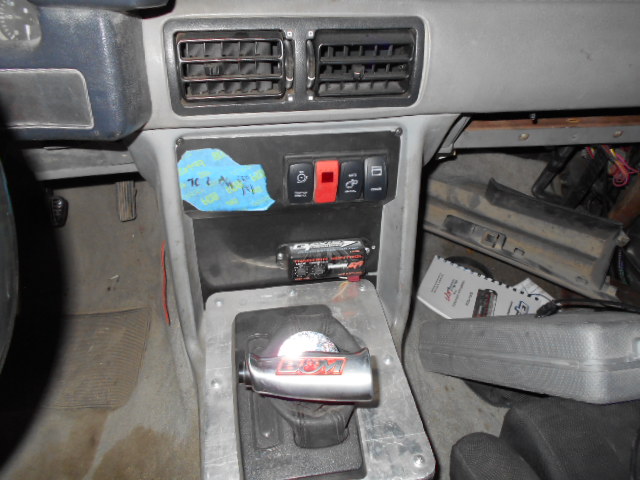
I also finished the switch panel for all the switches I need along with a few more dodads like traction control module and water tank temp : I made place for 4 switches - turns out I needed a fifth one- the switches are for traction control , 2 step , auto/manual, intercooler chiller , and the fifth one that I didn't count for is for launch retard .
( sorry for got to take pics )
so after a few miles of tuning and messing with the car and dialing it in I decided it was time to mess with the intercooler system; one of the issues I have with air to water intercoolers is that you have to always add ice if you want the best performance . problem is that you can't find ice every where you go ,,, and the damn stuff melts if you keep it outside for a while
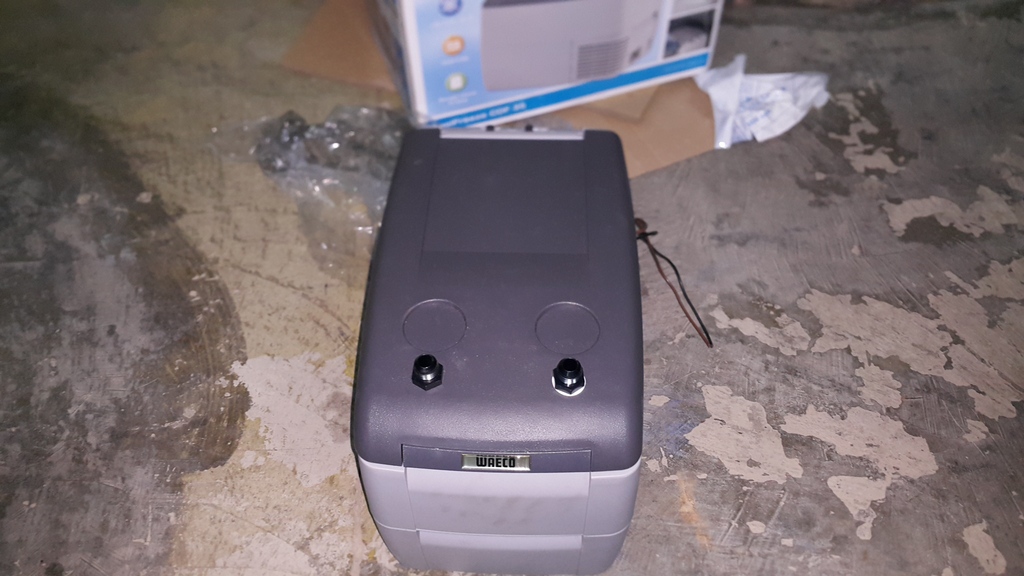
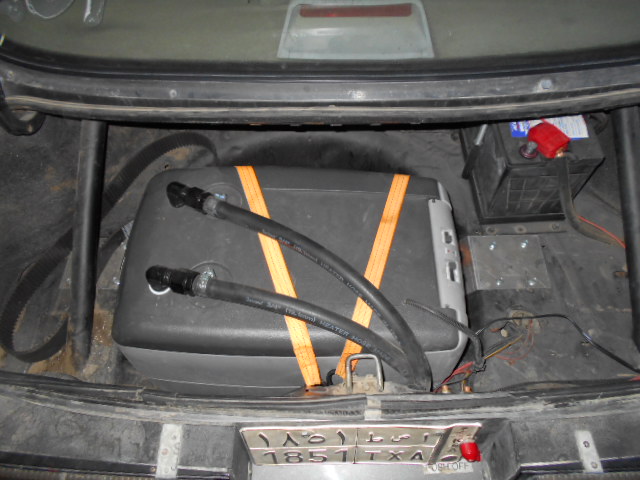
so I was messing with the idea of an intercooler chiller type of deal , where the intercooler water would be chilled using an electric AC compressor and condenser, so after many moons of thinking and sourcing parts I decided to just go with a portable electric freezer
so I want and looked for a freezer with the right dimensions and got it , then I proceeded to drilling holes in it
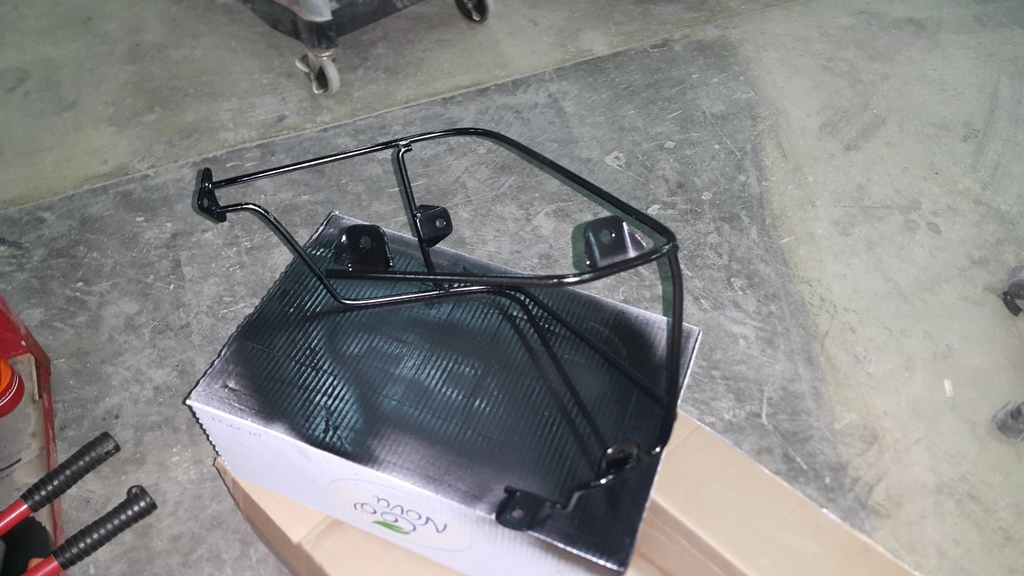
so the plan was to make a mount for it in the spare tire area where the old tank was , here are some of the brackets holding it in place :
so after that was done I drilled some holes in the removable lid ( the nice folks at WACO actually had two perfectly placed dimples on the cover where I needed to pass the water hoses )

I then fabbed a plastic cover to help stop the water from splashing around and installed the water pump:
so after that was done I wired the cooled to a 12v source and uses the fuel pump signal to trigger the intercooler pump so it only stays on when the pumps are running . I then plumbed the hoses and I was ready for some more testing
and since I was messing with cooling I thought this would be a great time to swap out my old radiator to a new one since the old one I had was off my Camaro and had been using it since 2001 ,,, and you guessed it , it was showing signs of aging
and while I was at it I decided to relocate the transmission cooler from the inner fender ( where is was getting all of the hot air from the radiator and heating up the transmission fluid - something I noticed while logging is the trans temperature graph was almost mirroring the engine temp graph ) . so I also relocated the cooler to the more traditional location of in front of the radiator :
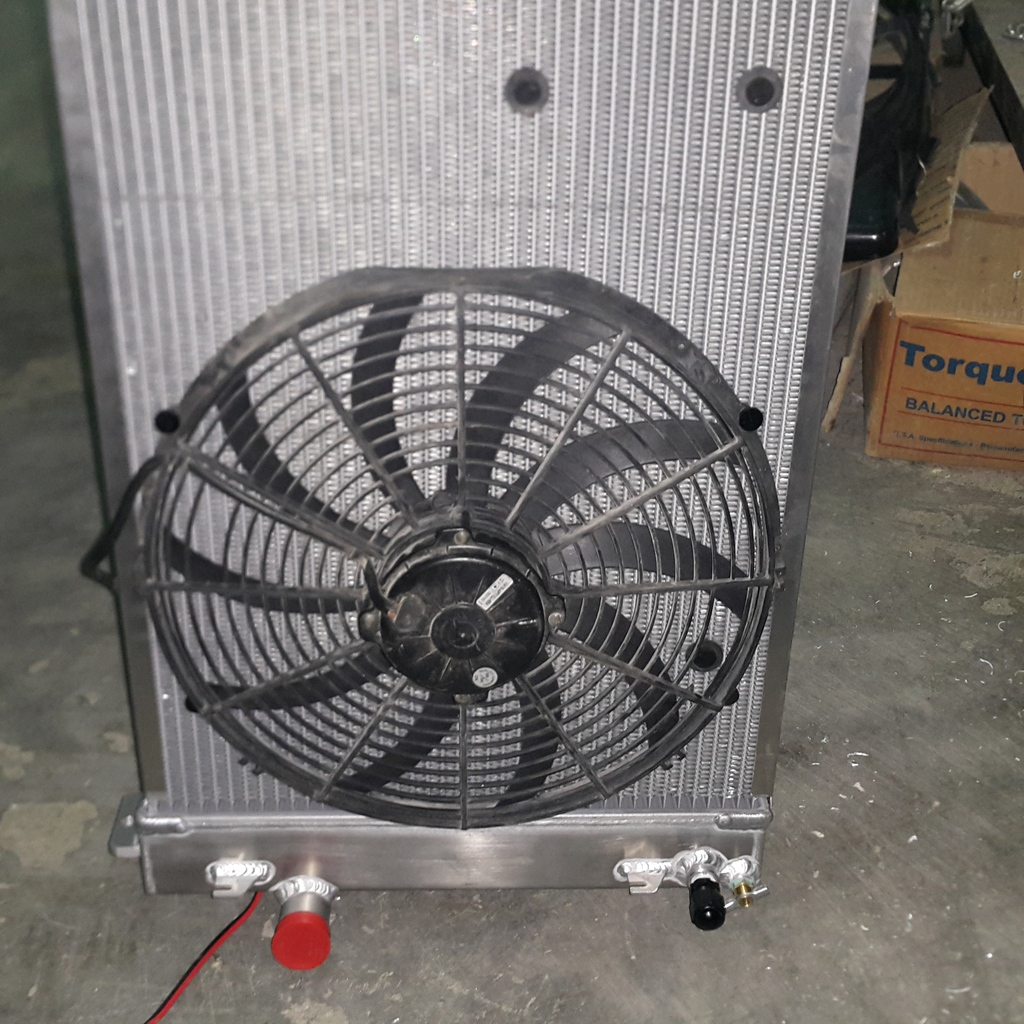
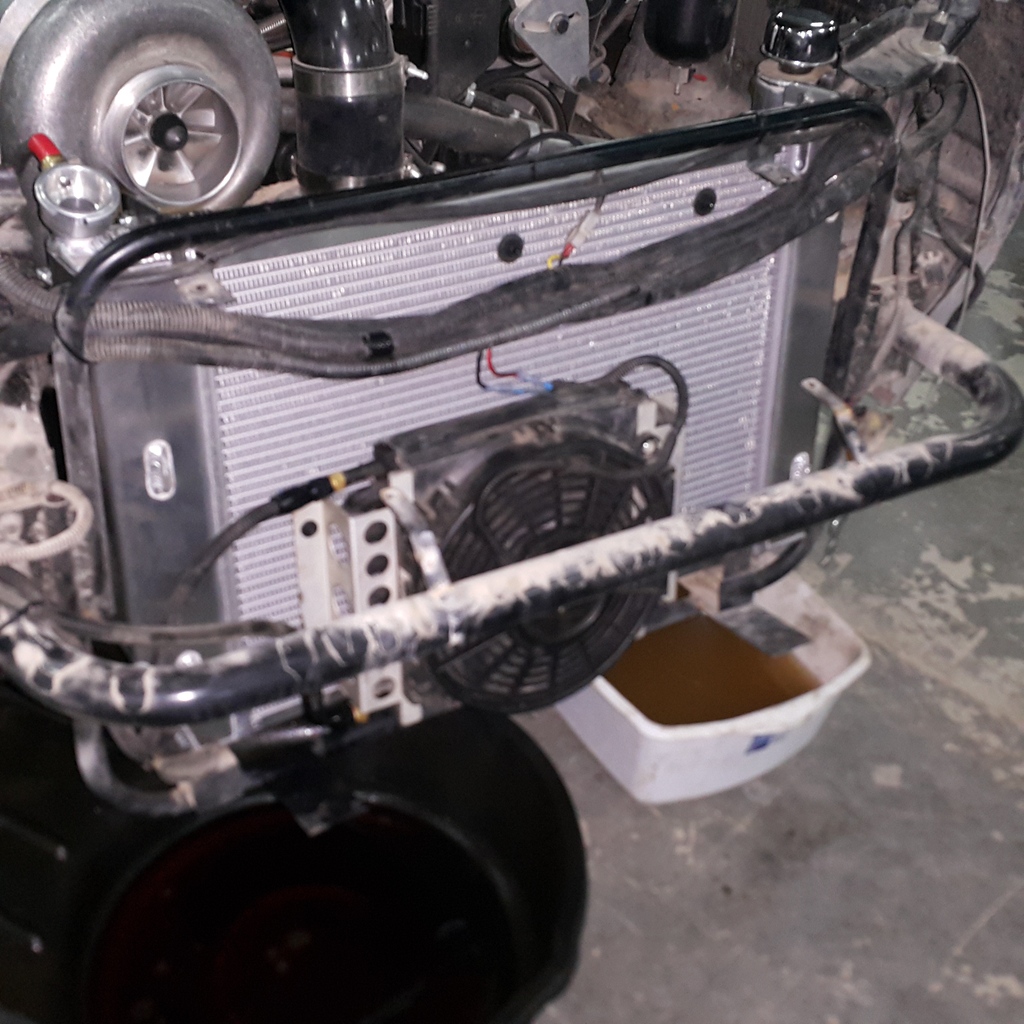
what I came to find out is the placement of my intercooler right behind the radiator with a big fan blowing hot air on it is not such a good idea ( who'da thunk it ) ; I was seeing intake temps of around 140 at cruising and rising to 170f+ at WOT, and the "chiller" was not keeping up and the water was getting pretty hot after a few passes.
so it was time for relocating the intercooler away from the radiator , and the best place I could find is in the passenger fender .
so a few bent bars here and a few brackets there and we had ourselves a new intercooler bracket :
and after that I had to redo the charge pipes to fit the new location ( I only have one pic here ,,, the others will be uploaded soon ) :
pic of the AWSOME beads I made ( the vibrant bead roller is the bees knees when it comes to this) :
moving on , I got the blower back from procharger ,,, and proceeded to install it back on the car and get back to fine tunning it some more . after a couple of WOT passes I noticed that there was a bit more converter slip than I would like ( to the tune of %19 !) , so I drained the trans fluid and put in some hydraulic fluid instead . that felt better but I still need to verify how much slip I have now. and incase you were wondering how far a lokar dipstick sticks into a 4L80 pan here you go :
moving on ,,, I drove the car for about 70-100 more miles after swapping the blower back to the F2 and guess what ; it decided to brake again . I will not go into any details about this right now until I see what procharger has to say about this .
so I went ahead and swapped ol' whiney back on the car and moved on. next up on the to do list was the completion of my exhaust system , I needed to extend it to exit from the rear where the stock location exhaust used to be to be legal for a local race class,,,, so out came the welder and chop saw
the plan was to have the exhaust pass under the axle instead of above it because of : 1- its easier to build , 2 I have no space for running dual exhaust above the axle because of the antiroll bar and the fuel lines there . plus I was planning on removing it when not racing and have it dump before the axle like before .
I didn't take a picture from the side but the bullets don't stand out too much when looking from the side , I still might paint it flat black to help blend it in .
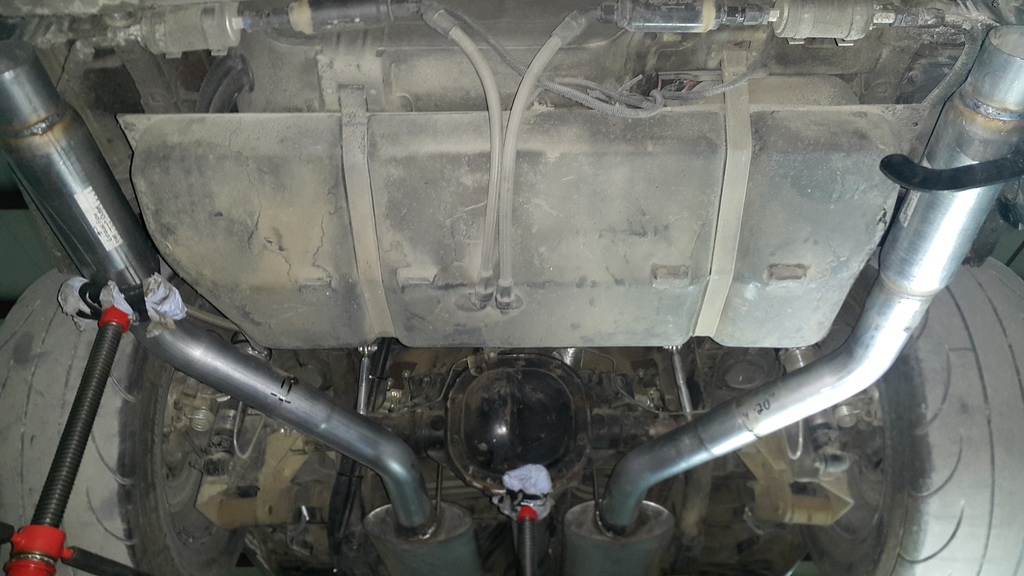
and to keep legal when racing at our track we also needed to have a belly pan that extended under the engine all the way to the end of the transmission :
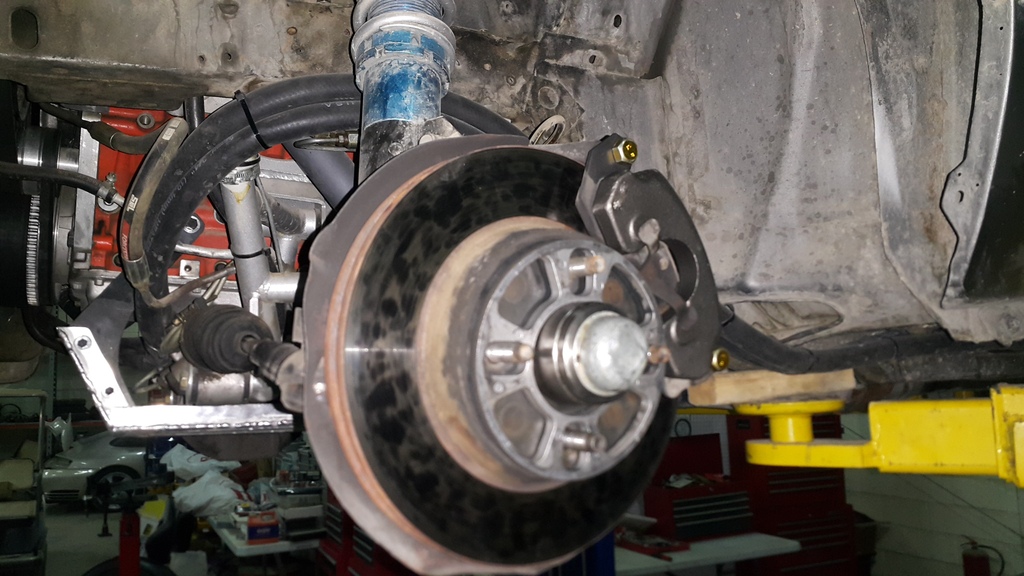
and finally , I got a pair of new ( rebuilt ) stock calipers to try to see if I can get this thing to stop better :
another thing I need to mention is that I noticed that I had a fuel pressure drop at wot a few times , and thanks to the holley ECU nothing bad happened since It corrected the fuel table right away. so I decided to start fixing it by starting with the simple and free stuff : I cleaned the filters ( no luck , they were clean) , I then swapped the regulator ( its just as old as the radiator - no luck there too ) , so all that was left was to change the fuel pumps ( old walbro 255 externals that were on the car since 2006 ,,,, with dual walbro 255 externals from - you guessed it my Camaro - that were on the car back in 2003 ! ,,,,not very smart I know )
I still don't have any logs on the new pumps to see if the solved the problem.
so I shipped the blower out to get fixed by procharger ( to the tune of $1500+ ) and while I was waiting for the F2 to get back I decided it was only appropriate to slap the F1r back on,,, so I did
I also finished the switch panel for all the switches I need along with a few more dodads like traction control module and water tank temp : I made place for 4 switches - turns out I needed a fifth one- the switches are for traction control , 2 step , auto/manual, intercooler chiller , and the fifth one that I didn't count for is for launch retard .
( sorry for got to take pics )
so after a few miles of tuning and messing with the car and dialing it in I decided it was time to mess with the intercooler system; one of the issues I have with air to water intercoolers is that you have to always add ice if you want the best performance . problem is that you can't find ice every where you go ,,, and the damn stuff melts if you keep it outside for a while
so I was messing with the idea of an intercooler chiller type of deal , where the intercooler water would be chilled using an electric AC compressor and condenser, so after many moons of thinking and sourcing parts I decided to just go with a portable electric freezer
so I want and looked for a freezer with the right dimensions and got it , then I proceeded to drilling holes in it
so the plan was to make a mount for it in the spare tire area where the old tank was , here are some of the brackets holding it in place :


so after that was done I drilled some holes in the removable lid ( the nice folks at WACO actually had two perfectly placed dimples on the cover where I needed to pass the water hoses
) 

I then fabbed a plastic cover to help stop the water from splashing around and installed the water pump:

so after that was done I wired the cooled to a 12v source and uses the fuel pump signal to trigger the intercooler pump so it only stays on when the pumps are running . I then plumbed the hoses and I was ready for some more testing
and since I was messing with cooling I thought this would be a great time to swap out my old radiator to a new one since the old one I had was off my Camaro and had been using it since 2001 ,,, and you guessed it , it was showing signs of aging
and while I was at it I decided to relocate the transmission cooler from the inner fender ( where is was getting all of the hot air from the radiator and heating up the transmission fluid - something I noticed while logging is the trans temperature graph was almost mirroring the engine temp graph ) . so I also relocated the cooler to the more traditional location of in front of the radiator :


what I came to find out is the placement of my intercooler right behind the radiator with a big fan blowing hot air on it is not such a good idea ( who'da thunk it ) ; I was seeing intake temps of around 140 at cruising and rising to 170f+ at WOT, and the "chiller" was not keeping up and the water was getting pretty hot after a few passes.
so it was time for relocating the intercooler away from the radiator , and the best place I could find is in the passenger fender .
so a few bent bars here and a few brackets there and we had ourselves a new intercooler bracket :


and after that I had to redo the charge pipes to fit the new location ( I only have one pic here ,,, the others will be uploaded soon ) :

pic of the AWSOME beads I made
( the vibrant bead roller is the bees knees when it comes to this) :
moving on , I got the blower back from procharger ,,, and proceeded to install it back on the car and get back to fine tunning it some more . after a couple of WOT passes I noticed that there was a bit more converter slip than I would like ( to the tune of %19 !) , so I drained the trans fluid and put in some hydraulic fluid instead . that felt better but I still need to verify how much slip I have now. and incase you were wondering how far a lokar dipstick sticks into a 4L80 pan here you go :

moving on ,,, I drove the car for about 70-100 more miles after swapping the blower back to the F2 and guess what ; it decided to brake again . I will not go into any details about this right now until I see what procharger has to say about this .
so I went ahead and swapped ol' whiney back on the car and moved on. next up on the to do list was the completion of my exhaust system , I needed to extend it to exit from the rear where the stock location exhaust used to be to be legal for a local race class,,,, so out came the welder and chop saw
the plan was to have the exhaust pass under the axle instead of above it because of : 1- its easier to build , 2 I have no space for running dual exhaust above the axle because of the antiroll bar and the fuel lines there . plus I was planning on removing it when not racing and have it dump before the axle like before .


I didn't take a picture from the side but the bullets don't stand out too much when looking from the side , I still might paint it flat black to help blend it in .
and to keep legal when racing at our track we also needed to have a belly pan that extended under the engine all the way to the end of the transmission :

and finally , I got a pair of new ( rebuilt ) stock calipers to try to see if I can get this thing to stop better :

another thing I need to mention is that I noticed that I had a fuel pressure drop at wot a few times , and thanks to the holley ECU nothing bad happened since It corrected the fuel table right away. so I decided to start fixing it by starting with the simple and free stuff : I cleaned the filters ( no luck , they were clean) , I then swapped the regulator ( its just as old as the radiator
- no luck there too ) , so all that was left was to change the fuel pumps ( old walbro 255 externals that were on the car since 2006 ,,,, with dual walbro 255 externals from - you guessed it my Camaro - that were on the car back in 2003 ! ,,,,not very smart I know ) I still don't have any logs on the new pumps to see if the solved the problem.
11-01-2015, 03:13 AM
#155
8 Second Club
Thread Starter
iTrader: (1)
Join Date: Nov 2001
Location: the not so stock tribe
Posts: 3,697
Likes: 0
Received 0 Likes
on
0 Posts
and finally we get to where we are today :
parked on the side of the road last night on the way to a local street race because the reluctor wheel decided to take a dump on me .
looking back I wonder why I never welded it on the crank when I was assembling the engine .
so the plan now is to get the engine out and apart and have the reluctor wheel swapped - I will change it over to a 58x instead of the 24 on right now.
I'm hoping to get this thing up ad running before the 23rd when we have a big race coming up.
so next up on the to do list :
- get the engine out
- rebuild and reinstall
- wire the launch retard switch
- wire install and wire the intercooler water temp gauge
- wire in a warning light
- install a new trans pump and regulator
- check fuel pressure issue and put new pumps in if needed
- launch testing
wish me luck !
11-02-2015, 01:15 AM
#156
8 Second Club
Thread Starter
iTrader: (1)
Join Date: Nov 2001
Location: the not so stock tribe
Posts: 3,697
Likes: 0
Received 0 Likes
on
0 Posts
here a few more pics as promised :
here is a pic of the switch panel with the switches and TC module , along with the new shifter base :
cooler all strapped in and snug :
charge pipes being fabricated :
more of the intercooler location :
here is a pic of the switch panel with the switches and TC module , along with the new shifter base :

cooler all strapped in and snug :

charge pipes being fabricated :

more of the intercooler location :
 11-04-2015, 01:46 AM
#157
8 Second Club
Thread Starter
iTrader: (1)
Join Date: Nov 2001
Location: the not so stock tribe
Posts: 3,697
Likes: 0
Received 0 Likes
on
0 Posts
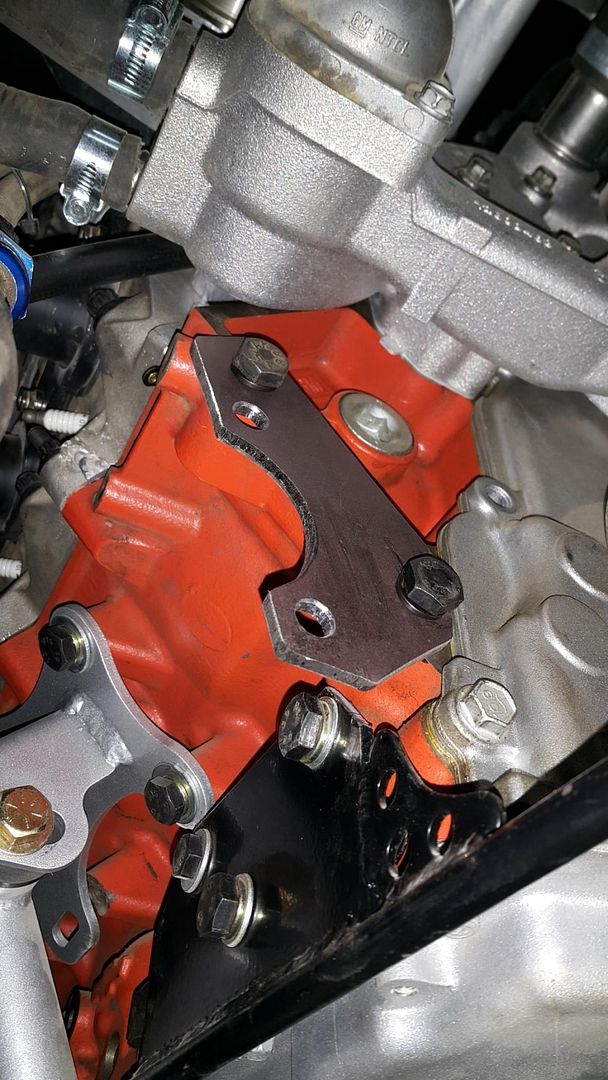
not much to report ,,, other than I found another issue that I have to address; the balancer was supposedly spinning on the crank snout . how do you know that you may be asking ??? well,,,,,
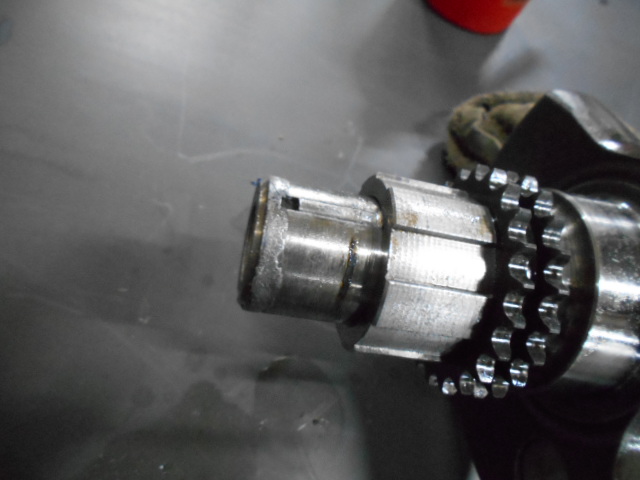
luckily its not that bad and I managed to clean up the snout pretty well.
I'm just surprised how a hardened key way could get snapped like that !
I've done it before on blower couplers on my other car but that was after the gear drive and not on the snout itself.
I also swapped the reluctor to the CBM one I had and welded it in to make sure it didn't go anywhere, here is the original culprit :
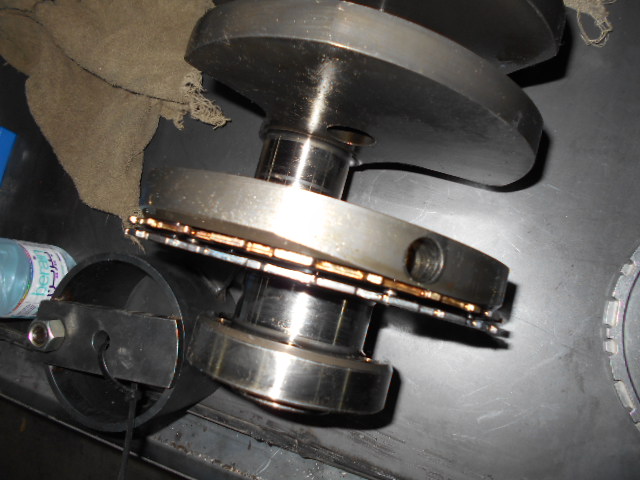
and upon disassembling the engine I found out that the bearings were a bit dark in color and did have some contamination in them because of the reluctor scuffing on the block, so I swapped them out .
so next up is to assemble the bottom end , double key the snout , swap the transmission pump and then drop the engine back in .
Last edited by 1dirtyZ; 11-04-2015 at 02:04 AM.
 11-06-2015, 08:52 AM
#159
I'll say this, You have serious dedication to going fast/keeping this car going.
I definitely would have been so pissed by now....probably lit that thing on fire.
But my patience for spending crazy money all time is thin lol
I definitely would have been so pissed by now....probably lit that thing on fire.
But my patience for spending crazy money all time is thin lol
11-06-2015, 09:26 AM
#160
8 Second Club
Thread Starter
iTrader: (1)
Join Date: Nov 2001
Location: the not so stock tribe
Posts: 3,697
Likes: 0
Received 0 Likes
on
0 Posts
the only reason I didn't set this thing on fire is that it will cost me money to clean up the mess
most of the stuff is either old stuff off the blue Camaro , or is the spares for the blue Camaro
most of the stuff is either old stuff off the blue Camaro , or is the spares for the blue Camaro