

1994 RX-7 With Mast Motorsports LS3 427 SS
 09-16-2008, 06:08 PM
#1
FormerVendor
Thread Starter

Join Date: Mar 2007
Location: Nacogdoches, TX
Posts: 182
Likes: 0
Received 0 Likes
on
0 Posts
Introduction
Here the build up thread for my personal 1994 FD RX-7. The intent of the project is to build a dual purpose track/street car. This car will serve as a test bed for new and existing Mast Motorsports Crate Engine Packages.
Overview
I picked the FD for the obvious reasons of good looks, light weight, good suspension kinematics, many damper options, and easy to swap in an LS Series engine. I wanted a late model chassis cannot think of a better engine/chassis combination available than an LS powered RX-7. I plan on doing drag racing road racing, and autocross, but the build is geared toward road racing. This car will be driven on the street. I want to be comfortable while driving allowing me to take the car on long trips. The car went on the Hot Rod Power Tour this year and I would like to have it where I want to do many events along those same lines. However, I still want to run events like Texas Mile, LSX Shootout, and track days at Texas World Speedway and Motorsport Ranch. Below is a summary of what my final setup will be moving toward as this build continues:
1994 FD RX-7
Mast Motorsports LS3 427 SS
700HP spec. T-56
Independent Rear (Kaaz Diff. with 300M Axles)
Mast Motorsports Fuel System w/67GPH in-tank Pump
JTR 1-7/8 Longtubes
Manual Steering
Air Conditioning
Welded in NHRA and SCCA spec. Roll Bar w/Removable Swing Out Door Bars
Carbon Front Clip (and hood)
Carbon Hatch with Lexan
18 inch BBS RK Wheels
PCS D200 Datalogger (To log engine data over the M-90�s CAN Bus and Suspension Data over the analog and digital channels)
As I began this build and got up close and personal with the car, I was really surprised with how the chassis was laid out. It is as close to a race car as any road car that I have had my hands on. It�s the little things that make this chassis easier than most to prepare/maintain. By this I am speaking of the easily adjustable suspension, easy access to fuel sending assembly; etc. I am shooting for mid 2600s/low 2700s without the cage and around 2750 with the cage. The car sitting on dollies in the pic below weighs 1901 Lbs.
Before I get into the build I would like to get one thing out of the way. Thanks to all who add to this forum. Having the information from this site greatly reduces build time and makes for better planning of projects like this.
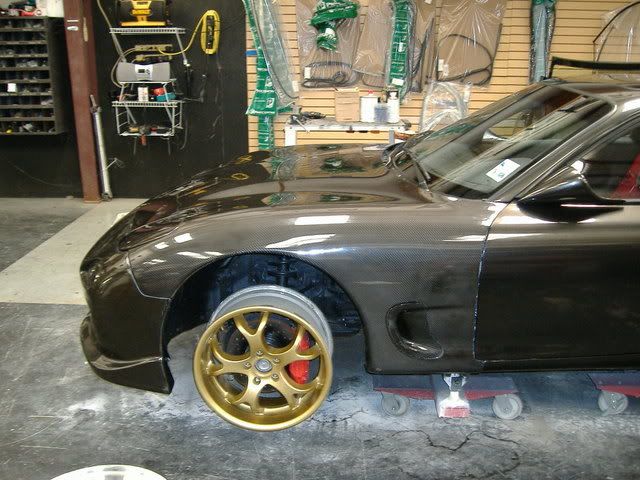
Here is the car with paint and fenders installed and no hatch. This is what I had to work with. Sorry in advance for the sub-par photography. THESE ARE NOT THE WHEELS GOING ON THIS CAR!

I typically don�t like carbon left unpainted unless it is on a race car, however, I was really pleased with how the look turned out. The hood is not carbon yet, but will be eventually. If the carbon doesn�t hold up to the weather, I am going to paint it the same color as the car. Even if it does hold up to the weather, I'm probably going to paint it anyway.
Here the build up thread for my personal 1994 FD RX-7. The intent of the project is to build a dual purpose track/street car. This car will serve as a test bed for new and existing Mast Motorsports Crate Engine Packages.
Overview
I picked the FD for the obvious reasons of good looks, light weight, good suspension kinematics, many damper options, and easy to swap in an LS Series engine. I wanted a late model chassis cannot think of a better engine/chassis combination available than an LS powered RX-7. I plan on doing drag racing road racing, and autocross, but the build is geared toward road racing. This car will be driven on the street. I want to be comfortable while driving allowing me to take the car on long trips. The car went on the Hot Rod Power Tour this year and I would like to have it where I want to do many events along those same lines. However, I still want to run events like Texas Mile, LSX Shootout, and track days at Texas World Speedway and Motorsport Ranch. Below is a summary of what my final setup will be moving toward as this build continues:
1994 FD RX-7
Mast Motorsports LS3 427 SS
700HP spec. T-56
Independent Rear (Kaaz Diff. with 300M Axles)
Mast Motorsports Fuel System w/67GPH in-tank Pump
JTR 1-7/8 Longtubes
Manual Steering
Air Conditioning
Welded in NHRA and SCCA spec. Roll Bar w/Removable Swing Out Door Bars
Carbon Front Clip (and hood)
Carbon Hatch with Lexan
18 inch BBS RK Wheels
PCS D200 Datalogger (To log engine data over the M-90�s CAN Bus and Suspension Data over the analog and digital channels)
As I began this build and got up close and personal with the car, I was really surprised with how the chassis was laid out. It is as close to a race car as any road car that I have had my hands on. It�s the little things that make this chassis easier than most to prepare/maintain. By this I am speaking of the easily adjustable suspension, easy access to fuel sending assembly; etc. I am shooting for mid 2600s/low 2700s without the cage and around 2750 with the cage. The car sitting on dollies in the pic below weighs 1901 Lbs.
Before I get into the build I would like to get one thing out of the way. Thanks to all who add to this forum. Having the information from this site greatly reduces build time and makes for better planning of projects like this.
Here is the car with paint and fenders installed and no hatch. This is what I had to work with. Sorry in advance for the sub-par photography. THESE ARE NOT THE WHEELS GOING ON THIS CAR!
I typically don�t like carbon left unpainted unless it is on a race car, however, I was really pleased with how the look turned out. The hood is not carbon yet, but will be eventually. If the carbon doesn�t hold up to the weather, I am going to paint it the same color as the car. Even if it does hold up to the weather, I'm probably going to paint it anyway.
 09-16-2008, 09:32 PM
#2

Nice start, should be a great project. Make sure you post up on www.v8rx7forum.com It's down currently, not sure why, but, regardless, they will be interested.
Keep it up!
Keep it up!
09-16-2008, 10:07 PM
#3
Just FYI, you might want to adjust that Kaaz before you install it. They ship from the factory set at 100% locking and it's too aggressive for a car that isn't only going in a straight line. There are quite a few 3rd gen LSX swaps in the DFW area. If you have any questions just let us know.
09-17-2008, 02:50 PM
#4
Looks great. Sounds like she is going to be well rounded. I think most people adjust their Kaaz diffs to about 30% from what I've been reading. It might even eliminate chatter.

 09-18-2008, 10:02 AM
#7
FormerVendor
Thread Starter
Join Date: Mar 2007
Location: Nacogdoches, TX
Posts: 182
Likes: 0
Received 0 Likes
on
0 Posts
Trending Topics
09-18-2008, 11:20 AM
#8
FormerVendor
Thread Starter
Join Date: Mar 2007
Location: Nacogdoches, TX
Posts: 182
Likes: 0
Received 0 Likes
on
0 Posts
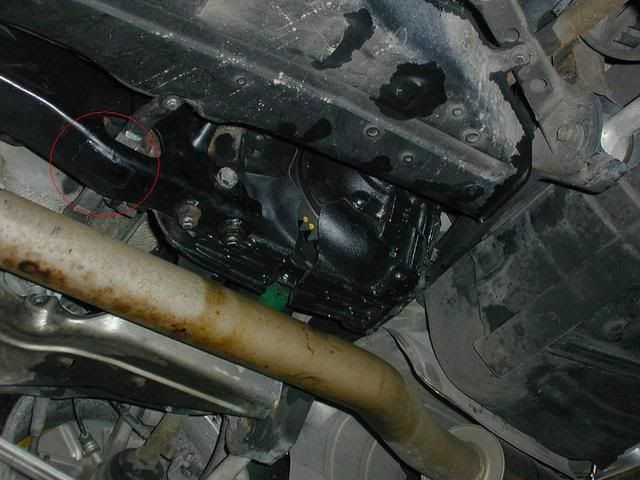
Diff. Build and Install
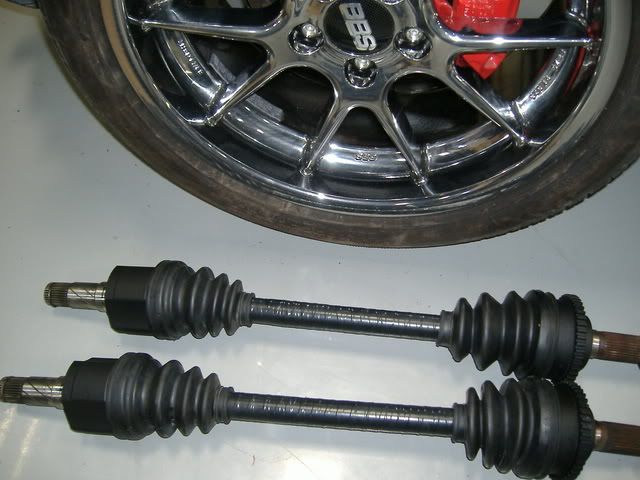
I bought the axles from The Driveshaft Shop. I do have to say that my dealings with them both at work and on my own have been great thus far. While building the axles I was a little concerned with the fitment of the tripod joint onto the axle splines. After exhausting the search engines on several sites, I called The Driveshaft Shop and they explained the fit. I followed their procedure and the tripods went on snugly. The 300M axles are approximately the same diameter as the stock axles, but they eliminate the stress risers of the snap ring grooves and are ,of course, 300M. I went ahead and taped the axles up to try and avoid extra stress risers from rock dings.
Here is picture of the 300M Axles completed.
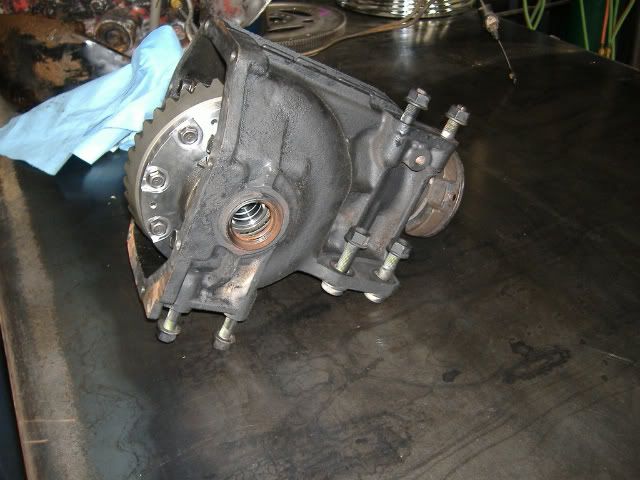
I was on the fence about what to do with the diff. For a while I was going to do a Cobra diff. and fab a cradle due to the weight of the stock Mazda piece. I wound up using a Kaaz unit in the stock diff. casing. We will see how well this holds up. I was skeptical whether I would be able to use the stock shims on the Kaaz unit, but when I measured the diff. was on the money with the Mazda specs. This was the simplest carrier install I�ve ever done. Below are some pics of the diff. building process.
During the build process.

Kaaz unit installed.
Ready to be cleaned, painted, and go back in.
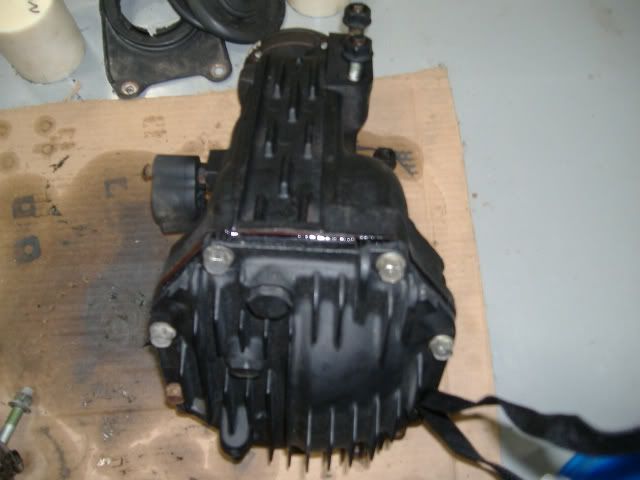
The diff. bushings are a two piece bushing that I turned on a lathe out of Nylon. They are basically a two piece top hat bushing. I don�t know what the popular kits do, but I opted to do mine like this as they will locate the diff. this way. The bushings have a 4340 sleeve that the bolt rides on. Sorry there are no pictures of those, but I was in a hurry installing them.
I set the bias up to 33% and it turns out that the diff. still pops a little on low speed corners. There was also evidence on the shop floor that the inside tire was scrubbing. That said�I have yet to do the 30 min.-1 hr. of figure 8 driving to break the diff. in properly. We�ll see how this setup works out. I may wind up doing a Cobra or Explorer unit in the end�but we�ll see.
I bought the axles from The Driveshaft Shop. I do have to say that my dealings with them both at work and on my own have been great thus far. While building the axles I was a little concerned with the fitment of the tripod joint onto the axle splines. After exhausting the search engines on several sites, I called The Driveshaft Shop and they explained the fit. I followed their procedure and the tripods went on snugly. The 300M axles are approximately the same diameter as the stock axles, but they eliminate the stress risers of the snap ring grooves and are ,of course, 300M. I went ahead and taped the axles up to try and avoid extra stress risers from rock dings.
Here is picture of the 300M Axles completed.
I was on the fence about what to do with the diff. For a while I was going to do a Cobra diff. and fab a cradle due to the weight of the stock Mazda piece. I wound up using a Kaaz unit in the stock diff. casing. We will see how well this holds up. I was skeptical whether I would be able to use the stock shims on the Kaaz unit, but when I measured the diff. was on the money with the Mazda specs. This was the simplest carrier install I�ve ever done. Below are some pics of the diff. building process.
During the build process.
Kaaz unit installed.
Ready to be cleaned, painted, and go back in.
The diff. bushings are a two piece bushing that I turned on a lathe out of Nylon. They are basically a two piece top hat bushing. I don�t know what the popular kits do, but I opted to do mine like this as they will locate the diff. this way. The bushings have a 4340 sleeve that the bolt rides on. Sorry there are no pictures of those, but I was in a hurry installing them.
I set the bias up to 33% and it turns out that the diff. still pops a little on low speed corners. There was also evidence on the shop floor that the inside tire was scrubbing. That said�I have yet to do the 30 min.-1 hr. of figure 8 driving to break the diff. in properly. We�ll see how this setup works out. I may wind up doing a Cobra or Explorer unit in the end�but we�ll see.
09-23-2008, 07:39 PM
#10
FormerVendor
Thread Starter
Join Date: Mar 2007
Location: Nacogdoches, TX
Posts: 182
Likes: 0
Received 0 Likes
on
0 Posts
09-24-2008, 04:10 PM
#12
TECH Regular
iTrader: (5)

Join Date: Apr 2008
Location: Miami, Florida
Posts: 474
Likes: 0
Received 0 Likes
on
0 Posts
(I like cobra/mkviii/explorer reareands also, but you still need custom axles)
09-25-2008, 03:53 PM
#14
I'm basing it off the the fact that the DIFF case is weak and this setup still causes wheel hop.
I dont know what you are basing it off of but his car is now a solid axel.
I'm telling you the cobra diff the the better way to go but if you want to find out the hard way be my guest.
(The custom axels are really no more then the Chome molly 300M axels you will buy anyways)
The reason I'm saying this is casue this is what the diff still likes to do.
Even if you have a brace, TA, diff mount, they are still a weak case. There has been one setup that works but it puts the price over what you could do the cobra diff for.
Last edited by Sabre002; 09-25-2008 at 04:02 PM.
