
Taking the plunge: LS3 into '64 Tempest. Need help with shopping list.
 12-09-2009, 11:18 PM
#201
Teching In
Join Date: Mar 2007
Location: Sunny Phoenix
Posts: 1
Likes: 0
Received 0 Likes
on
0 Posts
B-man, I've been on the board for more than a little while, but haven't had anything to offer. I had a 66 Chevelle that I had purchased a lot of the Suspension parts for two and a half years ago. The project sat for a long time after I discovered a body that I didn't want to fix. I ran across a 64 Lemans convertible that looked like the ideal GTO Vert clone. I've since gotten excited again. I ran across your thread a few days ago and have seen a ton of things to consider before, not after, the fact. I'll be posting a new thread soon and will post progress on my restoration. I'm using an LS1 out of a 99 Z/28 with a T56 Trans. I will need to change the cam to get more pop out of it.
Thanks again to you (and the other posters on your thread) for the insight and documentation. It will make my journey less treacherous.
Jim - jwrig
Thanks again to you (and the other posters on your thread) for the insight and documentation. It will make my journey less treacherous.
Jim - jwrig
 12-13-2009, 04:03 PM
#202
Not a lot going on lately, my hours at work have been increased so I have less free time to get things done.
I did spend some time fitting up some universal Lokar column shift linkage made for GM auto transmissions, I want to keep the original 2-speed auto column shifter that came in the Tempest. The factory shift linkage that is supported by a pivot bracket on the frame and the trans selector shaft won't work, the selector shaft on the 4L70E is located about 1-1/4" further back on the trans compared the the TH400 and original ST300 2-speed. The Lokar kit cost me about $50 and was well-worth it.
Back when I first installed a TH400 in the car to replace the original Super-Turbine 300 2-speed I did a few mods to the steering column so the shift linkage would travel far enough to grab low gear on the 3-speed TH400.
I took the steering column apart and filed a slot in the outer column at the bottom and in one of the inner pieces near the top to allow the extra shift lever travel I needed. I also modified the shifter detent that bolts to the bottom of the column by fabricating and welding on an extension that gives the lower lever another step in the detent.
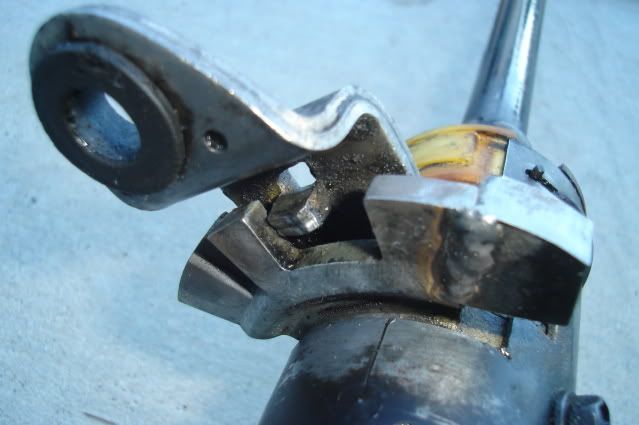
Welding the fabricated mild steel step to the cast factory shifter detent seemed to go okay. I just used a little 308 stainless rod with a TIG welder and they joined together just fine. The weld did spit and pop a little during the process but it's lasted for over 30K miles so far and shows no signs of cracking.

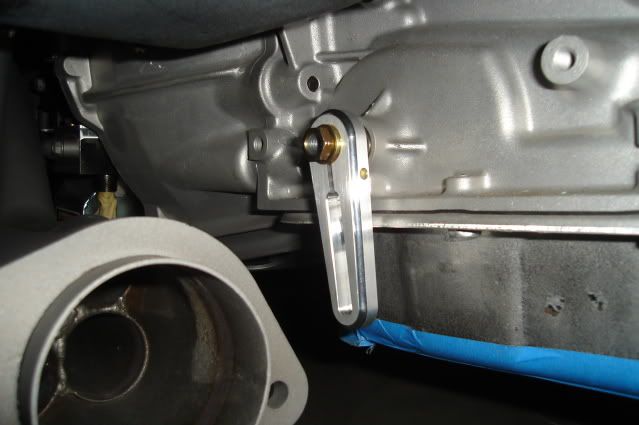
The Lokar kit comes with a nice billet aluminum lever that slips over a splined bushing that bolts onto the shift selctor shaft. The splines fit together very tightly and the lever gets locked in place with a clamp bolt, very high-quality fit and finish on these parts.
The lever is slotted so you can adjust the amount of selector shaft travel. I used the position that's located the farthest out to limit the length of lever travel, I only want to select Overdrive, 3rd and 2nd. I see no need to be able to grab low gear. The trans will kick down if I need low gear while accelerating and the trans will start off in low by itself if the selector is in 3rd or Overdrive.
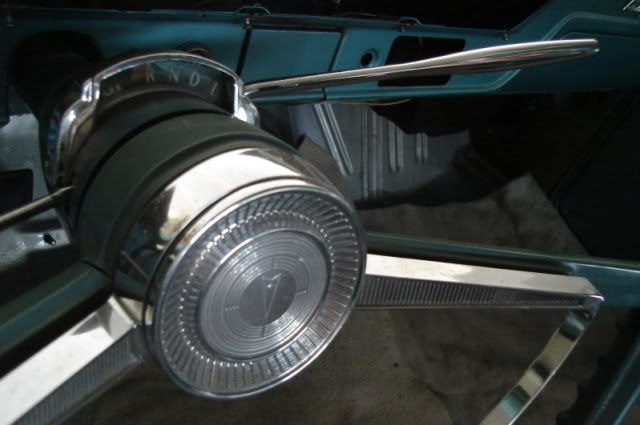
The factory 2-speed shift indicator pointer will be in the correct position for Park, Reverse and Neutral and will be in the Drive position for running in Overdrive. For 3rd gear it will be directly between the Drive and Low positions on the shift indicator, to engage 2nd I will have to pull the lever back and utilize the added shift detent that was welded on.
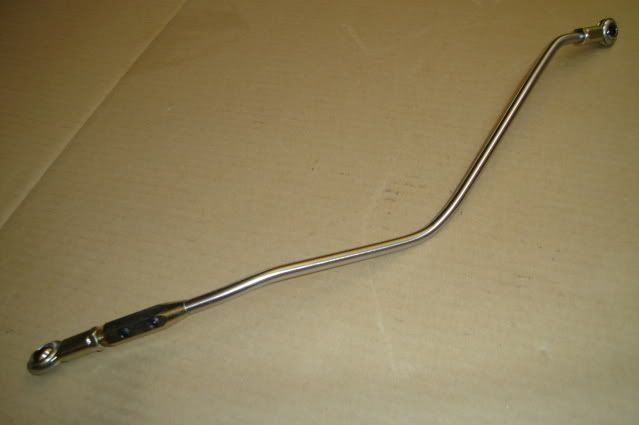
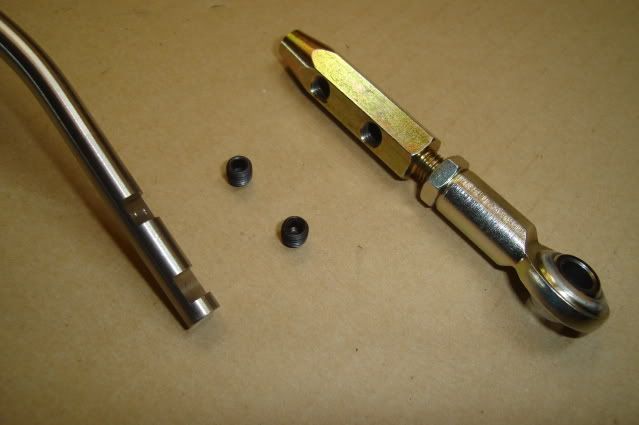
The Lokar kit comes with a 21"-long piece of 5/16" stainless rod that you bend and cut to length for your particular application. It comes threaded 5/16-24 on one end for a heim joint, the other end gets cut off and a piece that screws into the other heim joint slips over the rod and gets secured with a pair of 1/4-28 set screws.
The 5/16" rod is very hard to bend cold, you need to clamp it in a large bench vise (using aluminum soft jaws) and push or pull it using all of your weight to bend it. I have my 6" vise bolted to the corner of a 48" X 36" X 1/2" thick steel welding table and I was able to lift the corner of it off the ground while bending the rod, so it's definitely plenty stiff and won't give any while shifting gears.
Getting the rod bent in the correct configuration takes a lot of time, constanlty checking and bending it and later on trimming it until it's not hitting the firewall, engine or trans in all of the different positions of travel. I must have bolted this thing on and taken it back off 20 or 30 times before it was right.
The kit instructions tell you to file a couple of flats after marking their locations. I had a friend mill the flats pefectly level in relation to one another and located properly center to center so the 2 set screws (with blue Loctite) would be best able to positively secure the heim joint.
A lot of effort for a column shifter that almost nobody else would want on a car like this.
That's all for now, thanks for looking.
Merry Christmas!
I did spend some time fitting up some universal Lokar column shift linkage made for GM auto transmissions, I want to keep the original 2-speed auto column shifter that came in the Tempest. The factory shift linkage that is supported by a pivot bracket on the frame and the trans selector shaft won't work, the selector shaft on the 4L70E is located about 1-1/4" further back on the trans compared the the TH400 and original ST300 2-speed. The Lokar kit cost me about $50 and was well-worth it.
Back when I first installed a TH400 in the car to replace the original Super-Turbine 300 2-speed I did a few mods to the steering column so the shift linkage would travel far enough to grab low gear on the 3-speed TH400.
I took the steering column apart and filed a slot in the outer column at the bottom and in one of the inner pieces near the top to allow the extra shift lever travel I needed. I also modified the shifter detent that bolts to the bottom of the column by fabricating and welding on an extension that gives the lower lever another step in the detent.
Welding the fabricated mild steel step to the cast factory shifter detent seemed to go okay. I just used a little 308 stainless rod with a TIG welder and they joined together just fine. The weld did spit and pop a little during the process but it's lasted for over 30K miles so far and shows no signs of cracking.
The Lokar kit comes with a nice billet aluminum lever that slips over a splined bushing that bolts onto the shift selctor shaft. The splines fit together very tightly and the lever gets locked in place with a clamp bolt, very high-quality fit and finish on these parts.
The lever is slotted so you can adjust the amount of selector shaft travel. I used the position that's located the farthest out to limit the length of lever travel, I only want to select Overdrive, 3rd and 2nd. I see no need to be able to grab low gear. The trans will kick down if I need low gear while accelerating and the trans will start off in low by itself if the selector is in 3rd or Overdrive.
The factory 2-speed shift indicator pointer will be in the correct position for Park, Reverse and Neutral and will be in the Drive position for running in Overdrive. For 3rd gear it will be directly between the Drive and Low positions on the shift indicator, to engage 2nd I will have to pull the lever back and utilize the added shift detent that was welded on.
The Lokar kit comes with a 21"-long piece of 5/16" stainless rod that you bend and cut to length for your particular application. It comes threaded 5/16-24 on one end for a heim joint, the other end gets cut off and a piece that screws into the other heim joint slips over the rod and gets secured with a pair of 1/4-28 set screws.
The 5/16" rod is very hard to bend cold, you need to clamp it in a large bench vise (using aluminum soft jaws) and push or pull it using all of your weight to bend it. I have my 6" vise bolted to the corner of a 48" X 36" X 1/2" thick steel welding table and I was able to lift the corner of it off the ground while bending the rod, so it's definitely plenty stiff and won't give any while shifting gears.
Getting the rod bent in the correct configuration takes a lot of time, constanlty checking and bending it and later on trimming it until it's not hitting the firewall, engine or trans in all of the different positions of travel. I must have bolted this thing on and taken it back off 20 or 30 times before it was right.
The kit instructions tell you to file a couple of flats after marking their locations. I had a friend mill the flats pefectly level in relation to one another and located properly center to center so the 2 set screws (with blue Loctite) would be best able to positively secure the heim joint.
A lot of effort for a column shifter that almost nobody else would want on a car like this.
That's all for now, thanks for looking.
Merry Christmas!

 01-20-2010, 10:36 AM
#206
TECH Resident
Join Date: Nov 2007
Location: Texas
Posts: 816
Likes: 0
Received 0 Likes
on
0 Posts
01-20-2010, 09:30 PM
#208
Thanks guys. 
My hours at work have increased considerably the last couple of months, so free time is at a premium for me for a while. But I'm lucky and thankful for the opportunity to make some extra money in this down economy.
Taking a breather here while I gather up some more things for the next big push forward.
01-21-2010, 05:10 AM
#209
Staging Lane

Join Date: May 2009
Location: Mississippi
Posts: 74
Likes: 0
Received 0 Likes
on
0 Posts
Having a job is a good thing. I Love the work on preserving the column shift, not too many people do that it seems.
02-04-2010, 12:20 PM
#210
Registered User

Join Date: Feb 2010
Posts: 1
Likes: 0
Received 0 Likes
on
0 Posts
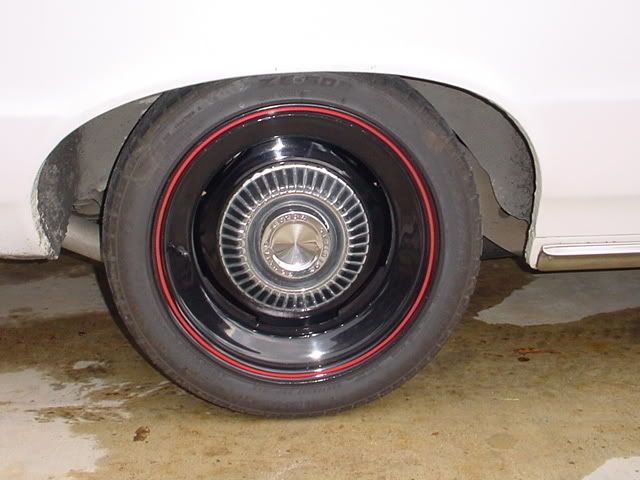
Hey - Where id you get those black steel wheels made? (17 x 8, zero offset). Im planning a similiar build on a 64 tempest, except for a 5 spd manual and 454 Chevy motor. Love your project and details
thanks - chris
thanks - chris
02-05-2010, 10:34 PM
#211
I had the wheels custom-built about 10 years ago, by a company who took a 100% deposit from me to build them and then took so long to deliver my wheels (6 months after quoting me a turnaround of 6 weeks) that I won't share their name here.

Wheel Vintiques sells 17" steel wheels just like mine in 7, 8 and 9-inch widths. They'll make them in just about any offset you want, they cost about $200 and up each which isn't out of line considering I paid $145 each for mine.
The wheels were bare when I first took delivery of them, I had a friend of mine paint them with black enamel at a body shop he manages. I then asked his dad who is a pinstriper to paint the wide red pinstripe on them, to simulate the look of running 14" wheels with redline tires.
Good luck, Bart
The following users liked this post:
brut4s (03-27-2021)
04-13-2010, 10:54 AM
#212
Registered User

Join Date: Apr 2010
Posts: 1
Likes: 0
Received 0 Likes
on
0 Posts
Would you happen to have a picture of the back side of the front seat? I am restoring a 64 Tempest that originally had a bench seat but now has buckets. I found a seat out of a 64 Malibu but I want to get the patterns as close to original as possible. I think there may have been vertical grooves in the vinyl on the back but I don't remember the specific pattern. Thanks, Chad.
04-15-2010, 09:54 PM
#213
Would you happen to have a picture of the back side of the front seat? I am restoring a 64 Tempest that originally had a bench seat but now has buckets. I found a seat out of a 64 Malibu but I want to get the patterns as close to original as possible. I think there may have been vertical grooves in the vinyl on the back but I don't remember the specific pattern. Thanks, Chad.
The original seat upholstery had smooth vinyl on the seat backs, the same type of material used on the front side along with the striped cloth.
Bart
No progress to report on the Tempest so far this year, I've put the project on hold for a while so I can catch up on some home repairs and upgrades that need to be done.
06-28-2010, 05:01 AM
#214
TECH Fanatic
iTrader: (14)
Join Date: Mar 2007
Location: Phoenix/Tempe, AZ
Posts: 1,968
Likes: 0
Received 0 Likes
on
0 Posts

Wow, Bart. Much props on the build so far.
This is doubly inspiring for me, im doing a 'pontiac 400' ls2 stroker in my 00 trans am, and this gives me a lot of appreciation for the level of detail, some of which i hope transfers to my 65 mustang coupe.
Cant wait for more updates.
This is doubly inspiring for me, im doing a 'pontiac 400' ls2 stroker in my 00 trans am, and this gives me a lot of appreciation for the level of detail, some of which i hope transfers to my 65 mustang coupe.
Cant wait for more updates.
06-28-2010, 05:41 AM
#215
TECH Fanatic
iTrader: (12)
Join Date: May 2005
Location: Nashville, TN
Posts: 1,250
Likes: 0
Received 0 Likes
on
0 Posts
lokar makes a nice kit that will allow you to hook up the 4l60 to your stock shifter.
don't know if anyone mentioned that yet (edit, I see you bought it)
nice project the car is sweet!
don't know if anyone mentioned that yet (edit, I see you bought it)
nice project the car is sweet!
08-10-2010, 08:53 PM
#219
.....today, my starter won't fit!
Today I was test fitting some things. I put both headers on the engine, at first leaving them loose to help make room to slip the transmission in place between the header collectors. The engine must be tilted forward slightly from it's 'normal' position so the headers will slip into place.
Next I mated up the transmission so I could finish up making my trans cooling lines. The engine must be tilted rearward slightly from 'normal' to mate up the trans, by leaving the 2 engine mount through bolts loose and supporting the engine under the oil pan with a block of wood it's easily done using one of my floorjacks.
With the trans now installed I tried to install the starter and there's absolutely no way to get it in there.
I loosened up the passenger side header and was able to pull it about 1" to the side to try to gain some room, I pulled it as far as it would go because at that point it was resting against the inside of the frame.
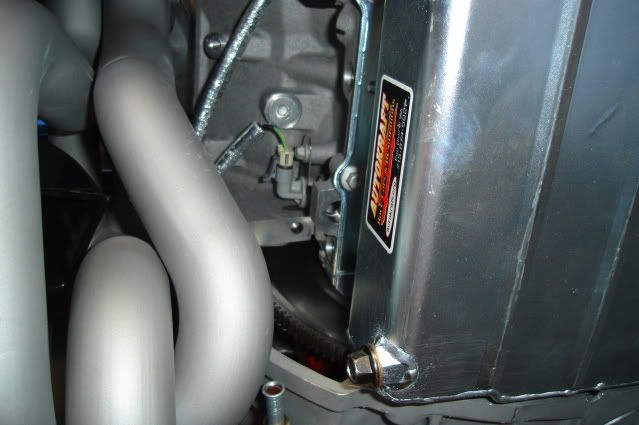
After taking a look at things I thought that maybe my Autokraft pan with the side kickouts could be the possible culprit. However I had test fitted the starter previously without the headers in place and it went in fine, although the access to the inside mounting bolt was limited a little by the kickout and I needed to use a flexible extension to get to it.
The way these headers are designed limits access to the outside starter bolt as well. Not that having limited access to that outside bolt makes much difference, I can't even get the starter in there!
The pan kickout is 1-3/8" wide from the side wall of the pan sump itself, but only extends 1/2" past the pan rail on the block:
Today I was test fitting some things. I put both headers on the engine, at first leaving them loose to help make room to slip the transmission in place between the header collectors. The engine must be tilted forward slightly from it's 'normal' position so the headers will slip into place.
Next I mated up the transmission so I could finish up making my trans cooling lines. The engine must be tilted rearward slightly from 'normal' to mate up the trans, by leaving the 2 engine mount through bolts loose and supporting the engine under the oil pan with a block of wood it's easily done using one of my floorjacks.
With the trans now installed I tried to install the starter and there's absolutely no way to get it in there.
I loosened up the passenger side header and was able to pull it about 1" to the side to try to gain some room, I pulled it as far as it would go because at that point it was resting against the inside of the frame.
After taking a look at things I thought that maybe my Autokraft pan with the side kickouts could be the possible culprit. However I had test fitted the starter previously without the headers in place and it went in fine, although the access to the inside mounting bolt was limited a little by the kickout and I needed to use a flexible extension to get to it.
The way these headers are designed limits access to the outside starter bolt as well. Not that having limited access to that outside bolt makes much difference, I can't even get the starter in there!
The pan kickout is 1-3/8" wide from the side wall of the pan sump itself, but only extends 1/2" past the pan rail on the block:
I have the Edelbrock mount system and was going by the same pan and headers, but no way in heck will I consider a system that does not allow me to service the starter without pulling the trans..
Last edited by speedtigger; 08-11-2010 at 12:15 PM.