

Custom SFC's on a budget
 08-09-2009 | 11:09 AM
#1
Thread Starter
11 Second Club
iTrader: (37)
Joined: Mar 2004
Posts: 2,046
Likes: 3
From: Vancouver, WA
Well, times are tough these days so a guys gotta do things on a budget. My original plan was to buy some SFC's, but they're around 180. I thought that was a little extreme for some bent up steel. I also need a rollbar, so that got me thinking about buying a welder and doing some of this myself since I have so much free time these days being layed-off haha...  Once I get a welder, I should break even with the price of "bolt-in" stuff, except now I'll have a welder that I can either sell, which would put me well ahead, or just keep it.
Here's some pics of the custom SFC's I'm fabbing up in my garage. I've got most of the cutting/fitting done, now I just need a MIG welder to finish it up.
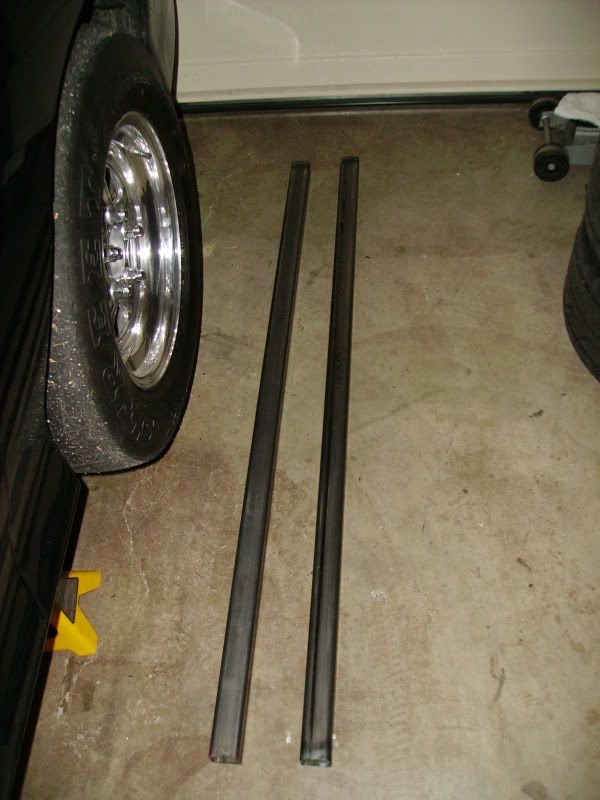
Started off with two 5' pieces of 2"x2" mild steel with 1/8th wall thickness. Thes are going to be STOUT SFC's and only be about 2lb's heavier than aftermarket pieces. The actual length of the SFC's ended up at 45-1/2", but the steel yard would only sell 10' min length. I had them cut it in half for easier transport. Total cost for material, 35.00.
Here's the front and rear subframes that I'll be tying together.
I used a piece of foam core board to mock up the bend and pattern for cutting. The bend makes it line up better, and creates an area on the outside mount that can be welded. Otherwise it would be too tight to get a welder into.
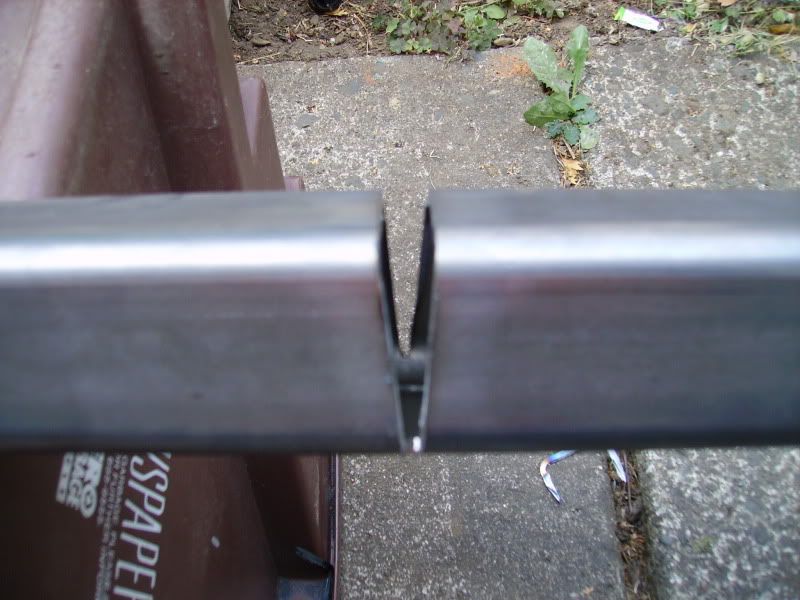
Create a pie notch in the tubing to get the bend. Once it's notched, it bends fairly easy, no special tools needed. I used a hand grinder with a cut-off wheel for all the cutting and it went fairly quick. Of course, this will get welded together again before it gets welded to the car.
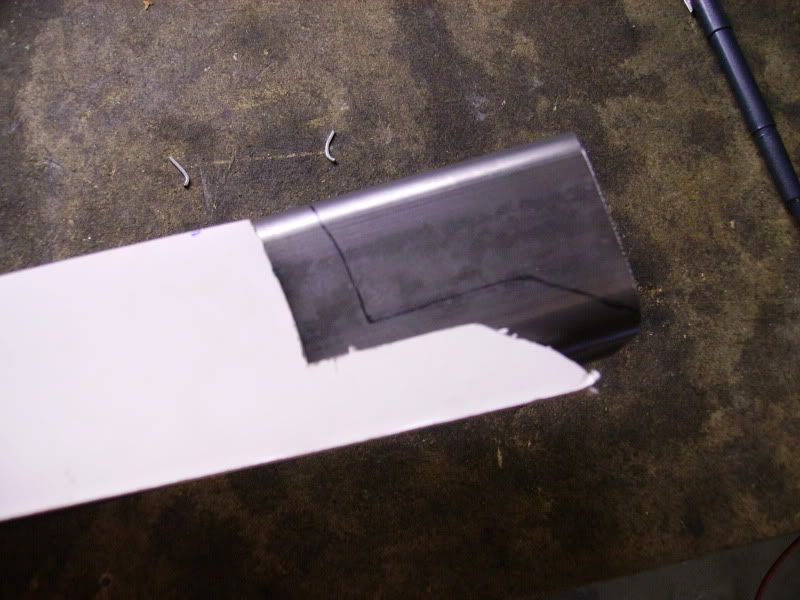
Once I had the correct angle, I transferred the pattern to the steel and started cutting. This is a trial and fit situation until it's good. Had to do this several time to get the fit good and tight against the front subframe.
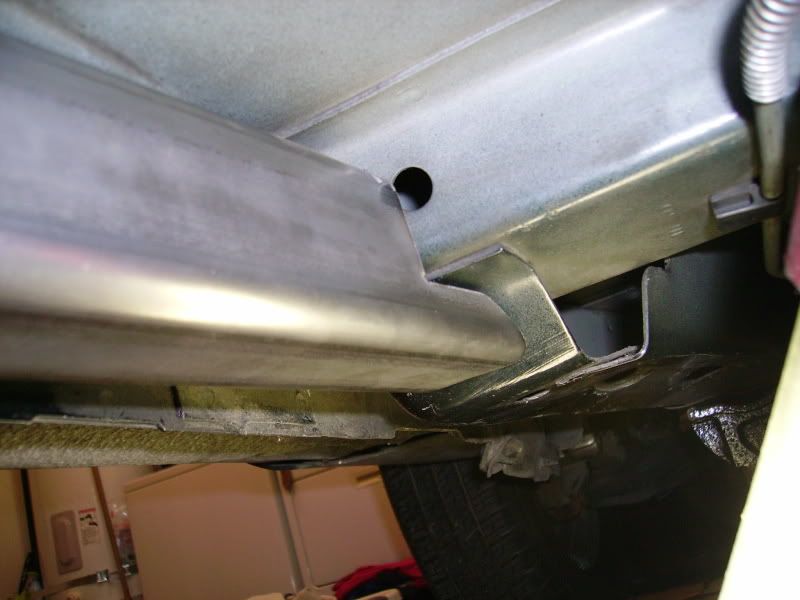
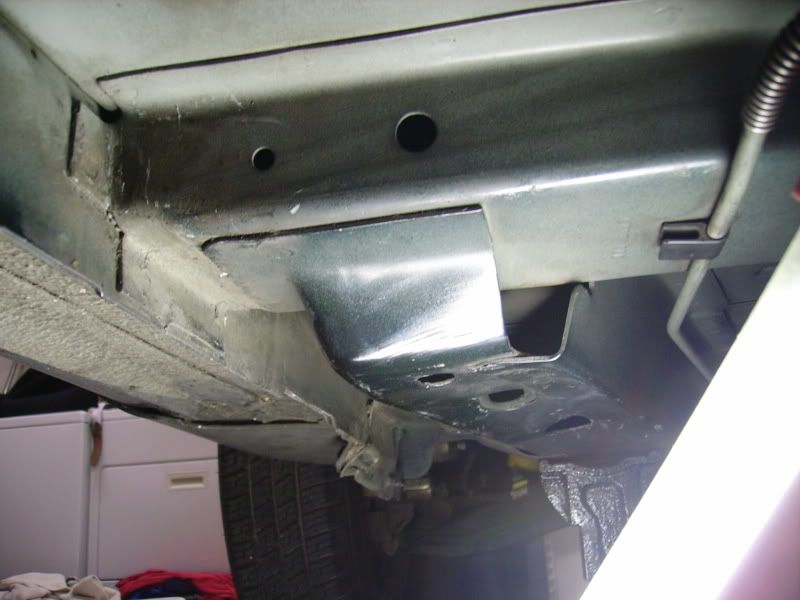
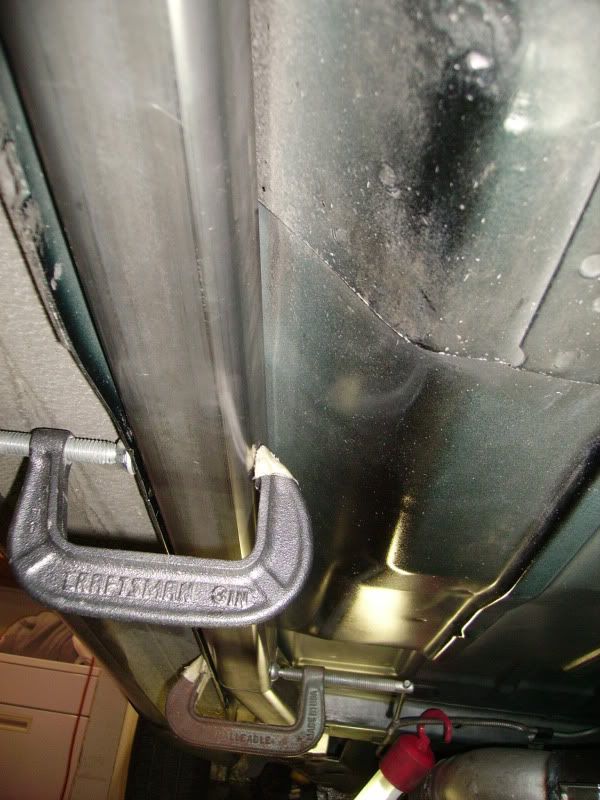
Here's the outside area of the front subframe mount that required the bend to get a welder into. Still pretty tight but should be good enough for a MIG torch head.
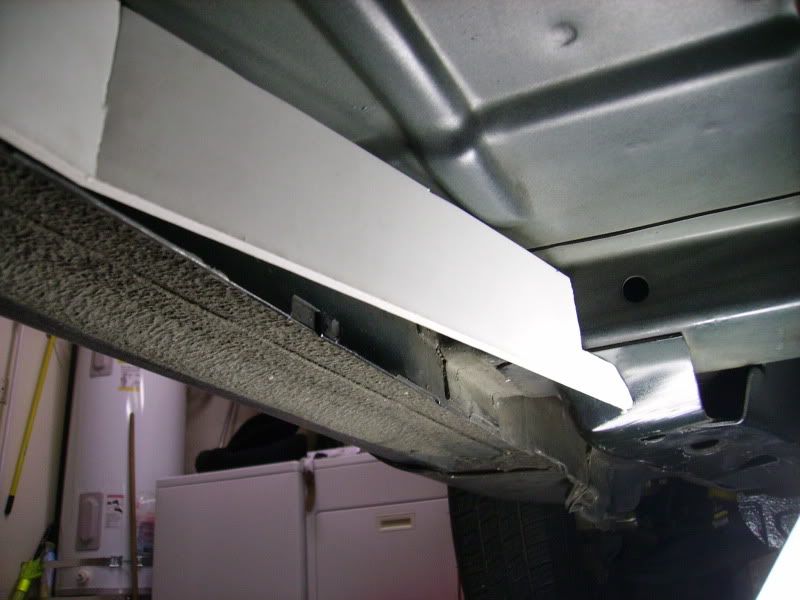
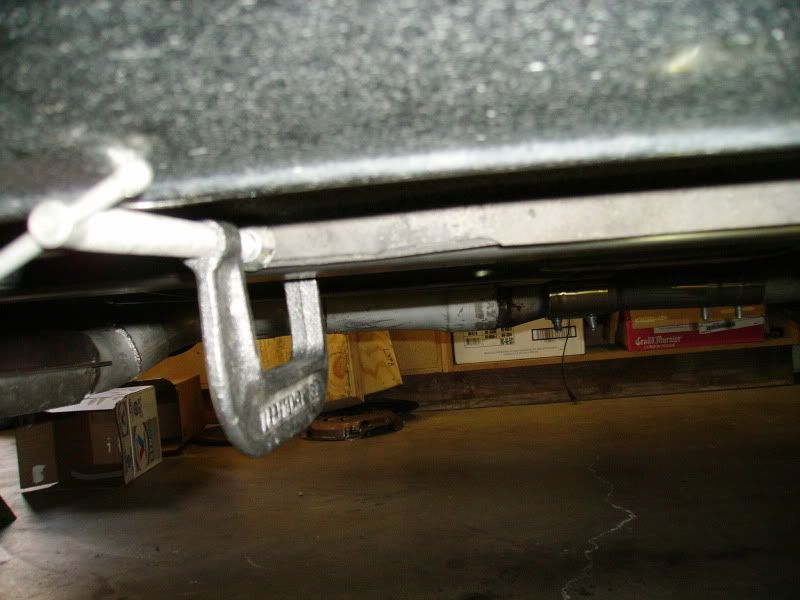
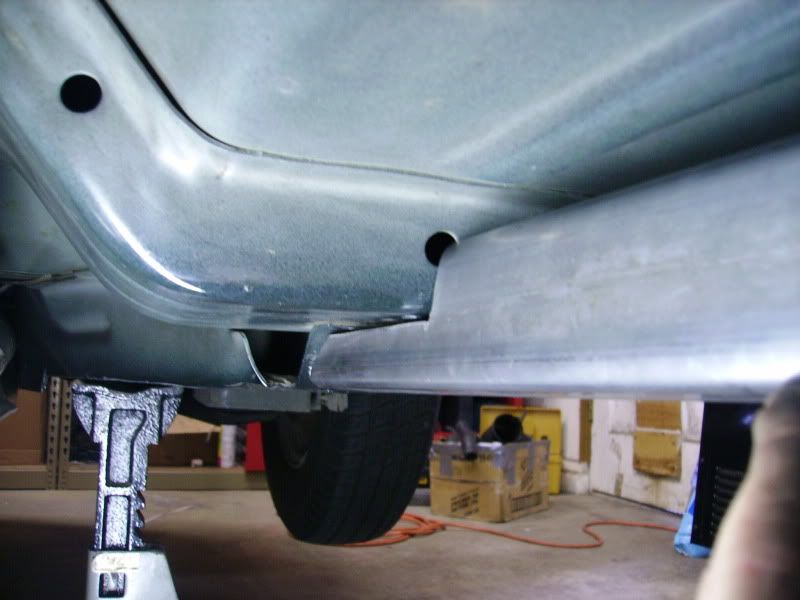
Here's the clearance from the side. They tuck up real nice under the lip of the bottom rocker panel. Once painted and welded in place you'll never see them from the side.
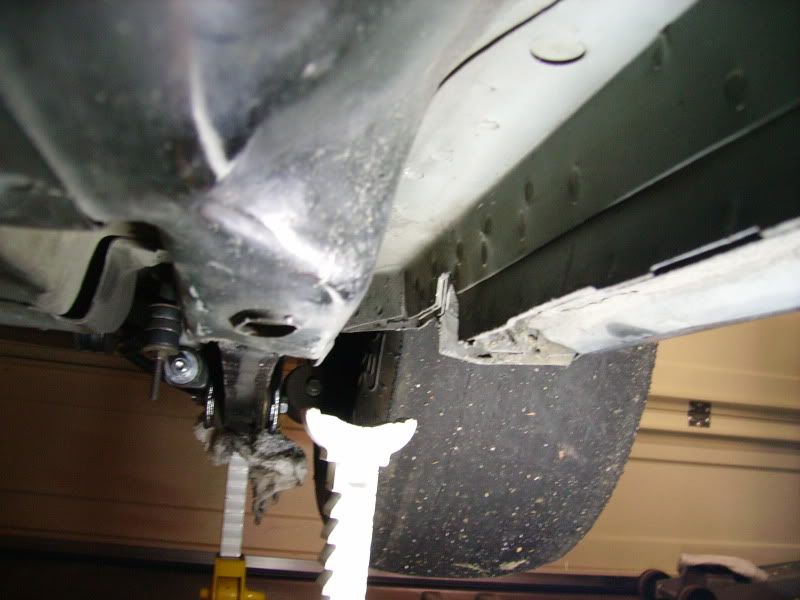
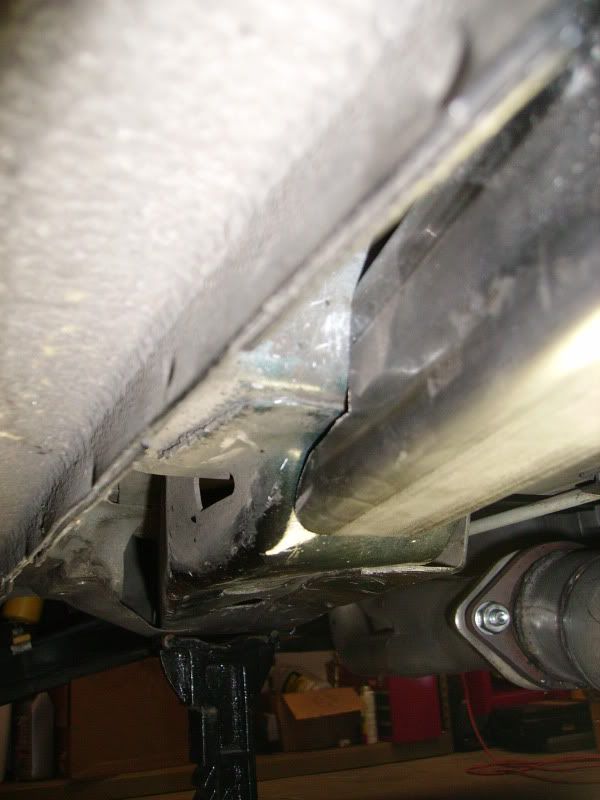
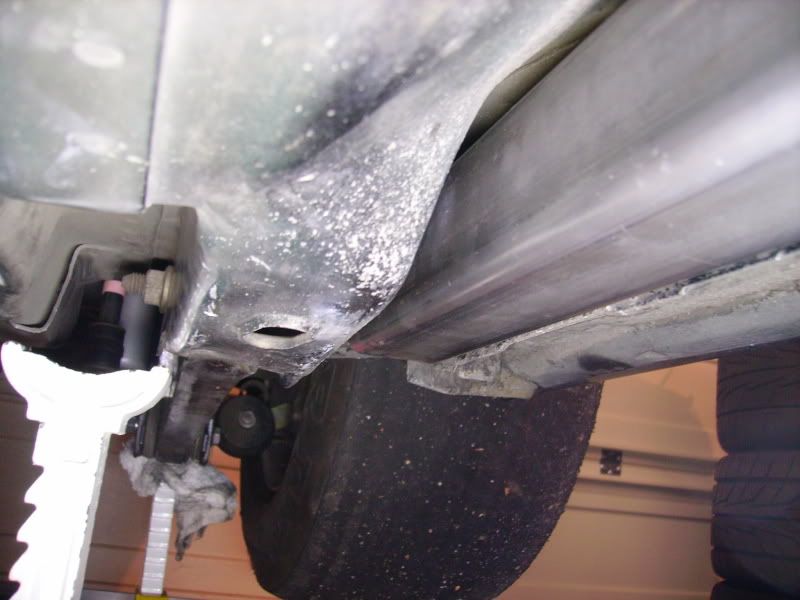
Here's the rear subframe and the connector. Notice that I'll need to fab up a spacer to fill the gap. Also going to fill the factory gap between the LCA mount and the rear subframe rail that goes over the rear axle. This will add strength and integrity to the entire front/rear subframe and create a stronger mount for the rollbar. I'll finish up the spacers once I acquire a welder.
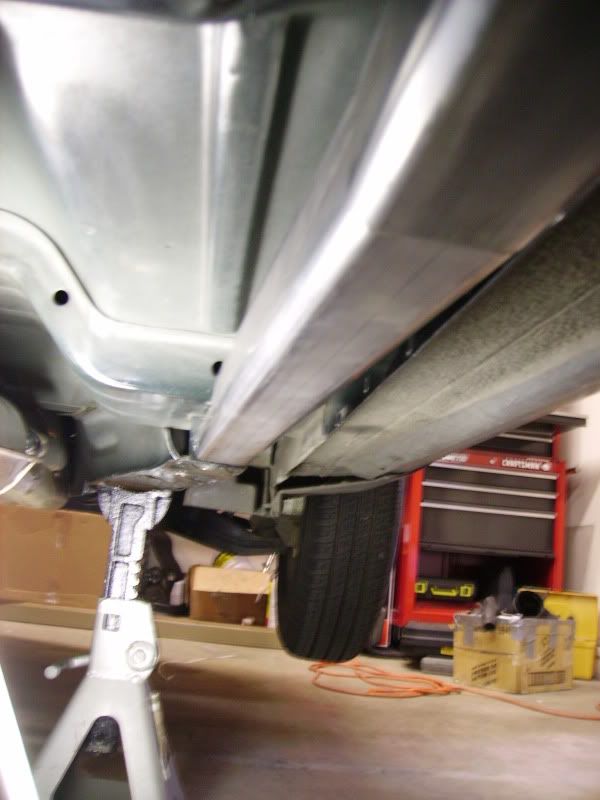
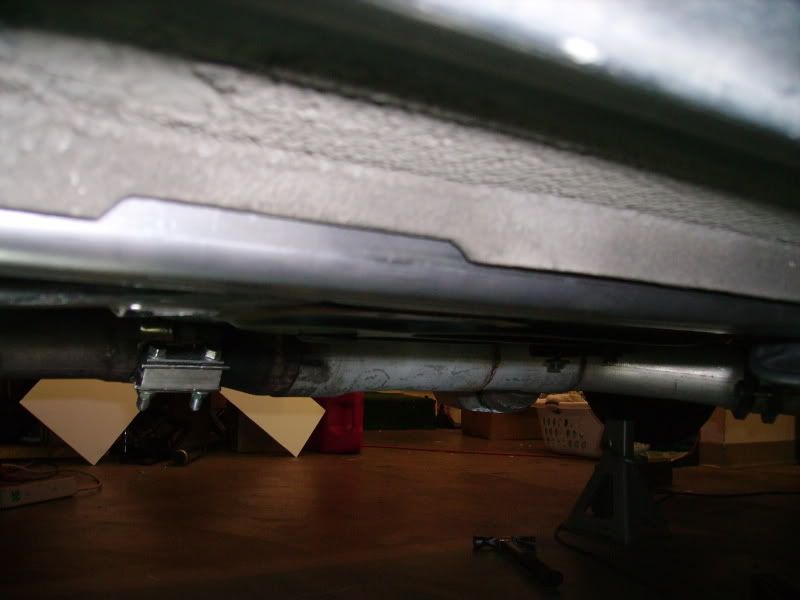
Shot looking forward. The PS SFC is nearly complete other than welding.
The passenger side is nearly identical as the driver side, but here's a few shots.
The PS hangs down a little further, maybe a 1/2" or so. Still barely noticable once it get's painted.
That's it for now. Hoping to have a welder soon so I can finish it all up.
Mike
Once I get a welder, I should break even with the price of "bolt-in" stuff, except now I'll have a welder that I can either sell, which would put me well ahead, or just keep it.Here's some pics of the custom SFC's I'm fabbing up in my garage. I've got most of the cutting/fitting done, now I just need a MIG welder to finish it up.
Started off with two 5' pieces of 2"x2" mild steel with 1/8th wall thickness. Thes are going to be STOUT SFC's and only be about 2lb's heavier than aftermarket pieces. The actual length of the SFC's ended up at 45-1/2", but the steel yard would only sell 10' min length. I had them cut it in half for easier transport. Total cost for material, 35.00.
Here's the front and rear subframes that I'll be tying together.
I used a piece of foam core board to mock up the bend and pattern for cutting. The bend makes it line up better, and creates an area on the outside mount that can be welded. Otherwise it would be too tight to get a welder into.
Create a pie notch in the tubing to get the bend. Once it's notched, it bends fairly easy, no special tools needed. I used a hand grinder with a cut-off wheel for all the cutting and it went fairly quick. Of course, this will get welded together again before it gets welded to the car.
Once I had the correct angle, I transferred the pattern to the steel and started cutting. This is a trial and fit situation until it's good. Had to do this several time to get the fit good and tight against the front subframe.
Here's the outside area of the front subframe mount that required the bend to get a welder into. Still pretty tight but should be good enough for a MIG torch head.
Here's the clearance from the side. They tuck up real nice under the lip of the bottom rocker panel. Once painted and welded in place you'll never see them from the side.
Here's the rear subframe and the connector. Notice that I'll need to fab up a spacer to fill the gap. Also going to fill the factory gap between the LCA mount and the rear subframe rail that goes over the rear axle. This will add strength and integrity to the entire front/rear subframe and create a stronger mount for the rollbar. I'll finish up the spacers once I acquire a welder.
Shot looking forward. The PS SFC is nearly complete other than welding.
The passenger side is nearly identical as the driver side, but here's a few shots.
The PS hangs down a little further, maybe a 1/2" or so. Still barely noticable once it get's painted.
That's it for now. Hoping to have a welder soon so I can finish it all up.
Mike
Last edited by Mikey 97Z M6; 08-09-2009 at 05:08 PM.
08-09-2009 | 11:34 PM
#4

Looking good but only thing i noticed is on the pic of the drivers side rear by the LCA mount should'n you have it going straight to the subframe with steel on both sides like how bolt in connectors are as opposed to having it on the outer side of the subframe? In my head that seems to me that it would be stronger as your useing both sides of the subframe and boxing it in somewhat at the same time. Other than that they look very good and seems to be saving you some cash!
08-10-2009 | 07:44 AM
#6

Just make sure the suspension is loaded, either on the ground or a drive on lift. NO 2-post lifts and your mint. Also I would paint the bars now, grind where the welds go and hit it again with some rustolium.
08-10-2009 | 09:54 AM
#7
Thread Starter
11 Second Club
iTrader: (37)
Joined: Mar 2004
Posts: 2,046
Likes: 3
From: Vancouver, WA
Looking good but only thing i noticed is on the pic of the drivers side rear by the LCA mount should'n you have it going straight to the subframe with steel on both sides like how bolt in connectors are as opposed to having it on the outer side of the subframe? In my head that seems to me that it would be stronger as your useing both sides of the subframe and boxing it in somewhat at the same time. Other than that they look very good and seems to be saving you some cash!
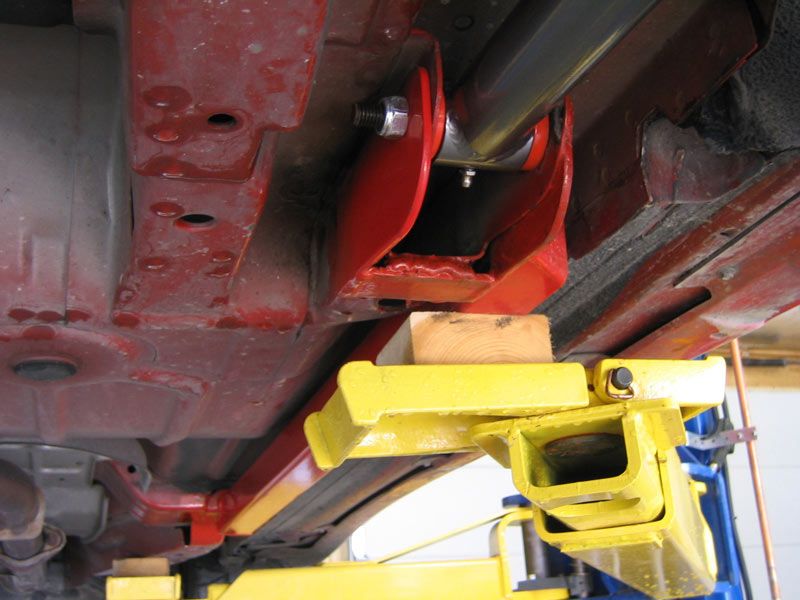
Here's a shot of a very typical weld-in sfc. As you can see, they just tied into the lca mount. As mentioned above, I'm taking that one step further and filling that big gap with a piece of the leftover 2"x2" square tubing.
Mike
Trending Topics
08-10-2009 | 10:05 AM
#8
Thread Starter
11 Second Club
iTrader: (37)
Joined: Mar 2004
Posts: 2,046
Likes: 3
From: Vancouver, WA
Yes thanks, that was suggested to me in another thread also. I think I'm going to support the front end on ramps, and the rearend will be supported by jackstands at the lca mounts on the housing. That should load the entire suspension. And yes, once the notched/angled areas are welded up, the sfc's will be painted before I burn them in for the last time.
Mike
 08-10-2009 | 06:57 PM
#10
Thread Starter
11 Second Club
iTrader: (37)
Joined: Mar 2004
Posts: 2,046
Likes: 3
From: Vancouver, WA
Great 1/4 time btw!! 
Well, bit the bullet and ordered up the MIG welder today. Did alot of research and finally decided on a Clarke 180EN. Runs on 220v single phase and max output is 180 amps. Should be plenty for what I'll use it for.
I also stumbled upon a used Art Morison 6point rollbar out of a 4th gen here locally, so that will be the next project after these SFC's are burned-in. Has both door swing outs and also has the extra forward upper sections to make it a cage if needed in the future.
Now I can't wait to get the new welder and start burnin' some metal.
Mike
08-10-2009 | 07:13 PM
#11
Joined: Jan 2006
Posts: 3,701
Likes: 2
From: Southaven, MS (near Memphis, TN)
Looks like a good start.
I bought a 220v welder, a Hobart Handler 187, and it sure is fun! I'm learning on my own, but so far everything has held up to some abuse. The go-karts I made are monsters
I bought a 220v welder, a Hobart Handler 187, and it sure is fun! I'm learning on my own, but so far everything has held up to some abuse. The go-karts I made are monsters
08-10-2009 | 09:09 PM
#12
Awesome man. I appreciate your craftsmanship. I Bought bolt-in SFC's, paid out the ***, and then later welded them in with my dad's mig. It would have payed off to be patient and do things myself. I'm a decent welder, so the welding thing was no problem, the welder was just 4 hours away, and i wanted to go racing!!!
08-11-2009 | 06:22 PM
#13

You can do them on 2 post lifts.Just load the front subrame and rearend with jacks/stands.
 08-12-2009 | 07:06 PM
#16
Hey Mikey i can not wait to see the finished product.. Being that are unemployed and i am unemployed.. Want to make some eatra $$$???
What i am asking can you make me a set
I want some SFC but i too am broke
and again cannot wait to see the finished product
What i am asking can you make me a set
I want some SFC but i too am broke
and again cannot wait to see the finished product
08-17-2009 | 09:17 PM
#18
Thread Starter
11 Second Club
iTrader: (37)
Joined: Mar 2004
Posts: 2,046
Likes: 3
From: Vancouver, WA
Thanks guys. My new MIG welder shows up tomorrow so I'll be welding up these SFC's and the 6 point rollbar this week. I'll post up some pics when they're finished up.
Mike
Mike
08-17-2009 | 09:25 PM
#19