
Viking Front Coilovers Install Thread
 07-04-2013, 07:47 AM
#1
So i got my New Vikings from MWC seem like a very high quality product i will post results soon. But i'll try to cover everything in the thread on how to make this an easy install. I've already done this once going from stock DeCarbon's to Eibach Pro's with Bilstiens. So I'll mention some things you might run into while doing this for the first time.
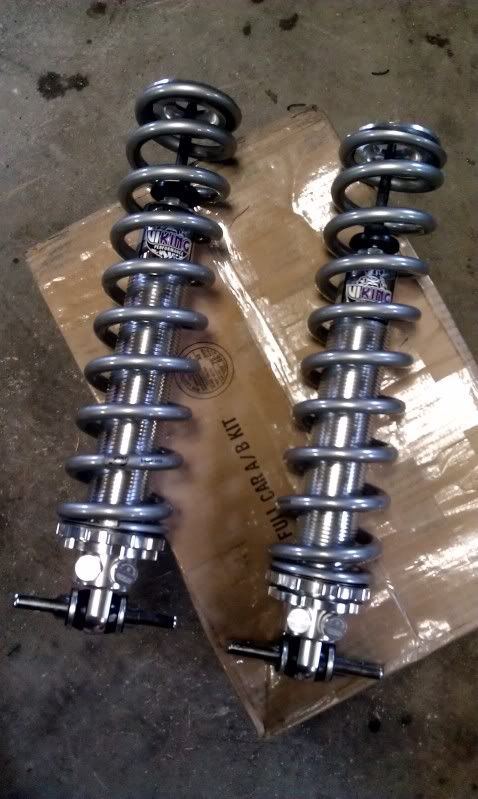
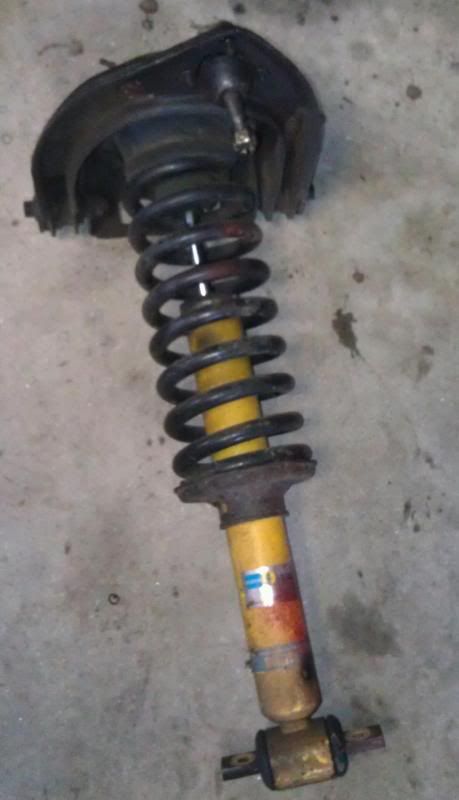
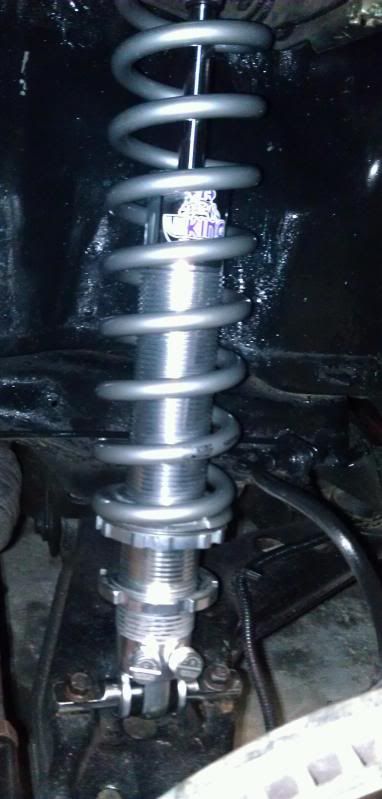
Here's what I'm working with DA Viking 18 Way Shocks with 300lb springs
I'll start off on the step where the wheel is off and car is jacked up everyone knows how to do that.
First you should Put your jack under the control arm just for some support
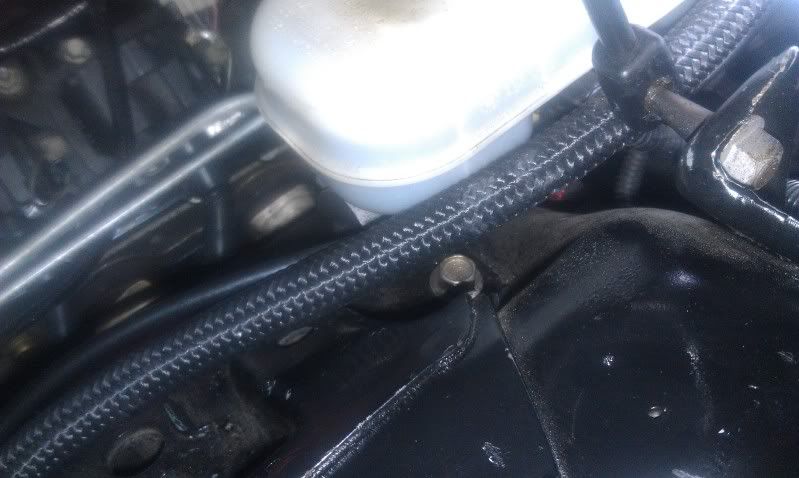
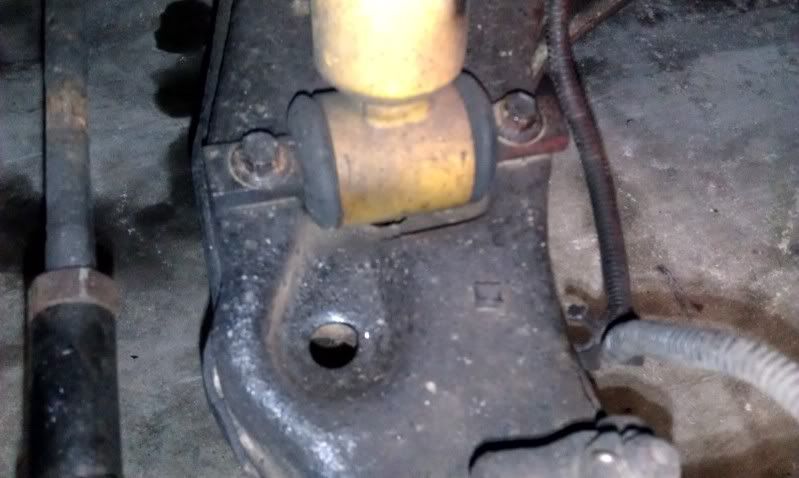
Remove all the 4 top Strut Mount bolts 2 are 15mm and the other two (if stock are Torx) i Replaced those since i hate using them. But in this picture you will see that all are simple to get at but if you have the torx left your going to have to remove the brake master cyl. Not hard to do just another 2 15mm nuts and remove the brake lines and pull it out dont worry you will not have to bleed this just set it off to the side.
Here is the one bolt thats a pain to get to but i would suggest ditching the stock bolt and getting a nice grade 8 so if you ever remove it again you can do it without removing the master
Once you have those four removed go back to the wheel and remove the ball joint I would just replace them while your in there might as well. They are cheap anyways. Theres threads on how to do that since your going to have to drill the old one out but thats another thread.........
Once that comes off grab some zip tie or something to hold your spindle that way its not just resting on the lower ball joint
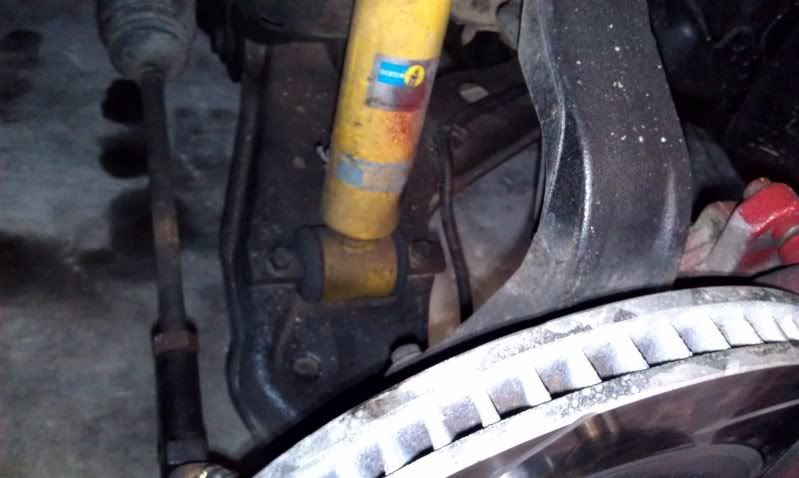
Now your going to remove the lower mounts they are a 13mm top and 15mm bottom.
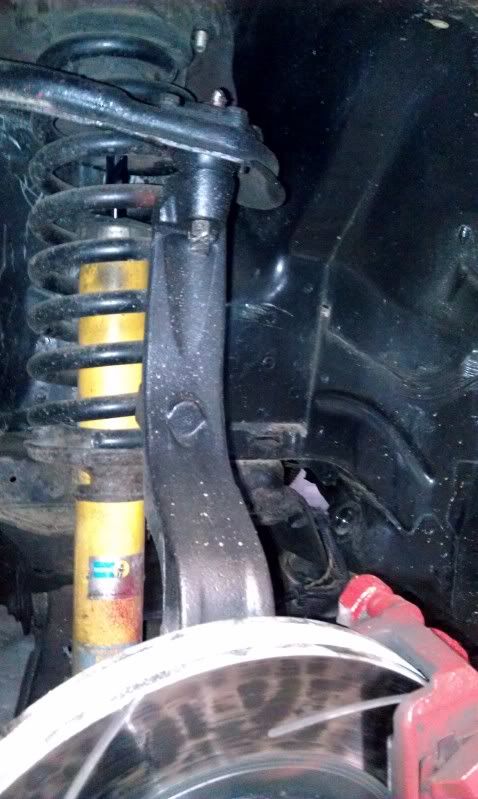
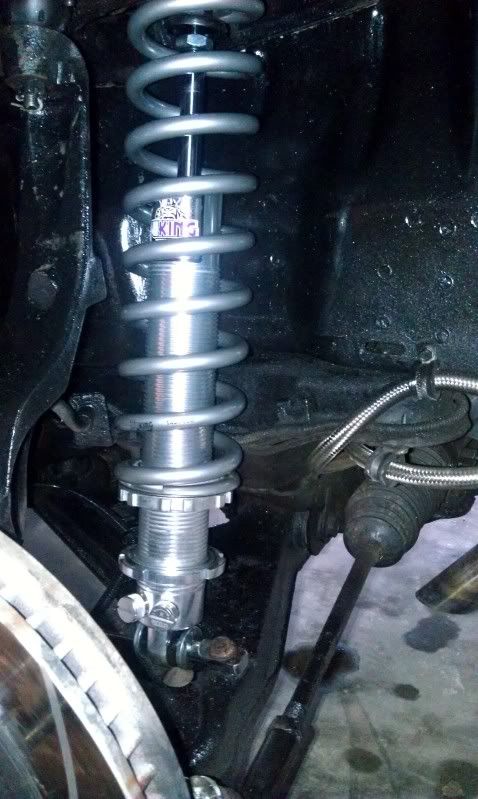
After this start to lower your jack and when you do this (Slowly) you will have the whole assembly free just pull that out and you can work on removing the spring. Since everything is out another good time to clean it up in there with some new paint i know mine wasnt looking goo so i cleaned it up as much as i could with black paint.
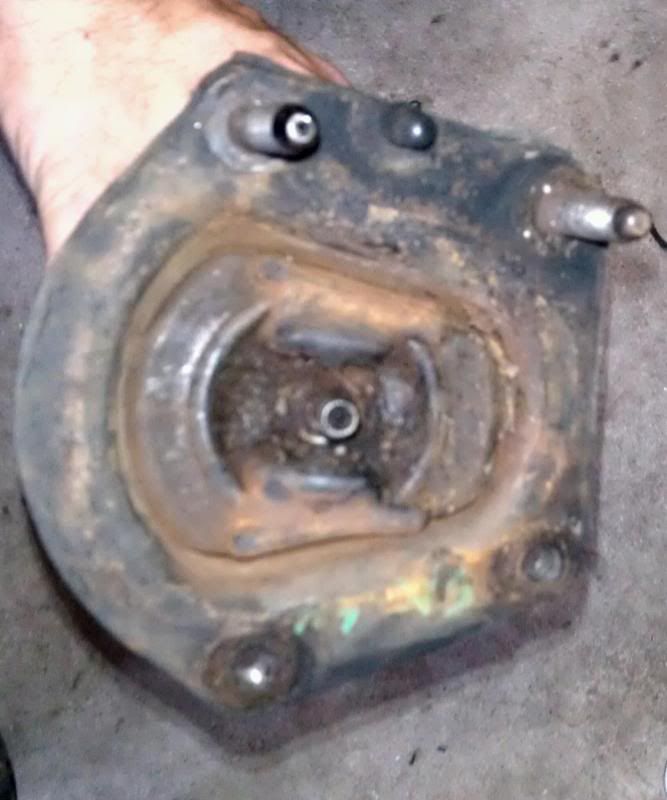
Here is the whole assembly The top control arm just pulls off and you can work on the upper shock mount
One thing that these car are notorious for is the rust in the top of the mount and will be a nightmare to get out unless your car has never seen snow.
What i had to do the first time was cut the top bolt right off i couldnt get it since it was rusted so bad.
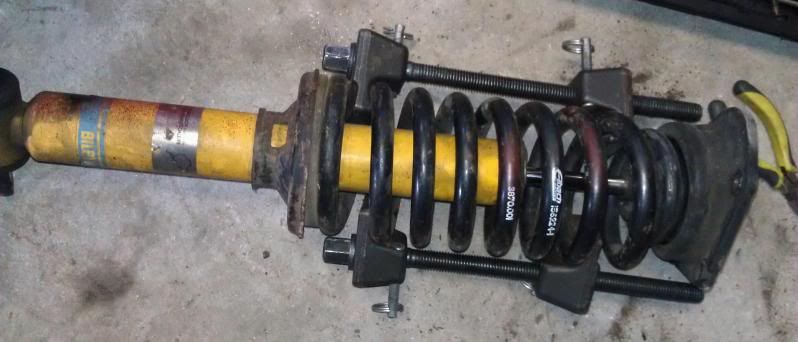
Rent a spring compressor dont be crazy and cut it so the spring goes flying across your garage
Here is the top bolt from my shock it wasnt hard to remove since i did it only a year ago and filled it with grease when i put it back together.
So once you get your new coilovers back in load up the top mount with some grease so you will not run into any of this again!
Again with my car i had to even replace the upper shock mounts on both they were rusted and seized up so bad it was frozen to my shock. I wish i had pictures from that but trust me if your having a hard time just replace them it will save you a ton of stress!
Now the easy part throwing everything back together
One thing i forgot to take pictures of is the bearing on the bottom of the spring mount for adjustment. I read the instructions that came with it and just followed that. But i can explain. when installing the bottom mount Use the washer (One side coated with anti seize) bearing and then the other washer with one side of anti seize again that way it spins more freely.
A good starting point for ride height is about 6 1/2 inches from the bottom spring mount to the adjustment *****. Thats what i did because when i first lowered it obv it was too low lol
If you need other pictures or have questions feel free to ask but it was a very straight forward job just gotta get those nasty old parts out of there and like i said if you want to just buy upper mounts it will save you a TON of time! You could even just toss the old assembly's in the trash and wouldnt even have to rent a compressor.
Here's what I'm working with DA Viking 18 Way Shocks with 300lb springs

I'll start off on the step where the wheel is off and car is jacked up everyone knows how to do that.
First you should Put your jack under the control arm just for some support
Remove all the 4 top Strut Mount bolts 2 are 15mm and the other two (if stock are Torx) i Replaced those since i hate using them. But in this picture you will see that all are simple to get at but if you have the torx left your going to have to remove the brake master cyl. Not hard to do just another 2 15mm nuts and remove the brake lines and pull it out dont worry you will not have to bleed this just set it off to the side.
Here is the one bolt thats a pain to get to but i would suggest ditching the stock bolt and getting a nice grade 8 so if you ever remove it again you can do it without removing the master

Once you have those four removed go back to the wheel and remove the ball joint I would just replace them while your in there might as well. They are cheap anyways. Theres threads on how to do that since your going to have to drill the old one out but thats another thread.........

Once that comes off grab some zip tie or something to hold your spindle that way its not just resting on the lower ball joint
Now your going to remove the lower mounts they are a 13mm top and 15mm bottom.


After this start to lower your jack and when you do this (Slowly) you will have the whole assembly free just pull that out and you can work on removing the spring. Since everything is out another good time to clean it up in there with some new paint i know mine wasnt looking goo so i cleaned it up as much as i could with black paint.
Here is the whole assembly The top control arm just pulls off and you can work on the upper shock mount

One thing that these car are notorious for is the rust in the top of the mount and will be a nightmare to get out unless your car has never seen snow.
What i had to do the first time was cut the top bolt right off i couldnt get it since it was rusted so bad.
Rent a spring compressor dont be crazy and cut it so the spring goes flying across your garage

Here is the top bolt from my shock it wasnt hard to remove since i did it only a year ago and filled it with grease when i put it back together.
So once you get your new coilovers back in load up the top mount with some grease so you will not run into any of this again!

Again with my car i had to even replace the upper shock mounts on both they were rusted and seized up so bad it was frozen to my shock. I wish i had pictures from that but trust me if your having a hard time just replace them it will save you a ton of stress!
Now the easy part throwing everything back together

One thing i forgot to take pictures of is the bearing on the bottom of the spring mount for adjustment. I read the instructions that came with it and just followed that. But i can explain. when installing the bottom mount Use the washer (One side coated with anti seize) bearing and then the other washer with one side of anti seize again that way it spins more freely.

A good starting point for ride height is about 6 1/2 inches from the bottom spring mount to the adjustment *****. Thats what i did because when i first lowered it obv it was too low lol

If you need other pictures or have questions feel free to ask but it was a very straight forward job just gotta get those nasty old parts out of there and like i said if you want to just buy upper mounts it will save you a TON of time! You could even just toss the old assembly's in the trash and wouldnt even have to rent a compressor.

 07-04-2013, 10:34 AM
#4

Great job! Thanks for the write up and pics. We will be doing a full front and rear install soon and this one will have the rear coil-over conversion on it with a MWC 9" rearend! I will get some pics of the install for everyone when we do the job here and some of it will be documented to the MWC website.
07-04-2013, 12:36 PM
#5
TECH Regular
iTrader: (11)
Join Date: Jun 2005
Location: Rochester N.Y.
Posts: 484
Likes: 0
Received 0 Likes
on
0 Posts

Hey camaro9969, how did you get your front wheel tucked in so much?
It looks like your still running stock control arms.
Or maybe it's just the way it looks in the pic?
It looks like your still running stock control arms.
Or maybe it's just the way it looks in the pic?
07-04-2013, 01:43 PM
#7
Great job! Thanks for the write up and pics. We will be doing a full front and rear install soon and this one will have the rear coil-over conversion on it with a MWC 9" rearend! I will get some pics of the install for everyone when we do the job here and some of it will be documented to the MWC website.
Trending Topics
07-04-2013, 01:45 PM
#8
TECH Regular
iTrader: (11)
Join Date: Jun 2005
Location: Rochester N.Y.
Posts: 484
Likes: 0
Received 0 Likes
on
0 Posts
I hear ya, it just looks like your tire is tucked behind your fender.
Mine touches the fender when coming down from a wheelie.
I need adj control arms to get them in a bit.
I would have def went with these shocks if I didn't already buy
Strange all the way around. They look good!
07-05-2013, 12:05 PM
#10
Lets see...
An industry-best 2 year warranty. 18 position double adjustable valving(Viking only makes double adj). Both adjusters easy to get to on the bottom of the shock body. USA made(Minneapolis area). High quality components and finish. Same or next day shipping. Price... by far the best bang for the buck right now while Viking is getting their name out there. These shocks are priced close to what other single adjustable packages are.
That's all. Need we say more?
07-05-2013, 12:38 PM
#12
I hear ya, it just looks like your tire is tucked behind your fender.
Mine touches the fender when coming down from a wheelie.
I need adj control arms to get them in a bit.
I would have def went with these shocks if I didn't already buy
Strange all the way around. They look good!
Mine touches the fender when coming down from a wheelie.
I need adj control arms to get them in a bit.
I would have def went with these shocks if I didn't already buy
Strange all the way around. They look good!
07-06-2013, 10:59 AM
#15
Lets see...
An industry-best 2 year warranty. 18 position double adjustable valving(Viking only makes double adj). Both adjusters easy to get to on the bottom of the shock body. USA made(Minneapolis area). High quality components and finish. Same or next day shipping. Price... by far the best bang for the buck right now while Viking is getting their name out there. These shocks are priced close to what other single adjustable packages are.
That's all. Need we say more?
An industry-best 2 year warranty. 18 position double adjustable valving(Viking only makes double adj). Both adjusters easy to get to on the bottom of the shock body. USA made(Minneapolis area). High quality components and finish. Same or next day shipping. Price... by far the best bang for the buck right now while Viking is getting their name out there. These shocks are priced close to what other single adjustable packages are.
That's all. Need we say more?
As a Chicago Bears fan i can not own a pair, lol
 07-07-2013, 06:20 AM
#18
https://ls1tech.com/forums/suspensio...lable-mwc.html
Also the part number for the shocks is B223
I paid $570 Shipped with everything to install and adjust them properly. Wrenches and bearings
07-07-2013, 11:39 AM
#20
But, do you know if their valving is correct? Anybody fast using them?
I have had two sets of double adjustable shocks that I had to send off to be re-valved. Adjustable doesn't mean you can adjust them far enough to "get there".
Most top chassis shops use Strange or AFCO, probably for a reason. I learned, the expensive way, to not try to save money there.
I have had two sets of double adjustable shocks that I had to send off to be re-valved. Adjustable doesn't mean you can adjust them far enough to "get there".
Most top chassis shops use Strange or AFCO, probably for a reason. I learned, the expensive way, to not try to save money there.