

** 2014 BlownZ 25.3 Camaro 275 Build Thread **
 12-24-2013, 12:20 PM
#1
LS1TECH Sponsor
Thread Starter
iTrader: (4)

Join Date: Mar 2006
Posts: 57
Likes: 0
Received 0 Likes
on
0 Posts

Going to do a build thread on here and Yellowbullet for our BlownZ 275 project car this year since we are doing so much on the car and hope anyone that wants to follow along or ask any questions can hop in here. We're racing NMCA West, PSCA, WCHRA mainly in 275 but will also dip out back east for probably 2 trips.
Click HERE for the Build Articles on Dragzine.com
We finished 2013 on a high � won the NMCA West World Finals in 275 Drag Radial and also ran the fastest run in our class history with 7.353 @ 190 mph. We were extremely proud of that accomplishment, but we want more for 2014 as we fell short of the championship by just a few points. Despite our progress on the track, we knew had to step up big time or we were going to get run over.
We are doing a new 25.3 roll cage/chassis by PMR Race Cars, a new Racecraft suspension setup, drivetrain, and new engine. Everything is pretty much new or overhauled.
One thing that is new in 2014 beyond the car is our relationship with DJ Reid and his crew chief Eric Kvilhaug. We are creating an informal partnership to campaign our 275 Camaro�s together during the year.
I'll post some updates here on where the car is at right now.

Engine: Our 2014 combination is fresh to make the horsepower needed to compete at this level. We�ve got an LME-built 400ci LSX, with a Chevy Performance LSX Block, Callies Billet Crank, GRP Rods, Diamond Pistons, Total Seal Rings, Jesel Lifters, COMP Camshaft, Curtis Boggs-ported Edelbrock LSR heads, and a Wilson single cast intake. Boost will come from a Procharger F1X with Holley EFI. We will also have a 427ci LME-built LS as another option with similar components with JE LSX Pistons and slightly higher compression.

Suspension: Racecraft�s 46″ Pro Series Torque Arm, Fabricated 9-inch housing with Moser Axles, Santhuff rear shocks, Strange Brakes, Racecraft Control Arms, Sway Bar and a Wishbone will be under the rear of the car this year, with the front featuring the Racecraft front suspension setup and Santhuff shocks we ran in 2013.

Chassis: A complete new 25.3 roll cage and chassis by PMR � Phil Mandella Race Cars will keep us safe as we run 190-195 mph consistently, along with Tim McAmis mini-tubs, a Racetech seat, and lots of bits and pieces from Jerry Bickel Race cars. The chassis build team will consist of Phil & Tony Mandella along with lead fabricator Charles.
At PMR - one of the first things Tony, Phil and Charles did was mount our chassis on their jig at our specified ride height. That ride height is LOW.

At this point, we�ve got part of the 25.5 roll cage cut out, but we�ve still got the rear frame rails in the car to check fitment on the Racecraft rear end housing and take all of the measurements that we need. The frame rails will come out soon just to be cleaned and dipped, but they will be put back in soon.
We are going to build strength and adjustability into the stock suspension setup. We needed to get a very precise location for the stock suspension mounting points so we started with a detailed mock up and took tons of pictures and got our tape measure and plumb bobs a time or two.

PMR is mocking up the main hoop and getting some of the initial bends in place. You can see the rear frame rails are gone temporarily here..


The Racetech seat has arrived. We picked a 4119 HRW. Link. The main reason we went with the Racetech is this is a seat that is engineered to save your life in a serious crash versus just be a lightweight option for drag racing. It's built from Fiberglass/Kevlar and carbon, weights 9.6 lbs, and is a full containment design. It' not inexpensive (about $2000) but neither is your brain, your life, your internal organs, etc. It's also compatible with the HANS device we use.
We actually got it at the recommendation of the guys at Tim McAmis. They use this seat in all of their car builds.

The old 25.5 chassis. PMR pretty much told us that we should probably start over after seeing the bends in the top of the A-pillar bars, PLUS the amount of work to retrofit a 25.3 is substantial. They simply felt building a 200 mph potential race car with these bends in the top of the roof was just not advisable, and building a 25.3 from scratch would build a better car. It also allowed us to raise the main hoop bar because I'm so short.. would be nice to sit higher in the car

This is the Racecraft 9-inch Fabricated F-Body housing. We are moving to a traditional coil-over with a wishbone lateral locator.

If you're curious what the metal pile looks like of what we've removed, this is about 30% of it!
Click HERE for the Build Articles on Dragzine.com
We finished 2013 on a high � won the NMCA West World Finals in 275 Drag Radial and also ran the fastest run in our class history with 7.353 @ 190 mph. We were extremely proud of that accomplishment, but we want more for 2014 as we fell short of the championship by just a few points. Despite our progress on the track, we knew had to step up big time or we were going to get run over.
We are doing a new 25.3 roll cage/chassis by PMR Race Cars, a new Racecraft suspension setup, drivetrain, and new engine. Everything is pretty much new or overhauled.
One thing that is new in 2014 beyond the car is our relationship with DJ Reid and his crew chief Eric Kvilhaug. We are creating an informal partnership to campaign our 275 Camaro�s together during the year.
I'll post some updates here on where the car is at right now.
Engine: Our 2014 combination is fresh to make the horsepower needed to compete at this level. We�ve got an LME-built 400ci LSX, with a Chevy Performance LSX Block, Callies Billet Crank, GRP Rods, Diamond Pistons, Total Seal Rings, Jesel Lifters, COMP Camshaft, Curtis Boggs-ported Edelbrock LSR heads, and a Wilson single cast intake. Boost will come from a Procharger F1X with Holley EFI. We will also have a 427ci LME-built LS as another option with similar components with JE LSX Pistons and slightly higher compression.
Suspension: Racecraft�s 46″ Pro Series Torque Arm, Fabricated 9-inch housing with Moser Axles, Santhuff rear shocks, Strange Brakes, Racecraft Control Arms, Sway Bar and a Wishbone will be under the rear of the car this year, with the front featuring the Racecraft front suspension setup and Santhuff shocks we ran in 2013.
Chassis: A complete new 25.3 roll cage and chassis by PMR � Phil Mandella Race Cars will keep us safe as we run 190-195 mph consistently, along with Tim McAmis mini-tubs, a Racetech seat, and lots of bits and pieces from Jerry Bickel Race cars. The chassis build team will consist of Phil & Tony Mandella along with lead fabricator Charles.
At PMR - one of the first things Tony, Phil and Charles did was mount our chassis on their jig at our specified ride height. That ride height is LOW.
At this point, we�ve got part of the 25.5 roll cage cut out, but we�ve still got the rear frame rails in the car to check fitment on the Racecraft rear end housing and take all of the measurements that we need. The frame rails will come out soon just to be cleaned and dipped, but they will be put back in soon.
We are going to build strength and adjustability into the stock suspension setup. We needed to get a very precise location for the stock suspension mounting points so we started with a detailed mock up and took tons of pictures and got our tape measure and plumb bobs a time or two.
PMR is mocking up the main hoop and getting some of the initial bends in place. You can see the rear frame rails are gone temporarily here..
The Racetech seat has arrived. We picked a 4119 HRW. Link. The main reason we went with the Racetech is this is a seat that is engineered to save your life in a serious crash versus just be a lightweight option for drag racing. It's built from Fiberglass/Kevlar and carbon, weights 9.6 lbs, and is a full containment design. It' not inexpensive (about $2000) but neither is your brain, your life, your internal organs, etc. It's also compatible with the HANS device we use.
We actually got it at the recommendation of the guys at Tim McAmis. They use this seat in all of their car builds.
The old 25.5 chassis. PMR pretty much told us that we should probably start over after seeing the bends in the top of the A-pillar bars, PLUS the amount of work to retrofit a 25.3 is substantial. They simply felt building a 200 mph potential race car with these bends in the top of the roof was just not advisable, and building a 25.3 from scratch would build a better car. It also allowed us to raise the main hoop bar because I'm so short.. would be nice to sit higher in the car
This is the Racecraft 9-inch Fabricated F-Body housing. We are moving to a traditional coil-over with a wishbone lateral locator.
If you're curious what the metal pile looks like of what we've removed, this is about 30% of it!

 12-28-2013, 10:17 AM
#5
LS1TECH Sponsor
Thread Starter
iTrader: (4)
Join Date: Mar 2006
Posts: 57
Likes: 0
Received 0 Likes
on
0 Posts
December 28, 2013 Updates:
PMR engineered the Racecraft 46-inch torque arm front mount into the 25.3 Floor X-Brace. Plenty of adjustment here. Ties directly into the frame rails.

A lot of 4130 chrome moly tubing. Some of this is to gusset the suspension mounts, but in reality most of these bars are dual purpose serving the 25.3 frame. The rear suspension control arm mounts are in the exact stock location but allow us to move the control arm mounting points up and down.

This is the front section of the frame rails and intersection of the frame rails into the roll cage and 25.3 chassis. This is the firewall you can see forward.

This shot probably gives you the best view of the engineering PMR is putting into our 25.3 275 Camaro. The frame rails (as part of the 25.3) actually tie directly into the stock front and rear frame rails of the stock Camaro chassis. The x-brace - also 25.3 required - ties into the torque arm and frame rails. The rear control arm mounting locations (stock location, but adjustable up and down) tie into the stock frame, stock frame rails in rear, and to the 25.3 frame rails and #1 bar. It's a tightly integrated package. You can see better now how a stock floorpan is going to get back reinstalled. The frame rails will go below the floorpan, the #1 bar and the rocker bars will go above.

Our trusty frame rails are back from the stripper. PMR is set up to reinstall the frame rails next week.

Racecraft's newly redesigned 4th Gen F-Body k-member just arrived from chilly Minnesota. This k-member is chrome-moly and is designed for the lightweight Stiletto rack.

PMR engineered the Racecraft 46-inch torque arm front mount into the 25.3 Floor X-Brace. Plenty of adjustment here. Ties directly into the frame rails.
A lot of 4130 chrome moly tubing. Some of this is to gusset the suspension mounts, but in reality most of these bars are dual purpose serving the 25.3 frame. The rear suspension control arm mounts are in the exact stock location but allow us to move the control arm mounting points up and down.
This is the front section of the frame rails and intersection of the frame rails into the roll cage and 25.3 chassis. This is the firewall you can see forward.
This shot probably gives you the best view of the engineering PMR is putting into our 25.3 275 Camaro. The frame rails (as part of the 25.3) actually tie directly into the stock front and rear frame rails of the stock Camaro chassis. The x-brace - also 25.3 required - ties into the torque arm and frame rails. The rear control arm mounting locations (stock location, but adjustable up and down) tie into the stock frame, stock frame rails in rear, and to the 25.3 frame rails and #1 bar. It's a tightly integrated package. You can see better now how a stock floorpan is going to get back reinstalled. The frame rails will go below the floorpan, the #1 bar and the rocker bars will go above.
Our trusty frame rails are back from the stripper. PMR is set up to reinstall the frame rails next week.
Racecraft's newly redesigned 4th Gen F-Body k-member just arrived from chilly Minnesota. This k-member is chrome-moly and is designed for the lightweight Stiletto rack.

Trending Topics
01-01-2014, 03:06 PM
#8
LS1TECH Sponsor
Thread Starter
iTrader: (4)
Join Date: Mar 2006
Posts: 57
Likes: 0
Received 0 Likes
on
0 Posts
Nothing too exciting to share.. but the front down bars are in place. Charles the lead fabricator did an outstanding job fitting the bar into the A-pillar.
One of the major advantages of the all-new 25.3 cage is that we were able to raise the cage up about 2 inches from where it was, giving the ability to not only provide a safer structure (farther away from driver's helmet) but also being able to get the seat up a little higher for this short driver.
There will be a lot of updates I can share next time.. will have the majority of the bar work done in the interior of the car plus the rear frame rails and rear support coming along...
Click here for the full build on Dragzine
01-08-2014, 11:59 PM
#9
LS1TECH Sponsor
Thread Starter
iTrader: (4)
Join Date: Mar 2006
Posts: 57
Likes: 0
Received 0 Likes
on
0 Posts
Some more updates on BlownZ

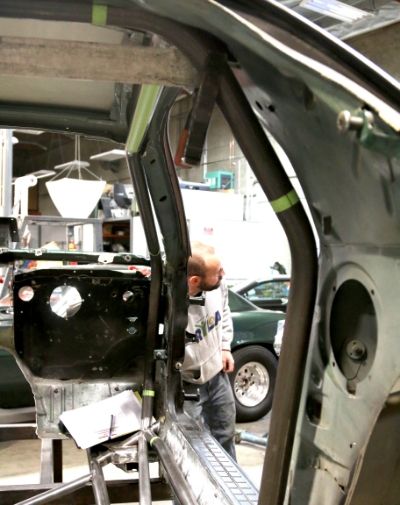
Work at PMR Race Cars continued as we progressed on the roll cage and with mounting our Racetech seat. Below you can see the mounts that PMR designed to allow the seat to sit down low in the car. The Racetech seat is a full containment seat � nicely styled, well padded and have a great look to them. We chose a containment seat for the best of protection since we believe the faster the car, the heavier the car, the stronger the seat needs to be.

PMR�s lead fabricator Charles finished with the front of our roll-cage including the A-pillar bars and the top of the front of the hoop. All the bars were tucked up into the roof line as much as possible. To be 25.3 compliant, we will need an �X� in our roof structure.

The 4th Gens rear frame rails came back from dip-strip and are being re-welded into the factory location.

A nice shot of the new 25.3 PMR funny car cage surrounding the seat. This hoop is only about 40% complete at this stage.

This gives a nice current snapshot of where we are build wise. We�ve made alot of progress but there is a still a good chunk of welding and finish work before we reinstall the floorpans.
Work at PMR Race Cars continued as we progressed on the roll cage and with mounting our Racetech seat. Below you can see the mounts that PMR designed to allow the seat to sit down low in the car. The Racetech seat is a full containment seat � nicely styled, well padded and have a great look to them. We chose a containment seat for the best of protection since we believe the faster the car, the heavier the car, the stronger the seat needs to be.
PMR�s lead fabricator Charles finished with the front of our roll-cage including the A-pillar bars and the top of the front of the hoop. All the bars were tucked up into the roof line as much as possible. To be 25.3 compliant, we will need an �X� in our roof structure.
The 4th Gens rear frame rails came back from dip-strip and are being re-welded into the factory location.
A nice shot of the new 25.3 PMR funny car cage surrounding the seat. This hoop is only about 40% complete at this stage.
This gives a nice current snapshot of where we are build wise. We�ve made alot of progress but there is a still a good chunk of welding and finish work before we reinstall the floorpans.
 01-12-2014, 10:50 AM
#11
LS1TECH Sponsor
Thread Starter
iTrader: (4)
Join Date: Mar 2006
Posts: 57
Likes: 0
Received 0 Likes
on
0 Posts
Some more updates from PMR Race Cars today. Big thanks to Tony Mandella for helping provide the photos and updates. Visit them on Facebook at https://www.facebook.com/PMRacecars

Work began on the rear frame today. PMR is engineering a back �tree� similar to what you would find in most top x275 or Outlaw Drag Radial class cars. This is an important and often overlooked part of a race car because of how much stress and torsional forces are applied through the rear tree. You can also see our Funny car cage is coming along.

This provides a nice bird�s eye view of the OEM F-body rear frame rails and how our rear tree rails run next to each other.

The two down bars where the top hoop meets up with the rear tree.

X-brace in the rear tree/rear down bars. Our Anti-roll bar, wishbone, and shock mounts will be to this critical bar. Avoiding twist in the chassis in this area is paramount.

More progress on the rear tree. Triangulation of the rear tree will be incorporated throughout.

This is where we stopped for the day. There is still quite a bit of work to do back here, more updates will come next time!
Work began on the rear frame today. PMR is engineering a back �tree� similar to what you would find in most top x275 or Outlaw Drag Radial class cars. This is an important and often overlooked part of a race car because of how much stress and torsional forces are applied through the rear tree. You can also see our Funny car cage is coming along.
This provides a nice bird�s eye view of the OEM F-body rear frame rails and how our rear tree rails run next to each other.
The two down bars where the top hoop meets up with the rear tree.
X-brace in the rear tree/rear down bars. Our Anti-roll bar, wishbone, and shock mounts will be to this critical bar. Avoiding twist in the chassis in this area is paramount.
More progress on the rear tree. Triangulation of the rear tree will be incorporated throughout.
This is where we stopped for the day. There is still quite a bit of work to do back here, more updates will come next time!
 01-19-2014, 08:01 PM
#13
LS1TECH Sponsor
Thread Starter
iTrader: (4)
Join Date: Mar 2006
Posts: 57
Likes: 0
Received 0 Likes
on
0 Posts
More updates from the weekend:

We are working on the front of the car this week a little bit. This gives a nice shot of the Racecraft bolt-in K-member. You can see the car up on the chassis jig at PMR.

Test fitting the LME 400 with the Wilson 123mm V-band throttle body. Single we�re using a single 4-barrel intake we need to get the cowl situated to get the 5-inch blower tubing through the firewall.


You can see the amount of triangulation in the rear tree that Phil Mandella Racing is incorporating in the back of the car.

Nice shot of the LSX money maker. PMR is mounting the engine and working on the crankshaft centerline for optimum weight distribution.
We are working on the front of the car this week a little bit. This gives a nice shot of the Racecraft bolt-in K-member. You can see the car up on the chassis jig at PMR.
Test fitting the LME 400 with the Wilson 123mm V-band throttle body. Single we�re using a single 4-barrel intake we need to get the cowl situated to get the 5-inch blower tubing through the firewall.
You can see the amount of triangulation in the rear tree that Phil Mandella Racing is incorporating in the back of the car.
Nice shot of the LSX money maker. PMR is mounting the engine and working on the crankshaft centerline for optimum weight distribution.
02-09-2014, 03:04 AM
#16
LS1TECH Sponsor
Thread Starter
iTrader: (4)
Join Date: Mar 2006
Posts: 57
Likes: 0
Received 0 Likes
on
0 Posts
Sorry I got so behind on updates. For the full build article click here.
We have 3 weeks to make our first test session. Time to get to work!

We worked with our friends at Optic Armor on a new windshield since we we broke the old lexan when we removed it.. Optic Armor windshields combine the lightweight, strength & safety of polycarbonate, with the optical clarity & scratch resistance of glass. What's cool is the poly window form matches the factory glass� but they offer pre-formed windows in a wide variety of applications.

PMR did final mock up on the 400 CI LME LSX Engine with fitment on the front frame rails, motor plates, etc. We needed to get an idea of where to trim the window and what we needed to do for the induction trimming since the supercharger tubing would have to run straight in to the engine through the firewall.

Charles @ PMR is an artist and this shows how and why.

We left the OEM firewall in place and decided to do a sheet metal overlay to make it look clean. This will also address the strange overhang in the F-Body since our new firewall overlay will go straight up to meet the window.

We worked with the team at Quarter-Max Racing Components to outfit us with some of their VERY trick bits and pieces. We are going to be upgrading to dual Stroud parachutes this year � and so we used the Quarter-Max Dual Parachute Mount Kit Part #209104-1 to get that done with PMR handling the fabrication. The QM Dual Chute Mounts will accept any brand of parachute and offered pre-welded pack mounts..

A little of artwork from PMR and Quarter-Max.

You can see the ugly OE firewall behind our new overlay firewall. Ick.

The finished sheet metal overlay. Much nicer looking.

Final mock up before headers.

Greg designed the Kooks Bullhorns to tuck out of the way at the rear of the engine/firewall.

Shot of the driver�s side of the Kooks headers.

Rear End, Torque Arm, and Racecraft wishbone are mounted up and tacked in position.

Our hope is that with our power levels, the stiffer chassis, cage, and suspension will produce a more reliable race car handling wise.

Final mock up on the front of the chassis. We still need to build the front tree, body mounts, and mount the dry sump and oiling hardware. Finally � the new blower inlet tubing will need to be fabricated for the F1X-12A supercharger.
The boys at Kooks hooked us up with a complete Kooks Bullhorn Stainless header kit that Greg Holman at REF used to build our headers. The Kooks kit from Chris, Jr. and the race experts in NC comes with pretty much everything you need to build the system - from the collector to the 2-1/4 and 2-1/8 tubing and flanges. We will have a complete gallery and story on the header assembly but this is a cool shot of the final product (all except the bullhorn itself). The muffler and bullhorn is 4.5-inches.

We have 3 weeks to make our first test session. Time to get to work!
We worked with our friends at Optic Armor on a new windshield since we we broke the old lexan when we removed it.. Optic Armor windshields combine the lightweight, strength & safety of polycarbonate, with the optical clarity & scratch resistance of glass. What's cool is the poly window form matches the factory glass� but they offer pre-formed windows in a wide variety of applications.
PMR did final mock up on the 400 CI LME LSX Engine with fitment on the front frame rails, motor plates, etc. We needed to get an idea of where to trim the window and what we needed to do for the induction trimming since the supercharger tubing would have to run straight in to the engine through the firewall.
Charles @ PMR is an artist and this shows how and why.
We left the OEM firewall in place and decided to do a sheet metal overlay to make it look clean. This will also address the strange overhang in the F-Body since our new firewall overlay will go straight up to meet the window.
We worked with the team at Quarter-Max Racing Components to outfit us with some of their VERY trick bits and pieces. We are going to be upgrading to dual Stroud parachutes this year � and so we used the Quarter-Max Dual Parachute Mount Kit Part #209104-1 to get that done with PMR handling the fabrication. The QM Dual Chute Mounts will accept any brand of parachute and offered pre-welded pack mounts..
A little of artwork from PMR and Quarter-Max.
You can see the ugly OE firewall behind our new overlay firewall. Ick.
The finished sheet metal overlay. Much nicer looking.
Final mock up before headers.
Greg designed the Kooks Bullhorns to tuck out of the way at the rear of the engine/firewall.
Shot of the driver�s side of the Kooks headers.
Rear End, Torque Arm, and Racecraft wishbone are mounted up and tacked in position.
Our hope is that with our power levels, the stiffer chassis, cage, and suspension will produce a more reliable race car handling wise.
Final mock up on the front of the chassis. We still need to build the front tree, body mounts, and mount the dry sump and oiling hardware. Finally � the new blower inlet tubing will need to be fabricated for the F1X-12A supercharger.
The boys at Kooks hooked us up with a complete Kooks Bullhorn Stainless header kit that Greg Holman at REF used to build our headers. The Kooks kit from Chris, Jr. and the race experts in NC comes with pretty much everything you need to build the system - from the collector to the 2-1/4 and 2-1/8 tubing and flanges. We will have a complete gallery and story on the header assembly but this is a cool shot of the final product (all except the bullhorn itself). The muffler and bullhorn is 4.5-inches.
02-15-2014, 02:15 PM
#17
LS1TECH Sponsor
Thread Starter
iTrader: (4)
Join Date: Mar 2006
Posts: 57
Likes: 0
Received 0 Likes
on
0 Posts

It was time to start mocking up the F1X-12A supercharger with our new RPS 5-inch blower tubing for 2014. We moved to all 5-inch tubing. Race Parts Solutions has a great selection. You can see our front tree taking shape.

Now that the Camaro�s floors have been tacked back in, PMR began work on the removable transmission tunnel that will house the Hughes Transmissions 3-speed Turbo 400s. We won�t be removing the transmissions from the interior of the car, but this will make access to the bolts much quicker making for quicker transmission and convertor swaps.

A nice shot of the final rear tree of our 2002 Camaro prior to working on our Tim McAmis carbon fiber 34-inch drag radial wheel tubs.

Mock up of our new ride height with our new VFN Fiberglass nose. We needed to mock up the front bumper, hood and fenders because we will have a 1-piece removable front end (with removable hood) for 2014. We also needed to mock up the bullhorn header exits that will tuck down behind the front tires.

PMR started the rear tub process by mocking up a cardboard rear tub. We are using 34-inch �mini-tubs� that Tim McAmis sells specifically for the 275 Pro and 315 Drag Radial racers. They are about 75% of the size of a regular wheel tub.

Mock up of the driver side � you can see the factory frame rail here. This really drives the width of the tubs � there is no point in having a wider tub than the frame rail.

You can see PMR transfers the cardboard cutout template to the carbon tub.

Installing and mocking up the windshield.