White.Lightning's Build Journal


 05-02-2013, 06:00 AM
#45
Little update.....
4/24/13
I pulled the car out of the garage to get the lawnmower out. When I went to pull the car back in, the battery was dead. I tried jumping it with another vehicle, and tried a battery charger/starter that I had. The battery was toast. Turns out is was a battery circa 2005 and it was leaking from somewhere. I went to Pep Boys and got a Pro Start battery PN#75-650PS SKU#9074222.
4/27/13
I changed the oil in the T/A using 6qts. Shell Rotella T6 synthetic oil and a Napa Gold 1522 filter. Mileage was 100,774 for my records.
5/1/13
As you recall from Post #35, my battery tray was broken. Since I recently purchased a new battery, and it was moving a lot from the broken tray, I decided to buy a new one. I got a Dorman #603-116 from Amazon. The battery is much more secure now. Here are a couple of pics of the new tray and battery.
05-07-2013, 05:59 AM
#46
This weekend I was running in and out of the garage as I was doing yard work. Every time I would walk by the T/A, I would see this grime/dirt between the spoiler and the hatch. I noticed it before, but for some reason it was bothering me this weekend. So what did I do??? I decided to pull the spoiler and clean it! I am going to be doing a full detail on the T/A in the next week or two, and I wanted to do this regardless to compound and polish the hatch and underside of the spoiler.
Anyways.......


I ended up taking a soft bristled brush and getting as much dirt loose as I could. Then I took some APC and carefully wiped away the dirt making sure it didn't come into contact with the hatch paint. Before I compound the car, I'll be washing and using a clay bar, so I wasn't too concerned with approaching it this way. I'll take a couple pics of the outline marks that were left before I compound. I'm hoping that all of those marks come out.
Anyways.......
I ended up taking a soft bristled brush and getting as much dirt loose as I could. Then I took some APC and carefully wiped away the dirt making sure it didn't come into contact with the hatch paint. Before I compound the car, I'll be washing and using a clay bar, so I wasn't too concerned with approaching it this way. I'll take a couple pics of the outline marks that were left before I compound. I'm hoping that all of those marks come out.
05-10-2013, 10:42 AM
#47
Launching!
iTrader: (2)
Join Date: Jul 2009
Location: Upstate, NY
Posts: 248
Likes: 0
Received 0 Likes
on
0 Posts
i love your attention to detail.
so many ppl over look the little things, like pulling a spoiler or corner lights out
just to clean the grime out of them.
i pull my plate every year just to clean the frame and behind it. lol
so many ppl over look the little things, like pulling a spoiler or corner lights out
just to clean the grime out of them.
i pull my plate every year just to clean the frame and behind it. lol
05-21-2013, 12:33 PM
#48
For anyone following this......
I am looking for a used tan leather drivers seat so I can replace my upper and lower seat covers. From what I've found out, the 1998 T/A seat differs from the 1999-2002 T/A seat with lumbar support. I've been in contact with a local junk yard and they are looking for one for me too.
I wouldn't be against sourcing a 1999-2002 seat, but at that rate, I'd rather have the pair so they match. Another option is wait and have all my seats re-upholstered in new leather, but that will have to wait until after my wedding.
I figured I'd post in here in case helps me find one. Let me know if you have a lead on anything.
ETA:
These are my 1998 seats


Rip in bottom

Note, no lumbar support

This is a 1999-2002 seat with lumbar support

I am looking for a used tan leather drivers seat so I can replace my upper and lower seat covers. From what I've found out, the 1998 T/A seat differs from the 1999-2002 T/A seat with lumbar support. I've been in contact with a local junk yard and they are looking for one for me too.
I wouldn't be against sourcing a 1999-2002 seat, but at that rate, I'd rather have the pair so they match. Another option is wait and have all my seats re-upholstered in new leather, but that will have to wait until after my wedding.
I figured I'd post in here in case helps me find one. Let me know if you have a lead on anything.
ETA:
These are my 1998 seats
Rip in bottom
Note, no lumbar support
This is a 1999-2002 seat with lumbar support
Last edited by White.Lightning; 05-21-2013 at 12:43 PM.
05-23-2013, 07:13 AM
#49
I finally got a free minute to detail the hatch and spoiler. Here are a few pictures after cleaning off the major dirt, prior to detailing......


And this is the finished product. There were still areas that were damaged to the extent that detailing couldn't fix. All that I cared about was getting it a little cleaner than it was, even though most would never go through this process. More pics.....


No more dirt!!!!

I will take this holiday weekend as a chance to do the entire car. As soon as this rain passes I'll wash the car and start the process.
And this is the finished product. There were still areas that were damaged to the extent that detailing couldn't fix. All that I cared about was getting it a little cleaner than it was, even though most would never go through this process. More pics.....
No more dirt!!!!
I will take this holiday weekend as a chance to do the entire car. As soon as this rain passes I'll wash the car and start the process.
05-26-2013, 07:15 PM
#50
I finally got a chance to detail my car this weekend. This was my first time using the PC7424XP and all of the other supplies I acquired. I will say for those on the fence about buying a PC7424XP or similar, BUY ONE! I was amazed at how easy it was to use and the results that I obtained. Here was my correction process:
Wash w/ dawn
Meguiars Clay bar (blue)
Meguiars M105 w/ orange pad
Meguiars M205 w/ white pad
Meguiars Gold Class Carnauba paste wax
Here are a couple of pictures. As you can see, the paint defect is gone in this area.
Before:

After:

And here are some inside finished pics. Trust me, the car is CLEAN. Pics don't do it justice.


Wash w/ dawn
Meguiars Clay bar (blue)
Meguiars M105 w/ orange pad
Meguiars M205 w/ white pad
Meguiars Gold Class Carnauba paste wax
Here are a couple of pictures. As you can see, the paint defect is gone in this area.
Before:
After:
And here are some inside finished pics. Trust me, the car is CLEAN. Pics don't do it justice.
 06-04-2013, 09:50 AM
#52
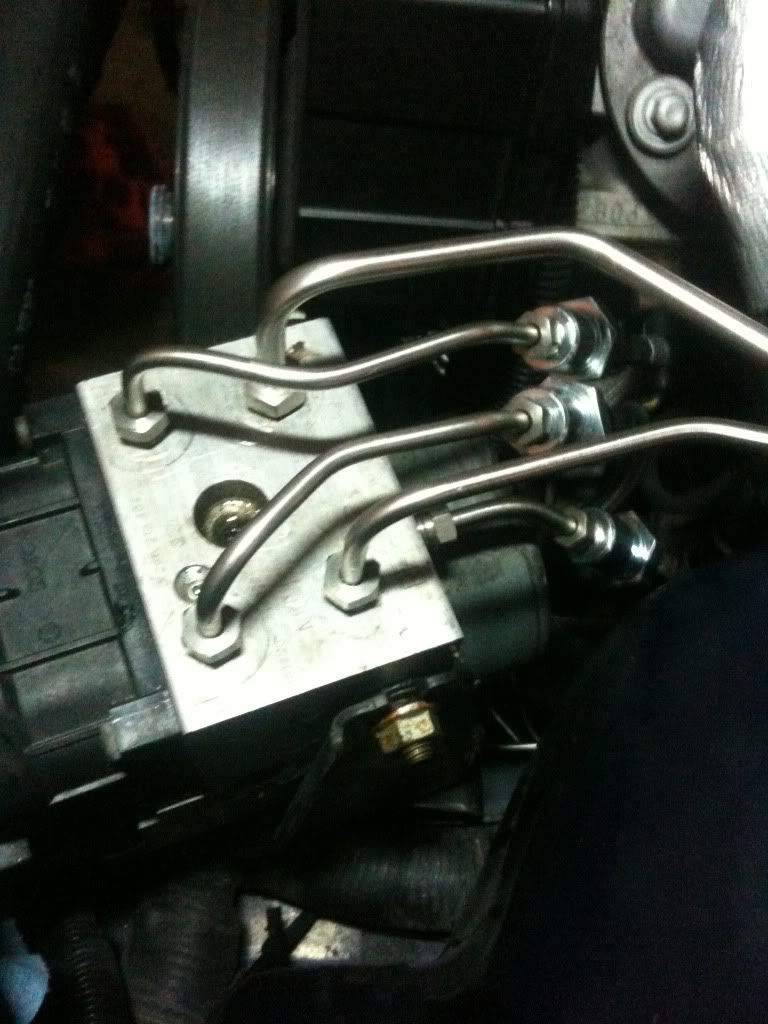
Hey guys. One of my hard brake lines burst that goes from the ABS block to the rear end area. They are extremely rusty- see the picture below.
I have a 4-channel car that I've previously removed the TCS module. The car still has ABS. Being a 4-channel car, I have two hard lines which run from the ABS block to the rear end. They then convert to rubber hoses, and then back to hard line on the rear housing. Each line, therefore, is for one of the rear calipers.
My question is, since I removed TCS, can I just install/run one hard line from the ABS block to the rear area, and 'tee' it at each point, to pick up both hard lines? I was told that the 3-channel cars only have one hard line which goes from the front to the rear. I still wish to retain ABS, and do not want to do anything that would interfere with its function.
Thanks.
06-04-2013, 12:31 PM
#53
I talked to a mechanic friend of mine. He said he was unsure of the pressures involved with the lines, that he would run two lines to be safe. I borrowed some flare wrenches off a friend, so I will pull the lines tonight and get a measurement for new tubing. I will also inventory the fittings I'll need to make it all work.

 06-06-2013, 06:04 AM
#56
Well, I pulled my brake lines last night. I plan to head to the parts store today and grab the necessary fittings and tubing to start bending tonight. I am just going to run two lines so that there is no doubt that the ABS system won't work.
I also might have to add a union near the header area. Getting those braided line portions snaked out the bottom was a real PITA. The lines are 'clean' from the heat shield forward. I will cut a line open and make sure it isn't rusted from the inside too.
We'll see what happens. Here are some pictures......


In the last picture, I took some sand paper to try and remove some rust to see where it failed. I was dirty as heck at that point, and tired, so I just went inside for the night. I'll scope it out more tonight.
I also might have to add a union near the header area. Getting those braided line portions snaked out the bottom was a real PITA. The lines are 'clean' from the heat shield forward. I will cut a line open and make sure it isn't rusted from the inside too.
We'll see what happens. Here are some pictures......
In the last picture, I took some sand paper to try and remove some rust to see where it failed. I was dirty as heck at that point, and tired, so I just went inside for the night. I'll scope it out more tonight.
 06-06-2013, 09:07 AM
#58
I would NOT put a union in, but that's just me. I mean, it's only the rear brakes.
Instead of putting in a union, I'd remove the header, possibly the ypipe as well and do it right rather than take a shortcut with putting a union in.
Instead of putting in a union, I'd remove the header, possibly the ypipe as well and do it right rather than take a shortcut with putting a union in.
Last edited by The Alchemist; 06-06-2013 at 09:22 AM.