Pics of my soon to be turbo'd LS1!


 11-15-2011, 08:05 PM
#44
TECH Fanatic
Thread Starter

Join Date: Oct 2011
Posts: 1,425
Likes: 0
Received 0 Likes
on
0 Posts
Thanks for the compliments. I hope the fittings work there. I am a little worried they are sticking out too far. That was why we tapped. I figure if they stick out too close to the balancer then I can pull them and put in a 90 or 45 instead.


 11-17-2011, 10:04 PM
#46
TECH Fanatic
Thread Starter
Join Date: Oct 2011
Posts: 1,425
Likes: 0
Received 0 Likes
on
0 Posts
Okay I need some help here. If I am going to run some type of Moroso Catch Can. Are you tapping a -4 an fitting into the back side of each valve cover and then running it to the catch can? I will probably mount mine on the firewall. I am getting ready to media blast the valve covers and paint them black. I wanted to knock this part out first. I appreciate the help.
 11-18-2011, 07:13 AM
#48
Okay I need some help here. If I am going to run some type of Moroso Catch Can. Are you tapping a -4 an fitting into the back side of each valve cover and then running it to the catch can? I will probably mount mine on the firewall. I am getting ready to media blast the valve covers and paint them black. I wanted to knock this part out first. I appreciate the help.
11-18-2011, 10:51 PM
#50
TECH Fanatic
Thread Starter
Join Date: Oct 2011
Posts: 1,425
Likes: 0
Received 0 Likes
on
0 Posts
Thanks for the input. -8 looked too big so I went with a -6. I can always put in a -8 if this doesn't work.
Today we spent just shy of 3 hours working on just valve covers. lol We cleaned them, media blasted them and then tapped them for two -6 AN fittings for our Moroso Catch Can. I figured GM knew what they were doing when they made this 5.3 so we took the grommet out for the PCV and cut out a piece of Aluminum and welded it in. I was told that we needed to let the aluminum "cool down" on its own. So while we were waiting around I got a chance to practice welding myself for the first time. I don't expect to get hired anytime soon. lol
There was already a hole up by the filler neck so we just decided to tap there. This way no chance of hitting the rocker arms. After we finished putting the fittings in, we blew them out with air really good and cleaned them really good. Tomorrow I will put a few coats of Osha Black on them. They won't look new but should look a whole lot better.
Maybe someone else could chime in but from what I understand you want the fitting on the opposite end of where most of the oil will be. On the drivers side you want the fitting in the rear and on the passenger side you want the fitting up front. Again, I am not sure of this....just what I understood. Feel free to correct if I am understanding this incorrectly.
11-19-2011, 10:53 PM
#51
TECH Fanatic
Thread Starter
Join Date: Oct 2011
Posts: 1,425
Likes: 0
Received 0 Likes
on
0 Posts
Spent most of the day cleaning up the engine compartment and painting the valve covers. The engine compartment was fine and really didn't need anything but it was almost too "pretty" if you know what I mean. It really didn't match the exterior of the car. I really like the theme of "You don't make love to this car....You **** it! lol So I attempted my first time doing anytype of body work. The inner fenders had dimples and I wanted to fill them and smooth them. I used way too much bondo and had to grind it all off and start over. It turned out good but not perfect which is just the way I like it. I also like the engine bay black instead of the color of my car. My entire engine will be silver and black and look more like a street car instead of a show car.
My 7 year old son Jake helped me today. He took off the hood hinges and said he was done. lol The other stuff was boring to him. I should be dropping the engine in 1 week from tomorrow.


My 7 year old son Jake helped me today. He took off the hood hinges and said he was done. lol The other stuff was boring to him. I should be dropping the engine in 1 week from tomorrow.
11-29-2011, 10:54 AM
#52
TECH Fanatic
Thread Starter
Join Date: Oct 2011
Posts: 1,425
Likes: 0
Received 0 Likes
on
0 Posts
Yesterday I was able to mount up the Car Shop adapter plates. These were very inexpensive and move the engine back about an inch. I am using my original 307 frame mounts and my Moroso Tall BBC engine mounts. This raised the engine about an inch and looks as though my oil pan is only going to sit about an inch below the cross member. I am going to pull the engine and make some 1/2" steel plates to sit the frame mounts on. This will make it so the H3 oil pan will only sit down a half inch. That is where my Moroso pan pretty much sat. My front end sits about 2" higher with the small block in the car so that will also help.
Here is a picture of the Car Shop Adapter plates and the Moroso Tall Engine Mounts

Moroso Tall Engine Mounts

-10 Oil Drain Fittings. They do fit and allow you to just slightly angle them at an upward slope without touching the balancer.

Here is a picture of the engine sitting in the engine bay. I just wanted to see how it fits. Pretty much went right in. I will have to modify the bolt holes slightly in the frame mounts. I will pull the engine tonight and bolt up the transmission and put it back in.

Here is a picture of the Car Shop Adapter plates and the Moroso Tall Engine Mounts
Moroso Tall Engine Mounts
-10 Oil Drain Fittings. They do fit and allow you to just slightly angle them at an upward slope without touching the balancer.
Here is a picture of the engine sitting in the engine bay. I just wanted to see how it fits. Pretty much went right in. I will have to modify the bolt holes slightly in the frame mounts. I will pull the engine tonight and bolt up the transmission and put it back in.
11-29-2011, 09:43 PM
#53
TECH Fanatic
Thread Starter
Join Date: Oct 2011
Posts: 1,425
Likes: 0
Received 0 Likes
on
0 Posts
Didn't get a lot done today but some of the tedious stuff. I sure hope this stuff helps someone in the future. It is a pain to stop and keep taking pictures and then trying to remember where the hell I was. lol
Today's goal was to mate an everyday TH400 to the new 5.3.
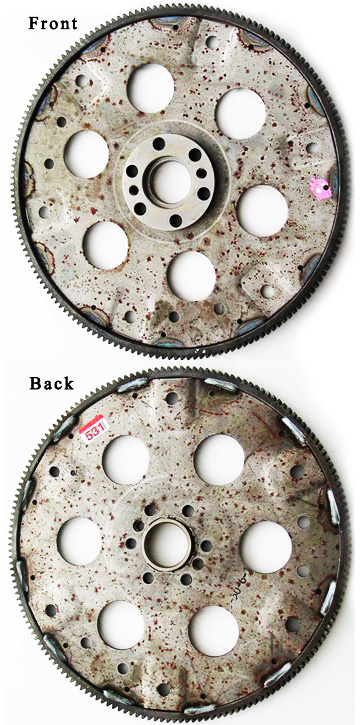
1. If you plan on using your "older style" convertor you will need to set the convertor up against the flywheel and take a sharpie and color in the areas that will need to be removed. They do sale different flywheels so you don't need to do this, but if your on a budget, like me, this is how it needs to be done.

Next I took this little tool and removed the areas that I needed to use my same convertor. I did a little at a time to make sure the bolts fit nice and snug and would slip in without issue. I didn't want it to wobble. Probably spent more time than needed on this but it was FREE!

Here is the spacer that I found for $15. This is a must if you are using the LS1 Flywheel and an older style trans and convertor. The fit wasn't as snug as I would like and I didn't want "rattling" with the engine running, so I put a thin bead of silicone around the spacer. It made a much more snug fit.

Here is a shot of the convertor matched up to the spacer. Keep in mind that this is BEFORE I tightened down the torque convertor. Once it was tightened down there is maybe a 16th of an inch gap. NOTE: The convertor bolts were a little long and would have got caught up. I used two medium thick washers to shorten them and a locking nut. Turned the engine over and it isn't catching. Must be pretty close though.

Here is the finished project. I was going to go ahead and try and put it in tonight but the kids were wanting me to come in the house. I will try and get out there tomorrow some time and see if I can't get the engine in and the trans cross member and drive shaft hooked up. I am hopeful the drive shaft will work. I just spent $400 on it right before the engine blew.

Today's goal was to mate an everyday TH400 to the new 5.3.
1. If you plan on using your "older style" convertor you will need to set the convertor up against the flywheel and take a sharpie and color in the areas that will need to be removed. They do sale different flywheels so you don't need to do this, but if your on a budget, like me, this is how it needs to be done.
Next I took this little tool and removed the areas that I needed to use my same convertor. I did a little at a time to make sure the bolts fit nice and snug and would slip in without issue. I didn't want it to wobble. Probably spent more time than needed on this but it was FREE!
Here is the spacer that I found for $15. This is a must if you are using the LS1 Flywheel and an older style trans and convertor. The fit wasn't as snug as I would like and I didn't want "rattling" with the engine running, so I put a thin bead of silicone around the spacer. It made a much more snug fit.
Here is a shot of the convertor matched up to the spacer. Keep in mind that this is BEFORE I tightened down the torque convertor. Once it was tightened down there is maybe a 16th of an inch gap. NOTE: The convertor bolts were a little long and would have got caught up. I used two medium thick washers to shorten them and a locking nut. Turned the engine over and it isn't catching. Must be pretty close though.
Here is the finished project. I was going to go ahead and try and put it in tonight but the kids were wanting me to come in the house. I will try and get out there tomorrow some time and see if I can't get the engine in and the trans cross member and drive shaft hooked up. I am hopeful the drive shaft will work. I just spent $400 on it right before the engine blew.
11-30-2011, 06:30 AM
#55
TECH Fanatic
Thread Starter
Join Date: Oct 2011
Posts: 1,425
Likes: 0
Received 0 Likes
on
0 Posts
11-30-2011, 12:25 PM
#57
TECH Fanatic
Thread Starter
Join Date: Oct 2011
Posts: 1,425
Likes: 0
Received 0 Likes
on
0 Posts
I figured out what was stopping the throttle body from sitting flush. It looks like a stop of some sort to not let the throttle blades open too far. I think I can just take it off. Anyways.....
Did a couple things today. First, I was able to find a place just above the starter area where I could put the convertor bolts in the other direction. I went and purchased a little shorter grade 8 bolt and tight fitting washer. I then used Red loctite on the nuts. Clearance is no longer a problem. It was a pain to redo them but I feel a ton better knowing that clearance won't be an issue.
My cousin Jeff who works as a Lexus mechanic fabricated me an adapter so I could move my alternator to the passenger side. It doesn't sit as high and I am not using the AC or the power steering. We cut the bracket so we could put a idler pulley on it. It looks ugly right now but we will clean it up. If it works out I am sure he will sale the brackets.


Here is a picture of the new bracket that moves the alternator to the passenger side and allows me NOT to use the a/c or pwr steering.

Did a couple things today. First, I was able to find a place just above the starter area where I could put the convertor bolts in the other direction. I went and purchased a little shorter grade 8 bolt and tight fitting washer. I then used Red loctite on the nuts. Clearance is no longer a problem. It was a pain to redo them but I feel a ton better knowing that clearance won't be an issue.
My cousin Jeff who works as a Lexus mechanic fabricated me an adapter so I could move my alternator to the passenger side. It doesn't sit as high and I am not using the AC or the power steering. We cut the bracket so we could put a idler pulley on it. It looks ugly right now but we will clean it up. If it works out I am sure he will sale the brackets.
Here is a picture of the new bracket that moves the alternator to the passenger side and allows me NOT to use the a/c or pwr steering.
12-01-2011, 06:28 PM
#58
TECH Fanatic
Thread Starter
Join Date: Oct 2011
Posts: 1,425
Likes: 0
Received 0 Likes
on
0 Posts
Okay, I got the drive shaft bolted up, the starter on and mock up started. Here are some pictures. I used a swimming noodle to simulate the routing of the down pipe. It looks like I will be able to route both down pipes on each side in a very similiar fashion. Over the headers and down behind the block. I don't know if 3" down pipe will fit or not. I still need to find out how much I would lose if I just used 2.5 " down pipe and ran it all the way out the back. I have the turbos pointed slightly down and forward towards the headlight. I need to find out if this is okay. I am not sure if the turbos have to be parallel to the deck or if they can tip forward slightly.

This goes where the oil feed is just above the oil filter. I decided to use this instead of trying to tap the cap. The cap looks very thin. I will feed the turbos from this with a -4an.

This goes where the oil feed is just above the oil filter. I decided to use this instead of trying to tap the cap. The cap looks very thin. I will feed the turbos from this with a -4an.
12-01-2011, 08:23 PM
#59
Launching!
Join Date: Feb 2010
Posts: 237
Likes: 0
Received 0 Likes
on
0 Posts

Just a idea, But you could use a flex plate that came in the 2500 trucks with 6 liter with 4l80. You have a 300mm flex plate thats why u need the pilot adapter. The flex plate im talking about looks like a sbc 1 with a spacer that goes between the flex plate and crank flange. That way you would be able to get rid of the pilot adapter and loose the washers plus the converter will bolt up with no reaming....My cam only Ls1 had the same flex plate as you have in the pics and they are junk. Mines 400wrhp if its lucky lol and it cracked on the ring gear rite by the bolt holes. in 3 spots. I will try and find a pic of 1.
Thats the most evil and sinister chevelle i have ever seen...Very nice car
Thats the most evil and sinister chevelle i have ever seen...Very nice car