
Snowball of a build - Turbo LSx Rx7
 01-14-2014, 09:59 AM
#21
Launching!
Thread Starter
iTrader: (5)

Join Date: Aug 2012
Location: IA
Posts: 255
Likes: 0
Received 0 Likes
on
0 Posts
The two main differences are the solid plate you have at the rear of the diff along with how the front mounts. Either way, they definately tried to duplicate what you had done.
 01-14-2014, 10:00 AM
#22
TECH Senior Member
iTrader: (7)

That was the first thing i noticed about yours. How the front was mounted. I will get some differnet pics of mine to see more clearly how thigns are done. When it comes time i may have to modify mine off of your pics. A little bit more strength never hurt anything. So far it has not shown up as an issue though - which i am very pleased with. However i wsa not putting down as much power either. I did find that the axle was a weak point since i did snap one of those.
The Ford inners are strong. I am assuming you had a custom 300m bar and were using the stock FC outer CV. I bet you broke the outer CV�LOL
I sent off my stock FC hubs to Frank at DSS and they broached it for a bigger CV. He then made me axles that used one of his giant Honda outer CVs combined with a 300m bar and stock Cobra inner CVs.
Here is the outer CV:

Andrew
01-14-2014, 10:24 AM
#24
Launching!
Thread Starter
iTrader: (5)
Join Date: Aug 2012
Location: IA
Posts: 255
Likes: 0
Received 0 Likes
on
0 Posts
I have no clue what axles i had in the car. They came out of the same white car that the rear did. It was ford inners obviously but the car used NA FC outters NOT turbo II outers. I eneded up going to the DSS and they sent me the bars for their conversion. I then had to buy TII axles to use the outters off of. It was a mess to get everythign lined up and figured out.
Here are the pics of the old axle that i broke. You can see it broke on the left of the first pic:

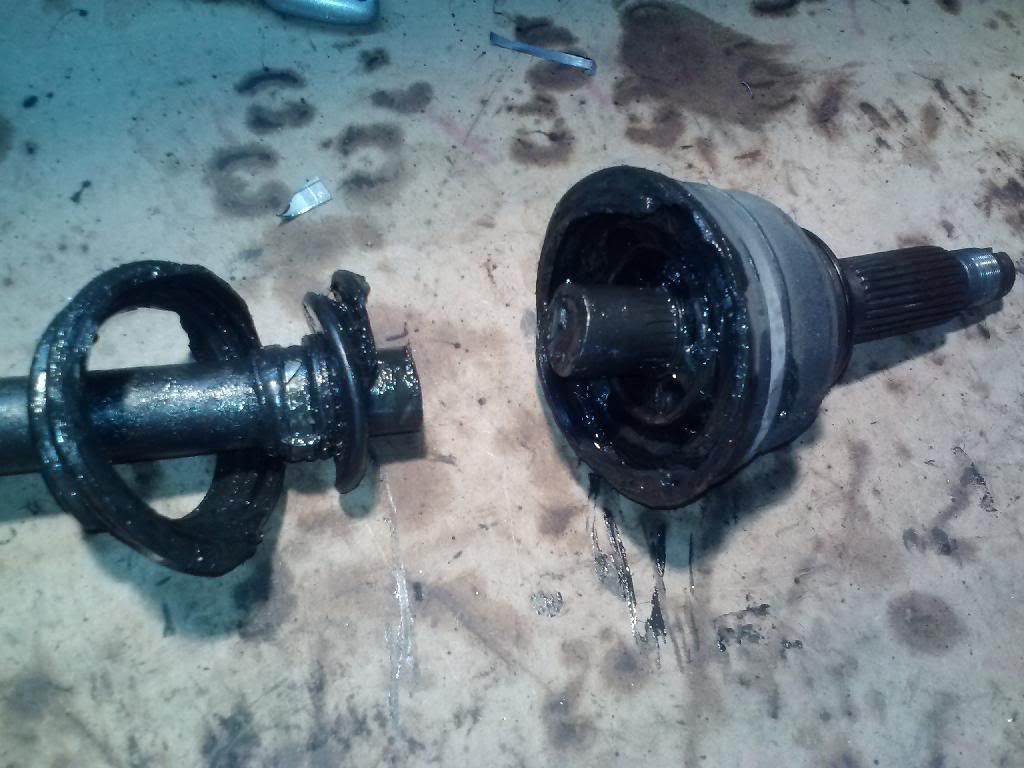
Here are the pics of the old axle that i broke. You can see it broke on the left of the first pic:

 01-15-2014, 12:28 PM
#25
 01-16-2014, 06:25 PM
#26
Launching!
Thread Starter
iTrader: (5)
Join Date: Aug 2012
Location: IA
Posts: 255
Likes: 0
Received 0 Likes
on
0 Posts
well i finnished the welding and modifying of the downpipe today. The welds dont look the greatest but with it being wrapped i am not to worried about it. I now have it the correct length and flanged once out of the bay. I still need to paint and wrap it.
The hippo is for dramatic effect:
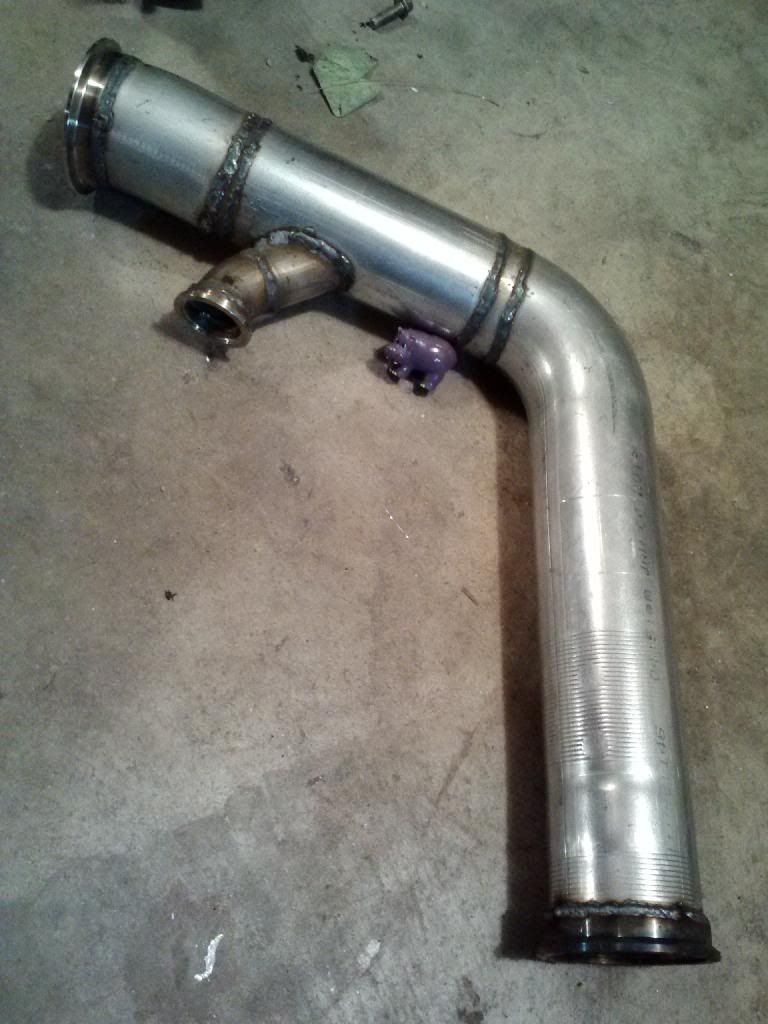
The hippo is for dramatic effect:


 01-17-2014, 07:01 PM
#29

I love these cars! I have an 89 GTU ive been toying with when i have time.... I just Finished rebuilding the ls1 and getting the t56/monster stage 3 in it, have 300 miles on it so far just afraid my rearend isnt gonna last long! HAHAHAHAHA
When i get the 8.8 swap done (hopefully soon lol) ill be installing a turbo also
Subscribed
When i get the 8.8 swap done (hopefully soon lol) ill be installing a turbo also
Subscribed
01-18-2014, 07:48 AM
#30
Launching!
Thread Starter
iTrader: (5)
Join Date: Aug 2012
Location: IA
Posts: 255
Likes: 0
Received 0 Likes
on
0 Posts
I love these cars! I have an 89 GTU ive been toying with when i have time.... I just Finished rebuilding the ls1 and getting the t56/monster stage 3 in it, have 300 miles on it so far just afraid my rearend isnt gonna last long! HAHAHAHAHA
When i get the 8.8 swap done (hopefully soon lol) ill be installing a turbo also
Subscribed
When i get the 8.8 swap done (hopefully soon lol) ill be installing a turbo also
Subscribed
 01-20-2014, 09:34 AM
#32
Launching!
Thread Starter
iTrader: (5)
Join Date: Aug 2012
Location: IA
Posts: 255
Likes: 0
Received 0 Likes
on
0 Posts
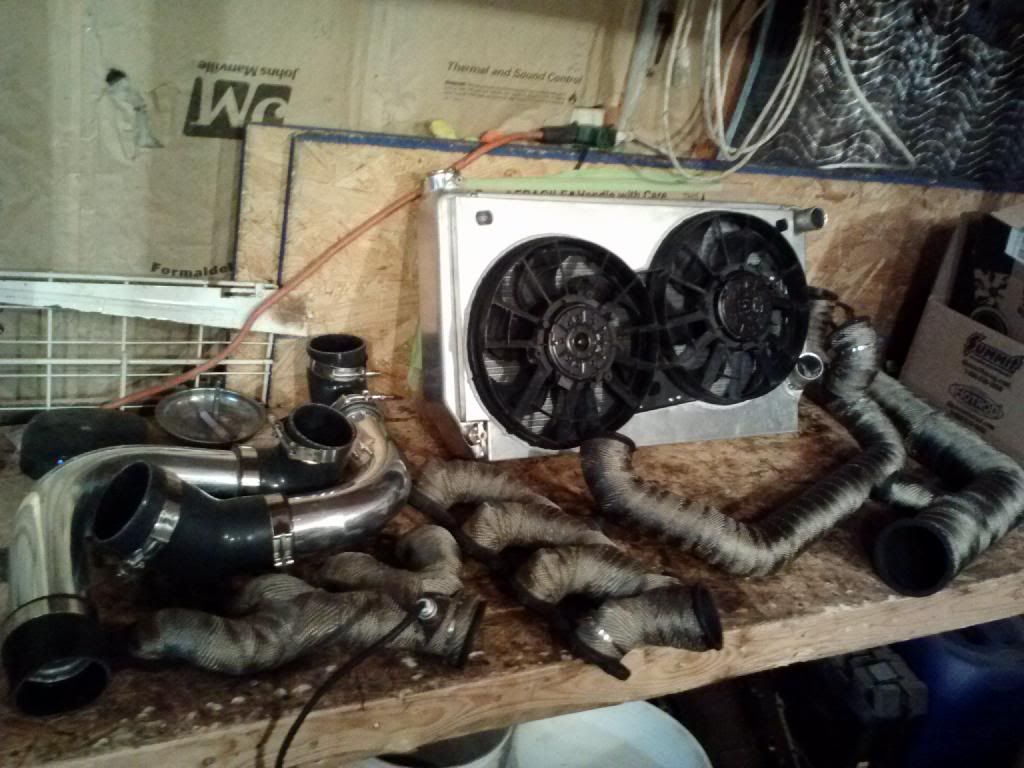
Not much notable progress has been made. I pulled all the hotside piping off the car so i could clean up the manifolds, paint them, then wrap them. Hopefully i can get it all wrapped tonight. I also ordered some sleeves for some wiring that is close to my hot side. It should be here in a day or two then i can get it installed on all of my wiring that is clsoe to the hot pipes. I will be glad when i can install the kit for the last time and dont have to keep taking it on and off the car.
01-24-2014, 05:46 PM
#33
Launching!
Thread Starter
iTrader: (5)
Join Date: Aug 2012
Location: IA
Posts: 255
Likes: 0
Received 0 Likes
on
0 Posts
Well the hot side is FINALLY complete. All parts are wrapped up and ready to go on.
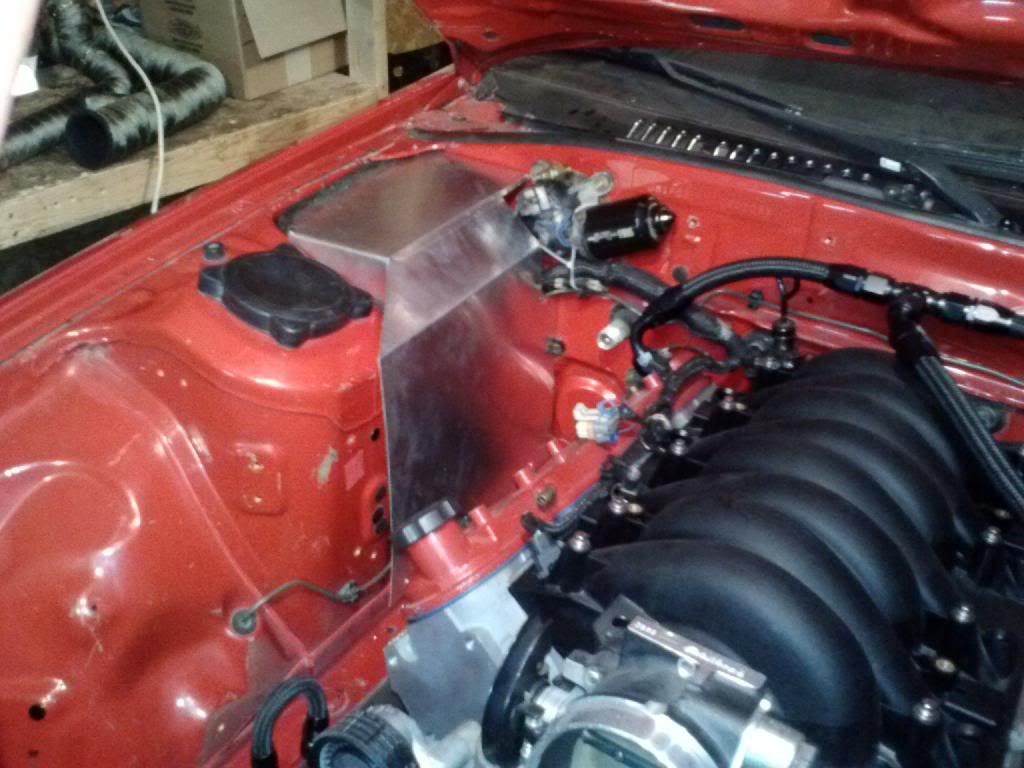
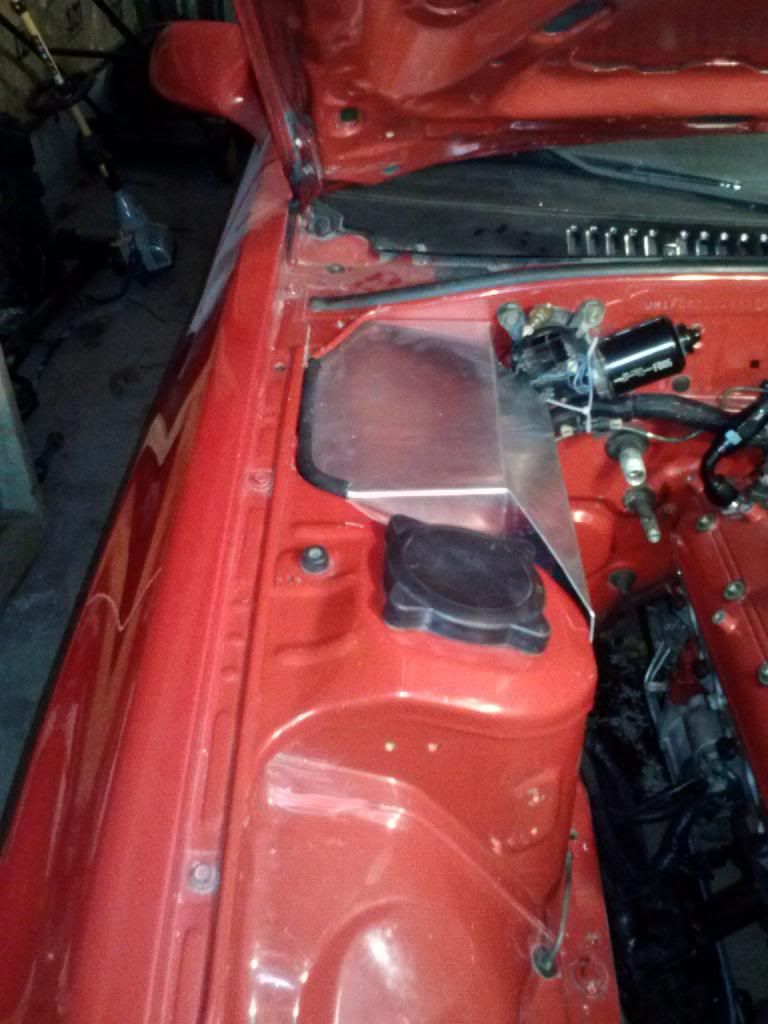
However my mind is still on heat control and keeping things from getting to hot. My first task was to build a heat shield since the downpipe runs so close to the computer:
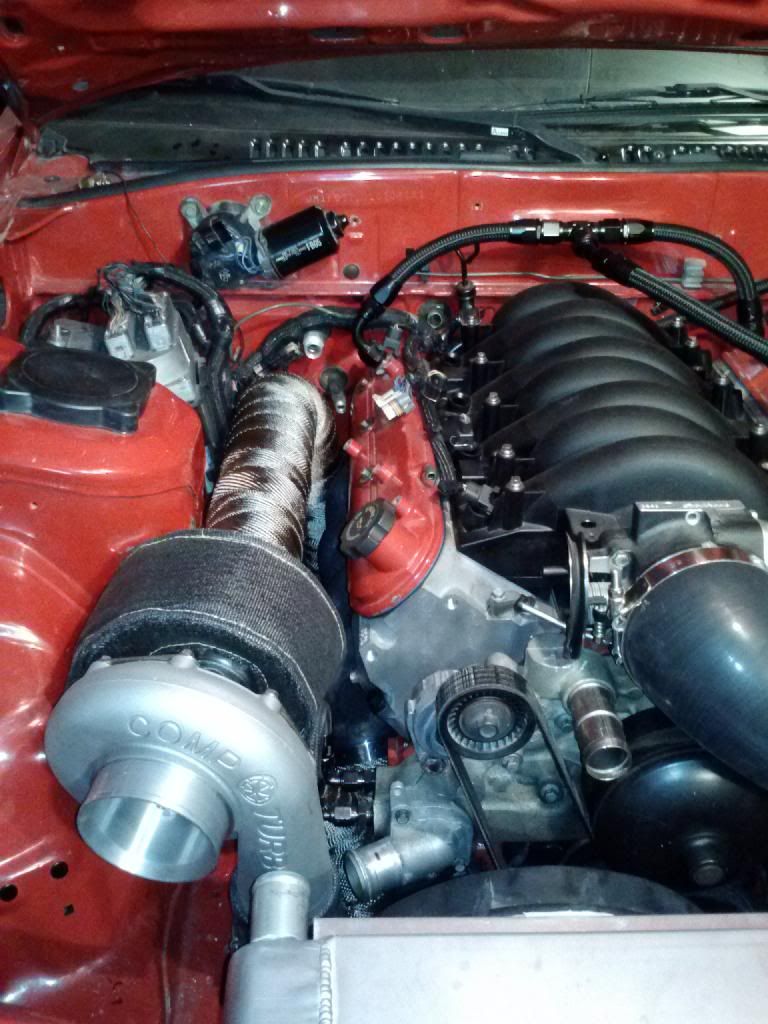
So, i fabbed up an aluminum heat shield. This is is put into place. I still need to get some edging to trim the piece out to make it look a little more clean. However, i think it turned out decent, will do its job, and make the bay look alot more clean.


 01-24-2014, 07:01 PM
#36
Launching!
Thread Starter
iTrader: (5)
Join Date: Aug 2012
Location: IA
Posts: 255
Likes: 0
Received 0 Likes
on
0 Posts
I sprayed it all down with the VHT header paint before i wrapped it. I hoped it would help keep it from rusting or anything of the like. The wrap itself is DEI Titanium wrap. The original plan was to coat it again with the clear VHT paint to help protect it from the elements. However after i did a test peice it made it look really dull, dirty, and horrible. Thus, i decided to not clear over the titanium wrap.
01-24-2014, 08:06 PM
#37
Launching!
iTrader: (3)
Join Date: Oct 2011
Location: Bay View, WI
Posts: 275
Likes: 0
Received 0 Likes
on
0 Posts

yeah mine is not cleared and has held up fine (but mine doesnt see rain or snow ever) I sprayed VHT on the merge also and it will help...I hope you did it by the directions...ask me what happens if you don't
I also suggest, if I may, that you double up on the metal tie-bands to keep things nice and secure because after a few heat cycles and road action I have seen them come apart...just a little fyi in case you didn't know...things are looking good so far!
I also suggest, if I may, that you double up on the metal tie-bands to keep things nice and secure because after a few heat cycles and road action I have seen them come apart...just a little fyi in case you didn't know...things are looking good so far!
 01-26-2014, 10:57 AM
#39
Launching!
Thread Starter
iTrader: (5)
Join Date: Aug 2012
Location: IA
Posts: 255
Likes: 0
Received 0 Likes
on
0 Posts
yeah mine is not cleared and has held up fine (but mine doesnt see rain or snow ever) I sprayed VHT on the merge also and it will help...I hope you did it by the directions...ask me what happens if you don't
I also suggest, if I may, that you double up on the metal tie-bands to keep things nice and secure because after a few heat cycles and road action I have seen them come apart...just a little fyi in case you didn't know...things are looking good so far!
I also suggest, if I may, that you double up on the metal tie-bands to keep things nice and secure because after a few heat cycles and road action I have seen them come apart...just a little fyi in case you didn't know...things are looking good so far!
Thanks for the tips. Howeverm most of the pieces are to large to bake, So i will have to do the warm up and cool down instructions that it lists on the can. Just out of curiousity, what issues did you have when you didnt bake it?
I finished heat wrapping my trans cooler lines and put heat sleeves overmy main power line and line coming off the ALT. Then i started installing the hot side for the final time. I cant install the WG or the turbo untill i get the heat shield mounted in there properly. I also need to pickup my Innovative MSBC1 from a friend tonight and get everything ran and plumbed from it. I must say it looks alot better now that everything is wrapped.


On a side note, the Girlfriend got her motor dropped in today while i was working on mine. She set it in to measure up for mounts and a few other things. But my oh my does that thing look like5 its at home in that car.

Last edited by Phish806; 01-26-2014 at 11:04 AM.
01-28-2014, 07:41 PM
#40
Launching!
iTrader: (3)
Join Date: Oct 2011
Location: Bay View, WI
Posts: 275
Likes: 0
Received 0 Likes
on
0 Posts
This was a few years ago on a different setup but that stuff will flake off and look fugly in no time if you don't do it correctly...and cleaning it all off without a sandblaster or wire wheel handy is not fun!
and that lady of yours is a keeper...LSRX8!!!
