


My build - Lots of pics
Thanks, Chris
9 Second Club


Joined: Oct 2006
Posts: 1,192
Likes: 243
From: IL
Another weekend (actually 2) has come and gone, and here is what we have gotten done! Last weekend we were heavy on work and short on time. So short in fact, that it looked like we wouldn't get ANYTHING done at all. Lucky for us, we are a little better that that! After figuring out a game plan for the rear hood pins, Chris got cracking on cutting up the hood. Since that is a one man job, I got busy in the back of the car on the battery box and the shutoff. Not that it was a big project, but it needed to get done. I had to leave so quickly that I actually didn't get any pictures, that is the first time that has ever happened!
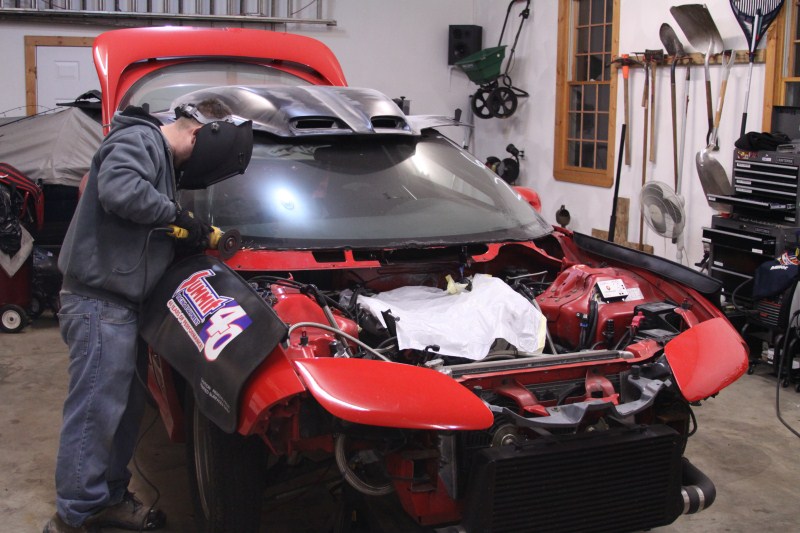
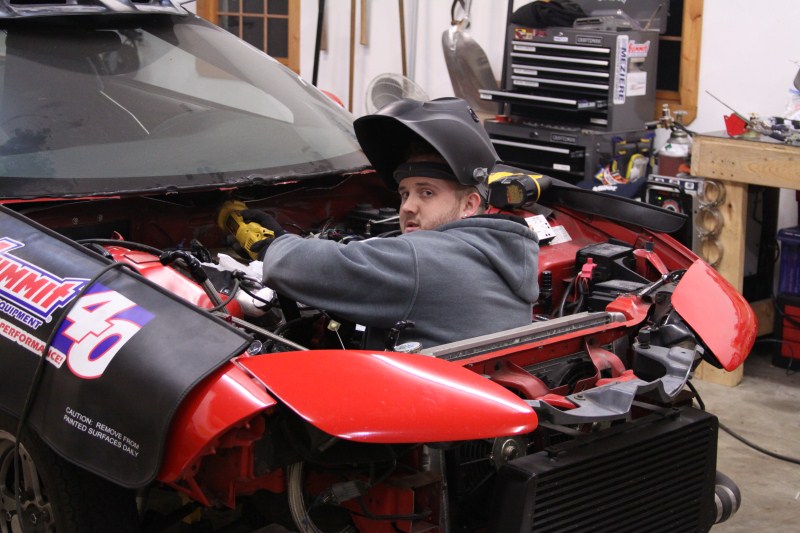
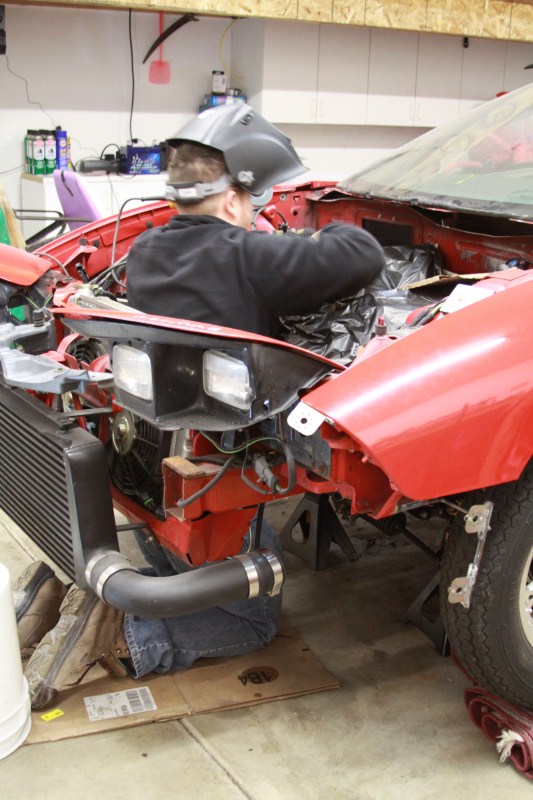
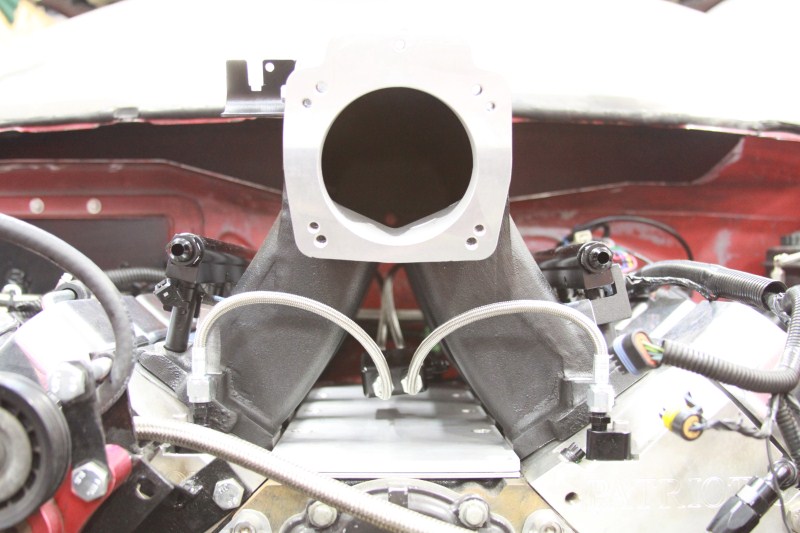
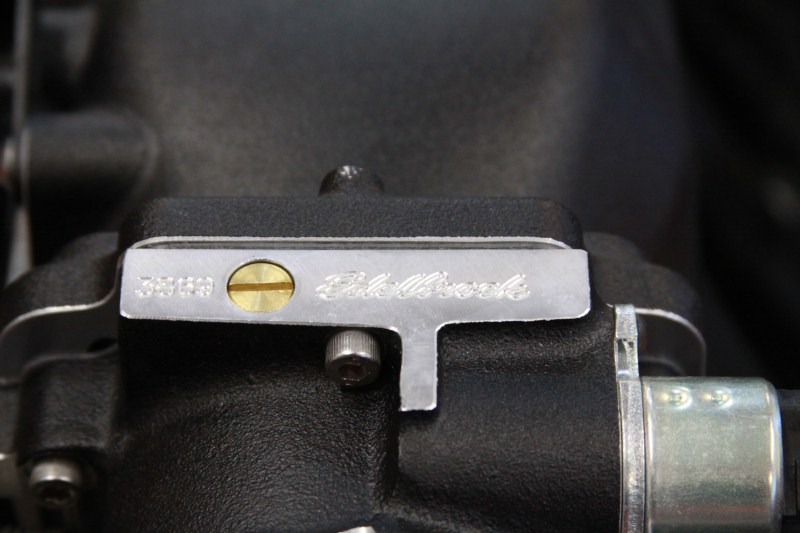
This weekend we had more time, and really got after it! We kicked it off with the new, monstrous Edelbrock Pro-Flo XT manifold with the matching 90mm throttle body. After drooling over it for a while Chris jumped on getting it on the car. He quickly pulled off the LS6 intake and the coil packs. As you know we already notched the center of the cowl for the coil packs last year. We assumed that was enough room, but the lower part needed to be trimmed more. Chris was determined and decided to cut it all out while he was at it. This is no easy tack with the motor in the car.
Started on the easy part
And then dug in for the harder areas
And now it fits!

Once he finally saw it on the car, he could move on to other things. Anyone who has been diligently following along will remember that we had a problem with cam sensors. One of the things that we need to check was the cam gear to make sure it was not loose at all. So Chris pulled the crank pulley, the front cover, and checked it all. There were no problems, so he buttoned it all back up and was done for the night. No pictures of that because I was busy, and because its boring work
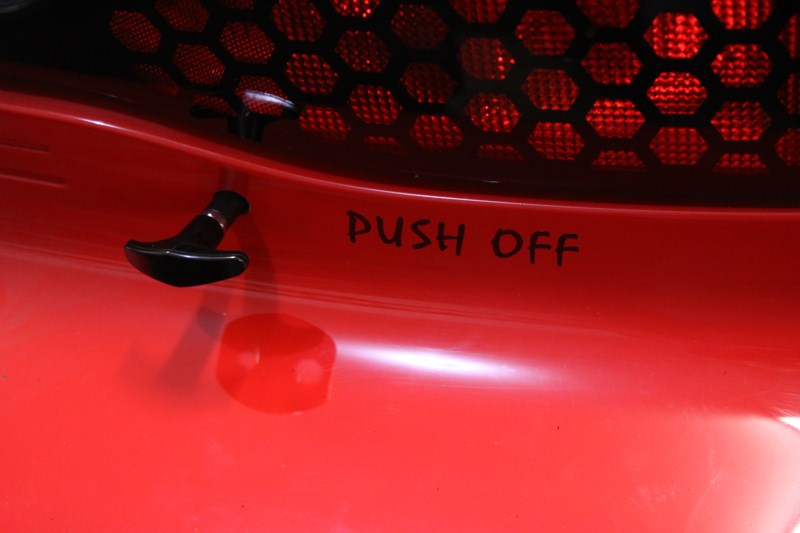
While he was doing that his girlfriend Rachel was in the back of the car lending a hand. She pulled off the WS6 emblem, and put on the "Push Off" sticker for the battery switch. She also prepped the back bumper for the CETA mod.
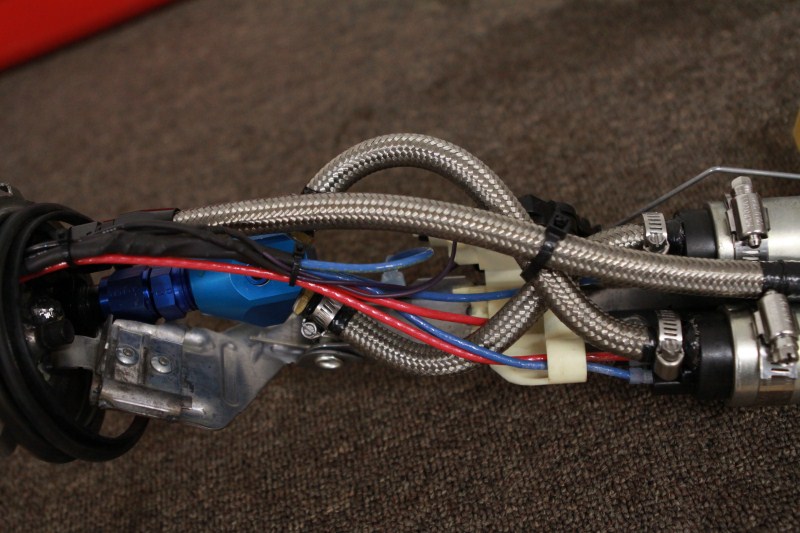
Here is the switch in the ON position. You can also see the finished lever that I cut down and powder coated.
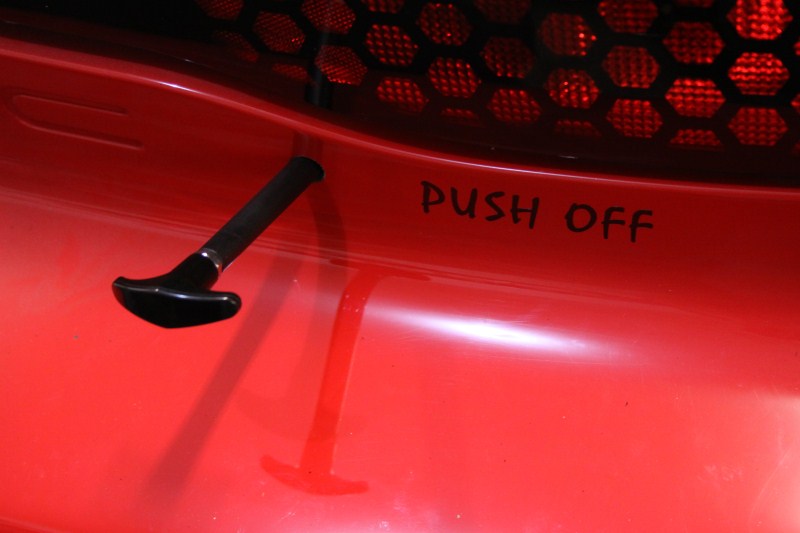
And here it is in the OFF position
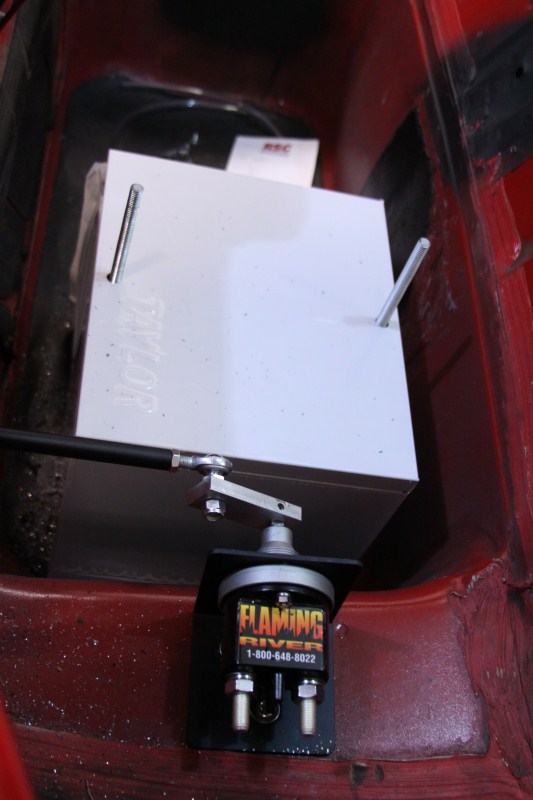
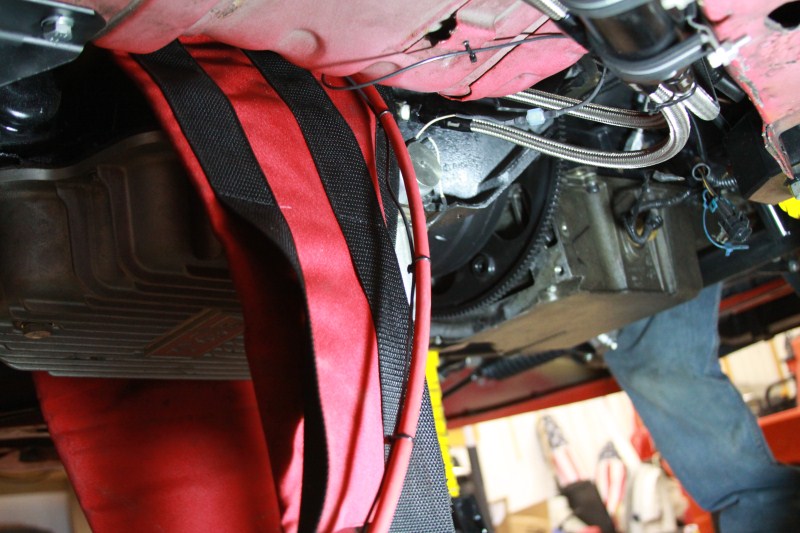
And here is the switch and the box in the very dirty hatch area.
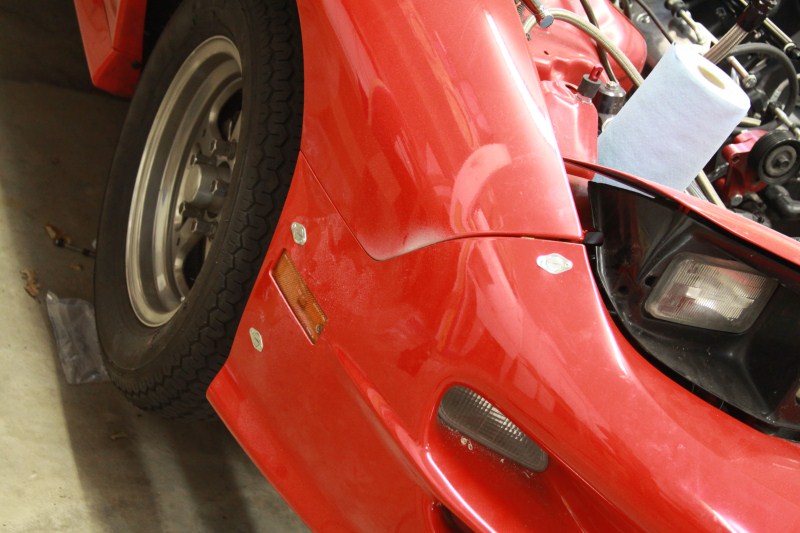
If anyone was wondering what I was doing during all of this (and all Saturday too), I was taking on a project that I have been putting off for quite a while. I'm sure you have all noticed that we rarely have the front bumper on the car. There are quite a few reasons for this, but basically its in the way a lot. We have wanted to make it quickly and easily removable for a long time now. Well this was the weekend that I jumped on it! I don't have much for pics because I was busy building and because my TIG skills are not all that great. I will get some pictures of what is behind the bumper next weekend, but for now this is all you get. Keep in mind that this is not finished yet, just the hard fab work is done. There are still a few dzus fasteners that are going to go on.
Bumper on!!!

Here are the two passenger side dzus fasteners

and the drivers side
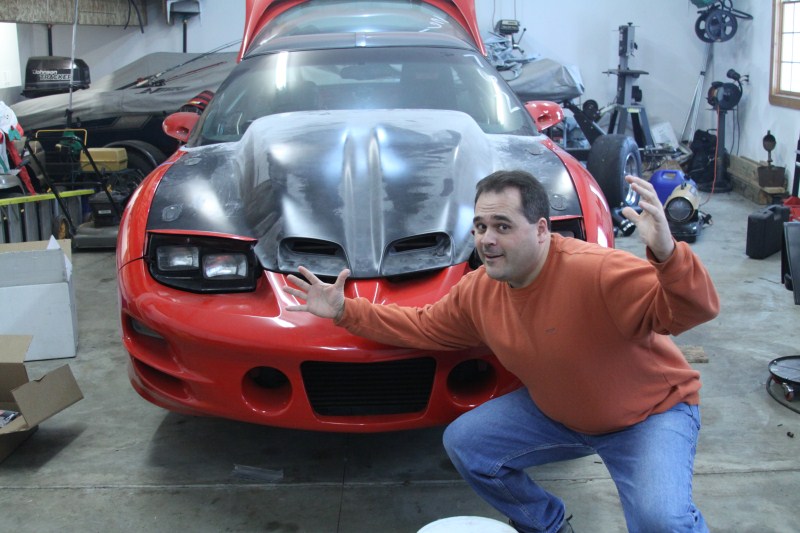
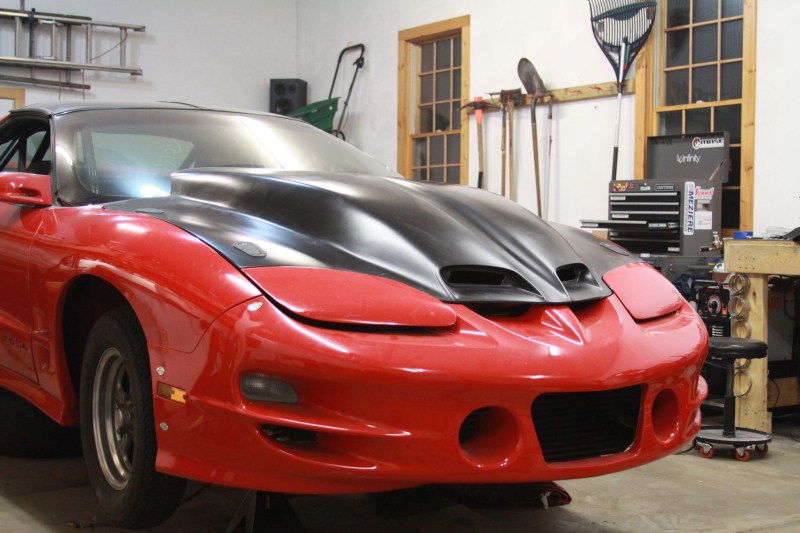
Here is the money shot (but with the headlights up). First time we have seen the hood on with the bumper!

And here is the same picture with Chris's gangsa brother striking a pose!
Well that is all for now. Next weekend I am hoping to wrap up the front end project, and get some pics of the brackets. We should have the new converter too, so we may jump on getting the trans back in the car too. Anyway, thanks for following along!
Sean
This weekend we had more time, and really got after it! We kicked it off with the new, monstrous Edelbrock Pro-Flo XT manifold with the matching 90mm throttle body. After drooling over it for a while Chris jumped on getting it on the car. He quickly pulled off the LS6 intake and the coil packs. As you know we already notched the center of the cowl for the coil packs last year. We assumed that was enough room, but the lower part needed to be trimmed more. Chris was determined and decided to cut it all out while he was at it. This is no easy tack with the motor in the car.
Started on the easy part
And then dug in for the harder areas
And now it fits!
Once he finally saw it on the car, he could move on to other things. Anyone who has been diligently following along will remember that we had a problem with cam sensors. One of the things that we need to check was the cam gear to make sure it was not loose at all. So Chris pulled the crank pulley, the front cover, and checked it all. There were no problems, so he buttoned it all back up and was done for the night. No pictures of that because I was busy, and because its boring work
While he was doing that his girlfriend Rachel was in the back of the car lending a hand. She pulled off the WS6 emblem, and put on the "Push Off" sticker for the battery switch. She also prepped the back bumper for the CETA mod.
Here is the switch in the ON position. You can also see the finished lever that I cut down and powder coated.
And here it is in the OFF position
And here is the switch and the box in the very dirty hatch area.
If anyone was wondering what I was doing during all of this (and all Saturday too), I was taking on a project that I have been putting off for quite a while. I'm sure you have all noticed that we rarely have the front bumper on the car. There are quite a few reasons for this, but basically its in the way a lot. We have wanted to make it quickly and easily removable for a long time now. Well this was the weekend that I jumped on it! I don't have much for pics because I was busy building and because my TIG skills are not all that great. I will get some pictures of what is behind the bumper next weekend, but for now this is all you get. Keep in mind that this is not finished yet, just the hard fab work is done. There are still a few dzus fasteners that are going to go on.
Bumper on!!!
Here are the two passenger side dzus fasteners
and the drivers side
Here is the money shot (but with the headlights up). First time we have seen the hood on with the bumper!
And here is the same picture with Chris's gangsa brother striking a pose!
Well that is all for now. Next weekend I am hoping to wrap up the front end project, and get some pics of the brackets. We should have the new converter too, so we may jump on getting the trans back in the car too. Anyway, thanks for following along!
Sean
9 Second Club
Joined: Oct 2006
Posts: 1,192
Likes: 243
From: IL
Another busy weekend of work on the TA has come and gone. This weekend was crazy, but we ended up getting a lot done. We started out Friday going to pick up the new converter from Midwest Converters in Rockford. It looked amazing, but the snout was not the right length. It was the standard TH400 length, but we needed it longer for the LS1 motor. It was a small mistake, but it meant we had to come back the next day after they machined out a new billet cover and put it on the converter. So after that small spot of bad news we got some supplies before heading off to work. I got to work right away finishing up the bumper mounts, so that was out of the way. I added two dzus fasteners to the top side of the bumper near the headlights. It likes to pull down from that area leaving a big gap. The only real problem I had was that the bumper is very thick in that area. The dzus fasteners are intended to go through about 1/8" fiberglass, not 1/4" thick urethane. I had to thin the back side out of the bumper, but I probably should have gone a little further.
Anyway here you can see the bracket near the driver side headlight (same on passenger side)
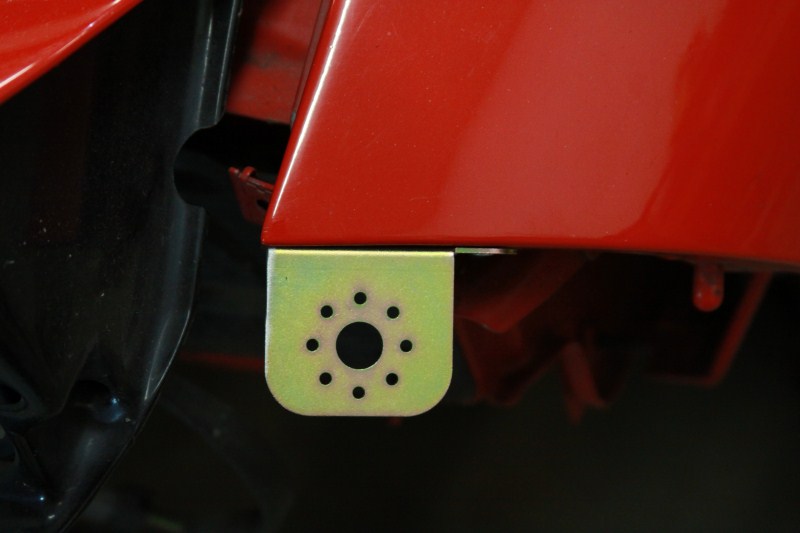
In this picture showing Chris cleaning up the cowl area (that was cut out last weekend), you can see the upper bracket, and the side bracket I made last weekend. I ended up adding a diagonal brace to the bottom corner after this pic was taken, to give it more strength.
Here is a pic of the driver side fasteners, you can see how the top one pulls the bumper in some.

And the passenger side
And the last fastener on the top. I thought about getting rid of this piece all together and making one out of molly, but it wasn't worth all of the work.
And here is an overall shot of the front end all together. This was after we finished up the rear hood pins, which I will get back too.
So now you have 7 dzus fasteners holding it all in place and thats it. One person can now take the bumper on or off in less than a minute!
While I was working on all of that Chris was having some troubles with some new billet pieces. He bought a billet valley cover plate from AEI CNC to go with the new Edelbrock intake manifold, but when he put it on he noticed that it was covering the cam position sensor. After measuring, comparing, and staring at it we figured out that the holes were drilled the wrong dimension from the front edge. We figured this out at about 9:00 at night and called the place who made the piece. Now only did he answer, he immediately went to a computer waiting for pictures showing what our problem was. Chris was on and off the phone with him for about an hour working out what the exact problem was, so that when the new piece is made on Monday it is 100% perfect. The customer service from AEI is as top notch as it gets!
While we are on the topic of cam position sensors, some of you may remember that we have had problems with them. We have checked every possible thing trying to determine why they go bad so quickly. While everything was apart Chris was able to stick his head over the hole the cam position sensor sits in to check the machining on the cam. That all checked out, as did everything else, so a new sensor will go in again and we will see what happens.
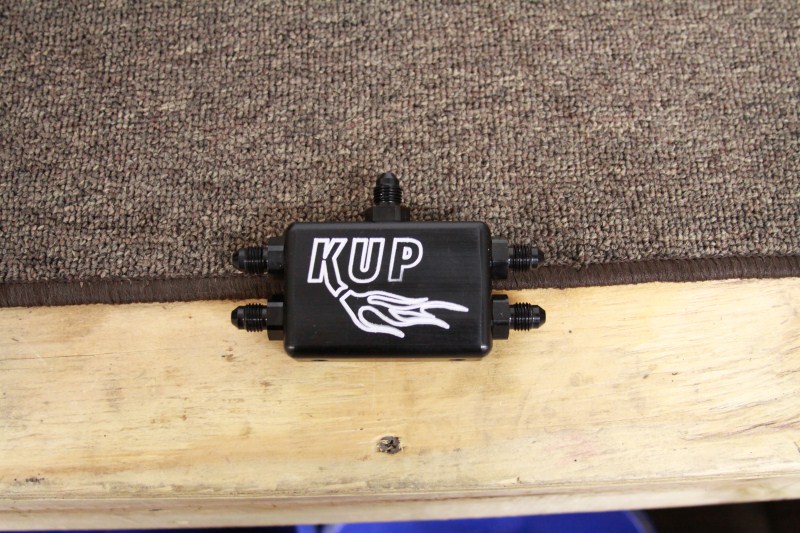
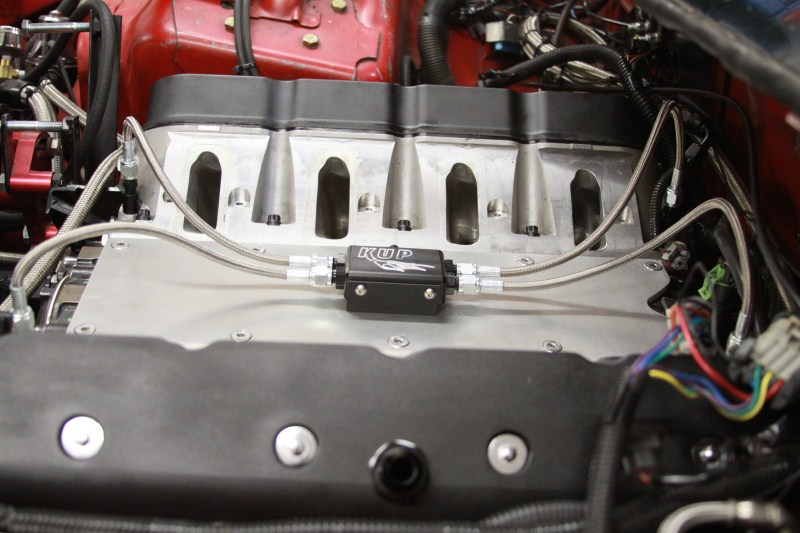
After all that was figured out, he moved on to laying out the new Kurt Urban water vapor set up. Not only does it look fantastic, it should work much better than the factory set up.
Here is a couple of pics of it
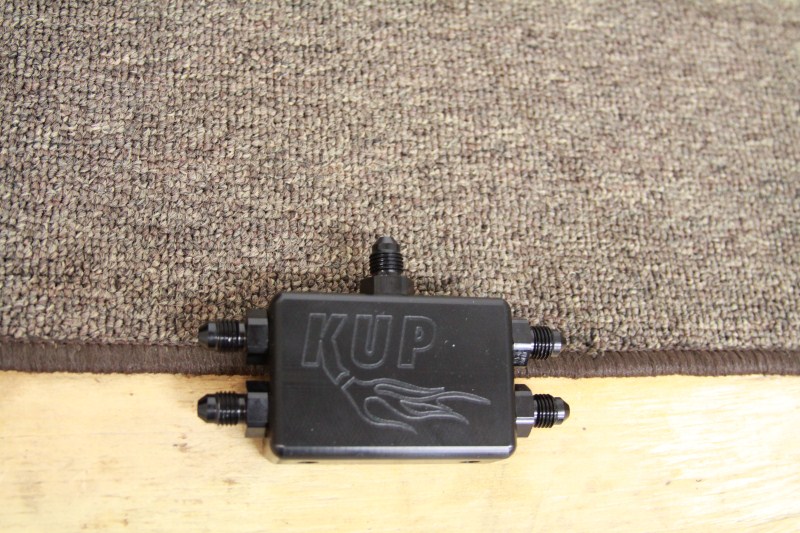
Other side
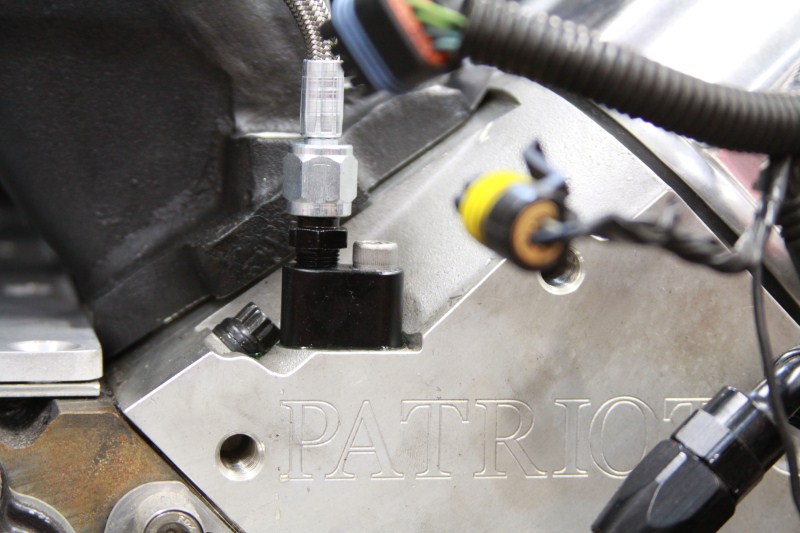
One of the block adapters
And some overall shots Chris took
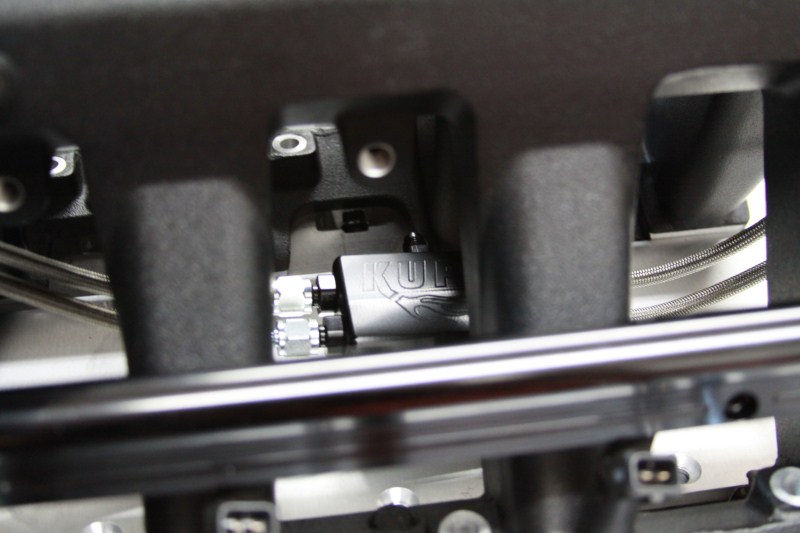
Chris also made up a mounting bracket for the block, but needs the new valley cover to install it.
Back on to the hood read quick. I had some spacers made up for the rear pins since they wouldn't reach. They are just some 2" pieces of steel drilled through and tapped so a bolt from the bottom holds them in place.
Simple yet effective. And here is the drivers rear pin all finished
Saturday!
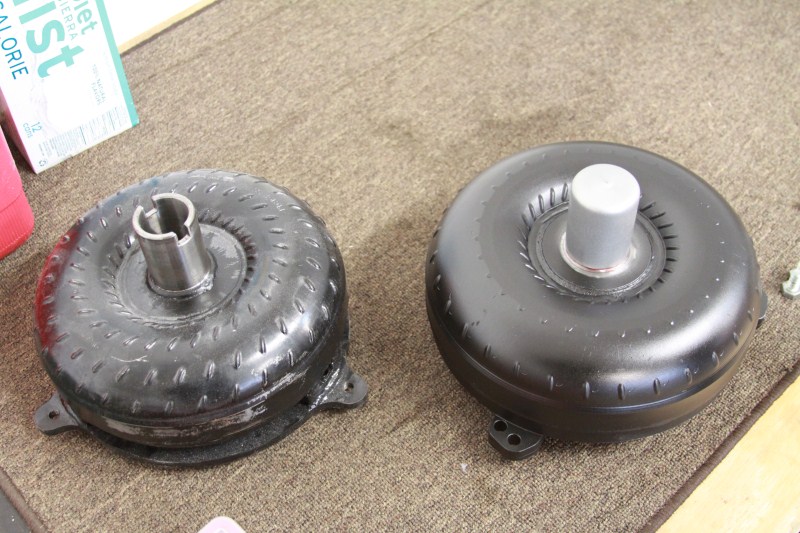
We started out Saturday morning back at Midwest converters to pick up the new new converter. What a beautiful piece it is too!! Ill just let the pictures speak for them selves.
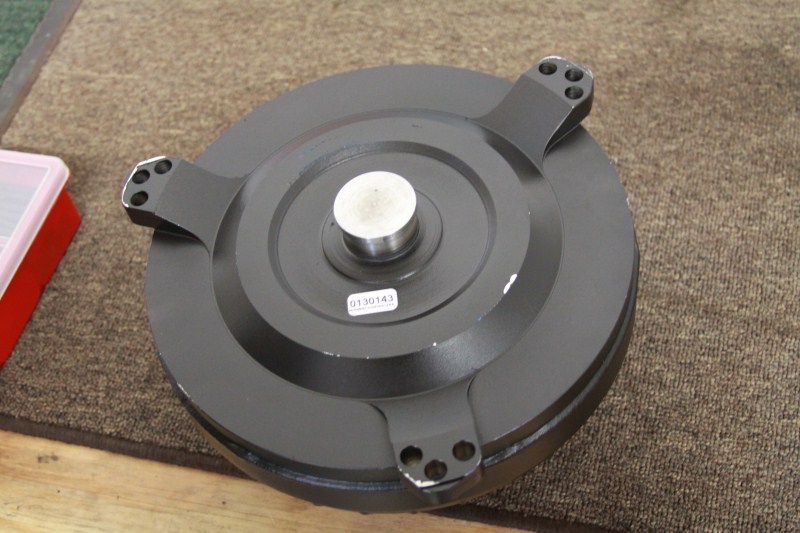
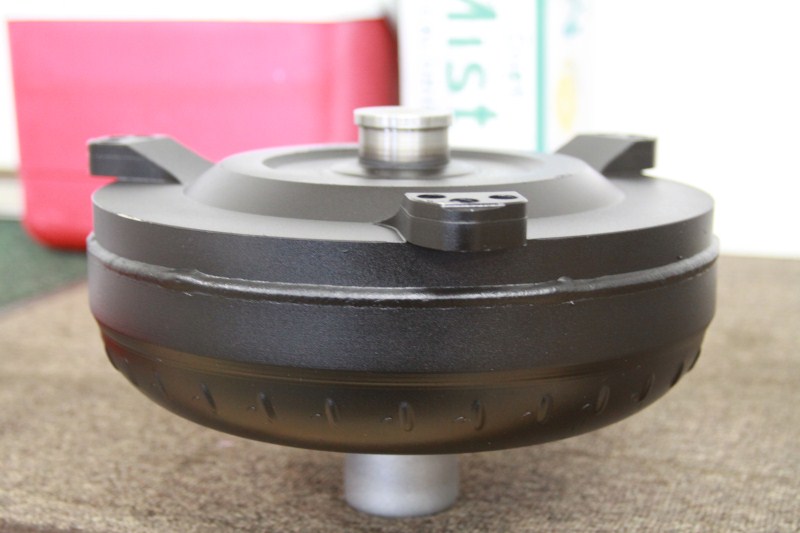
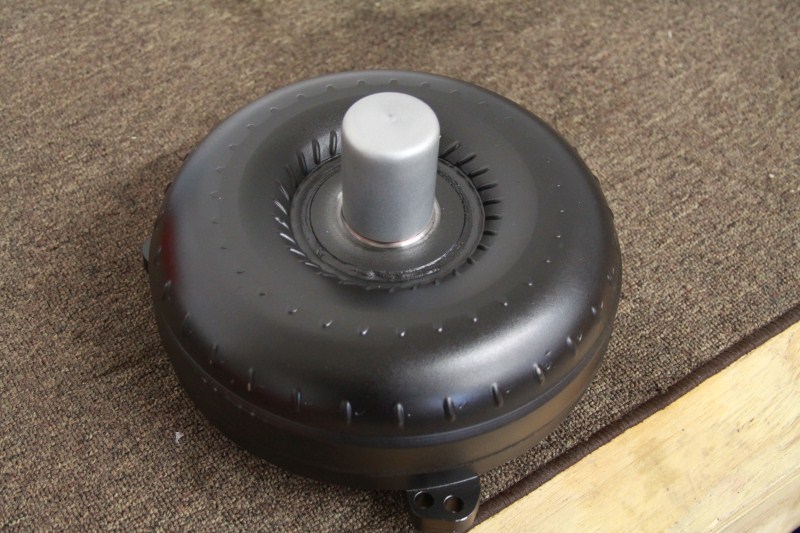
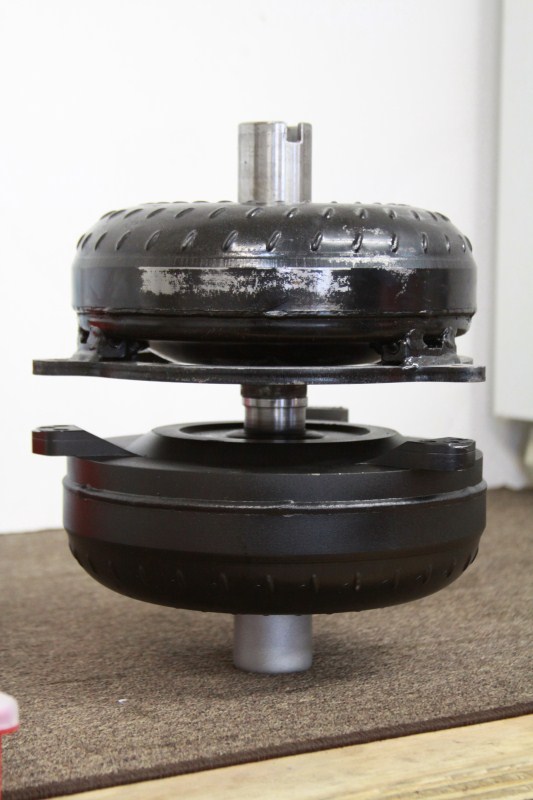
And compared to the old PTC unit that was on the car.
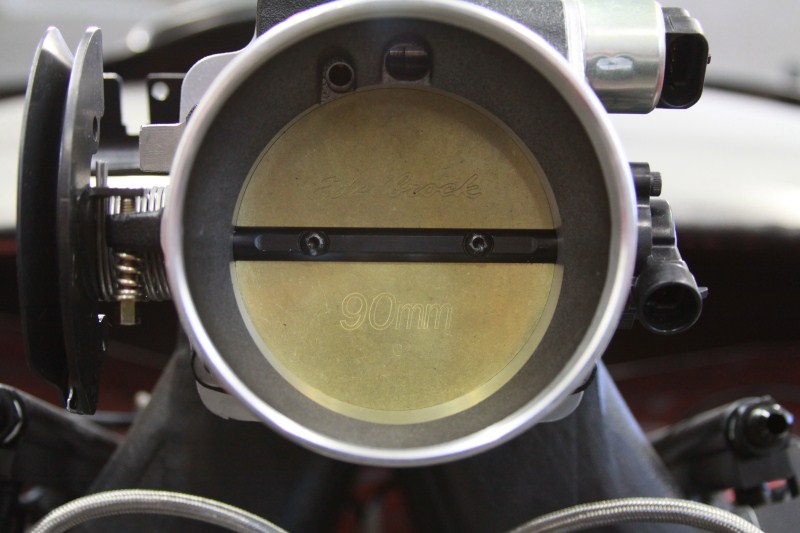
After leaving Midwest converters we stopped for supplies again, and then went back to install the converter and trans. While Chris got started on that, I figured I can get working on the upper inter cooler piping since the intake was still on the motor. So I threw the new throttle body on, and started cutting.
Here are a couple pics of the 90mm Edelbrock throttle body. This first one you can see the factory throttle cable bracket, which does not work.

Matching powder coat
Here you can see the supplied cable bracket which I will modify next week Also you can see the fuel rail mounts I had made up at work. I will get more pics of them, and the plug that was made next week.
Here is the newly modified (AGAIN) upper inter cooler pipe. I had to make up an angle by cutting it into the pipe which is not my preferred method, but I was working with what I had.
While I was working on this, Chris discovered that the converter needed different bolts than the last one. So another run back to Rockford for bolts (this was the third trip of the weekend for those counting). We got back and Chris started on trimming the trans and shield to fit. Again, while he was working on that I decided to plug the breather holes on the valve covers since we don't need them. I have only welded aluminum once before, but it went OK I guess.
Here is the result
Now they need to get cleaned up and powder coated!
And again, while I was doing that Chris figured out that the bolts that came with the trans shield would not work. So at 8:30 at night we made ANOTHER run to Rockford for bolts! We figured that 60mm long would work just fine, and of course they didn't have any that size. Chris grabbed some 50mm bolts and I told him they would be too short, and to get the 75mm ones instead. We get back to the house and figure out that the 75mm is too long, the threaded part was to long, and the non threaded shoulder was also too long. Double fail!! We then figured out that he 50mm (though not ideal) would have worked!! This trans just did not want to go in this weekend! I started digging around in the junk drawer and found a bag of brand new 55mm long M10x1.5 grade 10.8 bolts!!! SUCCESS finally That is when the battle begun! I found the bolts at around 9:30PM or so, we finished up about 2:00AM! The trans shield was such a pain in the ***, but its all in there now, and here is the proof.
Well that is all for this weekend. Next weekend should see the intake all buttoned up, the turbo back on, and possibly the car running! Thanks again for following along!
Sean
Anyway here you can see the bracket near the driver side headlight (same on passenger side)
In this picture showing Chris cleaning up the cowl area (that was cut out last weekend), you can see the upper bracket, and the side bracket I made last weekend. I ended up adding a diagonal brace to the bottom corner after this pic was taken, to give it more strength.
Here is a pic of the driver side fasteners, you can see how the top one pulls the bumper in some.
And the passenger side
And the last fastener on the top. I thought about getting rid of this piece all together and making one out of molly, but it wasn't worth all of the work.
And here is an overall shot of the front end all together. This was after we finished up the rear hood pins, which I will get back too.
So now you have 7 dzus fasteners holding it all in place and thats it. One person can now take the bumper on or off in less than a minute!
While I was working on all of that Chris was having some troubles with some new billet pieces. He bought a billet valley cover plate from AEI CNC to go with the new Edelbrock intake manifold, but when he put it on he noticed that it was covering the cam position sensor. After measuring, comparing, and staring at it we figured out that the holes were drilled the wrong dimension from the front edge. We figured this out at about 9:00 at night and called the place who made the piece. Now only did he answer, he immediately went to a computer waiting for pictures showing what our problem was. Chris was on and off the phone with him for about an hour working out what the exact problem was, so that when the new piece is made on Monday it is 100% perfect. The customer service from AEI is as top notch as it gets!
While we are on the topic of cam position sensors, some of you may remember that we have had problems with them. We have checked every possible thing trying to determine why they go bad so quickly. While everything was apart Chris was able to stick his head over the hole the cam position sensor sits in to check the machining on the cam. That all checked out, as did everything else, so a new sensor will go in again and we will see what happens.
After all that was figured out, he moved on to laying out the new Kurt Urban water vapor set up. Not only does it look fantastic, it should work much better than the factory set up.
Here is a couple of pics of it
Other side
One of the block adapters
And some overall shots Chris took
Chris also made up a mounting bracket for the block, but needs the new valley cover to install it.
Back on to the hood read quick. I had some spacers made up for the rear pins since they wouldn't reach. They are just some 2" pieces of steel drilled through and tapped so a bolt from the bottom holds them in place.
Simple yet effective. And here is the drivers rear pin all finished
Saturday!
We started out Saturday morning back at Midwest converters to pick up the new new converter. What a beautiful piece it is too!! Ill just let the pictures speak for them selves.
And compared to the old PTC unit that was on the car.
After leaving Midwest converters we stopped for supplies again, and then went back to install the converter and trans. While Chris got started on that, I figured I can get working on the upper inter cooler piping since the intake was still on the motor. So I threw the new throttle body on, and started cutting.
Here are a couple pics of the 90mm Edelbrock throttle body. This first one you can see the factory throttle cable bracket, which does not work.
Matching powder coat
Here you can see the supplied cable bracket which I will modify next week
Also you can see the fuel rail mounts I had made up at work. I will get more pics of them, and the plug that was made next week.Here is the newly modified (AGAIN) upper inter cooler pipe. I had to make up an angle by cutting it into the pipe which is not my preferred method, but I was working with what I had.
While I was working on this, Chris discovered that the converter needed different bolts than the last one. So another run back to Rockford for bolts (this was the third trip of the weekend for those counting). We got back and Chris started on trimming the trans and shield to fit. Again, while he was working on that I decided to plug the breather holes on the valve covers since we don't need them. I have only welded aluminum once before, but it went OK I guess.
Here is the result
Now they need to get cleaned up and powder coated!
And again, while I was doing that Chris figured out that the bolts that came with the trans shield would not work. So at 8:30 at night we made ANOTHER run to Rockford for bolts! We figured that 60mm long would work just fine, and of course they didn't have any that size. Chris grabbed some 50mm bolts and I told him they would be too short, and to get the 75mm ones instead. We get back to the house and figure out that the 75mm is too long, the threaded part was to long, and the non threaded shoulder was also too long. Double fail!! We then figured out that he 50mm (though not ideal) would have worked!! This trans just did not want to go in this weekend! I started digging around in the junk drawer and found a bag of brand new 55mm long M10x1.5 grade 10.8 bolts!!! SUCCESS finally
That is when the battle begun! I found the bolts at around 9:30PM or so, we finished up about 2:00AM! The trans shield was such a pain in the ***, but its all in there now, and here is the proof.Well that is all for this weekend. Next weekend should see the intake all buttoned up, the turbo back on, and possibly the car running! Thanks again for following along!
Sean
LS1 Tech Stories
The Best V8 Stories One Small Block at Time

6 Common C5 Corvette Failures and What's Involved In Repairing Them
Pouria Savadkouei
Retro Modern Bandit Pontiac Trans AM Comes With Burt Reynolds' Autograph
Verdad Gallardo
Top 10 Greatest Cadillac V Series Performance Models Ever, Ranked
Pouria Savadkouei
Top 10 Most Powerful Chevy Trucks Ever Made!

Hennessey's New Supercharged Silverado ZR2 Has 700 HP
Verdad Gallardo
Coachbuilt N2A Anteros Is an LS2-Powered C6 Corvette In Italian Clothes
Verdad Gallardo
Awesome K5 Blazer Restomod Comes With C7 Corvette Power
Verdad Gallardo
10 Camaros You Should Never Buy

10 LS Engine Myths That Refuse to Die
Verdad Gallardo9 Second Club
Joined: Oct 2006
Posts: 1,192
Likes: 243
From: IL
Another weekend has come and gone, and while we did get a good amount of work done, we did not get it started. Thats partly because some needed parts wont be here till this week, but mostly because we decided not to work on it Friday. Saturday morning (any it was actually morning) we went in the garage and got to work. Chris started right away on tackling the wiring for the battery relocation. Since he was working on that, and I knew that the battery tie down that came with the box did not fit our battery, I started working on a new tie down. I started making it out of some aluminum, but that failed because it was too thin and just flexed. So I whipped one up out of some molly round bar and angle iron.
Here is what I came up with

My welding is getting a little better

And here it is in place with most of Chris's wiring. He still needs to run main wire from the alternator to the battery.


Here is a quick shot showing the difference between quality wire (stinger on the right), and cheap ****. Both of these are 4gauge.

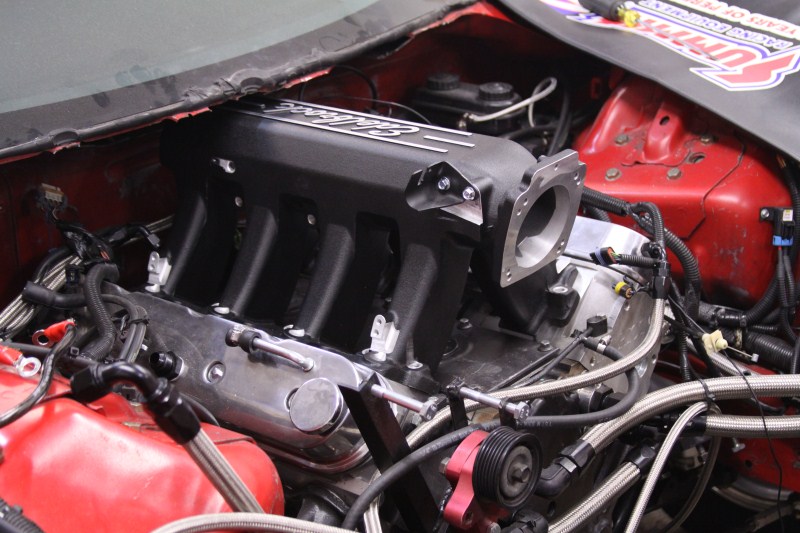
After that, the new valley cover plate showed up! This was the replacement piece we got from AEI Inc. after they found the root cause of the problem (I believe a program error). This one looked beautiful (just like the last one) and fit like a glove! I didn't really get any pics of the plate for some reason, but you can see it well enough in the next few.
Here is the Kurt Urban Performance water vapor block mounted to the plate. This was just a quick bracket the Chris whipped up out of some aluminum angle.

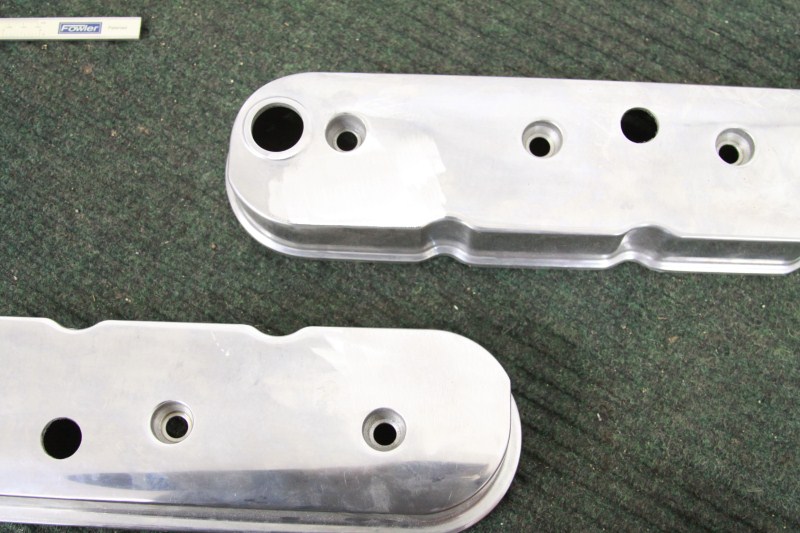
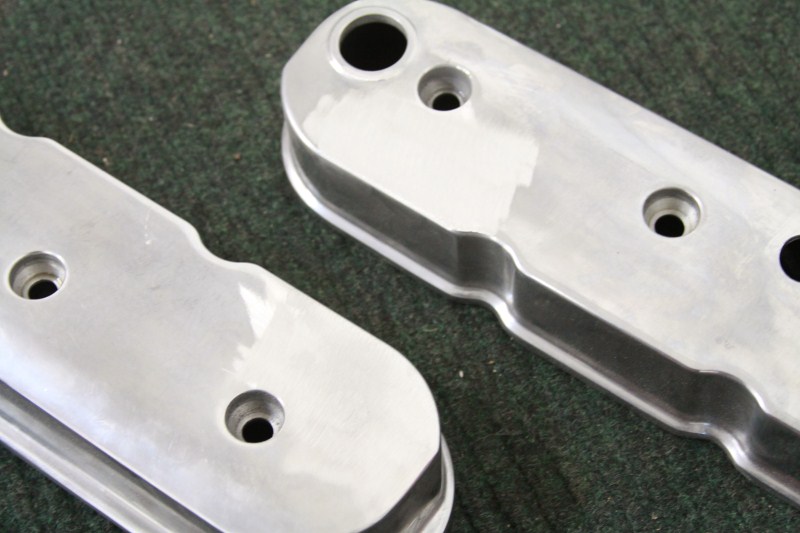
And on the motor, ready for the intake manifold. You can also see the valve covers all powder coated and installed.
Speaking of the intake, here are some pics of it before being installed. Here is the FAST intake gaskets installed ready to go.

Here you can see the bracket for the fuel rails that the machinist at work whipped up out of some aluminum.

And here is a plug he made up. This intake has a hole and a bracket for MAP sensor which we aren't using. So instead of threading and tapping the hole, I had the machinist whip up a plug. The allen on the right hand side holds the plug itself that has a very slight press to seal it. Then the screw on the left is what holds it in to the factory bracket hole. This way it plugs the hole, but doesn't modify the intake if Chris ever decides to sell it.

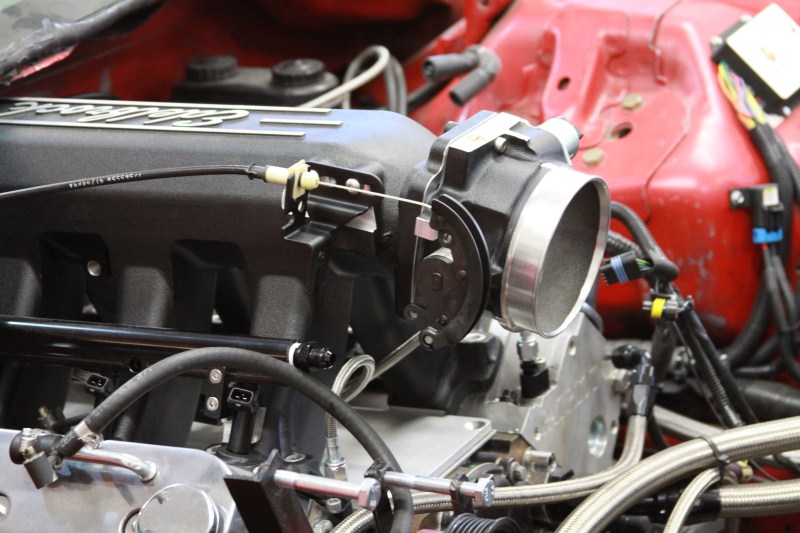
Here are some shots of it all on the car!


Here is a quick pic of the upper inter cooler pipe. Obviously its not 100%, we are waiting on the 3"-3.5" adapter to come in this week so that it fits the silicone transition to the throttle body. That should all be wrapped up next weekend for sure.

The eagle eye among you will notice that the alternator, AND the alternator bracket are missing. We have a little surprise in store for that That is why the wiring is not complete yet either. Thats all for this week, thanks for following along!
Sean
Here is what I came up with
My welding is getting a little better
And here it is in place with most of Chris's wiring. He still needs to run main wire from the alternator to the battery.
Here is a quick shot showing the difference between quality wire (stinger on the right), and cheap ****. Both of these are 4gauge.
After that, the new valley cover plate showed up! This was the replacement piece we got from AEI Inc. after they found the root cause of the problem (I believe a program error). This one looked beautiful (just like the last one) and fit like a glove! I didn't really get any pics of the plate for some reason, but you can see it well enough in the next few.
Here is the Kurt Urban Performance water vapor block mounted to the plate. This was just a quick bracket the Chris whipped up out of some aluminum angle.
And on the motor, ready for the intake manifold. You can also see the valve covers all powder coated and installed.
Speaking of the intake, here are some pics of it before being installed. Here is the FAST intake gaskets installed ready to go.
Here you can see the bracket for the fuel rails that the machinist at work whipped up out of some aluminum.
And here is a plug he made up. This intake has a hole and a bracket for MAP sensor which we aren't using. So instead of threading and tapping the hole, I had the machinist whip up a plug. The allen on the right hand side holds the plug itself that has a very slight press to seal it. Then the screw on the left is what holds it in to the factory bracket hole. This way it plugs the hole, but doesn't modify the intake if Chris ever decides to sell it.
Here are some shots of it all on the car!
Here is a quick pic of the upper inter cooler pipe. Obviously its not 100%, we are waiting on the 3"-3.5" adapter to come in this week so that it fits the silicone transition to the throttle body. That should all be wrapped up next weekend for sure.
The eagle eye among you will notice that the alternator, AND the alternator bracket are missing. We have a little surprise in store for that
That is why the wiring is not complete yet either. Thats all for this week, thanks for following along!Sean


9 Second Club
Joined: Oct 2006
Posts: 1,192
Likes: 243
From: IL
IT'S ALIVE!!!
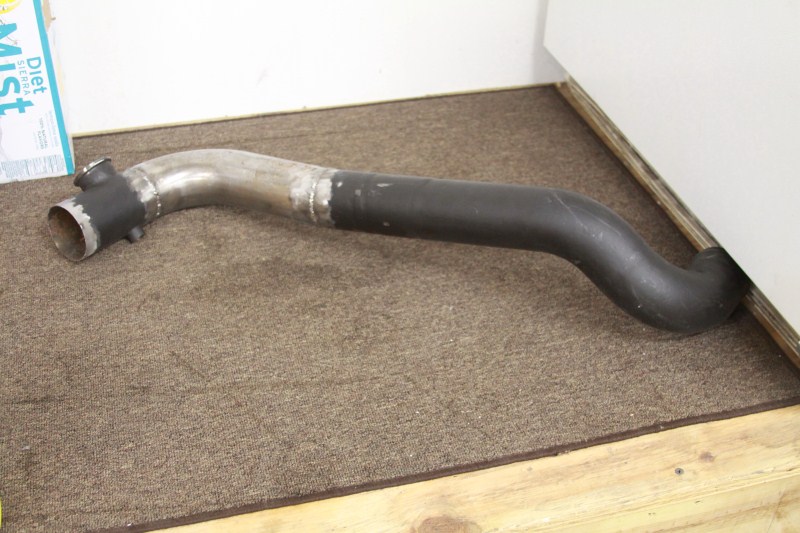
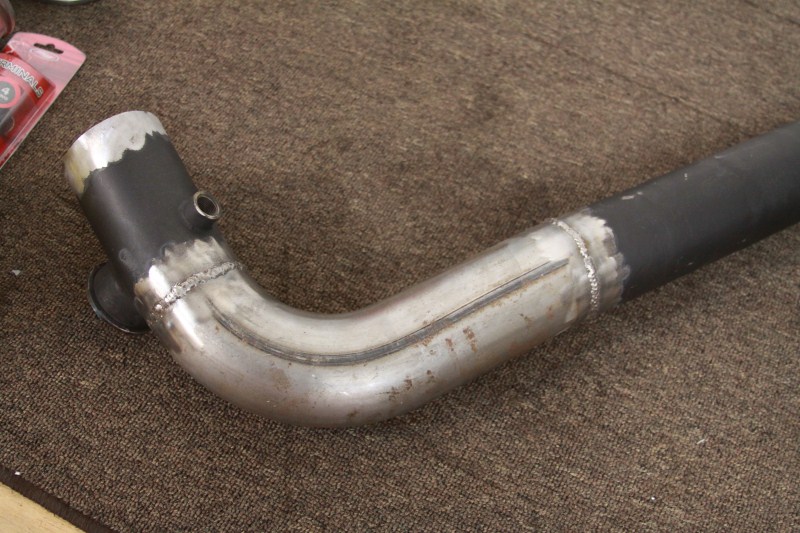
But that is getting a little ahead of ourselves. It was a LONG weekend, and we got a lot done for sure. Friday night we dove right in, and I started on finishing the upper inter cooler pipe since the material came in. Nothing really too exciting, we had to go from 3" to 3.5" because apparently nobody makes a 4.5" to 3" silicone coupler. Anyway we took the easy way out and Chris picked up a 3-3.5 transition and some 3.5" pipe. I think you can figure out what happened from there
Here is the finished product before paint. I didn't bother cleaning up the welds because I know I am changing it all again after this season.


While I was doing that Chris was busy helping his girlfriend Rachel pull off the back bumper so she could finish the CETA mod she started a couple weeks back. Here is the bumper pulled off, masked and prepped for primer.

Once that was done Rachel sprayed the primer, and we called it a night.
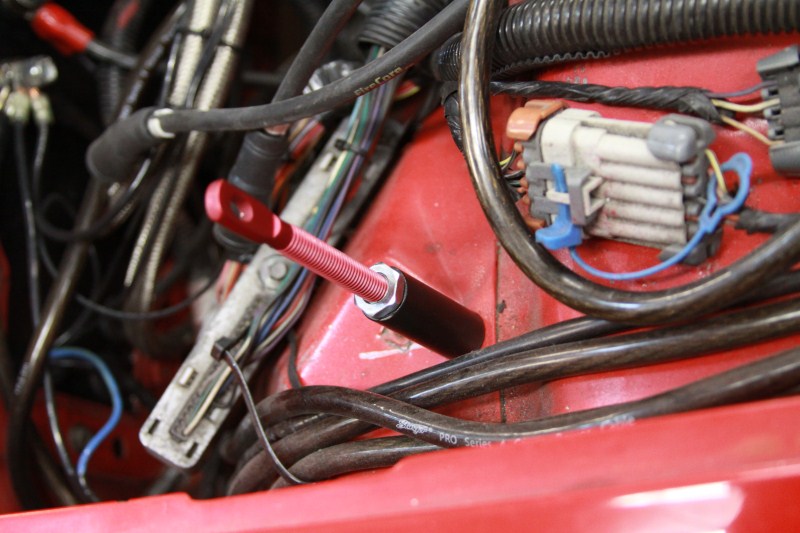
Saturday morning, Chris was busy helping his dad change the belt on his car. After he was finished with that he jumped on making a mount for the fuel pressure regulator. Some may remember that we had a fuelab FPR that we never even used really. We had to change to a Forge Performance unit before hitting the dyno last year since we needed a boost referenced unit. Well we never had time to make a new mount for it so it was temped in, that is until now!
Here is Chris doing... something with the mount I am sure

And here it is all wrapped up.

I got busy on the coil pack mounts first thing in the morning. After looking around for some good spots, we decided to mount them up on the shock towers. This gives us quick and easy access to them if we need to do any trouble shooting, or change one out. Also we didn't have to worry about getting new plug wires, or modifying the wiring. I didn't get any pics of them, but you can see them some others. We need to clean up the wiring to the coils still to make it look nicer.
After that I got crackin on getting the turbo installed. This is no easy task to do by yourself, but I got it done, and without dropping it! Rachel got busy finishing up the back bumper.
Here it is with the final coat of paint on it before she pulled off the masking

and here it is all unmasked and ready to go back on

and just a quick one of it back on the car. Once its on the ground next weekend we can move it forward to get some better shots of it.

Once that was all done Chris got to work on mounting the vacuum manifold, and running all new lines.
Here is the manifold installed. It is fed by a 3/8" line from the back of the intake which is the line on the right

And here it is with all of the new lines installed. We did everything in 1/4" silicone line to make it easier.

While he was working on that, I was busy installing the inter cooler pipes, and wrapping up small things under the car like the shifter cable. Rachel was busy running some new wires for the alternator, and shut off. Then it was a matter of going through everything on the car and making sure it was all tight. We tried to start the car late Saturday night, but the battery was dead, and so was the jumper pack. So we had to wait until the next morning for this...
http://www.youtube.com/watch?v=fACxsRpEjbw
And some pics.


So now that its running we need to finish up the alternator and the associated wiring, the fuel pumps, and some other odds and ends. Then we have to clean up the engine bay, and change over to a 99 up ECU for better tune-ability. Thats right, now that its running we are changing the computer and a lot of the wiring, so that means we will have a second first start of the year As always, thanks for following along!
Sean
But that is getting a little ahead of ourselves. It was a LONG weekend, and we got a lot done for sure. Friday night we dove right in, and I started on finishing the upper inter cooler pipe since the material came in. Nothing really too exciting, we had to go from 3" to 3.5" because apparently nobody makes a 4.5" to 3" silicone coupler. Anyway we took the easy way out and Chris picked up a 3-3.5 transition and some 3.5" pipe. I think you can figure out what happened from there
Here is the finished product before paint. I didn't bother cleaning up the welds because I know I am changing it all again after this season.
While I was doing that Chris was busy helping his girlfriend Rachel pull off the back bumper so she could finish the CETA mod she started a couple weeks back. Here is the bumper pulled off, masked and prepped for primer.
Once that was done Rachel sprayed the primer, and we called it a night.
Saturday morning, Chris was busy helping his dad change the belt on his car. After he was finished with that he jumped on making a mount for the fuel pressure regulator. Some may remember that we had a fuelab FPR that we never even used really. We had to change to a Forge Performance unit before hitting the dyno last year since we needed a boost referenced unit. Well we never had time to make a new mount for it so it was temped in, that is until now!
Here is Chris doing... something with the mount I am sure
And here it is all wrapped up.
I got busy on the coil pack mounts first thing in the morning. After looking around for some good spots, we decided to mount them up on the shock towers. This gives us quick and easy access to them if we need to do any trouble shooting, or change one out. Also we didn't have to worry about getting new plug wires, or modifying the wiring. I didn't get any pics of them, but you can see them some others. We need to clean up the wiring to the coils still to make it look nicer.
After that I got crackin on getting the turbo installed. This is no easy task to do by yourself, but I got it done, and without dropping it! Rachel got busy finishing up the back bumper.
Here it is with the final coat of paint on it before she pulled off the masking
and here it is all unmasked and ready to go back on
and just a quick one of it back on the car. Once its on the ground next weekend we can move it forward to get some better shots of it.
Once that was all done Chris got to work on mounting the vacuum manifold, and running all new lines.
Here is the manifold installed. It is fed by a 3/8" line from the back of the intake which is the line on the right
And here it is with all of the new lines installed. We did everything in 1/4" silicone line to make it easier.
While he was working on that, I was busy installing the inter cooler pipes, and wrapping up small things under the car like the shifter cable. Rachel was busy running some new wires for the alternator, and shut off. Then it was a matter of going through everything on the car and making sure it was all tight. We tried to start the car late Saturday night, but the battery was dead, and so was the jumper pack. So we had to wait until the next morning for this...
http://www.youtube.com/watch?v=fACxsRpEjbw
And some pics.
So now that its running we need to finish up the alternator and the associated wiring, the fuel pumps, and some other odds and ends. Then we have to clean up the engine bay, and change over to a 99 up ECU for better tune-ability. Thats right, now that its running we are changing the computer and a lot of the wiring, so that means we will have a second first start of the year
As always, thanks for following along!Sean
9 Second Club
Joined: Oct 2006
Posts: 1,192
Likes: 243
From: IL
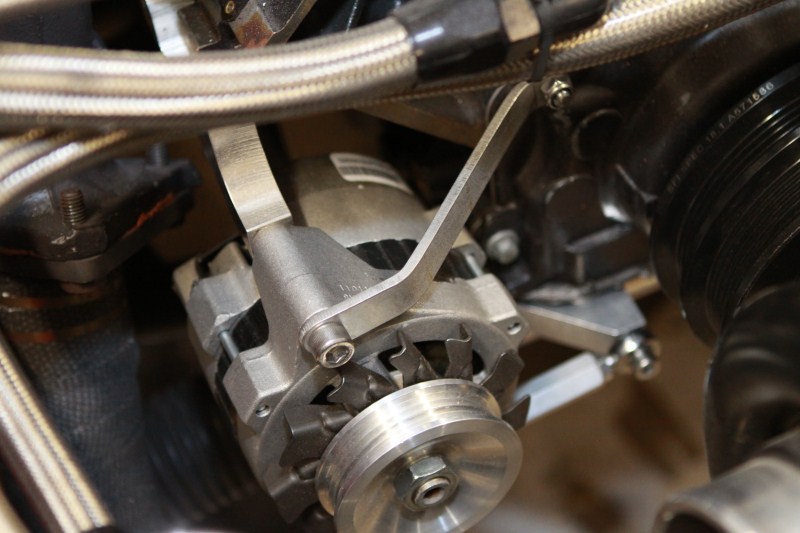
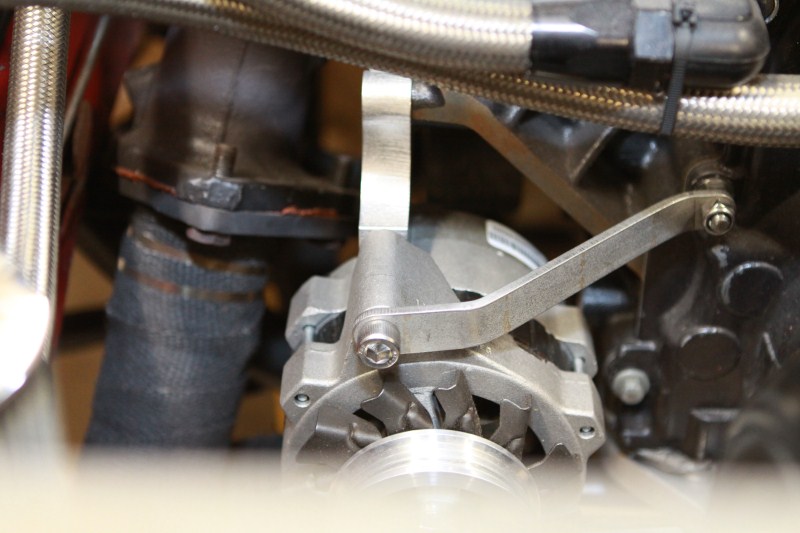
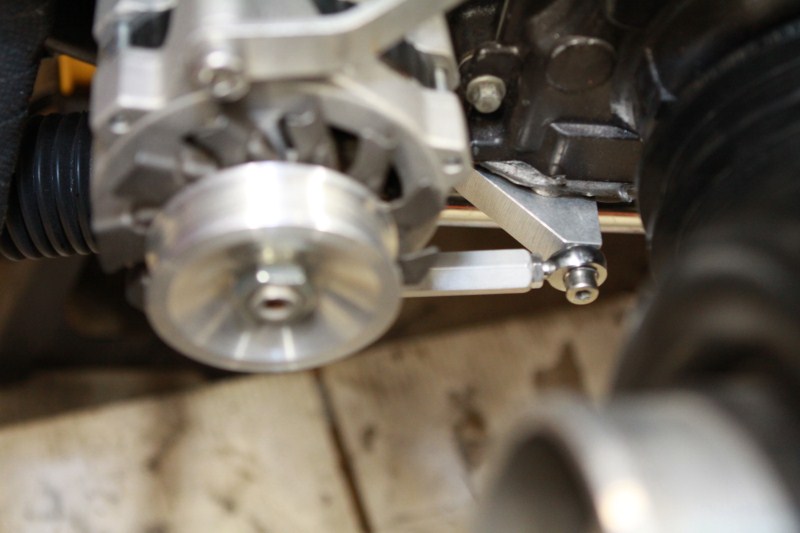
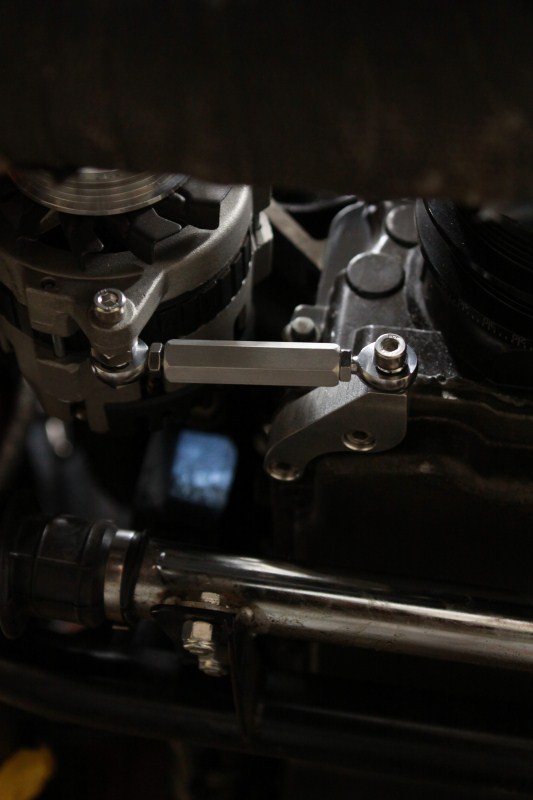
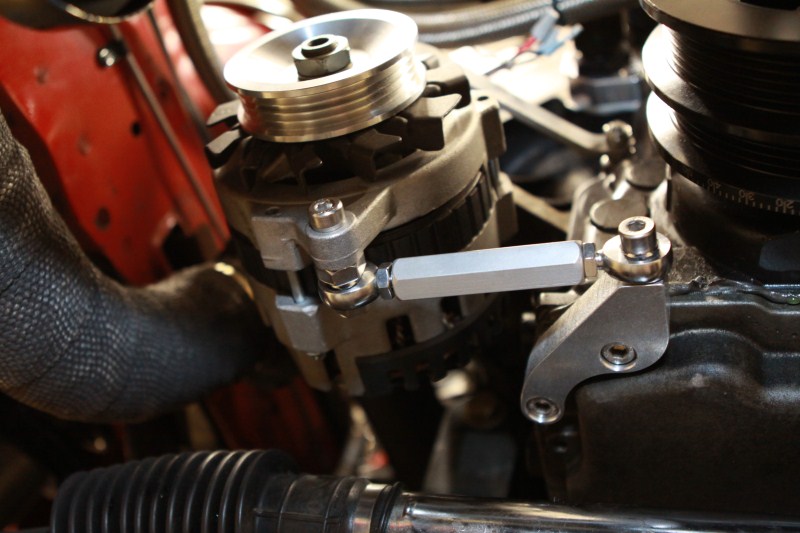
Well another weekend of work has come and gone! It is getting very close now, and we are dying to wrap it up and make some passes!! Anyway, we are not racing yet of course but we did wrap up a bunch of smaller projects. Friday night I got started on mounting the alternator. We were doing some testing for AEI CNC who makes all kinds of pieces for various applications. They have been working on an alternator mount for LS motors with truck manifold turbo kits. I believe that he has only tried this kit on a car that had V-Bands welded to the manifolds, which we do not (yet). So the first kit he sent out didn't work for us even though the brackets fit absolutely perfect. So we got on the phone with Bob and started brainstorming a solution and came up with two. He had them cut, machined, and on the way to us Monday so we could try them this weekend. Here is a quick shot of all three kits laid out (with the exception of the stainless steel bracket for the original kit).
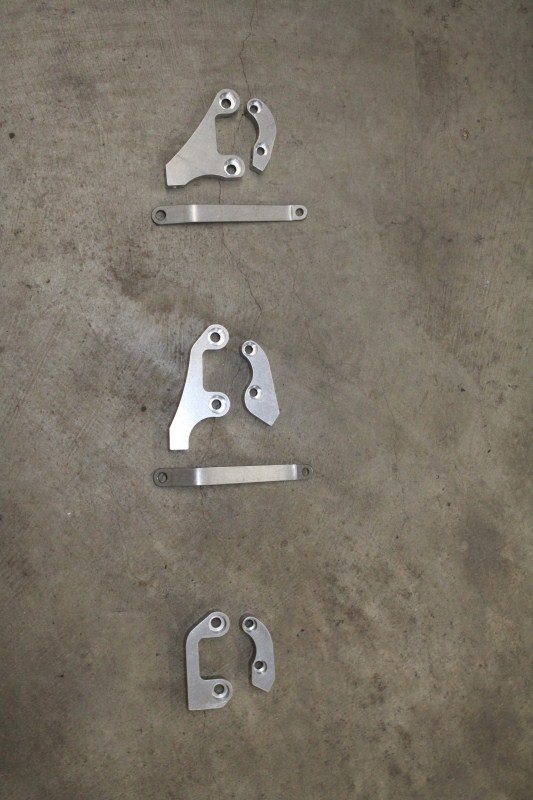
The very bottom set is the original which holds the alternator tight to the block and catches the 4 rib portion of the crank pulley. It would work great if you have a v-banded truck manifold. The top set moves the alternator straight down from the original location and clears everything for us, but is a little tight. The middle one was just right! It moves the alternator down some, and forward to catch the 6 rib portion of the crank pulley. Keep in mind that he made the other two kits with nothing more than a phone call and a couple of pictures. He does not have a LS in the shop to try these on before he sent them to us, and they all fit like OEM pieces.
Here are some pics of the one we left in the car.
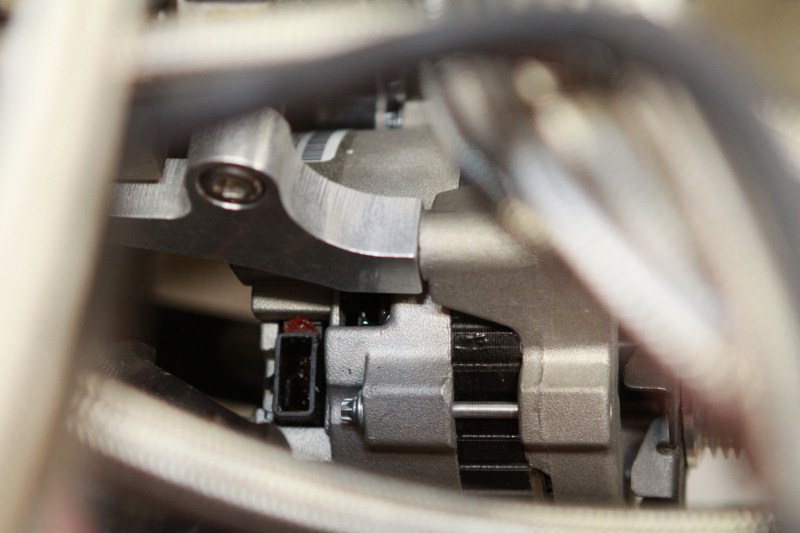
Unfortunately I cant be trusted, and I broke the alternator! We tried to clock it so that the plug was further from the manifold, but I separated it and it all came apart. So we did have a chance to throw a belt on and tension it to make sure it was all good, but I never got any pics of that. Chris ordered up a new alternator and I will have finished pics next weekend.
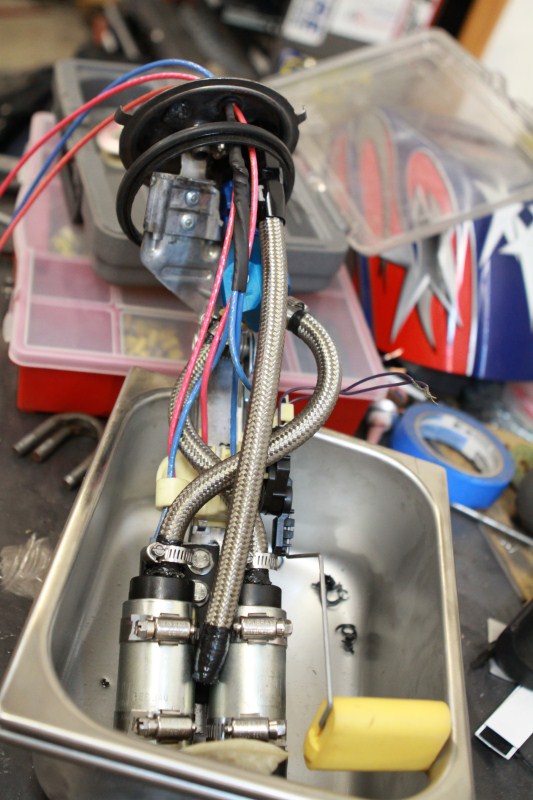
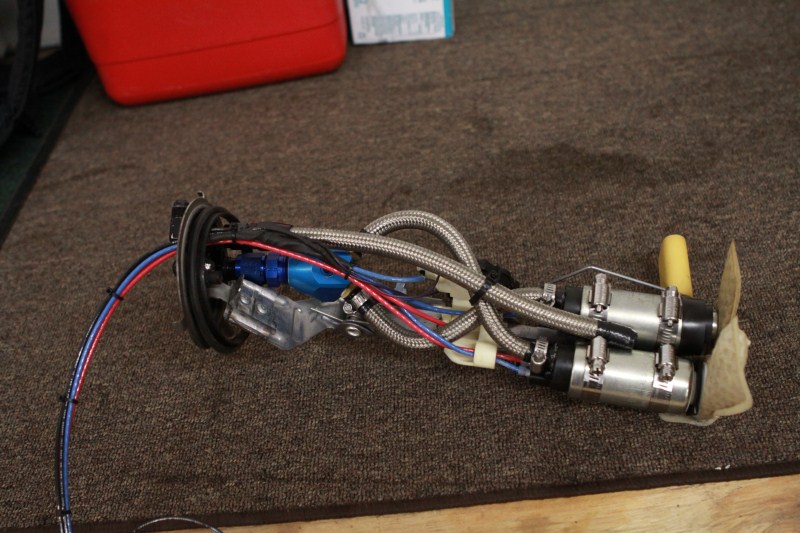
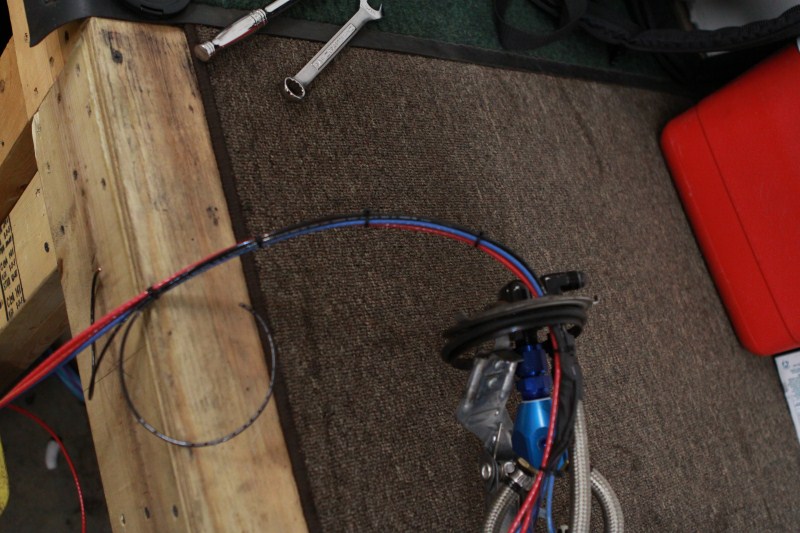
Chris got crackin' on the fuel pumps. I'm sure you all remember that we had minor fuel issues that showed up while we were on the dyno (luckily). We weren't really sure what the problem was, just that we were lower on pressure than we should have been. Well as soon as we got the pumps out of the car the problem was obvious, one of the rubber hoses from the pump to the "Y" block had a 1" long split down it. So we replaced both lines with some AN, and while they were out beefed up the wiring. Chris ran a new 12ga power and ground from each pump out of the tank. Both pumps are now fed by their own independent 10ga power wire (10ga back to the their own relays, then 12ga from the relays to the pump), and they both have beefed up grounds. Now we can test each pump independently of one another, and they are both working to the best of their ability's.
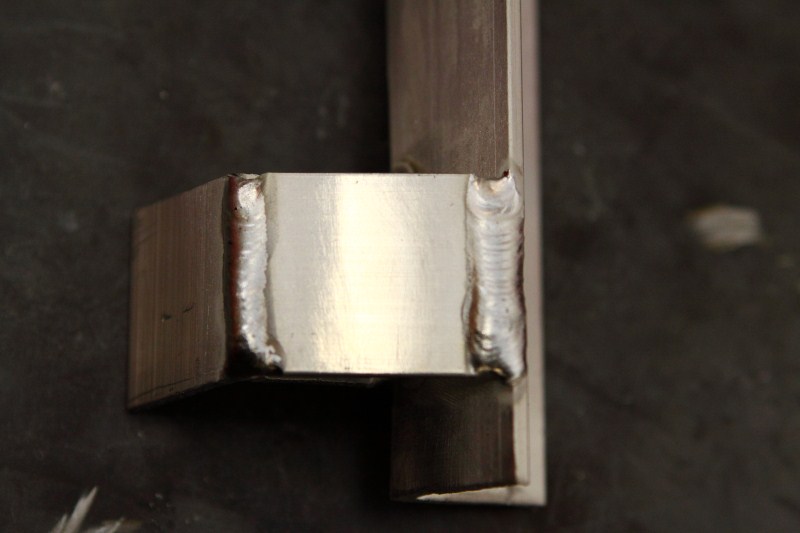
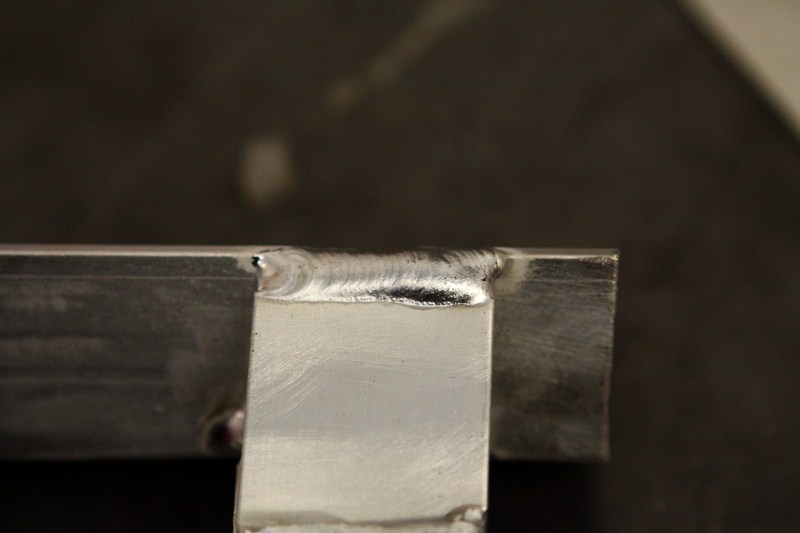
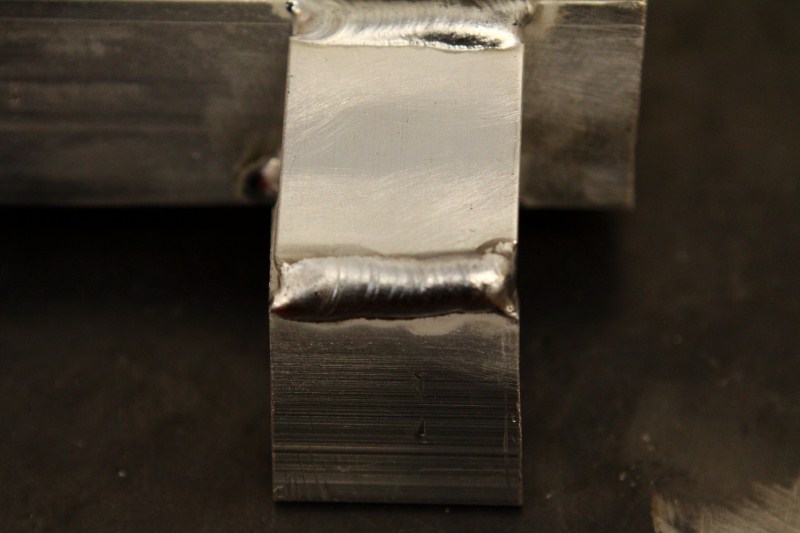
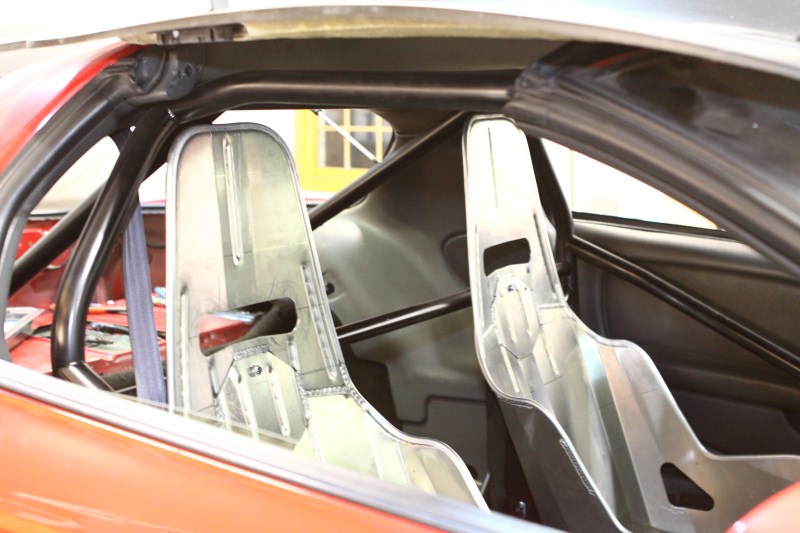
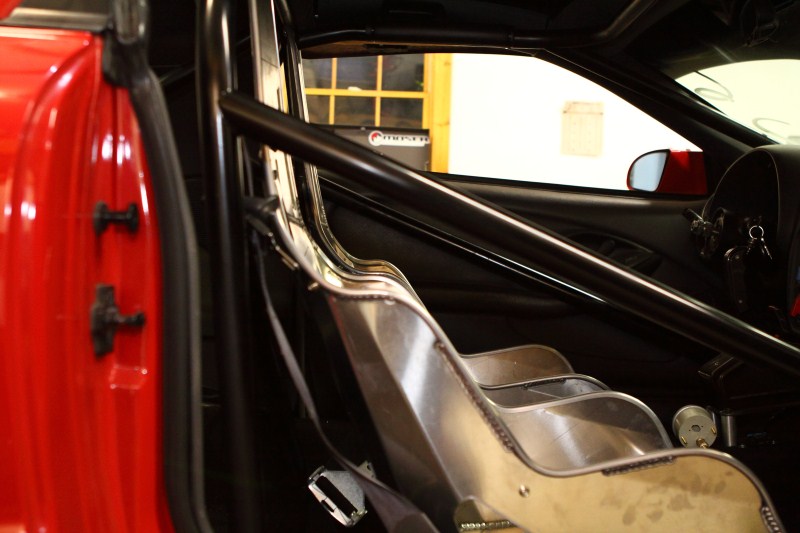
Saturday Chris got to work installing the new bigger battery, final installing the battery box, and the last of the battery wiring. He didn't however finish cleaning up the back when he was done, so I have no pics I whipped up a mount for the new passenger seat. I more or less copied the mount the Eric at Midwest Chassis had made for the driver seat out of some aluminum angle. The problem however is that the passenger side that the famous bump where the front of the seat mounts. So I had to raise the rear of the brackets up to make the seat sit properly. I didn't get pics of the whole set up because I forgot, but we need to take it out to paint it so I will get some next weekend. In the meantime I am happy with my aluminum welding so far, so I DO have pics of that!!

And a couple quick shots of the seat in the car.
Then we threw the drive shaft in, set it on the ground, and drove it outside so we could clean up a little. Here is the video of it moving for the first time this year!
http://www.youtube.com/watch?v=VBNhgFKaYzE
And since I didn't feel like sweeping, I pretended like I was taking pictures of the car
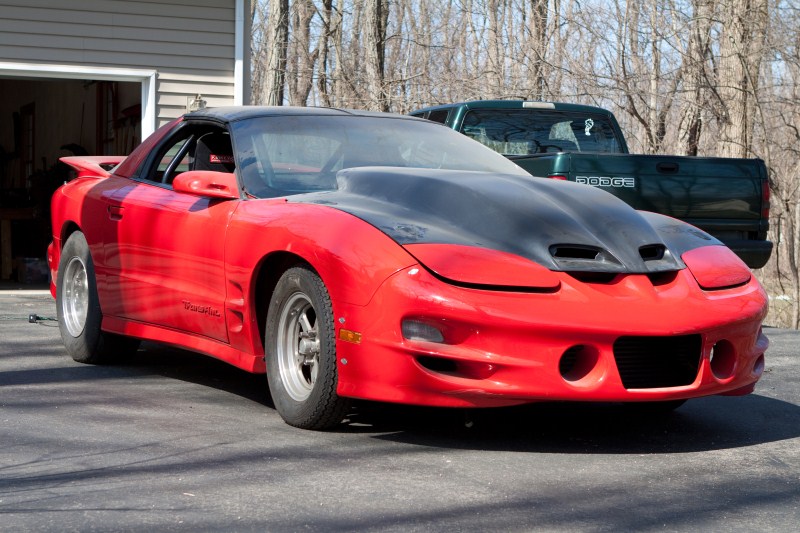
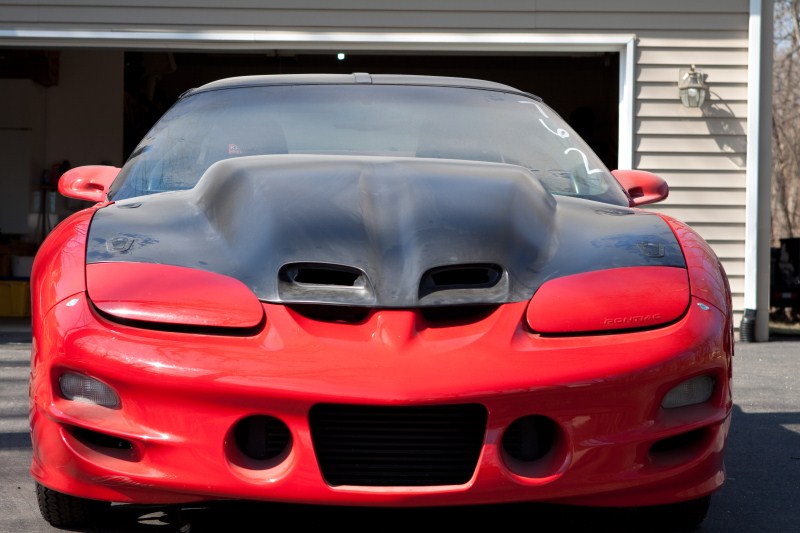

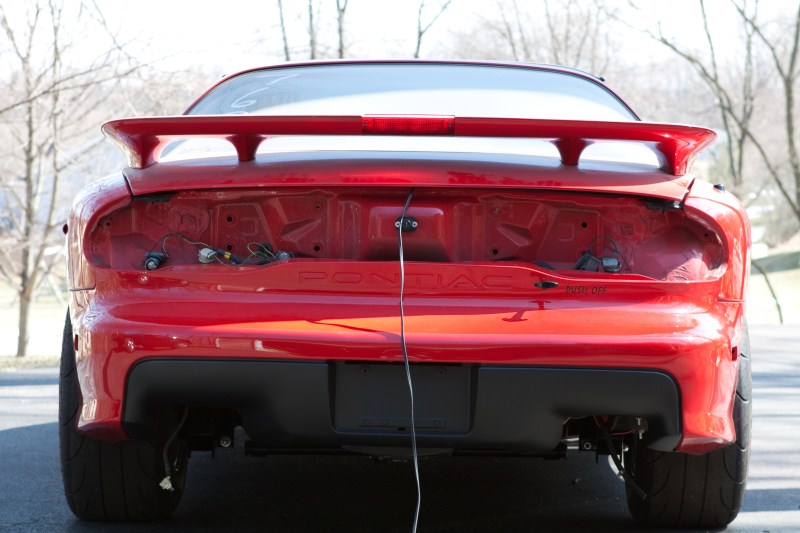
Yes the car is dirty as hell, but at least its in the sun. The tail lights are off because we just had the bumper off, and it needs to come off again soon so why bother. And the cord is for the battery charger since for some odd reason we still don't have an alternator
Anyway thats all for this weekend, now we just have to wait for a couple things to be all finished up. We should be 100% and on the dyno with in a few weeks I hope, then its off to the track to run 12's Thanks for following along!
Sean
The very bottom set is the original which holds the alternator tight to the block and catches the 4 rib portion of the crank pulley. It would work great if you have a v-banded truck manifold. The top set moves the alternator straight down from the original location and clears everything for us, but is a little tight. The middle one was just right! It moves the alternator down some, and forward to catch the 6 rib portion of the crank pulley. Keep in mind that he made the other two kits with nothing more than a phone call and a couple of pictures. He does not have a LS in the shop to try these on before he sent them to us, and they all fit like OEM pieces.
Here are some pics of the one we left in the car.
Unfortunately I cant be trusted, and I broke the alternator! We tried to clock it so that the plug was further from the manifold, but I separated it and it all came apart. So we did have a chance to throw a belt on and tension it to make sure it was all good, but I never got any pics of that. Chris ordered up a new alternator and I will have finished pics next weekend.
Chris got crackin' on the fuel pumps. I'm sure you all remember that we had minor fuel issues that showed up while we were on the dyno (luckily). We weren't really sure what the problem was, just that we were lower on pressure than we should have been. Well as soon as we got the pumps out of the car the problem was obvious, one of the rubber hoses from the pump to the "Y" block had a 1" long split down it. So we replaced both lines with some AN, and while they were out beefed up the wiring. Chris ran a new 12ga power and ground from each pump out of the tank. Both pumps are now fed by their own independent 10ga power wire (10ga back to the their own relays, then 12ga from the relays to the pump), and they both have beefed up grounds. Now we can test each pump independently of one another, and they are both working to the best of their ability's.
Saturday Chris got to work installing the new bigger battery, final installing the battery box, and the last of the battery wiring. He didn't however finish cleaning up the back when he was done, so I have no pics
I whipped up a mount for the new passenger seat. I more or less copied the mount the Eric at Midwest Chassis had made for the driver seat out of some aluminum angle. The problem however is that the passenger side that the famous bump where the front of the seat mounts. So I had to raise the rear of the brackets up to make the seat sit properly. I didn't get pics of the whole set up because I forgot, but we need to take it out to paint it so I will get some next weekend. In the meantime I am happy with my aluminum welding so far, so I DO have pics of that!!And a couple quick shots of the seat in the car.
Then we threw the drive shaft in, set it on the ground, and drove it outside so we could clean up a little. Here is the video of it moving for the first time this year!
http://www.youtube.com/watch?v=VBNhgFKaYzE
And since I didn't feel like sweeping, I pretended like I was taking pictures of the car
Yes the car is dirty as hell, but at least its in the sun. The tail lights are off because we just had the bumper off, and it needs to come off again soon so why bother. And the cord is for the battery charger since for some odd reason we still don't have an alternator
Anyway thats all for this weekend, now we just have to wait for a couple things to be all finished up. We should be 100% and on the dyno with in a few weeks I hope, then its off to the track to run 12's
Thanks for following along!Sean