


Fuel pump??

Thread Starter
TECH Apprentice
iTrader: (6)
Joined: Oct 2006
Posts: 332
Likes: 0
From: Coral Springs, FL.
OK, i have a 98 Z28 and i need a fuel pump/kit for it, i heard the 98's are different than the 99+ F-cars. I need suggestions along with where to get it or w/e.
Thanks alot in advance.
And i did use search, all it showed was a bunch of cars for sale.
Thanks alot in advance.
And i did use search, all it showed was a bunch of cars for sale.

TECH Apprentice
Joined: Jul 2005
Posts: 363
Likes: 0
From: Melbourne, Oz
I believe they are the same as the trucks right?
If so...here ya go!
I did this last week....works great!
Walbro 255.
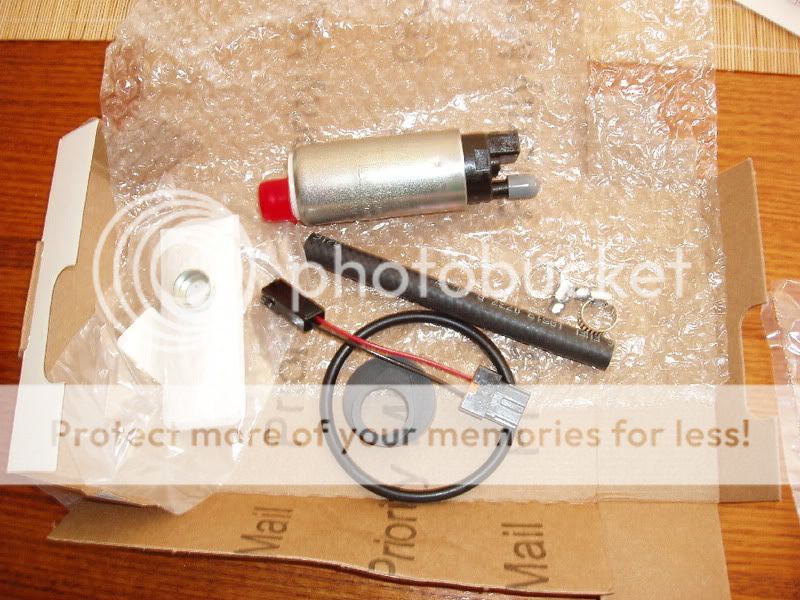
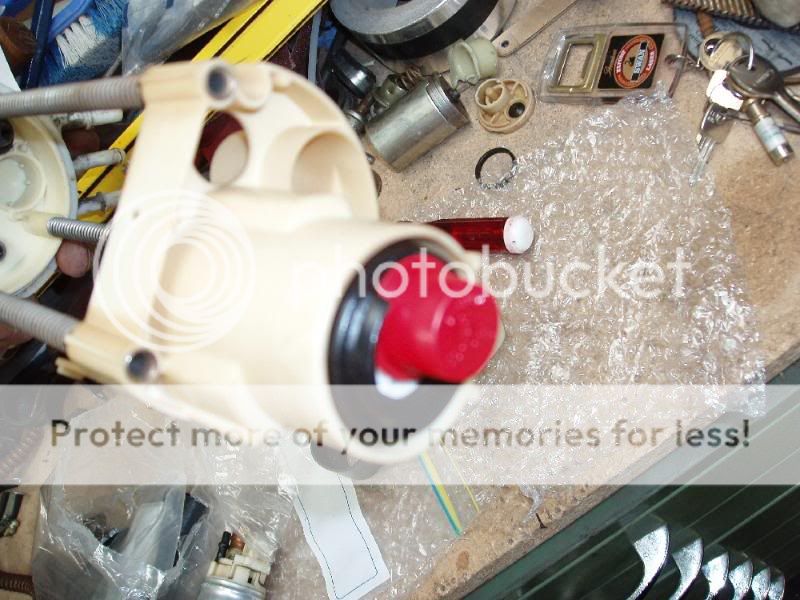
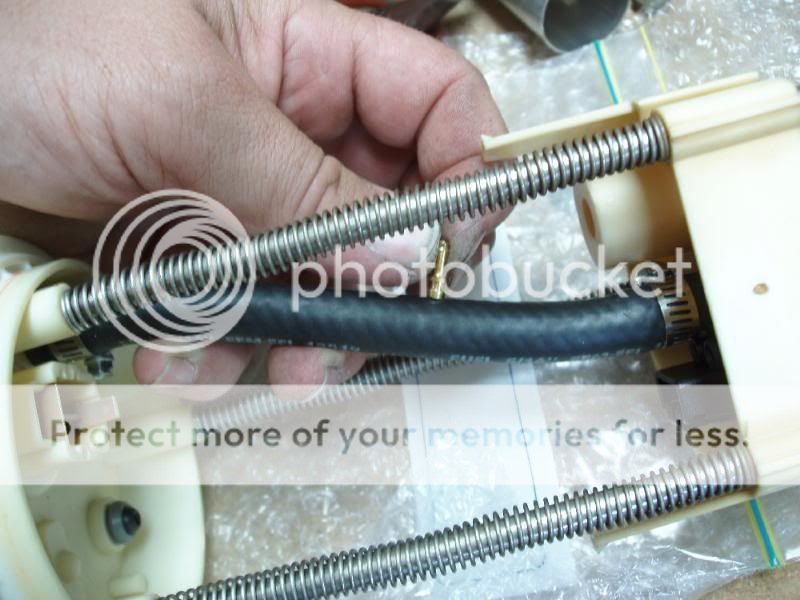
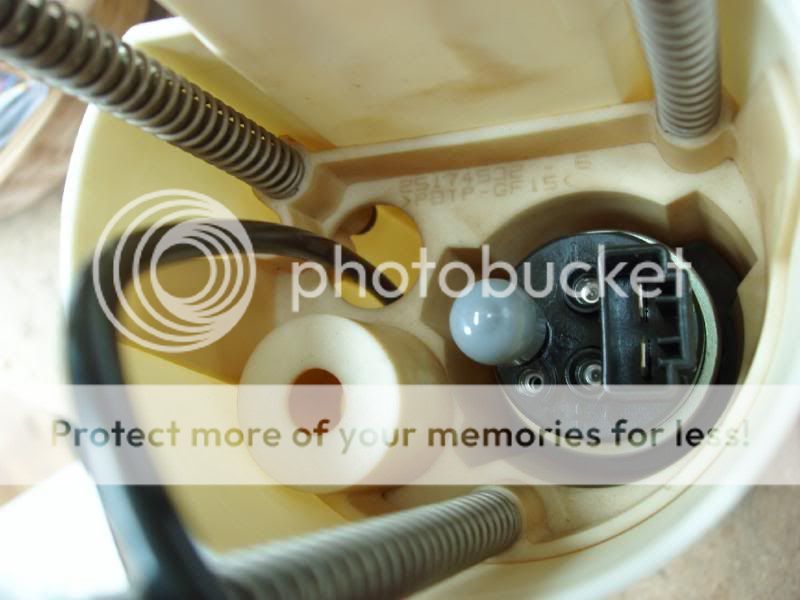
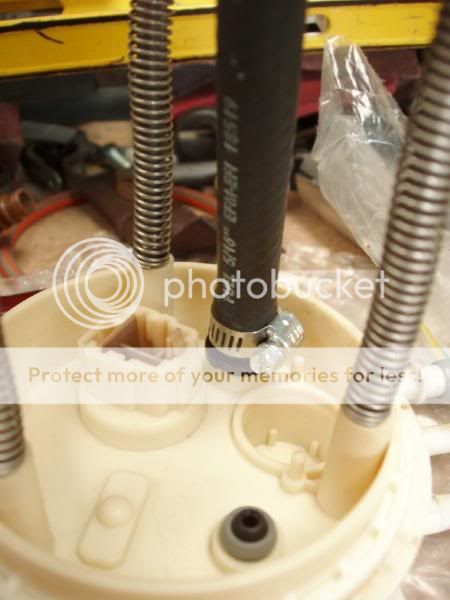
The old pump has a small black tube coming from a fitting in the bottom of the bucket to a nipple in the top of the pump.


The Walbro doesn't have that fitting.
It has a hole but no nipple.
Question is....do I need to worry about that fitting?
Do I just pull that tube out and forget about it?
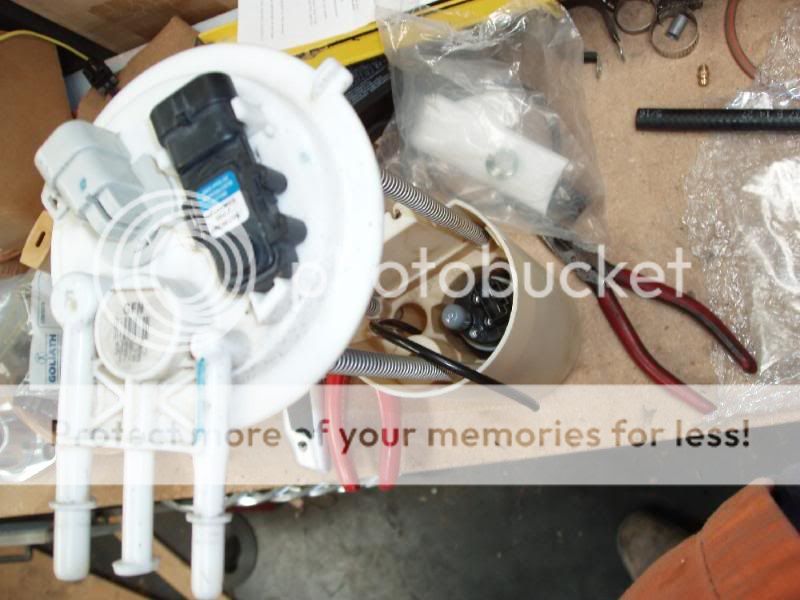
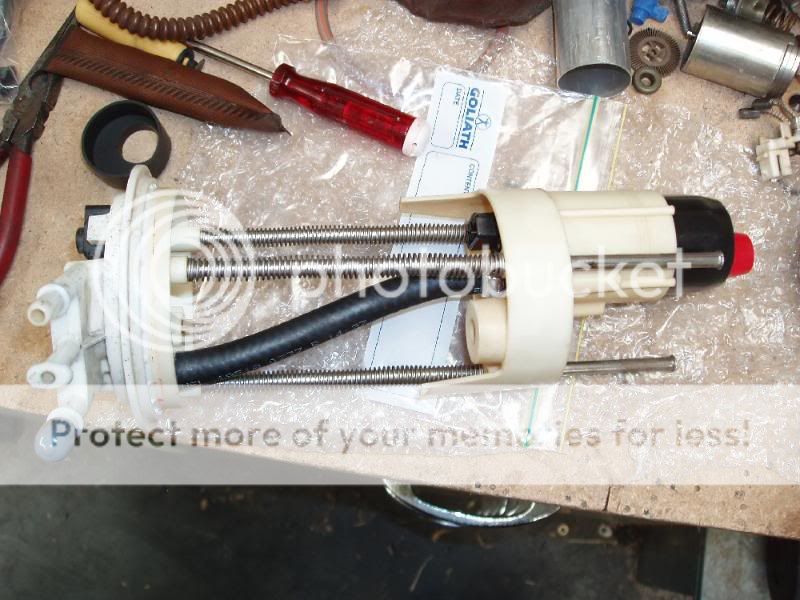
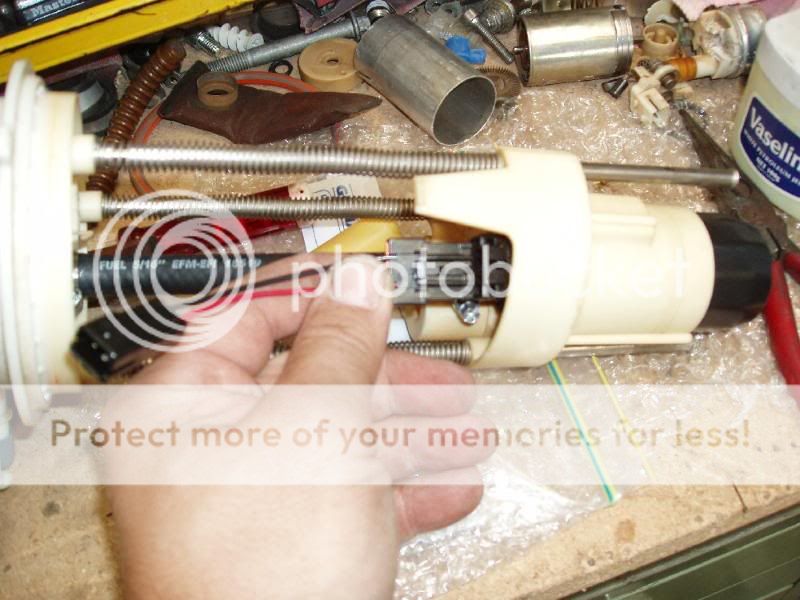
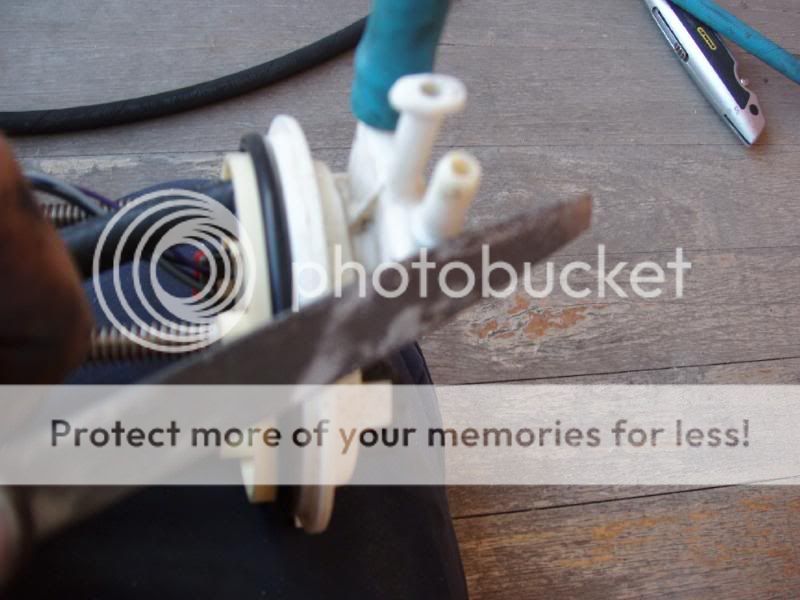
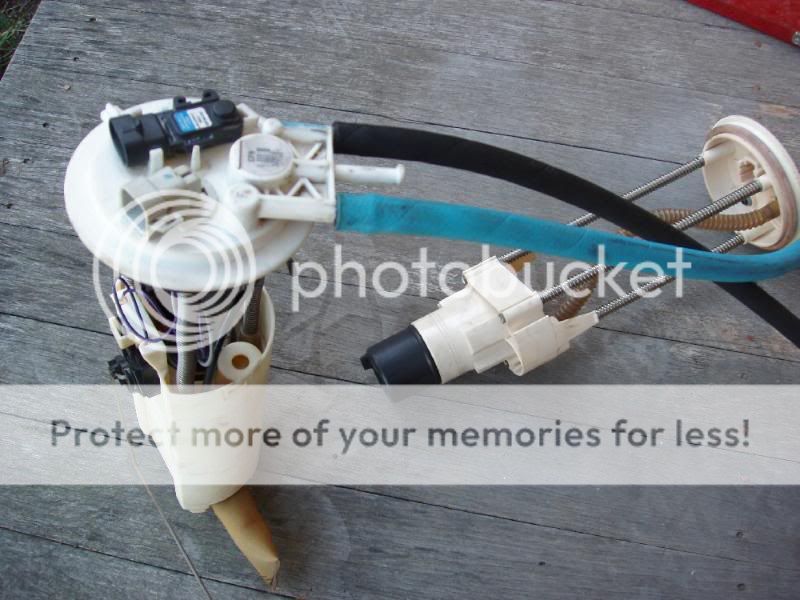
Some general pic's
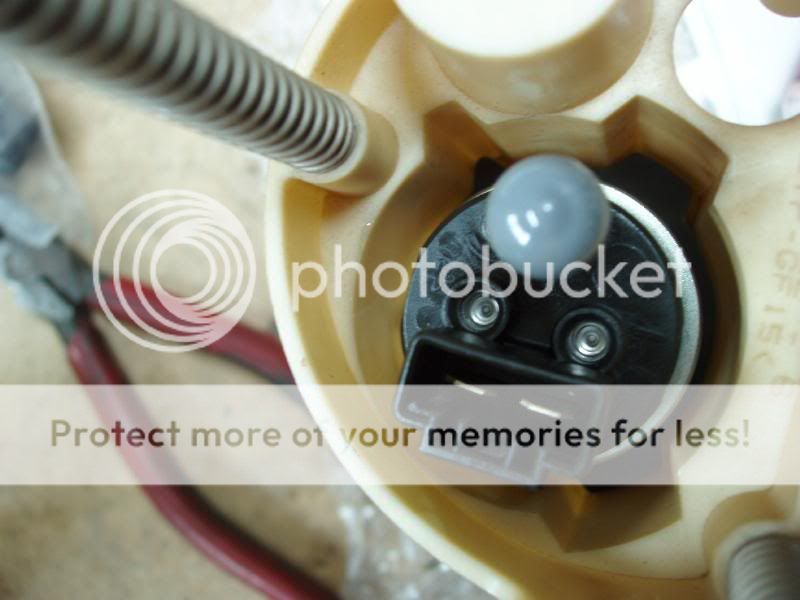
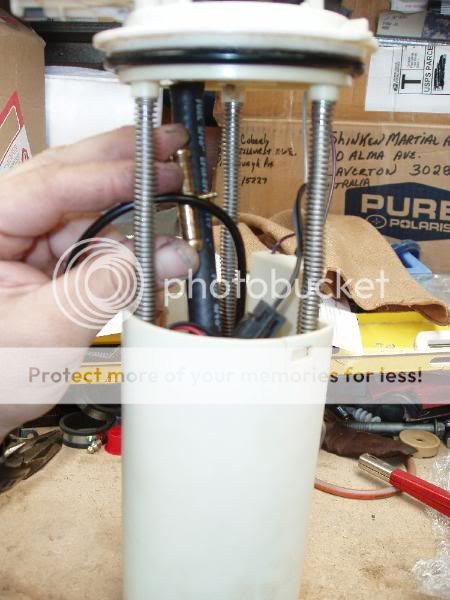
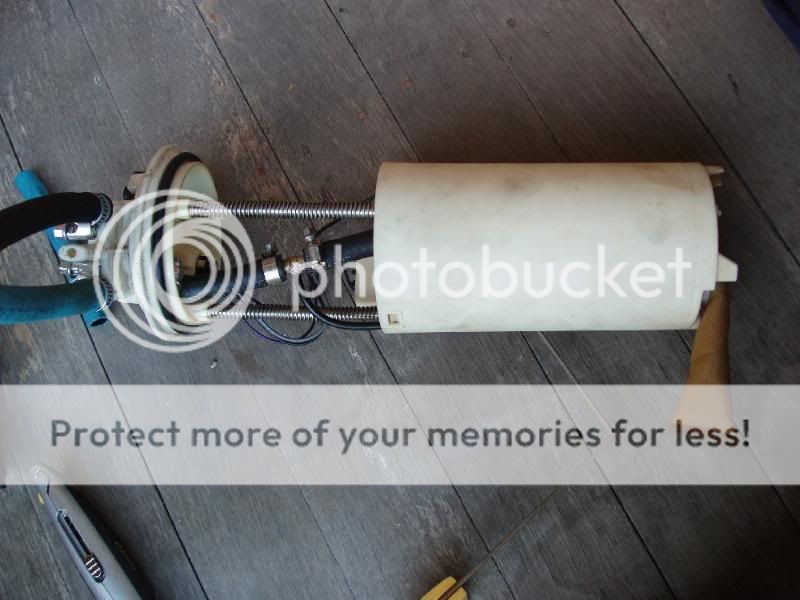
Sender unit..

With the aid of Vaseline....I managed to get the original rubber sleeve onto the Walbro (it's slightly larger in diameter to the OEM pump...but I got it in there. I've heard the Walbro's are LOUD if you don't use the rubber sleeving provided...figured this would be better still)
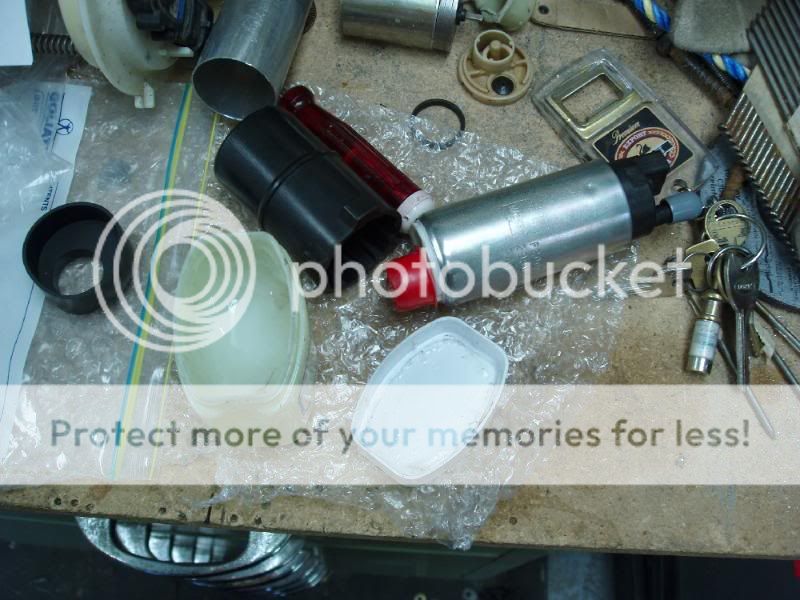
Makes for a neat fit!
From a friend on another forum:
If so...here ya go!
I did this last week....works great!
Walbro 255.
The old pump has a small black tube coming from a fitting in the bottom of the bucket to a nipple in the top of the pump.
The Walbro doesn't have that fitting.
It has a hole but no nipple.
Question is....do I need to worry about that fitting?
Do I just pull that tube out and forget about it?
Some general pic's
Sender unit..
With the aid of Vaseline....I managed to get the original rubber sleeve onto the Walbro (it's slightly larger in diameter to the OEM pump...but I got it in there. I've heard the Walbro's are LOUD if you don't use the rubber sleeving provided...figured this would be better still)
Makes for a neat fit!
From a friend on another forum:
I believe the tube in question relates to the sump filling of the pump - you do need it unless you want to hack a hole in the bottom of the cup. The stock pumps are designed to keep the cup full of fuel, to keep from having issues when fuel level gets low, and deal with no baffles in the tank.
Also, I don't know that I'd recommend using the black piece of rubber hose supplied with the Walbro, you may want to either re-use the stock accordion tube or find a new piece. I believe I read somewhere that it's a dampening effect... that doesn't happen with normal hose. Also, I've read that rubber fuel line will eventually degrade, the plastic stuff is supposed to not... *shrug*. There has to be a reason it's what is supplied, though. Dunno.
Apparently you won't have kinking issues with the supplied hose, as it's very close to the perfect length (you'll have to compress the pump to fit it on, though).
Here's a link to a Walbro install for an F-body (similar fuel system) where you don't have the venturi-effect of the tube in question... and here's the Racetronix kit that allows it to function as stock...
I don't know what you have to do to get the pump to function correctly, it looks like it has everything but the nipple where the hose connects... you may be able to fashion something.
TECH Apprentice
Joined: Jul 2005
Posts: 363
Likes: 0
From: Melbourne, Oz
And some info from an Aussie site where the VT Commodore runs the same pump setup.
http://www.ls1.com.au/forum/showthre...light=jet+pump
http://www.ls1.com.au/forum/showthre...light=jet+pump
Before Christmas some of you will know that I fitted a supercharger to my LS1, this required unpgrading the fuel pump.
I spoke with a rep from CAPA and he ended up selling me a fuel pump that was a driect replacement for the standard pump. Just a matter of bolting it in place of the origional was his statement to me.
I purchased the pump and fitted into the origional intank swirl pot. There were two fuel lines coming from the top of a CAPA pump the same as the origional. One to supply fuel to the jet pump the other to supply the fuel lines and fuel rail. I fitted it up and put the tank back in. I fired up first go and seemed to work really well. That was untill I got to about 20litres of fuel. The car cut out, I had run out of fuel and the fuel light hadnt even come on. The gauge was still reading just under 1/4 to go.
Today I pulled the fuel tank out of the car and then proceded to pull the modular intank swirl pot and pump out. I pulled the CAPA pump out and connected it to a 12volt power supply and then submirsed it in fuel and turned it on. Fuel came out of the main fitting, but not from the jet pump fitting. I hooked up the origional pump to check what sort of flow I should be getting. Would you believe it was coming from both outlets. In VT commodores the second fitting on the pump supplies fuel to the jet pump which allows the swirl pot to scavange the last 15 litres of fuel. With out this line working you can only use the first 3/4 of the tank.
I thought that one of the outlets may have been blocked in the CAPA pump, but didnt have any luck there. So I called Justin from CAPA and told him were I was up to. He called me back after speeking to Walbro in the states and informed me that the pump CAPA supplied wouldnt work in my VT, but would work in a VX or VY commodore. Apparently the swirl pot and fuel pump is different from VT to VX.
To solve my problem I will put a T piece in line of the major fuel supply line intank and the run a line to supply the Jet pump. This should fix my problems and allow the fuel pump to pick up all of the available fuel.
Fingers crossed it will work.
Just goes to show that you cant believe all that you are told, even when its by people representing well know companys.
Today I fitted a t piece into the main line off the walbro pump and then drill and tapped a small fitting to take the jet pump line. All bolted up well, then it was time to test it.
I sent the swirl port and pump up in a bucket full of fuel, hooked up the fuel filter between the supply and return line and then fitted a pressure gauge to the main supply line. Hooked the pump up to a battery and watched the pressure in the line rise to about 58psi before the regulator kicked in, all the time the jet pump kept the swirl pot completly full.
I then did another test , I disconected the pressure gauge and ran the line into a fuel container. Turned the pump on and waited to see if the jet pump would scavanged the fuel to the bottom of the bucket. It sucked up every last bit of fuel, which is what it is supposed to do.
So in short these pumps work very well and are a direct drop in replacement of VX onwards, but they need a bit of modifaction to fit into the VT swirl pot.
TECH Apprentice
Joined: Jul 2005
Posts: 363
Likes: 0
From: Melbourne, Oz
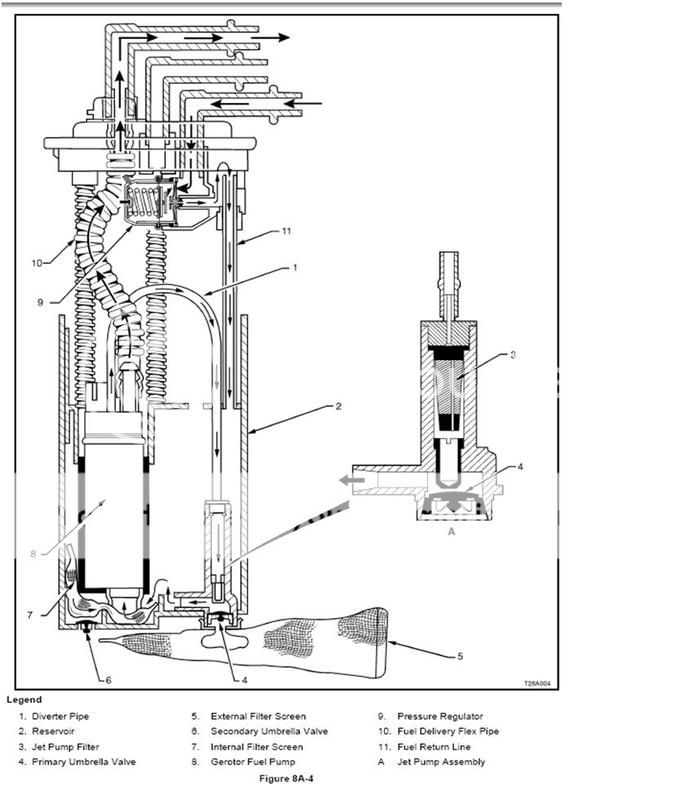
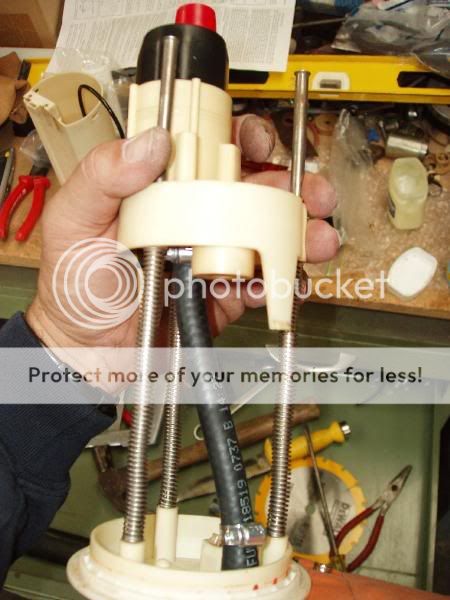
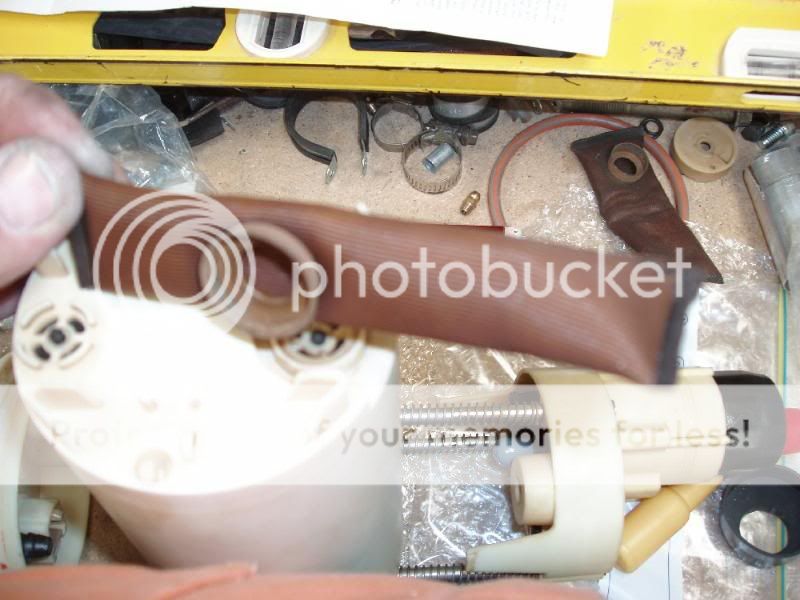
The LT1 F-body cars have a pump that is inside a plastic fill-bucket. The fill-bucket's inlet and check-valve system in combination with the fuel pump are designed to draw fuel from the bottom of the tank via suction. This keeps the bucket full at all times and the pump fully immersed in fuel regardless of the tank level so that when the tank is low on gas and you are doing some hard cornering or acceleration the pump does not run dry and start aerating (air bubbles) the fuel. This happens as the fuel sloshes from side to side in the tank leaving the center low on fuel. The F-LT1 cars have minimal to no baffling in them. This can cause detonation and possible engine damage. The bucket also allows the car to operate with lower fuel levels in the tank due to its scavenging effect. The bucket can also effect motor cranking time as the priming time is reduced under certain conditions. The return line from the fuel pressure regulator is diverted back into the bucket via a filter sock inside so that the unused fuel also helps keep the bucket full at all times. Keeping the pump constantly immersed in gas within the bucket can extend the pump's life by not allowing it to be exposed to open air. Open air within the tank contains moisture and in time will cause the pump to rust / seize up especially if left to sit for long periods of time without the tank topped-up (i.e. winter storage). The Racetronix pump assembly is modified so that it will seal in the bucket’s rubber check-valve so that its function is retained.
Useful pic.
Useful pic.
TECH Apprentice
Joined: Jul 2005
Posts: 363
Likes: 0
From: Melbourne, Oz
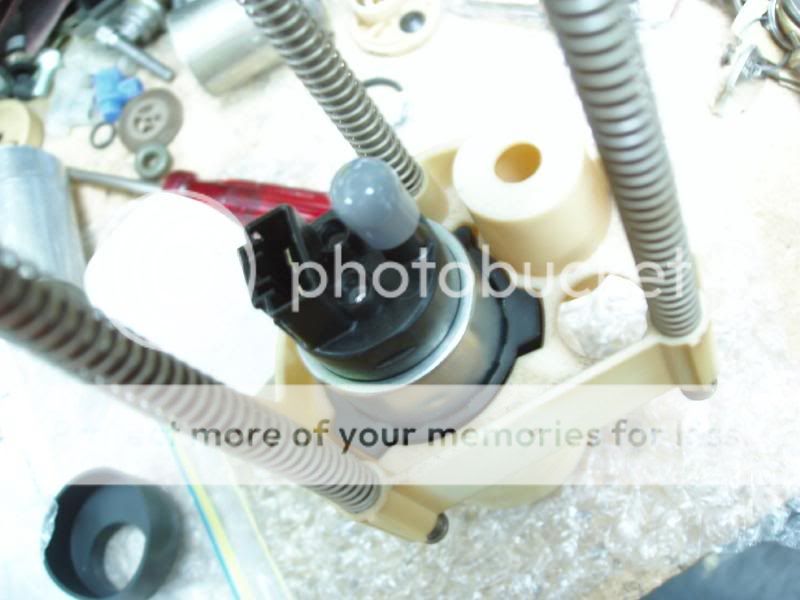
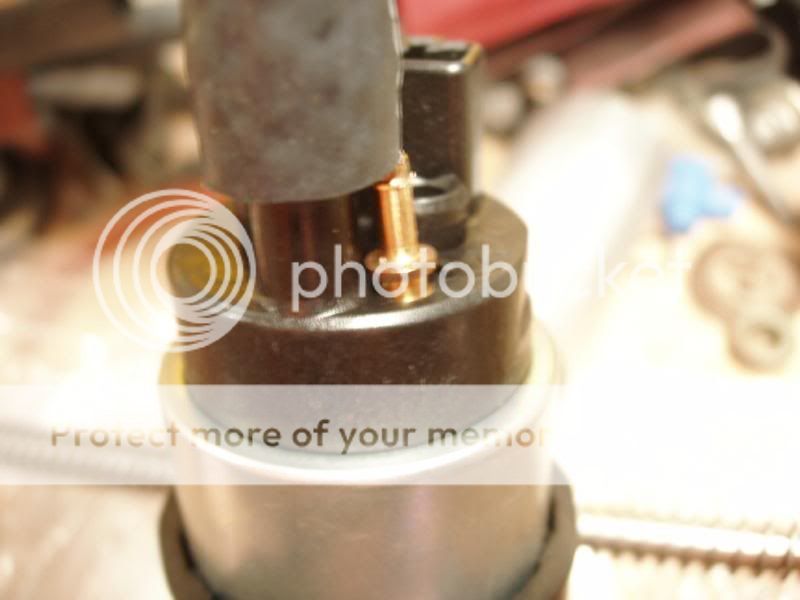
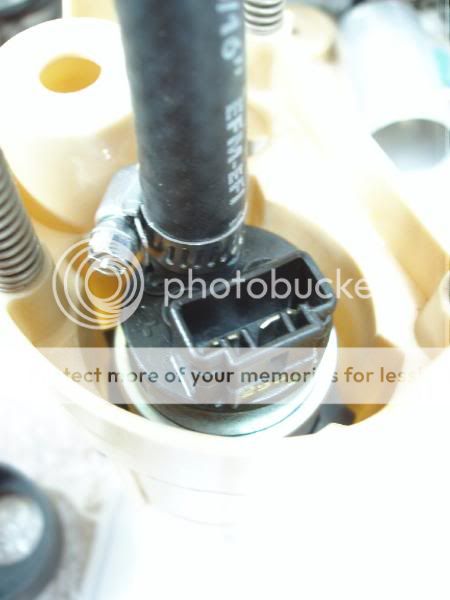
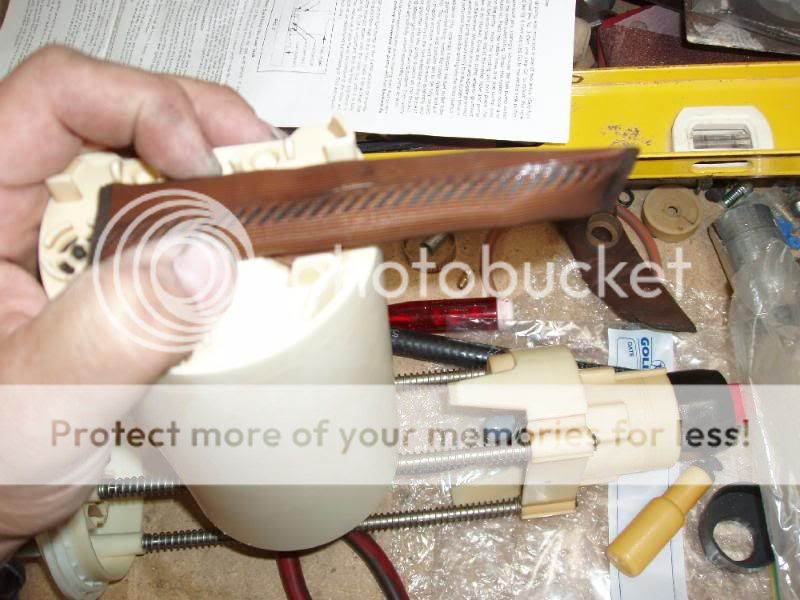
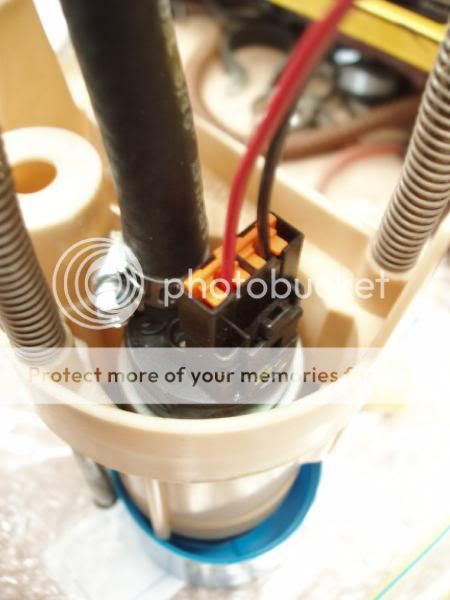
Cleaned all the elec connections and started assembling the unit.
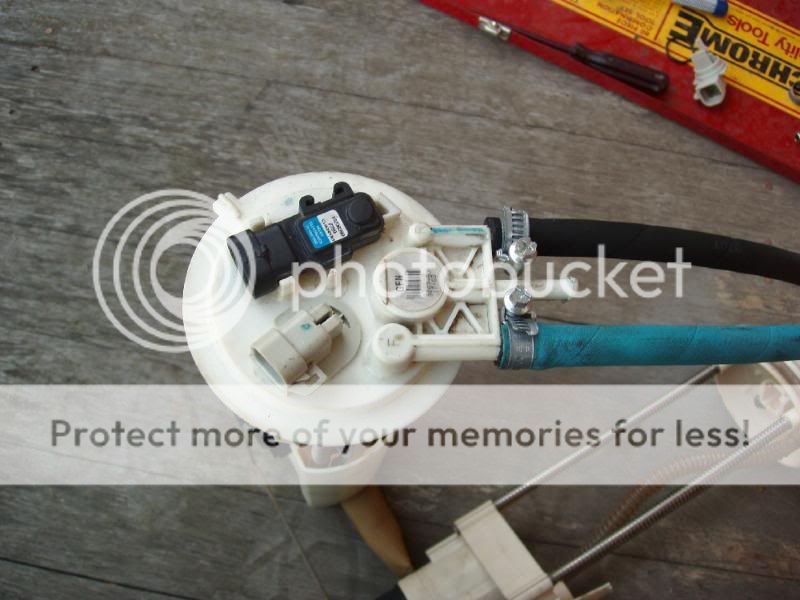
Here's why we can't use that small 'jet pump' barb...
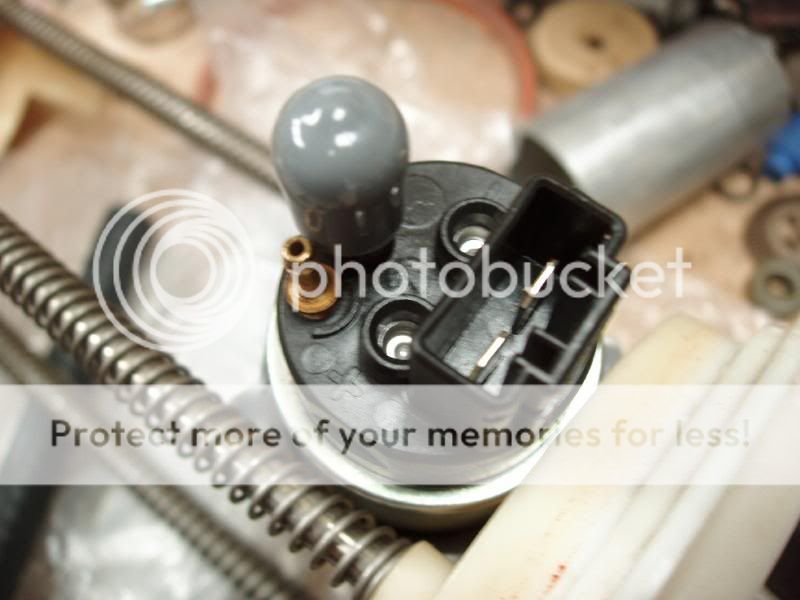
So I've decided to go with the 'T' idea. I'll make up a 'T' from a 3 way fitting tomorrow at work.
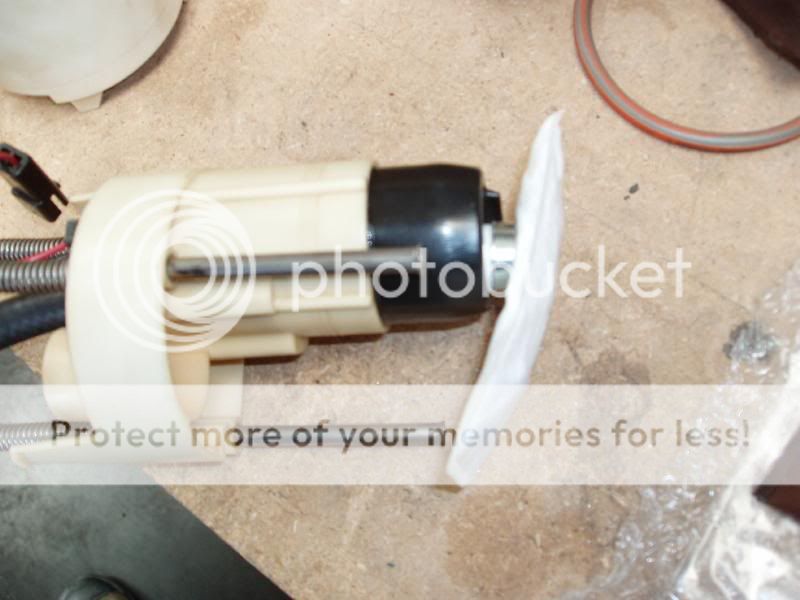
I used a little Vaseline around the outside of the rubber 'sock' which the pump sits in and pushed it into the carrier until it was fully seated.

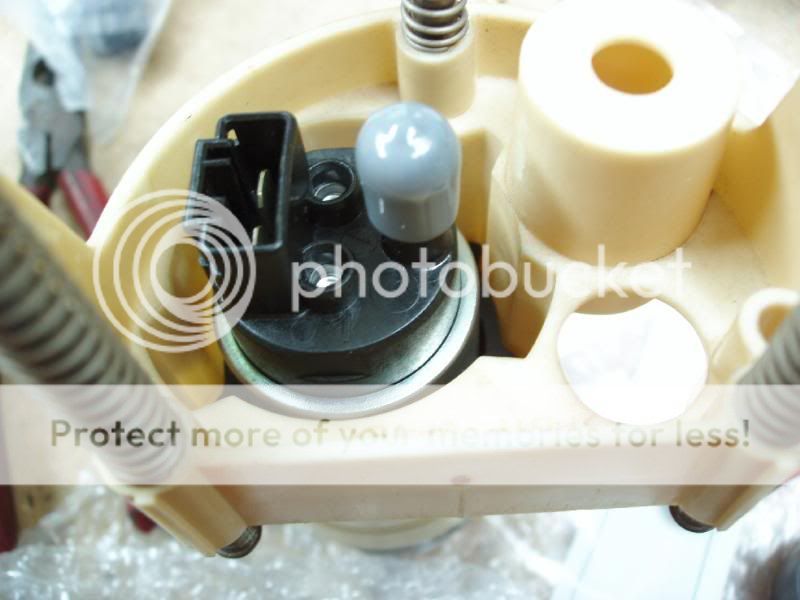
I then 'test fitted' it all into the bucket.


I installed the rubber fuel line which came with the Walbro kit.
I'm considering re-using this filter sock (mainly just because everything takes too long to get here...and I want to do this Tuesday. I might duck out and see if I can get one from a parts store here on Monday).
I cleaned it out with some elec parts cleaner and it seems OK. It's a fairly coarse filter. The finer one is attached to the bottom of the pump 'inside' the bucket.
Attached the 'adaptor' plug which comes with the Walbro kit.
Re-attached the sender unit/float.

Here's why we can't use that small 'jet pump' barb...
So I've decided to go with the 'T' idea. I'll make up a 'T' from a 3 way fitting tomorrow at work.
I used a little Vaseline around the outside of the rubber 'sock' which the pump sits in and pushed it into the carrier until it was fully seated.
I then 'test fitted' it all into the bucket.
I installed the rubber fuel line which came with the Walbro kit.
I'm considering re-using this filter sock (mainly just because everything takes too long to get here...and I want to do this Tuesday. I might duck out and see if I can get one from a parts store here on Monday).
I cleaned it out with some elec parts cleaner and it seems OK. It's a fairly coarse filter. The finer one is attached to the bottom of the pump 'inside' the bucket.
Attached the 'adaptor' plug which comes with the Walbro kit.
Re-attached the sender unit/float.
Trending Topics
TECH Apprentice
Joined: Jul 2005
Posts: 363
Likes: 0
From: Melbourne, Oz
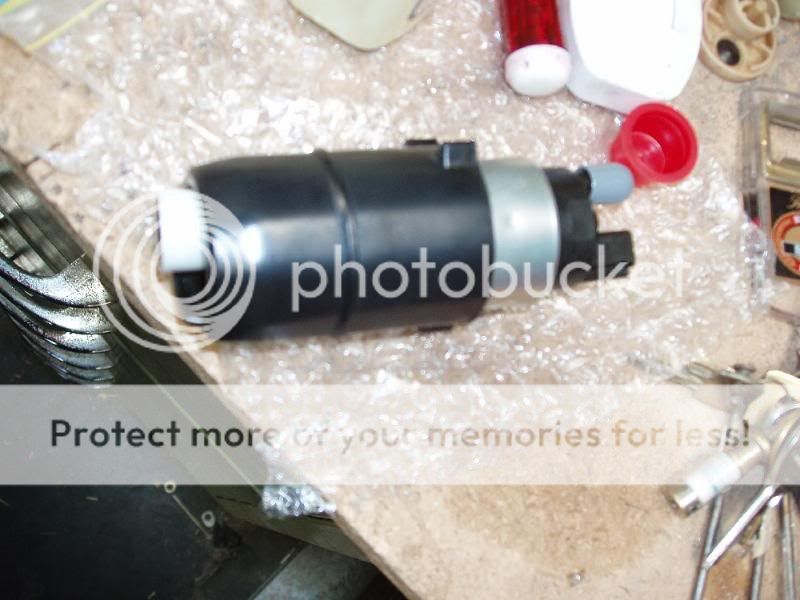
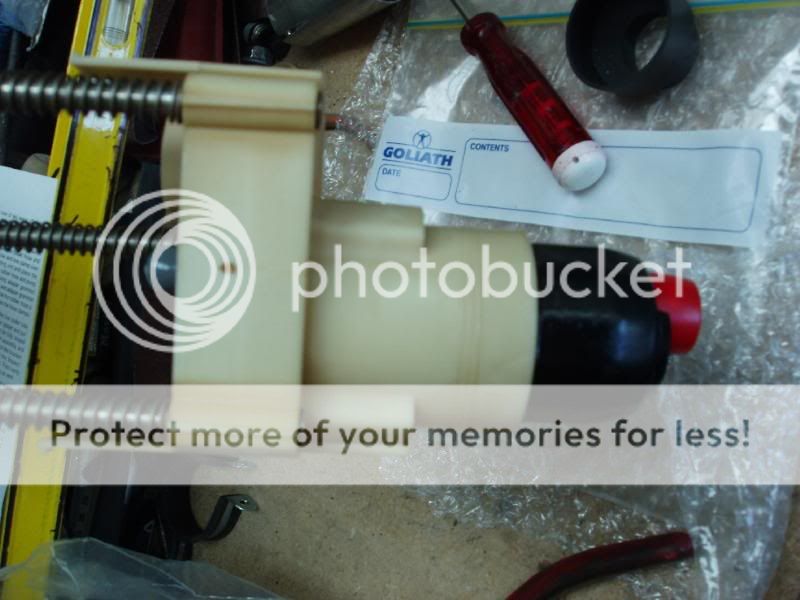
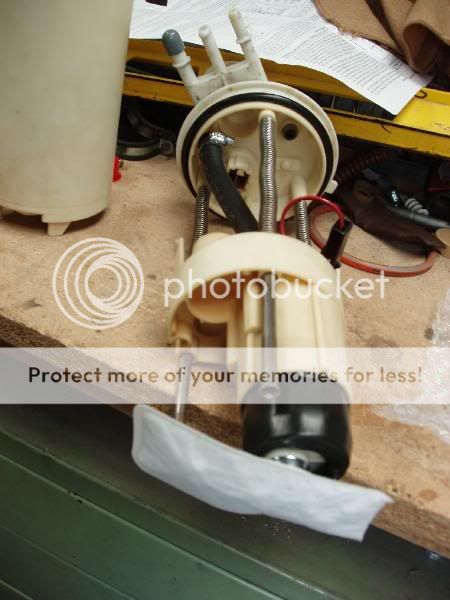
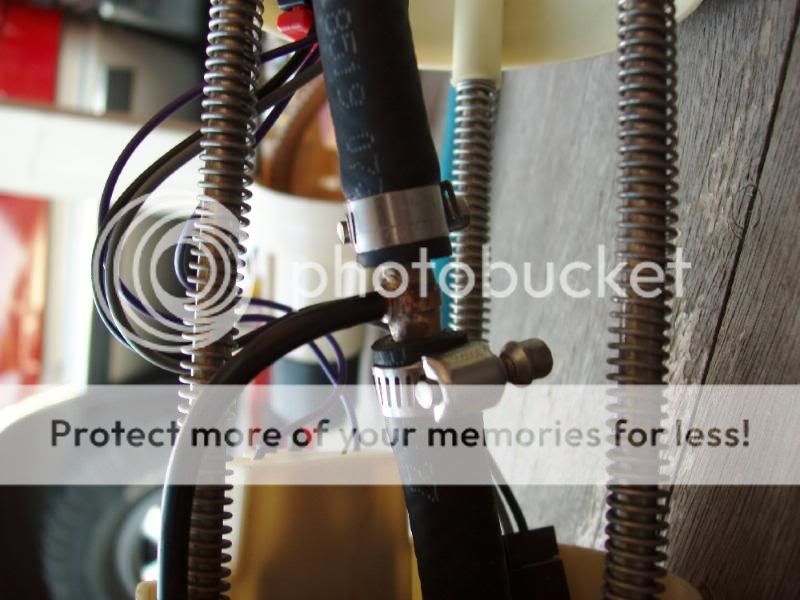
Installed the 'in bucket' filter on the bottom of the Walbro pump and re-assembled the whole unit.


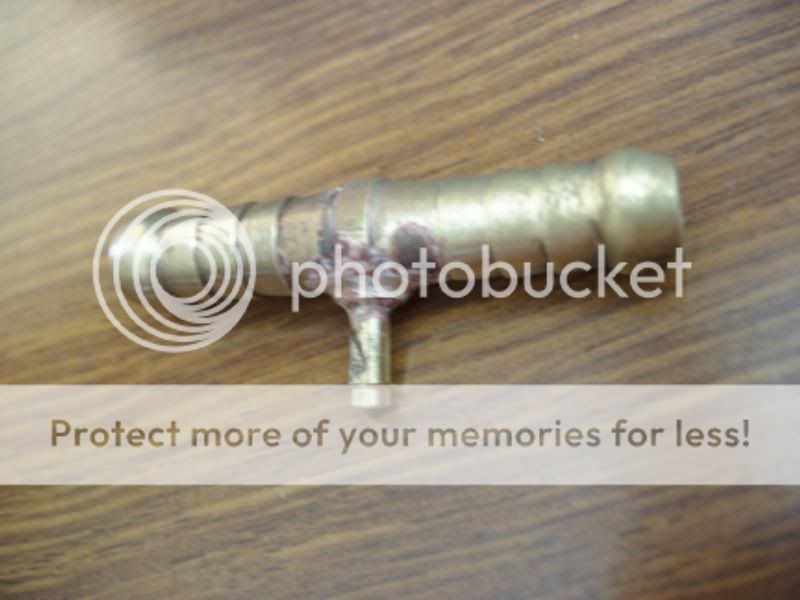
So...I picked up a 5/16" straight through hose barb.....
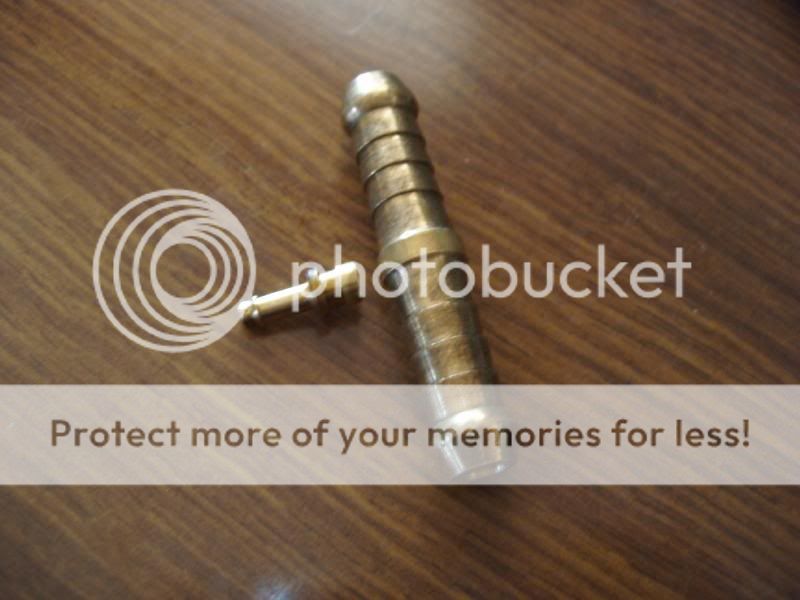
Filed a flat spot in the centre and drilled a 4mm hole in the flat section.

I then filed the stepped section off the nipple I removed from the old pump.

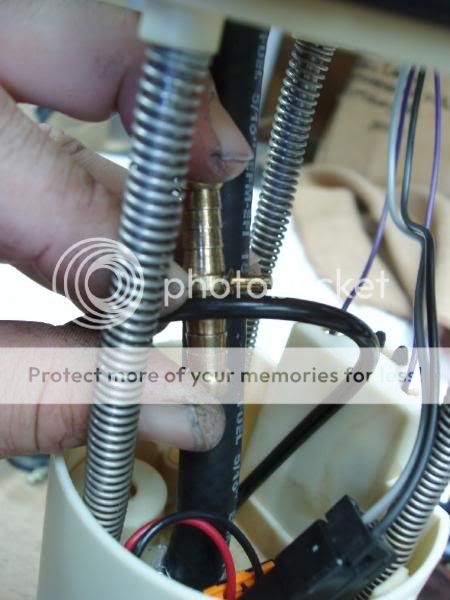
I then fitted the small nipple into the flat spot on the double ended hose barb (will be silver soldered tomorrow).
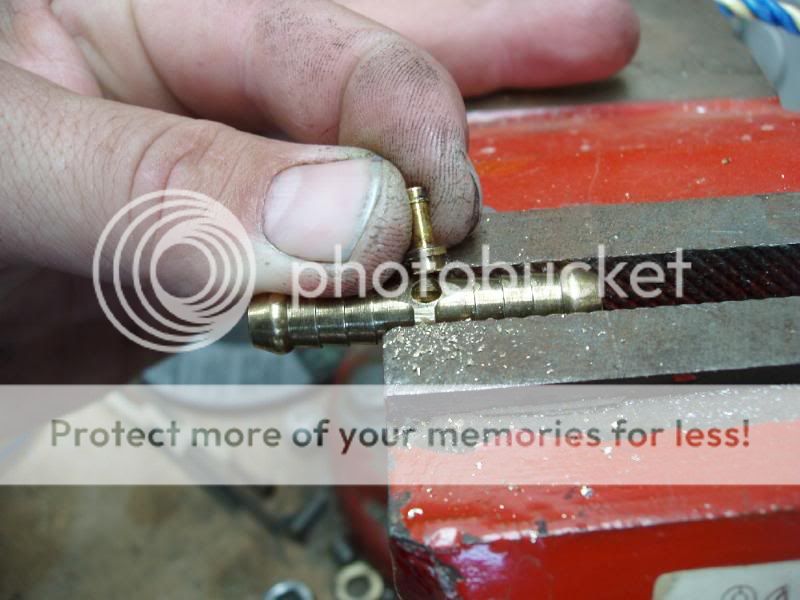
Here's where it will fit into the main fuel 'outlet' line.
So...I picked up a 5/16" straight through hose barb.....
Filed a flat spot in the centre and drilled a 4mm hole in the flat section.
I then filed the stepped section off the nipple I removed from the old pump.
I then fitted the small nipple into the flat spot on the double ended hose barb (will be silver soldered tomorrow).
Here's where it will fit into the main fuel 'outlet' line.
LS1 Tech Stories
The Best V8 Stories One Small Block at Time

Gas Monkey Built a 6-Wheel Ferrari Testarossa With a Corvette LT4 Engine
Verdad Gallardo
7 Most Reliable High-Performance Engines GM Has Ever Built
Verdad Gallardo
Amazing '71 Camaro Restomod Is Modern Muscle Car Under the Skin
Verdad Gallardo
6 Common C5 Corvette Failures and What's Involved In Repairing Them
Pouria Savadkouei
Retro Modern Bandit Pontiac Trans AM Comes With Burt Reynolds' Autograph
Verdad Gallardo
Top 10 Greatest Cadillac V Series Performance Models Ever, Ranked
Pouria Savadkouei
Top 10 Most Powerful Chevy Trucks Ever Made!

Hennessey's New Supercharged Silverado ZR2 Has 700 HP
Verdad Gallardo
Coachbuilt N2A Anteros Is an LS2-Powered C6 Corvette In Italian Clothes
Verdad Gallardo TECH Apprentice
Joined: Jul 2005
Posts: 363
Likes: 0
From: Melbourne, Oz
OK...well...it's all in and running.
Made no difference to the performace of the Burb whatsoever...but...my fuel guage wors properly'ish again.
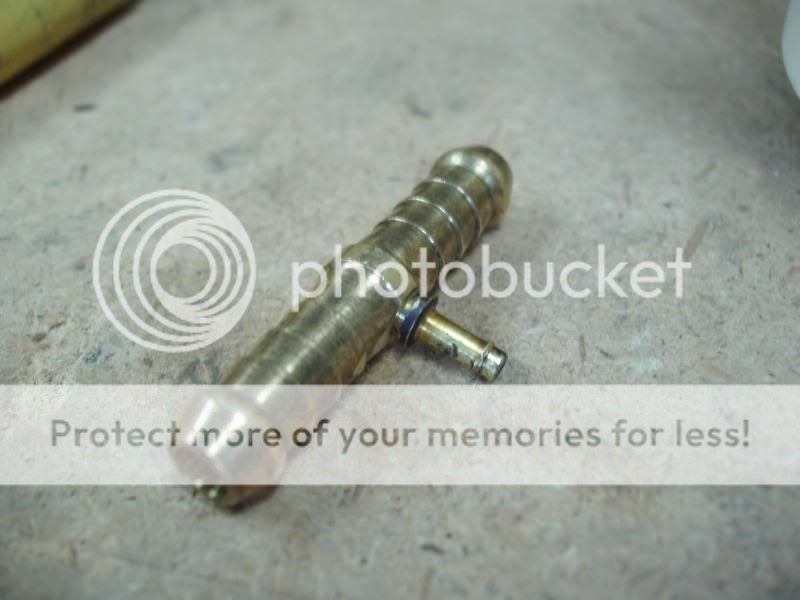
Got called to work again at 1.30am so I took the opportunity to silver solder that 'T' piece.
Pulled the fuel pump relay with the truck running and let it idle until out of fuel....to take the pressure out of the lines.

Dropped the tank and removed the old pump.
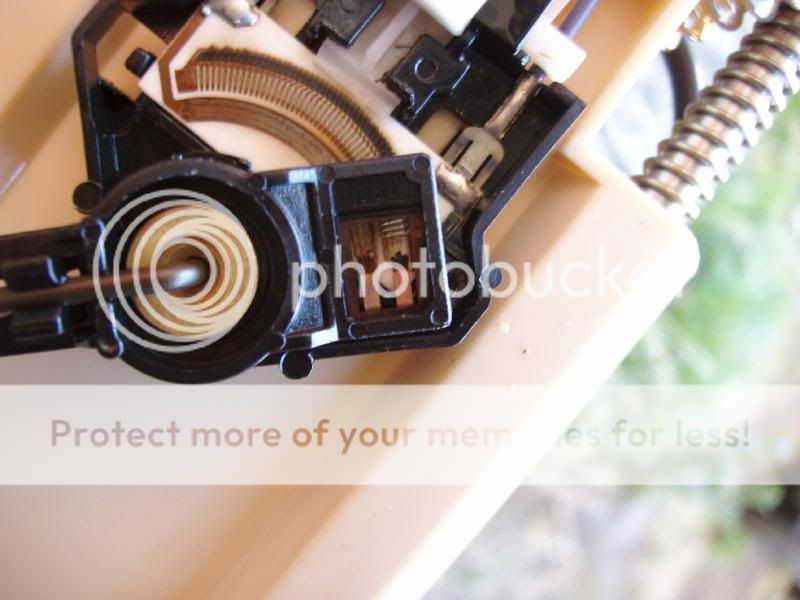
Found the cause of the jumpy fuel guage...see the little fingers/contacts are worn away.
Ruined the little tabs inside the 'quick connect' fittings whilst trying to remove the fuel pump so decided to go with a new...better setup.
And the existing fuel lines....I cut the 'quick connect' (almost impossible to disconnect) fittings off and inserted the Aeroquip 'pushlock' fittings.
Next I measured the depth of the fuel tank and cut the main fuel 'outlet' line and inserted the 'T' piece.
Put it all back together and installed a new filter....still had approx 7 litres of fuel in the tank.
Turned the ignition on and off a couple of time to allow the pump to prime the lines and started her up.
Made no difference to the performace of the Burb whatsoever...but...my fuel guage wors properly'ish again.
Got called to work again at 1.30am so I took the opportunity to silver solder that 'T' piece.
Pulled the fuel pump relay with the truck running and let it idle until out of fuel....to take the pressure out of the lines.
Dropped the tank and removed the old pump.
Found the cause of the jumpy fuel guage...see the little fingers/contacts are worn away.
Ruined the little tabs inside the 'quick connect' fittings whilst trying to remove the fuel pump so decided to go with a new...better setup.
And the existing fuel lines....I cut the 'quick connect' (almost impossible to disconnect) fittings off and inserted the Aeroquip 'pushlock' fittings.
Next I measured the depth of the fuel tank and cut the main fuel 'outlet' line and inserted the 'T' piece.
Put it all back together and installed a new filter....still had approx 7 litres of fuel in the tank.
Turned the ignition on and off a couple of time to allow the pump to prime the lines and started her up.
Howard, what you are showing is a good example of what the truck senders look like. For anyone doing a return style system, I can get you a setup that is virtually drop in, with the correct hoses etc, so there is no fabrication or rubber hoses required. It also retains the venturi system.
For bigger power levels I offer a twin pump kit as well.
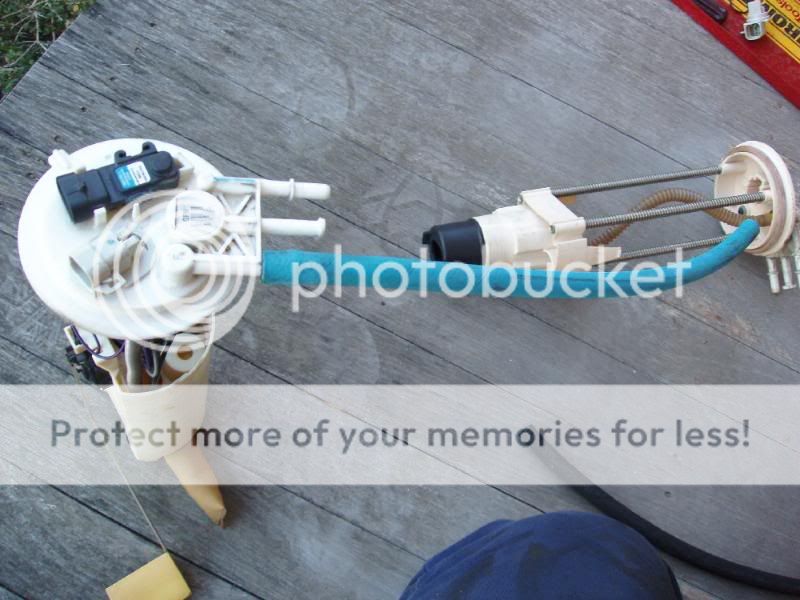
Visually these kits are similar, but slightly different than the LS1 f-bodies.
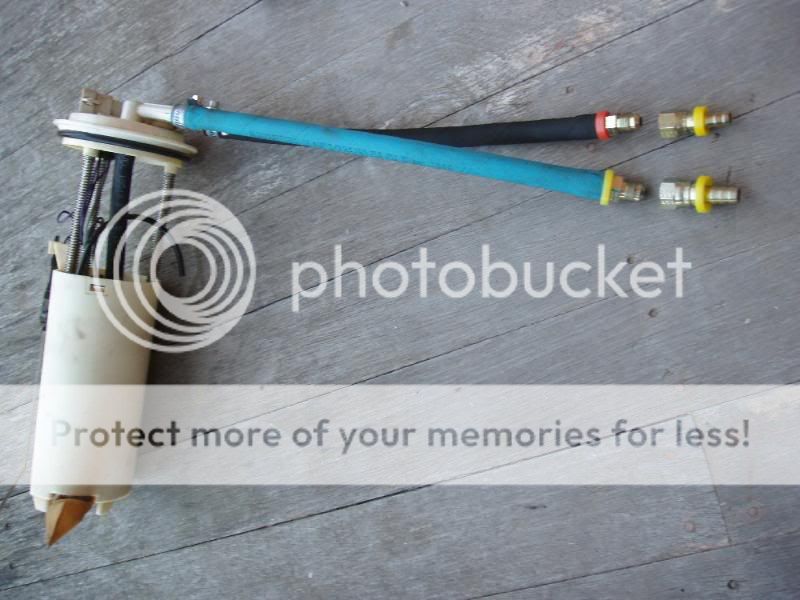
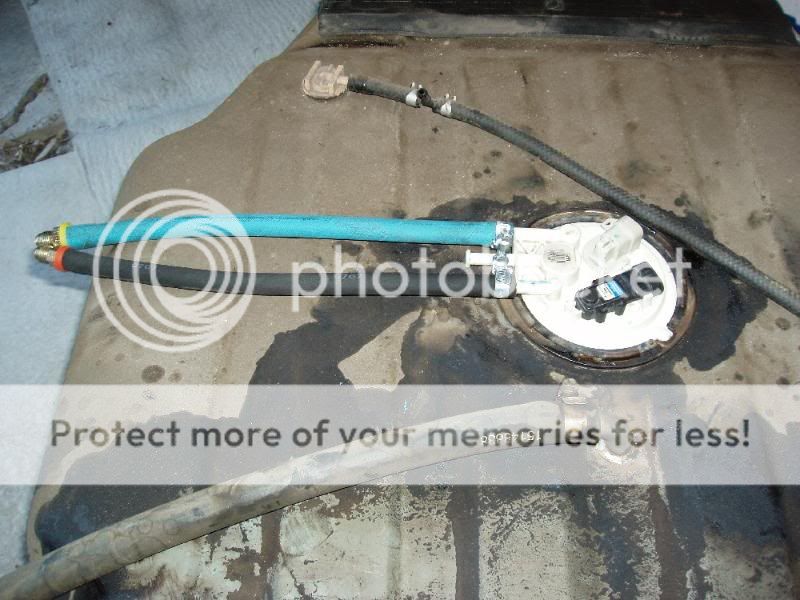
The original post above is for a '98. It looks nothing like the truck system & is sort of the odd one of the bunch. It does not have a small bucket like the LT1, or a sender similar to above for the plastic tank LS1.
The pump basically lays on the bottom with the return line feeding the filter sock.
Racetronix makes a drop in kit for the '98's. Save yourself some time & buy the correct kit. This is correctly engineered to fit & does not require a bunch of modifications. To the best of my knowledge, it is the only direct fit kit out there.
For bigger power levels I offer a twin pump kit as well.
Visually these kits are similar, but slightly different than the LS1 f-bodies.
The original post above is for a '98. It looks nothing like the truck system & is sort of the odd one of the bunch. It does not have a small bucket like the LT1, or a sender similar to above for the plastic tank LS1.
The pump basically lays on the bottom with the return line feeding the filter sock.
Racetronix makes a drop in kit for the '98's. Save yourself some time & buy the correct kit. This is correctly engineered to fit & does not require a bunch of modifications. To the best of my knowledge, it is the only direct fit kit out there.
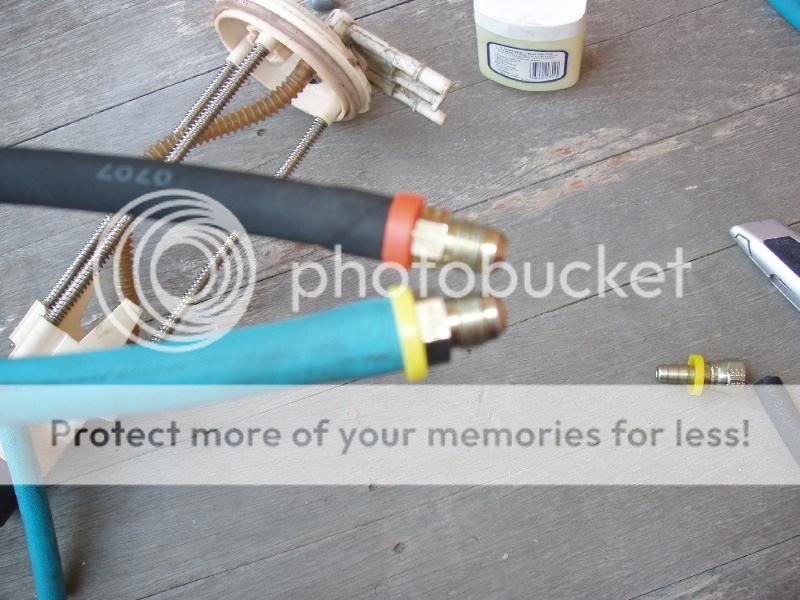
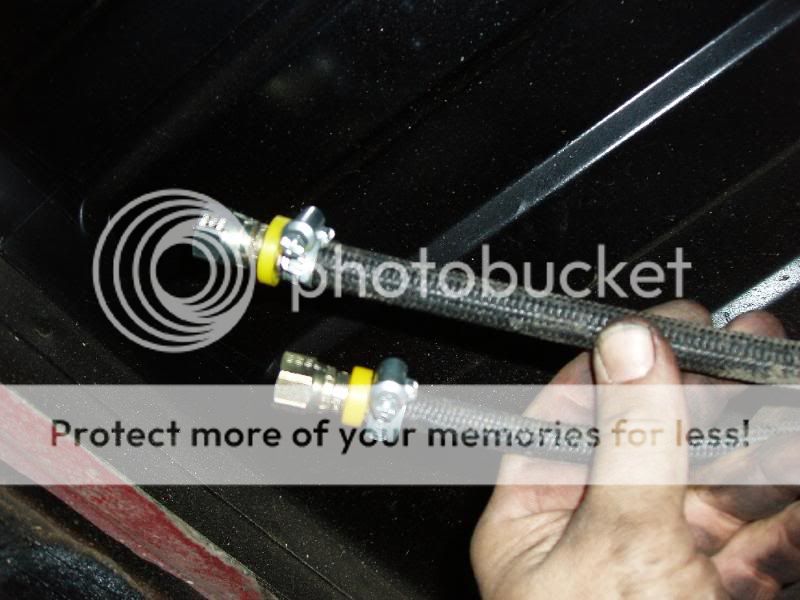
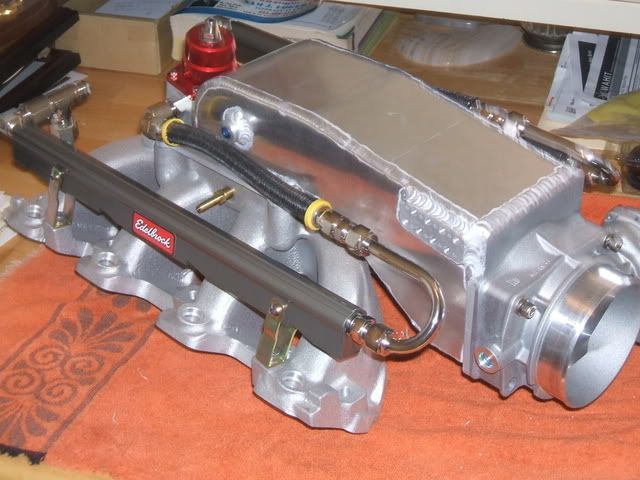
Howard, nice write and very good of you to spend the time and effort to help others. However, I did notice on thing that we need to be careful with. On your Push-Lock connectors you used hose clamps, you should not. the push locks are good for 250psi with no clamps. These hose barbs have sharper and deeper barbs compared to normal hose barbs (which do require clamps) and clamping with hose barbs will/can cut into the hose and compromise said hose and sealing ability. The design of push locks allows them to act like a "Chinese finger thing", meaning the pressure of the fuel actually makes the seal stronger. Just a heads up. The second picture shows correctly installed push locks on my set-up.
Also, for those reading along, I have a couple fuel system upgrade write ups, that may give a few ideas, in my personal web site and the '98 is covered somewhat. Just a couple options/ideas and can help if going with Lonnie's kits too.

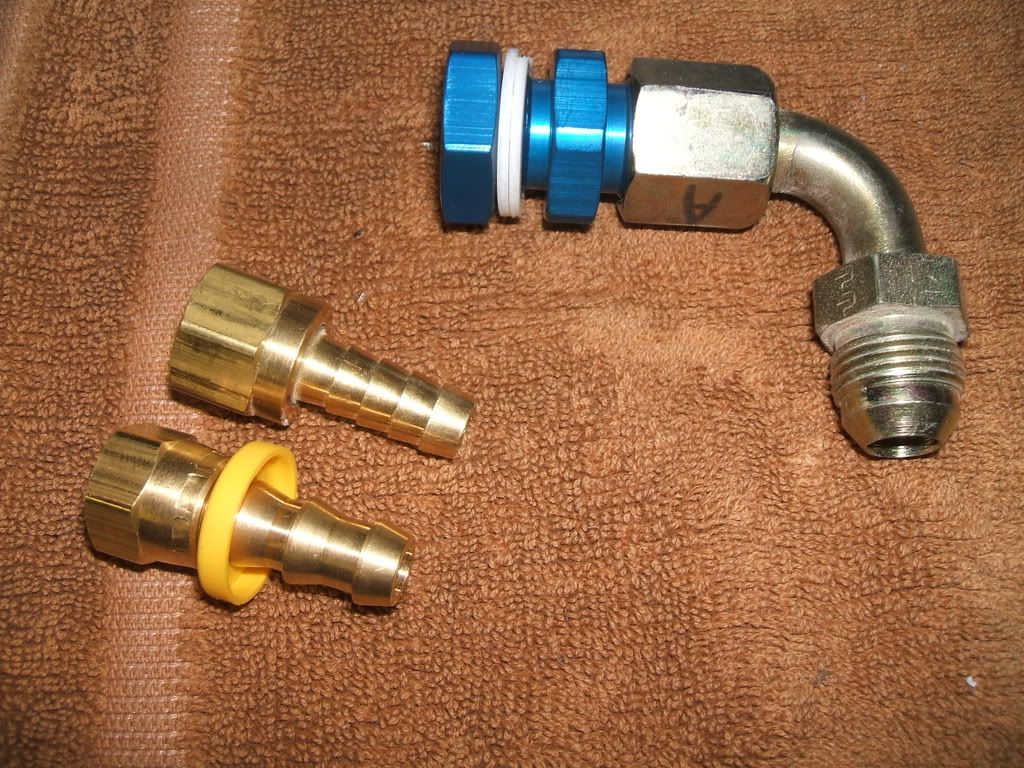
Here you can see the push-lock installed. I take the yellow seating ring off and use a little shrink wrap to clean the ends of the hose up (ring is only for seating hose and to clean the fraid hose end look).
The difference between a push-lock (yellow ring), and a standard hose barb.
Robert
Also, for those reading along, I have a couple fuel system upgrade write ups, that may give a few ideas, in my personal web site and the '98 is covered somewhat. Just a couple options/ideas and can help if going with Lonnie's kits too.
Here you can see the push-lock installed. I take the yellow seating ring off and use a little shrink wrap to clean the ends of the hose up (ring is only for seating hose and to clean the fraid hose end look).
The difference between a push-lock (yellow ring), and a standard hose barb.
Robert
Last edited by Robert56; Apr 13, 2008 at 02:12 PM.
TECH Apprentice
Joined: Jul 2005
Posts: 363
Likes: 0
From: Melbourne, Oz
Thanks Robert.
I completely understand what you're saying about the pushlock fittings. You can see on the other end of the fuel pump I've used them without clamps.
I figured because the OEM fuel line isn't designed for the pushlock fittings I'd use the clamps.
Also, if you look at the standard barb fittings compared to the pushlock (pic you posted) the pushlock fittings 'ridges' are actually chamfered (flat) where as the standard fittings have sharp ridges. It makes sense that the pushlock fittings should be fine with the clamps on them.
However...next time I have the opportunity I'll drop the tank and remove the old line and install aeroqip right up to the solid line.
Howard

For a long time I always thought that the push locks were not very good, but these days I rate it at the top of my fittings list. I am sure your fine, but just wanted to post the info for any reading along so as to understand the different fittings.

Robert