


weird steering column stuff

Thread Starter
TECH Apprentice
Joined: Jun 2008
Posts: 391
Likes: 0
From: Mesa, AZ
Okay... so, at first, i thought my high beam switch didn't work when i got my Z.
today, i figured out how to turn them on... and it involves something that's been bothering me about my steering column for a while.
when I pull down on the wheel... it moves about two inches to the left and about an inch down, and will spring back up when i let go.
when i have it pulled down, i can activate/deactivate the highbeams, and also use the ACC position with the ignition (turning it to the left so the stereo and such turn on without the ac, vents/dash lights, etc)
what's wrong with my steering column? this is so confusing...
About the thing moving down and sideways... I would check the mounting bracket for the steering column? Not sure.
About the high/low beam switch-- on a lot of old GM cars the switch moves a little over time so that it will only work when you have the wheel in a certain position. This is easy to fix. If you pull off the trim panel and look up under there you will see a metal rod that moves along the column as you actuate the stalk with your hand. At the end of that rod down the column you can see where it is trying to click the switch. The switch is mounted to a bracket on the top of the column. You have to loosen the two things that hold it on. I think one is a nut, one a screw, I don't remember but you have patience and contortionist skills to get them. You loosen them, push the bracket toward the steering wheel just a millimeter or 3 and then tighten them both down again. Now your high/low switch will work in every position. Push it, tighten one nut, test it, and tighten both if ok.
That being said, with that crazy down 1 inch, left 2 inch behavior you are describing, I would first check all the mount positions on the column--at the firewall and the bracket holding the whole thing up. Sorry I can't thing of anything else--maybe someone hit the wheel in a fender bender??
You are correct. The actual switch is on slotted holes and you can adjust it but it is very hard to get to on a stock car. I have pulled alot of now unsed wires and it isn't much easier. There is no adjustment up top or in the column for the high beams switch. It is by where the column harness plugs into the body harness.
The issue with the steering wheel moving to the left and down is known. I will try to work on a solution sometime in the future. My car and several others I have seen have had this issue. I think it may be related to the car being wrecked in the past because all the cars I have seen with this issue have been in some kind of serious wreck. I think it may be a "replace a part and it's fixed issue." Maybe caused by the airbag inflating or the streering column being subject to force?
I am just not sure what to replace because I haven't done this yet.
Thread Starter
TECH Apprentice
Joined: Jun 2008
Posts: 391
Likes: 0
From: Mesa, AZ
...according to carfax and carchex, there wasn't a serious accident in the car's past.
idk though... the dealership seems like it's lied to me more and more every day. i finally got the number of the guy who owned the car before me... time to get some real answers
idk though... the dealership seems like it's lied to me more and more every day. i finally got the number of the guy who owned the car before me... time to get some real answers
The steering wheel is moving because there is a bolt or two in the joint that have backed out. They will back out against something and not come out anymore so it wont get worse. I beleive you have to take the wheel off and take the column apart to fix it.
All 3 of my fbodies have done this. None where wrecked.
All 3 of my fbodies have done this. None where wrecked.
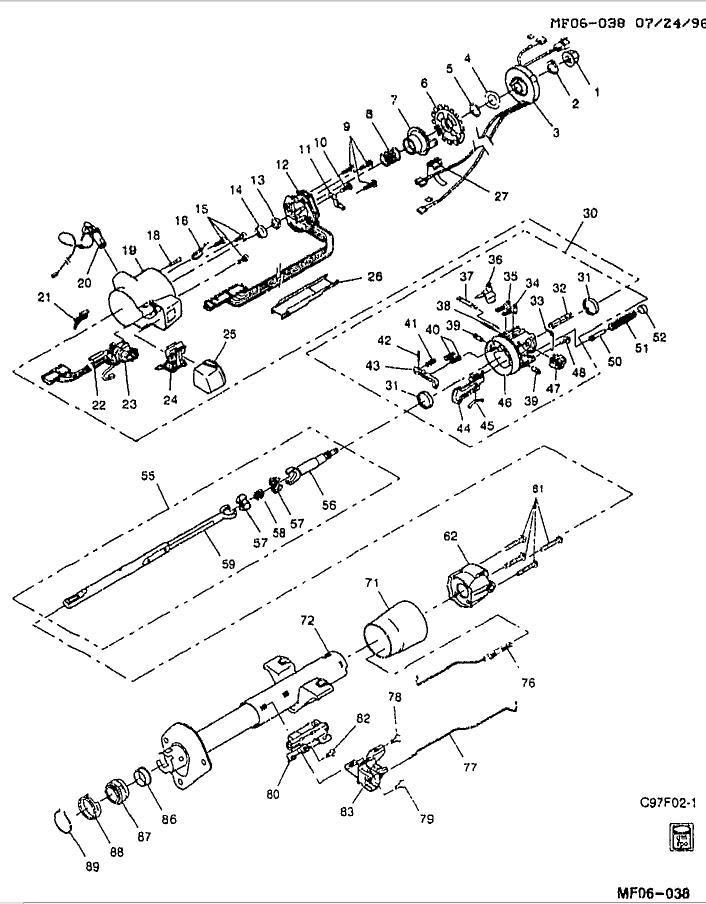
Is there any chance you could ID what you touched in this diagram? It would help I am sure! Thank you.
Last edited by 2002_Z28_Six_Speed; Aug 19, 2008 at 12:38 AM.
Trending Topics

TECH Fanatic
Joined: Jul 2007
Posts: 1,516
Likes: 0
I believe its Items 15. There are 3 or 4 screws that have reverse torx heads on them. Ok, to get to them is the fun part.
1. Disconnect battery for 10 min before starting.
2. Remove steering wheel
3. Remove nut in center of column followed by the horn switch.
4. Press and hold in the metal plate while removing the snap ring holding it down.
5. Remove the turn signal switch. You shouldn't have to remove it all the way, just unplug the wires under the column and pull until it will hang out of the way.
6. Ok you should be able to see the screws now. Remove them one at a time and place loctite on the threads and replace them.
7. Reassemble.
LS1 Tech Stories
The Best V8 Stories One Small Block at Time

Topdon ONE vs. Artidiag 800 BT2: Which is the Diagnostic Tablet For You?
Pouria Savadkouei
Gas Monkey Built a 6-Wheel Ferrari Testarossa With a Corvette LT4 Engine
Verdad Gallardo
7 Most Reliable High-Performance Engines GM Has Ever Built
Verdad Gallardo
Amazing '71 Camaro Restomod Is Modern Muscle Car Under the Skin
Verdad Gallardo
6 Common C5 Corvette Failures and What's Involved In Repairing Them
Pouria Savadkouei
Retro Modern Bandit Pontiac Trans AM Comes With Burt Reynolds' Autograph
Verdad Gallardo
Top 10 Greatest Cadillac V Series Performance Models Ever, Ranked
Pouria Savadkouei
Top 10 Most Powerful Chevy Trucks Ever Made!

Hennessey's New Supercharged Silverado ZR2 Has 700 HP
Verdad Gallardo Thread Starter
TECH Apprentice
Joined: Jun 2008
Posts: 391
Likes: 0
From: Mesa, AZ
I believe its Items 15. There are 3 or 4 screws that have reverse torx heads on them. Ok, to get to them is the fun part.
1. Disconnect battery for 10 min before starting.
2. Remove steering wheel
3. Remove nut in center of column followed by the horn switch.
4. Press and hold in the metal plate while removing the snap ring holding it down.
5. Remove the turn signal switch. You shouldn't have to remove it all the way, just unplug the wires under the column and pull until it will hang out of the way.
6. Ok you should be able to see the screws now. Remove them one at a time and place loctite on the threads and replace them.
7. Reassemble.
1. Disconnect battery for 10 min before starting.
2. Remove steering wheel
3. Remove nut in center of column followed by the horn switch.
4. Press and hold in the metal plate while removing the snap ring holding it down.
5. Remove the turn signal switch. You shouldn't have to remove it all the way, just unplug the wires under the column and pull until it will hang out of the way.
6. Ok you should be able to see the screws now. Remove them one at a time and place loctite on the threads and replace them.
7. Reassemble.
Everyone was partly correct and partly wrong!
The down and to the left problem is caused by part 39 on the driver's side, popping out. It's not a screw, and it's not backed out. It's just a pin with a shoulder and a cap, and it needs to be hammered back in after removing part 39 on the driver's side (it just pops out... wiggle it with a screwdriver or thin punch while you move the wheel up/down). You will have to pull the wheel down and center it to put the part back in. Then just slide the passenger side back in and reassemble.
I figured I would update this in case anyone else finds the thread and wants to know if there was ever a solution.


Car fax car check CAR ANYTHING will not show it if the shop that fixes the car doesn't report to them. Carfax is a JOKE.
a machine shop could make one, but thats the whole reason the seats move. plus, depending on how far you wanted to lengthen it, you would have to modify the clock spring or else you'd lose all the electronics in the steering wheel
Thread Starter
TECH Apprentice
Joined: Jun 2008
Posts: 391
Likes: 0
From: Mesa, AZ

But, to get to them:
Remove the steering wheel
Remove the SIR coil/clockspring
Remove the lockplate
Detach the white turn signal switch mechanism (don't forget the hazard switch)
Remove the #15 and #18 screws, and pull the ignition cylinder out of the column
pull the cowling towards you about an inch
the two pins should be visible at 3 and 9 o'clock.

Thread Starter
TECH Apprentice
Joined: Jun 2008
Posts: 391
Likes: 0
From: Mesa, AZ
Thread Starter
TECH Apprentice
Joined: Jun 2008
Posts: 391
Likes: 0
From: Mesa, AZ
No cursing or even grunting required.

Registered User
Joined: Mar 2013
Posts: 3
Likes: 0
I actually tore into my column and found diagram part number 62 be at fault. It has two ears that the dowels fit into. One became wallowed out. I didn't bother to research whether or not you can even get the part. However, I took the column down to this part and removed it. I flattened the top of the 'ear' in question to allow for drilling and tapping it for a makeshift set screw of sorts. The bolt needs to be small and it took some time, beers and expletives to get it to work. As far as I can tell it cured the issue. I still need to put the column back in. I will update with final results soon. If it does work I will try to post pics of another column that needs the same repair to illustrate my method. Its a simple enough idea but a real ***** to pull off due the severe lack of space allowed upon reassembly.